DTX500 - Weather Station Cresta - Free user manual and instructions
Find the device manual for free DTX500 Cresta in PDF.
User questions about DTX500 Cresta
0 question about this device. Answer the ones you know or ask your own.
Ask a new question about this device
Download the instructions for your Weather Station in PDF format for free! Find your manual DTX500 - Cresta and take your electronic device back in hand. On this page are published all the documents necessary for the use of your device. DTX500 by Cresta.
USER MANUAL DTX500 Cresta
A = Alert, B = Alarm, C= keuze NEER, D= k
Basis biehttgg
Thank you for purchasing this device, Please read the operating instructions carefully to familiarize yourself with the features
Package Contents
Contents
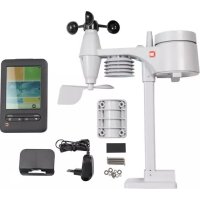
Carefully unpack and remove the contents:
- 1x weather station main unit
- 1x stainless steel mast
- 1x thermo-hygro sensor
- 1x rain sensor
1x wind speed sensor - 1x wind direction sensor
M ounting screws
S tainless steel accessory for fixing the mas
Technical Details
Details
Six keys A, , :A, M,SNOEEOZHHT. LIGHT.
Radio controlled clock
Automatic receiving of time signal DCF77
Automatically switches to/from daylight
Time display in 12/24 format
- +/-12 total 24 adjustable time zones
Continuous perpetual calendar up to 2099
- Display of D ate , Month and Day of week
Day of week display available in 7 languages,
Spanish , Danish
Dual alarm with s nooze function (5 minutes
5 weather forecast: sunny, partly sunny
Barometer and bar and data of 12 hours
- Indoor /outdoor temperature and humidity
Max./min. of temperature and dfumidity/humidity and
Thermometer measuring range inside:
- T temperature display elective in °C or °F
Temperature alert for indoor and outdoor
Living space humidity
- Moon phase
- Wind speed in mph /kmh, wind speed 0~2
- Wind direction in 16 directions
Rainfall in mm and inch and display of 1hour Rain volum : ( 0~999.9MM )
· Low battery indication
B lue b ackground illumination LED.
- Main unit b after ies : 3 x A A, LR 6 , 1.5V
O outdoor sensor:
F frequency: 433 MHz
Transmission range: 100 meters in open area. Actual distance may be varied depending interference ,such as concrete wall etc.
- Batteries : 2 x AA, LR 6 1.5V
Installation
- Installing thallBatteriBatteries
- Open the main unit battery cover located into the battery compartment and close th
Pull away the shower proof casing of the wind sensor and rain sensor
C onnect the attached cables 1.cable from direction direction corresponding sensors 2. cable from wind corresponding sockets of the thermo-hygro that rain and wind cables are connected

NOTES:
| • First insert the batteries of main unit, then insert the batteries of the outdoor sensor in 3 minutes after the main unit is powered on, to assure of the sensor data received well. In case of the outdoor sensor key fdata more received than seconds to synchronize the RF signal. • Every time the batteries are replaced, the • Every time the batteries are replaced, the u nit again , you keymust for pressre then 3 seconds |
| The main unit can be placed onto any flat h anging hole, It is important to check that |
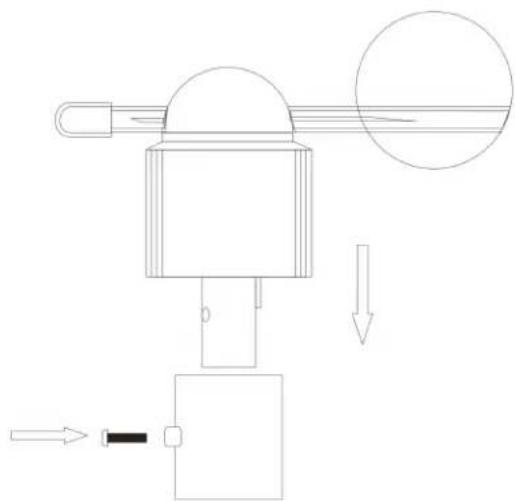
- Mountingthe outdoorportbato the stabilizeristmasm - masteel
| For accurate results, the outdoor sensor | |||||||
| surface and in open area away from tree speed may be reduced causing inaccurate |
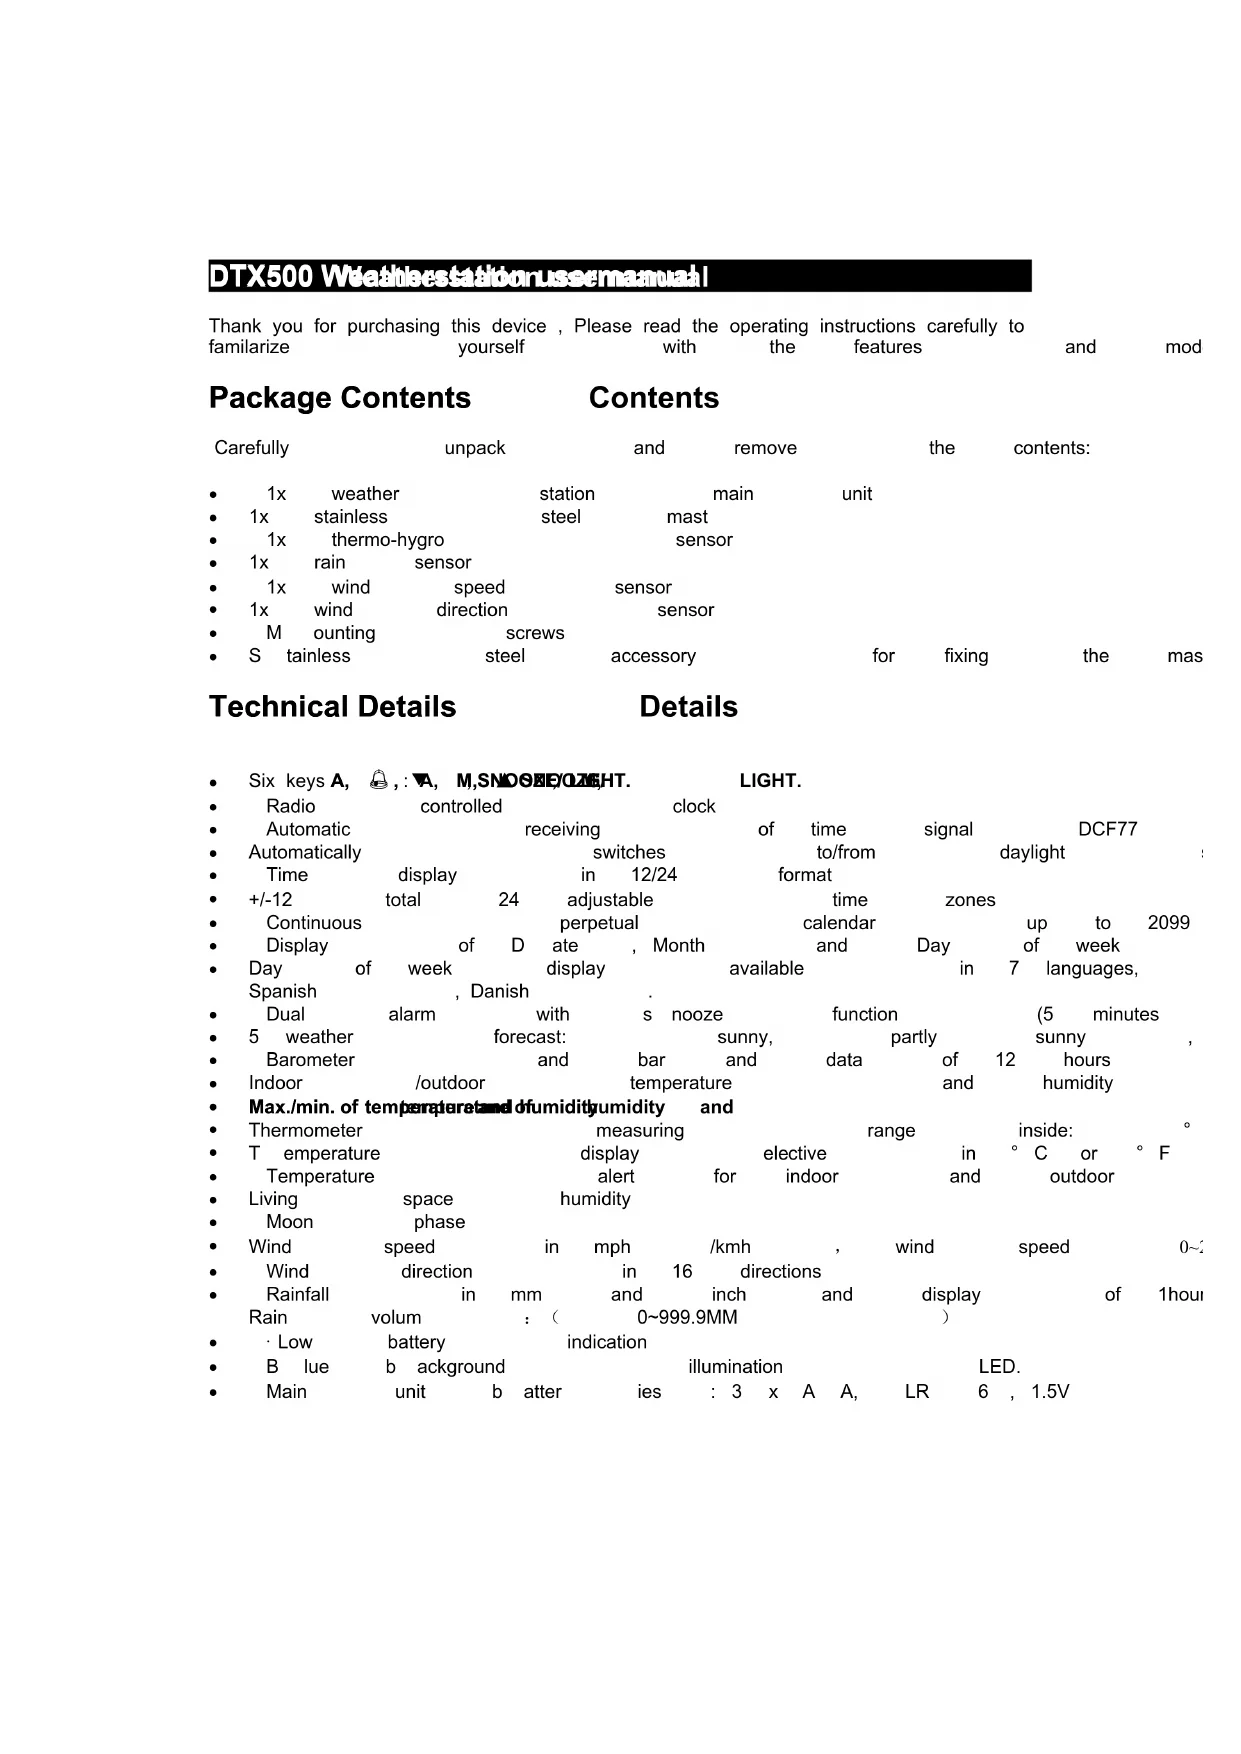
| 1. | Mouldingthwindspeedsensibilitythe firstplasticbracket | bracket:first | check | |||
| can rotate freely before bracket provided to allow directions.please follow the below | wind to travel | |||||
- Maumbing thieewindcdthreestbnoesessotothefiiftpbskcbraackdt : first check the wind
direction
sensor
before
fixing,there
is one
into
the
socket
under
the
wind
direction
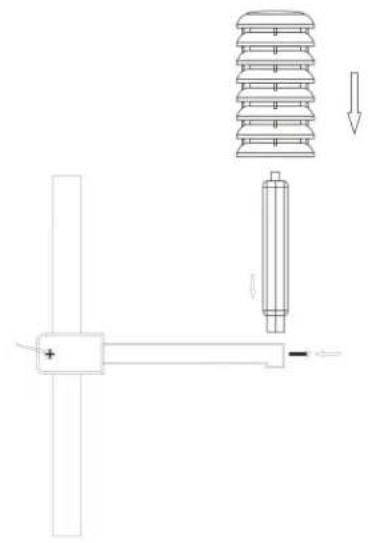
- Mouhbingithjgerairinsensor tsethebassecondplastic bbaakheplastic
lines
the
bottom
edge
of
round
vertical:
the
two
line
into
one
position,
then
C
well,
t
n
m = 311
m
with
screws
the
please
follow
the
below
dispay
- Mounting the biethoeohyggoseassorttothiehirdipstabtsdbskht: once the wind
| sensors corresponding transmitted please | and to the main display: | ||||||
| rain thermo-hygro | are unit ,then | fixed sensor | onto | tl socl | |||
| follow | the below | put | the | ||||
| Note | : please | don | ' t put | in | or | take | off | the | pl |
| for | a long | time | to | avoid | any | damage | of |
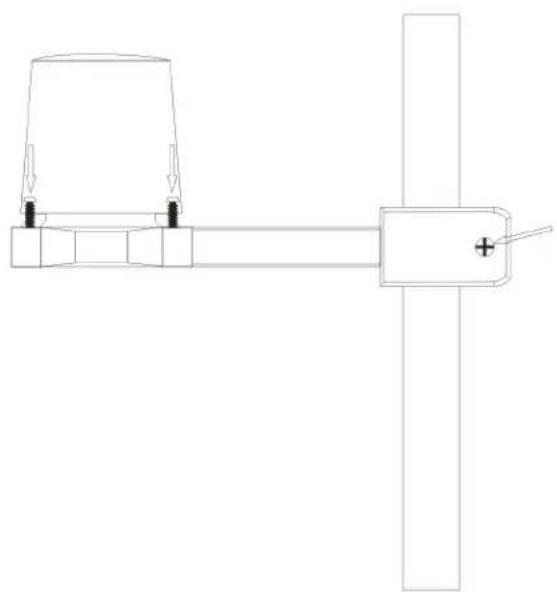
- Mounting the steeessonto tbeestainsteel mast and fin shantillabepart at outdoor open area :(notepnasemake pursalhtasabtes are connectedwell Into the soutte)

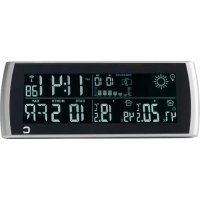
LCD overview

- Indoor low battery 2. O utdoor low battery 3. O utdoor humidity trend 4. Outdoor humidity 5.
Comfort
Outdoor
temperature
Weather
symbol
indication
temperature
trend
Forecast
-
Date
-
Outdoor
alert
-
Indoor
-
Rainfall
-
Time
10.
temperature
Indoor
m = 311
tempera
1
midity
18.
Wind
SI
D
A: Alert
B: Alarm
C: Minus
D: Plus
E:
Initial Operation
| After T he This /humidity/wind more the reception. This time Once tower | inserting RF signal process /humidity/wind than automatic reception. RCC display radio “ continuously | symbol takes speed/wind 3 seconds receiving reception area signal | at about to p at the receiving , no | the 3 0 process same is flashing. | the main out minutes. direction/rainfall, again. DCF is going time. is successful, | unit will Then radio on,t successful, | 1 |
| If, due manually | to | bad | reception, | or | no | RCC | automatic |
Manual time set-up Plstio also folloWthidbops tttpohedene setting, as 12/24hour, time zonelkangusgesite) ) etc.
| Press“MM for hold” seconds The 12/24 h'or and▼” flashingselect Use “ | ||
| PressMM to confirm. | ||
| The display for the time zone is flashing. (-12 to +12). | ||
| Press“MM to” confirm. | ||
| The DM/MM/MD flashing, Use “▲” and “▼” to select | ||
| PressMM to confirm. | ||
| The display for the year is flashing. Use “ | ||
| PressMM to confirm. | ||
| The display for the and▼toth“ select is flashingmonth. Use | ||
| Press“MM to” confirm. | ||
| The display for the date is flashing. Use | ||
| Press“MM to” confirm. | ||
| The display for the and▼toh“ selects flashingthe hour. Use “ | ||
| Press“MM to” confirm. | ||
| The display for the▲“ and▼toth“ select is flashinggutes.. Use | ||
| Press“MM to” confirm. | ||
| The language selection for the display of | ||
| press“MM to” confirm. | ||
| T he C/F for temperature flashing, Use “▲” a | ||
| Press“MM to” confirm. | ||
| The hpa/Inhga/pinhg for air▲“ preswutureo“ select flashing, Use | ||
| Press“MM to” confirm. | ||
| The mm/inchmm/inch for rainfall ▲” and√d to “ skeltpmpg flashing, | ||
| Press“MM to” confirm. |
Information:
- The clock automatically changes from set-up mode to time display mode if no keys are pressed for 20 seconds.
| Explanation You can manually Frankfurt/Main) from the time received. If, e.g. the time display to 01. | for the time zone adjust where a given clock | display: the clock receives country is now DCF | to the 1 hour controlled |
Daily alarm set-alarmp set-up
| Press “MM to ” switch | from | time | display | to | A1 | display | ||
| Press and “MM forold | 3 seconds | key | “, the alarm | flashing | alarm | |||
| The hour display | of the | time | is | flashing. | ||||
| Press “MM to confirm. | ||||||||
| then follow the minutes. | Use | ▲ | and | ▼ | ||||
| Press “MM to confirm. | ||||||||
| The same A2 setting | as for | A2. | ||||||
Daily alarm on/offarm on/off
| 1st press to activate | the | the alarm | 1 with alarm | alarm syn |
| 2nd press "0" cancel | the alarm | 1, then activate | then | the |
| 3rd press "0" to " activate | the alarm1 | and alarm | 2 v | |
| 4th press "0" carfcel all | the alarms |
Information:
| The clock automatically changes from set-up mode to time mode if no keys are pressed for 20 seconds. |
| The alarm sounds for 2 minutes if no key |
Snoopze function function
| To | activate | the | snooze | function, | follow | the |
| • | Press | SNOOZE/LIGHT | “ SNOOZE/LIGHT | “ , while | the | alarm |
| • | If the | snooze | function | is activated | , alarm | |
| • | The alarm | repeat | after 5 minutes | . | ||
| • | The | snooze | function | can be | stopped | by |
12/24 hours modbours mode
| The time display can be in 12 (AM/PM) o |
^ C/CF feftprepatratai display display
| The temperature display can be in °C or °F |
Max./Mhinf6orthieinidoofoodooorteenppaaaarchnnniiity
Press“▲”for displaying of indoor/outdoor “▲”for moremax./min. than 3 seconds to clear up the max./min.
Temperature alert set-up set-up alert
- Press "A" for " more than 3 seconds, the "▲upper lit " and "▼ to set the maximum alert temperature.
- Press "A", the A lower limit of inside temperature minimum alert temperature.
- Press "A", the upper limit of outside " and temperature maximum alert temperature.
- Press "A", the A lower limit of outside temperature minimum alert temperature.
- W hen the alert is activated, the alert symbol
Temperature alert on/off on/off alert
Press and A hold set the the key temperature alert on Alert on: Temperature alert symbol shown Alert off: Temperature alert symbol goes
Information
The set-up process cannot be completed the minimum selected temperature. The minimum temperature selected must
temperature.
5 WeaThaThe forecast forecast
Sunny Slightly Sunny Cloudy Rain
Remarks as the wathereidfocastadair praisspresuhy, by only, Tbeedisplay dliphave discrepndiswipatheyactuaahotatle swithatime.
Barometer and bairand data of histomystorythieopast12fouurlalr prarres sure.
Air pressure can be in hPa and inHg , and hav
Wind speed in mapelephfKn0-256kmh)
The wind speed mph km and bepeahshown follow in mph the manual mph/kmh, the display of the speed is updated
Wind dithecidon
There will be 16 wind directions, the display of the direction is updated in case of the sensor updated every 1 minutes
Rainfalldispiy(009999.99mm)()
Rain fall camm ibeland shown ipbase in mfollow the manual mm/Inch
Press “▼” to show the rainfall in 1 hour,
Press “▼” for more than 3 seconds to clear clear clear up the data in 1 hour, others unchanged, others unchanged,
The max. of the rainfall is up to 999.99mm you have to clear up data by hand, otherwise,
Illumination
Press SNOOZE/LIGHT "SNOOZE/LIGHT to activate the display
Moon phase display
The weatherstation uses savstikataebestshowthav moon phase

A B B C C D E E F F G G H H
A: New moon moon B: increasing basingseent C: First Fiftlf C:
D: increchng34g E: Full Moon moon
G: Lbshalf half H: dderHaiggresenht
Living space humldyacehumidity
The weather
respective symbols.
station
uses
saved
data
to
determ

comfortable, dry, humid
Low blatteryconddlbodlsplgy
The weather station displays the low battery condition symbol to remind the batteries of the weather station or the outdoor sensor
- Weather
station
low
battery
condition
- O utdoor
sensor
low
battery
condition
display
disp
RF connexdiunetdtthe dudouustensor to sensor
Press
and
"holo
3 thesecondkey
sea
for
outd
symbol
the
outside
area
will
flashing
whe
rooms
with concrete
walls
(e.g.
in
the
basemer
shorten
if have
interference.
Reception of radotontrolled signablated signal
DCF
radio
radio
signal
search
starts
automatically
radio
tower
nal
is flashing.
P
“or
more
than
3 seco
The
clock
Z es
with
[
F radio
3:00
to
correct
potential
time
“radio
to
er
symbol
disappears),
5:00
unt
il success.
This
process
is
repeated
reception
stop.
Information
- Flashing
Continuous
radio
tower
symbol
stands
Please
observe
a
nimal
distance
of
computer
screens.
The
radio
signal
is
in rooms
with
buildings.
For
extreme
cases,
please
put
There
are
less
atmospheric
time.
One
synchronisation
Tip
You can
interferences,
signal
Radio
adjust
can
signal
ast
large
be
received,
sender
time
manually
in
case
the
distance
the
sender,
the
clock
wil
be
adjusted
coverage
up
up
150
0km
Declaration of Conformity
f
We, (AOkeleotwokhtekrionmatheproduct td.
ITEMNOAOK-5027(customeitemoDTX500)
Itsconformitywith
Council Directive
ENB01489-1V1.8.1:2008
ENB01489-3/1.4.1:2002
EN30020-2/2.1.22007
EN50372002
Weherebydeclare inegallybindingwaythatalproductswhichare delivered
byoutyoucompanycomplywiththerequirementsROHS2002/95/EC
(issuedb1-NOV-2010dateofthecurrenversion).
alsodeclare the Conformity of the above mentioned products identically.
modeAOK-5027withtheaboveCEstandard.
Manufacturer: AOKELECTRONIqTD. Signature: BanderPeng
Date: APRIL.,04 TH,2011