
CX 900 - Food Processor Turmix - Free user manual and instructions
Find the device manual for free CX 900 Turmix in PDF.
| Product type | Stand mixer |
| Brand | Turmix |
| Model | CX 900 |
| Power | 500 W |
| Bowl capacity | 4 liters |
| Bowl material | Stainless steel |
| Number of speeds | 6 (including off) |
| Included accessories | Balloon whisk, flat beater, dough hook |
| Switch type | 6-position rotary switch |
| Mixer arm material | Cast iron |
| Base material | Cast iron |
| Warranty | 2 years |
| Features | Planetary movement, splash-proof lid with pouring spout |
| Safety | Must unplug before cleaning, do not immerse motor unit |
| Maintenance | Bowl and accessories dishwasher safe |
| Usage | Domestic, maximum operating time 3 minutes |
Frequently Asked Questions - CX 900 Turmix
User questions about CX 900 Turmix
0 question about this device. Answer the ones you know or ask your own.
Ask a new question about this device
Download the instructions for your Food Processor in PDF format for free! Find your manual CX 900 - Turmix and take your electronic device back in hand. On this page are published all the documents necessary for the use of your device. CX 900 by Turmix.
USER MANUAL CX 900 Turmix
natural_image
White stand mixer with stainless steel bowl and control panel (no visible text or symbols)Bedienungsanleitung
Mode d'emploi
Istruzioni d'uso
Operating Manual
1. Überblick
natural_image
Line drawing of a hairdryer with a button and base (no text or symbols)Bedienen
Aufstellen
natural_image
Illustration of a hand holding a small object with a circular inset, labeled '3.' (no text or symbols on the diagram itself)natural_image
Line drawing of a kitchen mixer with hand holding cup (no text or symbols)Hinweis:
natural_image
Abstract black silhouette of a curved shape resembling a stylized letter or symbol (no text or symbols present)natural_image
Abstract black ink brushstroke on white background (no text or symbols)natural_image
Simple line drawing of a teardrop-shaped object with a handle (no text or symbols)Butterguezli
natural_image
Simple line drawing of a stylized bird head with curved blades (no text or symbols)
natural_image
Simple line drawing of a teapot with a handle (no text or symbols)- 4 Eiweiss
Double Chocolate Chip Cookies
natural_image
Simple line drawing of a teardrop-shaped object with a handle (no text or symbols)
natural_image
Simple line drawing of a teapot with a handle (no text or symbols)Vanillebutter-Cake
- 125 g weiche Butter
natural_image
Line drawing of a hairdryer with a handle and base (no text or symbols)Utilisation
Mise en place
natural_image
Illustration of a hand holding a small object with a circular component, labeled '3.' (no text or symbols on the diagram itself)natural_image
Line drawing of a kitchen mixer with hand placing a pan (no text or symbols)Recommendations:
natural_image
Line drawing of a mechanical clamp or bracket assembly with no visible text or symbolsElimination (recyclage)
natural_image
Silhouette of a curved object resembling a stylized animal or tool (no text or symbols)natural_image
Abstract black ink brushstroke on white background (no text or symbols)natural_image
Simple line drawing of a teardrop-shaped object with a handle (no text or symbols)Biscuits au beurre
natural_image
Simple line drawing of a stylized bird head with curved blades (no text or symbols)
natural_image
Simple line drawing of a teapot with a handle (no text or symbols)Double Chocolate Chip Cookies
natural_image
Simple line drawing of a teardrop-shaped object with a handle (no text or symbols)
natural_image
Simple line drawing of a teardrop-shaped object with a handle (no text or symbols)natural_image
Line drawing of a kitchen stand with a handle and legs (no text or symbols)Collocazione
natural_image
Illustration of a hand holding a small object with a label '3.' (no text or symbols on the object itself)natural_image
Line drawing of a kitchen stand mixer with hand holding cup (no text or symbols)Nota:
natural_image
Line drawing of a mechanical component with a labeled line (5), no text or symbols presentnatural_image
Simple line drawing of a trash bin with crossed lines indicating no waste or discharge (no text or symbols)Smaltimento
natural_image
Abstract black ink brushstroke on white background (no text or symbols)natural_image
Silhouette of a curved object resembling a stylized animal or tool (no text or symbols)Pane e panini integrali
natural_image
Simple line drawing of a teardrop-shaped object with a handle (no text or symbols)Biscotti al burro
natural_image
Simple line drawing of a stylized bird head with curved blades (no text or symbols)
natural_image
Simple line drawing of a teapot with a handle (no text or symbols)- 4 albumi
Double Chocolate Chip Cookies
natural_image
Simple line drawing of a teardrop-shaped object with a handle (no text or symbols)
natural_image
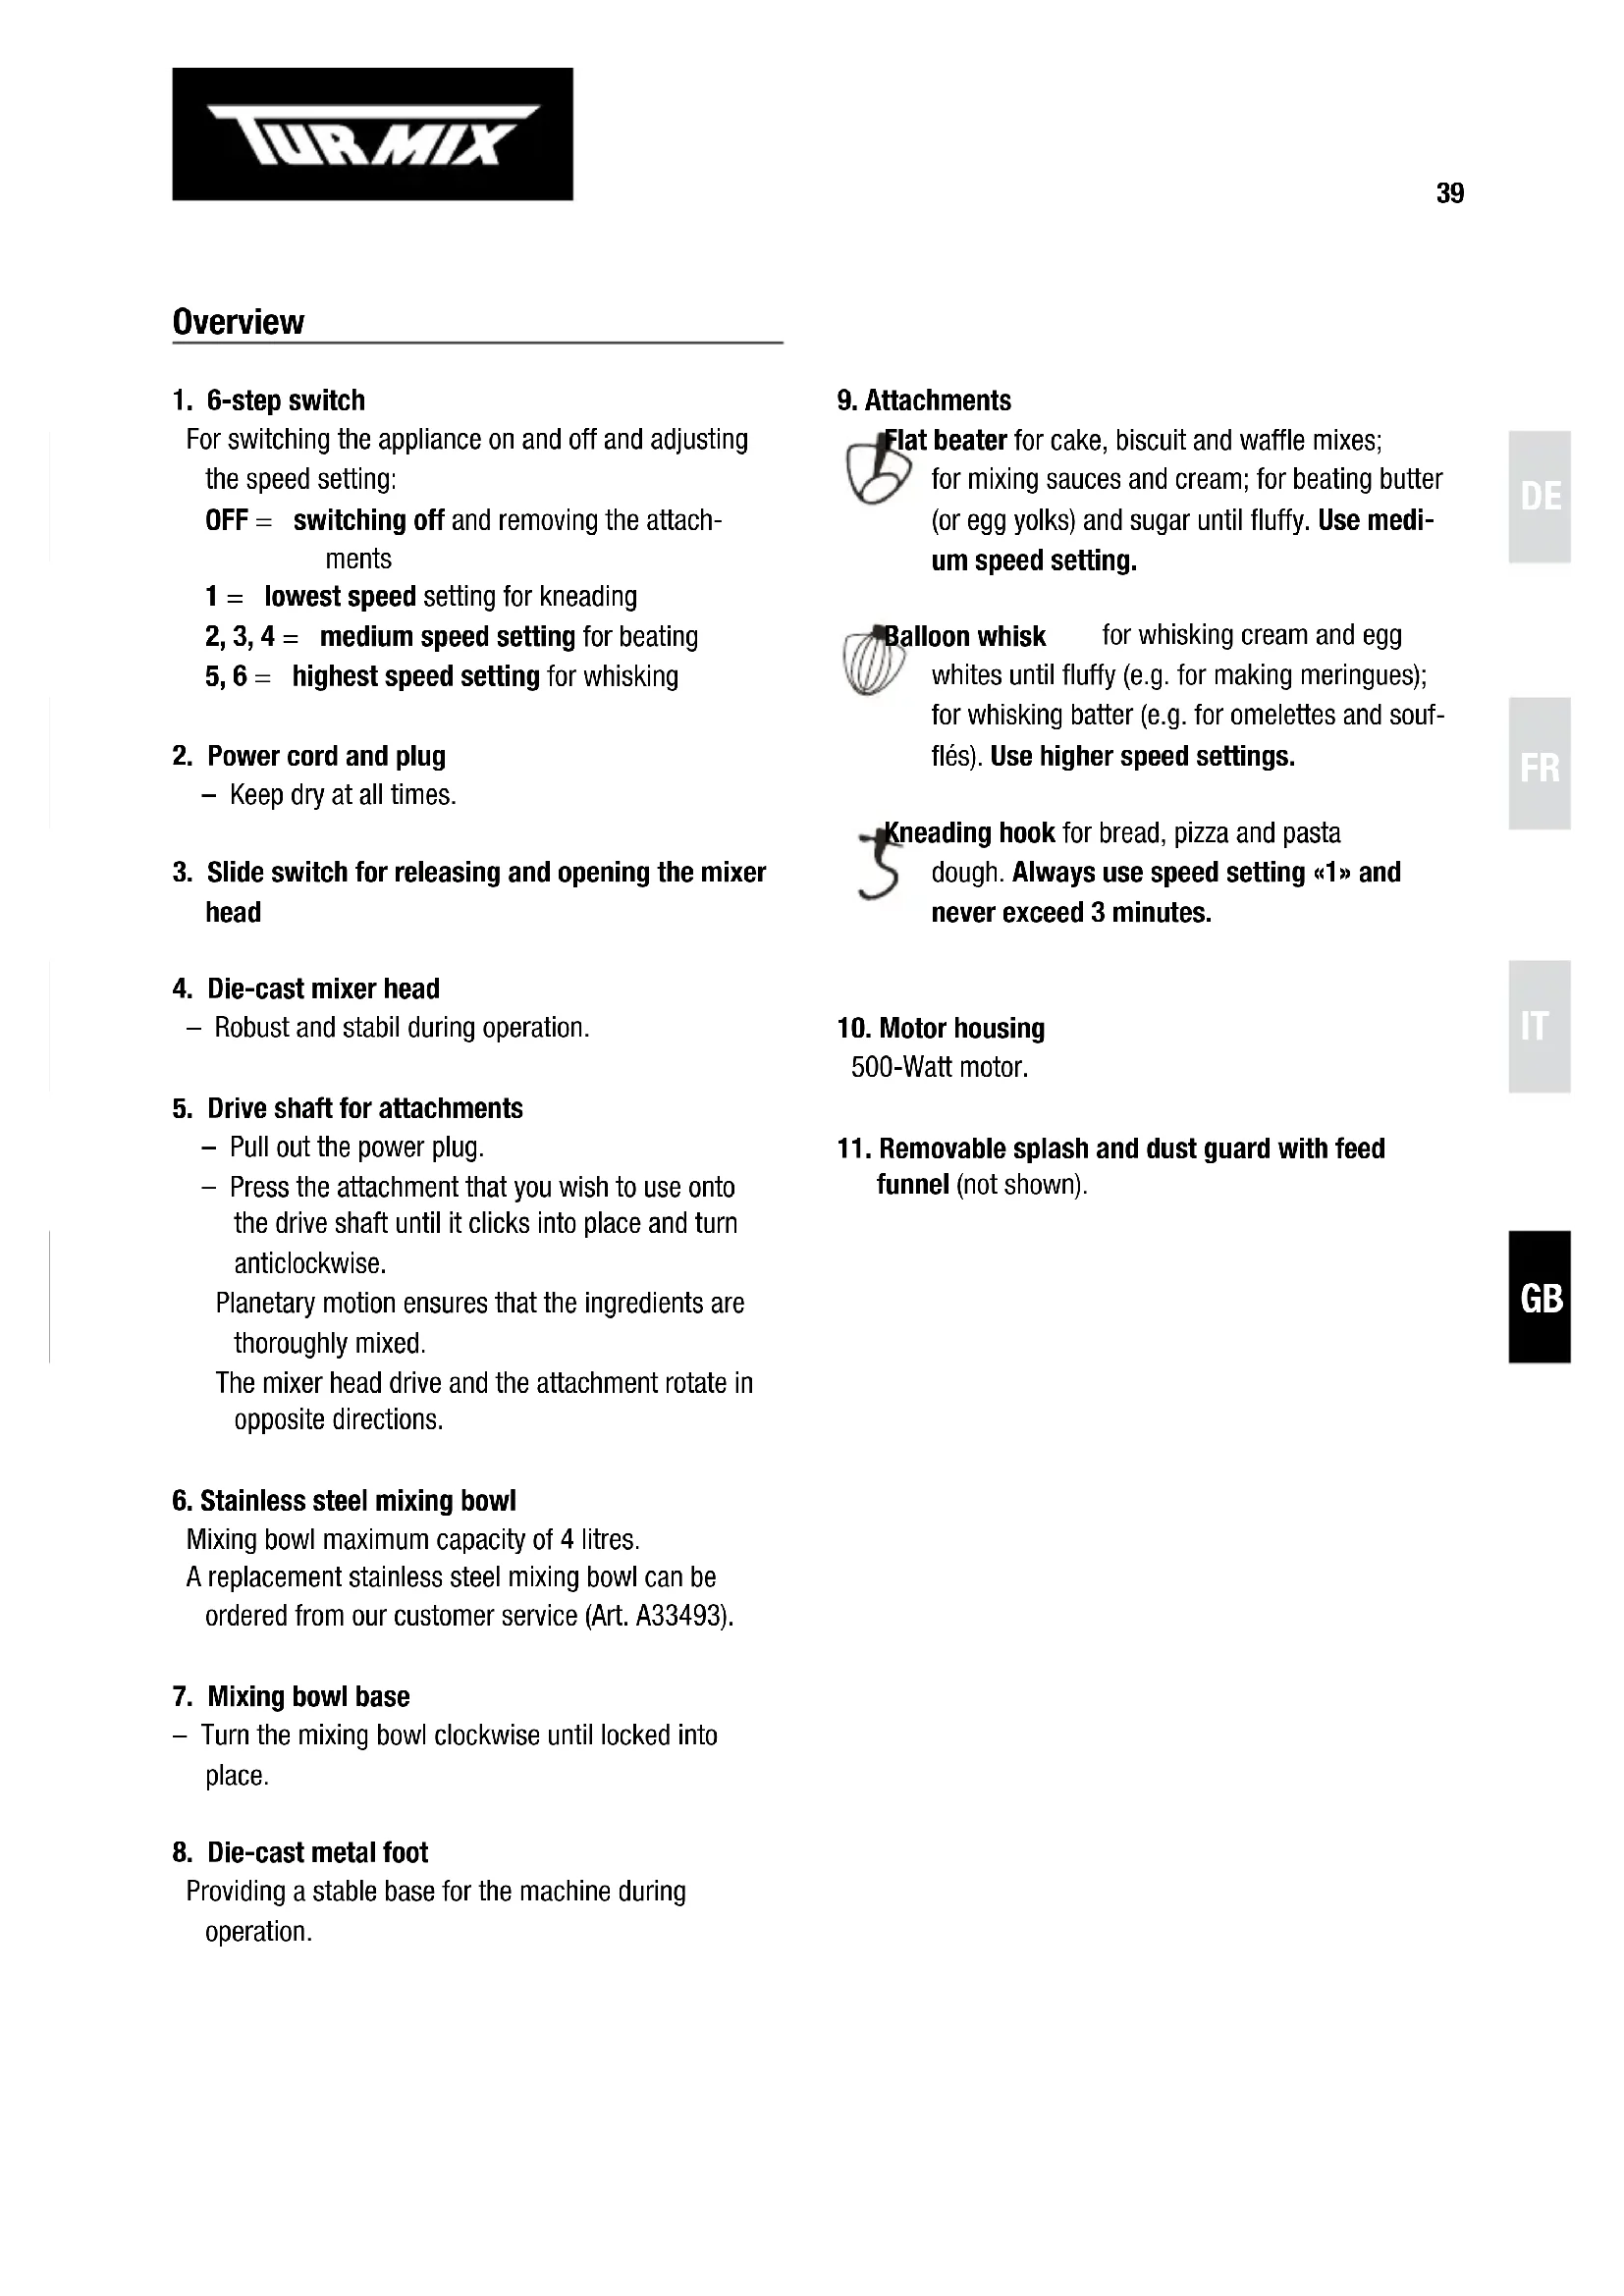
Simple line drawing of a teapot with a handle (no text or symbols)For switching the appliance on and off and adjusting the speed setting:
OFF = switching off and removing the attachments
1 = lowest speed setting for kneading
2, 3, 4 = medium speed setting for beating
5, 6 = highest speed setting for whisking
2. Power cord and plug
- Keep dry at all times.
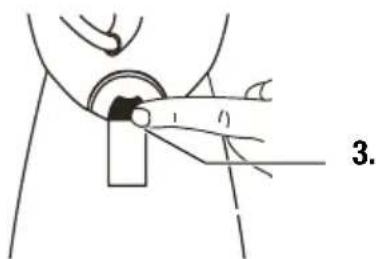
3. Slide switch for releasing and opening the mixer head
4. Die-cast mixer head
– Robust and stabil during operation.
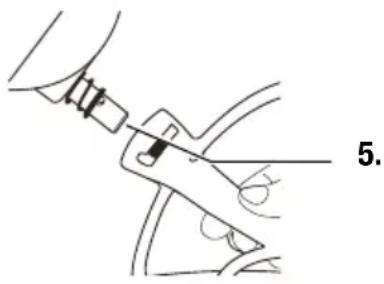
5. Drive shaft for attachments
- Pull out the power plug. - Press the attachment that you wish to use onto the drive shaft until it clicks into place and turn anticlockwise.
Planetary motion ensures that the ingredients are thoroughly mixed.
The mixer head drive and the attachment rotate in opposite directions.
6. Stainless steel mixing bowl
Mixing bowl maximum capacity of 4 litres.
A replacement stainless steel mixing bowl can be ordered from our customer service (Art. A33493).
7. Mixing bowl base
- Turn the mixing bowl clockwise until locked into place.
8. Die-cast metal foot
Providing a stable base for the machine during operation.
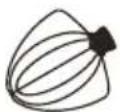
9. Attachments

t beater for cake, biscuit and waffle mixes; for mixing sauces and cream; for beating butter (or egg yolks) and sugar until fluffy. Use medium speed setting.

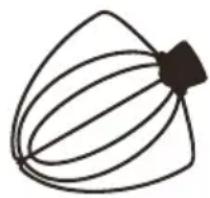
loon whisk for whisking cream and egg whites until fluffy (e.g. for making meringues); for whisking batter (e.g. for omelettes and soufflés). Use higher speed settings.

reading hook for bread, pizza and pasta dough. Always use speed setting «1» and never exceed 3 minutes.
10. Motor housing
500-Watt motor.
11. Removable splash and dust guard with feed funnel (not shown).
2. Operating the appliance
Operating the appliance
natural_image
Line drawing of a hairdryer with a handle and base (no text or symbols)Setting up
- Place the appliance on a flat, stable and dry surface.
- Do not place it on a hot surface or close to a naked flame. Make sure that nobody can trip over the power cord and that the machine is out of reach of children. Never let children play with the machine.
Base unit with attachments
Before using the appliance for the first time, clean the appliance, attachments and mixing bowl.
An especially good result is achieved if the attachments are used for the following applications:
Beater for ...
... all mixing tasks. For beating butter (or egg yolks) and sugar until fluffy. Use medium speed setting.
Whisk ...
... for an airy, fluffy result: cream and egg whites (e.g. for meringues) or batter (e.g. for omelettes and soufflés). Use higher speed settings.
Tip: For best results, when whisking egg whites, make sure the bowl and whisk are perfectly clean, dry and grease free.

Kneading hook ...
... exclusively for kneading bread, pizza and pasta dough. Always use speed setting «1».
natural_image
Illustration of a hand holding a small object with a circular inset, labeled '3.' (no text or symbols on the diagram itself)- Before positioning the mixing bowl and inserting the attachments, set the step switch (1.) to OFF and make sure that the power cord is unplugged.
- Press the slide switch (3.) (on the back) and hold it down. Release the mixer head with one hand and tilt it upwards until it clicks into place.
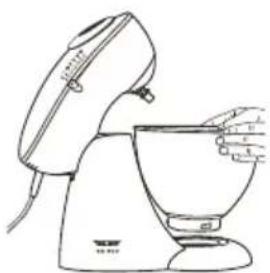
- Position the mixing bowl on the base (7.) and turn it clockwise until locked into place.
- Fit the splash and dust guard (without the feed funnel). Make sure that the opening is oriented towards the attachment (otherwise the attachment will be resting on the splash and dust guard).
natural_image
Line drawing of a kitchen mixer with hand holding cup (no text or symbols)Note:
- To insert/remove the mixing bowl, the mixer head must be in the open/engaged position respectively.
text_image
5.- Press the attachment that you wish to use onto the drive shaft (5.) and turn it anticlockwise until it clicks into place.
- Place the feed funnel on the splash and dust guard and secure it.
- With one hand, hold the mixer head at the front and with the other press the slide switch (3.) at the same time to close the mixer head. (The mixer head locks into place horizontally.)
- To open the mixer head, follow the instructions in the reverse order.
Important:
- Make sure that the attachment has clicked into place properly to prevent it from falling out during operation.
text_image
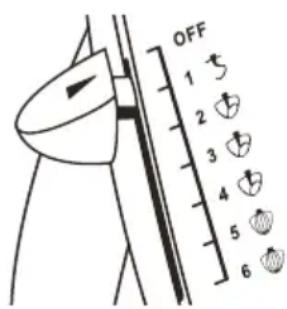
OFF 1 5 2 3 4 5 6Starting up
- Switch the switch with 6 settings to OFF.
- Plug the power cord into the mains socket.
- Pour the ingredients into the mixing bowl through the feed funnel.
Switch with 6 settings
- Select the appropriate speed:
| Speed Use For | |||
| 1 |  | mixing, kneading | Bread, pizza and pasta dough |
| 2 |  | Light mixing Cream and sauce mixes, cake mixtures | |
| 3-4 | [7044] | Beating and whisking | Butter (or egg yolks) with sugar, cake, biscuit or waffle mixtures |
| 5-6 | [VS20] | Beating until fluffy | Cream and egg white, meringues |
- Once finished, switch the appliance off and unplug it from the mains. Release and remove the attachments by turning them clockwise.
Important
- Do not overfill the mixing bowl or operate the appliance uninterruptedly for longer than 3 minutes.
-
Never insert fingers or a spatula in the bowl while the appliance is running (risk of injury).
-
Always start on speed setting «1» to avoid ingredient splatter and flour puff. You may then increase the speed (see table for correct speed settings).
– Follow the times indicated in the recipes: do not overstir. - If necessary, switch the appliance off during operation and scrape the mixture off the sides of the mixing bowl using a plastic spatula.
After use
- Once you have achieved the desired result, switch the appliance off using the switch with 6 settings.
– Unplug the appliance from the mains.
Cleaning
Caution!
– Pull out the power plug before cleaning.
- Never immerse the base unit, power cord or plug in water or any other liquids.
- Wipe the base unit with a damp cloth and then wipe dry.
- Wash the attachments and the mixing bowl in the dishwasher or clean them with a soft cloth under running water.
- Important: Do not use sharp cleaning products or abrasive cleaning agents.
Correct utilization
This appliance is designed for domestic and not industrial use. Use the appliance for processing normal quantities of food for domestic use. Please retain the operating instructions. If passing on the appliance to a third party, always include the operating instructions.
Disposal
Equipment that has reached the end of its service life can be handed over at a sales outlet, and will be professionally disposed of free of charge.
Equipment that has hazardous defects should be disposed of immediately.
Please ensure that it won't be used again.
Do not dispose of equipment with household rubbish (for environmental reasons!).
Safety instructions

Risk of electric shock!
Connect and operate the appliance only in accordance with the specifications on the rating plate.
Do not use the appliance if the power cord and/or appliance are damaged. Keep children away from the appliance. After using the appliance, always pull out the main plug, also before cleaning or re-assembling the appliance, before leaving the room or if a fault occurs.
Do not lay the power cord near sharp edges or hot surfaces. To prevent injury, repairs to the appliance, such as replacing a damaged power cord, should be carried out by our customer service only. Do not use the appliance with damp hands and do not operate at no load. Operate the appliance with original accessories only.
Always use the specified settings.
Do not exceed 3 minutes' operation.
Do not immerse the appliance, power cord or plug in water or any other liquid: risk of short-circuit! If there is a power failure, the appliance remains switched on.
This appliance is not intended for use by persons (including children) with reduced physical, sensory or mental capabilities, or lack of experience and knowledge, unless they have been given supervision or instruction concerning use of the appliance by a person responsible for their safety. Children should be supervised to ensure that they do not play with the appliance.
Risk of injury!
The attachments and mixing bowl may be removed only after the mixer has been switched off and the power cord has been unplugged from the mains.
Only switch the appliance on after the attachments and the bowl have been fitted and the appliance is properly set for operation.
Never insert fingers or a spatula in the bowl while the appliance is running (risk of injury).
Recipes
Focaccia
- 3 cups (450 g) bread flour
- 1 teaspoon salt
- 2 teaspoons sugar
- 2 teaspoons dry yeast
- 2 tablespoons olive oil
- 1 cup (250 ml) water
Topping
- 2 tablespoons olive oil
- Sea salt
- 2 tablespoons black olives, sliced

natural_image
Abstract black ink brushstroke on white background (no text or symbols)- Assemble mixer using kneading hook.
- Place flour, salt, sugar and yeast into the mixing bowl.
- Using speed 1-2, slowly add the oil then the water to the dry ingredients. Mix for 1 minute until a dough ball starts to form.
- Turn the mixer off. Turn the dough out onto a lightly floured surface and knead by hand until the dough is soft and pliable.
- Place the dough ball into a large bowl, loosely cover with a damp cloth and leave to stand in a warm area for 20 minutes until doubled in size.
- Remove the risen dough from the bowl and knead again on a lightly floured surface.
- Press the dough into a lightly greased baking tray or put on parchment paper.
- Cover loosely with a damp dish towel and leave to stand in a warm area for 20-30 minutes or until doubled in size.
- Brush dough with olive oil and sprinkle with sea salt and olives.
- Bake in a preheated oven at 200 °C for about 30-35 minutes or until cooked and golden brown.
- Remove from baking tray and cool on wire rack.

natural_image
Abstract black ink brushstroke on white background (no text or symbols)Wholemeal bread and rolls
- 4 cups (600 g) wholemeal plain flour
- 2 teaspoons salt
- 3 tablespoons sugar
- 2 teaspoons dry yeast
- 2 tablespoons olive oil
- 400 ml water
- Extra bread flour, for kneading
- 1 egg yolk, for brushing (optional)
-
Seads (poppy, sesame, linseeds) (optional)
-
Assemble mixer using kneading hook.
- Place flour, salt, sugar and yeast into the mixing bowl.
- Using speed 1-2, slowly add the oil then the water to the dry ingredients. Mix for 1 minute until a dough ball starts to form.
- Turn the mixer off. Turn the dough out onto a lightly floured surface and knead by hand until the dough is soft and pliable.
- Place the dough ball into a large bowl, loosely cover with a damp dish towel and leave to stand in a warm area for 20 minutes or until doubled in size.
- Remove the risen dough from the bowl and knead again on a lightly floured surface.
- For bread: shape dough into a roll shape to fit a large lightly greased bread tin or put on parchment paper.
For bread rolls: divide dough evenly into 16-24 pieces, knead into balls and place close together on a lightly greased baking tray or put on parchment paper.
-
Cover loosely with a damp dish towel and leave to stand in a warm area for 30-40 minutes or until well risen. Remove dish towel.
-
Brush top of dough with egg yolk and sprinkle with seads if required.
-
For bread: bake in a preheated oven at 200 °C for about 40-50 minutes or until cooked and golden brown.
For bread rolls: bake in a preheated oven at 180 °C for about 15-20 minutes or until cooked and golden brown.
- Remove from baking tray/pan and cool on wire rack.

natural_image
Simple line drawing of a teardrop-shaped object with a handle (no text or symbols)Butter Biscuits
- 125 g butter, softened
- 3/4 cup caster sugar
- 1 teaspoon vanilla essence
- 1 egg
- 2 cups (300 g) plain flour
-
1 teaspoon baking powder
-
Assemble mixer using flat beater.
- Using speed 5, cream butter until soft, add sugar, vanilla essence and egg, cream until light and fluffy.
- Sift flour and baking powder together.
- Reduce mixer to speed 2, add sifted ingredients into the creamed mixture until just combined. Do not over mix.
- Roll heaped teaspoons of biscuit mixture into balls and place evenly on a lightly greased baking tray or put on parchment paper. Allow space for spreading. Flatten balls slightly with a lightly floured fork.
- Bake in a preheated oven at 190 °C for 12-15 minutes or until cooked and pale golden.
- Remove biscuits from baking tray and cool on wire rack.
Orange Biscuits
- 1 quantity Butter Biscuit mixture, but without vanilla essence (see above).
- Add instead of vanilla essence 1 tablespoon finely grated orange rind.
Note
- When using smaller quantities turn off the mixer from time to time and scrape the bowl with a spatula.
Macaroons
natural_image
Simple line drawing of a stylized bird head with curved blades (no text or symbols)
natural_image
Simple line drawing of a teardrop-shaped object with a handle (no text or symbols)- 4 egg whites
- 1/2 cups caster sugar
- 2 teaspoons finely grated lemon rind
- 3 tablespoons corn flour, sifted
- 4 cups desiccated coconut
- Extra desiccated coconut, for sprinkling
-
Melted chocolate, optional
-
Assemble mixer using balloon whisk.
- Using speed 6, beat the egg whites until firm peaks form. Gradually add the sugar, beating constantly, until the mixture is thick and glossy and the sugar is dissolved. Add lemon rind, beat until just combined.
- Switch off the mixer. Remove balloon whisk and assemble mixer using flat beater.
- Using speed 1, add corn flour and coconut and mix until just combined.
- Place tablespoons of mixture onto lightly greased baking trays. Allow 3 cm spaces for spreading. Sprinkle with extra coconut if desired.
- Bake in preheated 160 °C oven for 15-20 minutes or until set and lightly golden.
- Remove macaroons from baking tray and cool on wire rack.
Decorate macaroons with a fine drizzle of melted chocolate if desired.
Double Chocolate Chip Cookies
- 180 g butter, chopped
- 150 g dark chocolate, chopped
- 225 g plain flour
- 3/4 cup cocoa
- 1.5 cups brown sugar
- 3 x eggs, lightly beaten
- 1.5 cups dark choc bits
- Melt butter and dark chocolate in a small saucepan over a low heat, stirring constantly until smooth. Keep warm.
- Assemble mixer using flat beater.
- Using speed 1, stir plain flour, cocoa and brown sugar, increase to speed 2, continue mixing and gradually add the butter mixture and eggs. Do not over mix.
- Using speed 1, stir in choc bits until just combined.
- Place tablespoons of mixture onto lightly greased baking trays. Allow 3 cm spaces for spreading. Flatten lightly with back of a spoon.
- Bake in a preheated oven at 180 °C for 15-20 minutes or until set and lightly golden.
- Cool biscuits on trays for 5 minutes before transferring to wire rack.

natural_image
Simple line drawing of a megaphone with a handle (no text or symbols)
natural_image
Simple line drawing of a megaphone with a handle (no text or symbols)Vanilla Butter Cake
- 125 g butter, softened
- 3/4 cup caster sugar
- 1 teaspoon vanilla essence
- 2 eggs
- 2 cups (300 g) self raising flour, sifted
- 3/4 cups milk
- Assemble mixer using flat beater.
- Using speed 5, beat butter and sugar until light and fluffy.
- Add vanilla essence, add eggs one at a time, beat well after each addition.
- Using speed 2, slowly add flour and milk alternately, to form a smooth batter.
- Divide mixture evenly into two lightly greased, round cake pans or one deep, large and round cake pan.
- Bake in preheated 180 °C oven for 45-50 minutes or until cooked and golden.
- Turn out onto wire rack to cool.
When cool, cover cake with cream frosting if desired or lightly dust with sifted icing sugar.
Coconut Cake
- 1 quantity Vanilla butter cake mixture (see above)
- 1/2 cup desiccated coconut
- 1 quantity Vanilla Icing
- Extra desiccated coconut, for sprinkling
- Using speed 2, slowly add flour, coconut and milk alternately, to form a smooth batter.
- When cool, cover cake with cream frosting and sprinkle with extra coconut if desired.
Sultana or Cherry Cake
- 1 quantity Vanilla Butter Cake mixture (see above)
- 3/4 cups sultanas or glace cherries
- Using speed 2, slowly add flour and milk alternately, to form a smooth batter.
- Reduce to speed 1, fold in sultanas or cherries. Do not over mix.
Garantie/Garantie/Garanzia/Warranty
Gadentie
Our TURMIX electrical household appliances carry a warranty of 2 years from the date of purchase. We undertake to replace, free of cost, any parts of the appliance that get damaged as a consequence of material or manufacturing defects during the warranty period. Return shipments should be packed in the original packing or something equivalent. In case of improper handling or in case repairs are attempted by third parties, the warranty is rendered null and void. Damage from hydro-chemical influences (e.g. owing to calcification) as well as parts that are subjected to normal wear, do not fall under the warranty. Moreover, damage or function faults that are a consequence of water from softening plants are excluded from the warranty.
Please preserve your receipt carefully, it serves as the warranty certificate as well.
DKB Household AG, Eggbühlstrasse 28, Postfach, CH-8052 Zürich www.turmix.ch
Tel. +41 (0)44 306 11 11 / Fax +41 (0)44 306 11 12 Mail: household@dkbrands.com
DKB Household AG, Service Center, Grindelstrasse 3-5, CH-8303 Bassersdorf
Tel. +41 (0)43 266 16 00 / Fax +41 (0)43 266 16 10 Mail: servicecenter@dkbrands.com