PCI300GE - Fridge PROLINE - Free user manual and instructions
Find the device manual for free PCI300GE PROLINE in PDF.

User questions about PCI300GE PROLINE
0 question about this device. Answer the ones you know or ask your own.
Ask a new question about this device
Download the instructions for your Fridge in PDF format for free! Find your manual PCI300GE - PROLINE and take your electronic device back in hand. On this page are published all the documents necessary for the use of your device. PCI300GE by PROLINE.
USER MANUAL PCI300GE PROLINE
PARTS OF THE APPLIANCE AND THE COMPARTMENTS 2
INSTALLATION INSTRUCTIONS
SAFETY INFORMATION 7
IMPORTANT INFORMATION 8
DISPOSAL
HOW TO OPERATE THE APPLIANCE 9
THERMOSTAT TEMPERATURE CONTROL PANEL. 9
THERMOSTAT SETTING 9
RED ALARM INDICATOR 9
GREEN MAINS POWER ON INDICATOR 9
LOW AMBIENT TEMPERATURE SWITCH 9
ORANGE LOW AMBIENT TEMPERATURE SWITCHED ON INDICATOR 10
NOISE FROM YOUR APPLIANCE 10
SHOPPING FOR FROZEN FOODS 10
STORAGE OF FRESH FOOD IN THE FRIDGE 10
STORING FROZEN FOOD 11
HOW TO THAW FROZEN FOOD 11
THAWING FROZEN VEGETABLES 11
STORING FROZEN FOOD 11
FREEZING FRESH FOOD 11
DEFROSTING 12
Refrigerator defrost process 12
Freezer defrost process 12
FOOD SAFETY TIPS 13
PROLONGED OFF PERIODS 13
POWER FAILURE 13
CLEANING AND MAINTENANCE 14
REPLACING THE REFRIGERATOR LIGHT BULB. 14
DOOR REVERSAL 14
TROUBLESHOOTING 15
Do and Do Not's 16
TECHNICAL DATA 17
TEMPERATURE INDICATOR 18
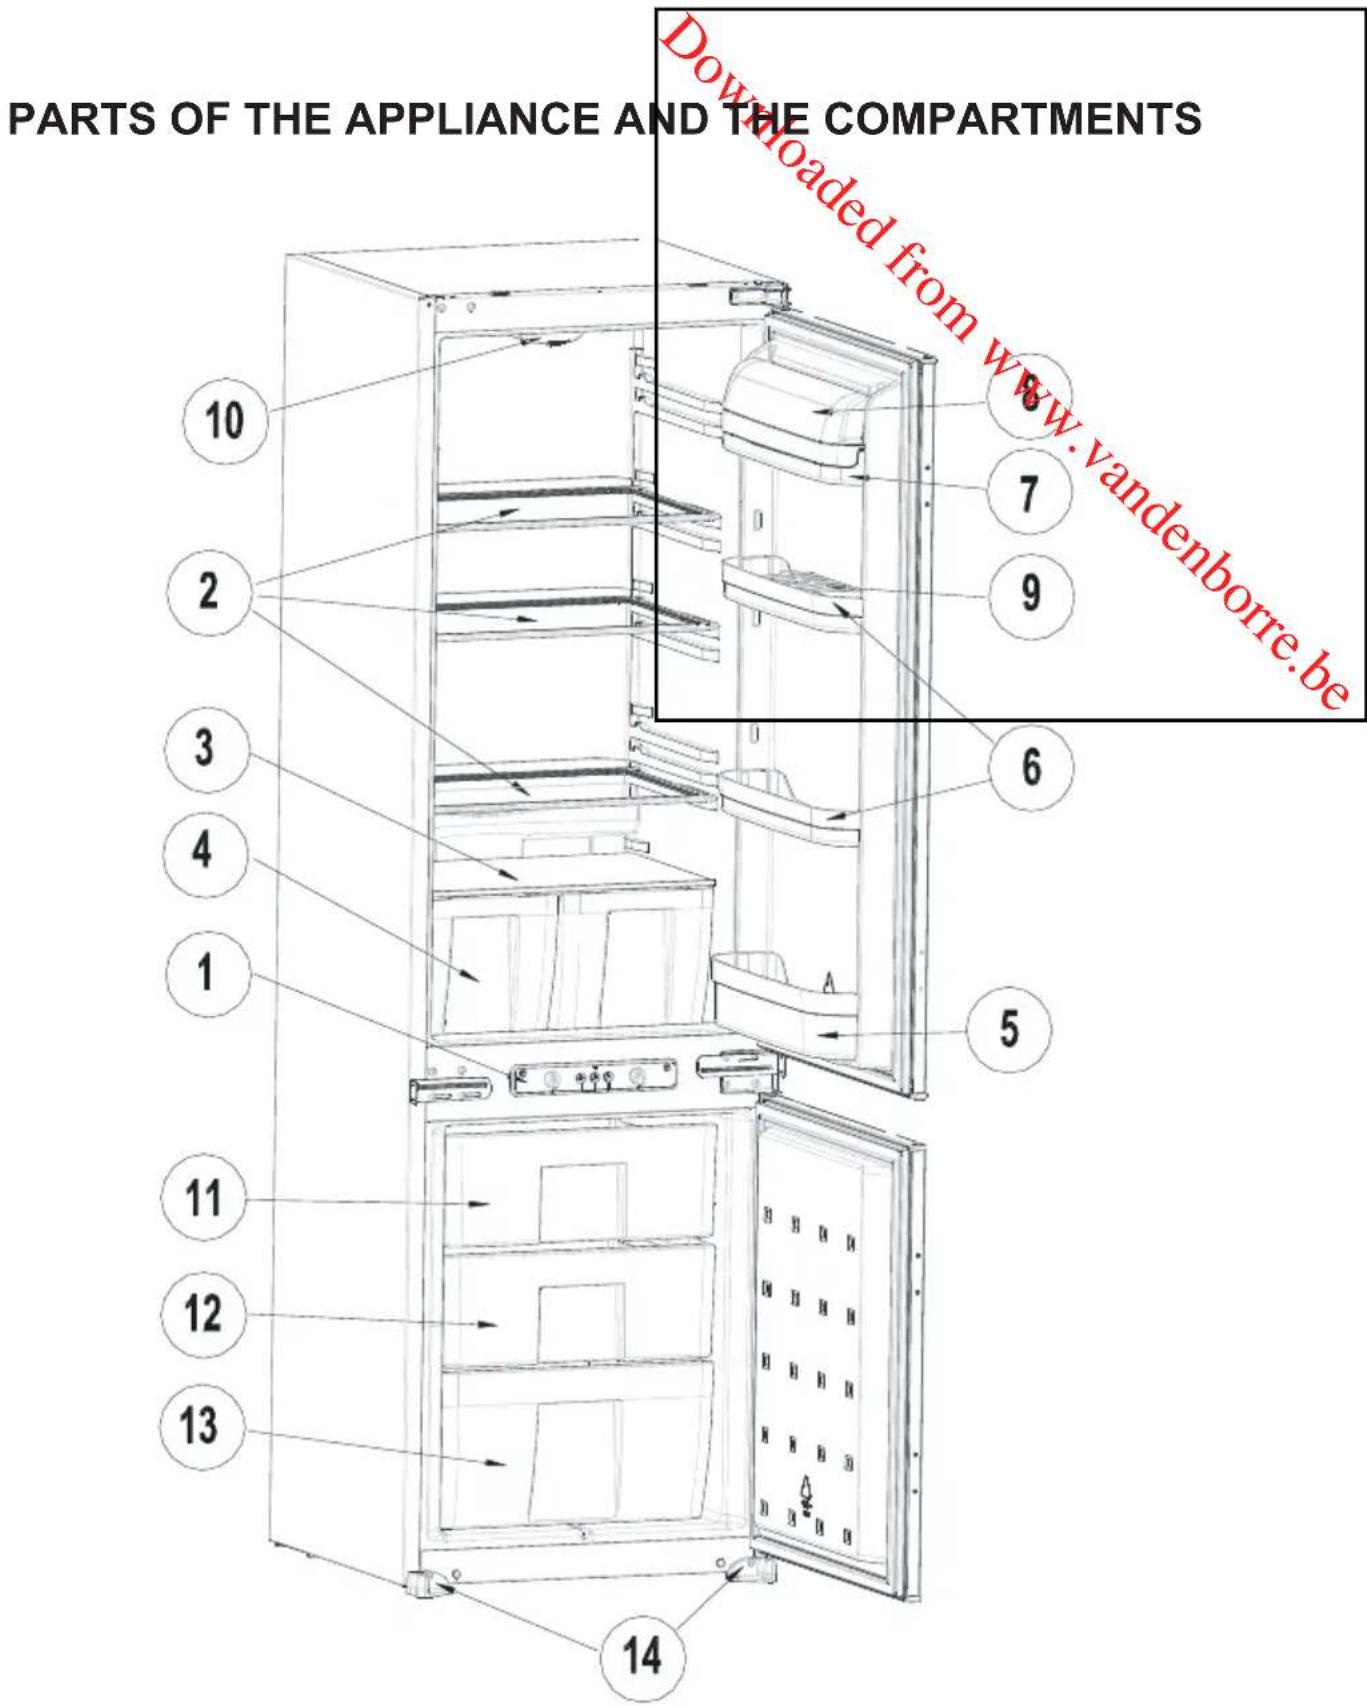
1) Display panel
2) Refrigerator shelf
3) Crisper shelf
4) Salad crispers
5) Bottle shelf
6) Middle shelf
7)Buttershelf
8)Butter shelf cover
9) Egg tray
10) Refrigerator lamp & cover
11) Freezer compartment flap
12) Freezer compartment drawer
13) Freezer compartment drawer
14) Bracket
INSTALLATION INSTRUCTIONS
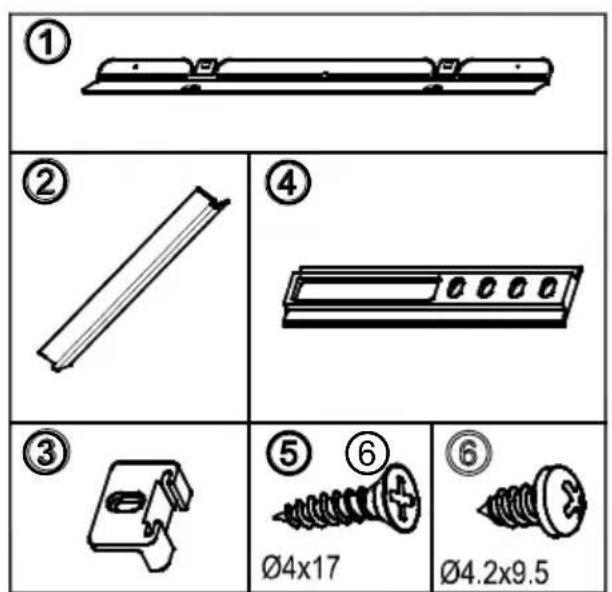

Fig. A
! Before installation, read the instructions carefully.
! Fit the refrigerator/freezer in stable kitchen units only.
! If necessary, reverse the door according to instructions.
! Check the installation dimensions according to fig.C. The position of the joint between the unit doors must be level with the position of the joint between the appliance doors.
1. See fig.A for the necessary attachment components.
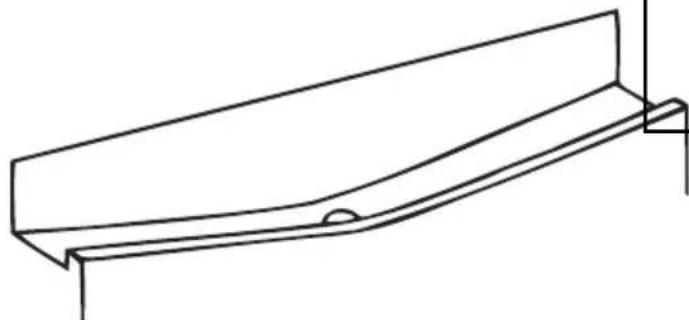
2. Insert trim flap into slot and screw by screws. (fig.D)
3. Pass the power cord through ventilation shaft and position it so that the appliance could be easily plugged in once it has been installed. (fig.B - fig.C)
4. Take out the trim gasket located on the side panel of the appliance and stick it on reverse side of the door hinges of the appliance. (fig.D - fig.E)
5. Raise appliance and slide into kitchen unit. Push appliance to the reverse side of door hinges providing that trim gasket covers space between appliance and the kitchen unit.
6. Align front feet with front surface of kitchen unit. (fig.F)
7. Screw the front feet by using screws. (fig.F)
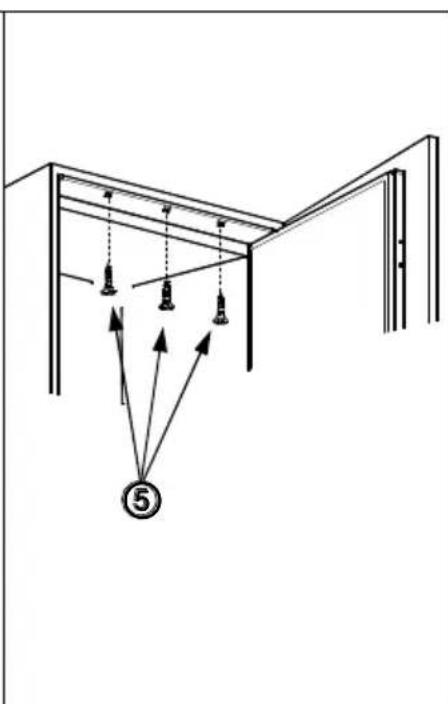
8. Screw trim flap to kitchen unit using screws5. (fig.G)
9. Screw fixing bracket11, as leaned to kitchen unit by using screws5. Repeat this for the opposite side. (fig.H)
10. Screw guides3 to appliance doors with screws6. Lean appliance doors to unit door as it is opened at right angle. Slide rails4 into guides3 aligning the groove. Screw the rails4 to the unit doors with screws5. (fig.J)
11. Set 1 2mm gap on handle side between unit itself and unit doors by adjusting guides 3. That is vital for appliance performance. (fig.J)
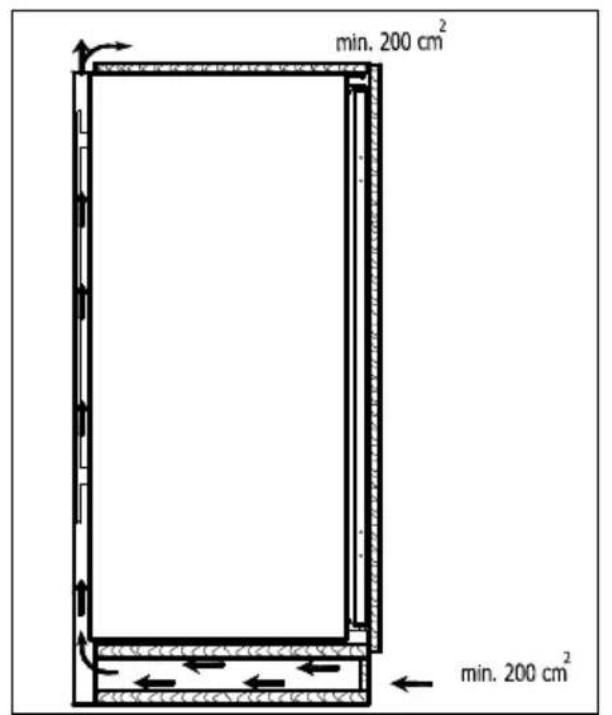
Fig. B

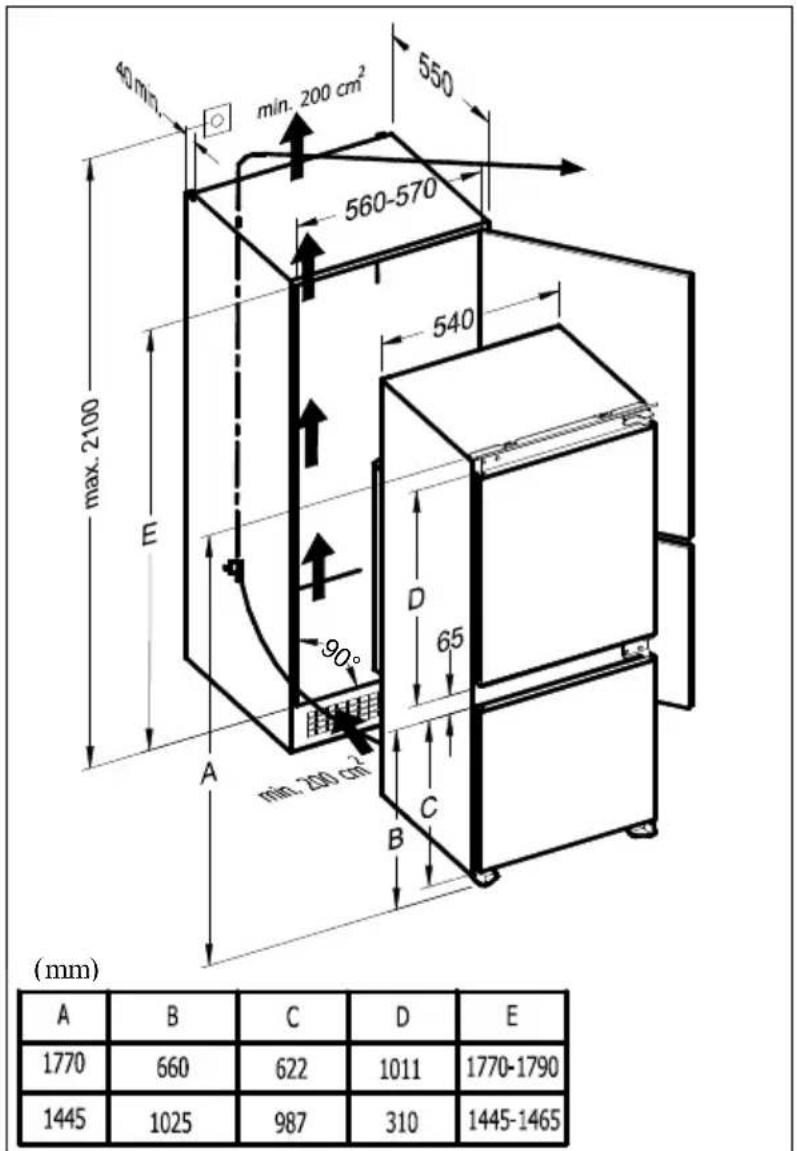
Fig. C
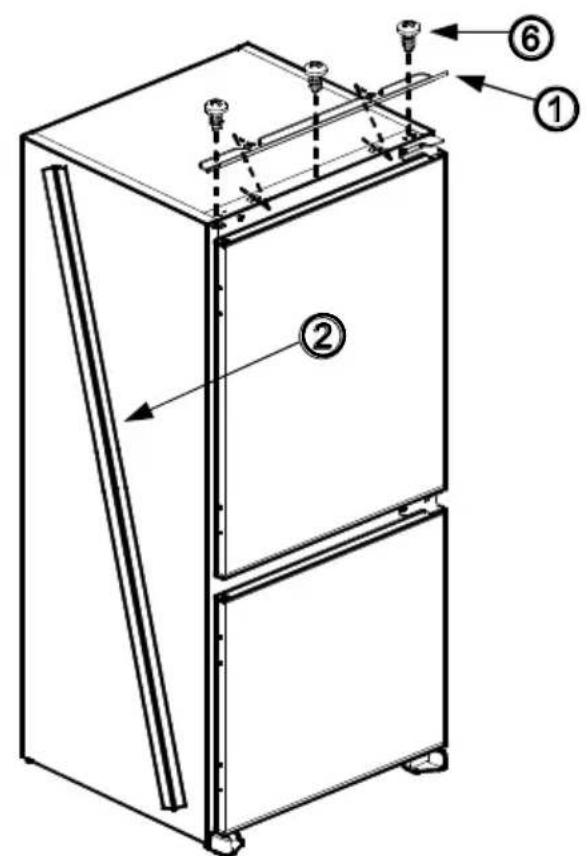
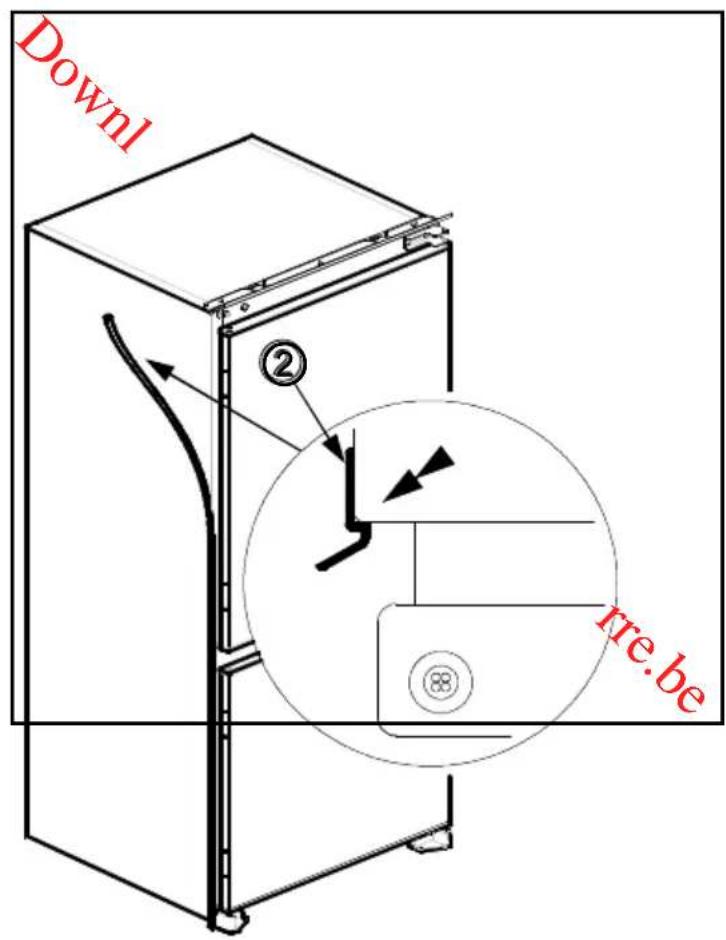
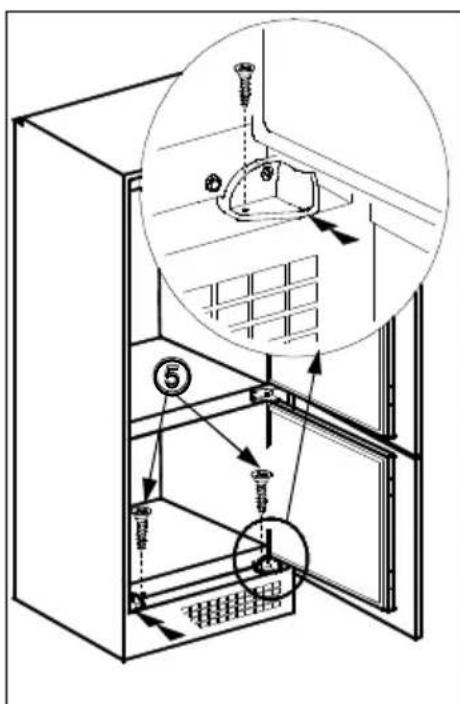
Fig. D Fig. E
Before using this appliance please read these instructions carefully and retain for future use.
SAFETY INFORMATION:
- This appliance is designed to operate at a check that the voltage matches that of your voltage will render the warranty void and may
voltage between 220 - 240 volts. Please or local supply. Failure to use the correct damage the appliance. - This appliance must only be used for its intended purpose i.e. the freezing or storage of domestic edible foodstuffs and should not be used for any other purpose.
- This appliance is intended for domestic household use only and should not be used for any other purpose or in any other application, such as for none domestic use or in a commercial environment.
- Do not operate this appliance with a damaged supply cord or plug, if the appliance malfunctions or as been damaged in any way contact the store from where your purchased your appliance for further information.
- Extreme caution must be used when moving an appliance as it is heavy and may have sharp edges under the base.
- This appliance is intended for indoor use only. Do not use or store outdoors (this appliance shall not be exposed to rain).
- Disconnect from the mains supply by removing the plug from the mains outlet socket before any maintenance or if the appliance is not going to be used for a long period of time.
- Do not position this appliance near hot surfaces, or in direct sunlight.
- This appliance is used for the storage of fresh food and for making and storing pre frozen food.
- If you are discarding an old refrigerating appliance with a lock or catch fitted to the door or lid, ensure that it is left in a disabled condition to avoid the entrapment of children when they are playing.
- This appliance might not operate consistently (possibility of defrosting of the contents or the temperature becoming too warm in the frozen food compartment) when sited for an extended period below the cold end of the range of temperatures for which the appliance is designed.
- Food to be frozen is not to be placed in direct contact with food already in storage.
WARNING:
- If the supply cord is damaged, it must be replaced by the manufacturer, its service agent or similarly qualified person in order to avoid a hazard.
- This appliance is not intended for use by persons (including children) with reduced physical, sensory or mental capabilities, or lack of experience and knowledge, unless they have been given supervision or instruction concerning use of the appliance by a person responsible for their safety.
Children should be supervised to ensure that they do not play with the appliance. - WARNING: Keep ventilation openings, in the appliance enclosure or in the built-in structure, clear of obstruction.
-
WARNING: Do not use mechanical devices or other means to accelerate the defrosting process, other than those recommended by the manufacturer.
-
WARNING: Do not use electrical appliances inside the food storage compartment of the appliance, unless they are of the type recommended by the manufacturer.
- Do not store explosive substances such as aerosols cans with a flammable propellant in this appliance.
WARNING: Do not damage the refrigerant circuit. - WARNING: To avoid a hazard due to instability of the appliance, it must be fixed in accordance with the instructions.
IMPORTANT INFORMATION:
- This appliance is designed to operate in temperature) between 16 and 32oC If these warmer, the appliance will not operate corre. exceeded for long periods, the temperature in food spoilage may occur.
- Remove all packaging materials from the appliance. Wash the inside of the cabinet with lukewarm water and bicarbonate of soda (5ml to 0.5 litre of water). Dry the appliance thoroughly.
- When using the freezer for the first time or after defrosting, turn the thermostat control to the maximum position for at least 2 hours before introducing food to be stored, and then readjust to the normal position.
- If there is a power failure, do not open the door. Frozen food should not be affected if the failure lasts for less than 12 hrs. If the failure is longer, then the food should be checked and either eaten immediately or cooked and then re-frozen.
DISPOSAL:
As old refrigeration appliances may contain CFC's which will damage the ozone layer, when disposing of any refrigeration appliance please contact your local waste disposal department for advice on the correct method of disposal.
The refrigerating gas contained in the circuit of this appliance is Isobutene (R600a); it causes a low level of pollution but is inflammable. please contact your local disposal department for advice on the correct method of disposal.
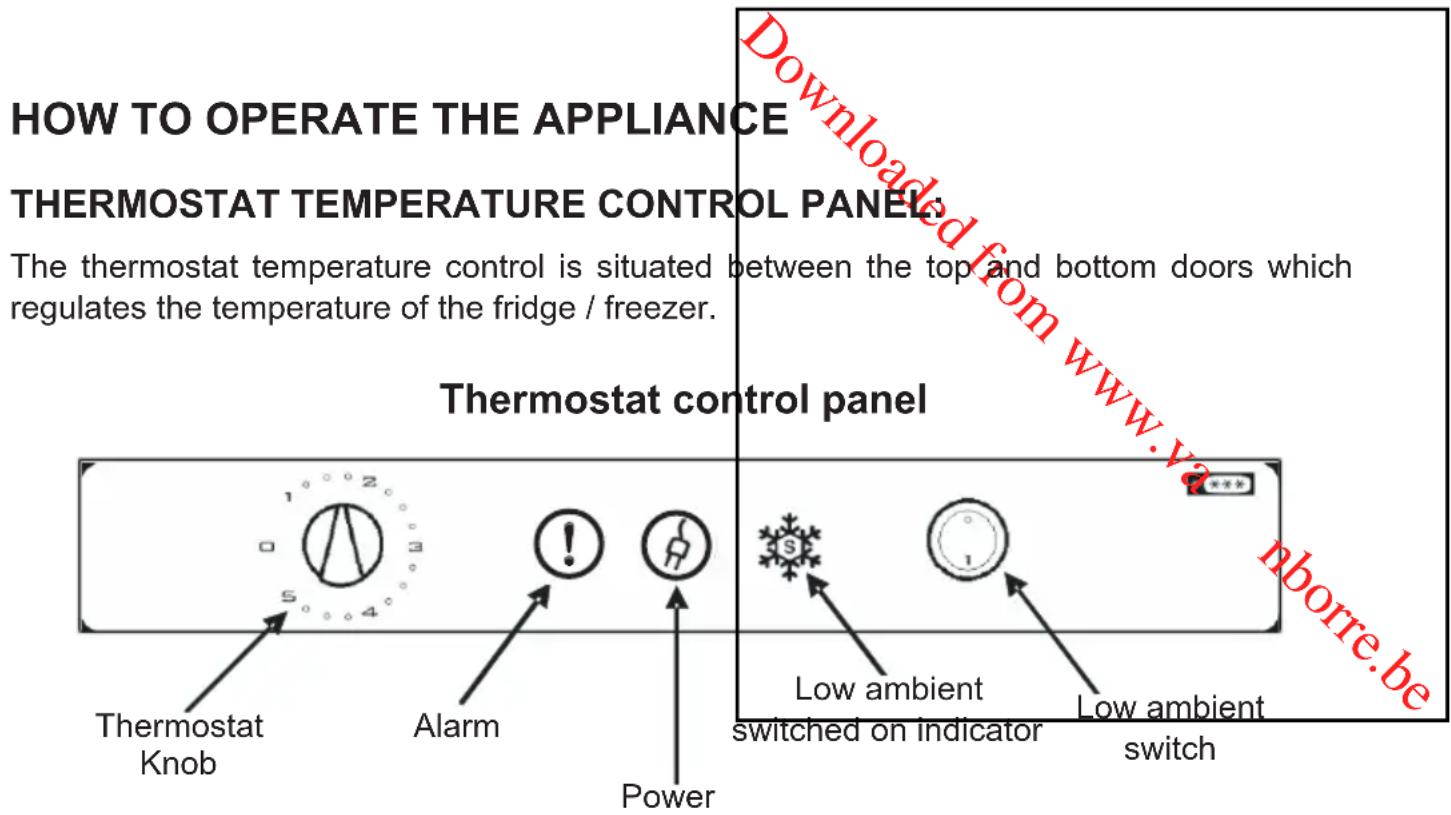
THERMOSTAT SETTING:
- This thermostat Knob regulates the internal temperatures in the Refrigerator and freezer compartments. By rotating the knob from position 1 - 5, colder temperatures can be obtained.
- "0" position shows that the thermostat is off, the appliance is switched off but is not disconnected from the mains supply, to do this remove the plug from the mains outlet.
- When turning on the appliance turn the thermostat control to the maximum position until the correct operating temperature is reached and then turn back to its normal setting.
- Set the thermostat control knob to a midway position to achieve -18 in the freezer compartment.
RED ALARM INDICATOR:
Indicates when the temperature is higher than normal for the correct operation of the appliance. This alarm will also come on when fresh food as been introduced into the freezer compartment for freezing and when the appliance is turned on for the first time. This alarm should go out when correct operating temperature is reached.
GREEN MAINS POWER ON INDICATOR:
This green lamp should be on when the appliance is plug in and connected to the mains supply.
LOW AMBIENT TEMPERATURE SWITCH:
This switch should only be used when the ambient temperature in the room is expected to drop below 18 degrees C this function helps to maintain the temperature in the freezer to maintain -18 degrees C in low ambient temperatures.
Please note: that when this switch is on the appliance uses slightly more energy than normal so should only be used when necessary.
ORANGE LOW AMBIENT TEMPERATURE SWITCHED ON INDICATOR:
- This indicator informs you when the low ambient temperature switch is activated.
- Please Note: if the appliance is switched off our unplugged you must wait at least 5 minutes before restarting the appliance or re-connecting the plug into the wall outlet.
- This is to allow the protection device in the compressor to reset.
- If the compressor fails to start correctly remove the plug and wait 5 minutes before you try again then the compressor should restart normally.
The storage temperature may be affected by:
The room temperature
How often the door is opened
How much food is stored
- Position of the appliance
In determining the correct thermostat temperature control setting, all these factors have to be considered and readjustment of the thermostat temperature control may be necessary.
NOISE FROM YOUR APPLIANCE:
You may notice some rather unusual Noises. The noises are caused by circulation of refrigerant in the cooling system. It has become more pronounced since the introduction of CFC free gases. This is not a fault and will not affect the performance of your freezer.
SHOPPING FOR FROZEN FOODS:
The appliance is rated as a 4 star freezer and can freeze fresh food and store pre frozen food. When you are buying frozen food, look at the Storage Guidelines on the packaging. You will be able to store each item of frozen food for the period shown against the 4 star rating.
STORAGE OF FRESH FOOD IN THE FRIDGE:
Food should always be covered tightly with foil, plastic film, placed in plastic bags or stored in airtight freezer containers. This will prevent food from dehydrating and to prevent any strong odours of some foods transferring to milder ones.
To store raw meat in the refrigerator wrap in plastic bags or in airtight containers and place on the lowest shelf to avoid cross contamination.
Do not allow raw meat to come into contact with cooked foods. For safety, only store raw meat for two or three days. Fruit and vegetables should be thoroughly cleaned and placed In the vegetable / salad crispper bin provided.
Milk and other liquids should be sealed with lids and placed in the bottle shelf in the door.
Please Note: The ambient temperature of the freshly stored food and how often the door is opened, affects the temperature in the refrigerator and freezer compartments. If required, change the thermostat temperature settings.
STORING FROZEN FOOD:
All frozen food products you purchase should be to avoid the frozen food from defrosting and spoil
All storage recommendations printed on the pack should always be followed.
- Making ice cubes fill a ice cube tray with clean water the freezer.
When the ice as set, you can remove the ice cube water to help remove the ice cubes.
HOW TO THAW FROZEN FOOD:
Thaw at room temperatures. Don't forget that thaw of bacteria. Always make sure there are no ice meat and fish. These crystals indicate that the foci
lower temperatures crystals in when cooking. Lower cooking temperatures may not destroy bacteria. Cook food as soon as possible after thawing. Drain off and throw away any liquid lost during thawing.
placed in the freezer as soon as possible.
aging of frozen food by the manufacturer
ter to 3/4 full and place in the top draw of
les by holding the tray under cold running
THAWING FROZEN VEGETABLES:
For some food, it is unnecessary to thaw food before cooking. Vegetables and pasta can be added directly to boiling water or steam cooked. Frozen sauces and soups can be put into a saucepan and heated gently until thawed.
STORING FROZEN FOOD:
When using the freezer for the first time or after defrosting, turn the thermostat control to the maximum position for at least 2 hours before introducing food to be stored, and then readjust to the normal position. All frozen food products you purchase should be placed in the freezer as soon as possible to avoid the frozen food from defrosting and spoiling. All storage recommendations printed on the packaging of frozen food by the manufacturer should always be followed.
FREEZING FRESH FOOD
Ensure that your freezing operations are carried out under the most hygienic conditions, as freezing alone does not improve the food. Never put hot or even warm foodstuffs into the freezer. Prior to storing the food, pack it in plastic bags, aluminium foil or food freezer containers and place into the freezer without placing them in contact with food that has already been frozen. See the technical data sheet at the rear of this instruction book for the maximum amount in kilograms of fresh food that can be frozen in any 24 hour period with a room temperature of 25 degrees C never freeze more than the maximum permissible. It could be necessary to reduce the quantity to be frozen if freezing every day is anticipated. Making ice cubes fill a ice cube tray with clean water to 34 full and place in the top draw of the freezer When the ice as set, you can remove the ice cubes by holding the tray under cold running water to help remove the cubes. All fresh food to be frozen should be placed in the top compartment of the freezer if Possible.
DEFROSTING
Refrigerator defrost process
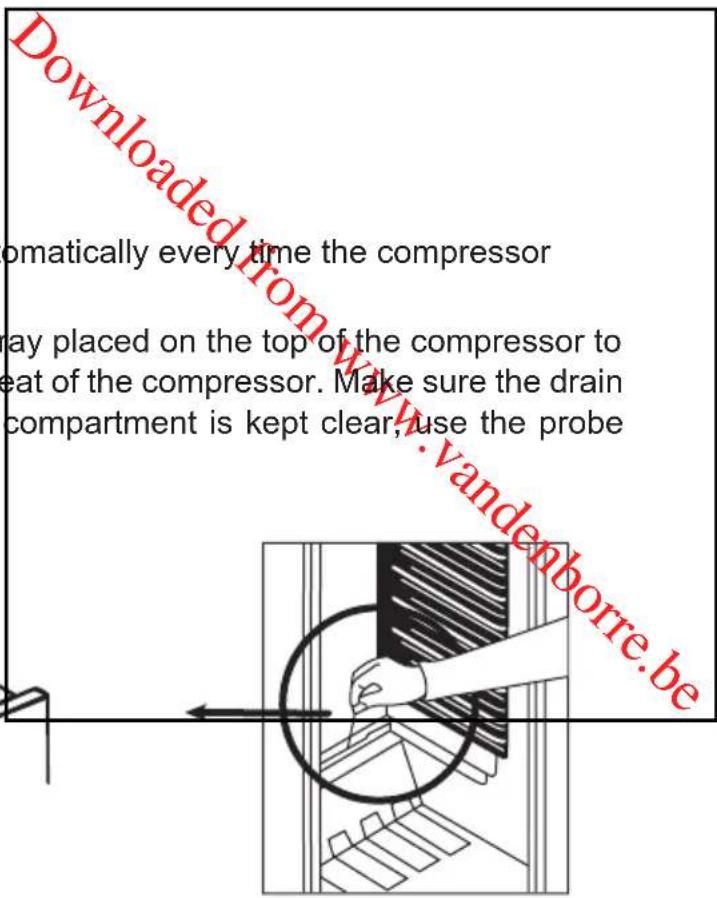
The refrigerator defrost process is carried out automatically every time the compressor stops.
The defrost water drains from the cabinet into a tray placed on the top of the compressor to the rear of the unit where it evaporates from the heat of the compressor. Make sure the drain hole on the ridge at the back of the refrigerator compartment is kept clear, use the probe supplied see the diagram below.
Refrigerator compartment:
Freezer defrost process
- Over time frost will accumulate inside the freezer depending upon the length of time during which the door is left open or the amount of moisture introduced.
- It is essential to ensure that no frost or ice is allowed to form at places where it will affect the close fitting of the door seal.
- This might allow air to penetrate the cabinet, thus encouraging continuous running of the compressor.
- Thin frost formation is quite soft and can be removed with a brush or plastic scraper.
- For the removal of thin frost it is not necessary to switch off the appliance.
- For the removal of heavy ice deposits disconnect the appliance from the mains supply and empty the contents into cardboard boxes and wrap in thick blankets or layers of paper to keep them cold.
- Defrosting should be undertaken when the freezer is nearly empty, and it should be carried out as quickly as possible to prevent undue increase in temperature of the contents.
- Providing that the contents are well wrapped and placed in a cool location they should keep for several hours.
- Examine the contents when replacing them in the freezer and if some of the packages have thawed out it should not be re frozen but eaten within 24 hours or cooked and refrozen.
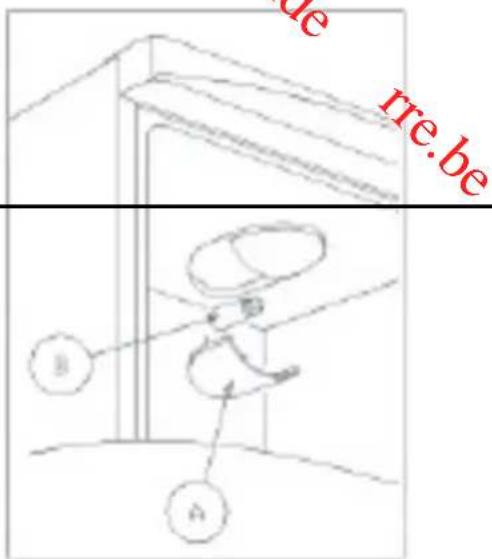
- This appliance is provided with a special drain system. Pull out the drain pipe which is stored on the back wall of the freezer behind the bottom draw.
-
Connect the drain pipe A as shown in the diagram below and place the bottom drawer of the freezer B to the front of the freezer to collect the drained water.
-
After defrosting has finished clean the inside of the freezer with a solution of warm water with a little bicarbonate of soda and then dried thoroughly.
- Wash all removable parts in the same way and reassemble replace the drain pipe to it normal position and replace the bottom draw.
- If there is still water on the freezer floor, you can clear it away by using a sponge.
- Reconnect the appliance the main supply and turn the thermostat up to maximum.
- Re introduce the frozen food and keep the door closed until the freezer as reached the correct operating temperature.
FOOD SAFETY TIPS:
Never re-freeze anything that has thawed out unless you cook it again to kill off harmful bacteria. Never re-freeze thawed shellfish.
PROLONGED OFF PERIODS:
If the appliance is not in use for a long period of time, proceed as follows:
- Disconnect from the main supply by removing the plug from the mains supply outlet.
- Clean and dry the inside as instructed under the heading of cleaning the appliance.
- Leave the door open to prevent any unpleasant smells from building up while the appliance is not in use.
POWER FAILURE:
If there is a power failure for less than 12 hours keep the door closed. The frozen food should not be affected if the failure lasts for less than this time. Extra protection can be given by covering the appliance with two or three thick blankets. If a long power failure is anticipated, try to get the foodstuff into another appliance or cold store, if possible.
If the power cut is longer than 12 hrs then check the content of the freezer. If the food has defrosted, cook and refreeze the food or it should be eaten immediately. Never refreeze food that as been defrosted.
CLEANING AND MAINTENANCE
Before any cleaning or maintenance is carried from the mains outlet socket by removing the plugs the appliance, both the inside and outside, can little bicarbonate of soda. (5ml to 0.5 litre of water) reintroducing the food. External Cleaning: wash the ensure you do not use water near any electrical coil may be sharp edges on the underside of the produce
out you must disconnect the appliance. It is recommended that when cleaning can be cleaned using warm water and a (ter). Dry the appliance thoroughly before the outer cabinet with warm soapy water component to the rear of the cabinet. There act so care should be taken when cleaning.
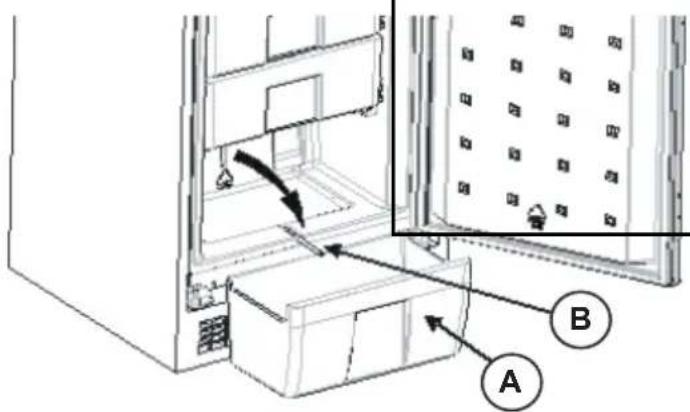
REPLACING THE REFRIGERATOR LIGHT BULB
- Unplug the appliance from the mains supply.
- Remove the refrigerator light cover (A) by pressing the hooks placed on both sides of the cover.
- Change the light bulb (B) with a new one (type E14 Base 15W)
- Replace the light cover and then reconnect the appliance to the mains supply.
DOOR REVERSAL
- Disconnect the appliance from the mains supply
- Unscrew the Top door hinge(15) by removing the two screws.
- Remove the top door ^(14) by lifting it slightly. Place the door in a safe location so it does not get damaged.
- Remove the top hinge pin ^(16) with a flat bladed screwdriver.
- Turn over the top hinge(15) and re fasten the hinge pin(16) into the opposite hole in the hinge and save it in a safe location.
- Remove the hole blanking plugs ^(17) and replace in the opposite holes were the hinge you have just removed.
- Unscrew the Cabinet fixing bracket ^(11) and ^(13) from both sides of the appliance and save in a safe location.
- Remove the middle hinge(12).
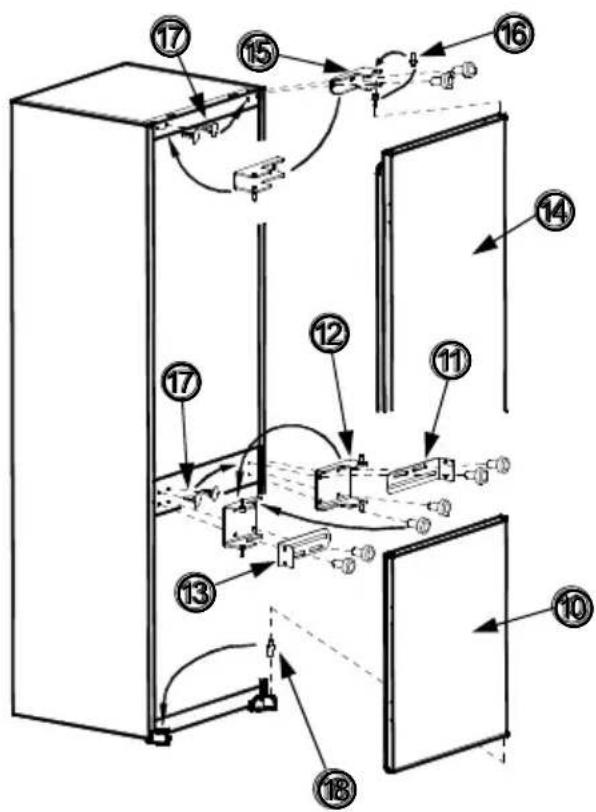
- Remove the bottom door(10) by lifting it slightly; Place the door in a safe location so it does not get damaged.
- Remove the bottom door hinge pin(18) from the bottom bracket and reposition into the opposite bracket.
- Replace the bottom door ^(10) onto the repositioned hinge pin and close the door onto the refrigerators cabinet.
- Turn over the middle door hinge(12) and fix to the bottom door and fasten the bracket with only two of the 4 screws into the top holes.
- Attach the cabinet fixing bracket to the remaining two holes through the middle hinge and fasten. Replace the hole blanking plugs ^(17) into the remaining holes.
- Fasten the opposite cabinet fixing bracket(13) to the other side using the bottom holes.
- Replace the top door onto the middle hinge and close the door onto the refrigerator cabinet.
- Insert the top hinge pin into the top door.
- Fasten the top hinge with two screws and ensure the doors close correctly and are level.
TROUBLESHOOTING:
Before calling for service please check the following points.
The freezer is not working
- Check the plug is inserted correctly into the mains outlet socket.
- Check there is power to the mains outlet socket by plugging in another appliance, if the other appliance works check the fuse in the freezer plug.
The freezer is noisy when running
- Check the freezer is level and it is not in contact with another appliance or kitchen furniture.
The freezer does not cool sufficiently
- If the door has been opened too often, or it has been left open for a while it will take time for the freezer to reach its set temperature.
- Check the airflow over the rear of the freezer has not been reduced due to insufficient clearance.
- If a large quantity of fresh food has been introduced
If there is water in the lower part of the refrigerator:
Check if:
- The drain hole at the back of the refrigerator is blocked use the defrost drain plug to unblock the hole.
If your appliance is not cooling enough:
Your appliance is designed to operate in the am rating label according to the climate class of the your appliance outside of the correct operating Please check on the rating label for which climate
bient temperature range as stated on the product. We do not recommend operating range as stated in this instruction book. class your appliance uses.
| Climate class Ambient temperature ( °C) |
| T Between 16 and 43 ( °C) |
| ST Between 16 and 38 ( °C) |
| N Between 16 and 32 ( °C) |
| SN Between 10 and 32 ( °C) |
If you are still having problems with your app instructions then please contact the store from assistance.
ance although you have followed thesewhere you purchased your appliance for
Do and Do Not's:
Do- Clean and defrost your appliance regularly (See "Defrosting")
Do- Check contents of the compartments every so often.
Do- Store commercially prepared food in accordance with the instructions given on the packets.
Do- Choose high quality fresh food and be sure it is thoroughly clean before freezing it.
Do- Wrap all food in food quality polythene bags or air tight containers and make sure any air is excluded.
Do Not- Store poisonous or any dangerous substances in your freezer. It has been designed for the freezing of edible foodstuffs only.
Do Not- Consume food which has been frozen for an excessive length of time.
Do Not- Leave the door open for long periods, as this will make the appliance more costly to run and cause excessive ice formation.
Do Not- Use sharp objects such as knives to remove the ice from the appliance. Only use a plastic scraper
Do Not- Put hot food into the appliance. Let it cool down to room temperature.
Do Not- Put liquid-filled bottles or sealed cans containing carbonated liquids into the freezer as they may burst.
Do Not- Give children ice-cream and water ices direct from the freezer as the low temperature may cause 'freeze burns' on the lips.
Do Not- Try to keep frozen food which has thawed; it should be eaten within 24 hours or cooked and re-frozen.
TECHNICAL DATA
| Brand | PROLINE |
| Appliance type Fridge-Freezer | |
| Star rating | *** |
| Net Freezer volume (L.) | 75L |
| Net Fridge volume (L.) | 189L |
| Freezing capacity (kg/24h) | 5kg |
| Climate Class +Ambient Range | N (+16°C to +32°C) |
| Energy class (1) | A |
| Gross weight (kg) 56 | |
| Power consumption (kWh/year) (2) | 343 |
| Supply voltage (V/Hz) | 220-240V / 50Hz |
| Light Power (Watts) | 15W |
| Noise [dB(A)re 1 pW] | 41dB |
| Refrigerating agent | R600a / 75g |
| Outside dimensions (W x D x H) | 1770 x 540 x 545 |
| Insulation Blowing Gas | Cyclo pentane |
| (1) Energy class: A....G (A= economical G=less economical) | |
| (2) The real power consumption depends on using conditions and appliance location. | |

TEMPERATURE INDICATOR
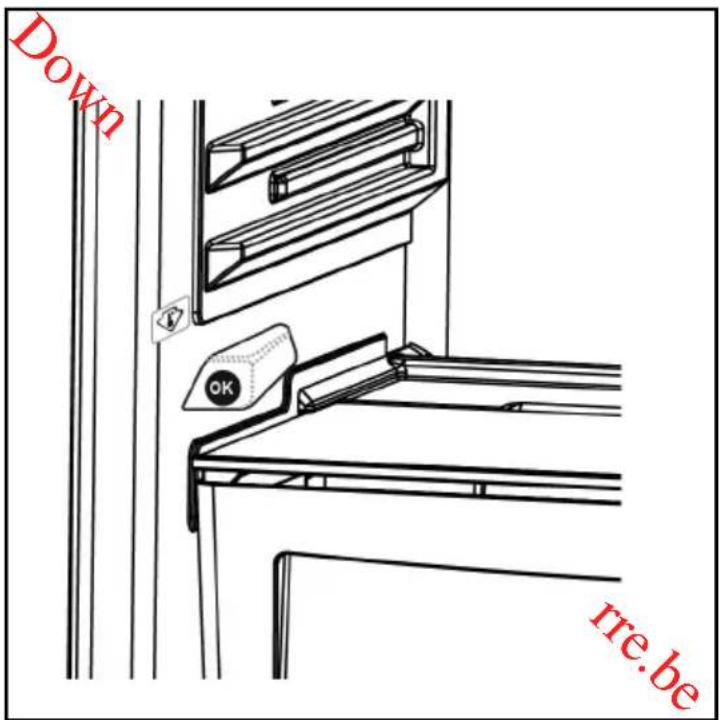
In order to help you better set your refrigerator, we have equipped it with a temperature indicator located in the coldest area.
To better store the food in your refrigerator, especially in the coldest area, make sure the message "OK" appears on the temperature indicator. If « OK » does not appear, this means that the temperature setting has not been done properly.
Since "OK" appears in black, it will be difficult to see this indication if the temperature indicator is badly lit. To be able to see this indication properly, there should be enough light. Each time the temperature setting device is changed, wait for the stabilisation of the temperature inside the appliance before proceeding, if necessary, with a new temperature setting. Please change the position of the temperature setting device progressively and wait at least 12 hours before starting a new check and potential change.
NOTE: Following repeated openings (or prolonged opening) of the door or after putting fresh food into the appliance, it is normal for the indication "OK" not to appear in the temperature setting indicator. If there is an abnormal ice crystals build up (bottom wall of the appliance) on the refrigerator compartment evaporator (overloaded appliance, high room temperature, frequent door openings), put the temperature setting device on a lower position until compressor off periods are obtained again.

Putting food in the coldest area of the refrigerator
Your foods will be better stored if you put them in the most appropriate cooling area. The coldest area is just above the crisper.
The following symbol indicates the coldest area of your refrigerator.
To be sure to have a low temperature in this area, make sure the shelf is located at the level of this symbol, as shown in the illustration.
The upper limit of the coldest area is indicated by the lower side of the sticker (head of the arrow). The coldest area upper shelf must be at the same level with the arrow head. The coldest area is below this level.
As these shelves are removable, make sure they are always at the same level with these zone limits described on the stickers, in order to guarantee temperatures in this area.
Each type of food has an ideal conservation temperature and consequently a particular location to follow.
| Locations Products |
| Upper shelves Cooking foods, desserts and all foods to be eaten fast enough. |
| Meal, poultry, game and raw fish Maximum conservation time: 1 to 2 days. Fresh fruits, cooked pork meat. |
| Crisper Fresh vegetables and fruits. |
| Door trays shall contain bottles at the bottom side, in their upper parts, low volume and currently used products like yoghurt, fresh cream, etc. |
| Butter, cooked cheese and eggs shall be introduced in appropriate holders. |
Waste electrical and electronic products must not be disposed of with household waste. Please refer to the retailer from whom you purchased this item for disposal instructions.
Sommaire
PARTIES DE L'APPAREIL ET COMPARTIMENTS 21
INSTRUCTIONS DE MONTAGE 22
CONSIGNES DE SECURITÉ 26
INFORMATIONS IMPORTANTES 27
MISEAU REBUT 27
PANNEAU DE CONTRÔLÉ DE LA TEMPERATURE DU THERMOSTAT ...28
COMMENT UTILISER L'APPAREIL 28
RÉGLAGE DU THERMOSTAT 28
INDICATEUR D'ALARME ROUGE 28
INDICATEUR VERT D'ALIMENTATION SECTEUR 28
COMMUTATEUR DE TEMPERATURE AMBIANTE BASSE 28
INDICATEUR ORANGE DE TEMPERATURE AMBIANTE BASSE ALLUME 29
BRUIT DE VOTRE APPAREIL 29
COURS POUR LES ALIMENTS SURGELES 29
CONSERVATION DE DENRÉES FRAICHES DANS LE REFRIGÉRATEUR ......29
CONSERVATION D'ALIMENTS SURGELES 30
COMMENT DEGIVRER LES ALIMENTS SURGELES 30
DEGIVRAGE DES LEGUMES SURGELES 30
CONSERVATION D'ALIMENTS SURGELES 30
SURGELATION D'ALIMENTS FRAIS 30
DEGIVRAGE 31
THERMOSTAAT INSTELLING:
GROENE STROOM AAN INDICATOR:
RUIS VAN UW APPARAAT:
Koelkast compartment: