HTC 2225D - Television XORO - Free user manual and instructions
Find the device manual for free HTC 2225D XORO in PDF.



| Product Type | LCD TV with integrated DVD player |
| Screen Size | 22 inches (diagonal) |
| Native Resolution | 1680 x 1050 pixels |
| Power Supply | 200-240 V AC, 50/60 Hz |
| Power Consumption | Approx. 35 W |
| Dimensions (approx.) | 50 x 30 x 5 cm (without stand) |
| Weight (approx.) | 3 kg |
| Connections | HDMI, VGA, SCART, S-Video, CVBS, stereo audio inputs (RCA), headphone jack, RF antenna input |
| Tuner | DTT (DVB-T) and analog |
| DVD Player | Slot-in, compatible with MPEG-1/2/4 |
| Main Functions | Teletext, EPG, parental control, sleep timer, automatic channel search |
| Safety | Do not open the casing, unplug if unused for a long time, minimum ventilation distance 5 cm |
| Care and Cleaning | Soft, dry cloth, no solvents |
| Package Contents | TV, remote control, batteries, user manual, warranty card |
Frequently Asked Questions - HTC 2225D XORO
User questions about HTC 2225D XORO
0 question about this device. Answer the ones you know or ask your own.
Ask a new question about this device
Download the instructions for your Television in PDF format for free! Find your manual HTC 2225D - XORO and take your electronic device back in hand. On this page are published all the documents necessary for the use of your device. HTC 2225D by XORO.
USER MANUAL HTC 2225D XORO
FREE TO CHOOSE INNOVATIONS
XORO®
LCD TV with DVD + DVB + HDMI
HTC 1525D (without HDMI)
HTC 1925D
HTC 2225D
natural_image
Illustration of a desktop computer monitor with a CD, enclosed in a curved black border (no text or symbols)OPERATION MANUAL BEDIENUNGSANLEITUNG MODE D'EMPLOI MANUAL DE OPERACIÓN


natural_image
Abstract black background with three white rounded rectangles and two small squares below, no text or symbols present.natural_image
Diagram of a remote control panel showing internal battery structure and external casing (no text or symbols)Farbeinstellung (Colour Setting)
Farbeinstellung (Color Setting)
Programmeinstellung
Programmsuche (Channel Search)
Programm (Channel No.)
Sperren & Entsperren (Lock & Unlock)
Favoritenliste
Systemeinstellungen
Zeitzone (Time Zone)
Systemeinstellungen
Spracheinstellungen (Language Setting)
Audio Sprache
TV Format (TV Shape)
Sättigung (Saturation)
Timer Liste (Booking List)
Signal Information

DVB-T Modus
FERNSEHTEXT (TELETEXT)
VSS (Virtual Surround Sound)
U.S. Patens Nos. 4,631,603; 4,577,216; 4,819,098; 4,907,093; 5,315,448 and 6,516,132
"This product incorporates copyright protection technology that is protected by U.S. patents and other intellectual property rights. Use of this copyright protection technology must be authorized by Macrovision, and is intended for home and other limited viewing uses only unless otherwise authorized by Macrovision. Reverse engineering or disassembly is prohibited."
Spezifikationen
To ensure reliable and safe operation of this equipment, please read carefully all the Instructions in this user guide, especially the safety information below.
Electrical safety
- The TV set should only be connected to a mains supply which matches that stated on the label on the mains adapter.
- To prevent overload, don't share the same mains supply socket with too many other items of equipment.
- Be careful to route the mains power cable away from areas where people can trip over it.
- Be sure to hold the plug-not the set is not to be used for a long time, Disconnect both the aerial and the mains power cable.
• Take care not to expose the set or the remote control to water or moisture. -
Pull the plug out immediately, and seek professional help if:
-
the mains plug or cable is damaged
- liquid is spilt onto the set, or if it is accidentally exposed to water or moisture
- anything accidentally penetrates the ventilation slots
- the set doesn't work normally.
- Never remove the cover, there are No user-serviceable parts inside.
Allow only qualified service personnel to repair this equipment.
• To avoid leakage, take out the remote control batteries when:
- the batteries are exhausted
- you are not going to use the remote control for a long time.
- Dispose of the batteries properly-do not put them into a fire.
Physical safety
- Make sure the set is positioned at 5cm (2 inch) from the wall or furniture.
- Never tap or shake the screen for any reason.
• Take care not to drop or sit on the remote control. - Clean the set using only a soft, clean, dry cloth. Do not use any solvents.
Contents
Safety information
Electrical safety....1
Physical safety....1
In the box....3
Features....3
Connection
Rear connection panel....4
Right Side 4
Connecting up....5
The Remote Control
Insert Battery 8
Operation range....8
Buttons....9
LCD Menus
Using the menus....11
The Video menu 11
The PC menu 12
The HDMI menu 13
The Audio menu 14
The TV menu....14
The General menu....15
Troubleshooting for LCD 16
DVB-T Mode
Getting into DVB-T mode 17
First time installation (Channel Setting)....17
Channel List....18
Favorite List....20
System Settings....20
EPG 23
Teletext....24
Troubleshooting for DVB-T....25
DVD Player
Getting into DVD mode....27
Insert a Disc....27
Functions....27
MPEG-1, MPEG-2 and MPEG-4 videos....31
System Setup 33
Troubleshooting....38
Specifications 40
Following accessories should be in the box:
• HTC 1525D/HTC1925D/HTC 2225D LCD-TV
- Remote Control with Battery
- Manual
- Main adapter
- Wire for the main adapter
- Warranty card
If any of the accessories are missing, then contact your dealer as soon as possible. Keep all the original packaging in case you need to return the set to the dealer.
Features
• High quality display
- Many Connections: VGA, RF, Video, S-VIDEO, SCART and HDMI
• HDMI Supports up to 1080i input resolutions (only HTC 1925D and HTC 2225D)
- Stereo audio inputs
• Integrated analog TV Tuner
- Integrated digital terrestrial TV Tuner (DVB-T)
• Automatic or manual channel search
• Auto-shutdown to save power when no signal input
• DVD-Player inside with Slot-in technology
Note:
The HTC 1525D has no HDMI interface.
Connection
Rear Connection Panel

| Name | Function | Descrit |
| DC In | Connect to Power Adapter | |
| HDMI | HDMI input (only for HTC 1925D and HTC 2225D) | |
| VGA | VGA signal of computer input | |
| SCART | Euro AV (Audio/Video) input | |
| S-video | S-video input | |
| Video | Video signal input | |
| AUDIO IN L / R | Audio signal input for Video and S-Video | |
| PC Audio | Audio signal of computer input | |
| PHONE | Headphone | |
| RF | Connect to cable or air |
ption
Note:
The HTC 1525D has no HDMI interface.
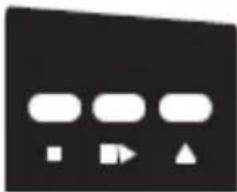
Buttons on the right side
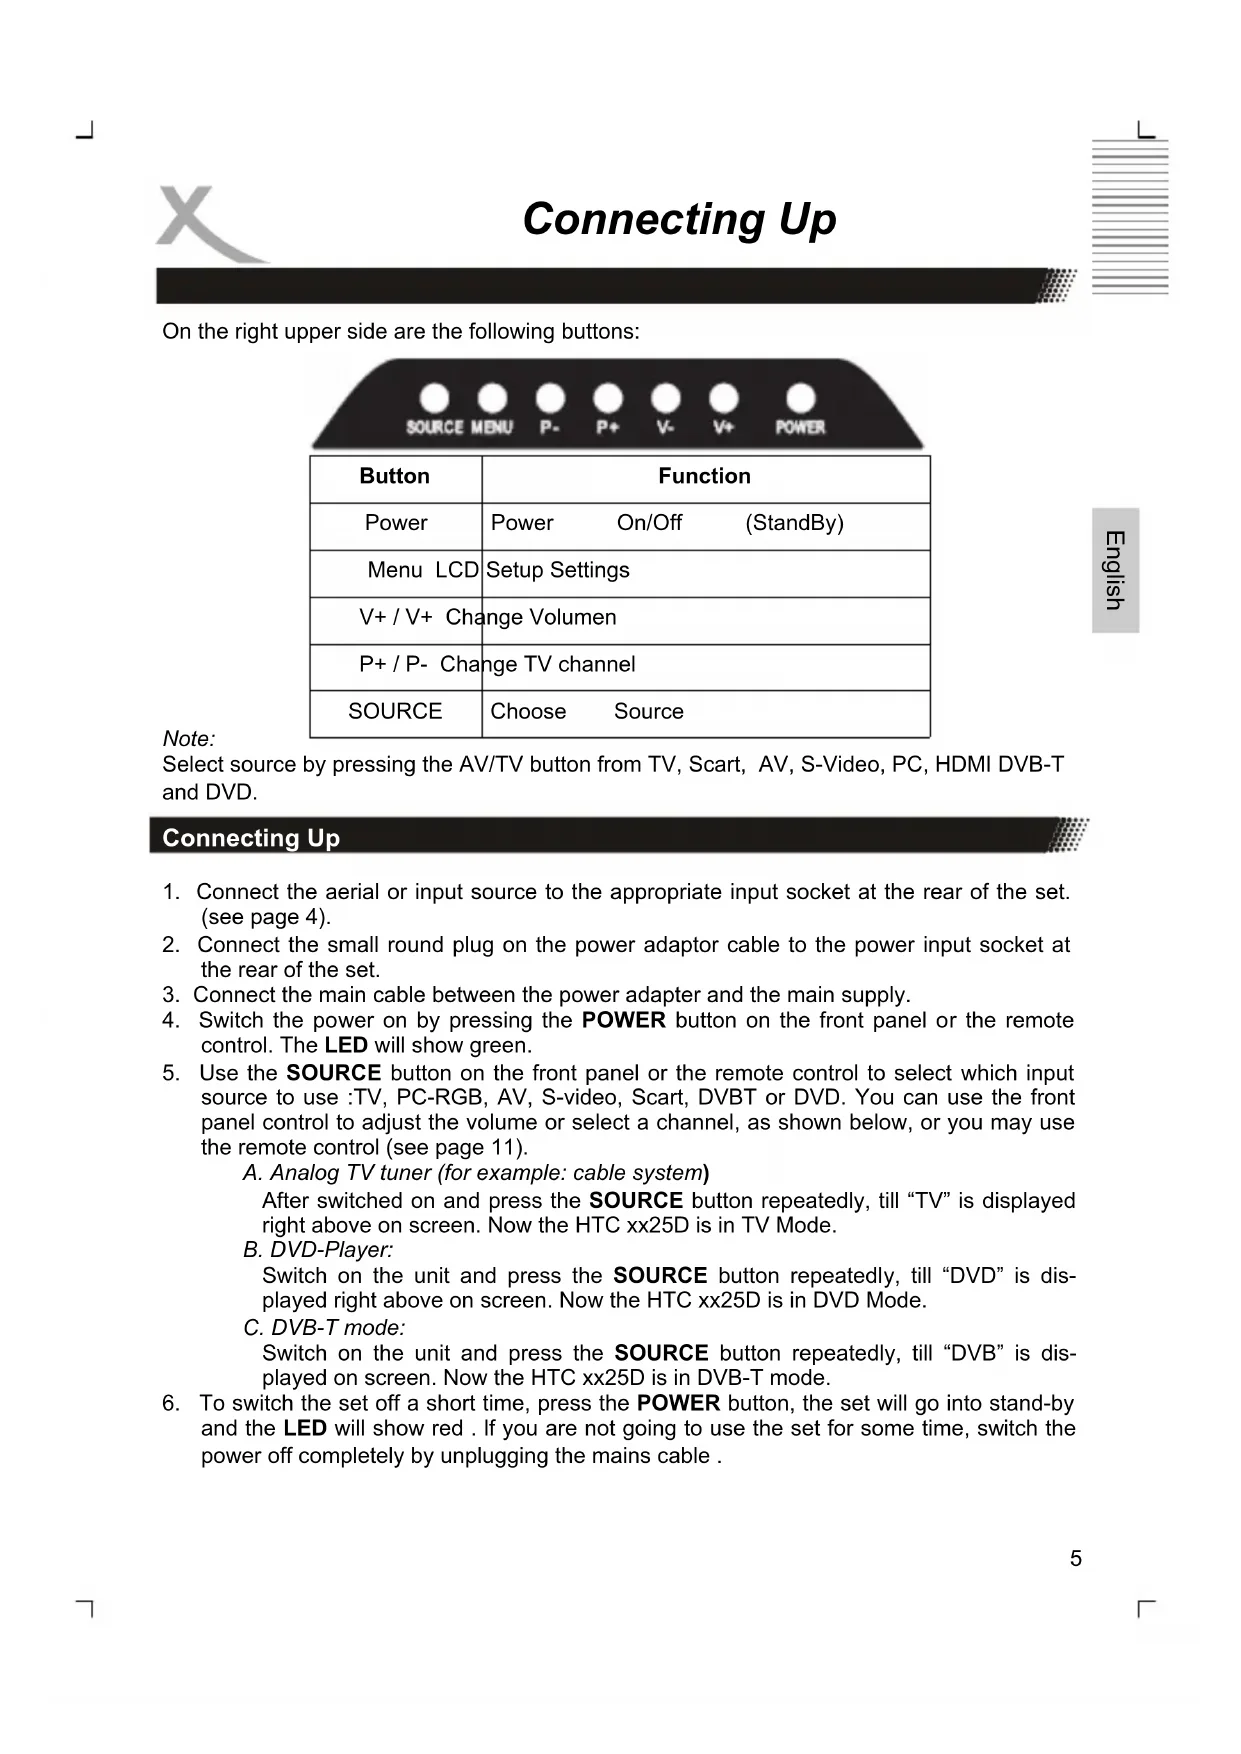
On the right bottom side are the following buttons:
| Button | Function |
| Close the loader | |
| >|| Play / | Pause |
| DVD DVD | Slot-in loader |
natural_image
Abstract black-and-white graphic with three white rounded rectangles and two small squares, no text or symbols present.On the right upper side are the following buttons:
| SOURCE MENU P- P+ V- V+ POWER | |
| Button | Function |
| Power | Power On/Off (StandBy) |
| Menu LCD | Setup Settings |
| V+ / V+ Change Volumen | |
| P+ / P- Change TV channel | |
| SOURCE | Choose Source |
Note:
Select source by pressing the AV/TV button from TV, Scart, AV, S-Video, PC, HDMI DVB-T and DVD.
Connecting Up
-
Connect the aerial or input source to the appropriate input socket at the rear of the set. (see page 4).
-
Connect the small round plug on the power adaptor cable to the power input socket at the rear of the set.
-
Connect the main cable between the power adapter and the main supply.
-
Switch the power on by pressing the POWER button on the front panel or the remote control. The LED will show green.
-
Use the SOURCE button on the front panel or the remote control to select which input source to use :TV, PC-RGB, AV, S-video, Scart, DVBT or DVD. You can use the front panel control to adjust the volume or select a channel, as shown below, or you may use the remote control (see page 11).
A. Analog TV tuner (for example: cable system)
After switched on and press the SOURCE button repeatedly, till "TV" is displayed right above on screen. Now the HTC xx25D is in TV Mode.
B. DVD-Player:
Switch on the unit and press the SOURCE button repeatedly, till "DVD" is displayed right above on screen. Now the HTC xx25D is in DVD Mode.
C. DVB-T mode:
Switch on the unit and press the SOURCE button repeatedly, till "DVB" is displayed on screen. Now the HTC xx25D is in DVB-T mode.
- To switch the set off a short time, press the POWER button, the set will go into stand-by and the LED will show red. If you are not going to use the set for some time, switch the power off completely by unplugging the mains cable.
Connection
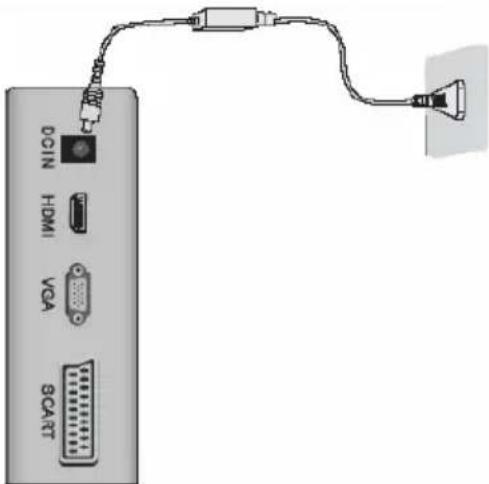
Power connection
Connect the AC/DC power adapter with the DC IN input of the HTC TV set. After than, please connect the power cable with the wall mounted power outlet.
On the front side you can see a red LED light. The HTC TV set is now in Stand-By mode. By pressing the POWER button on the remote control or on the top side of the device the red LED changes to a green light.
Antenna
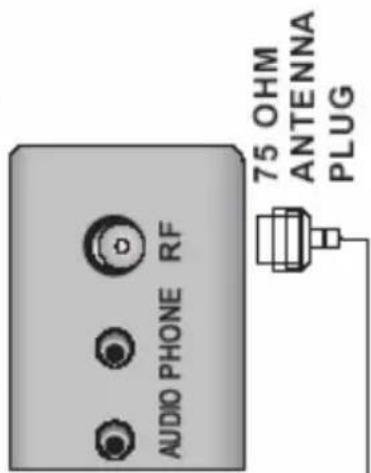
The HTC TV set has an analogue and a digital TV Tuner inside. For receiving analogue TV signals please connect the antenna cable with the RF connector on the HTC TV set and with the VHF/UHF roof antenna or with a CATV antenna plug.
For receiving digital terrestrial TV signals please connect the HTC TV set with the RF plug and also with the roof antenna. If no roof antenna is available, please use indoor aerial.
For activating the analogue TV Tuner, please switch with the Source button to „TV“. For viewing DVB-T, please change with the SOURCE button to „DVB“.
Note:
For getting the best DVB-T reception please uses the roof antenna. If not possible, than you can connect the HTC TV set with an active indoor aerial.
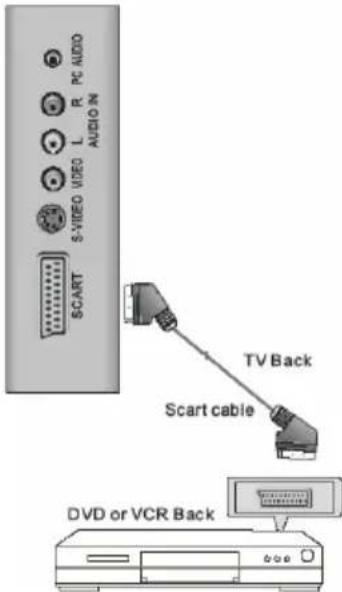
SCART Input
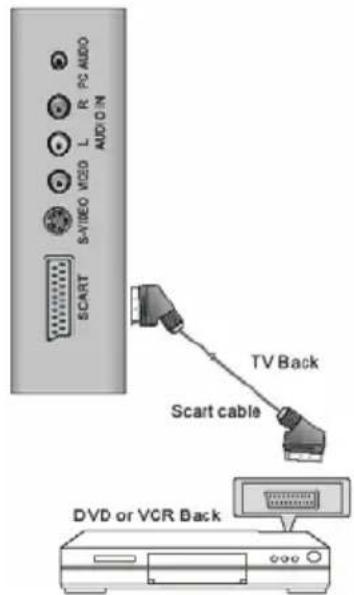
Audio- and Video signals from a VCR or a setup box can be transmitted by SCART. Please connect a SCART cable with the SCART input on the HTC TV set and with the SCART output on the VCR or setup box.
Press the SOURCE button again until „SCART“ appears on the screen and the SCART interface is activated.
CVBS Video- and Stereo Audio input
If you uses more than one multimedia terminals and the SCART, HDMI and S-Video connection are used, than you connect the next device by the audio/video component input. Please connect the yellow wire of an 3-pin component cable with the VIDEO input of the HTC TV set and the multimedia device. With this kind of connection only video signals are transmitted. For listening sound on the TV you should establish also a sound connection.
Please connect the white and red wire of the 3-pin component cable with the AUDIO IN L / R and the correspondent audio out on the multimedia device.
Please press the SOURCE button until „AV“ appears on the screen and the AV input is active.
If you uses more than one multimedia terminals and the SCART, HDMI and AV connection are used, than you connect the next device by the S-Video. Please connect the S-Video cable with the S-VIDEO input of the HTC TV set and with the S-Video output of the multimedia device. With this kind of connection only video signals are transmitted. For listening sound on the TV you should establish also a sound connection.
Please connect the white and red wire of the 2-pin cable with the AUDIO IN L / R and the correspondent audio out on the multimedia device.
Please press the SOURCE button until „S-Video“ appears on the screen and the S-Video input is active.
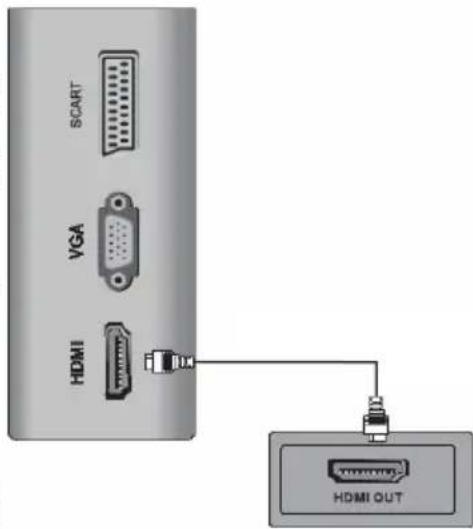
HDMI
If you want connect a multimedia device with HDMI like a game console „PS3“ or a setup box with the HTC TV set, you can establish a HDMI connection. Please connect the HDMI cable on the HDMI interface on the HTC TV set and the HDMI output of the multimedia device.
Please press the SOURCE button until „HDMI“ appears on the screen and the HDMI input is active.
VGA
You can use the HTC TV set as a PC monitor by using the VGA interface. Please connect a VGA cable with the VGA input of the HTC TV set and with the PC.
Please press the SOURCE button until „PC-VGA“ appears on the screen and the PC-VGA input is active.
Notes:
- Before you connect the HTC TV set with the PC, please change the graphic resolution of the PC to: 640 x 480, 800 x 600 or 1024 x 768.
- Please establish the connection and switch to "PC-VGA" input.
- For displaying the best results, please uses the native resolution of the TV LCD panel:
• HTC 1525d —> 1280 x 800 Pixel
• HTC 1925d —> 1440 x 900 Pixel
- HTC 2225d —> 1680 x 1050 Pixel
Remote Control
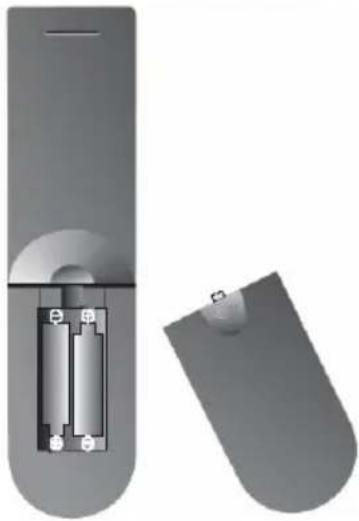
Insert battery into the remote control
Insert the batteries in the remote control:
- Open the cover.
- Insert the batteries. Make sure to match - and +.
- Close the cover
natural_image
Diagram of a remote control panel showing internal components and casing (no text or symbols)Notes on batteries: Improper use may cause battery leakage and corrosion.
Please follow the instructions below:
- Do not insert the batteries in the wrong direction
- Do not use different types of batteries together
- If you do not use the remote control for a long time, remove the batteries
- If the remote control operates not correctly, replace the batteries
- If battery leakage occurs, wipe the battery liquid from the battery compartment, then insert new batteries
- Make sure that the used batteries are disposed properly according to you local regulations.
Operation range
Point the remote control at the IR:
- Within about 5 m with angle about 30 grade in both direction.
Notes:
• Do not expose the IR of the device to a strong light source or direct sunlight.
- Direct the remote control at the infrared receiver (IR) of the player
- Do not drop the remote control.
- Do not spill water or put anything wet on it.
- Do not disassemble the remote control.
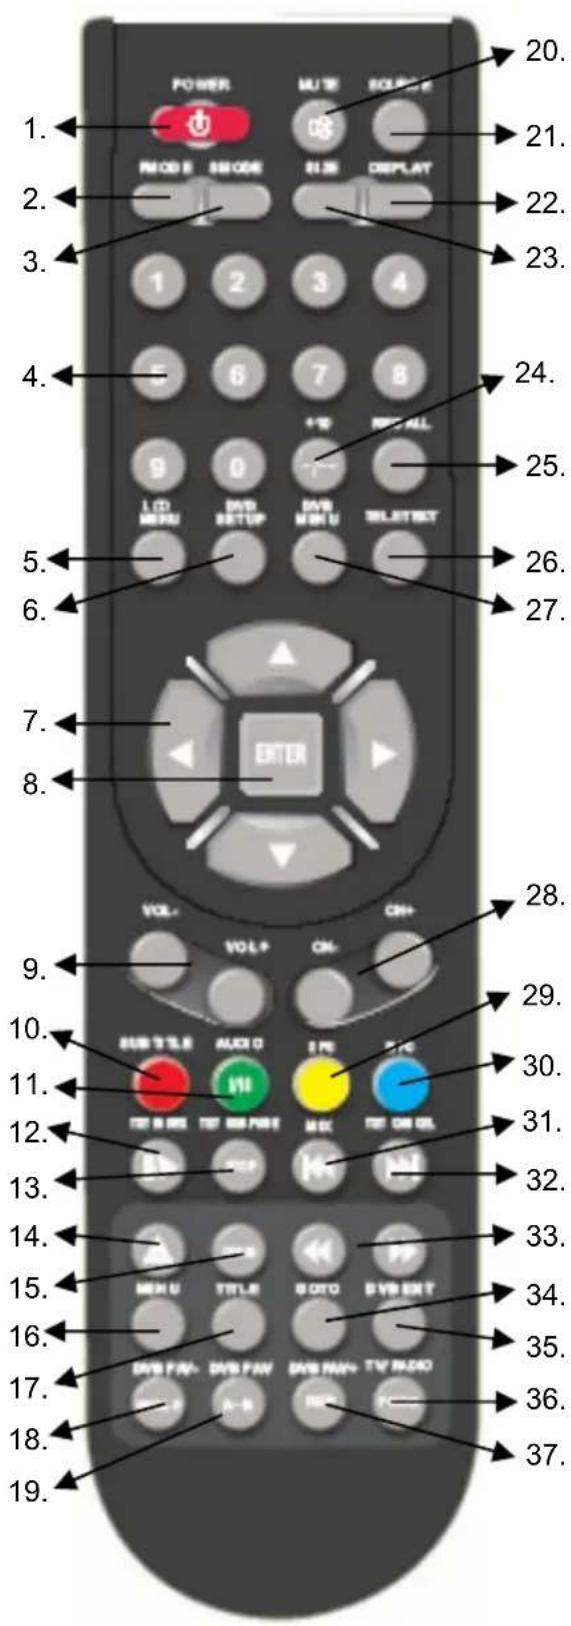
Buttons of the remote control:
ATV: Analogue TV Tuner
DVB-T: Digital TV Tuner
DVD: DVD Player
-
POWER button
-
Picture mode (PMODE)
-
Sound mode (SMODE)
-
Numeric buttons (0—9)
-
LCD settings (LCD MENU)
-
DVD settings (DVD SETUP)
-
Navigation cross
-
ENTER button
-
Volume (Vol- / Vol+)
-
ATV: Red Teletext button; DVB-T: Red Teletext button and subtitle; DVD: subtitle button
-
ATV: Green Teletext button and NICAM; DVB-T: Green Teletext and Audio button; DVD: Audio button
-
ATV: Teletext Index button; DVD: Play / Pause
-
ATV: Teletext sub page button; DVD: Stop
-
DVD: Open / Close
-
DVD: Zoom
-
DVD: Video DVD Menu
-
DVD: Video DVD Title menu
-
DVB-T: Favorite -; DVD: Angle
-
DVB-T: Favorites; DVD: A-B Segment Playback
-
MUTE button
-
SOURCE button
-
Aspect Ratio LCD 4:3 / 16:9 (SIZE)
-
Source information (Display)
-
One or two digits of channel numbers (-/—)
-
Last TV channel (RECALL)
-
Teletext in ATV and DVB-T
-
DVB-T settings (DVB MENU)
More button description on the next page.
English
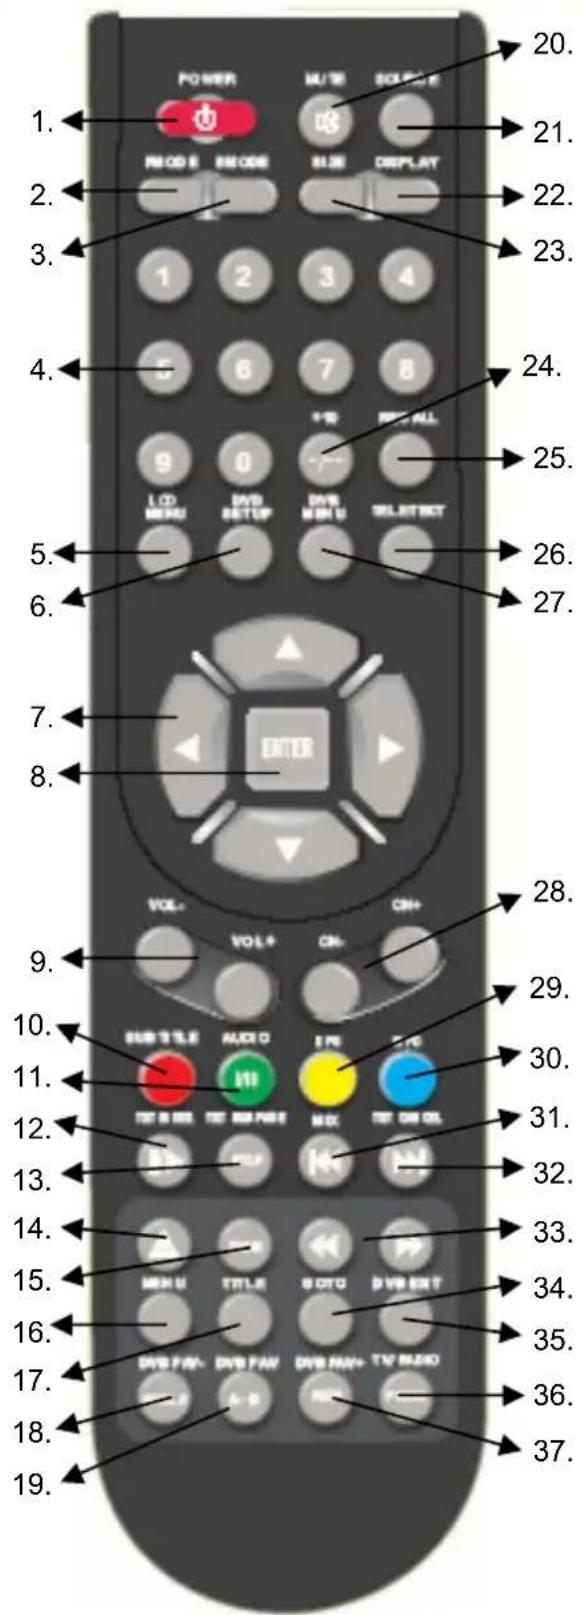
Buttons of the remote control:
ATV: Analogue TV Tuner
DVB-T: Digital TV Tuner
DVD: DVD Player
- Channel ATV und DVB-T (CH-/CH+)
- ATV: Yellow Teletext button; DVB-T: EPG and yellow Teletext button
- ATV: Blue Teletext button; DVB-T: Information and blue Teletext button; DVD: Information
- ATV: Teletext Mix displaying; DVD: Previous chapter / track
- ATV: Teletext exit; DVD: Next chapter / Track
- DVD: Fast back- or Forward (<< / >>)
- DVD: GOTO button
- DVB-T: Exit of DVB-T settings
- DVB-T: Switch to TV and Radio channels
- DVB-T: Favorites +; DVD: Program
For all the buttons mentioned below, you can use those on the front panel, or you can use those on the remote control. To see the menus, press the LCD MENU button. The first will show either:
• the VIDEO menu, if the set is switched to TV, AV, S-video, SCART, DVB-T, DVD
• the PC menu, if the set is switched to PC
• The HDMI menu, if the set is switched to HDMI
Press the MENU button again, to see the other menus:
• another press to see the AUDIO menu
• another press to see the TV menu (only when switched to TV)
• another press to see the GENERAL menu
- another press to see the menus off.
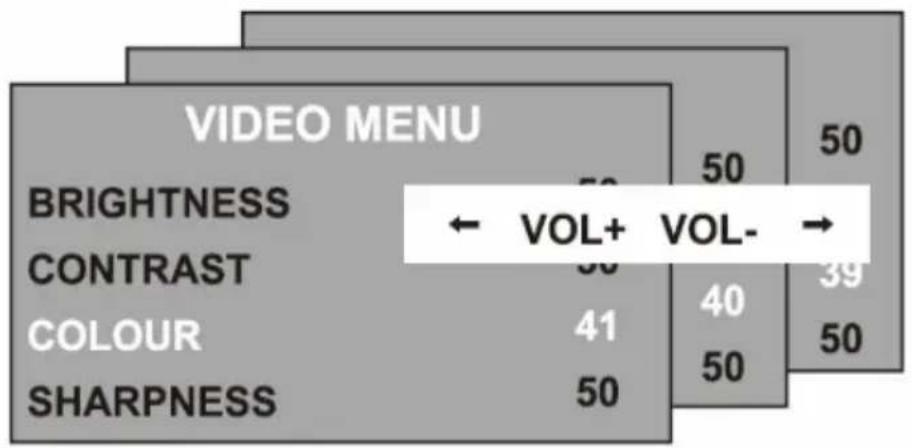
To select a menu item, for example COLOUR, press the CH+ and CH- buttons to
• scroll up and down the list.
- When a menu item is highlighted, use the VOL+ or VOL-buttons to change the setting.
CH+↑
CH- ↓
other
VIDEO MENU | Category | Value | |---|---| | BRIGHTNESS | 50 | | CONTRAST | 50 | | COLOUR | 41 | | SHARPNESS | 50 | ← VOL+ VOL- → 39 50When you have changed the settings, you can exit from the menu:
• by waiting fifteen seconds without pressing any buttons,
- by pressing the LCD MENU button few times until the menus turn off.
Video Menu
The first press of the LCD MENU button will show the VIDEO menu, if the set is switched to TV, AV, S-Video, SCART, DVB-T, DVD. In this menu it is possible to change brightness, contrast, colour and the sharpness.
Brightness
Use the VOL+ or VOL- buttons to adjust the brightness of the picture.
Contrast
Use the VOL+ or VOL- buttons to adjust the contrast of the picture.
Colour
Use the VOL+ or VOL- buttons to adjust the colour of the picture.
Sharpness
Use the VOL+ or VOL- buttons to adjust the sharpness of the picture.
| VIDEO MENU | |
| BRIGHTNESS | 50 |
| CONTRAST | 50 |
| COLOUR | 40 |
| SHARPNESS | 50 |
PC Menu
If the LCD is connected by VGA to a personal computer (PC) or to a device with VGA output, so by pressing the LCD MENU button the PC-Menu starts up.
Brightness
Use the VOL+ or VOL- buttons to adjust the brightness of the picture.
Contrast
Use the VOL+ or VOL- buttons to adjust the contrast of the picture.
Color setting
Use the VOL+ or VOL- buttons to select from 6500k, 9300k or USER.
If you select USER, you can use the VOL+ or VOL- buttons to adjust the RED.
Green and blue values individually. Press
MENU button when you have finished adjusting.
Auto configure
Press the VOL+ button to have the following settings configured automatically.
| PC MENU | |
| BRIGHTNESS | 50 |
| CONTRAST | 50 |
| COLOUR SETTING | USER |
| AUTO CONFIG | → |
| H.POSITION | 0 |
| V.POSITION | 0 |
| PHASE | 0 |
| CLOCK | 0 |
PC Menu
Horizontal and vertical position
Use the VOL+ or VOL- buttons to adjust the position of the picture on the screen.
Phase
Use VOL+ or VOL- buttons to adjust the phase of the ADC sampling clock relative to the H-sync signal, until a stable image is obtained.
Clock
Use the VOL+ or VOL- buttons to adjust the pixel clock frequency, until the image size is maximized for the screen.
HDMI Menu
If the LCD is connected by HDMI to a personal computer (PC) or to a device with HDMI output, so by pressing the LCD MENU button the PC-Menu starts up.
Brightness
Use the VOL+ or VOL- buttons to adjust the brightness of the picture.
Contrast
Use the VOL+ or VOL- buttons to adjust the contrast of the picture.
Color setting
Use the VOL+ or VOL- buttons to select from 6500k, 9300k or USER.
If you select USER, you can use the VOL+ or VOL- buttons to adjust the RED.
Green and blue values individually. Press MENU button when you have finished adjusting.
| HDMI MENU | |
| BRIGHTNESS | 50 |
| CONTRAST | 50 |
| COLOUR SETTING | USER |
| AUTO CONFIG | → |
| H.POSITON | 0 |
| V.POSITON | 0 |
Auto configure
Press the VOL+ button to have the following settings configured automatically
Horizontal and vertical position
Use the VOL+ or VOL- buttons to adjust the position of the picture on the screen.
Audio Menu
Press the LCD MENU button again to see the AUDIO menu.
Volume
Use the VOL+ or VOL- buttons to adjust the volume of the sound.
Balance
Use the VOL+ or VOL- buttons to adjust the left/right balance of the sound.
Audio preset
Use the VOL+ or VOL- buttons to select from PERSONAL, VOICE, MUSIC or THEATRE.
If you select personal, you can adjust the following settings.
AUDIO MENU
| VOLUME | 20 |
| BALANCE | 50 |
| AUDIO PRESET | PERSONAL |
| TREBLE | 50 |
| BASS | 50 |
Treble and bass
Use the VOL+ or VOL- buttons to adjust the tone of the sound.
TV Menu
Press the LD MENU button again, to see the TV menu (only if switched to TV).
Channel
Use the VOL+ or VOL- buttons to select a channel.
System
Use the VOL+ or VOL- buttons to select from DK, BG I or L TV display systems.
Skip
Use the VOL+ or VOL- buttons to turn the channel ship:
- ON – this channel will be shipped when changing channel using the CH buttons.
- OFF - this channel will be included when changing channel using the CH buttons.
AFC
Automatic frequency control. Use the VOL+ or VOL- buttons to turn AFC On or OFF.
| TV MENU | |
| CHANNEL | 0 |
| SYSTEM | DK |
| SKIP | OFF |
| AFC | ON |
| FINE TUNE | 487.25MHz |
| SWAP | → |
| MANUAL SEARCH | → |
| AUTO SEARCH | → |
Fine Tune
Use the VOL+ or VOL- buttons to fine tune the frequency if you are having Press with a week signal on the current channel. The AFC will turn off if you use the fine Tune controls.
TV Menu
SWAP
Press the VOL+ buttons to enter the SWAP menu, press the VOL+/- button to select the channel that you want the program to be put in "FROM" menu, then press the CH- button to go to the "TO" menu, press the VOL+/-button to select the channel Whose program you want, press the VOL+/-button to confirm if "SWAP" menu.
Manual search
Press the VOL+ button once, then again to select from down or up
Press the MENU button to start the manual station search. When the search is finished, the first station found will be allocated to the current channel.
Auto Search
Press the VOL+ button once. Use the VOL+ or VOL- buttons to select the DK/BG/I or SE-CAM L mode then press CH+ and CH- to select yes or no, press MENU button to confirm, The automatic Station Search will start. When the searching is finished, then for example, if 12 station have been found, they will be allocated to the first 12 channel.
General Menu
Press the MENU button again to see the GENERAL menu.
Language
Use the VOL+ or VOL- buttons to select from a number of European languages.
Blue Screen
Use the VOL+ or VOL- buttons to turn the blue screen:
- ON – The screen will turn blue when the signal strength is very poor.
- OFF – The picture and sound will be noisy when the signal is very poor.
(Use this function if reception cannot be improved, to stop the screen from turning blue screen)
Noise Reduce
Use the VOL+ or VOL- buttons to turn the noise reduction system:
• ON: to reduce noise when reception is poor
- OFF: improve picture and sound quality when reception is good.
Input Source
Use the VOL+ or VOL-buttons to select which input source to use: TV, SCART, PC-RGB, AV or S-video, DVD
Reset
Press the VOL+ button to return the set to the factory default setting.
All the setting in the VIDEO, PC and AUDIO menus, and blue screen in the GENERAL menu will be returned to be the settings shown in this user guide.
GENERAL MENU
| LANGUAGE | ENGLISH |
| BLUE SCREEN | ON |
| NOISE REDUCE | ON |
| INPUT SOURCE | TV |
| RESET | → |
Troubleshooting
Check the following guide for the possible cause of a problem before contacting service. Technical Support of Xoro/MAS:
| Problem Solution | |
| TV won't switch on | Check the mains cable is connected properly to both the mains supply and the mains adapterCheck the cable from the mains adapter is connected properly to the set.The electronic circuit may have reset. Pull the plug out, wait for 60 seconds, then plug back again. |
| No picture | Check the aerial or other input is connected properly.Check that the correct input is selected, using theSOURCEbutton or theGENERALmenu.Check the brightness and contrast settings in theVIDEOor PC menu. |
| No sound | Check that theVOLUMEisn't turned down, or theMUTEbutton pressed.Check that the audio cables are connected to the correct inputs. |
| Picture is wrong colour | Check that the correct input is selected, using the TV/AV button or theGENERALmenu. |
| The picture is unstable when used with a PC | Check that the settings in thePCmenu match the video output settings of the PC. |
| There are a few coloured spots on the screen | High resolution LCD screens often have a small number of faulty pixels.This is normal and within the bounds of our quality control checks. |
| Picture with wrong scaling | The LCD has the wrong aspect ratio. Please press theSizebutton to switch the aspect ratio from 16:9 to 4:3. |
Be sure to select the DVB source before operation. Please follow the way to switch into the DVB-T mode:
- Power on the device
- Press the AV/TV button often until a "DVB" comes on the right top side.
Enter Main Menu
Press the DVB MENU on the remote control to bring up the main menu on the screen and press it again to return to the previous menu or return to TV viewing.
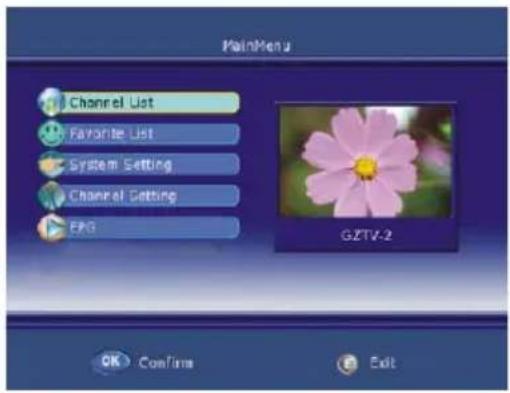
English
Adjust the OSD on screen
- Press ▲ / ▼ button select each menu.
- Press ▶ button and then use ▲ / ▼ / ◀ / ▶ button to select and adjust the available menus.
- Press DVB MENU or ◀ button to return to previous menu and press EXIT to return to TV viewing.
- Press Enter to confirm your settings
Waiting SIGNAL or NO SERVICE
Here is no signal or no service prompt.

Channel Setting
For the first time installation you should start the searching to the TV Programs. Please navi-
gates to Channel Setting and activate the Menu by pressing Enter button. Choose there the option "Channel Scan" and confirm by pressing the Enter button.
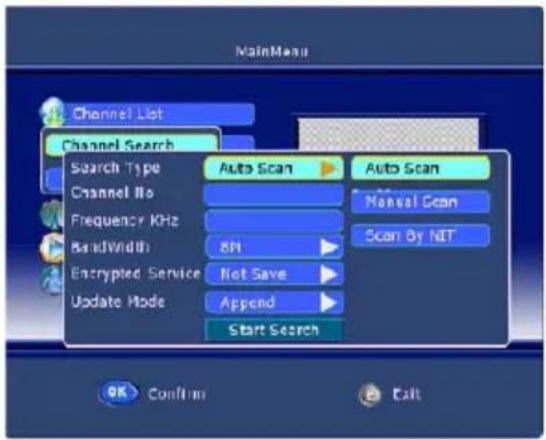
Search Type
Press ▶ and then use ▲ / ▼ to select one of the search type options: Auto Scan/ Manual Scan/ Scan By NIT. Standard setting is "AUTO Scan".
Channel No
Input the number directly to select the channel number, but the range of channel is 0 --- 69. This option is by "Auto Scan" not active.
Frequency
This function let you know the frequency accordance the channel.
Channel Setting
Band Width
Press ▶ and then use ▲ / ▼ to select one of the band width options: 6M/ 7M/ 8M.
Encrypted Service
Press ▶ and then use ▲ / ▼ to select one of the encrypted service options: Save/ Not Save.
Update Mode
Press ▶ and then use ▲ / ▼ to select one of the update mode options: Append/ Replace.
Sort Channel
Use the ▲ / ▼ to select Sort Channel item and then press Enter to confirm it
- Name UP Press Enter to rise to the channel list by name.
• Name Down Press Enter to drop the channel list by name. - Encrypt Press Enter to sort the channel list by encrypting.
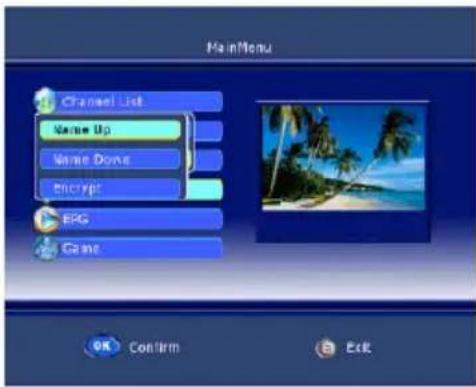
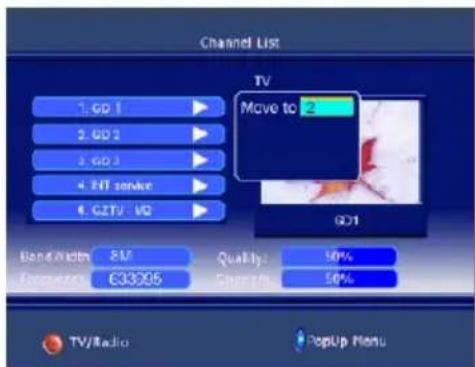
Channel List
- Press the DVB MENU on the rem to bring up the main menu on the screen and use ▲ / ▼ to select the Channel List menu.
- Press the Enter to confirm your and there will be a Channel List menu on the screen
- There is a channel list of DVB-T services in this menu, also you can see the Band Width/Quality/Frequency and Strength of the current service.
- Using the ▲ / ▼ to select channel which you like, and press ▶ that allow you to delete/ move/ Lock & Unlock it.
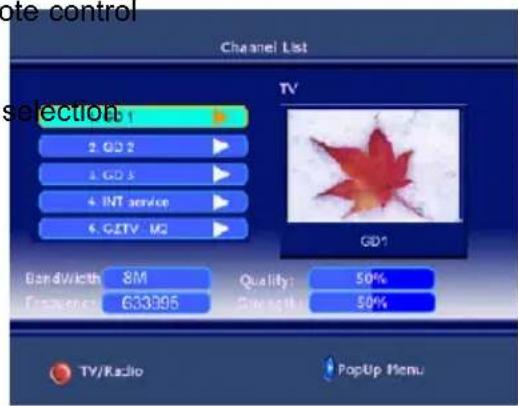
Channel List
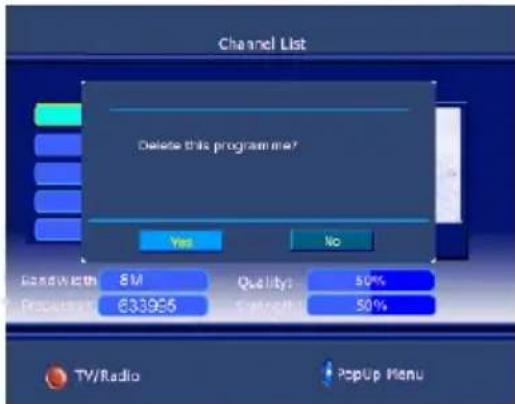
Delete
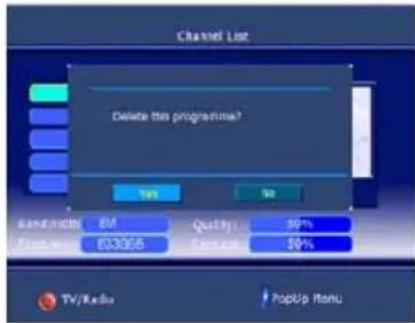
- Press ▲ / ▼ to select the delete item and press OK to confirm it. There is a delete menu on screen as below:
- Press ENTER to delete the channel and press DTV MENU to return to previous menu.
- If you want to restore the channel that have been deleted, you should search again.
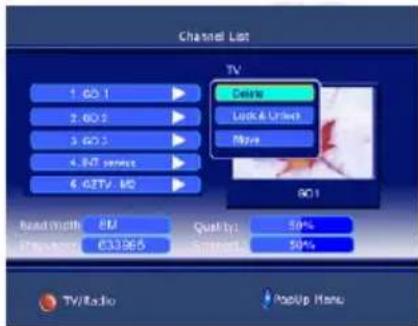
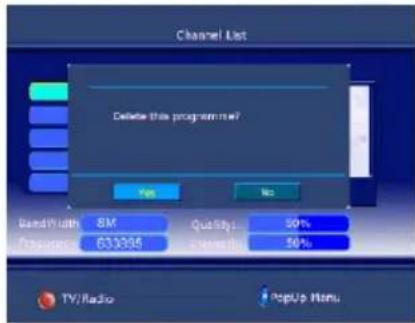
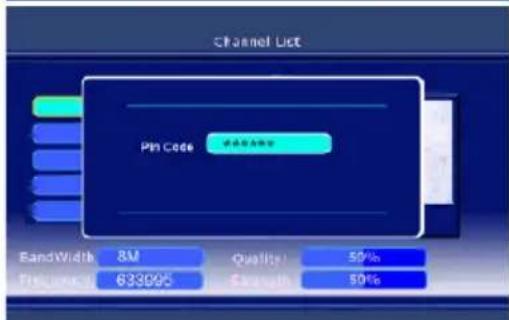
Lock & Unlock
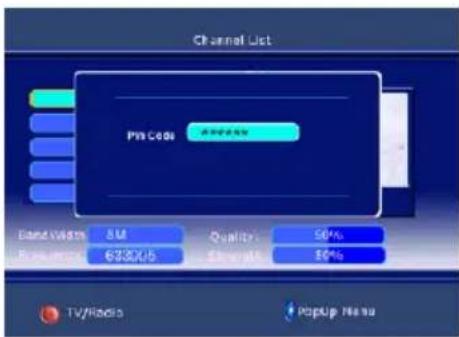
- Press ▲ / ▼ to select Lock & Unlock item and press OK to confirm it. There is a pin code menu on screen.
- Press the number buttons directly to input the pin code that is made up of six numbers and the initial is: 888888. You can change it in System Setting.
- If Lock is already set, enter the pin code as requested.
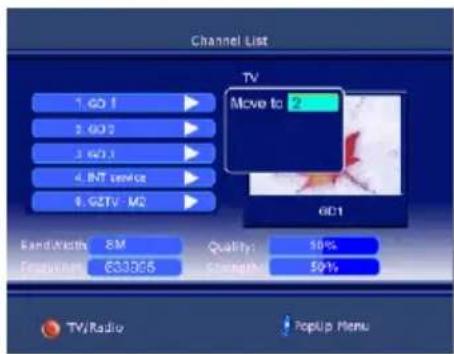
Move
- This function allows you to change the order of channel in the list.
DVB-T Mode
Favorite List
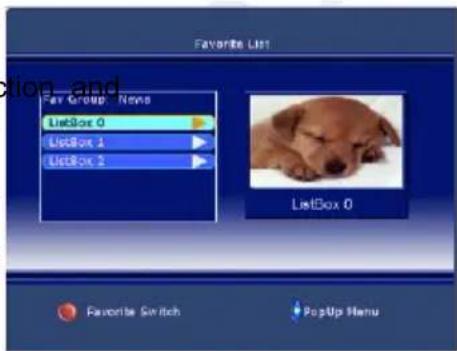
- Press the DVB MENU on the remote control to
bring up the main menu on the screen and use ▲ / ▼ to select the Favorite List menu. - Press the Enter to confirm your select there have a Favorite List menu on screen as below:
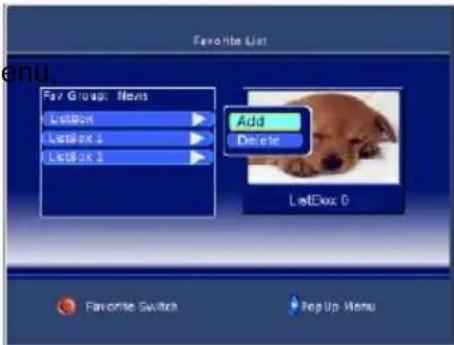
- Press ▶ that you can continue add or delete the favorite channel.
- Use the ▲ / ▼ to select add item and then press Enter to confirm it, there have a Channel list menu display on the right, you can use ▲ / ▼ and Enter to select one of them to your favorite list.
- Press DVB MENU to return to previous m then press Enter to TV viewing.
System Settings
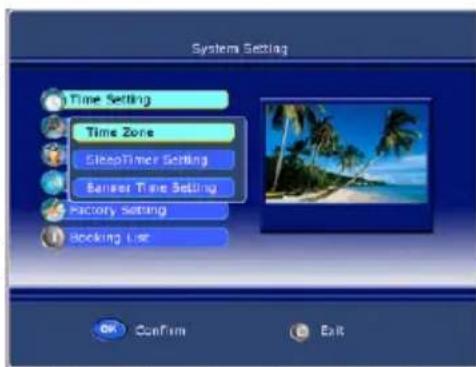
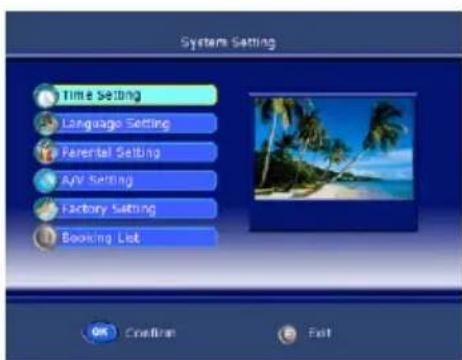
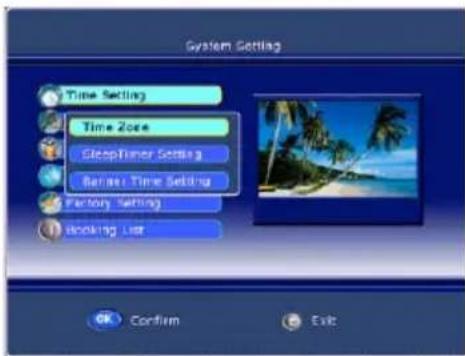
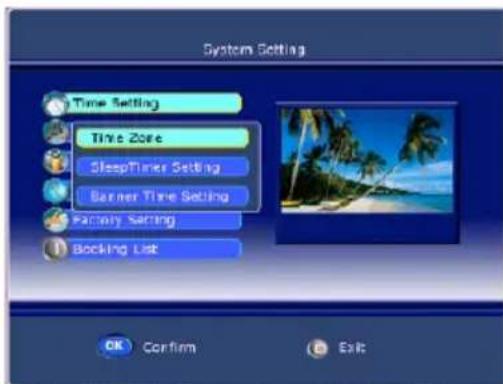
Press the DVB MENU on the remote control or on the front panel to bring up the main menu on the screen and use ▲ / ▼ to select the System Setting menu. Press the Enter to confirm your selection and there have a System Setting menu on screen as below:
Time Setting
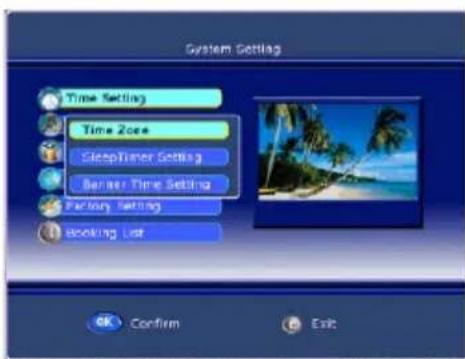
Use the ▲ / ▼ to select Time Setting item and then press Enter to confirm it
Time zone
Press ▲ / ▼ to select Time Zone, then press OK to confirm it, you can select the option of GMT+0 --- 8.
Banner Time Setting
This function allows you to set the time of banner display, you can Press ▲ / ▼ to select banner time options: 1secs/ 3 secs / 5 secs/ 7 secs/ 9 secs.
System Settings
Language Setting
Use the ▲ / ▼ to select Language Setting item and then press Enter to confirm it.
Menu language
This function allows you to set the language of OSD display, you can Press ▲ / ▼ to select the options: English / French / German / Spanish / Italian / Portuguese.
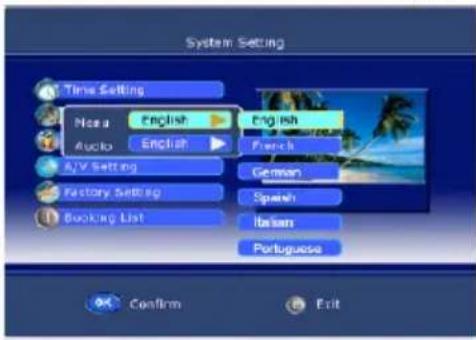
Audio language
This function allows you to set the language of audio, you can Press ▲ / ▼ to select the options: English / French / German / Spanish / Italian / Portuguese.
Parental Setting
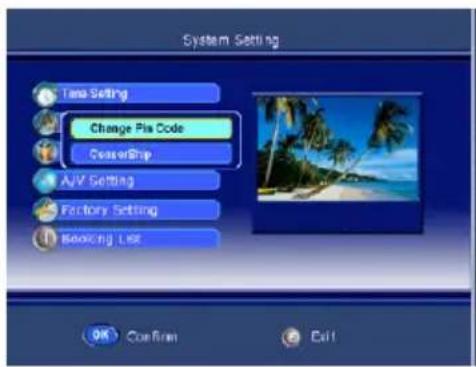
Use the ▲ / ▼ to select Parental Setting item and then press Enter to confirm it If the lock is already set, enter the pin code as requested.
Chang Pin Code
This function allows you to change the pin code, you should to input a new pin code twice and press OK to confirm it.
Censorship
You can Press ▲ / ▼ to select an age bracket options: None Block/ 6/ 10/ 14/ 18.
A/V Setting
Use the ▲ / ▼ to select A/V Setting item and then press Enter to confirm it.
TV Shape
This function allows you to select the proper picture proportion to match the source's image, you can select one of 4:3 and 16:9.
Conversion Prefer
This function allows you to select the screen conversion mode options: Full Frame/ Vertical cut/ Pillar Box or Full Frame/ Pan & Scan/ Letterbox.
Bright & Contrast
Press the ◀ / ▶ to adjust the value of bright and contrast.
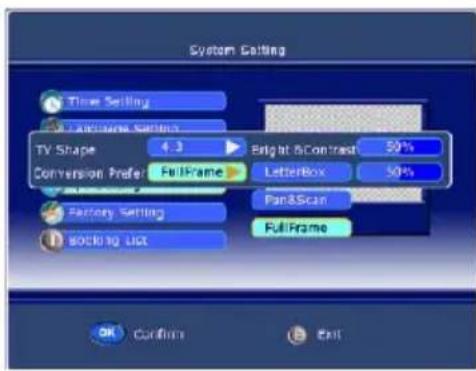
System Settings
Saturation
Press the ◀ / ▶ to adjust the value of saturation.
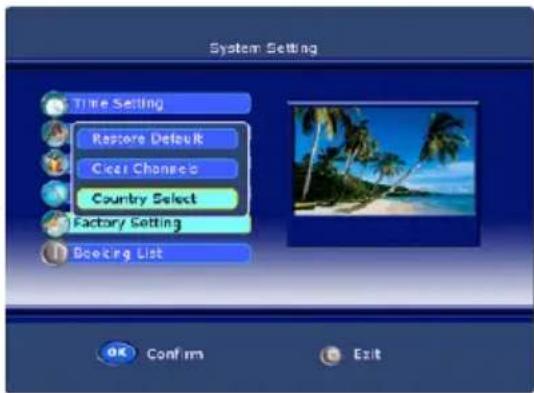
Factory Setting
Use the ▲ / ▼ to select Factory Setting item and then press Enter to confirm it
Restore Default
Press Enter to enter the restore default menu and use Enter to do it else use Menu to return to previous menu.
Clear Channels
Press Enter to enter the clear menu and use Enter to do it else use Menu to return to previous menu.
Country Select
Press Enter to enter the country select menu and use ▲ / ▼ to select country that one of Default.
Timer List
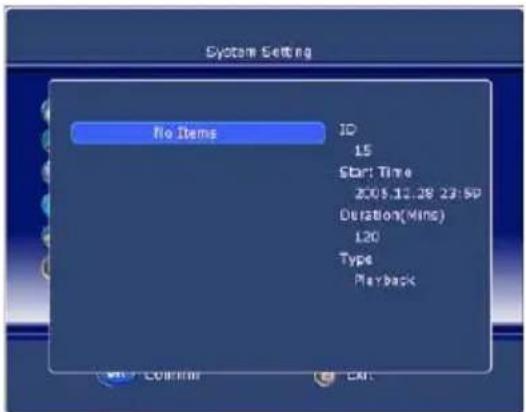
Use the ▲ / ▼ to select Booking List item and then press Enter to confirm it. This function allows you booking the TV program, press Enter to enter the setting menu
Event ID
Press ▶ and then use ▲ / ▼ to select event id options: 1/2/3/4/5.
Service
Press Enter and then use ▲ / ▼ to select channel which you want to book from channel list.
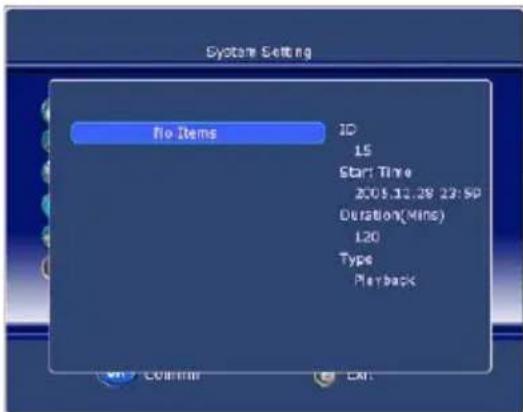
Event type
Press ▶ and then use ▲ / ▼ to select event type options: ONCE/ DAILY/ WEEKLY.
Start Time
Press the ◀ / ▶ to select the move cursor and input the number directly to set the begin time of channel which you have booked.
Start date
Press the ◀ / ▶ to select the move cursor and input the number directly to set the begin date of channel which you have booked.
System Settings
Duration
Input the number directly to set the last time of the channel which you have booked.
Status
Press ▶ and then use ▲ / ▼ to select options: ON/ OFF.
System Info
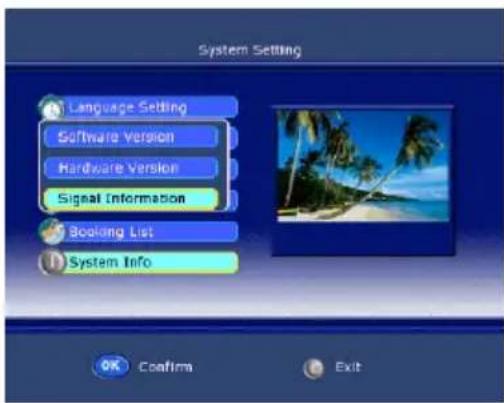
Use the ▲ / ▼ to select System Info item and then press Enter to confirm it.
Software Version
Use the ▲ / ▼ to select Software Version item and then press Enter to refer to the version of software.
Hardware Version
Use the ▲ / ▼ to select Hardware Version item and then press Enter to refer to the version of hardware.
English
Signal Information
Use the ▲ / ▼ to select Signal Information item and then press Enter to refer to the signal quality and strength of signal.
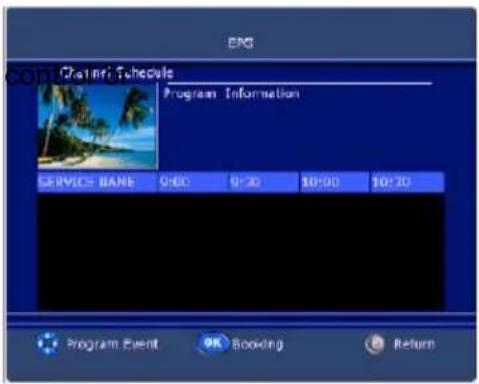
EPG
The last submenu in the main menu is EPG.
- Press the DVB MENU on the remote on the front panel to bring up the main menu on the screen and use ▲ / ▼ to select the EPG menu.
- Press the Enter to confirm your selection and there have a EPG menu on screen as below.
- This function let you know the detailed information of the channel, that can predict the time of the program playing.
- You can book channel by pressing Enter, and the operation of it is the same as Book setting.
DVB-T Others
Teletext
Press this button to enter Teletext interface. Press it again the background of teletext will become transparent and press it once more to exit teletext mode and return to normal TV viewing.
RED/ GREEN/ YELLOW/ BLUE
Press these buttons to access directly to the corresponding color pages displayed at the lower parts of the teletext screen.
PAGE SELECTION
- Press UP and Down buttons to select the preceding or following page.
- You also can enter page number (three digital) directly using the number buttons to select the page, and if you press a wrong number during input, you must complete the three digital number and re-enter the correct page number.
- Press Right and Left buttons to select the sub page of one page.
Other Operations
TV/RADIO
Press TV/Radio to select TV or Radio mode in sequence.
AUDIO
Press audio to select one of audio type as following: Stereo/ Left/ Right/ Mono.
SUBTITLE
Press this button to display the current sub-title, and press it again to hide it.
AUDIO
Press this button to select the Language of the current program.
EPG
Press this button to enter the EPG menu directly.
FAV
Press this button to enter the FAV menu directly.
INFO
Press this button to display some information about current program.
Our custom service will help you. Did you already read the notes for Troubleshooting?
Technical custom service of Xoro/MAS :
• Phone: +49 40 77 11 09 17
• Internet: www.xoro.de/support.htm
No DVB-T Signals?
Please check if the HTC xx25D is in DVB-T mode ? If not please switch to this mode.
Bad reception quality?
Please, align your antenna optimally in direction of the mast. Use a antenna with active amplifier or a house antenna and roof antenna. If you have changed the HTC xx25D area, adjust the antenna new or connect an active antenna
No TV programs ?
If there are no more programs shown in the Channel list. Please start automatic searching again.
Remote control works not ?
Please, direct the remote control upon the device. If the problem is not repaired yet, then change the batteries.
NOTE:
In areas with less DVB-T signals the application of amplifier aerials is recommended to the reception of all available TV channels.
The DVD Player is activated by repeated printings of the AV/TV key.
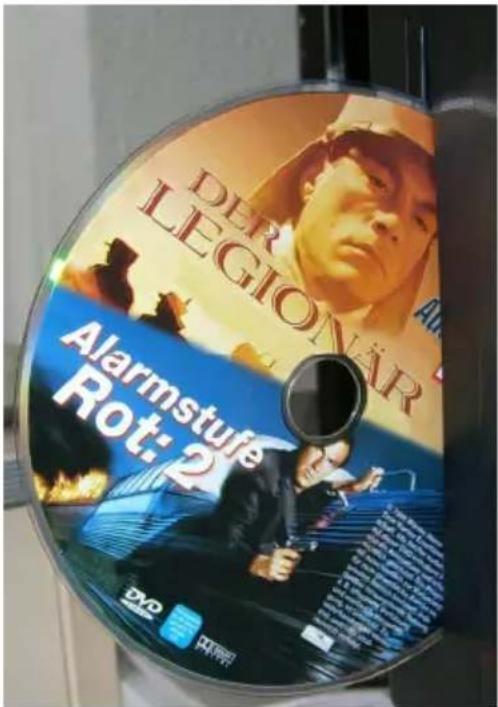
The DVD Slot-In loader opens and produces now some noise. The Slot-In loader is on the left side of the HTC xx25D. Place the disc with the printed side to the rear into the loader and push very slightly to the right side. You can see the silver side. The loader moves in the disc automatically and reads the disc information.
Note:
If the disc is inserts with the wrong side, than the loader tries to read the disc. This procedure needs more time than in a normal way. The loader can not read the disc content and displays the message "No disc" and moves out the disc.
NOTE:
To be able to eject a CD or DVD it is necessary to enable the DVD mode. Otherwise the pressing of the OPEN/CLOSE button (▲) will be without function.
Switch on the unit and press the SOURCE button repeatedly, until "DVD" is displayed right above on the screen. Now the HTC xx25d is in DVD mode.
Function
An On Screen Display (OSD) indicator will be displayed at the upper part TV screen when certain functions are executed, or when pressing the OSD button on the remote control.
The OSD indicator is a user friendly interface designed to display the status of play-back type. When a different disc is loaded (DVD, CD, Music ready); the OSD indicator bar will be different
The OSD bar will appear automatically if it is activated by pressing the OSD button, Press the OSD button again and a new status bar will appear. Press OSD button a third time and the OSD bar will disappear. When OSD indicator bar appears, press other button, the OSD indicator bar will disappear automatically.
Function
By pressing the OSD button again the following picture is shown by Video –DVD:

- Active sound track
- Format of sound track DD 5.1 CH (channel)
- Subtitle (not included in this example) (OFF)
- More aspects (in this example there are no aspects activate at moment)
By MPEG-4 video files the information is a bit different than with a video DVD. Important information for a ISO Data disk with MPEG-4 files are:

- Disc Format (here CDROM)
- Number of tracks and which one is just played
- With or without sound
- Running time
Open/Close

To open and close the disc tray. Press OPEN button on the front panel or the remote.
Notes:
- Player will not skip forward or backward during "WARNING" section of a DVD disc.
- Single chapter DVD or single track CD cannot skip
Play/Pause

Press PLAY button to play the disc. Press PLAYP/AUSE button again to pause (still picture). Press PLAY/PAUSE button to playback the content.
Stop

Press STOP button to stop in two modes:
- Press STOP button once. Stop memorizes the interrupt position and the OSD shows PRESTOP. Resume play by pressing PLAY button.
- Press STOP button twice completely stop disc. The OSD shows "STOP" and the PLAY button will resume disc.
DVD-Player
Function

Press this button skip advance DVD chapter or CD track.

Press this button skip backward DVD chapter or CD track.
Fast Backward/Fast Forward

Press this button to fast backward through the disc. Repeatedly press the button.

Press this button to fast forward through the disc. Repeatedly press the button will increase the search speed.
Notes:
- The changes in speed by fast backward or fast forward are from Normal x2 x4 x8 20 Normal
- The player is muted in fast forward or fast backward this mode.
- Player will not fast forward or fast backward during WARNING section of a DVD disc
DVD Menu
While playing a DVD, press the MENU button return to the DVD disc menu.

Numeric Buttons


Numerical key pad (Random Program access)
- To direct access a DVD chapter or a CD track, input the desired
DVD chapter or CD track number using the numerical key pad. - Input data for the DVD disc start menu or the player's setup menu.


Title
While playing a DVD, press the TITLE button return to the DVD disc title menu.

Audio Track
While playback a DVD disc, press LANG button repeatedly to select the desired audio sound track. A DVD disc may contains up to 8 selectable audio sound tracks.
Function
Repeat section A-B
To repeat playback a specific section of a disc.
- Press the A-B button at the starting point of the desired section, "REPEAT A-" display on screen.
- Press the A-B button again, at the end of the desired section, "REPEAT A-B" display on screen. The desired section A to B until the function is cancelled.
- To cancel the function, Press the A-B button again return to normal play.
Note:
Some DVD discs do not allow A-B function
Repeat Mode
Press PEPEAT button repeatedly to select the repeat mode. In DVD mode In CD mode
REP. CHAPTER Repeat chapter REP. 1 Repeat track REP. TITLE Repeat title REP. ALL Repeat disc REP. OFF Repeat off REP. OFF Repeat off
Note:
Some DVD discs do not allow repeat function.
Angle
While playback a DVD disc, press ANGLE button repeatedly to select the desired camera angle. A DVD disc may contain up to 9 selectable camera angles.
Subtitle
While play a DVD disc, press SUB-T button repeatedly to select the desired subtitle, A DVD disc may contains up to 32 selectable subtitles.
SUBTITLE

Note:
DVD disc start menu may contains set up of angle, Subtitle and Audio soundtrack selection. You may do the selection in the disc start menu.
Zoom
Press the ZOOM button repeatedly TV Screen display: ZOOM x2 —> ZOOM x3 —> ZOOM x4 —> ZOOM x1/2 —> ZOOM x1/3 —> ZOOM x1/4 —> ZOOM OFF

When playback the JPEG. Press the ZOOM button display the zoom x1/2, x1/3, x1/4, press direction button to rotate picture. While display the zoom x2, x3, x4, press direction button to move picture position.
Function
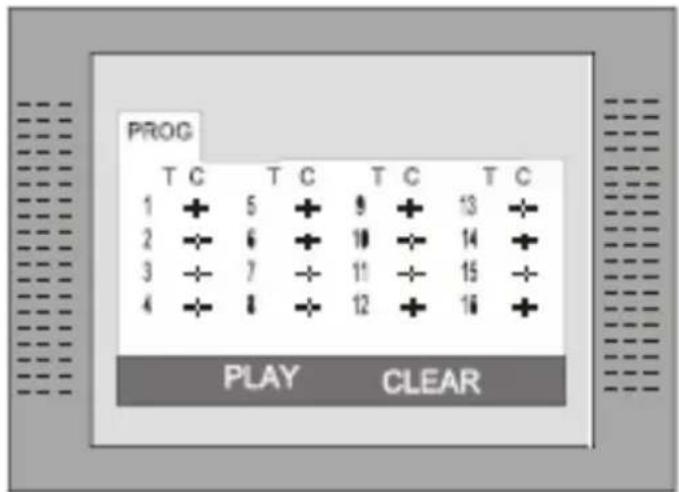
Program
Press PROG button to quit the program menu.

In DVD mode
When the program menu appears input the Title and Chapter Number
PLAY: Press PLAY button to start program play.
CLEAR: Press CLEAR button if you want to cancel the wrong information you input. Press
CLEAR again to cancel all the tracks.
In CD mode
When the program menu appears, input the Track number, press ENTER, when the programming is completed.
Data disc with Music, JPEG or Video files
- Switch on the unit
- Pressing SOURCE button repeatedly till "DVD" is displayed above left on screen.
- Insert a disc with Music, JPEG or MPEG-1, MPEG-2 or MPEG-4 video files
Insert the a disc and the player will auto search the directories saved Music/JPEG files. After searching, it will auto go to the first directory saved Music files (to the disc containing both Music and JPEG files. To the disc containing single type of files, it will go to the first directory) and play the first song in the directory (File name is highlighted). The screen displays as the picture below:
![Current directory name Current file name [SONGTOLO]TRACK_NO.MPS 01.SONGTOLO 02.THE_ELIT 03._____ 04._____ 05.DISK1 06.DISK2 07.DISK1 08.DISK2 01.TRACK_NO 02.TRACK_NO 03.TRACK_NO 04.TRACK_NO 05.TRACK_NO 06.TRACK_NO 07.TRACK_NO 08.TRACK_NO 09.TRACK_NO 10.TRACK_NO The slide bars will be moved down while file moves File Switch Region: Display the file type of the playing and the switching The playing file is music The playing file is a video file The playing file is a JPEG](/content/2026/02/394374/images/a475da2cd1423ea963117966e1af7a3d7089d0cef10c4696a63fb49730f0a626.jpg)
Note:
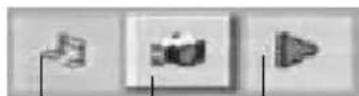
- With the arrow key to the right you can change between the catalogue window, the Chops and Track window and to the file format. File formats are of the order: music (mark (note)), pictures (camera) and video (arrow).
- The DVD player starts with the playback of Music files.
Data disc with Music, JPEG or Video files
- Use the Arrow buttons to enter the Directory Region and highlight the desired directory, then the first track under it starts playback. You also can use the arrow buttons to enter the File Region and select the file you want to play.
Notes:
- With pressing the Left and Right arrow buttons, you can activate Directory Region, File Region and File Switch Region separately.
- The highlight in Directory Region and File Region is shown as the picture on left page; While highlighted, a transparent rectangle appears
- In File Switch Region, you can press the Left and Right arrow buttons to switch
the highlight, then press Enter; the " " " and " Button is illustrated in the left side picture. For example, if a disc with Music and JPEG files but without any Video files is loaded, the color of the letter " and " will be white and " black. If a Music file playing, " turns red.
- When playing a JPEG picture on discs containing WMA, MP3 and JPEG files, press the Return button to return to JPEG list.
- You can press the Numeric buttons to select the file you want to play. For example, if you desire the 15 ^th track in current list, press the “10+” Button once, then press “5”, the 15 ^th starts playback.
Notes:
- When playing a disc with MP3files, no video can be displayed at the same time.
- You can press the "PREVIEW" buttons to get helpful message.
- When playing JPEG picture, press the Program button to choose the picture transition mode. There are 17 transition modes available. Press Program repeatedly to activate the function and choose the desired switch mode. Following transition modes are available: Spread from Left Up to Down, Spread from Down to Left, spread from Left to Right, Spread from Right to Left, Spread from Left Up to Right Down, spread from Right UP to Left Down, Spread Left Down to Right Up, Spread From Right Down to Left Up, Spread from Center to Up /Down, Fold from Up /Down to Center, old from Left/ Right to Center, Horizontal Shutter, Vertical Shutter, Fold from the Corners to the Center, and Play, Off.
Press the DVD SETUP button to enter the player's setup menu. Setup menu is a facility for the owner to adjust the detail setting of the player. For the detail of Setup menu see "SET UP MENU" of this instruction manual. Various features of the player can be adjusted in the SETUP menu.
-
Press DVD SETUP button SETUP menu appears.
-
Press the UP/DOWN button to highlight the desired menu.
In STOP mode, press DVD SETUP button Highlight SYSTEM SETUP. Press UP/DOWN button to select the subtitle. Press ENTER button, the screen displays submenu.
- Press UP/DOWN button to highlight the desired time
• Press ENTER confirm your selected item.
Three different global settings are in the Setup available:
- System Setup for TV systems, TV Type, Password, Rating and Default settings.
- Language Setup for OSD, Audio, Subtitle, Menu and MPEG-4 Subtitle settings.
- Audio Setup for Down mix, Audio Out and Dual Mono settings.

System Setup:
TV System
There are NTSC/PAL/ PAL 60 / AUTO three modes, and choose one mode according your TV mode.
If the TV mode is not suitable as the DVD player screen will blink and become colourless.
The default setting: PAL
SCREEN SAVER
This setting activates or deactivates the screen saver. If the screen saver is ON, than appears the screen saver automatically when the playback stops for a longer time or when no disc is inside.
VIDEO
The setting defines the kind of video output. This setting can not change, because the video output is fixed.
DVD Player Setup
System setup
TV Type
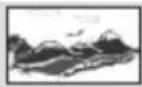
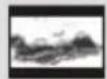
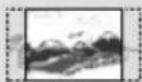
- 4:3 Pan Scan: It is suit to the common size TV. When playing, the picture will be cut. so that the TV screen is filled with the picture.
- 4:3 Letter box: when the player connect to the commonly size TV, please select the type. The top and bottom of TV screen will display black frame.
- 16:9 Wide Screen: When the player connects to the wide screen TV.
The default setting: 4 : 3 Pan Scan.
16:9
Wide
4:3
Letter Box
4:3
Pan Scan
Password
Move the cursor the PASSWORD item and press ENTER button to confirm and then input the secret code "0000" (if it is the first use). After confirmation, you are required to input new secret code and then press ENTER "button" to confirm.
Warning:
Please remember the new secret code, otherwise you will not be able to change the parental control. Please contact the agent or our company if you forget the secret code.
RATING
There are total eight levels of this control. Eight levels as follow:
- KID-SAFE
- G
- PG
- PG13
- PG-R
- R
- NC-17
- ADULT
The first level discs are open to people of average and eight level only suitable for the adult. If you want to change the Parental control setting, enter the user's age control item and then enter four digital secret code. The default secret code is 8357(if you are using this player for the first time, just input this code). If the input code has been confirmed, the level setting up menu will appear. Move the cursor to choose the expected level and press ENTER button to confirm and store it.
Default
This is the factory default setting up. When choose "RESTORE", the previous setting up, by the user will be cancelled and the player will come to the factory setting up state.

DVD Player Setup
Language Setup
In STOP mode, press DVD SETUP button and Highlight LANGUAGE.
- Press UP/DOWN button
- Press ENTER button, the screen displays submenu.
- Press UP/DOWN button to highlight the desired item in the LANGUAG menu.
- Press ENTER to confirm your selected item.
- Press SETUP button SETUP to quit.
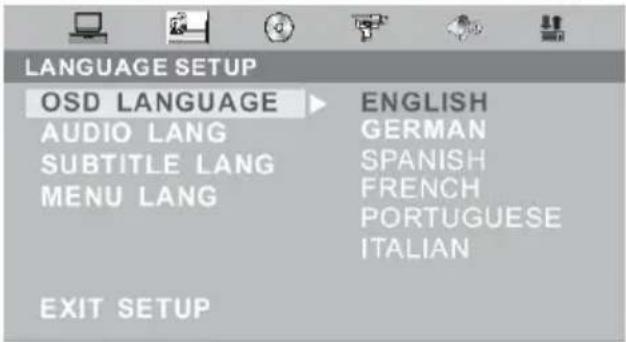
MPEG4-Lang
Select the a codepage for the MPEG-4 Subtitle:
Central EU: Swedish etc.
Cyrillic: Russian, Serbian etc.
Western EU: German, French etc...
East EU: Polish., Slovene etc.
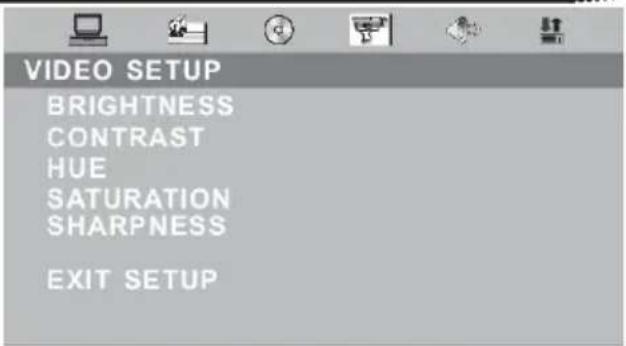
Video setup
In STOP mode, press DVD SETUP button, highlight VIDEO SETUP. Press ENTER to enter next sub-menu.
The sub menu are "Brightness", "Contrast", "Hue", "Saturation" and "Sharpness".
Enter into one of the sub menu and change the settings by using the navigation buttons UP or DOWN. To save the new setting, please press the ENTER button.
DVD Player Setup
SPEAKER SETUP
In STOP mode, press DVD SETUP button and Highlight SPEAKER SETUP.
- Press UP/DOWN button
- Press ENTER button, the screen displays submenu.
- Press UP/DOWN button to highlight the desired item in the LANGUAGE menu.
- Press ENTER to confirm your selected item.
- Press SETUP button SETUP to quit.
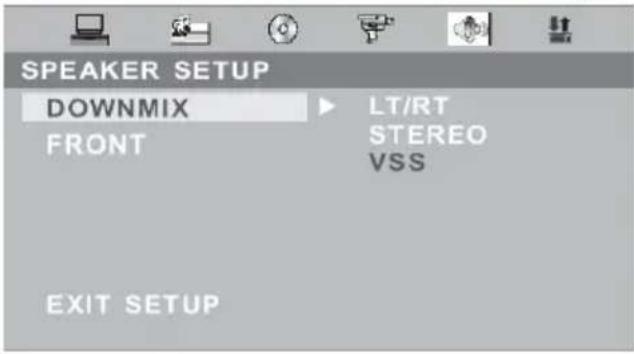
Downmix
- This setting is suitable for films. If you only need two channels to enjoy music, it's recommended to select the second option, Stereo.
- The option VSS produces a "virtual surround sound".
- LT/RT divided the channels.
FRONT
Adjust the size of the front speaker.
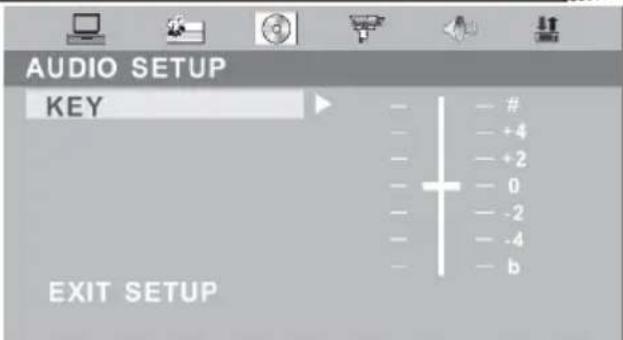
AUDIO setup
The setting "KEY" adjust the bass audio output.
Positive values for decreasing the bass. Negative values for increasing the bass.

DVD Player Setup
Digital setup
In STOP mode, press DVD SETUP button and Highlight DIGITAL SETUP.
- Press UP/DOWN button
- Press ENTER button, the screen displays submenu.
- Press UP/DOWN button to highlight the desired item in the LANGUAG menu.
- Press ENTER to confirm your selected item.
- Press SETUP button SETUP to quit.
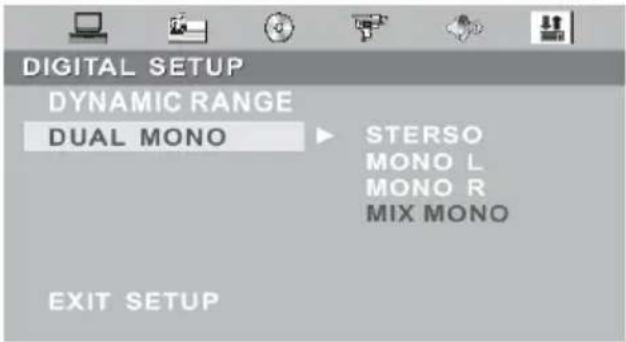
Dynamic Range
Here you can change the audio compression. If you choose the setting "FULL" than the audio gets the biggest limitation. A kind of "NIGHT MODE". By using the setting "OFF", the audio gets no compression.
Dual Mono
The options here are Stereo, Mono L, Mono R and Miy Mono.
If you have Dolby digital output your amplifier/decoder, you may select stereo, left, right and mixed sound accordingly.
Troubleshooting
Our custom service will help you. Did you already read the Troubleshooting pages?
Technical custom service of Xoro/MAS:
• Phone: +49 40 77 11 09 17
• Internet: www.xoro.de/support.htm
English
| Symptom Check and Action | |
| Does not play | No disc, load a disc.Disc has been loaded upside down. Place the disc with the label side up.Disc's region code does not match to the player.Disc's rating level is higher than the player's rating level setting.Disc is not correct type for the player.Disc is damaged or power on for one or two hours.Moisture may be condensed inside the player. Remove the disc and leave the unit power on for one or two hours. |
| No Picture | Check the system connection is proper and secure.Check if the connection cables are damaged.Clean the disc. |
| Picture noise/distorted | The disc is dirty or damaged. Clean the disc or try another disc. |
| Picture not full screen | Select the screen format from the player's SETUP MENU.See "SETUP MENU" of this manual.Select the screen format from DVD disc menu. |
| Problem message display on screen | Following message will display when there is a problem with the loaded disc"1. "WRONG REGIONAL DISC": Disc's region code is not match to the player.2. "WRONG PASSWORD": The player refuse to play a disc with rating level higher than the player's rating level setting.3. "WRONG DISC": The player is equipped with automatic disc quality detection software. When the player detects a problem disc or a damaged disc, the player may keep playing the disc at lower quality or stop playing, depending on the damage level of the disc. |
Troubleshooting
| Symptom Check and Action | |
| Cannot SKIP or SEARCH | Some discs are programmed that do not allow users to SKIP or SEARCH a some sections, especially at the beginning WARNING sectionSingle Chapter disc cannot apply SKIP function. |
| Remote control des not function | Remove the obstacles between the remote control and the player. Point the remote control towards the remote sensor on the player. Check if the batteries of the remote control have been loaded with correct polarities.Replace the batteries of the remote control. |
Macrovision
U.S. Patens Nos. 4,631,603; 4,577,216; 4,819,098; 4,907,093; 5,315,448 and 6,516,132
"This product incorporates copyright protection technology that is protected by U.S. patents and other intellectual property rights. Use of this copyright protection technology must be authorized by Macrovision, and is intended for home and other limited viewing uses only unless otherwise authorized by Macrovision. Reverse engineering or disassembly is prohibited."
Specification
English
| HTC 1525D HTC | 1925 HTC 2225D | ||
| Screen Size 39 cm | (15,4 inch) 48 cm (19 inch) 56 cm (22 inch) | ||
| Display Type TFT LCD | |||
| Resolution 1280 x | 800 1440 x 900 1680 x | 1050 | |
| Aspect Ratio 16:10 | |||
| Brightness 200 cd/m | ^2 | 300 ^2 | cd/m 400 ^2 |
| Contrast 300:1 | 1000:1 | 1000:1 | |
| Response Time 25 | ms 6,5 ms 5 ms | ||
| Viewing Angle | 90 ° | 160 ° | 160 ° |
| TV System | PAL BG / DK / ISECAM BG / DK / L / L' | ||
| Stereo | NICAM / A2 | ||
| Interface | |||
| CVBS Video | 1,0 V p-p 75 Ohm unausgeglichen | ||
| S-Video | Y: 1,0 V p-p +/- 3 dBC: 0,3 V p-p +/- 3 dB | ||
| Scart | CVBS: 1,0 V p-p 75 OhmRGB: 1,0 V p-p 75 Ohm | ||
| PC VGA | 640 x 480 bei 60 Hz / 800 x 600 bei 60 Hz / 1024 x 768 bei 60 HzEmpfohlen wird immer die native Auflösung. | ||
| Antenna | RF Antennenanschluss, 75 Ohm | ||
| Speaker | 2 x 3 Watt | 2 x 3 Watt | 2 x 5 Watt |
| Video System | PAL / NTSC | ||
| AC / DC Adapter | AC: 110—260 V 50 / 60 HzDC: 12 V bei max. 5 A | ||
| Comsumption | 60 W / Standby 3 W | ||
| Dimension(LxTxH) | 385 x 175 x 336 mm | 465 x 210 x 410 mm | 540 x 210 x 460 mm |
| Weight | 5,5 kg | 6,5 kg | 7,0 kg |
cd/m

English
natural_image
Abstract black-and-white graphic with three white rounded rectangles and two small squares, no text or symbols present.Верхняя панель
natural_image
Simple line drawing of a hand holding a small object with an arrow indicating direction (no text or symbols)natural_image
Simple line drawing of a battery with an arrow indicating direction and two cylindrical objects beside it (no text or symbols)natural_image
Simple diagram showing a gray square labeled '4' inside a curved boundary with an arrow pointing downward (no text or symbols beyond the label)natural_image
Simple line drawing of a flat-screen computer monitor (no text or symbols)Настройка каналов
bar
Channel List | Category | Value | |---|---| | Pin Code | 50% | | BandWidth | 8M | | Frequency | 633995 | | Quality | 50% | | Earnings | 50% |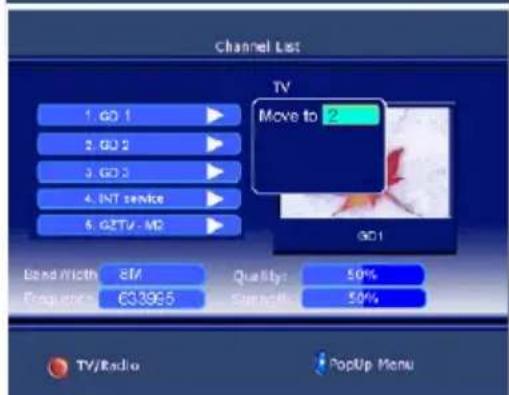
Системные настройки
Time Setting - Установка времени
Системные настройки
East EU: Polish., Slovene etc.
Восточная
natural_image
Abstract black-and-white graphic with three white rounded rectangles and two small squares, no text or symbols present.CONNECTIQUE
CONNECTIQUE
natural_image
Diagram of a remote control panel showing internal battery structure and external casing (no text or symbols)Support technique Xoro/MAS:
• Tél.: 0825 889441
- Internet: www.xoro.fr/Service.aspx
- Email : supportfrance@mas.de
Français
Mode mise à jour
Liste des chaînes
Effacer
bar
Channel List | Category | Value | |---|---| | Band Width | 8M | | Power Rating | 63.3/US | | Quality | 50% | | Charge (%) | 16% | TV/Radio PopUp Menu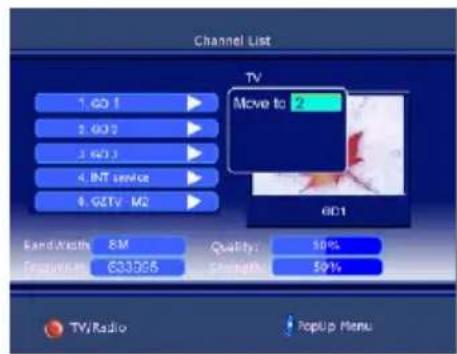
Chânes favorites
Langue audio
Français
Configuration A/V
ID évènement
Français
Version de Matériel
MODE TNT
Télétexte
Support technique Xoro/MAS:
• Tél.: 0825 889441
- Internet: www.xoro.fr/Service.aspx
- Email : supportfrance@mas.de
Pas de signal TNT ?
If you press the title button during playback, the video DVD goes back to the title menu.
Menu DVD

Support technique Xoro/MAS:
• Tél.: 0825 889441
- Internet: www.xoro.fr/Service.aspx
- Email : supportfrance@mas.de
U.S. Patens Nos. 4,631,603; 4,577,216; 4,819,098; 4,907,093; 5,315,448 and 6,516,132
"This product incorporates copyright protection technology that is protected by U.S. patents and other intellectual property rights. Use of this copyright protection technology must be authorized by Macrovision, and is intended for home and other limited viewing uses only unless otherwise authorized by Macrovision. Reverse engineering or disassembly is prohibited."
SPÉCIFICATIONS
Français
| HTC 1525D HTC | 1925 HTC 2225D | ||
| Screen Size 39 cm | (15,4 pouses) 48 cm (19 pouces) 56 cm (22 pouces) | ||
| Display Type TFT LCD | |||
| Resolution 1280 x 800 1440 x 900 1680 x 1050 | |||
| Aspect Ratio 16:10 | |||
| Brightness 200 cd/m ^2 | 300 ^2 | cd/m 400 ^2 | |
| Contrast 300:1 | 1000:1 | 1000:1 | |
| Response Time 25 ms 6,5 ms | 5 ms | ||
| Viewing Angle | 90 ° | 160 ° | 160 ° |
| TV System | PAL BG / DK / ISECAM BG / DK / L / L' | ||
| Stereo | NICAM / A2 | ||
| Interface | |||
| CVBS Video | 1,0 V p-p 75 Ohm | ||
| S-Video | Y: 1,0 V p-p +/- 3 dBC: 0,3 V p-p +/- 3 dB | ||
| Scart | CVBS: 1,0 V p-p 75 OhmRGB: 1,0 V p-p 75 Ohm | ||
| PC VGA | 640 x 480 bei 60 Hz / 800 x 600 bei 60 Hz / 1024 x 768 bei 60 Hz | ||
| Antenna | RF Antennenanschluss, 75 Ohm | ||
| Speaker | 2 x 3 Watt | 2 x 3 Watt | 2 x 5 Watt |
| Video System | PAL / NTSC | ||
| AC / DC Adapter | AC: 110—260 V 50 / 60 HzDC: 12 V bei max. 5 A | ||
| Consumption | 60 W / Standby 3 W | ||
| Dimension(LxTxH) | 385 x 175 x 336 mm | 465 x 210 x 410 mm | 540 x 210 x 460 mm |
| Weight | 5,5 kg | 6,5 kg | 7,0 kg |
cd/m

Français
Channel Setting....16
Lista de canales 17
natural_image
Abstract black-and-white graphic with three white rounded rectangles and three small icons (two squares, one triangle) on a dark background, no text or symbols present.natural_image
Diagram of a remote control panel showing internal battery structure and external casing (no text or symbols)Distancia et Angulo
Treble and bass (agudos y bajos)
Channel Setting
Search type
Lock&Unlock
Move
Audio language
TV Shape
System Setting
Saturation
Clear Channels
Hardware Version
natural_image
Three grayscale icons representing file, image, and play symbols (no text or labels)- G; 3.
- PG
- PG13
- PG-R
- R
- NC-17
- ADULT
U.S. Patens Nos. 4,631,603; 4,577,216; 4,819,098; 4,907,093; 5,315,448 and 6,516,132
"This product incorporates copyright protection technology that is protected by U.S. patents and other intellectual property rights. Use of this copyright protection technology must be authorized by Macrovision, and is intended for home and other limited viewing uses only unless otherwise authorized by Macrovision. Reverse engineering or disassembly is prohibited."
Specifications
| HTC 1525D HTC 1925 HTC 2225D | |||
| Tamaño de monitor | 39 cm (15,4 pulgadas) | 48 cm (19 pulgadas) | 56 cm (22 pulgadas) |
| Tipo de pantalla TFT LCD | |||
| Resolucion en Pixel | 1280 x 800 1440 x 900 | 1680 x 1050 | |
| Relacion de lados 16:10 | |||
| Brillo 200 cd/m | ^2 | ^2 cd/m 400 ^2 | |
| Contraste 300:1 | 1000:1 | 1000:1 | |
| Tiempo de reaccion | 25 ms 6,5 ms | 5 ms | |
| Angulo de vista | 90 ° | 160 ° | 160 ° |
| Sistema de TV | PAL BG / DK / ISECAM BG / DK / L / L' | ||
| Estereo | NICAM / A2 | ||
| Conexiones | |||
| Video CVBS | 1,0 V p-p 75 Ohm desiguales | ||
| S-Video | Y: 1,0 V p-p +/- 3 dBC: 0,3 V p-p +/- 3 dB | ||
| Euroconector | CVBS: 1,0 V p-p 75 OhmRGB: 1,0 V p-p 75 Ohm | ||
| PC VGA | 640 x 480 bei 60 Hz / 800 x 600 para 60 Hz / 1024 x 768 para 60 HzSiempre se recomienda la resolucion negativa | ||
| Antena | Conexion de antena RF , 75 Ohm | ||
| Parlantes | 2 x 3 Watt | 2 x 3 Watt | 2 x 5 Watt |
| Sistema de Video | PAL / NTSC | ||
| Adaptador AC / DC | AC: 110—260 V 50 / 60 HzDC: 12 V max. 5 A | ||
| Consumo | 60 W / Standby 3 W | ||
| Medidas (LxAxA) | 385 x 175 x 336 mm | 465 x 210 x 410 mm | 540 x 210 x 460 mm |
| Peso | 5,5 kg | 6,5 kg | 7,0 kg |
cd/m
Español
FREE TO CHOOSE INNOVATIONS

XORO by MAS Elektronic AG
Blohmstrasse 16/20
21079 Hamburg
Germany
Tel: +49(040) 77 11 09 17
Fax: + 49(040) 77 11 09 33
xoro@mas.de
www.xoro.de


- XORO®
- LCD TV with DVD + DVB + HDMI
- HTC 1525D (without HDMI)
- Farbeinstellung (Colour Setting)
- Farbeinstellung (Color Setting)
- Programmeinstellung
- Programmsuche (Channel Search)
- Programm (Channel No.)
- Sperren & Entsperren (Lock & Unlock)
- Favoritenliste
- Systemeinstellungen
- Zeitzone (Time Zone)
- Spracheinstellungen (Language Setting)
- Audio Sprache
- TV Format (TV Shape)
- Sättigung (Saturation)
- Timer Liste (Booking List)
- Signal Information
- DVB-T Modus
- FERNSEHTEXT (TELETEXT)
- VSS (Virtual Surround Sound)
- Spezifikationen
- Electrical safety
- Physical safety
- Contents
- Safety information
- Connection
- The Remote Control
- LCD Menus
- DVB-T Mode
- DVD Player
- Features
- Note:
- Buttons on the right side
- Connecting Up
- Power connection
- Antenna
- SCART Input
- CVBS Video- and Stereo Audio input
- HDMI
- VGA
- Notes:
- Remote Control
- Insert battery into the remote control
- Operation range
- Buttons of the remote control:
- Video Menu
- Brightness
- Contrast
- Colour
- Sharpness
- PC Menu
- Color setting
- Auto configure
- Horizontal and vertical position
- Phase
- Clock
- HDMI Menu
- Audio Menu
- Volume
- Balance
- Audio preset
- Treble and bass
- TV Menu
- Channel
- System
- Skip
- AFC
- Fine Tune
- SWAP
- Manual search
- Auto Search
- General Menu
- Language
- Blue Screen
- Noise Reduce
- Input Source
- Reset
- Troubleshooting
- Enter Main Menu
- Adjust the OSD on screen
- Waiting SIGNAL or NO SERVICE
- Channel Setting
- Search Type
- Channel No
- Frequency
- Band Width
- Encrypted Service
- Update Mode
- Sort Channel
- Channel List
- Delete
- Lock & Unlock
- Move
- Favorite List
- System Settings
- Time Setting
- Time zone
- Banner Time Setting
- Language Setting
- Menu language
- Audio language
- Parental Setting
- Chang Pin Code
- Censorship
- A/V Setting
- TV Shape
- Conversion Prefer
- Bright & Contrast
- Saturation
- Factory Setting
- Restore Default
- Clear Channels
- Country Select
- Timer List
- Event ID
- Service
- Event type
- Start Time
- Start date
- Duration
- Status
- System Info
- Software Version
- Hardware Version
- EPG
- DVB-T Others
- Teletext
- RED/ GREEN/ YELLOW/ BLUE
- PAGE SELECTION
- Other Operations
- TV/RADIO
- AUDIO
- SUBTITLE
- FAV
- INFO
- The DVD Player is activated by repeated printings of the AV/TV key.
- Function
- Open/Close
- Play/Pause
- Stop
- DVD-Player
- Numeric Buttons
- Repeat section A-B
- Repeat Mode
- Angle
- Zoom
- In DVD mode
- In CD mode
- Data disc with Music, JPEG or Video files
- System Setup:
- TV System
- SCREEN SAVER
- VIDEO
- DVD Player Setup
- System setup
- TV Type
- Password
- Warning:
- RATING
- Default
- Language Setup
- MPEG4-Lang
- Video setup
- SPEAKER SETUP
- Downmix
- FRONT
- AUDIO setup
- Digital setup
- Dynamic Range
- Dual Mono
- Macrovision
- Specification
- Верхняя панель
- Настройка каналов
- Системные настройки
- Time Setting - Установка времени
- CONNECTIQUE
- Mode mise à jour
- Liste des chaînes
- Effacer
- Chânes favorites
- Langue audio
- Configuration A/V
- ID évènement
- Version de Matériel
- MODE TNT
- Télétexte
- Pas de signal TNT ?
- Menu DVD
- SPÉCIFICATIONS
- Distancia et Angulo
- Treble and bass (agudos y bajos)
- Lock&Unlock
- System Setting
- Specifications
- XORO by MAS Elektronic AG
Brand : XORO
Model : HTC 2225D
Category : Television