
PTL 1015 V2 - Television XORO - Free user manual and instructions
Find the device manual for free PTL 1015 V2 XORO in PDF.


| Product Type | LED TV |
| Brand | Xoro |
| Model | PTL 1015 V2 |
| Screen Size (Diagonal) | 10.1 inches |
| Display Resolution | 1024 x 600 pixels |
| Aspect Ratio | 16:9 |
| TV Standard | DVB-T2 / DVB-C |
| Power Supply | DC 12 V, 2 A |
| Power Consumption (Operating) | 15 W |
| Power Consumption (Standby) | < 1 W |
| Weight | 1.2 kg |
| Dimensions (W x H x D) | 25.0 x 17.0 x 3.0 cm |
| Connectivity | HDMI, USB 2.0, AV In, Headphone Out |
| Tuner | Integrated DVB-T2 / DVB-C |
| USB Playback | MP4, AVI, MKV, MP3, JPEG |
| Remote Control | Included |
| Stand | Table stand included |
| VESA Mount Pattern | 75 x 75 mm |
| Operating Temperature | 5°C to 35°C |
| Cleaning Instructions | Use a soft, dry cloth. Do not use liquid cleaners. |
| Safety Warnings | Keep away from moisture. Do not open the casing. Use only supplied power adapter. |
| Disposal | Do not dispose with household waste. Follow local WEEE regulations. |
Frequently Asked Questions - PTL 1015 V2 XORO
User questions about PTL 1015 V2 XORO
0 question about this device. Answer the ones you know or ask your own.
Ask a new question about this device
Download the instructions for your Television in PDF format for free! Find your manual PTL 1015 V2 - XORO and take your electronic device back in hand. On this page are published all the documents necessary for the use of your device. PTL 1015 V2 by XORO.
USER MANUAL PTL 1015 V2 XORO
link: https://eprel.ec.europa.eu/qr/1281390
TXT Mostrare Teletext
natural_image
Technical line drawing of a device rear panel with a black arrow pointing to a component (no text or symbols present)Televisore
natural_image
Technical line drawing of a device rear panel with a black arrow pointing to a component (no text or symbols present)Avvertenza:
Energy consumption - Conformity - Pixel error 3
Energy consumption 3
Information on ecodesign requirements for external power supplies 3
Conformity 3
Pixel errors 3
Safety and intended use 4
Power supply and rechargeable battery 4
Installation and handling 4
Receiving system 5
USB socket 5
Remote control and batteries 5
Connecting headphones 5
Usage 5
Service case 5
Environment - Customer service 6
Disposal of electrical and electronic products (waste equipment) 6
Recycling of paper and cardboard 6
Recycling of plastics 6
Disposal of batteries 6
Scope of delivery - overview 7
Scope of delivery 7
Overview: Main unit 7
Overview: Vehicle power cable 8
Overview: Remote control 9
Overview: Device keys 9
Power supply 10
Remote control 10
Television 10
Status display - Charging process - Antenna 11
Battery LED 11
Power LED 11
Connecting the antenna 11
Initial installation 12
Daily operation 13
Important keys and functions 13
Screen setting - Connecting additional devices 15
Connecting an external TV 15
Connecting additional devices - USB
media player 16
AV jack plug 16
Headphones 16
USB storage devices 16
USB media player 16
Supported file formats 17
Main menu 18
Channel/Edit channel list 18
Channel/EPG 19
Channel/sort 19
Channel/LCN 19
Picture/aspect ratio 19
Picture/HDMI resolution 20
Channel search/automatic scan 20
Channel scan/manual scan 20
Channel scan/Antenna Power 20
Time/Time zone setting 21
Time/Time Zone 21
Time/Auto standby 21
Preferences/OSD language 21
Preferences/subtitle language 21
Preferences/audio language 21
Preferences/digital audio 21
Preferences/audio description 22
Preferences/Internal Speaker 22
System/parental control 22
System/ Set PIN 22
System/Restore factory default 22
System/information 22
System/Software Update 22
USB/XORO media player 22
USB/photo settings 22
USB/Subtitle settings 23
Technical data 23
Troubleshooting 24
Energy consumption
For information on the TV's energy consumption, visit the following link:
https://eprel.ec.europa.eu/qr/1281390
Registration number: 1281390

Information on ecodesign requirements for external power supplies
| Manufacturer's name or trade mark, commercial registration number and address | Trademark: XOROManufacturer: MAS Elektronik AGWeidegrund 321614 BuxtehudeGermanyCommercial Register at Hamburg Local Court HRB74448 |
| Model identifier F18L10-120150SPAV | |
| Input voltage 100 - 240 V | |
| Input AC frequency 50 Hz / 60 Hz | |
| Output voltage 12.0 V DC | |
| Output current 1.5 A | |
| Output power 18.0 W | |
| Average active efficiency 86.1% | |
| Efficiency at low load (10 %) 80.2% | |
| No-load power consumption 0.07 W |
Conformity
Hereby, MAS Elektronik AG declares that the radio equipment type XORO PTL1015 V2 is in compliance with Directive 2014/53/EU.
The full text of the EU declaration of conformity is available at the following internet address: www.xoro.de/downloads

Pixel errors
The pixel errors defined in the following table (bright or dark pixels, line defects and differences in brightness) describe the permitted defects in type and number, which are excluded from warranty.
| Bright pixels (bright dot) ≤ 2 | |
| Dark pixels (dark dot) ≤ 3 | |
| Bright + dark pixels ≤ 3 | |
The lightning flash within a triangle is intended to alert the user to the presence of dangerous voltage of exposed conductive parts within the product's enclosure.
The exclamation mark within a triangle is intended to alert the user to the presence of important operating and maintenance instructions (servicing) in this manual which must be followed.

Power supply and rechargeable battery
- The portable TV may only be operated with the voltage printed on the back.
- The supplied power supply may only be operated with the mains voltage printed on it.
- The supplied vehicle power cable may only be used with the printed voltage.
- The portable television may only be powered using the accessories supplied (power supply and vehicle power cable).
- Protect the device from high temperatures (e.g. in parked vehicles). The permissible operating temperature range is between 5^ and 37^ , air humidity: < 90% (non-condensing).
- Do not overload sockets, extension cables or other cables as this may result in fire or electric shock.
- Disconnect the device from the power supply if it is not to be used for a longer period of time.
- The battery installed in the television may only be replaced by the XORO customer service.
- Charge the battery at least every 6 months to avoid deep discharge. For safety reasons, the charging electronics of the device do not charge deeply discharged batteries.
- To disconnect the unit completely from the mains, the AC power supply unit must be unplugged from the mains socket.
Installation and handling
- Please do not place any objects on cables, as this could cause the protective function to be lost.
Avoid placing great strain on cables, especially on sockets and plugs.
- If you want to remove the plug out of the socket, always pull the plug and not the cable. Otherwise the cable could break.
- The LCD screen is fragile. Avoid any mechanical stress on the screen.
- This device must not be positioned near moisture or water. Never touch the device with wet or damp hands.
- Protect the device from moisture and weather influences.
- Do not expose the device and the remote control to direct sunlight. This impairs the function and could lead to damage.
- The television, the power supply and the plug of the vehicle power cable heat up during operation. Do not place the devices on heat sensitive surfaces.
- The openings in the housing provide ventilation to prevent the unit from overheating. These openings must always be kept free. Avoid heat accumulation on the device.
- The device must not be positioned near heat sources such as ovens or heaters.
- For additional protection of the unit during a thunderstorm or when the unit is left unattended for long periods of time: Unplug the power plug from the socket and the antenna connector from the antenna/cable connection socket. This prevents damage due to lightning / overvoltage.
- Do not insert any objects into the openings of the unit, as current flows in some places and contact with these places may cause an electric shock.
- Do not connect any accessories not recommended by the manufacturer.
- Do not place the unit on an unstable surface. The device could be damaged or people injured. Any fixings should only be fitted in accordance with the manufacturer information or should be acquired from the manufacturer.
- For cleaning, unplug the appliance from the power outlet and switch off the appliance using the main switch.
• Do not use liquid cleaners or cleaning sprays. The device may only be cleaned with a damp cloth.
- Keep small accessories out of the reach of children so that they are not accidentally swallowed.
Receiving system
- An outdoor antenna must not be installed near power lines or other electrical circuits, as contact with such lines can be fatal.
- To avoid damage to property or persons and to ensure proper operation, have your outdoor antenna installed by a specialist company.
- The receiving system must be earthed in accordance with the regulations.
USB socket
- The USB socket of the TV is not suitable for charging devices with built-in batteries (e.g. telephones, MP3 players, tablet computers, etc.).
- USB devices that require a current greater than 500 mA (0.5 A) violate the USB specifications and may not be recognized by the TV.
Remote control and batteries
- Remove and replace old batteries. Old batteries may leak and damage the remote control.
- Remove leaking battery fluid with a cloth. Avoid skin contact with the liquid.
- If the battery or battery fluid is swallowed, seek medical attention immediately.
• In case of skin/eye contact, rinse the skin/eyes with plenty of water and consult a doctor. - Please keep batteries and the remote control away from children.
Connecting headphones
- Prolonged exposure to high volume levels can cause temporary or permanent hearing loss when using headphones.
- Avoid higher volume levels, especially over long periods of time.
Usage
- The device is designed for use in private households.
- Children may only use the device under adult supervision.
- Heavy tobacco smoke damages the electronics of the device and can lead to visible impairment of the image quality due to deposits on the screen. Damages and impairments caused by tobacco smoke will not be repaired under warranty.
Service case
- Never carry out repairs yourself. Always leave this to qualified personnel.
- Only original spare parts and accessories may be used.
- The unit must immediately be taken out of operation if it has been exposed to water or moisture, if the housing, screen, accessories or cables are damaged, if the unit is not functioning properly, if objects have entered the housing, if there are loose parts inside the unit or if the battery cannot be charged properly.
XORO customer service
By phone: +49 4161 - 800 24 24 (Mon-Fri, 11.00 a.m. to 5.00 p.m., German/English)
By e-mail: support@ersservice.de
Address: ERS GmbH Elektronik Repair Service
Weidegrund
3
21614
Buxtehude
Germany
Disposal of electrical and electronic products (waste equipment)
This crossed-out dustbin on the product, the accompanying materials and/or on the packaging means that electrical and electronic equipment must not be disposed of in general household waste. Consumers are required by law to dispose of such equipment separately from general household waste. Old appliances must be taken to the relevant collection points for treatment, refurbishment or recycling in accordance with the statutory provisions. Furthermore, there is an obligation to remove batteries that are not enclosed in the appliance before disposing of the old appliance and to dispose of them separately.
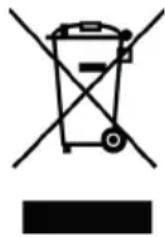
The same applies to lamps that can be removed from the old appliance without destroying it. By properly disposing of old products, you contribute to environmental protection and human health. Consumers must take responsibility for deleting any personal data that may be stored on the old appliance before disposing of it.
Recycling of paper and cardboard
The material recycling symbol on the packaging board and on the user manual indicates that they are recyclable. Do not dispose of the packaging with normal household waste.

Recycling of plastics
The material recycling symbol on plastic parts means that they are recyclable. Do not dispose of the plastics with normal household waste.
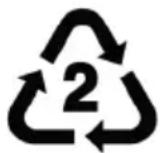
Disposal of batteries
Every consumer is legally obliged to hand in batteries at a collection point of his community or the retailers so that they can be disposed of in an environmentally friendly way.


The disposal of batteries in household waste is prohibited!
A chemical symbol (Pb for lead, Hg for mercury, Cd for cadmium) under the crossed-out wheelie bin indicates that the battery contains more than 0.0005% mercury, more than 0.004% lead or more than 0.002% cadmium.
The TV contains a built-in accumulator which is enclosed in the unit and can only be replaced or removed by qualified personnel in repair shops or waste disposal companies.
Scope of delivery
Please make sure that the following parts are included in the packaging:
- Portable television
- Remote control
- Power supply
• Vehicle power cable - Antenna
- AV cable
Note:
Check the completeness of the accessories immediately after purchase. If any accessories are missing, please contact the dealer from whom you purchased the device directly.
Overview: Main unit

Overview: Vehicle power cable

| Item Labelling Comment | ||
| 1 MEN | U/OK/EXIT/CH/VOL | Local control keys |
| 2 OFF | ON Main switch | |
| 3 DC IN 12V Socket for power supply | ||
| 4 ANTENNA Antenna socket | ||
| 5 HDMI OUT HDMI output | ||
| 6 Screw thread (M6) | ||
| 7 Stand | ||
| 8 USB | USB socket | |
| 9 EAR | PHONE Headphones output | |
| 10 AV | OUT AV output | |
| 11 Stereo Speakers | ||
| 12 Charge status display | ||
| 13 Operating status display | ||
| 14 Receiver for remote control signals | ||
| 15 Power indicator | ||
| 16 Ground | ||
| 17 Positive pole/screw cap for the fuse holder | ||


Overview: Remote control
POWER Switch device on/off
Mute Mute sound
GOTO Jump to a specific playback position
RPT Activate repeat mode
SUB-T Call up subtitles
SCREEN Display screen settings/change HDMI resolution
◀◀ ▶▶ Picture search backwards/forwards
I ◀ ◀ ▶ ▶ I Previous/next file
AUDIO Change audio tracks
▶|| Pause/start playback
Open USB media player/stop playback
RED Red function key
GREEN Green function key
YELLOW Yellow function key
BLUE/SLEEP Blue function key, set sleep timer
MENU Show main menu
EXIT Exit menu
▲/▼/◄/► Select elements in on-screen menus
OK/LIST Confirm selection, display channel list
i Display information
BACK Recall previous channel (Back)
VOL+/VOL- Change volume
EPG Show Electronic Program Guide
TXT Show teletext
CH Switch channels
0-9 Numerical input
TV/RADIO Switch between TV and radio mode
FAV Show favourites list selection


natural_image
Technical line drawing of a device rear panel with a black arrow pointing to the component (no text or symbols present)Overview: Device keys
MENU Show main menu/media player: Back
LIST Confirm selection, display channel list
EXIT / ⏻ Exit menu, switch on/off device (long press)
▲CH▼ Switch channel, select elements in on-screen menus
◀VOL▶ Change volume, select on-screen menu items
OFF ON Mechanical main switch.
Completely switch device off and on.
Power supply
Remote control
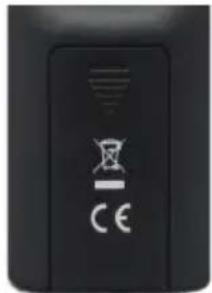
- Open the battery compartment cover by sliding it in the direction of the arrow.
- Insert the batteries (1.5V size AAA) into the compartment. When inserting the batteries, please ensure that the polarity (+/-) is correct. Refer to the markings on the remote control and the batteries.
- Replace the battery compartment cover.
Television
First, slide the main switch of the TV to the OFF position.
Connect the TV (DC IN 12V socket) to a wall outlet using the power supply or to a car cigarette lighter socket using the vehicle power cable.
Slide the main switch to the ON position to turn on the TV.

natural_image
Technical line drawing of a device rear panel with a black arrow pointing to a component (no text or symbols present)Note:
- The built-in battery is charged as soon as the TV is supplied with power. The charging process cannot be interrupted with the main switch.
- The television may only be supplied with power using the accessories supplied (power supply or vehicle power cable).
- The supplied vehicle power cable supports input voltages between 12 V - 24 V and generates a stable supply voltage for the TV. If other connection cables are used, the television may be seriously damaged!
- The indicator light on the vehicle power cable lights up when it can properly supply power to the television. Please note page 24 if the vehicle power cable does not work correctly.
The LEDs on the front panel indicate the charging status of the built-in battery and the operating status of the TV.
Battery LED
| Colour Meaning | |
| RED The television is supplied with power. Battery is charging.A complete charging process takes about 4 hours (main switch in position OFF) or approx. 6 hours (main switch in position ON). | |
| GREEN The television is supplied with power. Battery is fully charged. | |
| "Off" | TV is not supplied with power. Power supply or vehicle power cable not connected. |
Note:
While you are watching TV, the approximate charging status of the battery is displayed when you change channels or press the i key. If the TV is connected to the power supply or the vehicle power cable, the charge level cannot be displayed.
Power LED

| Colour Meaning | |
| RED | The main switch is in the ON position. The television is in standby mode (standby operation).The TV can be switched on with the ⏻ key on the remote control or by pressing and holding the EXIT/ Tunisia key directly on the TV. |
| GREEN The | main switch is in the ON position. The TV is switched on. |
| "Off" | The main switch is in the OFF position, the TV is disconnected from the power supply or the battery is completely discharged. |
Connecting the antenna
Connect the supplied antenna to the ANTENNA socket (see Page 7).
Note:
The supplied antenna is not the optimal choice for every reception area. Ask your local dealer for information on selecting the right antenna.
After sliding the main switch to the ON position, the power LED will first light up green. After a moment, Please wait followed by the start screen will appear on the screen. When the start process is complete, the installation menu is displayed.
You can use the arrow keys ▲/▼ to switch between the menu items. If a menu item is highlighted in colour, you can adjust it with the keys ◀/►.
OSD language
Select the language in which the on-screen menus will be displayed.
Country
Select the country in which you want to operate the television.
Antenna Power
If your antenna (e.g. an indoor antenna with amplifier without its own power supply) must be supplied with power from the TV via the antenna cable, switch on this function.
Note:
Antenna Power must be switched on for the antenna that is included in the package.
Channel search
Start the channel search with the OK key.

• The search can take several minutes.
- If the search does not find all channels, reposition your antenna or use a more efficient antenna and start the search again (see page 20)
• After moving to another region, you must run the channel scan again.
Important keys and functions
Channel switching
You can change the channel with the keys CH▲▼. You can also enter the channel number directly using the 0-9 keys.
Channel list
Call up the channel list by pressing the OK/LIST key.
▲/▼ Select channel.
◀/▶ Switch between radio and television channels.
OK Call up the selected channel.
EXIT Hide channel list.

For information on how to sort channels, see page 18.
TV/Radio
If you want to switch between TV and radio channels, press the TV/RADIO key.
Favourites
If you have created favourites lists (see page 19), you can use the FAV key to access the favourite lists.
◀/▶ Select a favourites list
▲/▼ Select a channel
OK Call up the selected channel
EXIT Hide favourites list
Languages: Subtitles and audio
Press the SUB-T key to open the Subtitle Language menu. Press the AUDIO key to open the Audio Language menu.
▲/▼ Select language
OK Activate the selected language
EXIT Hide menu

- Some channels require you to open Teletext and enter the page number for the subtitles manually.
- Select Off if you no longer want subtitles to be displayed.
Set sleep timer
Press the SLEEP key repeatedly to select a time after which the TV will turn off.
Teletext
Teletext is activated with the TXT key.
0-9 Select teletext page
▲/▼ Select previous/next Page
◀/▶ Select subpages
TV/Radio Hide teletext display
EXIT End teletext display

Press the MUTE key on the remote control to turn off the sound. Press the MUTE key again to turn the sound back on.
Change volume
Use the VOL+ / VOL- keys to change the volume.
Note:
If you output digital multi-channel audio from the HDMI output as bitstream, the volume control of the TV will have no effect (see page 21)
Information
Press the i key to display various information about the current program and the approximate battery charge status.
Note:
- The battery indicator is not available while the battery is charging.
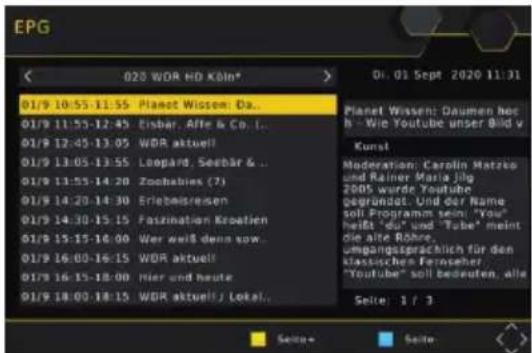
Electronic Program Guide
Press the EPG key to display the program guide.
▲/▼ Select a programme
◀/▶ Switch channels
YELLOW/BLUE Scroll through the description of the programme.
EXIT Hide EPG
Screen setting - Connecting additional devices
While the built-in screen is active, the SCREEN key can be used to display the screen settings menu.
BRIGHTNESS/CONTRAST/COLOUR
Set the values according to your wishes.
LED-BL
This setting affects the brightness of the LED illumination of the screen and the power consumption or battery life.

| Setting Meaning | |
| ECO | Reduced screen brightness. Low energy consumption and long battery life. |
| NORMAL | Medium brightness. |
| OUTDOOR | Maximum brightness, e.g. when using the TV outdoors. The battery life is shorter in this mode. |
LANGUAGE
Changes the language for the screen settings menu.
RESET
Resets the screen settings to the factory defaults.
Connecting an external TV
You can connect the portable TV to a larger TV using an HDMI or AV cable.
HDMI output
Connect the HDMI output (see page 7) of the portable TV to an HDMI input of another TV. Refer to the manual of your TV to find out how to access the HDMI input. An HDMI cable is required for the connection. This is not included with the television. The built-in screen and speakers of the portable TV are automatically turned off when an HDMI connection is used.
Note:
See page 9 and 20 to learn how to change the HDMI resolution.
AV output
Connect the AV OUT output (see page 7) of the portable TV to an AV input of another TV. Refer to the manual of your TV to find out how to access the AV input.
Note:
• See page 19 to adjust the aspect ratio to the connected TV.
- You can turn off the speaker built into the portable TV. See page 22.
- The AV cable supplied with the portable TV is required for the connection.
Connecting additional devices - USB media player
AV jack plug
Diameter: 3.5mm
Length: 14mm
PIN assignment
1 PIN: Audio left
2 PIN: Audio right
3 PIN: Video FBAS
4 PIN: Ground
Headphones
You can connect stereo headphones (3-pin plug) and most headsets (4-pin plug, CTIA standard) to the TV (see page 7). The built-in speakers are switched off when headphones are connected.


USB storage devices
Connect USB memory devices to the USB socket of the portable TV (see page 7).
Note:
• Make a backup of all files on a USB storage device before connecting it to the TV.
- If your USB storage device is no longer recognized, the file system may be damaged. Please check it with the data carrier diagnostic of your computer.
- The TV may take some time to recognize USB devices and USB devices are ready for operation. During this time, the television may react with a delay to inputs from the remote control.
- A variety of different USB storage devices are currently sold and not all of them meet the specifications for USB mass storage devices. If your USB memory device is not recognized, please try another USB memory device.
- Storage devices with "MBR" partition style up to 2048GB (2TB) are supported.
- Storage devices with "GPT" partition style cannot be used with the TV
USB media player
Open the media player with the ■ key.
The media player allows the playback of the following file types: music, photo and film.
Use the keys ◀/▶ to select the desired file type and confirm your selection with the OK key.

File browser
▲/▼ Select file/folder
OK Open/playback file/folder
Full screen playback
▶|| Start slide show (only for image files)
BLUE Change view (only for image files)

BACK/MENU Navigation to the parent folder
EXIT Return to the selection screen
Playback - general
▶▶| Play next file
|◀◀ Play previous file
▶|| Pause/resume Play
STOP ■ Stop playback
GOTO Jump to a specific playback position (not during image playback)
RPT File repeat/random playback
i Display file information (not during music playback)
Playback - photo
RED Enlarge or reduce the image
GREEN Rotation of the image by 90° counterclockwise
YELLOW Clockwise rotation of the image by 90°
Playback - film
AUDIO Switching audio tracks (only for certain video files)
SUB-T Display subtitles (only for certain video files)
RED Switch between full screen and preview view
Resume playback
For some file formats, the TV can save the position where you stopped playback the last time you played.
If the TV was able to save the last playback position, it will display the Last pos./[EXIT] Cancel selection at the top of the screen when playback is restarted.
Last pos.: Resume playback from the stored position.
[EXIT] Cancel: Stop playback and playback file from
the beginning.
The selection between the options is made with the ▲/▼ keys, confirm your selection with OK.
Supported file formats
Photos: JPEG, BMP (we recommend resolutions suitable for television, e.g. 1280x720 or 1920x1080)
Music: MP3
Video:
| Video codec | Resolution Profile | Container | |
| MPEG1MPEG2 | 1080P@30fps | MP@HL | MPEG, MPG, TS |
| MP4 | 1080P@30fps | Simple Profile, Advanced Simple Profile @Level5 | AVI, MKV |
| H.264 | 1080P@30fps | Main Profile, High Profile @Level 4.2 | AVI, MKV, MP4, TS |
| HEVC H.265 | 1080P@60fps | Main10 Profile, High Tier @Level4.1 | TS, MKV |
Note:
• GMC is not supported.
• Bit rate: 40Mbit/sec.
• Aspect ratio: 4/3, 16/9
- Errors and technical changes reserved.
Press the MENU key to display the main menu.
Channel/Edit channel list
In the submenu you have the possibility to sort or edit the found channels according to your wishes. You can only access this menu if you enter the correct PIN (default: 0 0 0 0 0 0, See page 22).
When you exit channel editing, the changes are saved.
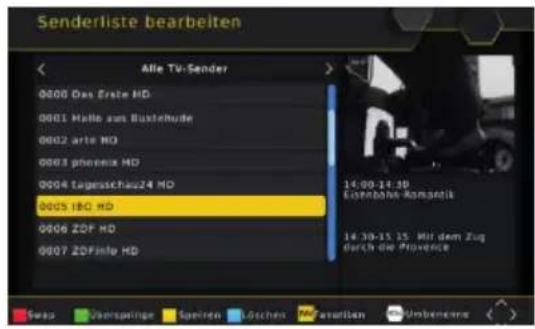
- Use the ▲/▼ keys to select a channel that you want to move to another program number.
- Press the RED key and the channel will be highlighted for moving.
- Use the ▲/▼ keys to select the location to which you want to move the highlighted channel.
- Press OK and the channel will be added to the channel list at the selected location.
Note:
Channels can only be moved if LCN is switched off (see page 19).
Swap
- Use the ▲/▼ keys to select a channel the program number (LCN) of which you want to exchange with another channel.
- Press the RED key.
- Use the 0-9 keys to enter the program number for the exchange.
Note:
Swap is only available if LCN is switched on (see page 19).
Delete
- Use the ▲/▼ keys to select a channel that you want to delete.
- Press the BLUE key, a security prompt is displayed.
- Press OK, the highlighted channel will be deleted
Lock
- Use the ▲/▼ keys to select a channel that you want to lock.
- Press the YELLOW key, the channel will be highlighted for locking.
- Press the YELLOW key again to cancel the lock.
Note:
The TV will ask for the PIN before a locked channel can be watched.
Skip
- Use the ▲/▼ keys to select a channel that you want to skip.
- Press the GREEN key and the channel will be marked for skipping.
- Press the GREEN key again to remove the marking.
Note:
Channels marked for skipping cannot be selected using the CH+/CH- keys.
Favourites
The television has 8 groups of favourites. You can assign each channel to any favourite group. A channel can be assigned to several groups.
- Use the ▲/▼ keys to select a channel you want to add to a favourite group.
- Press the FAV key. The Favourites menu appears.
- Select the favourites group from ▲/▼ to which you want to add the channel.
- Press the OK key, the corresponding symbol appears in front of the favourite group.
- Press the EXIT key to close the Favourites menu.

- Switch off cancels the selection of all favourite groups.
- Use the BACK key to change the name of the selected favourite group.
Rename channel
Select a channel with the ▲/▼ keys and press the BACK key. The on-screen keyboard is displayed. Use the navigation keys ◀/▶/▲/▼ to select letters and confirm the letter with the OK key. When the new channel name is complete, navigate to the OK field and press the OK key. The channel then receives the new name.
Channel/EPG
See page 14.
Channel/sort
This option allows you to sort the channels according to the specifications (LCN, ONID, name, etc.) within the list. As a result the previous sorting is lost.
Channel/LCN
Some DVB providers transmit LCN information. These allow the provider to generate a presorted channel list. Only activate LCN if your provider supports this feature.
Picture/aspect ratio
This setting determines which picture format your TV uses and how content with a different aspect ratio is adapted for your TV.
Note:
You only need to change this setting if you connect an external TV. For the built-in screen, the default setting 16:9 PillarBox is optimal.
| Setting Meaning | |
| 4:3 Pan&Scan | For 4/3 TV. Contents deviating from the aspect ratio are displayed in full-screen format if possible, undistorted, but with loss of information. |
| 4:3 Letterbox | For 4/3 TV. Contents deviating from the aspect ratio are displayed undistorted but possibly with "black bars". |
| 16:9 PillarBox | For 16/9 TV. Contents deviating from the aspect ratio are displayed undistorted but possibly with "black bars". |
| 16:9 Pan&Scan | For 16/9 TV. 16/9 transmissions are displayed full-screen and undistorted. 4/3 transmissions are displayed undistorted but enlarged. This setting is particularly suitable for 4/3 "letterbox" transmissions to reduce the display of "black bars" in this case. |
Picture/HDMI resolution
Here you define the resolution that is output via the HDMI output.
Note:
- Please also refer to the manual of your TV.
- This setting is only active when an external TV is connected via HDMI.
Channel search/automatic scan
When this option is activated, the automatic scan starts. See page 12.
Channel scan/manual scan
You can search for specific channels. To do this, you must know the technical parameters (frequency or channel). The bar display at the bottom of the screen indicates whether a signal can be found with the set parameters. You can also use the bar display to align your antenna. Start the manual channel scan with the OK key.
Channel scan/country
Select the country in which you use the TV.
Channel scan/Antenna Power
If your antenna (e.g. an indoor antenna with amplifier without its own power supply) must be supplied with power from the TV via the antenna cable, please enable this function.
Channel scan/Filter Internet Service
When this function is enabled, the TV will not store internet channels during the channel scan.
Note:
- The TV cannot be connected to the internet and therefore cannot display internet channels.
- This function is not supported by all DVB platform operators.

Channel scan/Filter scrambled Channels
When this function is enabled, the TV will not store encrypted channels during the channel scan.
Note:
The TV cannot display encrypted channels.
Time/Time zone setting
The television automatically sets its clock as soon as a channel is received that transmits time. In order for the TV to calculate the time correctly, the correct time zone must be set.
| Setting Meaning | |
| Auto | The TV sets the time zone automatically. |
| Manual | You must set the time zone yourself. |
Time/Time Zone
If time zone setting: is set manually, you can set the time zone here.

Energy saving according to the requirements of an EU directive. The TV will turn off after 3 hours if no user activity is detected.
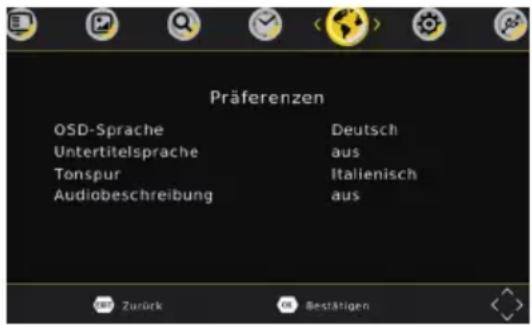
Preferences/OSD language
Select the language in which the on-screen menus will be displayed.
Preferences/subtitle language
Select the preferred language for subtitles.
Preferences/audio language
Select the preferred language for audio tracks.
Preferences/digital audio
This option determines the format in which the audio signal is available at the HDMI output:
| Setting Meaning | |
| PCM | Digital stereo audio. |
| RAW | If a TV programme has a supported multi-channel audio track, this audio format is output via the HDMI output. The device connected to the HDMI output must be able to handle multi-channel audio. |
Note:
- If you cannot hear sound from an external TV, please select the PCM setting.
- Please use the AUDIO key to select a multi-channel audio track of a TV channel or a video file, if available.
- If you output multi-channel audio from the HDMI output as bitstream (RAW), the volume control from the TV has no effect.
Preferences/audio description
Some television channels broadcast a separate audio track for visually impaired viewers (audio description). This setting determines the volume at which the TV mixes the audio description into the main audio track.
Preferences/Internal Speaker
This setting allows you to turn off the built-in speakers of the portable TV.
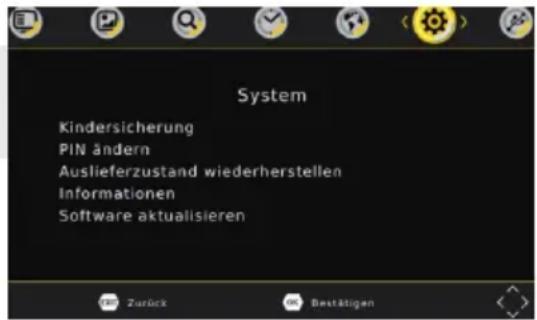
System/parental control
In this menu, you can set the age rating for a television programme from which the picture and sound are only displayed after the PIN has been entered.
System/ Set PIN
After activating the option, you must first enter the old PIN. The default PIN is 000000. The pointer automatically jumps to the next line. Enter a new six-digit PIN here. After you have entered the PIN,
you must enter it again for security reasons.
Note:
If you have forgotten your PIN, you can use the Super PIN to assign a new PIN. Super PIN: 888888
System/Restore factory default
You have the possibility to undo all settings and changes by loading the factory settings. Call up the option and enter the PIN.
- All settings are reset. You must then also perform the search run again.
- Image and speaker settings must be reset separately.
System/information
This option allows you to display information about software and hardware.
System/Software Update
If necessary, the latest firmware is provided on www.xoro.de together with an update guide. Please do not install firmware that you have downloaded from other websites.
USB/XORO media player
This menu item opens the media player (see 17).
USB/photo settings
Display duration
The settings determine how long a single image is displayed during a slide show.
Transition effect
The settings determine how the transition between two images is animated.
Aspect ratio
Determines how image files are displayed.
| Setting Meaning | |
| Keep | Images are displayed without distortion. |
| Discard | Images are adjusted to fit the screen but may be distorted. |
USB/Subtitle settings
Font size
Determines the font size of subtitles in the media player.
Background
Defines the background on which subtitles are displayed in the media player.
Font colour
Defines the font colour in which subtitles are displayed.
Technical data
General data
Power supply 12 V DC/1.5 A
Power consumption 18 W (max.) / <0.5 W standby)
Dimensions 245 x 160 x 29,3 mm
Weight (approx.) 700 g (TV)/1000 g (TV, remote, power supply, antenna, vehicle cable, AV-Cable)
Battery
Capacity (typical) 7.4 V/3500 mAh
Technology Li-Ion
Weight 130 g
Speakers
Power Stereo (2x1.3 W)
Screen
Technology TFT LCD with LED Backlight
DVB-T/T2 Tuner
Input frequency 174-230 MHz, 470-858 MHz
Antenna power supply 5 V, max. 100 mA
Memory locations 400 channels
Note:
Errors and technical changes reserved.
| Symptoms Cause and solution | |
| Not all channels are foundNo receptionImage disturbances with strong mosaics or artefacts, frozen images | No DVB-T/T2 TV reception in your areaAlign the antenna correctly (see page 20).Repeat the scan (see page 20).Buy an efficient antenna (see page 12).If necessary, switch on the power supply for your antenna (see page 20, 12). |
| No image on a connected TV | HDMI: Check the HDMI resolution (page 9, SCREEN key, see page 20).AV OUT: You need a suitable cable (see page 15). |
| No image on the built-in screen | The built-in screen is turned off when an HDMI connection is used. |
| The built-in screen is too dark | Change the setting of the LED backlight (see page 15 Page). |
| No sound | Increase the volume (VOL +).HDMI: See page 21 for HDMI audio settings.AV OUT: You need a suitable cable (see page 15).The built-in speakers are switched off when headphones or an HDMI device is connected.Check that the built-in speakers are turned on (see page 22). |
| USB device is not recognized | Please note the information on page 16. |
| Device shows the wrong time | Please note the information on page 21 (time zone setting). |
| The TV switches off after 3 hours | See page 21, “Auto Standby” setting. |
| Image is too small or distorted | See page 19. |
| Charging the battery takes longer than expected | Switch off the TV with the main switch to reduce the charging time (see page 11). |
| The LED on the vehicle power cable does not light up. The TV is not supplied with power. | The voltage at the input of the vehicle power cable is too high or too low.The output of the vehicle power cable is overloaded or short-circuited.Disconnect the TV from the cable and check that the LED is lit. Contact the XORO customer service.The tip of the vehicle power cable can be unscrewed for checking and changing the fuse.ATTENTION: The fuse may only be replaced by a fuse with identical values. The fuse only responds in case of extreme overload. When replacing a defective fuse, the vehicle electrical system, the television and the general function of the vehicle power cable must therefore also be checked. Consult a specialist. |
natural_image
Technical line drawing of a device rear panel with a black arrow pointing to a component (no text or symbols present)Fernseher
natural_image
Technical line drawing of a device rear panel with a black arrow pointing to the component (no text or symbols present)Hinweis:


- Televisore
- Avvertenza:
- Energy consumption - Conformity - Pixel error 3
- Safety and intended use 4
- Environment - Customer service 6
- Scope of delivery - overview 7
- Power supply 10
- Status display - Charging process - Antenna 11
- Initial installation 12
- Daily operation 13
- Screen setting - Connecting additional devices 15
- Connecting additional devices - USB
- media player 16
- Main menu 18
- Troubleshooting 24
- Energy consumption
- Conformity
- Pixel errors
- Power supply and rechargeable battery
- Installation and handling
- Receiving system
- USB socket
- Remote control and batteries
- Connecting headphones
- Usage
- Service case
- XORO customer service
- Disposal of electrical and electronic products (waste equipment)
- Recycling of paper and cardboard
- Recycling of plastics
- Disposal of batteries
- Scope of delivery
- Overview: Main unit
- Overview: Remote control
- Overview: Device keys
- Power supply
- Remote control
- Television
- Note:
- Connecting the antenna
- OSD language
- Country
- Antenna Power
- Channel search
- Important keys and functions
- Channel switching
- Channel list
- TV/Radio
- Favourites
- Set sleep timer
- Teletext
- Change volume
- Information
- Electronic Program Guide
- Screen setting - Connecting additional devices
- BRIGHTNESS/CONTRAST/COLOUR
- LED-BL
- LANGUAGE
- RESET
- Connecting an external TV
- HDMI output
- AV output
- Connecting additional devices - USB media player
- AV jack plug
- PIN assignment
- Headphones
- USB storage devices
- USB media player
- File browser
- Playback - general
- Playback - photo
- Playback - film
- Resume playback
- Supported file formats
- Channel/Edit channel list
- Swap
- Delete
- Lock
- Skip
- Rename channel
- Channel/EPG
- Channel/sort
- Channel/LCN
- Picture/aspect ratio
- Picture/HDMI resolution
- Channel search/automatic scan
- Channel scan/manual scan
- Channel scan/country
- Channel scan/Antenna Power
- Channel scan/Filter Internet Service
- Channel scan/Filter scrambled Channels
- Time/Time zone setting
- Time/Time Zone
- Preferences/OSD language
- Preferences/subtitle language
- Preferences/audio language
- Preferences/digital audio
- Preferences/audio description
- Preferences/Internal Speaker
- System/parental control
- System/ Set PIN
- System/Restore factory default
- System/information
- System/Software Update
- USB/XORO media player
- USB/photo settings
- Transition effect
- USB/Subtitle settings
- Background
- Technical data
- Fernseher
- Hinweis:
Brand : XORO
Model : PTL 1015 V2
Category : Television