
BS 1247 - Vacuum Cleaner CLATRONIC - Free user manual and instructions
Find the device manual for free BS 1247 CLATRONIC in PDF.
| Brand | Clatronic |
| Model | BS 1247 |
| Product Type | Bagless Vacuum Cleaner |
| Power Supply | 230 V, 50 Hz |
| Rated Power | 1200 W |
| Maximum Power | 1700 W |
| Protection Class | II |
| Dust Container Capacity | About 1/3 of the container (to be emptied regularly) |
| Filtration System | Triple filter: main in container, motor protection, and exhaust filter |
| Filter Cleaning | Filters washable in hot water (no detergent); do not use washing machine or hair dryer |
| Exhaust Filter Replacement | Every 6 months |
| Hose Type | Adjustable height telescopic hose |
| Included Accessories | 2-in-1 nozzle (crevice and brush), floor nozzle with carpet/hard floor adjustment |
| Cable Length | Approx. 5 m (reel with yellow and red mark) |
| Storage Device | Cable rewind with push button, hanging support for nozzle |
| Air Regulator | On handle to control suction power |
| Warranty | 24 months from purchase date |
| Safety | Do not vacuum liquids or hot ashes; keep away from children |
| Intended Use | Household use only |
Frequently Asked Questions - BS 1247 CLATRONIC
User questions about BS 1247 CLATRONIC
0 question about this device. Answer the ones you know or ask your own.
Ask a new question about this device
Download the instructions for your Vacuum Cleaner in PDF format for free! Find your manual BS 1247 - CLATRONIC and take your electronic device back in hand. On this page are published all the documents necessary for the use of your device. BS 1247 by CLATRONIC.
USER MANUAL BS 1247 CLATRONIC
Overview of the Components 3
Instruction Manual. 60
Technical Data 66
Guarantee 66
Spis tresci PL Strona
General Safety Instructions
- Read the operating instructions carefully before putting the appliance into operation and keep the instructions including the warranty, the receipt and, if possible, the box with the internal packing.
- The appliance is designed exclusively for private use and for the envisaged purpose. This appliance is not fit for commercial use. Do not use it outdoors (except if it is designed to be used outdoors). Keep it away from sources of heat, direct sunlight, humidity (never dip it into any liquid) and sharp edges. Do not use the appliance with wet hands. If the appliance is humid or wet, unplug it immediately. Do not put it in water.
- When cleaning or putting it away, switch off the appliance and always pull out the plug from the socket (pull on the plug, not the cable) if the appliance is not being used and remove the attached accessories.
- Do not operate the machine without supervision. If you should leave the workplace, always switch the machine off or remove the plug from the socket (pull the plug itself, not the lead).
- To protect children from the dangers posed by electrical appliances, make sure that the cable is hanging low and that children do not have access to the appliance.
- Check the appliance and the cable for damage on a regular basis. Do not use the appliance if it is damaged.
- Do not try to repair the appliance on your own. Always contact an authorized technician. To avoid the exposure to danger, always have a faulty cable be replaced only by the manufacturer, by our customer service or by a qualified person and with a cable of the same type.
- Use only original spare parts.
- Pay careful attention to the following "Special Safety Instructions".
Special Safety Instructions
- Do not suck up liquids!
- Do not suck up hot ashes or pointed or sharp objects!
- Do not use the appliance in humid rooms!
- Never use without the fi lter. Check that the fi lter is inserted correctly!
- hair, clothing and body parts away from the vacuum nozzle during use!
- Keep the vacuum cleaner away from sources of heat like radiators, ovens, etc!.
- In order to ensure your children's safety, please keep all packaging (plastic bags, boxes, polystyrene etc.) out of their reach.
Overview of the Components
1 Vacuum hose 9 Floor nozzle
2 Hose connection 10 Cable-winding key
3 Telescopic suction tube 11 Carrying handle
4 Coupling 12 Air slide (not shown)
5 Button for releasing the 13 Cover of outlet fi Itern new dust container
6 Dust container with fi Iter insert
7 On/off switch ,2-in-1" nozzle
8 Parking assistance (groove and brush nozzle)
GB
Start-up
- Insert the connection head of the suction hose into the hose connector until it locks in place. To do so, please press the buttons simultaneously. In order to release the hose again, please press the buttons once more on the connection head.
- Keep the buttons pressed down and then pull out the hose.
- Insert the vacuum tube into the handle if required.
Using the Appliance
- Fit on the accessory.
- Unwind the necessary length of cable and insert the plug in a duly installed 230V / 50Hz protective contact socket.
- Vacuum at a steady speed. There is no need to exert pressure.
- Attention: pay attention to the range that can be covered with the cable length.
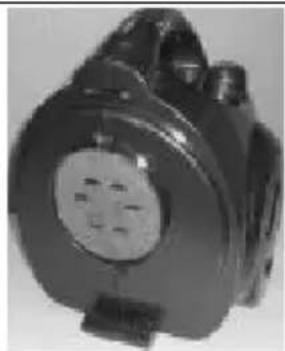
Cable winding device
Pull out the cable up to the maximum length indicated with the yellow mark. Never pull the cable out up to the red mark as the cable winding can be damaged. Said damages are not covered by the warranty.
Winding
Press the cable winding button and guide the cable. Hold the cable to avoid wrapping.
GB
Telescope Vacuum Pipe
The height-adjustable vacuum pipe enables individual alignment to your height.
- Hold the suction tube tightly and unlock the coupling by turning in the direction of the UNLOCK arrow.
- Slide the vacuum pipe to the desired length.
- To lock the coupling please turn it in the LOCK direction until tight.
Nozzle accessories
Groove and brush nozzle: "2-in-1" nozzle: For crevices, slits etc. please use the nozzle without the attachment. If you would like to vacuum items such as upholstery for example, please place the brush attachment on the crevice nozzle, taking note of the recess.
Floor nozzle: To clean carpets or smooth surfaces.
In order to facilitate control, the floor nozzle is fitted with rollers and can be adjusted to suit the circumstances.
Carpet: make sure that the brushes on the floor nozzle are deactivated when cleaning carpets. If this is not the case, press the lever on the floor nozzle forwards with your foot.
In order to vacuum even surfaces, for example, press the lever back with your foot. This activates the brushes (you can tell whether this is the case by checking that the brushes are visible on the floor nozzle).
Releasing the nozzles: Pull these off while turning slightly.
Air Slide
Open the air slide on the hose handle in order to regulate the airflow or to clear any particles sticking to the nozzle.
Filter
Your machine has three fiiter systems. The traditional dust bag system has been replaced by a transparent dust container. In this, coarse dirt particles and tiny particles flating in the air are swirled out of the suction air by the high speed of the air current.
The quantity of dust can be easily read off at any time on the container, which is also very easy to empty.
The purchase of dust bags is no longer necessary.
Main Filter (in the Dust Container)
If the dust container is approximately 1/3 full with dust particles, or if the suction power is reduced, please proceed as follows:
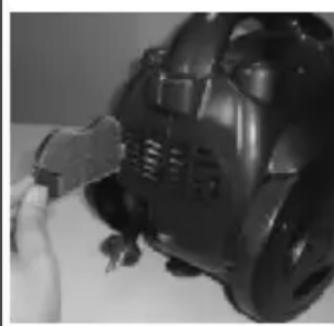
| Emptying the Dust Container In order to facilitate handling, fi rst release the suction tube from the connection head (see “Initial Operation”). Lift the key to release the dust container and then remove it. |
| Carefully pull the fi liter element out by holding both clamps. Empty the contents of the dust container. Then re-insert the fi liter element. The marking ← on the fi liter element is in line with the ▷ marking of the dust container (see illustration). Please ensure that the fi liter element is straight and tightly in position. Tighten the dust container and the suction tube again until it clicks into place. |
GB
GB
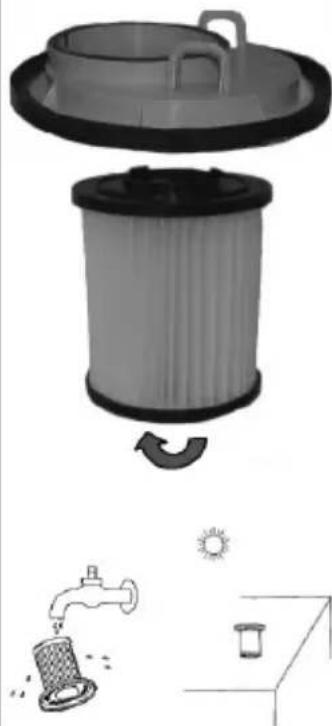
Cleaning the Filter Element
Important:
Always empty the dust container fi rst before re-inserting the fi lter element.
Pull the fi tter element out carefully by holding both clamps.
- Unlock the main fi iter by turning slightly (see illustration). The fi iter can then be removed by pulling downwards. Clean the fi iter by tapping and gentle brushing.
- Now replace the components. It is important to insert the sealing ring as otherwise the fi liter will leak. Please tighten the main fi liter again, taking note of the recesses.
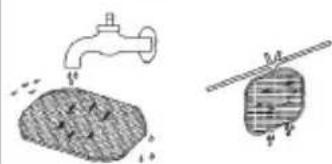
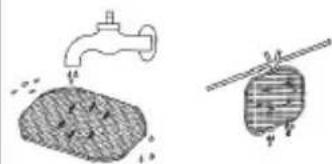
Every third time the dust container is emptied, or in the case of severe soiling, clean the fi liter by allowing water to flow through the fi liter fabric against the direction in which the vacuum cleaner blows. The dust container should only be reinserted when it is completely dry!
Now place this back in position once it has completely dried!
Caution:
Never wash the fi liter in the washing machine, and please do not use a hairdryer to dry it.
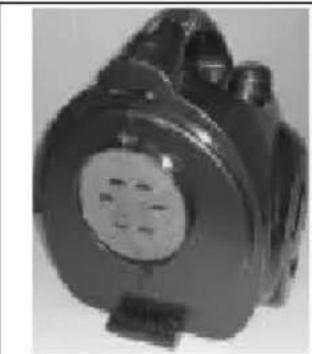
Motor protection fi Iter (inlet fi Iter)
The inlet fiiter is located in the dust container compartment. The fi liter is located vertically in the rear section of the dust housing (see illustration). Pull the fi liter out towards the front. Clean the motor protection fi liter approximately every 10th time you empty the dust container. If necessary, the fi liter can also be washed in warm water without any additives. Place it back into place only once it is completely dry!
Outlet filer (13)
The appliance is also equipped with an outlet fi liter. In order to ensure that the fi liter works correctly, we recommend that you replace it every six months. It is located on the rear part of your appliance behind a ventilation grid. Open the ventilation grille by pressing the lever on its side. Remove the fi liter and clean as described above. Fit the fi liter back into place and close the ventilation grid by following the steps above in the opposite order.
GB
Important note!
- Cleaning may become necessary after a shorter time, depending on the conditions of use, e.g. when vacuuming fi ne dust.
- If the suction power of your vacuum cleaner diminishes please clean the fi iters as described.
- If the suction power suddenly diminishes during operation this may be due to the fi Iters being locked.
Cleaning and storage
Cleaning
- Pull the plug out of the socket before cleaning!
- Clean the casing with a dry cloth.
- Clean the motor protection fi liter approximately every 10^th time it is emptied, or more often if necessary. Clean the fi liter in hot water without additives. Put it back into place only once it is completely dry.
Storage
- Let the iron cool down completely.
- Wind the cable completely.
- Insert the hook of the nozzle on the back of the device into the parking aid (8).
GB
Technical Data
Model: BS 1247
Power supply: 230 V, 50 Hz
Power consumption:
P 1200W nom.
P 1700W max
Protection class: II
This device has been tested according to all relevant current CE guidelines, such as electromagnetic compatibility and low voltage directives, and has been constructed in accordance with the latest safety regulations.
Subject to technical changes without prior notice!
Guarantee
The device supplied by our Company is covered by a 24 month guarantee starting on the date of purchase (receipt).
During the life of the guarantee any fault of the device or its accessories *) ascribable to material or manufacturing defects will be eliminated free of charge by repairing or, at our discretion, by replacing it. The guarantee services do not entail an extension of the life of the guarantee nor do they give rise to any right to a new guarantee!
Proof of the guarantee is provided by the proof of purchase. Without proof of purchase no free replacement or repair will be carried out.
If you wish to make a claim under the guarantee please return the entire machine in the original packaging to your dealer together with the receipt.
*) Damage to accessories does not mean automatic free replacement of the whole machine. In such cases please contact our hotline. Broken glass or breakage of plastic parts are always subject to a charge.
Defects to consumables or parts subject to wearing (e.g. motor pistons, kneading blades, drive shafts, spare remote control, spare toothbrushes, saw blades, etc.) as well as cleaning, maintenance or the replacement of said parts are not covered by the guarantee and hence are to be paid!
The guarantee lapses in case of unauthorized tampering.
After the expiry of the guarantee
After the expiry of the guarantee repairs can be carried by the competent dealer or repair service against the payment of the ensuing costs.
GB
Meaning of the "Dustbin" Symbol
Protect our environment: do not dispose of electrical equipment in the domestic waste.
Please return any electrical equipment that you will no longer use to the collection points provided for their disposal.
This helps avoid the potential effects of incorrect disposal on the environment and human health.
This will contribute to the recycling and other forms of reutilisation of electrical and electronic equipment.
Information concerning where the equipment can be disposed of can be obtained from your local authority.
In many EU countries the disposal of electrical and electronic equipment in the domestic waste is prohibited from August 13, 2005 on. In Germany from March 23, 2006 on.

PL
- H3 coo6paKeHn 6e30nacHOCT nIJI dTeH He OCTaBnIte neKaTb yNaKOBky (nlaCTNKOBblc MeuKn, KapTOH, neHONnact N T.D.) 6e3 npncMOtpa.
O63op detae np6opa
3 MexaHn3M CmTaBbAHH
10 Khonka MexaHn3Ma CMatbHaHH
cTeBOro UHypa cTeBOrO UHypa
4 CoyneHeHne 11 Pyka Ina nepeHoCKn
5 KhoNka pa36noknpOBKn 12 Bo3dyuHa8 3acNoHka (6e3 pnc.) KOHTeHepa-tnIec6OpHnKa 13 KoxyBbInyckHoro fHbTp a
MexaHn3M cMaTbIBaHHcTeBOrO uHypa
IoxanyiCTa He BbITrNBaIte cTeB0n Hpy daee JKeIToMETKn. Hn B Koem Cnyae He BbITrNBaIte ero Do KpaCHO METKn, 3TO MOKeT npHBecT N NOIOMKe MExAHN3Ma CmTaIBaHn. Ioo6hble NOLOMKn He nnonaIoT noR rapaHTnIO.
CmatbBaHne
HaKMITE Ha KHONKY MexAHIN3Ma CMATbIBAHN IN NOMaJIeHbky NOdaBaIte Ka6eNb. DePKeNTe Ka6eNB Kpenko B pyKax, YTO6blpeDfBpAITb erO xIecTaHne.
94

Teleckonnuecka nIecochTpy6a
I3MeHeHne dInHb IBCacbBaIOue Tpy6a no3BOJrEt Bam noO6paTb yO6Hyo dnn BaWero poCTa pa6Ouyo BlicOTy.
- Bo3bMnte KpeNko B pyKN nbIeocchHyo Tpy6y n pa36IoKnyTe coUneHHe, NOBepHyB erO B HnpaBNeHHn CtePkn UNLOCK.
- OTPerynpyte dnnHy nbinecochOn Tpy6bl.
-Дязакpenпенгубь кренихо 3a6nokypyte coчileнhoe, NOBepHyB erO B HappaBneHn LOCK.
Conla-HacaKn
YsKoe conno n
conno-ueTka: Hacaikka 2B1":ДЯ ydaeneHn nbIn n3 yrnoB, ueJeN T.I.N. IcNoIb3yIte 3TO cOnIO 6e3 HacaDN. JnMgKoJ Xe Me6eHn HaDeHbTe Ha y3Koe cOnIO uTeKy, O6paTInTe BHNMaHHe Ha BblCTynbl.
OCTOPOXHO BbITaUNTe FINbTp,NOTHHyB ero 3a o6a depKaTeIa.
Pa36IOKpyNe rnaBbHbI FnIbTp KOpOTKIM BpaueHnEM (cM. pnc.). CneDyUoIm WaIOM BbITaUNTe FnIbTp BHN3. IpnOuNtTe FnIbTp BbICTyKnBaHnEm n npn NOMOUn IeTKn C MArKm BOPCOM.
BCTaBBTe BCE DetanH o6paTHo. He 3a6yIbTe BCTaBHbY yNIOHTHeJbHoe KOJIbO, B npHTNBHom Cnyae HnIbTp He 6yDet repMeTHueH. 3aBePHnte rJaBHbI HnIbTp 06paTHO, o6paTHe BHIMaHHe Ha BBICTynbl.
Pocne KaKdoTpeTbeOuHCTKN Hnnp CNbHOM 3aqr3HeHnn PpOMoTe FnbTp NOI npOTOHNOBDOH, HApBaNB CTpyIO BODbl pOTIN HApBaJIeHNBCacbHaHn BO3dyxa. Pocne nonHO rpoCbxHnFnhtpa BCTaBte erO o6paTHo!
BcTaBnTe erO o6paTHo TOnbKO nocne noHoro BBicbXaHnI
BHHMaHHe: Hn B Koem cIyue He MoIe fNbTp B CTnpaIbHO MauHHe n He cyuHte ero noJ FehOM.
RUS
3aunthbIy fNlbTp MoToPa (BXoHOnfNlbTp)
BxodHoi FnhbTp HaxoHITcB OTCKe dIa KOnTeHepa-Nblnc6OpHnka. FnhbTp pa3MeueH BeptHKalbHo B 3aDHe Yactn Kopnyca Nblncoca (CMOTpn PnC.). NotAHnTE FnhbTp Ha ce6r N BbIHbTe erO hapyKy. 3aunTHbI FnhbTp MOTopa Heo6XoHMO npouHsA Tb NocLe KaKDoRo 10 onyctOWeHn I KOnTeHepa-Nblnc6OpHnka. Prn Heo6XoHMoCTn erO MoJHO IpombTb B TeNIO Bode, 6e3 Do6aBOK. BCTabHne erO o6pato HO TOnbKO nocLe noHoi npocuShk!

BbInyckHoi HnIbTp (13)
Kpome Bcero 3neKtponpnpo6chaueH BbInyckhblm FnIbTpom. YTo6bl rapaHTnpOBatb 6e30ka3HyIO pa6Oy FnIbTpa, peKOMeHnyETCn npOnuATb erO KaJkbIe 6 MecaueB. 3TO T FnIbTp HaxODNTcH Ha 3aDHeY qACTN np6Opap 3a BeHTnlaRcHHO PeWetKO. OTkpoTe BEHTnlaRcHHOpeWetKY, Haxab H paBvAr cboky ee. BbInbTe FnIbTp n IpoucnCTte erO, KaK 3TO yKe 6blIO OncaHO. BCTaBBte FnIbTp o6paTHO n 3akpoTe BeHTnlaRcHHOpeWetKY B o6paTHO IOcNeIOBaTEJIbHOCTN.
PonkanyuCTa yUTHe 3TN BaHHbIe npHMeuaHn!
- YnCTka FInbTpa MoKet CTaTb Heo6xOJHMOI upe3 KOpOTKOE BpEMa, B 3aBnCIMOCtN OT yCNOBn EKcNpyatauH, HApPmep ecnn cocatb OeHb MEJIkyIO PbIb.
- Ecni MouHocb nbIeocca ocna6la, npouHCTte fHbTp, KaK 3TO 6blno OnicaHO.
- Ecnn MOUHOCTb nbIinecoca BO BpeMa pa6oTb I HeOKnDaHHO ocna6eET, 3TO MoKet 6bITb npn3HaKOM 3aKyIopKn fNtpa.
UHCTka H xpaHeHne
RUS
UHCTKa
-Перед чистковынты сетевую влку n3 розтkn!
-ПopotриteКорпсусcuхоTprankoI.
3aunHbI ΦnBtp MOTopa Heo6xOIMo IpoounaTb npimepHo nocJe KaJdOro 10 onyctOweHnKoHTeHepa-NbIeC6OpHnKa Hn YaSe,ecn3To Bb3Baet Heo6xOIMocTb. PpOMTe FInbTp B TeNlOu BOe,6e3 Do6aBOk. NocJe noNHO BbcIxAHn BCTaBtE erO o6paTHo.
XpaHeHne
JaTe yTIOr NOHOCbIO OCTbITb.
-ПОЛНOCью CMOTаиTe Ka6eJIb.
BCTaBBTe KpIouOK cOnla BO BcNOMoratelbHoe npncnocO6JeHne (8) Ha o6paHOH cTOpOHe nbInecoca.
TexHHueckne daHHbIe
MoeIb: BS 1247
3JIeKtpoHHTaHHe: 230B,50T
Iotppe6nemam MoHoctb:
P nom: 1200 BaTT
P max. 1700 BaTT
Klacc 3aunr: II
3TO n3deneHne npoJIO BCE Heo6XODMbIe I aKTyAJIbHbIe npOBepKn, npedncaHHbIe dIpeKTHBOI CE, K npm. Ha 3NeKTPomarHHTHyO COBMeCTHMOCt b HCOTBETCTBHe Tpe6OBAHnM K Hn3KOBoJIbTHOH TexHnke, OHO 6blIO TaKKe CkOHCTpyuPObaHO n NOcTpoEHO C yueToM NocJeDnIX Tpe6OBAHnN IO TexHnke 6e30NaChOCTn.
MbOCTaBnem 3a co6oI npaBO Ha TexHueeCKne H3MeHeHHr!
RUS
TapaHTnHoe 06a3aTeJbCTBO
TapaHTnHbI cpoK Ha TeppHTOpN PoCCnCKo Fedepaun yCTaHaBnBaETcnoHOMOHyIMn PpeCTaBtEnAMn.
Kaccobbuek RBAJIETcra paaHTnHbIM TaHOH. Be3 Hero HeBO3MOKeH 6ecnlaTHb peMOHT nnn 3aMeHa N3deJInr.
B cnyuae BO3HNKHOBHnnpTeH3n no rapaHTn, npdeIbBte n3dene B NOHOMKoNKeTAcuH, C opHnHaJIbHOyNAKOBOH N KACCOBbIM YeKOM ToproBoi ToUke, npOdaBwe 3TO n3dene.
*) DepeKbI npHnAdJeXHoCTe He cnyKaT npuHOn Ia ABToMaTHueCKo3aMeHb BCero n3denn. B 3tOM clyuae no3BOHnte Ham, noxanynta, no ropaey JInnn! Pa36HTbIe cTeKJIHHbIe I NOLOMaHbIe INaCTMaCCOBbIe DeTaIIBO3MeUaOTcra TObko 3a DOnONHITebHyIO ONnatY!
DeΦeKtIи3HaunBaembIX npHnadJeKHOCTe HIN TpyuXcR DeTalei (HaPnmep KOHTaKTHbIe 8ETKN MOTOPOB, CMECNTBHLie KpOKN, PnIBoDhble peMHN, 3aNaChbIe NylbTI ynpabLeHHra, 3aNaChbIe 3y6hble 8ETKN, NIIbHbIe NOJOTHa I.T.D.), a TaKHe YnCTKa, TexO6CnyxHBaHne HIN 3aMeHa TpyuXcR DeTalei He NonaAdOT NOI rapaHTHIO, IN OToTMy nPOBOdYrC3a OTdeNbHyO ONnATy!
Tepetn Bckpbtnn 3dJIIN NOCTOPOHmIuamn.
После rapаNTиN
Iocne oKoHuaHnCpoka rapaHTnn,peMOHT n3deNn npOn3BODntc 3a onlaTy, COOTBETCTByUOuIMM MaCTepCKnMn Nn nyHKTaMn cepBnCHoro O6cnyKaBaHn.


CATHRONIC INTERNATIONAL GMBH
D-47906 Kempen/Germany · Industriering Ost 40
Telefon 02152/2006-888
Internet: http://www.clatronic.de · email: info@clatronic.de