
BS 1249 - Vacuum Cleaner CLATRONIC - Free user manual and instructions
Find the device manual for free BS 1249 CLATRONIC in PDF.
| Product type | Bagless Cyclone Vacuum Cleaner |
| Brand | Clatronic |
| Model | BS 1249 |
| Power supply | 230 V, 50 Hz |
| Rated power | 1600 W |
| Maximum power | 2200 W |
| Protection class | II |
| Collection type | Transparent dust container (bagless) |
| Container capacity | Approximately 1/3 of total capacity before emptying |
| Filtration system | 3 filters: motor protection, suction, exhaust |
| Exhaust filter | Replacement recommended every 6 months |
| Cable length | Approximately 8 m (estimated) |
| Power control | Yes, adjustable (low/medium/high) |
| Telescopic tube | Yes, adjustable in height |
| Included accessories | Metal hard floor brush, parquet brush, turbo brush, 2-in-1 nozzle, sofa nozzle |
| Weight | Approximately 5 kg (estimated) |
| Dimensions (L x W x H) | Approximately 40 x 30 x 30 cm (estimated) |
| Maintenance | Empty the container regularly, wash the filters with hot water without detergent |
| Safety | Do not vacuum liquids, hot ashes, or sharp objects; unplug before maintenance |
| Warranty | 24 months from date of purchase |
Frequently Asked Questions - BS 1249 CLATRONIC
User questions about BS 1249 CLATRONIC
0 question about this device. Answer the ones you know or ask your own.
Ask a new question about this device
Download the instructions for your Vacuum Cleaner in PDF format for free! Find your manual BS 1249 - CLATRONIC and take your electronic device back in hand. On this page are published all the documents necessary for the use of your device. BS 1249 by CLATRONIC.
USER MANUAL BS 1249 CLATRONIC
Overview of the Components 3
Instruction Manual. 60
Technical Data 66
Guarantee 66
Spis tresci PL Strona
General Safety Instructions
- Read the operating instructions carefully before putting the appliance into operation and keep the instructions including the warranty, the receipt and, if possible, the box with the internal packing.
- The appliance is designed exclusively for private use and for the envisaged purpose. This appliance is not fit for commercial use. Do not use it outdoors (except if it is designed to be used outdoors). Keep it away from sources of heat, direct sunlight, humidity (never dip it into any liquid) and sharp edges. Do not use the appliance with wet hands. If the appliance is humid or wet, unplug it immediately. Do not put it in water.
- When cleaning or putting it away, switch off the appliance and always pull out the plug from the socket (pull on the plug, not the cable) if the appliance is not being used and remove the attached accessories.
- Do not operate the machine without supervision. If you should leave the workplace, always switch the machine off or remove the plug from the socket (pull the plug itself, not the lead).
- To protect children from the dangers posed by electrical appliances, make sure that the cable is hanging low and that children do not have access to the appliance.
- Check the appliance and the cable for damage on a regular basis. Do not use the appliance if it is damaged.
- Do not try to repair the appliance on your own. Always contact an authorized technician. To avoid the exposure to danger, always have a faulty cable be replaced only by the manufacturer, by our customer service or by a qualified person and with a cable of the same type.
- Use only original spare parts.
- Pay careful attention to the following "Special Safety Instructions".
Special Safety Instructions
- Do not suck up liquids!
- Do not suck up hot ashes or pointed or sharp objects!
- Do not use the appliance in humid rooms!
- Never use without the fi Iter. Check that the fi Iter is inserted correctly!
- hair, clothing and body parts away from the vacuum nozzle during use!
- Keep the vacuum cleaner away from sources of heat like radiators, ovens, etc.!
- In order to ensure your children's safety, please keep all packaging (plastic bags, boxes, polystyrene etc.) out of their reach.
Overview of the Components

1 Cover of outlet fi Iter 10 Cable
2 Hose connection 11 Parking assistance
3 Carrying handle 12 Metal floor nozzle
4 Vacuum power regulator 13 Parquet brush
5 Dust container handle 14 Turbo brush
6 Dust container with 15 Inlet fi lter motor protection fi lter
7 Button for releasing the
new dust container A,2-in-1" nozzle
8 On/off switch (groove and brush nozzle),
9 Cable-winding key B Upholstery nozzle
Accessories:
Start-up
- Insert the connection head of the suction hose into the hose connector until it locks in place. To do so, please press the buttons simultaneously. In order to release the hose again, please press the buttons once more on the connection head.
- Keep the buttons pressed down and then pull out the hose.
- Insert the vacuum tube into the handle if required.
Using the Appliance
- Fit on the accessory.
- Unwind the necessary length of cable and insert the plug in a duly installed 230V / 50Hz protective contact socket.
- Set the vacuum power with the vacuum power regulator.
- Vacuum at a steady speed. There is no need to exert pressure.
- Attention: pay attention to the range that can be covered with the cable length.
Vacuum power regulator
Low vacuum power: For curtains and delicate fabrics
Medium vacuum power: For long-pile velour carpets and textile floring
High vacuum power: For sturdy rugs and floors
Cable winding device
Pull out the cable up to the maximum length indicated with the yellow mark. Never pull the cable out up to the red mark as the cable winding can be damaged. Said damages are not covered by the warranty.
Winding
Press the cable winding button and guide the cable. Hold the cable to avoid wrapping.
GB
Telescope Vacuum Pipe
The height-adjustable vacuum pipe enables individual alignment to your height.
- Unlock the coupling by pressing the key in the direction of the arrow.
- Slide the vacuum pipe to the desired length.
- To lock the device, release the key until you hear it lock in place.
Nozzle accessories
Groove and brush nozzle: For vacuuming upholstery, curtains and in corners and crevices etc.
"2-in-1" nozzle: When this is folded together it can be used as a groove nozzle. If you would like to use the brush nozzle, pull the brush section in the direction of the arrow until it locks in place.
Upholstery nozzle: For cleaning upholstery, curtains etc.
Metal floor nozzle: To clean carpets or smooth surfaces.
Smooth fl
Press down the lever with the brush symbol with your foot. The brush is now visible.
Carpets:
Press down the opposite lever.
Parquet brush: The floor nozzle is fitted with rollers for improved
manoeuvrability. For large areas such as parquet, laminate or tiles etc.
Turbo brush: The floor nozzle is fi tted with rollers for improved
manoeuvrability. The brush is equipped with a rotating and swivelling brush roller driven by the air current.
Removes ground-in dirt, animal hairs, threads and fluff particularly thoroughly. The carpet pile is brushed up to look almost new.
Please note that the turbo brush is not suitable for smooth floors, e.g. parquet, laminate etc. as the surface might be damaged.
Releasing the nozzles: Pull these off while turning slightly.
Air Slide
Open the air slide on the hose handle in order to regulate the airflow or to clear any particles sticking to the nozzle.

Filter
Your machine has three fiiter systems. The traditional dust bag system has been replaced by a transparent dust container. In this, coarse dirt particles and tiny particles fl oating in the air are swirled out of the suction air by the high speed of the air current.
The purchase of dust bags is no longer necessary.
If the dust container is approximately 1/3 full with dust particles, or if the suction power is reduced, please proceed as follows:
| Emptying the Dust Container Press the button to release the dust container and remove it from the vacuum cleaner. | |
| Press the button on the side of the container to empty its contents. Then close the fl ap of the dust container again. |
GB
1. Motor Protective Filter (in the Dust Container)
Cleaning the Filter Element
Important:
Always empty the dust container fi rst before removing the fi lter element.
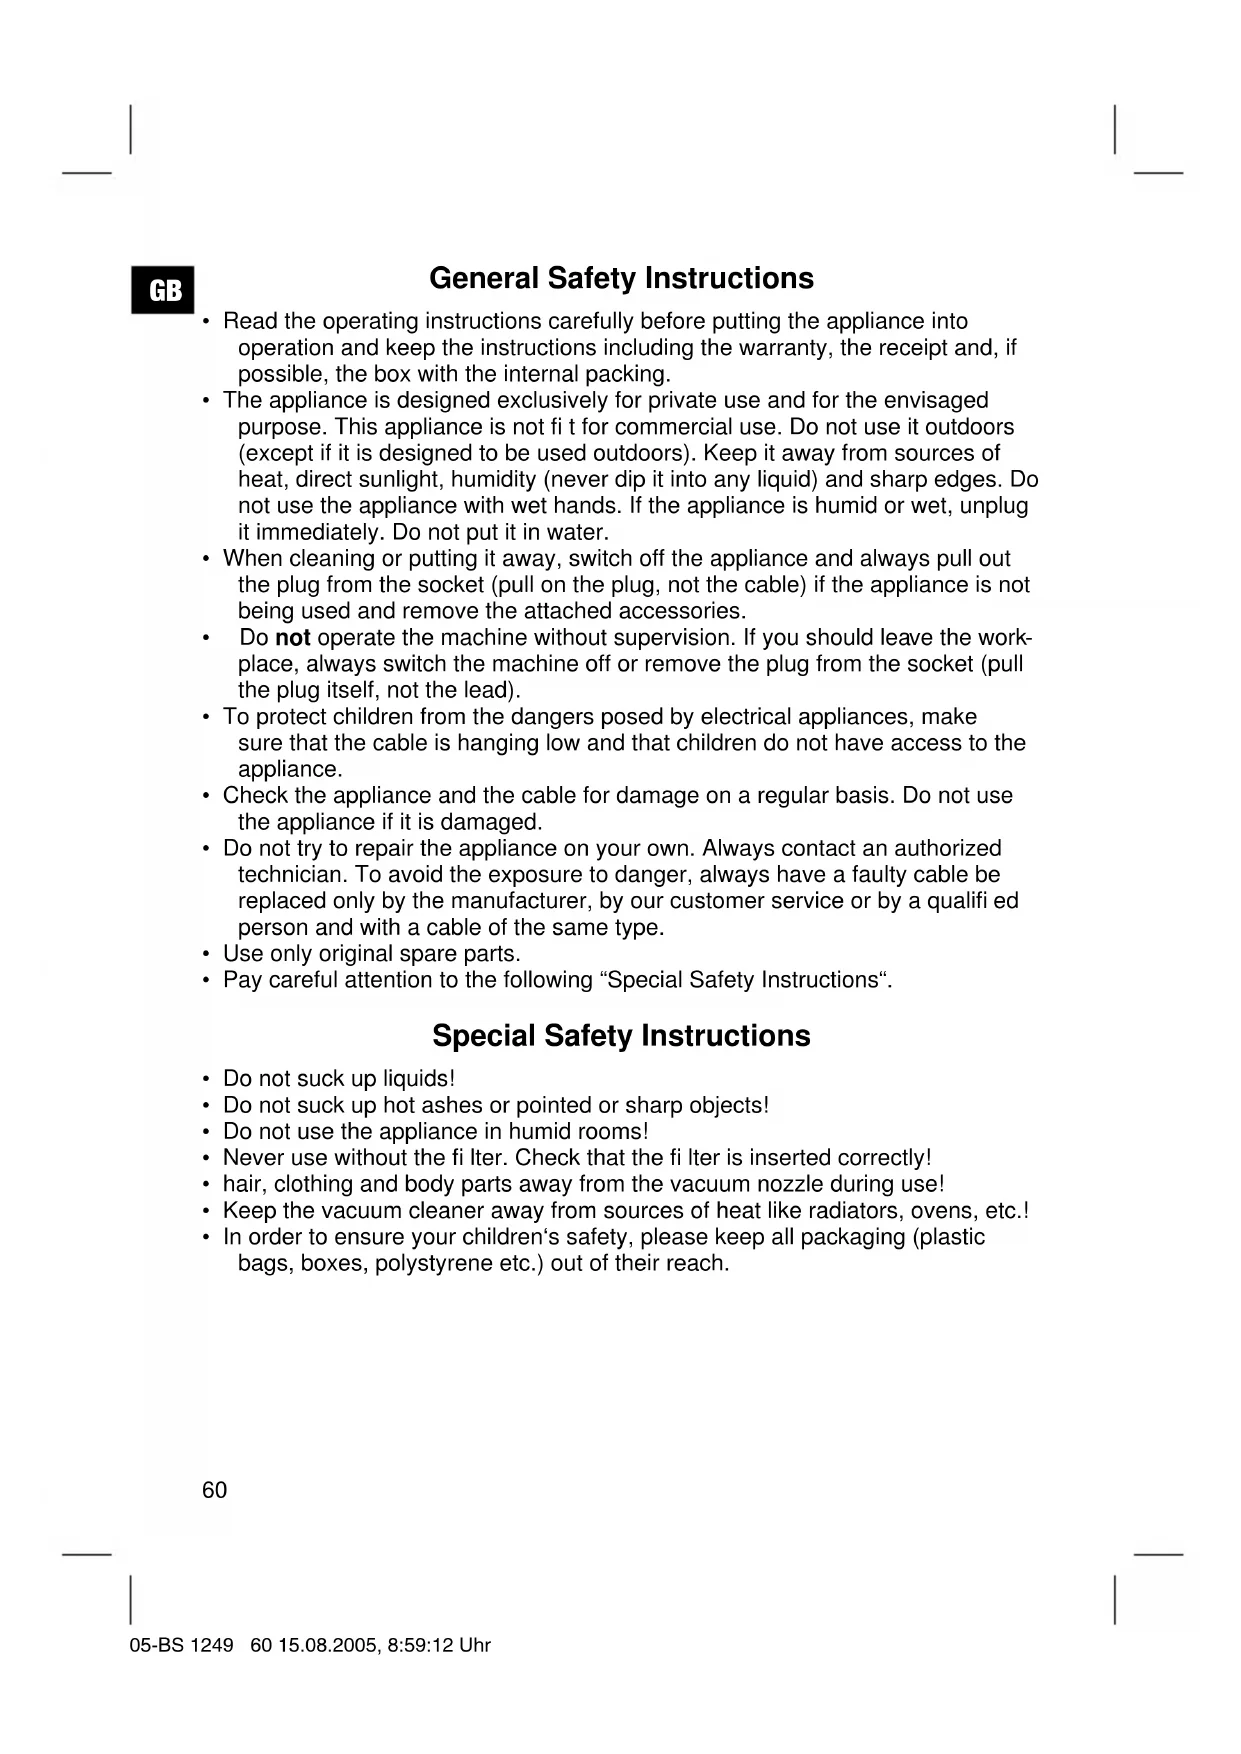
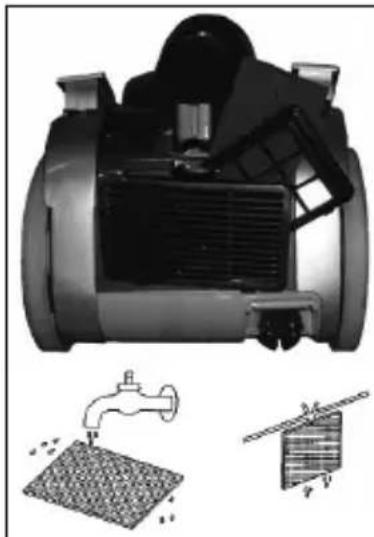
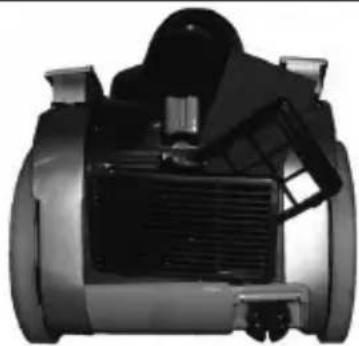
- Press the button to release the dust container and then remove it (see illustration 1).
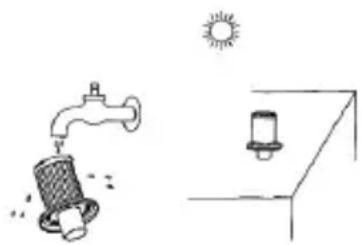
- Remove the contents of the dust container. In order to do this, press the button on the dust container (see illustration 2). Unlock the fi Iter element by pressing briefly in a clockwise direction (see illustration). In the second step the fi Iter element can be removed by pulling downwards
- Clean the motor protection filter by tapping and gently brushing out.
- Now replace the components.
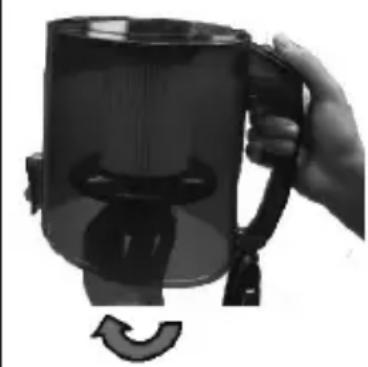
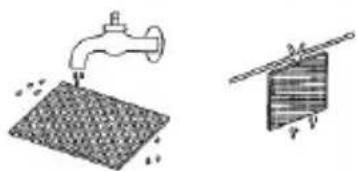
- Then close the flap of the dust container again. Every third time the dust container is emptied, or in the case of severe soiling, clean the fiiter by allowing water to flow through the fiiter fabric against the direction in which the vacuum cleaner blows. The dust container should only be reinserted when it is completely dry!
Now place this back in position once it has completely dried!
Caution:
Never wash the fi Iter in the washing machine, and please do not use a hairdryer to dry it.
2. Inlet filter
The inlet fi liter is located below the dust container compartment. Press the button to release the dust container and then remove it. Turn the fi liter in an anticlockwise direction in order to remove it. Clean the inlet fi liter approximately every tenth time the dust container is emptied, or more frequently if necessary. Please ensure that the fi liter is always clean, as otherwise air circulation cannot be guaranteed. If necessary, the fi liter can also be washed in warm water without any additives. Place it back into place only once it is completely dry!
3. Outlet fi lter
The appliance is also equipped with an outlet fi liter. In order to ensure that the fi liter works correctly, we recommend that you replace it every six months. It is located on the rear part of your appliance behind a ventilation grid. Open the ventilation grille by pressing the lever on its side. Then pull the grille out towards the front. Remove the fi liter and clean as described above. Fit the fi liter back into place and close the ventilation grid by following the steps above in the opposite order.
GB
Important note!
- Cleaning may become necessary after a shorter time, depending on the conditions of use, e.g. when vacuuming fine dust.
- If the suction power of your vacuum cleaner diminishes please clean the fi iters as described.
- If the suction power suddenly diminishes during operation this may be due to the fi iters being locked.
Cleaning and storage
Cleaning
Pull the plug out of the socket before cleaning!
- Clean the casing with a dry cloth.
- Clean the motor protection fiiter approximately every 3. time the vacuum cleaner is emptied. Clean the fiiter in hot water without additives. Put it back into place only once it is completely dry.
Storage
- Let the iron cool down completely.
- Wind the cable completely.
- Please position the device horizontally and insert the hook on the telescopic tube into the parking aid (11) on the back of the device.
GB
Technical Data
Model: BS 1249
Power supply: 230 V, 50 Hz
Power consumption:
Pnom: 1600W
P max. 2200 W
Protection class: II
This device has been tested according to all relevant current CE guidelines, such as electromagnetic compatibility and low voltage directives, and has been constructed in accordance with the latest safety regulations.
Subject to technical changes without prior notice!
Guarantee
The device supplied by our Company is covered by a 24 month guarantee starting on the date of purchase (receipt).
During the life of the guarantee any fault of the device or its accessories *) ascribable to material or manufacturing defects will be eliminated free of charge by repairing or, at our discretion, by replacing it. The guarantee services do not entail an extension of the life of the guarantee nor do they give rise to any right to a new guarantee!
Proof of the guarantee is provided by the proof of purchase. Without proof of purchase no free replacement or repair will be carried out.
If you wish to make a claim under the guarantee please return the entire machine in the original packaging to your dealer together with the receipt.
*) Damage to accessories does not mean automatic free replacement of the whole machine. In such cases please contact our hotline. Broken glass or breakage of plastic parts are always subject to a charge.
Defects to consumables or parts subject to wearing (e.g. motor pistons, kneading blades, drive shafts, spare remote control, spare toothbrushes, saw blades, etc.) as well as cleaning, maintenance or the replacement of said parts are not covered by the guarantee and hence are to be paid!
The guarantee lapses in case of unauthorized tampering.
After the expiry of the guarantee
After the expiry of the guarantee repairs can be carried by the competent dealer or repair service against the payment of the ensuing costs.

Meaning of the "Dustbin" Symbol
Protect our environment: do not dispose of electrical equipment in the domestic waste.
Please return any electrical equipment that you will no longer use to the collection points provided for their disposal.
This helps avoid the potential effects of incorrect disposal on the environment and human health.
This will contribute to the recycling and other forms of reutilisation of electrical and electronic equipment.
Information concerning where the equipment can be disposed of can be obtained from your local authority.
In many EU countries the disposal of electrical and electronic equipment in the domestic waste is prohibited from August 13, 2005 on. In Germany from March 23, 2006 on.
PL
Regulator sily ssania
Niski stopien ssania: Do fi ranek, materiałow delikatnych.
Cna6a MoHocb: 3aHaBeCe, TOHKo MaTePN
CpeHnRA MOUHOCTb: IJIy BeINHOBbIX IN TEKCTINbHBIX NIOOB C DInHHbIM BOPCOM
MexaHn3M cMaTbIbAHnCeTeBOrO shHypa
IooKaiyIcTa He BbITaHbAte CeTeBOH UHyp DaJee XeJIToH MeTKn. HnB Koem Clyuae He BbITaHbAte eO Do KpaCHO MTeKN, 3TO MOXET PnIBeCTN K NOJOMKe MexAHN3Ma CMaTbIBaHH. IoIObHbIe NOnOMKn He NOnaDaIOT NOD rapaHTHO.

CmTaBbAHe
HaKMTe Ha KhoNky MexaHn3Ma CmTaBbAHn I NOMaJIeHbKy NODaBaIte Ka6eJIb.
JepXHTe Ka6eJIb KpeNko B pyKaX, YTO6bl npEOTBpaTNTb erO XJIecTaHne.
Teleckonuuecka nblncocna Tpy6a
I3meHHe IINHb IBCaBbAHOse Tpy6a No3BOJAEr Bam noO6paTb yO6HyIO dnn BaWero poCTa pa6OuyIO BlicOTy.
Pa36KOpuYTe coeHHeHne, HaxaB KOnkY B HappaBHeHn CTpeJKN.
OtperynnpyIte dnnHy nbinecochoH ty6bl.
-Дяфнкали OTnyctte KhoNky,До YeTko CJIbIIMMOrO IeJyKa.
Conna-Hacadkn
Y3Koe conno n
CONNO-ueTKa:ДЯуdaineHnIyMbIN C MmRKOJ Me6eHN,3aHaBeCeN,a TaKKe H3 TpydHOoCTUynbIX yrNoB,SeJeN I
HacaKa ,2B 1": B CIOXeHHOM BnDe ee MOxHO
nPmHeTb KaK y3Koe cOnNo. EcHn Heo6xOdIma
IeTKa,TO BbITAHnTe ee B HApPaBHeHHN CTpeKN, Do
MexaHnueCKoFnKCaunn.
Conno nla uctkn tkahe: Iydaene Hnbln C mRko Me6eN, 3aHaBecei T.d.
MetaJIHueckaIeTKa:JnOuHcTKnKOBPOBnIraDKNX NOBepxHOCTeN.
TnaidKne NOJbI:
HaKMnte HoroHa pbyar C cIMBOLOM 5eTKN I BdaBte erO. Teepb 5eTKn CTaHOBATCR BNINMbIMN.
KobpbI:
Bdabnte npotnboonoljxno lekaun pbuar.
Letka nna napkeTa: Ira IerKoro cKoIbXeHn IeTka OChaueHa
poJHKamN.ДЯбOBJbUHX NOJOB:napKeTHbIX, JINHOJInyMHbIX,KaΦeJIbHbIX N.T.I.
RUS
Typ6oetka: InerKoro cokbHexnIeTka OchaueHa
poHkamn.LeTKaOchauSeHaBpaaIooMmncn KOJIbUoMMnCn 1eTKaMn-BaJKAmN, KOTOpbl npBOADTcB DnKHeHne 3a CHT NOTOKa BO3dyxa.
Oco6o TtataelbHO ydaIaReT BToTaaHHbMycOp,
Wepctb XHBOTbIX,HHTKN CBAJIbBwHcR BOPc.
UeTKa ouehbXopoIo npOecbBaET KObpbl.
HnB Koem cIyuae He MoIte fHnlbTp B CTHpaJIbHOm MaUNHe H He cyuHTe erO nOd ΦeHOM.
RUS

2. BxOaHOnФHJIbTp
BxOJHOH HaxoHTcnoTcKOM KOHTeHepa-NbIeScOpHnKa. HAXMITE KHOJky pa36IOKINPOBKn KOHTeHepa-NbIeScOpHnKa n BbITauNTe erO. BbIKpyTnte FInbTp, Bpauaerero npOTNB YacOBOn CTpeKN. BxOJHOH FInbTp Heo6XoHMo IpOuNtA bPnIMepHo NocJe KaJDoRo
10 onytoweHHa KOHTeHepa-bIineC6OpHnKa Hnn yaaue,ecJN 3TO BB3bBaet HeoXOIMOCtB.
CneHTe 3a Tem, UTO6bI fNJIbTp 6bl BCerDa uHCTbIM, HNaue He 6yDet OBeCneueHa CBO6OHNa cHpKuJnA B03dyxa. Ppi
Heo6xOaHMOCTn erO MOxHO IpOMbIb B TeNIOB OBe, 6e3 IobABoK. BcTaBnIte erO o6paTHO ToJIbKO nocNe pONHO npocUxn!
3. BbInyckHOH ΦnIbTp
Kpome Bcero 3JIeKtpOnp6Op ochaueh BbInyCKHbIM FInIbTpOM. 4To6bl rapaHTnpOBatb 6e3OTka3HyIO pa6Otu FInIbTpa, peKoMeHdyETcR npOuNtAb erO KaKdIbe 6 MeCnueB. 3TO T FInIbTp HaxODHTcR Ha 3aDHeJ qactn np6Opa 3a BEHTINrAOnHOHn peWetKo. OTKpoIte BEHTINrAOnHOHyo peWetKy, HaxKaB Ha pblar c60ky ee. NocLe 3rTO R BYITAHnTe peWetKy BnpeEd. BbInbTe FInIbTp n IpOuNCTnte erO, KAK 3TO yKe 6blno ONicaHo. BCTabTe FInIbTp 6opatho H 3akpoIte BEHTINrAOnHOHyo peWetKy B 6opatho NocJeIOBaTeNbHOCTn.
PonkaNyIcTa yUHTe 3TN BaXHbI npMueaHra!
- Chstka fHbtpa MoKet CtaTb Heo6xOIMoN upe3 KOpOTKoe Bpem, B 3aBnCHMOCTN OT yCIOBn 3KcIpyatauH, HApPmep eCIN COcaTb OyeHb MEKyoPiJIb.
- Ecnn MOUHOCTb NbIeocca Ocna6la, IpOuHCTnTe FnJIbTp, KaK 3TO 6blIO ONNCAHO.
- Ecnn MoUHocTb nbIeCoca Bo Bpemra pa6Otb HeoXnDaHHo ocna6eet,3TO MOKET 6bITb npN3HaKOM 3aKvNOpKn OINbTpA.
Ynctka n xpaHeHne

UHCTka
-Перед чисков Вьнбte сету bukky n3 po3etkn!
- PpOtpnTe KOpnyc cyXoTprAnKoN.
- PpOuHsAaIe 3aUHTbI ΦNtBt MToIpa NocIe KaXdoI 3. YnCTKm MeKKa-NbIeC6OpHnKa. IpnOMoIte FInbTp B TeIIOI B0e, 6e3 Do6aBok. NocIe NOJHO RO BbICbIXaHH BCTaBbTe eO o6pAHO.
XpahHeHne
-ДаTe yTHORY NOHOCtBIO OCTbITb.
-ПОЛНOCТБИСМOTаTe Ka6eJIb.
- YCTaHOBHTe nbIeCoc BepTKaJIbHO n BCTaBBTe KpOK TeJeCKOJIueCKo Tpy6bl B napKOBOUHoe npncnOCO6NeHne (11) Ha erO o6paTHoCtOPOHe.
TexHnueckne daHHbIe
MoeIb: BS 1249
3JIeKtpoNTaHHe: 230B,50T
Iotppe6JMaM MOUHOCTb:
P 1600 BaTT nom.
P 2200 BaTT max.
Klacc 3aunTbI: II
3TO n3deneHne npoJIO BCE Heo6xOaMbIe N aKTyajbHbIe npOBepKn, npEaHcAHbIe DnpeKTHBOI CE, K npIM. Ha 3JeKtpomarHHTHyIO COBMeCTHMOCt b I COOTBETCTBNE Tpe6OBAHm K Hn3KOBoJbTHOH TexHnke, OHO 6blIO TaKKe CKOHCTpyuPObaHO INoCTpoEHO C yueTOM NOcNeDHnx Tpe6OBAHn IO TexHnke 6e30NaCHOCTN.
Mbl octabJrEm 3a co6oI npabo Ha TEXHnueckne n3MeHeHHr!
TapaHTnHoe 6aTeJIbCTBO
TapaHTnHbI cPOK Ha TeppHTOpN PocCnCKo Φeepaun yCTaHaBnBaETcR IIOHOMOHyIMN IpeDCTaBNTeJAMN.
KaccobbyuekABnretc rapaHTnHbIM TaHOH.6e3 Hero HeBO3MOKeH 6ecnlatbI peMOHT nIN 3aMeHa n3deJInr.
B clyuae BO3HKnHOBxHn npTeH3n no rapaHTn, npeIbYBaTne n3dJIe N B NOJHOKOMNKeTAcH, C OPHINHLbHO YnaKObKO H KaccOBbIM YeKOM ToproBOI TOUKe, npoDaBwe 3TO n3dJIe.
RUS
*) DeΦeKtBi npHaJdIeXHcTei He cnyKaT npuHoiD Ia ABToMaTHueCKo3aMeHb BCero n3denn. B 3om cnyae no3BOHte Ham, noKaanycta, noTopruey nnH! Pa3bIbIe cTeKJIHHbIe I NOIOMaHbIe INaCTMaCCOBbIe DeTaNNB03MeaHTcra TOnbKO 3a DOnONHITeNbHyO ONLatY!
DeΦeKtBi N3HaUHbAembIX npHnAdJIeJXHOCTe INI TpyuNXcR DeTalei (HaPnMep KOHTaKTBHe Ie TkN MOTOpOB, CMEcNTeJIbHbIe KpIOKN, pINBOdHbIe peMHN, 3aNaChbIe NylbTBI ynpaBHeHNA, 3aNaChbIe 3y6HbIe UeTKN, NIIbHbIe NOLOTHA nT.D.), a TaKHe YIcTka, TexObCnyXbAHne INI 3aMeHa TpyuNXcR DeTalei He nonaDaOT NOI rapaHTNo, INo3TOMy npoBOdRTc 3a OTdeJIbHyO ONLatY!
IapaHTnTepaETc npBvckpbItHn 3dEInr NOCTOpOHmN IuCaMn.
Pocne rapaHTn
Iocne OKOHuaHn Cpoka rapaHTn, peMOHT n3denn npOn3BOaNTc 3a Onnatay, COOTBeTCTByUoUHM MaCTepCKMn nn nyHKtaM cepBnCHOrO O6CnyKbAHn.

Ciatronic
INTERNATIONAL GMBH
D-47906 Kempen/Germany · Industriering Ost 40
Telefon 02152/2006-888
Internet: http://www.clatronic.de·email: info@clatronic.de
