Xtender - Dive computer Scubapro - Free user manual and instructions
Find the device manual for free Xtender Scubapro in PDF.


User questions about Xtender Scubapro
0 question about this device. Answer the ones you know or ask your own.
Ask a new question about this device
Download the instructions for your Dive computer in PDF format for free! Find your manual Xtender - Scubapro and take your electronic device back in hand. On this page are published all the documents necessary for the use of your device. Xtender by Scubapro.
USER MANUAL Xtender Scubapro
Thank you for purchasing Xtender, and welcome to SCUBAPRO. Starting today, you'll be accompanied on all your dives by a computer featuring advanced technology for dives in complete safety.
Notes about safety
Like all dive computers, Xtender gives the diver information, but it doesn't provide the concepts required to interpret and use this information in a practical way. Dive computers are no substitute for good sense and a suitable dive training course. Before using your Xtender dive computer, carefully read and understand the information provided in this manual.

CAUTIONS
Scuba diving entails certain risks. Even if you carefully follow the instructions provided in this manual, potential risks will remain regarding decompression sickness, oxygen toxicity, and other risks related to diving with Nitrox mixtures or compressed air. If you are not fully aware of these risks, and if you do not accept full responsibility for them, do not use Xtender.
Xtender is only programmed for dives using nitrox (max. 99% O_2 ) and compressed air ( 21% O_2 ). Do not use Xtender for dives with mixtures of other gases.
Before diving, always check the level of O_2 set, and compare it with the gas mix that you will be using. Always keep in mind that entering the wrong mixture will result in calculations of insufficientcient decompression time or calculation of an oxygen toxicity value that is too low. The maximum difference of the mixture measured must not exceed 1% O_2 . The wrong gas mixture can be deadly!
- Always pay attention to the visual and acoustic signals that Xtender provides; in Nitrox dives never descend beyond the Maximum Operating Depth (MOD) for the mixture you're breathing
- Always check the limits of the dive you are preparing for, taking into consideration the oxygen fraction in the mix and the standard procedures for recreational diving (decompression sickness, oxygen toxicity)
- As all your courses will tell you, avoid diving to depths deeper than 40 meters (130 feet); the danger of nitrogen narcosis must be kept in mind, and Xtender does not warn you about this risk
- In all dives with Xtender, make a safety stop of at least three minutes at 5 meters (16 feet); Xtender features a safety stop timer designed to make this procedure easier
- All divers who use a computer to monitor their decompression status must use their own individual computer, and always wear it during all dives taken close together in a short period of time
- If Xtender stops working at any point during the dive, the dive must be terminated and you should ascend slowly, executing your 3-5 minute safety stop at the depth of 5 meters (16 feet)
- Always comply with the ascent rate indicated by Xtender and make all the required decompression stops. If the computer malfunctions, do not exceed the maximum speed of 10 meters (32 feet) per minute as you ascend
- During any dive, pairs or groups of divers must follow the indications given by the most conservative computer
- Never dive alone: Xtender cannot replace a dive buddy!
- Avoid ascending and descending repeatedly (yo-yo dives)
- Avoid an excessive work load at depth
- In cold water, plan shorter dives
-
After decompression, or at the end of a no-decompression dive, ascend as slowly as possible through the final few meters
-
Before using Xtender, you must be familiar with the signs and symptoms of decompression sickness: if after a dive any of these signs or symptoms appear, IMMEDIATELY seek specialized medical attention. In fact, the faster a diver begins treatment after symptoms appear, the more effective that treatment will be
- Do not dive with Nitrox before earning a specific certificati cation from an accredited teaching institution.
Nitrox and repetitive dives
For subsequent dives, wait until the CNS O 2 % value drops below 40 %
- Nitrox dives: make sure you have sufficient surface time (as for dives using air). Plan for a minimum of two hours of surface time. Even oxygen requires a certain period before it is expelled from the body
- Always choose the most suitable mixture for the dive you have planned
- Refrain from diving at least one day each week
- Repetitive dives with different computers: wait at least 48 hours before diving with a computer that you have not used during your previous dives.
Dives at altitude
- Do not dive at altitudes of more than 4,000 meters (13,000 feet)
- After a dive, Xtender indicates the altitude that must not be exceeded using flashing segments.
Flying after a dive
After the dive, wait at least 24 hours before traveling by air.
Xtender is personal protective equipment (PPE) that meets the essential safety requirements called for by European Union Directive 89/686/EEC. RINA SpA (notified body #0474) has certified its compliance with standard EN 13319:2000.
EN 13319:2000 "Depth gauges and combined depth and time".

WARNING
All information regarding decompression requirements shown by the instrumentation is explicitly excluded from the realm of validity of these standards.
INTRODUCTION
We know that you can't wait to try out your Xtender in the water, so we have divided this manual into two sections: the first explains the basic functions and operations needed to use the computer right away, and it is essential that you read it before taking your computer on a dive. The second describes supplemental operations and technical specifications, and you can consult this section as needed (although we highly recommend that you read it before using Xtender).
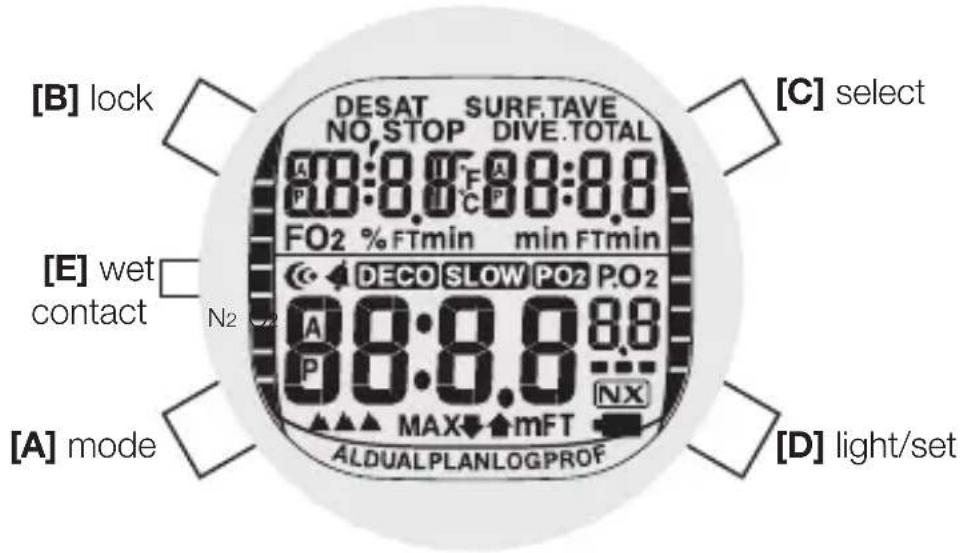
Arrangement of the display and buttons
The Xtender case has four buttons and one wet contact. The description of button operations will be identified with the word engraved on the Xtender ferrule:
[A] "mode" is used to change the usage mode
[B] "lock" activates and deactivates the option to change settings
[C] "select" allows you to move from one value to the next, and to increase the value you are changing
[D] “light/set” activates the display backlight, and during adjustments it decreases the value you are changing
[E] wet The metallic contact on the left side of the computer is there to contact tell Xtender that you have entered the water, and has no specific function on the surface except to interface the dive computer with a PC.
BASIC WATCH USE
When using Xtender on the surface, it will be in watch mode; it returns to this mode after each adjustment operation and 5 minutes after the end of each dive (Fig. 1).
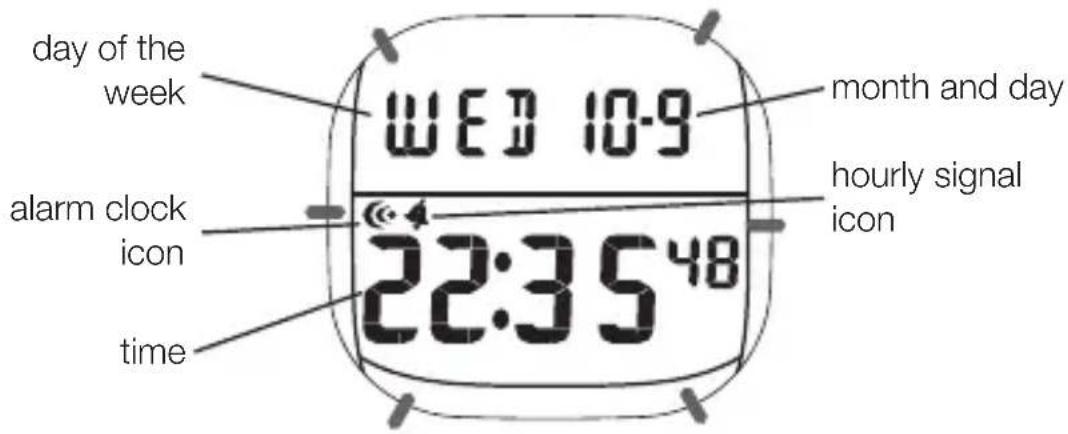
Figure 1
Pressing "select" will display the second time zone, desaturation time, and the surface time.
Adjusting the date and time
Press the "lock" button and choose the value you want to change with the "select" button; the sequence is: seconds > minutes > hour > year > month > days > hour format > seconds >... The value you are changing will flash, and you can increase it one unit at a time by pressing the "light/set" button. Press and hold the button to scroll through the values quickly. When adjusting the seconds, if you press "light/set" when the value is between 30 and 59, one minute will be added; the same is true for day, month, and year.
When adjusting the hour, moving from 59 minutes to 00 does not change the hour value, just as moving from hour 23 to hour 0 does not move you to the next day.
You can also choose whether you want to display the time in AM/PM or 24 hour format by pressing the "light/set" button when the hour number and minute number are flashing. The AM/PM format is indicated by the letter "A" or "P" shown to the left of the time value, respectively from 12:00AM and 11:59AM and from 12:00PM and 11:59PM.
After making your changes, press "lock" again to return to watch mode, or simply wait 2-3 minutes.
Setting the alarm clock
The alarm clock function lets you set a daily alarm, or activate or deactivate an hourly signal. Access alarm clock mode with the "mode" button; the letters "AL" will replace the indication of the date. Then, press the "lock" key, which will allow you to set the time. Once you have made your changes, press "lock" again to return to alarm clock mode. Now choose whether you want to enable the alarm, the hourly signal, or both, using the "select" button. Depending on your selections, the alarm clock icon, hourly signal icon, both, or neither will appear above the time.
Backlighting
The "light/set" button enables backlighting; the "select" button activates lighting and also shows the secondary display, with information about the mode the computer is in at that time. In order to limit battery consumption, backlighting is automatically disabled after three seconds.
BASIC DIVE COMPUTER USE
When Xtender is used as a dive computer, it shows all the information needed for no-decompression and decompression dives, either with air or Nitrox mixtures.
Functions during the dive
As soon as Xtender detects contact with the water, it turns on and begins to show the depth, updating the value on the screen once per second. Once the depth exceeds 1.5 meters (5 feet), it also begins counting the dive time elapsed. Total dive time is measured up to a maximum of 599 minutes, and the computer continues to count until ten minutes after surfacing, at which point the dive is considered over and its data are stored in the logbook.
During the dive Xtender gives a numeric readout of the current and maximum depth, the dive time, time left for a no-decompression dive or the decompression stop required, the ascent speed, the oxygen partial pressure, and the water temperature. Further, two bar graphs indicate the nitrogen saturation level and the accumulation of oxygen in the central nervous system (CNS O_2 ).
Information shown on the display
The display provides two different sets of information, depending on whether the dive is within no-decompression limits (Fig. 2) or is a decompression dive (Fig. 3).
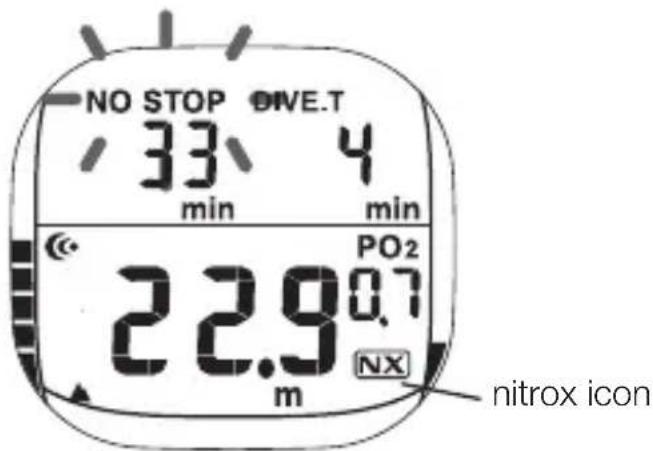
Figure 2
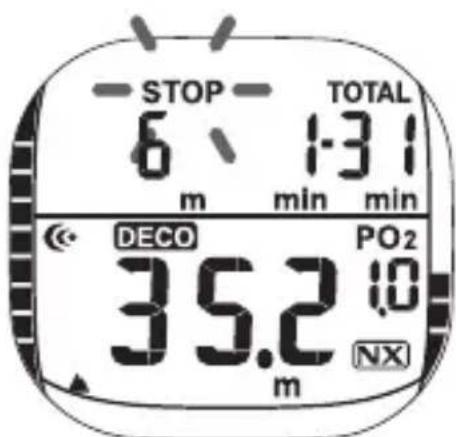
Figure 3
Regardless of the type of dive, you can use the buttons to access other information that is not shown on the main screen in dive mode. Pressing the "mode" button will display: The current time, the oxygen percentage set (from 22 to 99 percent, or "Air"), and the personal safety level selected.
The "select" button will display the maximum depth reached up to that point, the water temperature, and the dive time.
On the left side of the display, a bar graph provides a visual indication of the nitrogen saturation level. The bar is divided into nine segments; if all of them are activated (that is, the bar reaches the top of the display), the dive becomes a decompression dive (Fig. 4).
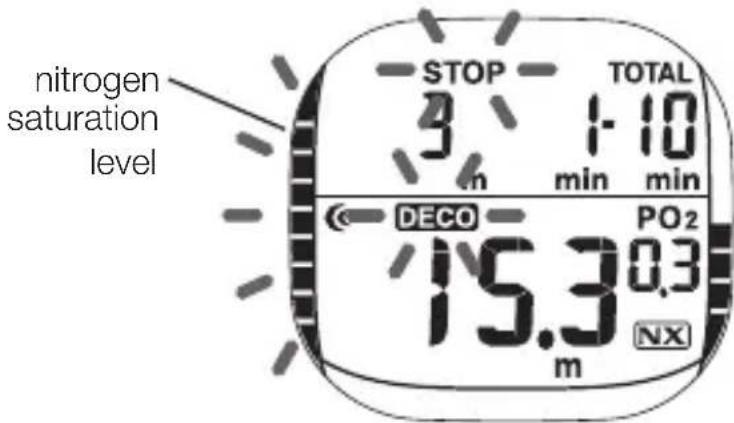
Figure 4
On the right side of the display there is another bar, similar to the one for nitrogen, but divided into eight segments, representing the level of oxygen toxicity on the Central Nervous System. During dives with air to depths of less than 40 meters, the CNS value will increase slowly, but on a Nitrox dive it is important to monitor this value closely; this will be described in detail in the corresponding section.
Repetitive dives
A repetitive dive means taking a second dive before a sufficient amount of time has elapsed to allow you to completely desaturate the nitrogen accumulated from your previous dive. In these cases, Xtender shows the level of nitrogen using the bar graph, and the desaturation time required (Fig. 5).
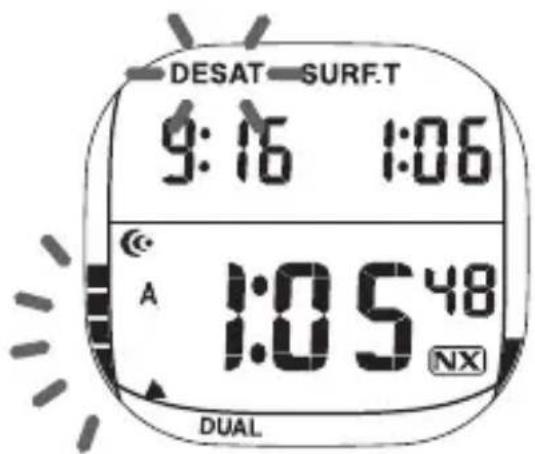
Figure 5
If you dive during this period, the no-decompression times available will be shorter, because Xtender takes into account the nitrogen already present in your tissues.
The dive planner allows you to monitor the no-decompression times allowed by the computer. To view the desaturation time and surface time, press the "select" button.
Nitrox dives
When you dive with Nitrox mixtures, it is necessary that you enter into Xtender the oxygen fraction contained in the gas you will be using on the dive. Is crucial that the oxygen fraction corresponds to the mix in your tank, because this information is the basis for the decompression calculations as well as for oxygen toxicity.
In order to set the oxygen fraction, access planning mode by pressing the "mode" button and then the "lock" button. The first value you will see is FQ, and you can change it using the "light/set" button. Each time you press the button the oxygen fraction increases by 1% .
The initial value is 21% (air), and you can set values up to (99%) , and then the cycles goes back to 21. To make it easier to set this value, if you hold down the "light/set" button, the values scroll by faster, pausing briefly at 32% and 99% . If you do not set any value, Xtender shows “- -” in the display area reserved for FO_2 , but if a value is entered, Xtender switches to Nitrox mode and the “NX” icon activates.
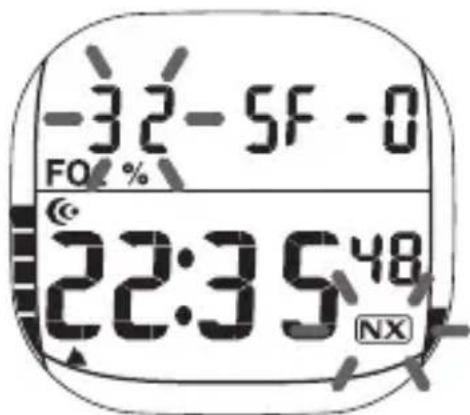
Figure 6
When Xtender is in Nitrox mode and at a depth of more than 1.5 meters (5 feet), it also indicates the oxygen partial pressure right above the "NX" icon.
Alarm signals
In situations that endanger the diver, Xtender uses different acoustic signals to warn about the risk:
- Excessive ascent speed: acoustic alarm every 3 seconds
An excessive ascent speed will be signaled by the indication of the current depth flashing for six seconds and the word SLOW. Along with each signal, an acoustic alarm is emitted lasting 6 seconds (Fig. 7) - Begin decompression phase: acoustic alarm for 3 seconds, repeated twice
- Decompression omitted: acoustic alarm for 3 seconds, repeated twice
- Operating limits exceeded: acoustic alarm for 3 seconds, repeated twice
- O_2 level alarm: acoustic alarm for 3 seconds, repeated twice
- PO_2 alarm: acoustic alarm for 3 seconds, repeated twice
- FO_2 setting alarm: acoustic alarm for 3 seconds, repeated twice
- Saturation level alarm: acoustic alarm for 3 seconds, repeated twice
- Setting not allowed alarm: acoustic alarm for 3 seconds, repeated twice
- Dive mode not allowed: acoustic alarm as long as the wet contact detects the presence of water.
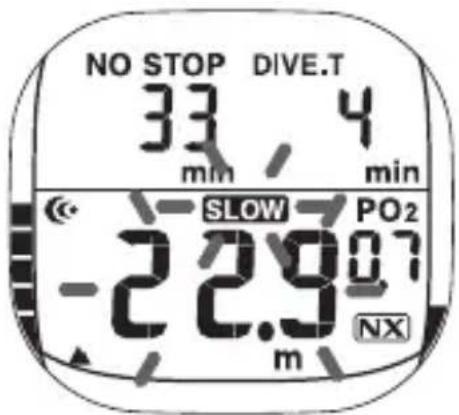
Figure 7

Note:
-
The acoustic alarms can not be deactivated using the buttons
-
If two alarms are activated simultaneously, the first is canceled and the second begins
-
The alarm clock sound can be deactivated by pressing one of the buttons. You can deactivate the alarm clock alert during the first 20 seconds. When you deactivate the alarm, the icon stops flashing but stays on
-
The alarms activated in Dive Mode are deactivated when the computer detects a depth of less than 1.4 meters (4.5 feet) and the E button no longer detects contact with the water
-
The alarms indicating that a certain setting or given mode cannot be accessed are interrupted when the wet contact button detects water.
ADVANCED WATCH FUNCTIONS
Automatic return
When Xtender is in Alarm Clock, Second Time Zone, Planner, or Logbook Mode (or a mode other than Watch Mode) and the mode is changed by pressing the "mode" button after any of the other buttons have been used, the computer automatically returns to Watch Mode. In all modes except for Dive Mode or Time Set Mode, the computer automatically returns to Watch Mode if no button is pressed for 2-3 minutes (or 14-15 minutes when in PC data Transfer Mode). In Dive Mode, the computer returns to Watch Mode 2-3 minutes after the display has been automatically updated.
Second Time Zone
Xtender keeps track of the current time in two time zones, which is very useful for divers who travel a lot. The second time zone can differ ± 23 hours and 30 minutes
from the main time zone, and is displayed by pressing the "select" button; the display will also show the "dual" indication.
To set the second time zone, access the corresponding mode by pressing the "mode" button until the second time zone appears in the upper section of the display. Press "lock" and move the time forward with the "select" button or backward with the "light/set" button. If you hold down either button the time will scroll faster. To change the date for the second time zone, move through a complete 24-hour cycle; it is not however possible to specify more than one day of difference between the local time and the second time zone.

Note: If the dive ended less than 10 minutes earlier, it is not possible to display or set the second time zone, and pressing the "select" button will emit an acoustic alarm.
Daily alarm / hourly signal
The alarm clock function activates an acoustic alarm each day at the set time; the hourly signal emits a brief signal at the beginning of each hour. In order to access the time set for the alarm clock, use the "lock" button and then press "select" to move from hours to minutes (Minutes > Hours > Minutes >... the cycle starts over). Both are adjusted using the "select" button. Hold the button down to scroll quickly through the values. When you are done setting the time, the alarm clock mode is activated automatically. The Alarm clock and hourly signal are activated/deactivated using the "select" button when Xtender is in alarm clock set mode.
ADVANCED DIVE COMPUTER FUNCTIONS
Viewing the nitrogen saturation level
During the dive, on the left side of the display there is a bar graph composed of nine LCD segments, corresponding to the colored scale on the side of the display itself. As the saturation level calculated by the algorithm increases, more segments are activated. When all the segments are active, the dive requires decompression.
Sometimes on the surface, the bar graph may be activated following a change in altitude (decrease in atmospheric pressure). If the graph reaches nine segments, dive mode will not be accessible, and an alarm will sound if the computer comes into contact with the water.
Setting the additional safety level
The Xtender algorithm allows you to calculate decompression more conservatively, for example in the case of very demanding dives or difficult conditions. To activate this function, access planning mode ("plan"), then press "lock", "select", and then activate or deactivate the additional safety factor by setting the SF (Safety Factor) value to 1 or 0. The preselected setting is 0 (deactivated).
Display of O_2 saturation - Oxygen toxicity alarm
The bar graph on the right side of the display shows the oxygen toxicity level on the Central Nervous System using eight LCD segments that are activated in proportion to the diver's exposure to an elevated partial pressure of oxygen.
When the seventh segment is reached, the entire graph fl ashes for 15 seconds, and two 3-second alarms will sound. If the eighth segment is reached, the same acoustic alarm will sound and the graphic continues to flash, and the alarm is recorded in the logbook. These alarms are also activated on the surface if the saturation is at level 7 or 8 and the wet contact detects the beginning of a dive (Fig. 8).
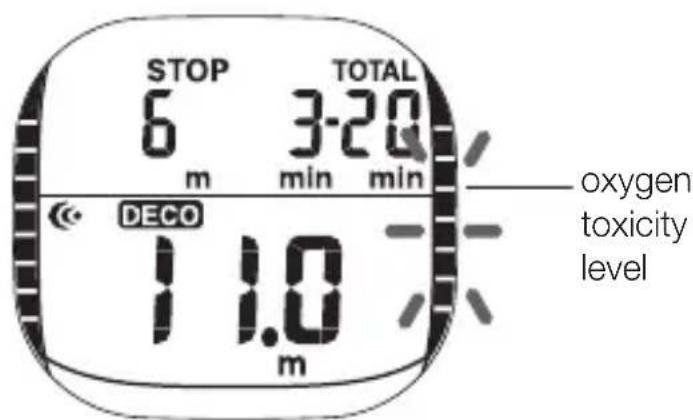
Figure 8
Indication of oxygen partial pressure
When you are below 1.5 meters (5 feet) and the oxygen fraction (FO_2) of the mixture is set to a value equal or greater to 22% , a ppO_2 indicator is displayed.
Safety block
When the operating limits of Xtender are exceeded or a decompression stop is skipped, the display will block: all segments of the display will begin flashing, and you will not be able to access dive planning, settings, or dive modes.
The block ends after 48 hours, or after you complete the reset procedure (simultaneously hold down the "select" and "light/set" button for at least 15 seconds while the computer is in watch mode).
Altitude measurement
Xtender detects the altitude every 10 minutes and indicates it with the mountain icons (Fig. 9). When the computer is in dive mode or data transfer mode, this measurement is disabled. The altitude icon is not visible in the following modes: Watch Settings, Set Alarm Clock, Set Second Time Zone, Clear History, Dive Profi le, and when the History is displayed in the Logbook area.
| Altitude level Altitude Indication on the display | ||
| 0 Up to 1000 m None | ||
| 1 | 700-1800 m Level 1 | segment lit |
| 2 1500-2600 m Level 2 segment lit | ||
| 3 2300-6000 m Level 3 segment lit | ||
| Error over 6000 m Level 3 segment fl ashing | ||
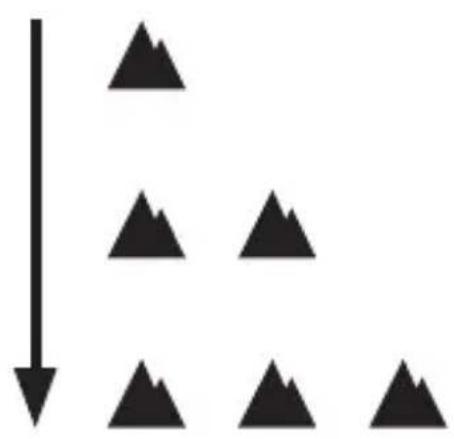
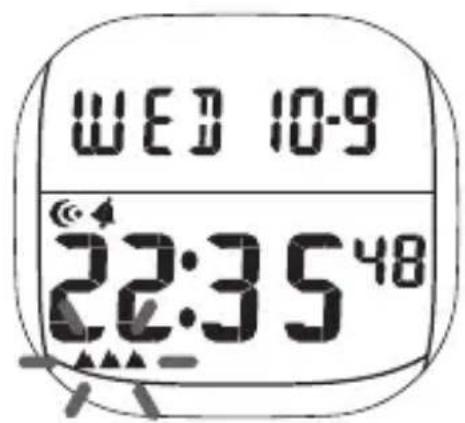
Figure
Surface time
Beginning 10 minutes after the end of the dive, Xtender shows the surface time, which is counted for 48 hours and can be displayed by pressing "select". After 48 hours, it will simply show "- - - -" (Fig. 10).
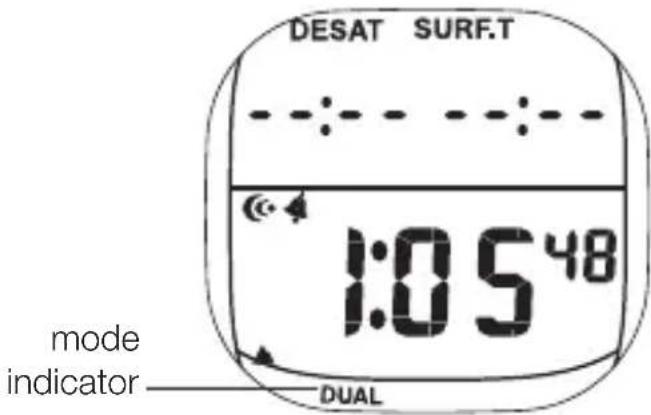
Figure 10
CHANGE SETTINGS
Select unit of measure
The pre-selected units of measure are those of the decimal metric system (meters and degrees Celsius); you can however select Imperial units (feet and degrees Fahrenheit) for depth and temperature. To choose the desired units of measure, hold down the "lock" button for approximately 15 seconds.
Dive Planner
Xtender has a dive planner that shows the no-decompression limits between 9 and 48 meters. The planner is activated by pressing the "mode" button and is indicated by the "plan" button in the lower portion of the display; the "select"
and "light/set" buttons respectively increase and decrease the depth indicated. If Xtender is set for a Nitrox mixture, the planner will show the times permissible with that FO_2 , and will indicate the oxygen partial pressure at various depths. If this exceeds 1.4 bar, instead of the minutes, " - " will be displayed. When the computer is in safety block mode, the dive planner is not available.
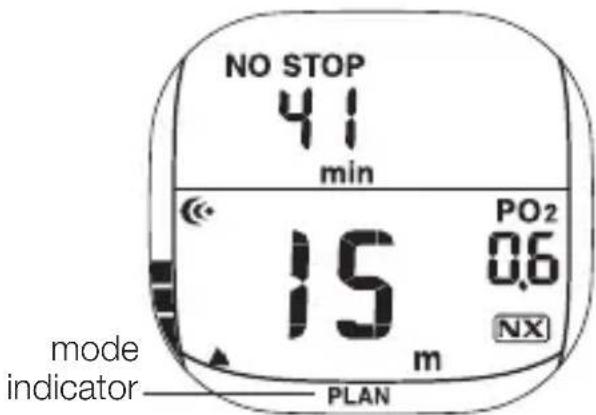
Figure 11
Resetting FO_2
When you use Nitrox (FO2. equal to or greater than 22% ), at midnight Xtender switches to a predefi ned setting (^ - ^) and the Nitrox icon (NX) fl ashes. If you access Dive Mode after the FO2 has been reset, an alarm is activated. If you ignore it and begin your dive without setting a new FO_2 , Xtender will base its calculations on a fi ctitious mixture of 99% 0 - 79% nitrogen.
Logbook and History
The Logbook mode allows you to view information about your past dives. That data will only be saved if the diver has spent at least three minutes at a depth equal to or greater than 1.5 meters (five feet). The data are saved in sequence until the computer memory is full; 30 dives can be stored, and after that the oldest dives will be overwritten. The logbook opens to the History display, and shows a
summary of the dives recorded by Xtender and can be recognized by the word "HIST" on the display (Fig. 12). The history stores the total number of dives (up to 999) and the total time spent diving (up to 999 hours and 59 minutes). When you first use the computer, the logbook does not contain any data, so it will simply show "-". The capacity of the logbook memory can store up to 30 dives with a maximum duration of 599 minutes for each dive; the maximum number of consecutive dives that can be saved in one day is 10. The information is only recorded if the diver descends below 1.5 meters (5 feet) for at least 3 minutes.
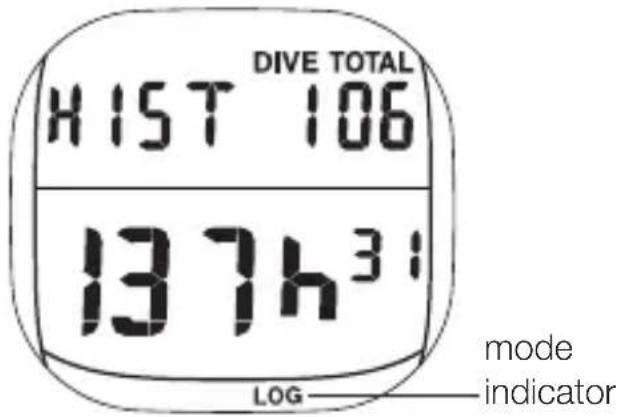
Figure 12
The data you can view in the logbook are:
- Minimum water temperature
Number of the dive in the Logbook - FO_2 Value
- Saturation level
- Date of the dive
- O_2 Saturation at the end of the dive (CNS)
- Altitude level at the beginning of the dive
- Dive with decompression indicator
Number of dives in the same day -
Divest start time
-
Dive end time
Total dive time
Maximum depth reached
Average depth - Operating limits exceeded alarm
- O_2 CNS level alarm (toxicity)
- Excessive pp@alarm
- Omitted decompression alarm
- Excessive ascent speed alarm.
The logbook is activated by pressing "mode", and can be identified by the "LOG" icon on the lower section of the display. The "light/set" and "select" buttons allow you to view the dives stored, moving respectively forward and backward through the sequence and showing the various displays available for each dive before moving to the next one. If display 1 is already visible, pressing the "light/set" button will move Xtender to the previous dive in the sequence. The Logbook does not operate in a continuous cycle - it only moves backward or forward in the sequence. When the FO_2 is set on the predefi red value, the display will show "--" % and the NX icon fl ashes.
If during the dive Xtender activates one or more of the alarms indicated below, the event is recorded in the logbook and is indicated by the word SLOW flashing on the screen.
- Decompression Warning.
If you exceed the no-decompression limits, even if you re-enter the limits as you ascend, the decompression warning is stored and is indicated by the DECO icon in the Logbook display.
- Decompression omitted alarm.
If you commit an error during a decompression stop, the alarm is saved and is indicated by the flashing DECO icon in the Logbook display. The alarm is saved even if the error was corrected by returning to the appropriate depth.
- Operating limits exceeded alarm.
If the diver descends below the usage limits for Xtender, an alarm is stored indicating that operating limits were exceeded, and when viewing the Logbook for that dive, the segments of the display will flash.
- ppO_2 alarm (oxygen partial pressure).
If the excessive ppO₂ alarm is activated, even momentarily, the alarm is stored in the Logbook and is indicated by a flashing ppQ icon.
Resetting the history
You can delete the total number of dives and the total dive time stored in the computer. (Resetting is not possible if the dive ended less than ten minutes ago, if there is no information in memory, or if an EEPROM error has occurred.) On the History screen, press the Lock button and the letters "CLEA" will be displayed. To confirm the deletion, hold down the Select button for about 5 seconds; the data will be deleted, the total dives will reset to 0, and the total time to 0h00.
Dive profi le
The dive profi le shows you the depth recorded corresponding to each sampling interval for a maximum of 30 dives. Once this limit has been reached, the oldest data are overwritten. If there is not enough memory available to enter the data currently being recorded, old data may be deleted even if 30 dives have not yet been stored. Information is also shown for: FO_2 , number of the dive in the logbook sequence, Nitrox icon.
When you access the Dive Profi le mode, it immediately shows the information for the most recent dive profi le. Example: If the memory contains logbook information for dives 1 to 13, the profi le for dive 13 will be displayed (Fig. 13).
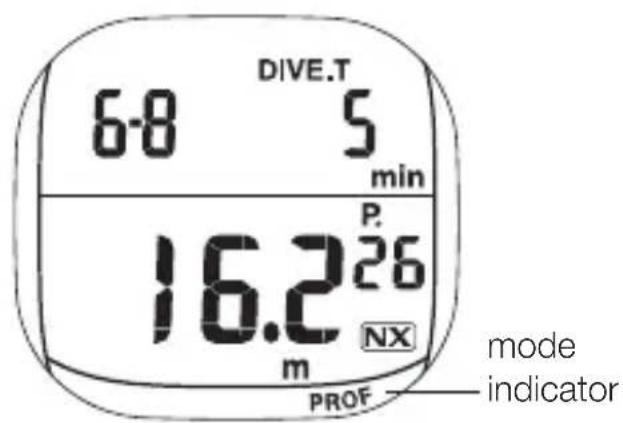
Figure 13
The display of dive profile information is updated automatically every two seconds, showing the progress of the dive time, and stops when it reaches the end of the profi le. After each update the indication "DIVE.T" fl ashes. To move to the next dive, press the "select" button.
(most recent) 30 > 29 > > 2 > 1 (less recent) > 30 (most recent) > 29 > (cycle starts over)
When you move on from the information for one dive to the next, the first screen of the new series of Logbook data will be displayed.
To move quickly through dive information to the next dive, hold down the "select" button. When advancing quickly, the computer pauses momentarily when it reaches the data for the oldest dive (N 1).
You can momentarily stop the sequence by pushing the "light/set" button.
Data transfer to the PC
The data saved can be transferred to a personal computer for precise analysis using the PC LogBook software and the dedicated interface. The interface and the software are available at authorized SCUBAPRO UWATEC dealers.
Once you have installed the interface on your Windows PC with a USB port, you can transfer your data using the following steps:
1) Launch the PC LogBook software.
2) Switch the Xtender dive computer to PC data transfer mode by pressing "mode" until you reach the dive profile display (PROF), and then enter transfer mode by pressing "lock". The letters "PC" will appear on the display.
3) Place the Xtender computer in the interface, making sure that the lower part of the case touches the metal contacts and that the wet contact corresponds with the transducer located on the left wall of the cavity. The LED stays off.
4) Activate the Transfer function from the Tool menu in the program. The data transfer window will appear, and you can begin transferring your data by pressing the "START" button.
For more information on installing and using the software, referred to the documentation provided with the interface.
Data profi le sampling frequency
Xtender saves the data for the dive profi le every 30 seconds. If you want to increase the resolution of data transferred to the PC, you can tell the computer to sample the data every 15 seconds. To change the frequency: from planning mode ("plan"), press "lock", then "select" twice, and finally "light/set". Setting the frequency at 15 seconds will cut the memory capacity in half.
Checking the battery charge
The level of battery charge is checked every 10 minutes in all modes except for:
Dive mode and Data transfer to the PC.
When Xtender detects the first drop in battery voltage, it flashes the corresponding icon. When the voltage drops again, the icon displays continuously and dive mode is disabled.
TECHNICAL SPECIFICATIONS AND MAINTENANCE
- Operating altitude: from sea level to 6000 meters (19,500 feet)
Maximum depth displayed: 99.9m - Nitrox compatibility/percentage of O_2 in the mix: from 21% (air) to 99%
- Algorithm: Modified Swiss model with 9 compartments
- Operating temperature: from -5^ to 45^ ( 23^ - 113^ )
Power: 1 CR2032 battery.
Maintenance
- Avoid dropping Xtender and do not subject it to violent blows
- Do not expose Xtender to strong and direct sun light
After every dive, rinse Xtender with fresh water - Do not use solvents to clean Xtender.

Disposal of electrical and electronic equipment in the European Union. European Union Directive 2002/96/EC and EN50419. Take the device to one of the special collection points to help protect the environment.
SCUBAPRO
MANUEL D'UTILISATION
MANUEL XTENDER 30
INTRODUCTION 34
UTILISATION BASIQUE MODE MONTRE 35
UTILISATION DE BASE DE L'ORDINATEUR DE PLONGEE 37
UTILISATION AVANCÉE MODE MONTRE 43
FONCTIONS AVANCEES DE L'ORDINATEUR DE PLONGEE 45
MODIFICATION DES RÉGLAGES 48