Gravit Smart Vision FPV - Drone LRP - Free user manual and instructions
Find the device manual for free Gravit Smart Vision FPV LRP in PDF.

| Brand | LRP |
| Model | Gravit Smart Vision FPV |
| Product type | Quadcopter drone with HD camera and WiFi video transmission, controlled by smartphone |
| Power supply | LiPo battery 3.7 V 520 mAh, recharge via micro-USB (5 V, min 500 mA) |
| Flight time | Approximately 5 to 7 minutes depending on usage |
| Recommended flight range | Up to 20 meters maximum |
| Required app | LRP Gravit Smart Vision FPV (iOS and Android) |
| Main functions | HD camera, live video transmission, altitude hold, gyroscopic control, headless mode, track-flying, 360° flips, auto landing, emergency stop |
| Power levels | 30%, 60%, 100% |
| Propeller guards | Included, removable |
| Available spare parts | Propeller guards (222932), propellers (222933), LiPo battery (222934) |
| Safety | Propeller guards installed; requires RC insurance; do not fly over people, near airports or power lines; maintain a safe distance |
| Maintenance and cleaning | Clean with a soft dry cloth; store in a dry place; remove battery when not in use |
| Warranty | Legal warranty against manufacturing defects; does not cover normal wear, accidental damage or misuse |
| General information | Manufactured by LRP electronic GmbH, Germany; complies with European directives 2014/30/EU and 1999/5/EC; recycling according to WEEE |
Frequently Asked Questions - Gravit Smart Vision FPV LRP
User questions about Gravit Smart Vision FPV LRP
0 question about this device. Answer the ones you know or ask your own.
Ask a new question about this device
Download the instructions for your Drone in PDF format for free! Find your manual Gravit Smart Vision FPV - LRP and take your electronic device back in hand. On this page are published all the documents necessary for the use of your device. Gravit Smart Vision FPV by LRP.
USER MANUAL Gravit Smart Vision FPV LRP
natural_image
Coiled black cable with USB port and plug, no visible text or symbolsnatural_image
White drone with four propellers and a branded can labeled 'GRANT SMARTVISION' (no additional text or symbols visible)Thank you very much for choosing a LRP-product. The Gravit Smart Vision FPV is a high-quality quadrocopter with built-in HD-camera and video transmission to your smartphone. In addition, it can be fully controlled by your smartphone, there is no need for a separate transmitter anymore. Please read this documentation before flying your Gravit in order to get the maximum fun out of it.
1. BEFORE FLYING - CHARGE FLIGHT-BATTERY
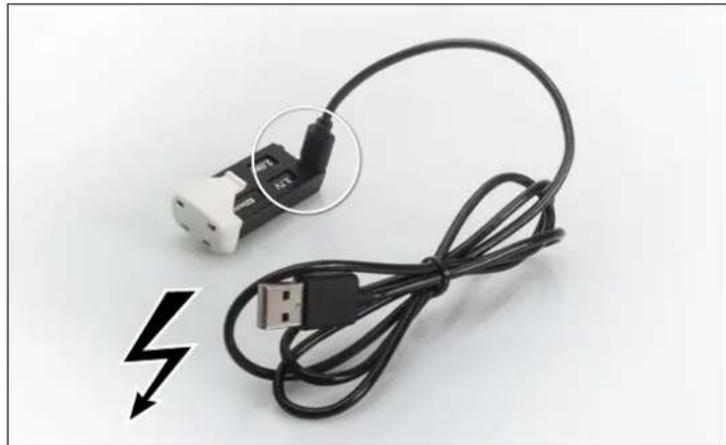
Before you can fly your Gravit, you should always make sure that the battery is fully charged. To charge the battery, remove the battery from the Gravit by pressing together the lock-mechanism on the upper and lower side of the battery' rear end, then pull the battery backwards out of the Gravit's chassis. The battery has a Micro-USB-port. Please use the provided USB-cable (or any other suitable cable) to connect the Micro-USB-plug to the battery's connector (see picture). Then insert the other end of the USB-cable into a suitable 5V power-supply. This can either be a USB 2.0 or 3.0 port of a PC or Laptop, or any separate 5V power-supply with at least 500 mA (most USB-power-supplies for smartphones should work, for example).
natural_image
Coiled black USB cable with a white plug connector, no visible text or symbolsWhen the battery is being charged, a SOLID GREEN LED is showing up just next to the Micro-USB-port of the battery. As soon as the battery is fully charged, the LED goes out and the battery should be disconnected.
Now you can insert the battery again into the Gravit's chassis. Please make sure that the Lipo is completely inserted into the chassis and is held in place firmly.
IMPORTANT: You can also charge the flight battery of your Gravit Smart Vision while the LiPo battery is inside the quadrocopter by connecting the copter to a Micro-USB-cable. However, we DO NOT RECOMMEND to do this, as the Gravit will be ON during the charging process and the whole copter will therefore heat up strongly. ALWAYS charge the battery of your Gravit OUTISDE of the copter!
2. BEFORE FLYING - DOWNLOAD AND INSTALL THE APP
PLEASE NOTE: The LRP GRAVIT VISION FPV app and its author are not associated with LRP electronic GmbH in anyway and LRP is not responsible for the content, functions, availability and pricing of the software. The software is the author's intellectual property and may be used according to the legal terms which apply for the application and the app-store offering it.
Now you have to download and install the app „LRP Gravit Smart Vision FPV“ from either Google's Play Store or Apple's iTunes marketplace.
IMPORTANT: Make sure to download the correct app with the exact name as shown above. There are other similar LRP apps. Those apps are for other quadrocopters and do NOT work with the Gravit Smart Vision FPV!
Turn on your smartphone's WiFi.
3. BEFORE FLYING - CONNECTING YOUR GRAVIT TO THE SMARTPHONE
After you have turned on the WiFi on your smartphone, set the Gravit on a flat and even surface and turn it on by pressing the button on the left side of the chassis.
Next, enter your smartphone's WiFi-settings and connect to the AP of your Gravit, named "GravitSmartVisionFPV".
In case your smartphone should give out a warning saying that there is no internet connecting established, please confirm to use this WiFi-connection nevertheless.
The connection is established within a few seconds.
Now start the downloaded app. On the start screen that will show up, tap the „Start Button“.
You should now see a live video image from your Gravits drone on the smartphone screen. You will also see a lot of buttons and controls. They will be explained below and in more detail in the download version of this manual, which you can grab from www.lrp.cc
4. STARTING THE GRAVIT SMART VISION FPV
To start and fly your Gravit, please do the following:
- Make sure that your Gravit is sitting level on an even surface, like the floor or a desk. Also make sure that you are either outdoors or in a room with enough space.
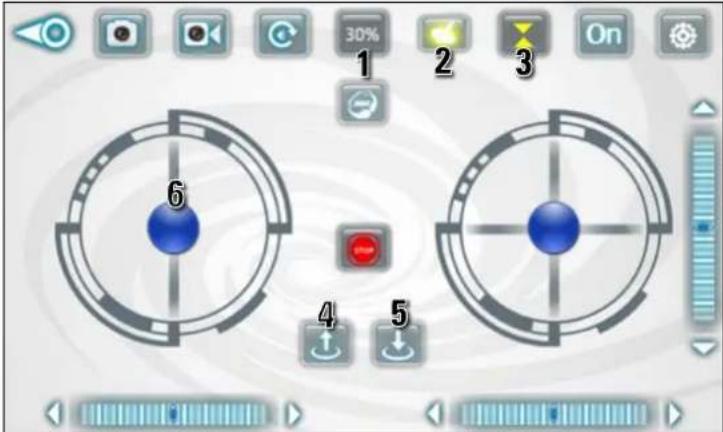
- Enable the altitude hold function (see picture, 3) by pressing the altitude hold button. It is highlighted yellow when enabled and 3 additional buttons will appear on the screen between the two control sticks.
- Enable gyro control by pressing the gyro-icon (see picture, 2). It will also highlight yellow when enabled and the RIGHT control stick will move when you tilt your smartphone, please check.
- Make sure the power level is set to 30% (see picture, 1). If it isn't, tap the icon until it is at 30%. You can later increase it, but for a first flight, 30% is recommended.
- Press the Auto-start button (see picture, 4) to start the motors. If you don't start within a few seconds (see point 6.), the motors will go out again. In this case, press Auto-start again.
- While the motors are turning, move the LEFT control stick (see picture, 6) upwards.
IMPORTANT: Make sure to hold your smartphone level! If you don't, your Gravit will fly towards the direction your smartphone is tilted right after the start! The Smart Vision will "jump" upwards, be careful. Let go off the throttle stick again and the Smart Vision will hold its altitude, go into a hover and wait for your further instructions.
5. FLYING THE GRAVIT SMART VISION FPV - BASIC FUNCTIONS
To control your Gravit in the air, please do the following:
To gain or loose altitude -> Move the LEFT control stick up or down
To rotate around your own axis -> Move the LEFT control stick left or right
To fly towards the left or right side ->
Tilt your smartphone to the left or right. The further you tilt your smartphone, the faster the Gravit will fly sideways
To fly forwards or backwards ->
Tilt your smartphone forwards or backwards. The further you tilt your smartphone, the faster the Gravit will fly forwards/backwards.
Of course you can combine those individual commands for more complex movements. For example: If you tilt your smartphone forwards and to the left side at the same time, the Gravit will fly to the front left.
Now you can carefully and slowly test the control of your Gravit Smart Vision FPV. You will see that it is very easy and intuitive to control.
You will quickly gain experience and you will be able to control the Smart Vision better and with greater confidence and skill.
To land your Gravit, make sure you are flying over a smooth surface, suitable for landing. Then press the Auto-Land-button (see picture). The Gravit will slowly decline, land and turn off the motors automatically.
PLEASE NOTE: If at any time your Gravit should crash and as a result of the crash start to blink and remain unresponsive to any control input from the smartphone, please set the Smart Vision on flat surface and move the LEFT control stick downwards. The blinking should stop and the Gravit should be ready to fly again.
6. FLYING THE GRAVIT SMART VISION FPV - ADVANCED FUNCTIONS
Now that you know the basics about flying your Gravit Smart Vision, it is time to look at the app and all more advanced features in detail.
If you start up the app, you will see the start-screen, which looks like shown in the
GRAVIT SMART VISION FPV
APP-CONTROLLED WIFI QUADROCOPTER

On the start-screen, you have the following buttons/options available:
1. SETTINGS
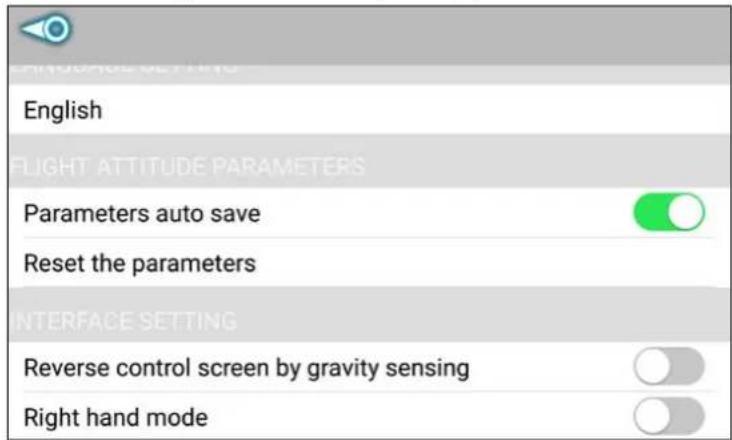
If you press the SETTINGS button, you will have the following options:
a) Language setting -> You can choose from different languages here
b) Parameters auto save -> Your settings will be saved, LEAVE THIS ON!
c) Reset parameters -> All settings will be reset to default again
d) Reverse control screen by gravity sensing -> The control screen rotates around
180° if you turn your smartphone. We do NOT recommend to use this feature, LEAVE IT OFF
e) Right hand mode -> Switches the control sticks between MODE 1 and MODE 2 (default), see HELP-screens for further details.
We recommend to LEAVE THIS FEATURE OFF
PLEASE NOTE: If an option-slider is GREEN, the setting is checked/ON, if it is GREY, the setting is unchecked/OFF
2. HELP
The help screen shows all kinds of information concerning the buttons and flight control. It is pretty much self-explanatory and all topics will also be covered here in the manual. The help screen shall serve as a quick reference guide if you don't have your manual at hand.
3. START
When you press the START button you will enter the main control screen where you control your Gravit, receive the live video image and take control of the advanced features

PLEASE NOTE: When talking about the virutal buttons on the control screen of your smartphone, we use the following terms/expressions for describing the state of the button/function:
- "Checked" or "highlighted" (yellow) or "activated" or "ON" -> This means that the button has been pressed and that its function is PERMANENTLY ON UNTIL it is pressed a second time.
Some buttons can be checked, others can NOT. If a button can NOT be checked, this means it does something immediately upon pressing it and then the button setting is back to default.
Example: If you press the Photo-button (1), it does NOT become checked/highlighted, it simply triggers taking a photo and is then back to its default position. The Gyro-control-button (6) works differently.
If you press it once, it will become checked/highlighted/activated/on and the gy-
ro-control is enabled UNTIL you press the button again and uncheck/disable to button.
Identifying checked/enabled features is rather easy, because a checked/activated feature will be HIGHLIGHTED IN YELLOW COLOR.
The control screen looks like the picture above. For easy reference, each of the control buttons has been numbered. Please check the function in the following description:
0 -> If you press this button, you will leave the control screen and get back to the Start-Screen
1 -> Press this button to take a picture
2 -> Press this button to start/stop a video recording. If you start a recording, a timer will run below this button to show you the recording time
3 -> Play media -> When you press this button you will enter the media playback menue. Here you can watch your recorded movies and photos and delete them
4 -> Power Level -> This is the power level setting. It can be either 30%, 60% or 100%. The higher the level, the more power and agility your Gravit will have. You can change the power level by tapping on the button. The power level will cycle through the 30/60/100% setting when you press the button. Leave the power level to 30% if you are a beginner.
5 -> 360° Flip -> When you press this button, it will be highlighted yellow and the flip-mode is activated. In flip-mode, you can have your Gravit perform flips in any direction. To do so, simply tilt your smartphone into the direction you want to do the flip. Be sure to tilt your smartphone above an angle of 80% to trigger the flipping and don't tilt it too quickly or jerky. When the Gravit has done its flip, the 360° Flip-button should be greyed out (=deactivated) again. To do another flip, simply press the button and tilt your smartphone again. If you have pressed the button but then decide to rather NOT do a flip at the moment, simply press the button again to uncheck the flipping function again.
6 -> Gyro-control. When this option is checked/highlighted, the Gravit can be controlled by the gyro of your smartphone. This means, that the Gravit is flying into the direction your are tilting your smartphone. The further you tilt it, the faster the movement into the appropriate direction will be. If you disable the feature (by unchecking the button), you can control the forward and sideward movement of your Gravit by moving the right virtual control stick on your smartphones screen in the corresponding direction. We recommend flying the Gravit by using the gyro-control. According to our experiences, it is more precise, intuitive and fun.
7 -> Altitude-hold. We STRONGLY recommend to keep this feature enabled/checked ALL the time. When this feature is checked, the Gravit holds its altitude automatically, which makes flying it a LOT easier and more fun. The buttons 15 (Auto-land), 16 (Emergency-Stop) and 17 (Lock/Unlock motors) are also ONLY available if Altitude-Hold is active. If you choose to DEACTIVATE altitude-hold and fly the Gravit „manually“, please refer to the chapter „Flying the Gravit WITHOUT Altitude-hold“ in this manual.
8 -> This button enables/disables the virtual controls in general. We STRONGLY recommend to have this ON ALL THE TIME, because otherwise you will not be able to control your Gravit properly.
9 -> This button is giving access to a pull-down menu with additional features. As long as you do not plan to use those features (see button 10-13 below), you can leave this button unchecked for a clearer screen layout. The button itself does NOT have a function, it only makes the additional feature either visible or invisible.
10 -> The REV-button rotates the live video image of your Gravit by 180".
11 -> Headless Flying. This button enables/disables the Headless Flying feature. If you want to use headless flying, please check this button.
How to use „Headless Flying“:
When you press the „Headless Flying“ -button, the Gravit memorizes its current orientation (=its facing of the front). As long as you stay in this mode, the flight direction of the copter will always be based on the memorized orientation when you issue flight controls, no matter what direction the copter is ACTUALLY facing. Here is an example. Let's say that you have positioned the Gravit in front of you on the ground, facing straight AWAY from you towards NORTH with its nose. Then you press the „Headless Flying“ - button. Your Gravit memorizes this heading/orientation as „forward“ (or NORTH) position/heading. Next you take off and rotate the Gravit by 180°, facing towards you (SOUTH) with its front. If you now issue the flight command „Fly forwards“ by moving your right control stick away (upwards) from you, the Gravit actually fly AWAY from you (towards its memorized forward/NORTH position, INSTEAD of flying TOWARDS you (south) as it would normally when facing you with its front.
-> This means, once you press the „Headless Flying“ -button, the controls of the Gravit are „locked" relative to the heading it had when you pressed the button. If you do not switch your position, moving your control stick right will always make the Gravit fly right, no matter which orientation the Gravit's front actually has. The same goes for flying left, forward and backward. Once you press the „Headless Flying" button again, the controls are back to normal and movement of your Gravit is dependent on its heading of the front/nose again.
How "Headless Flying" should be normally used:
To get the most out of this feature, LRP advises to enable "Headless Flying" ONLY when the copter is actually facing STRAIGHT AWAY from you with its FRONT. By doing so, you can easily control the Gravit during flight because you simply have to push the control sticks into the direction you want the Gravit to fly, NO MATTER
GRAVIT SMART VISION FPV
APP-CONTROLLED WIFI QUADROCOPTER

what direction/heading the Gravit's front is ACUTALLY facing
-> Your Gravit will always simply fly into the direction you are moving your right control stick to. In order to have this feature work as intended, please also note that you should NOT change your location or heading when flying in "Headless" mode. Otherwise, you will become disoriented with the controls and the feature does not make sense anymore. Please note: You may enable or disable "Headless Flying" anytime, no matter whether you are flying or on the ground. For best operation and results, we advise NOT to enable the function while the Gravit is moving in the air, but while the Gravit is still on the ground.
12 -> Gyro-calibration: Pressing this button calibrates the gyro of the Gravit. You can use this function if you experience abnormal strong drift while flying. To do a proper calibration, please do the following:
a) Set your Gravit ready to fly on a flat, even surface (a desk for example)
b) Press the gyro-calibration button once -> The LEDs in the arms of the Gravit will start to blink quickly. As soon as the blinking stops again, the calibration has been successfully done.
IMPORTANT: Do NOT press this button while flying, as this will most likely end up with the Gravit crashing to the ground.
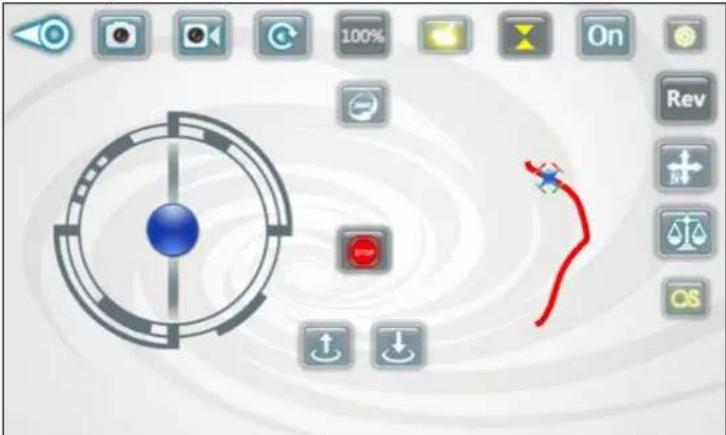
13 -> Track-flying: Track-flying allows you to control the flight of your Gravit by drawing a flight course on the screen of your smartphone. The Gravit will then fly the course accordingly.
To enable Track-flying, press the button 13. It should be highlighted. We STRONGYL recommend to use Track-flying ONLY OUTDOORS or in a very large room (or hall).
As soon as you have checked Track-flying, the RIGHT control stick will disappear and you will find an empty screen instead. No draw any pattern on the screen and the Gravit will fly the pattern accordingly.
This looks like in the picture below:
To get a feeling for Track-flying, we recommend that you draw SIMPLE and SHORT patterns in the beginning. If you feel comfortable with the function, you can switch to more complex and longer courses.
PLEASE KEEP IN MIND: When you enable Track-flying and have Gyro-control enabled AT THE SAME TIME (button 6 AND 13 BOTH checked), gyro-control is able to OVERRIDE the Track-flying commands.
This means, that while the Gravit is flying a pre-drawn course, this course can be interrupted by tilting your smartphone to either side. This was done so on purpose and is some sort of safety-feature. You can interrupt the pre-drawn course if you see something is going to go wrong.
So please make sure while Track-flying that you do NOT tilt your smartphone UNLESS you want to interrupt the pre-drawn flight course. If you do NOT want this option to interrupt, then you can also choose to disable gyro-control while Track-flying, of course.
14 -> The right virtual control stick will let your Gravit fly backwards and forwards and sidewards (see also chapter 3 „Basic functions“)
If button 6 (Gyro-control) is enabled, the right control sticker is operated by the tilting your smartphone instead of pushing the stick with the tip of your thumb.
15 -> Auto-Land: Press the auto-land button to have the Gravit slowly loose in height, land automatically and then shut off the motors. If you initiate the auto-land, make sure the Gravit is flying over a free area with a flat, even surface beneath. Otherwise the auto-land might result in a crash.
16-> STOP-button: Press this button to shut down the motors of the Gravit IMMEDIATELY, no matter whether you are flying or how high you are flying. Use this button in case the Gravit should be out of control to prevent it from flying away.
17 -> Start/Stop motor-button: Press this button to stop and start the motors. If you want to start the Gravit and fly, press the start button to start the motors. Then, within a few seconds, move the throttle sticker (18) upwards. For details see chapter "Starting the Gravit Smart Vision FPV".
18 -> The left control stick is used for rotating the copter around its own axis (yaw) clockwise and counter-clockwise and to gain and loose in height. For rotation, move the stick left or right. For increasing height, move the stick forwards, for loosing height, move it downwards.
PLEASE NOTE: In case Altitude-Hold (button 7) should be deactivated/unchecked, the Gravit will NOT hold its altitude automatically. You have to keep the Gravit at the desired flight height by issuing stick commands yourself, moving the stick up and down accordingly.
7. FLYING THE GRAVIT WITHOUT ALTITUDE-HOLD
Normally, we recommend flying the Gravit only with Altitude-Hold enabled. The reason for this is that it is very precise, easy, intuitive and convenient to fly when this feature is turned ON.
PLEASE NOTE: It is MUCH more difficult to fly the Gravit without altitude-hold and you should only do so if you are an experienced pilot and feel very safe with the controls. If you want to disable the feature nevertheless, you can do so, of course.
Flying the Gravit WITHOUT automatic height control works as follows:
- Make your Gravit ready to fly and set it on a flat, even surface
- To start the motors, you have to use a special "stick command", because the "Start/Stop motors"-button is not available when altitude hold is disabled.
First, DISABLE/UNCHECK the gyro-control function (button 6).
Then move the left control stick to the 7 o'clock-position and the right control stick to the 5 o'clock position at the same time and hold them until the motors start. - Now you can either choose to leave the gyro-control disabled (which means you have to fly using the right virtual control stick instead of the gyro-function of your smartphone) OR you can quickly press the button to enable gyro-control again.
Flying WITH gyro-control enabled is easier. - Move the left control stick upwards while the motors are still turning. In case you have waited too long and the motors are already off again, repeat the procedure described in 2)
The Gravit will lift off and you are in full control now. Please be aware that you have to hold altitude by yourself now, moving the right control stick up and down.
The rest of the controls works just like described in altitude-hold-enabled flight modes. - To land the Gravit, simply move the left control stick downwards. The Gravit will lose in height. To shut down the motors, move the left control stick completely downwards.
8. FLYING THE GRAVIT SMART VISION FPV - WHEN THE BATTERY GETS EMPTY
If the battery of your Gravit is becoming empty, the LEDs on the bottom side of your Gravit's arms will start to blink. The blinking pattern is "blink-blink-pause-blink-blink-pause" at a rate of two blinks per second. When you see this blinking, you know that it is time to land your Gravit. You still have time to fly around a bit, but some of the advanced functions (like doing flips) won't work anymore and the Gravit should be safely landed with the next 30 seconds.
9. NOTES AND TIPS
Operating range: The operating range of the Gravit Smart Vision strongly depends on the smartphone you are using to control the Smart Vision and the environmental conditions. Please do not fly the Gravit too far away from you. LRP recommends to stay within a range of max. 20 meters!
Flight time: The flying time of your Gravit Smart Vision strongly depends on how you fly it and what advanced functions you are using. For example, doing a lot of flips and flying fast will result in shorter flight times. Expect the flying time to be around 5-7 minutes.
Propeller Guards: The propeller guards of the Smart Vision can be detached very easily. Simply push the guards downwards by using your fingertips on two opposite sides. You can attach them again in the same way. When you attach them again, make sure the prop guards are pushed upwards completely. There is a small latch on the Gravit's foot that is keeping each prop guard in place.
Flying with or without propeller guards both has advantages and disadvantages. The advantage is more safety! When the prop-guards are installed, they protect the propellers from impacts caused by crashes or flying against a wall. And they also protect other objects or person from being hit by the rotating propellers.
The disadvantage is that the propeller guards add weight and additional air resistance to the Gravit. This means that the flight time will be slightly shorter and the handling of the Gravit will be less agile and responsive with the propeller guards being installed.
LRP thinks that safety goes first, that's why the propeller guards are installed right out of the box. Of course, you may choose to detach and attach them again as needed any time.
9. SPAREPARTS AND REPLACEMENT
The following spare parts are available for your Gravit Smart Vision FPV:
- 222932: Replacement propeller-guards (white, 4 pcs.) - Gravit Smart Vision FPV
- 222933: Replacement propeller (2xA/2xB) - Gravit Smart Vision FPV
- 222934: Replacement LiPo-battery 3.7V 520mAh - Gravit Smart Vision FPV
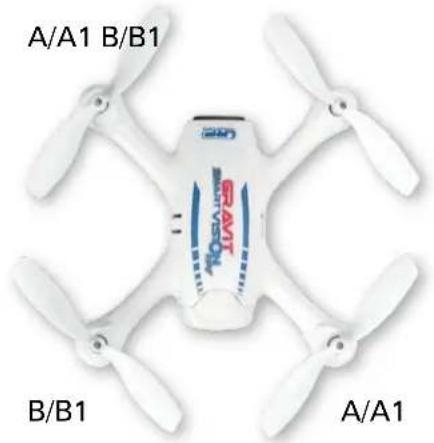
Replacing the propellers
GRAVIT SMART VISION FPV
APP-CONTROLLED WIFI QUADROCOPTER
BEST-NR. 220716
ENGLISH
WWW.LRP.CC
Sooner or later, you will have to replace one or more propellers of your Gravit, because they are worn or damaged.
If you replace the propellers, make sure you do this correctly and as shown on the photo below. Always be sure to mount the correct propeller (see marking on prop!) on the correct propeller shaft. To detach the propeller, untighten the screw that hold the prop onto the motor Schaff first. Then replace the propeller with a correct new one and secure it again by tightening down the screw.
You can see the correct assignment of the propellers on the picture below:
natural_image
White drone with blue 'GRANT' branding and labeled propellers (A/A1, B/B1, A/A1) on four propellers (no additional text or symbols)REPAIR PROCEDURES & WARRANTY
All products from LRP electronic GmbH (hereinafter called "LRP") are manufactured according to the highest quality standards. LRP guarantees this product to be free from defects in materials or workmanship for 90 days (non-european countris only) from the original date of purchase verified by sales receipt. This limited warranty doesn't cover defects, which are a result of misuse, improper maintenance, outside interference or mechanical damage.
This especially applies on already used batteries or batteries, which show signs of heavy usage. Damages or output losses due to improper handling and/or overload are not a product fault. Signs of wear (loss of capacity) after intensive usage are also no product fault.
Furthermore this includes the following points: Crash damage, Component failure or premature wear as a result of crash damage, Water damage or problems resulting from water/moisture intake, Painted canopies, after they have been used.
LRP does not do a warranty change of the whole product, once the product has been used. Do not send in the whole product. Only send in the defective parts, on which you want to claim warranty. If the whole product is send in, LRP will charge a service fee for the Disassembly and Assembly of the product at our discretion.
To eliminate all other possibilities or improper handling, first check all other components in your model and the trouble shooting guide, if available, before you send in this product for repair. If products are sent in for repair, which do operate perfectly, we have to charge a service fee according to our pricelist.
With sending in this product, the customer has to advise LRP if the product should be repaired in either case. If there is neither a warranty nor guarantee claim, the inspection of the product and the repairs, if necessary, in either case will be charged with a fee at the customers expense according to our price list. A proof of purchase including date of purchase needs to be included. Otherwise, no warranty can be granted. For quick repair- and return service, add your address and detailed description of the malfunction.
If LRP no longer manufactures a returned defective product and we are unable to service it, we shall provide you with a product that has at least the same value from one of the successor series.
The specifications like weight, size and others should be seen as guide values. Due to ongoing technical improvements, which are done in the interest of the product, LRP does not take any responsibility for the accuracy of these specs.
LRP-DISTRIBUTOR-SERVICE:
- check www.lrp.cc
GENERAL NOTES

WEEE NOTES
This symbol indicates that this product is not to be disposed of with your household waste, according to the WEEE Directive (2012/19/EU) and your national law. This product should be handed over to a designated collection point, e.g. on an authorised one-for-one basis when you buy a new similar product, or to an authorised collection site for recycling waste electrical and electronic equipment (EEE). Improper handling of this type of waste could have a possible negative impact on the environment and human health due to potentially hazardous substances that are generally associated with EEE. At the same time, your cooperation in the correct disposal of this product will contribute to the effective usage of natural resources. For more information about where you can drop off your waste equipment for recycling, please contact your local city office, waste authority, approved WEEE scheme or your household waste disposal service.

CE NOTES
Hereby, LRP electronic GmbH declares that this product is in compliance with the essential requirements and other relevant provisions of the european directive 2014/30/EU.
This item is in accordance with directive 1999/5/EC. For the declaration of conformity visit: http://www.LRP.cc/CE
BATTERY DISPOSAL NOTES:
Batteries and accumulators used in this product are to be disposed of separately from your household waste. Batteries and accumulators must not be disposed of as unsorted municipal waste. Users of batteries and accumulators must use the available collection framework for the return, recycling and treatment of batteries and accumulators. Customer participation in the collection and recycling of batteries and accumulators is important to minimise any potential effects of batteries and accumulators on the environment and human health due to substances used in batteries and accumulators.
Insurance notes:
In some countries it is mandatory to have a special liability insurance if you use a radio-controlled helicopter or airplane. Be sure to check with your insurance if your liability insurance covers the use of a radio-controlled helicopter or airplane before you use your model for the first time.
GRAVIT SMART VISION FPV
APP-CONTROLLED WIFI QUADROCOPTER

natural_image
Coiled black USB plug with a lightning bolt symbol nearby (no text or labels)Reverse control screen by gravity sensing

Right hand mode

1. SETTINGS
natural_image
White drone with blue 'GRANT' branding and labeled propellers (A/A1, B/B1, A/A1) on its body, no additional text or symbols visible.CONDITION GÉNÉRAL DE GARANTIE ET DE RÉPARATION
natural_image
Coiled black USB plug with a black connector, accompanied by a lightning bolt symbol (no text or labels)natural_image
White drone with four propellers and a branded cover, labeled A/A1, B/B1, and A/A1 (no additional text or symbols)natural_image
Coiled black USB cable with a white plug connector, no visible text or symbolsReverse control screen by gravity sensing

Right hand mode
1. IMPOSTAZIONI
natural_image
White drone with four propellers and a central branded cover, labeled A/A1, B/B1, and A/A1 (no additional text or symbols)Do not fly in crowded areas. Fly in large, open areas instead. Ask the landlord for permission where necessary.
Never fly over persons or animals and always keep a save distance.
When taking off or landing, take special care not to harm anybody.
Do not fly near airports (minimum clearance 1.5 km) and stay away from helicopter landing places (near hospitals, for example).
Make sure not to fly the model too far away, so that you may still be able to see the model with the naked eye and recognize its attitude of flight.
Watch out for other flying objects (airplanes, helicopters, balloons, e.g.) and try to evade them and land if necessary.
Please note that you might need a special insurance IN ADDITION TO
your normal liability insurance, depending on the country you are flying in. Please check this with your insurer.
In case your flight model should feature a video-camera, make sure to
respect the privacy of your fellow men. Do only record movies with their explicit approval and do not pass the video recordings to other people. Do not publish your recorded videos without the approval of the recorded fellow-men.
Do not fly near transmission towers, high-voltage transmission lines or similar devices.
Never fly over industrial plants or power plants, military facilities, railway lines, roads or over scenes of security forces like the police, fire service or similar.
No toy. Not suitable for children under 14 years. Keep the product out of the reach of children. Pay close attention to the following points, as they can destroy the product and void your warranty. Non-observance of these points can lead to property damage, personal and severe injuries! Never leave the product unsupervised while it is switched on, in use or connected with a power source. If a defect occurs, it could set fire to the product or the surroundings. Avoid incorrect connections or connections with reversed polarity of the product. All wires and connections have to be well insulated. Short-circuits can possibly destroy the product. Always remove the battery from your product or disconnect the product from the power source, if the product is not in use. Always charge the battery outside of the product you want to use. The product could get damaged, if a battery defect occurs. Avoid short circuits, overcharging and reverse polarity of the battery or single cells. This can lead to fire or explosion. Never open a battery or a single cell. Never leave the battery unattended while charging. During charging, the battery has to be kept on a non-flammable, heat-resistant mat. Furthermore no flammable or highly inflammable objects may be close to the battery. Never exceed the maximum charge/discharge current, which is recommended. Under no circumstances a NiMH/LiPo-battery shall be deep discharged. The battery may never get in touch with fire, water or other liquids. Only charge in a dry place. Damaged packs cannot be used any longer. If the packs show signs of damage, are bent or similar, do not use the packs anymore. For NiMH/NiCd batteries, only use chargers and dischargers, which are specified for this battery type by the manufacturer. Never use chargers or dischargers, which are specified for LiPo-batteries! Always switch on your transmitter first before you switch on the receiver or the speed control. The receiver could receive interference signals, start full acceleration and damage your model. When you switch off, make sure you do so in the reverse sequence. First switch off the receiver and speed control, then switch off the transmitter. Do not use different types of batteries and do not mix new and used batteries. Always wire up all the parts of the equipment carefully. If any of the connections come loose as a result of vibration, you could loose control over your model. The manufacturer can not be held responsible for damages, which are a result of non-observance of the warning notes and security advices. Replace only with genuine parts. Check the transmitter antenna to be sure it is not loose. If the transmitter antenna works loose, or is disconnected while the model is running, signal transmission will be lost. Do not screw the antenna forcibly. Otherwise its antenna-holding part can be damaged. Always perform a operating range check prior to use. Be sure to set the Fail Safe function. When making adjustments to the model, do so with the engine not running or the motor disconnected. You may unexpectedly lose control and create a dangerous situation. Always turn off the model and the transmitter while they are not in use. This is a high performance R/C kit, and it requires regular maintenance for best performance. If you don't do regular maintenance the performance will suffer. LRP electronic has all the necessary parts and accessories available to keep your car performing at its best. Please read and understand the instructions carefully before proceeding. Failure to follow these instructions can cause injury to yourself or others. You might also cause property damage or damage your kit. All instructions and precautions outlined in this manual should be strictly followed to ensure safe operation of your model. Drive the vehicle in a very large space, especially until you get the feel of driving the product. Do not run in sand or gras. To prevent any serious personal injury and/or damage to property, please be responsible when operating all remote controlled models. If you are not familiar with RC vehicles, we recommend that you ask someone familiar with RC vehicles for advice. Avoid running in rain or wet conditions. The electronic and mechanical components could be damaged. If your model got wet, please dry it up directly and clean it. Do not drive your car during a thunder storm! Mortal danger! Avoid running the car in crowded areas and near children. Do not run the car on public roads. Always use fresh batteries for your transmitter and receiver to avoid losing control of the model. Turn off receiver first, then turn off transmitter. This will prevent the car from losing control. Do not operate your car at night, or anytime your line of sight to the model may be obscured or impaired in any way. Always run your car with the body shell mounted. When the model is behaving strangely, immediately stop the car and check for the reason. Do not operate the car until the problem is solved. This may lead to further trouble and unforeseen accidents. Do not put fingers into rotating and moving parts. Be careful with the motor temperature. It could be better to wait a few minutes after every run to cool down the motor. Please do not run in small or confined areas.