
Luftreiniger AX 500 - Dehumidifier Turmix - Free user manual and instructions
Find the device manual for free Luftreiniger AX 500 Turmix in PDF.
| Product type | Air purifier / Dehumidifier |
| Brand | Turmix |
| Model | Luftreiniger AX 500 |
| Dimensions | 37 x 18 x 50 cm |
| Net weight | 5.4 kg |
| Power supply | 220-240 V / 50 Hz |
| Consumption (max fan) | 45 W |
| Max airflow | 150 m³/h |
| Recommended area | 40 m² |
| Filter type | HEPA filter + activated carbon |
| Ionizer | Yes, negative ion emission 2.5 x 10¹² per second |
| Fan speeds | High, medium, low |
| Timer | 1 to 8 hours |
| Functions | Purification, ionization, timer |
| Housing maintenance | Soft cloth, no chemicals |
| HEPA filter replacement | Every 6 to 8 months |
| Spare parts available | HEPA filter (ref. HEEN filter kit) |
| Safety | Automatic shutdown, safety instructions included |
| Warranty | 2 years |
Frequently Asked Questions - Luftreiniger AX 500 Turmix
User questions about Luftreiniger AX 500 Turmix
0 question about this device. Answer the ones you know or ask your own.
Ask a new question about this device
Download the instructions for your Dehumidifier in PDF format for free! Find your manual Luftreiniger AX 500 - Turmix and take your electronic device back in hand. On this page are published all the documents necessary for the use of your device. Luftreiniger AX 500 by Turmix.
USER MANUAL Luftreiniger AX 500 Turmix
FR Cheres clients, chers clients,
7.1 Elimination (recyclage)
Thank you for choosing to purchase this TURMIX product. Since 1933 we have been working to one end alone – to give you pleasure in using our equipment.
Our philosophy can be summed up in just four words:
lasting, uncomplicated, fascinating and reliable.
This means that we lay a great deal of stress on quality, ergonomics, simplicity and service and repairs, with a view to offering you the very best in the way products and services.
We hope you will get a lot of pleasure out of your new TURMIX product!
Table of Contents
| 1 Description of parts | 1.1 Parts description 47 | |
| 1.2 Brief instructions 48 | ||
| 2. Safety Instructions 492 Important safety inst | ||
| 3.1 AX 500 Operating mode 503 Functionality | ||
| FR | ||
| 4 Starting operation | 4.1 Initial operation 51 | |
| 4.2 Set up | 51 | |
| 4.3 AX 500 benefits | 52 | |
| 4.4. Electrical connection | 53 | |
| 4.5 Setting clock | 53 | |
| 4.6 Power On/off and fan adjustment | 53 | |
| 4.7 lonizer | 54 | |
| 4.8 Set timer | 54 | |
| 4.9 Maintenance and cleaning | 55 | |
| 4.10 Storage | 56 | |
| 5 Troubleshooting | 5.1 Troubleshooting | 56 |
| 6 Technical data | 6.1 Technical data | 57 |
| 7.1 Disposal 577 Disposal | ||
| 8 Appendix | 8.1 Fault analysis 61 | |
| 8.2 Warranty 62 | ||
| 8.3 Accessories 63 | ||


13. 174. 13.15. 16.
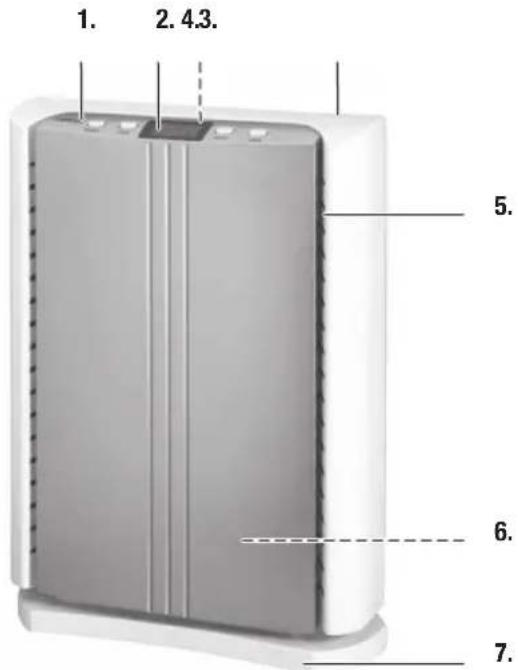
1.1 Description of parts
| Overview of controls and equipment components | 1 Controls |
| 2 LCD display | |
| 3 Handle (rear) | |
| 4 Air exhaust | |
| 5 Air inlet | |
| 6 Air cleaner (inside) | |
| 7 Base | |
| 8 On/Off switch | |
| 9 Adjustment up/down | |
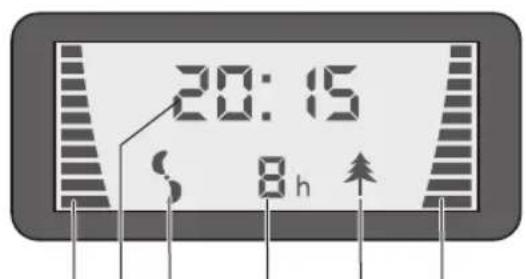
| 10 LCD display | |
| 11 Ionizer on/off | |
| 12 Timer | |
| 13 Blower setting | |
| 14 Clock | |
| 15 Blower operation | |
| 16 Timer Set (1-8 hours) | |
| 17 Ionizer indicator |
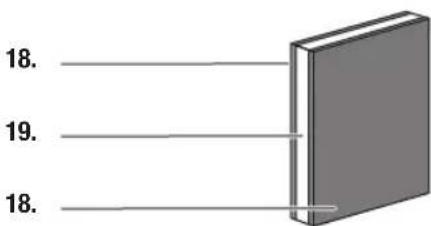
| Overview of the accessories 18 Charcoal |
| 19 HEPA filter |

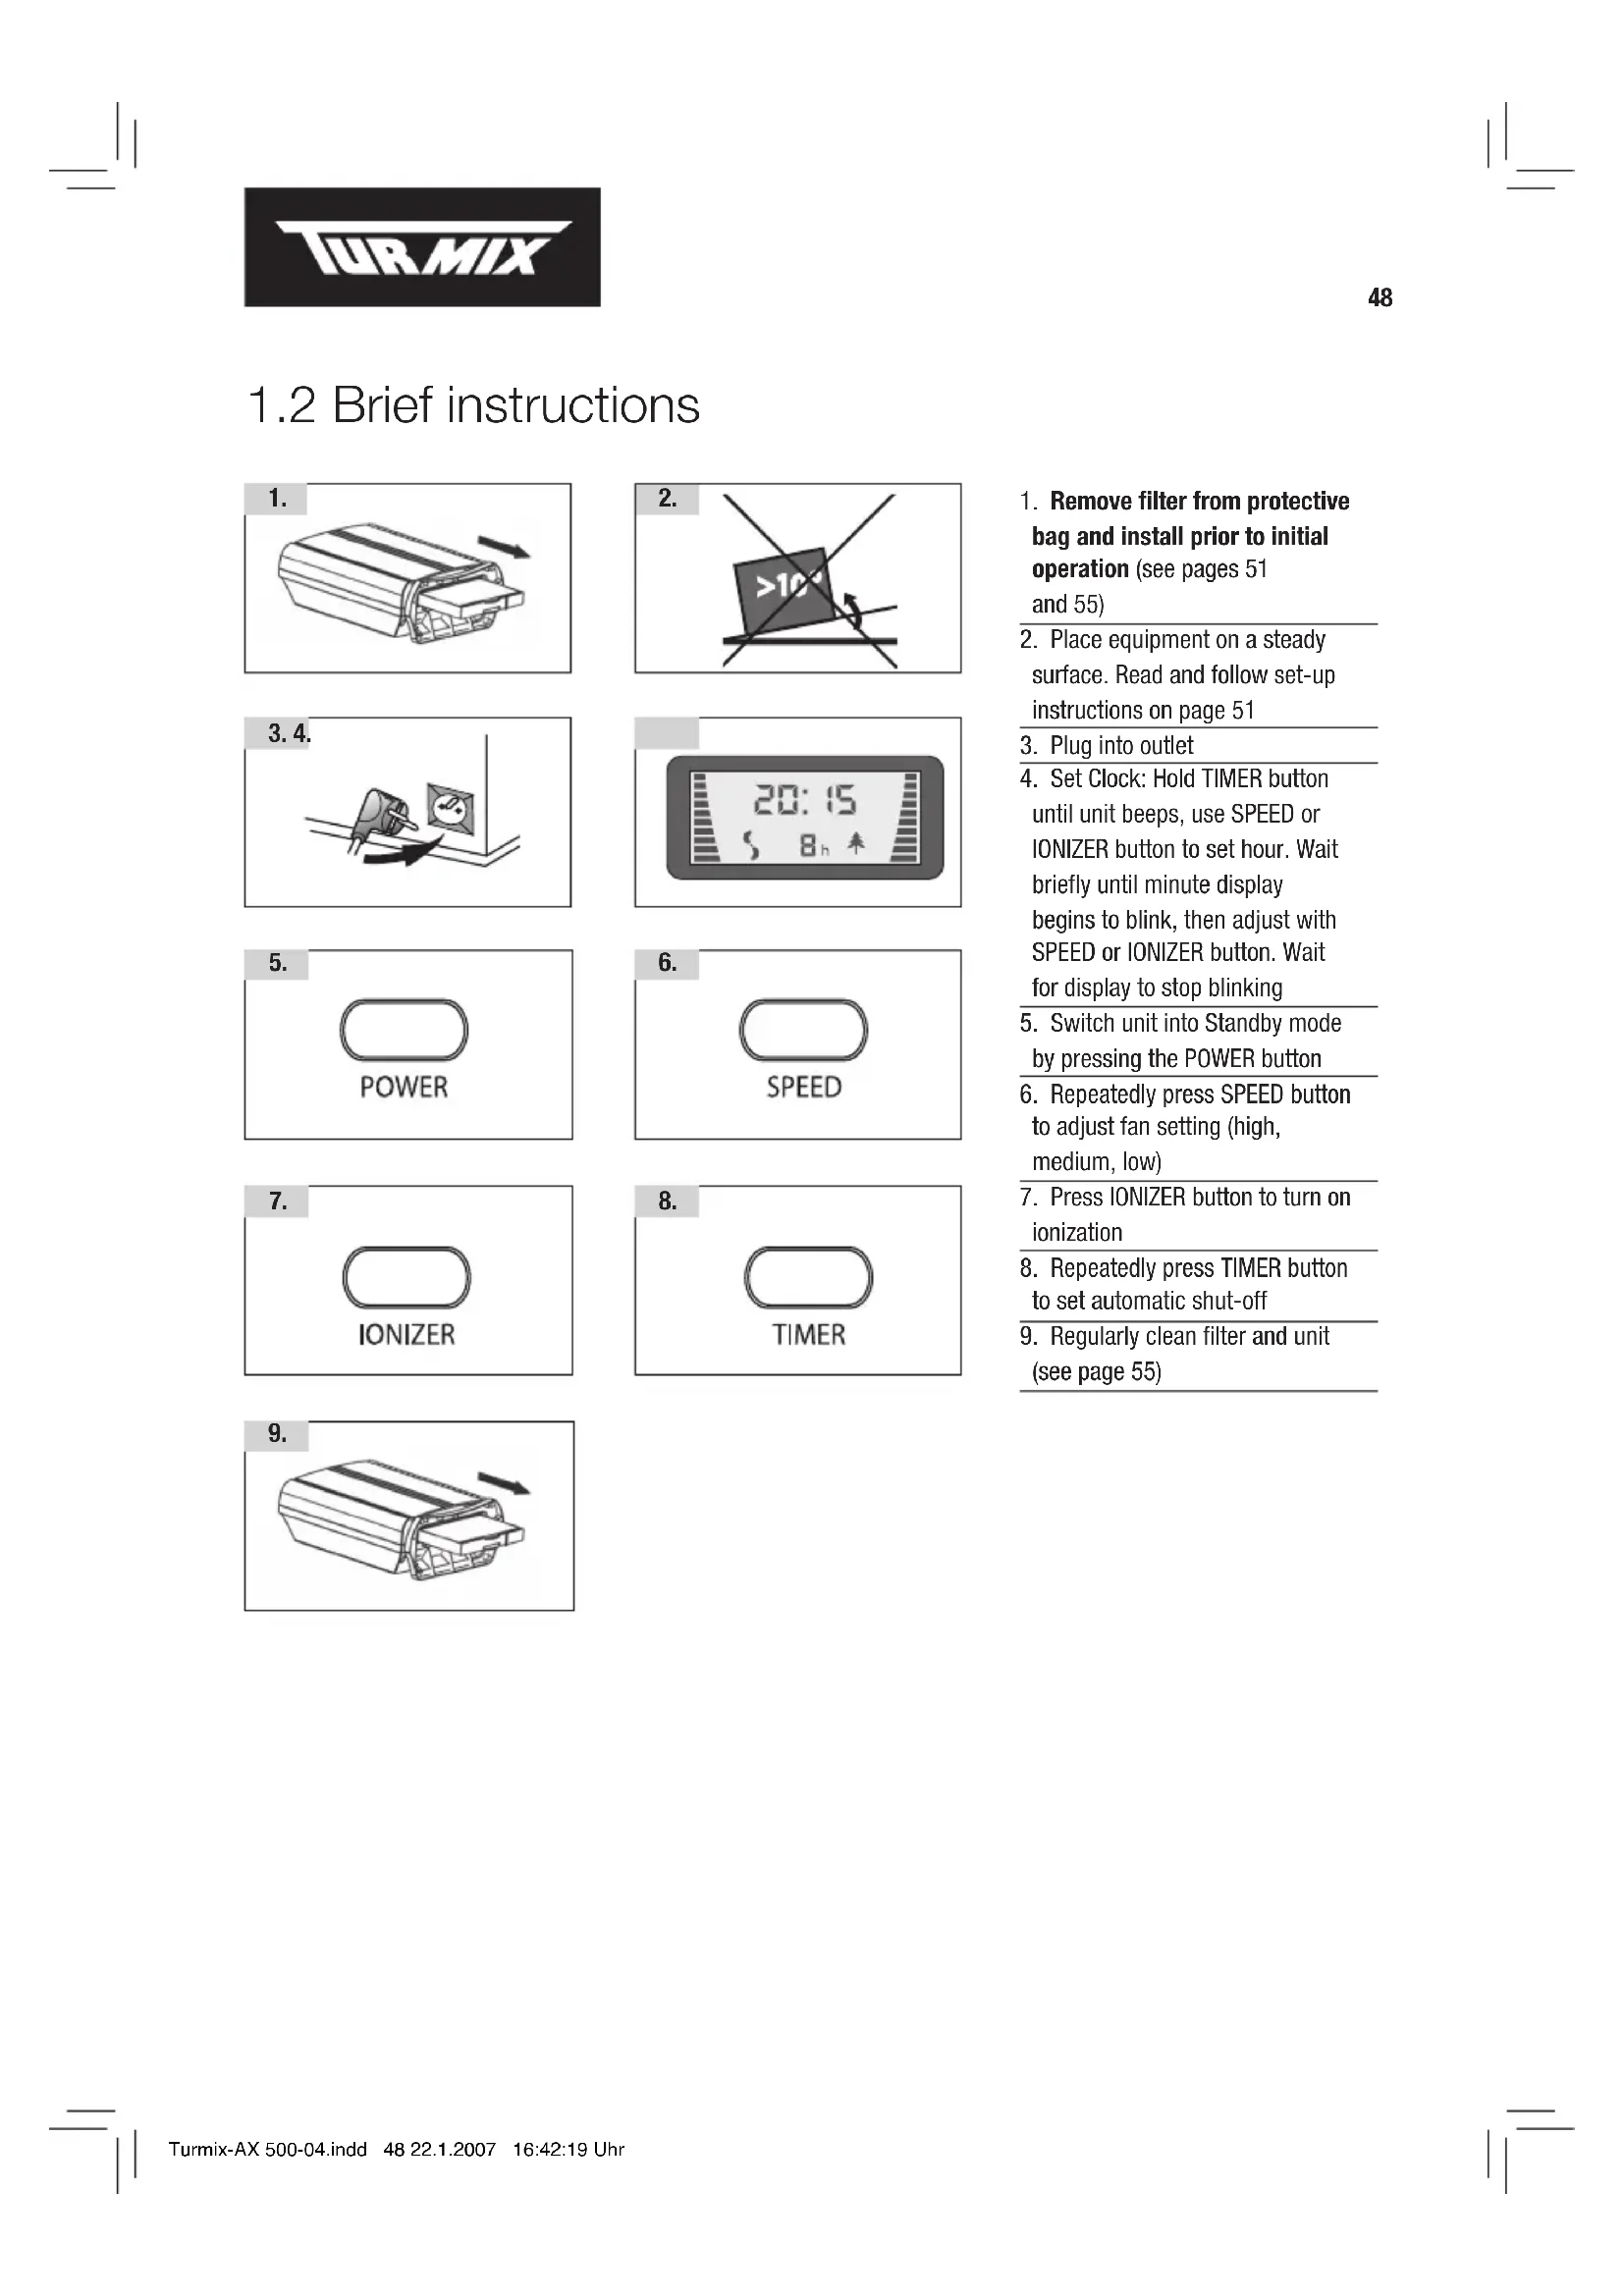
1.2 Brief instructions
- Remove filter from protective bag and install prior to initial operation (see pages 51 and 55)
- Place equipment on a steady surface. Read and follow set-up instructions on page 51
- Plug into outlet
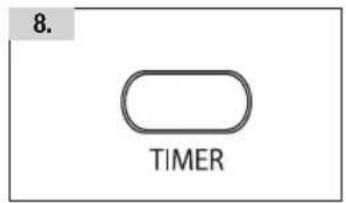
- Set Clock: Hold TIMER button until unit beeps, use SPEED or IONIZER button to set hour. Wait briefly until minute display begins to blink, then adjust with SPEED or IONIZER button. Wait for display to stop blinking
- Switch unit into Standby mode by pressing the POWER button
- Repeatedly press SPEED button to adjust fan setting (high, medium, low)
- Press IONIZER button to turn on ionization
- Repeatedly press TIMER button to set automatic shut-off
- Regularly clean filter and unit (see page 55)
2. Important Safety Instructions

When using the air purifier the following safety precautions must be observed:
- It is essential to read the operating instructions carefully and thoroughly.
- There is the risk of an electric shock if the unit, power cable or plug is dipped in water or any other liquid medium. or the power cable is incarcerated.
- Do not touch the unit with wet hands.
- Place the unit on a stable and horizontal surface.
- Use the electrical equipment always out of children's reach.
- Always unplug the power (pull the plug) before inserting or removing parts (filter,etc.) for the purpose of cleaning.
- Units with a defective plug or power cable and units which have been damaged or show impaired functionality should be inspected and repaired by an authorised customer service agent before trying to be put it back into operation.
- Do not use extension cable.
- The use of accessories or spare parts which are not authorised by the manufacturer may result in fires, electric shocks or personal injury.
- Do not use the unit outdoors and do not expose it to high humidity (example in a bathroom).
- The power cable may not come in contact with hot surfaces and should not hang down from tables or working surfaces.
- Do not set up the unit in the immediate vicinity of gas stoves, electric stoves or grills.
- Do not enter into the vents with any objects: risk of an electric shock.
- The unit should only be used in the household for the purposes for which it is intended.
- In order to turn off the unit first turn off the power switch and then unplug the power plug.
- After unpacking the unit please make sure that the plastic wrapping is kept out of reach of children.
- Persons, including children, who in view of the level of their physical, sensory or mental capacities, or their lack of experience or knowledge, are not in a position of using the unit safely may not use the unit without supervision or instructions from a responsible person.
PLEASE SAVE THESE SAFETY INSTRUCTIONS!
3. Functionality
3.1 AX 500 Operating Mode
1
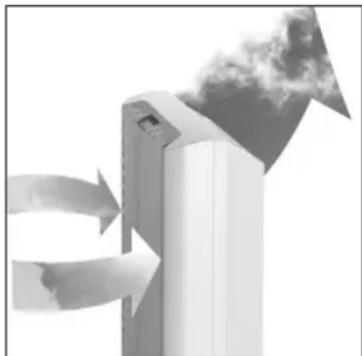
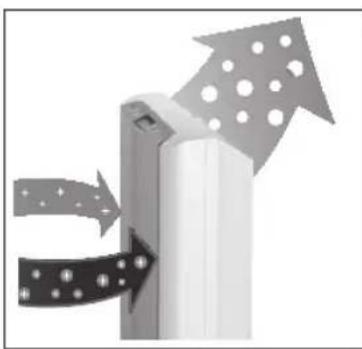
The air cleaner draws air through the front side and passes it through an advanced HEPA filter. The filtration system removes pollutants from the air. When the ionizer is switched on, the air is additionally enhanced with negative ions. The cleaned and enhanced air is returned into the room through the top of the unit.
The air cleaner helps to provide a comfortable sense of well-being by removing cold tobacco smoke, odors, household dust, pet hair and pollen.
The AX 500 features a HEPA filter. The HEPA filter features an activated carbon filter, enabling the neutralization of odors. The AX 500 is delivered with the filters installed. These are sealed in a protective bag, which must be removed before initialization.
Beneficial to your health
Did you know that without any physical exertion, a person draws approximately 14 to 16 breaths per minute? This number can rise as high as 60 times per minute under physical exertion. In one day, you breathe approximately 23'000 times and take in about 10'000 liters of air. The entire surface of alveole (little air pockets inside the lungs) is as large as a tennis court. Thanks to this air cleaner, you will be breathing up to 10'000 liters of clean air.
4. Starting operation
4.1 Initial operation
Please read the entire manual before initial set-up and installation of this unit.

Caution! Filters must be removed from protective bags before initial operation (see page 55)!
2
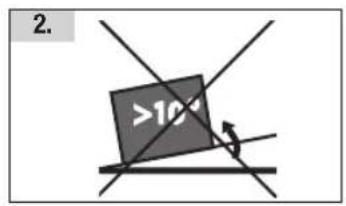
4.2 Set up
The air purifier works on the concept of ionization. This could lead to a stronger deposit of pollutants in the area surrounding the air cleaner. Since dark spots could form, it is recommended to place the unit near washable surfaces.
Place unit on a solid and stable surface. During set-up, ensure the unit is placed on a safe surface and the air flow is not blocked by items such as furniture. Place at least 60~cm from walls. Do not place near radiators or other heating sources. Be sure the electrical cord does not pose a tripping hazard and the unit is out of reach of children.
Important:
Do not place unit near sensitive electronics such as video or music tapes, floppy disks, computers, watches, lamps with sensor switches, radios, stereo equipment, telephones, VCR, etc.
Do not place on metal surfaces.
Upon initialization, the unit immediately starts to clean your air. For highest efficiency, close entry doors and windows during initiation.
The backside of the unit features a handle. Turn unit off and unplug before moving it.
4.3. AX 500 benefits

Smoke

Dust
Pollen
Dust mites
Bacteria
Food odors
Pet dander
The air purifier and ionizer improves the air quality in your room. The filters not only removes large particles, but also pollutants smaller than 0.1 Micrometer.
The AX 500 enhances the air with negative ions, which are found in large quantities in clean outside air (approx. 1000 - 5000 per cm^3 of air). Inside rooms, the quantity is reduced to a few hundred units or less. Since pollutants in ambient air are charged with ions, the ions of this unit are electrostatically repelled and fall to the floor.
The air purifier can be beneficial to people suffering from asthma or allergies by removing pollutants, smoke, pollen, dust, fibers and soot and therefore minimizing resulting symptoms.
The AX 500 can also help with various weather dependent ailments such as headaches, nausea and body aches.
The AX 500 can help you achieve relaxation and improved sleep.
The AX 500 checks air circulation in its surroundings and reduces stuffy and stale air, a major complaint in offices and work stations.
Ions are electrically charged particles. An electron deficiency charges them positive, electron excess negative. Negative charged ions as emitted by the air purifier, have a positive environmental effect: They neutralize odors and leave the air with a fresh scent, just as you are familiar with from non-industrial areas or following a thunderstorm.


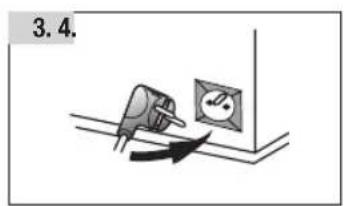
4.4. Electrical connection
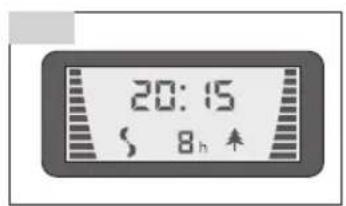
Upon plugging the unit in or pushing any button, the unit will beep. When the unit is turned off, the LCD display is off. When the POWER button is pushed, the blue LCD display lights up and the time is displayed. After a few seconds, the display extinguishes again and the unit enters standby mode. Pushing the POWER button when the unit is turned on or in standby mode will turn the air purifier off (the display is dark).
4.5 Setting clock
When plugging the unit in (or after an interruption in the circuit) the display will show 00:00.
To set the time, press the TIMER button until unit beeps (the hour display will blink). Set the hour with the SPEED or IONIZER button. After setting the desired hour, wait a moment until the minute display begins to blink. Use the SPEED or IONIZER button to set the minutes. Wait until the display stops blinking. You have successfully set the clock.
Note: The clock can only be set in Standby mode.
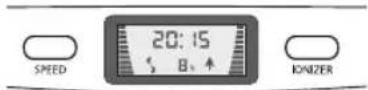
4.6. Power on/off and fan adjustment
If the unit is not already in Standby mode (clock is displayed), press the POWER button. Turn the unit off by pressing the POWER button again. Turn the unit on by pressing the SPEED button. The air purifier automatically starts on the highest setting (the fan symbol in the display runs fast).
The fan setting can be adjusted by repeatedly pressing the SPEED button (the bar and fan display change).
Available settings: High, medium, low, and standby.

4.7 lonizer
3
Pressing the IONIZER button switches the ionizer on. The LCD display shows a fir tree moving upwards.
Pressing the IONIZER button again will turn this function off.
4.8. Set timer
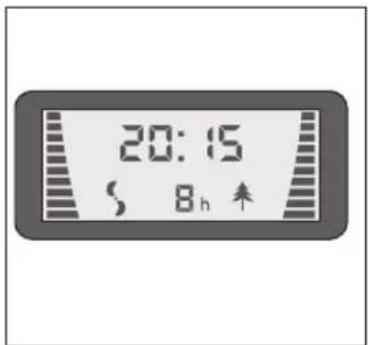
The timer function allows for the unit to automatically turn off after 1-8 hours.
Set the desired number of hours by repeatedly pressing the TIMER button, e.g. 8 hours.
To cancel the timer, press the TIMER button repeatedly until the hour display cancels, or use the POWER button to switch the unit off.
4
4.9. Maintenance and cleaning

Unplug unit before maintaining or cleaning!
Clean housing
Clean housing with a soft cloth. Do not use chemicals, harmful additives, fuel, or harsh cleaners, as the housing could be damaged.
Clean area
Due to the operating method, dust will collect in the area surrounding the air cleaner. We recommend cleaning the area weekly with a damp cloth.
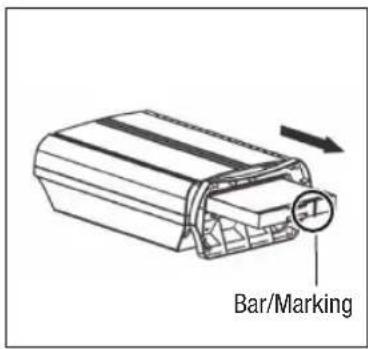
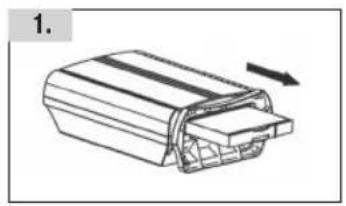
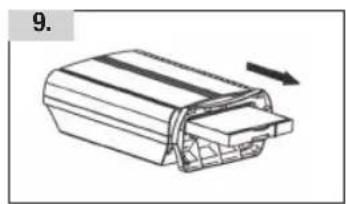
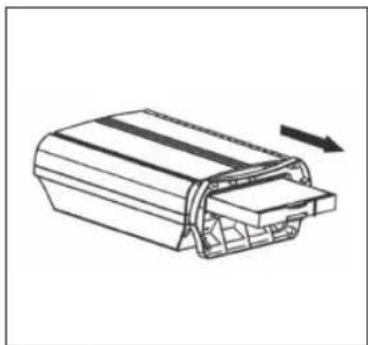
Install or remove filter
Remove filter from packaging prior to first use. Place the unit on the backside for this.
Push the two fastener clips together to release the filter bracket and pull out from the unit bottom 5.
Replace filter bracket as follows: Place filter bracket so both clips face away from the unit. The bar on the filter bracket must be to the right of the handle. Push filter into unit until a locking sound is heard.
5
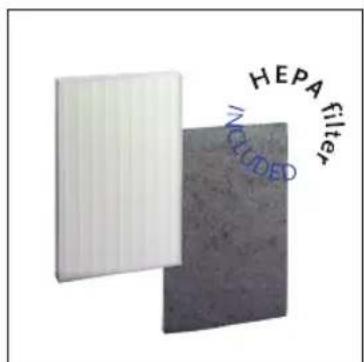
HEPA filter
The HEPA filter 6 consists of three layers: a folded HEPA filter between two charcoal filters. The filters are affixed inside a cartridge.
The HEPA filter is a single use filter and can not be washed. Replace after about 6-8 months (contact dealer to purchase, or see page 61).
6

4.10. Storage
Follow these steps for the proper storage when the unit is not used for longer periods of time:
Unplug unit and wind cord
- Clean unit and filter. Store unit in original packaging or otherwise protect it from dust
- Store upright in a cool, dry location, out of reach of children
5. Troubleshooting
Please contact customer service.5.1 Troubleshooting
6. Technical data
| Power Supply 220 - 240 V / 50 Hz | |
| Energy Use (highest setting) 45 W | |
| Ozone Production significantly below international regulations | |
| Fan settings High, medium, low | |
| Air quantity 150 m3/h on highest setting | |
| Area 40 m2 | |
| Ion Emission 2.5 x 10¹² total (2.5 billion) negative ions per second | |
| Size 37 x 18 x 50 cm | |
| Net Weight 5.4 kg | |
Subject to change without notice. Please see name plate for further details.
7. Disposal
7.1 Disposing of equipment
Equipment that has reached the end of its service life can be handed over at a sales outlet, and will be professionally disposed free of charge.
Equipment that has hazardous defects should be disposed of immediately. Please ensure that it cannot be used again.
Do not dispose of equipment with household rubbish (for environmental reasons).


59
DE
FR
IT
GB


61
Ja/Oui/Si/YesNein/Non/No/Nb
Datum / Date / Dato / Date
Unterschrift / Signature / Signature / Signature
Garantie/Garantie/Garanzia/Warranty
Gadentie
Our TURMIX electrical household appliances carry a warranty of 2 years from the date of purchase. We undertake to replace, free of cost, any parts of the appliance that get damaged as a consequence of material or manufacturing defects during the warranty period. Return shipments should be packed in the original packing or something equivalent. In case of improper handling or in case repairs are attempted by third parties, the warranty is rendered null and void. Damage from hydro-chemical influences (e.g. owing to calcification) as well as parts that are subjected to normal wear, do not fall under the warranty. Moreover, damage or function faults that are a consequence of water from softening plants are excluded from the warranty.
Please preserve your receipt carefully, it serves as the warranty certificate as well.

Zubehör/Accessoires/Accessori/Accessories
Art.A54467
HEDA-Filterkit
Consisting of HEPA filter and activated carbon filter.

D0510.10010/01.2007
Änderungen vorbehalten / Sous réserve de modifications / Con riserva di modifiche / Alterations)."
www.turmix.com