T3 Classic - Desk Phone AVAYA - Free user manual and instructions
Find the device manual for free T3 Classic AVAYA in PDF.

| Product Type | Wired desk phone |
| Model | T3 Classic |
| Brand | Avaya |
| Category | Desk phone |
| Display | Alphanumeric backlit screen |
| Keys | 12 alphanumeric keys, 4 display keys, programmable function keys, navigation keys |
| Power | PoE (Power over Ethernet) or 48V DC power adapter |
| Network interface | 10/100Base-T Ethernet (RJ45) |
| Compatibility | Avaya Integral 5 and IP Office PBX |
| Main functions | Calling, call waiting, conference, call forwarding, call list, directory, PIN lock, voicemail |
| Speaker | Hands-free and amplified listening |
| Settings | Volume, contrast, ringtone, language (11 languages) |
| Dimensions (approx.) | 220 x 180 x 110 mm (W x D x H) |
| Weight (approx.) | 900 g |
| Maintenance and cleaning | Clean with a soft, dry cloth; do not use abrasive products |
| Safety | Do not open; repairs by qualified personnel only |
| Spare parts and repairability | Contact Avaya support; optional DSS/Link modules available |
| General information | Compliant with Directive 1999/5/EC; do not dispose of with household waste, mandatory recycling |
| Operating temperature | 0°C to 40°C |
| Relative humidity | 20% to 80% non-condensing |
Frequently Asked Questions - T3 Classic AVAYA
User questions about T3 Classic AVAYA
0 question about this device. Answer the ones you know or ask your own.
Ask a new question about this device
Download the instructions for your Desk Phone in PDF format for free! Find your manual T3 Classic - AVAYA and take your electronic device back in hand. On this page are published all the documents necessary for the use of your device. T3 Classic by AVAYA.
USER MANUAL T3 Classic AVAYA
T3 Classic connected to IP Office / Integral 5

natural_image
Two men sitting on a park bench, one using a smartphone and the other holding a laptop (no visible text or symbols)Bedienungsanleitung
Operating instructions
Manual de manejo
text_image
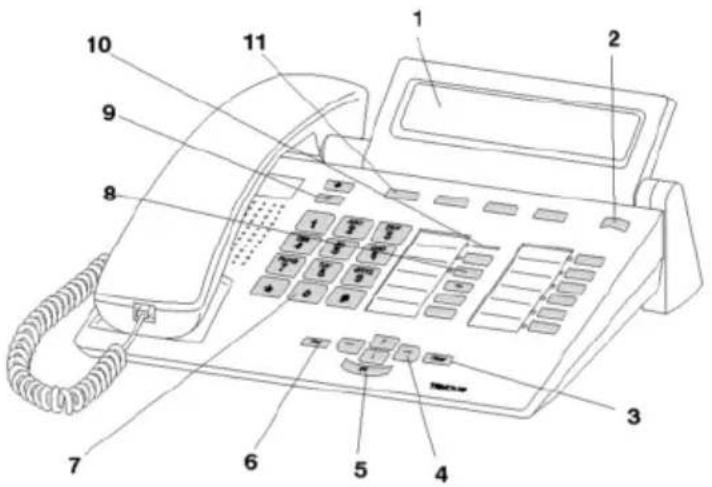
Diagram of a classic telephone with numbered parts for identificationFamiliarise yourself with your telephone
Important notes 2
Your T3 Classic at a glance 5
Putting the T3 IP telephone into service (I5) 6
Basic rules of operation 8
Telephoning as usual
Answering calls 11
Call someone 12
Making several connections ....13
Telephoning without the handset 15
Telephoning with ease
Using the call list 16
Diverting calls (I5)....18
Diverting calls (IP Office) 20
Locking the telephone 22
Using the directory 23
Viewing charges (I5)* 25
Customising your telephone
Setting audio, contrast and language ....26
Important notes
Contents of this operating manual
These operating instructions describe the most frequently used telephone functions at Integral 5 (I5) and IP Office telecommunications systems.
If operation of any functions differs at the two systems, it is clearly marked in the text.
User manuals which include all the functions are available on the CDs supplied with the telecommunications system or on the Internet at http://www.avaya.tenovis.com.
Which system is your telephone connected to?
You can find out the type of system to which your telephone is connected as follows:
Press the "Menu" function key.
Press the "Down" arrow button several times.
The "Group state" menu item only appears at the IP Office. It is not available if your telephone is connected to Integral 5.
Which systems can you connect your telephone to?
This telephone is only intended for connection to telecommunications systems from Avaya-Tenovis. It must not be connected directly to a PSTN.
Declaration of conformity
We, Avaya-Tenovis GmbH & Co. KG, declare that the T3-Classic telephone complies with the basic requirements and other relevant rules in accordance with EU directive 1999/5/EU (radio and telecommunication terminal equipment, R&TTE).
This telephone is intended for connection to digital interfaces of Avaya-Tenovis telecommunications systems and meets the fundamental requirements formulated in EC directive 1999/5/EC (Radio and Telecommunication Terminal Equipment, R&TTE).
The design of this telephone makes it unsuitable for direct operation on interfaces of public telephone networks.
If any problems should occur during operation, please initially contact your specialist dealer or your system administrator.
The complete declaration of conformity can be requested from the following Internet address: http://www.tenovis.com/deutsch/verzeichnis/conformance.htm or look for 'Conformity' in the index.

Important notes
Declaration of Conformity IP (I5)
We, Avaya-Tenovis GmbH & Co. KG, declare that the T3 IP Classic telephone complies with the basic requirements and other relevant rules in accordance with EU directive 1999/5/EU (radio and telecommunication terminal equipment, R&TTE).
This telephone is designed for connection to Ethernet / LAN interfaces of IP-compatible telecommunications systems from Avaya-Tenovis, and complies with the basic requirements of EU Directive 1999/5/EU (R&TTE).
Avaya-Tenovis cannot guarantee successful operation of the telephone in LAN or Intranet environments in which no Avaya-Tenovis telecommunications system is present.
Declaration of Conformity (Links)
When using links and DSS modules:
This link / DSS module is intended for connection to T3 telephones and meets the fundamental requirements of EC directive 1999/5/EC (Radio and Telecommunication Terminal Equipment, R&TTE).
The design of this Link/DSS module makes it suitable for use with T3 telephones only.
Tips on phone location
Place the telephone on a non-slip surface, especially if the furniture is new or has recently been cleaned or polished. Varnishes or cleaning agents may contain substances which soften the base parts of your telephone, and the softened bases can leave undesirable marks on the furniture. Avaya-Tenovis cannot assume liability for damages of this kind.
Repairs
The equipment may only be opened or repaired by a qualified technician. Do not open the telephone yourself. Doing so could damage the unit and cause it to malfunction.
Additional functions
Functions marked by an * are not supplied as standard with your telephone.
Other functions may be disabled or – depending on the system software – not available. If you wish to use one of these functions, please contact your system administrator.
Important notes
User manual in other languages
Would you prefer to read these operating instructions in a different language? Via our homepage http://www.avaya.tenovis.com you can access our document database. Look there to find out whether the language version you want is available for download.
Always dispose of old equipment correctly - keep our environment tidy

Old electrical and electronic equipment marked with this symbol can contain substances hazardous to human beings and the environment. Never dispose of these items together with unsorted municipal waste (household waste). In order to protect the environment, public collection points have been set up to ensure the correct disposal of old electrical and electronic equipment marked with this symbol.
To reduce the risk of these substances being released into the environment and to reduce the burden on natural resources, it is also possible to participate in Avaya-Tenovis' used equipment return system. This system ensures the correct recycling of old equipment as well as the re-utilisation of individual components.
Your T3 Classic at a glance
text_image
Diagram of a classic telephone with numbered parts for identification1 Display
2 Switch level key for display keys
3 Clear key
4 Arrow keys for navigating in the display
5 OK key
6 Escape key
7 Digit keys with letters
8 Function keys, some with light display
9 Volume/contrast keys
10 Call display
11 Display keys for destinations, functions and partners
Familiarise yourself with your telephone
Putting the T3 IP telephone into service (I5)
Please read and follow the following instructions regarding the commissioning of an IP telephone.

- IP specific settings are described in the user manual.
Connecting the T3 IP telephone and logging in (I5)
After connecting to the LAN (Local Area Network) and to the power supply (only if the telephone is not powered via the LAN), the telephone software is activated and after that a search starts automatically for a gatekeeper (responsible for access authorisation). A gatekeeper is normally found. If this is the case, the log-in window appears next:
ABC 2 ... WXYZ 9Enter extension number.
↓ Scroll to the PIN menu item.
0 0 0 0 Enter your PIN. The factory setting is "0000".
OK Confirm your selection. The idle display appears next. From now on you can also be reached under the call number (extension number) that you have entered.

- You can change the language for the log-in ( p. 7) procedure.
- The log-in PIN is the same as the PIN you can use to unlock your locked telephone. You can change this PIN in the Lock menu.
- If you have cancelled a log-in procedure (i.e. you have left the log-in window using the Escape key) in order to change or view settings in the menu, you can then log back in again via the User administration menu item.
Putting the T3 IP telephone into service (I5)
Logging out from telephone
When you want to log out of the telephone:
Press the "Menu" function key.
↓ Scroll to the Log out menu item.
OK Confirm your selection. You are now logged out of this telephone. Another user can now log on.Modifying language for the log-in procedure and IP settings
If your telephone has not yet been logged in, you can choose between 11 different languages (German/English/French/Italian/Spanish/Dutch, Hungarian, Slovenian, Polish, Czech and Russian):
Press the "Menu" function key.
↓ Scroll to the "Switch language" menu item.
OK Confirm your selection.
↓ Select the desired language, e.g. English.
OK Confirm your selection.
i
- When first setting up your telephone you can choose your preferred language in other ways: When the log-in window appears, press the Escape key twice. "D/GB/F/I/E/NL..." appears. Then select your preferred language. "D/GB/F/I/E/NL..." disappears once the language has been changed.
Familiarise yourself with your telephone
Basic rules of operation
You can select and use most of the functions using the menu. To make operation easier, you can assign frequently used functions to the function keys. Some keys have already been assigned functions in their factory settings.
Selecting functions in the menu
Press the "Menu" function key.
or ↑scroll to the desired menu item.
OK Confirm your selection. The selected function is displayed. A submenu also appears in many cases. You can scroll in the submenu just as you can in the menu.
Cancelling or exiting an operation
If you have made an input or parameter error:
[ESC] Press (several times if necessary) to cancel the procedure. You then move up one menu level or go to the idle display.
What does the idle display show?
The idle display shows:
- Your name and call number
- Date and time
- Assignment of display keys
- Status messaged if required
Info window
| --- Info --- Function not possible | |||
| Line 1 | Line 2 | Liszt | Chopin |
Sometimes the "info window" appears. This gives you important information, e.g. if a particular function cannot be executed or you have changed a setting. It disappears again automatically after a short time.
Basic rules of operation
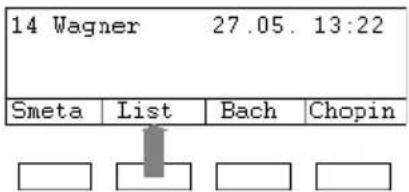
Display keys
text_image
14 Wagner 27.05. 13:22 Smeta List Bach ChopinYour telephone has four special function keys, the display keys. The current allocation of each key is shown in the display.
Example: List is written above the second key. If you press the key, the function list is carried out.
Display keys in several levels
One level with four key assignments is shown on the display at a time. However, you can assign each key several times. The display keys of the first level can be assigned partners, lines (I5) or any desired functions. Normally, you will see the first level displayed.
You can assign destinations to display keys in other levels. You can change between the levels using the "Switch level" key.
Press ☐. The next level of the display keys will be shown. The current functions are shown in the display.
Press ESC Return to the first level.

• 15:
- You can temporarily switch off the status message display with the Escape key.
- The destinations on the keys in level two and higher correspond to the entries in your individual directory. All entries are automatically assigned to the display keys, starting with code 900.
- Your system administrator can change the number of levels for the display keys (max. 8).
Familiarise yourself with your telephone
Basic rules of operation
Entering text
The digit keys can also be used to enter letters and characters, e.g. for names in the individual directory. The letters are printed on the digit keys. Your telephone switches automatically to entry of letters and numbers when this is necessary.
Example: Enter the name "JOHN":
5 Press the JKL button once. J appears in the display. Wait briefly until the cursor moves to the right.
MNO MNO MNO 6 6 6 Press the MNO button three times. The display reads JO. Wait briefly until the cursor moves to the right.
GHI 4 GHI 4 Press the GHI button twice. The display reads JOH. Wait briefly until the cursor moves to the right.
MNO MNO 6 Press the MNO button twice. The display reads JOHN.
Deleting letters
Clear Deletes the character above the marker. If the marker comes after the last character, the last character is deleted.
Switching between upper case and lower case letters
Press #key to change between upper case and lower case letters.
Entering special characters
Not all possible symbols appear on the digit keys. All the keys provide additional characters to the ones printed on them.
Answering calls
If you receive a call
Your telephone rings. The call is shown in the display.

Lift the handset.
If another telephone rings (pick-up)
Another telephone rings.
15:
Press the "Menu" function key.
Scroll to the Pick up menu item.
OK Confirm your selection. A list of incoming calls is shown.
Scroll to the call you want to pick up.

Lift the handset. You can now talk with the caller.
IP Office:
Press the "Menu" function key.
Scroll to the Pick up menu item.
OK Confirm your selection.
0 ... 9 Enter the number of the ringing telephone.

Lift the handset. You can now talk with the caller.
Call during a conversation (second call)
You are on the phone. Someone else calls you. You hear a single ringing tone. The caller is shown as the top item on the menu.
OK Answering a call. The first caller is waiting and cannot hear your conversation.

- In order for a second caller to be displayed, call waiting has to be activated.
Telephoning as usual
Call someone
Making a call within and outside your telephone system
0 ... \$Enter the desired number.
Lift the handset.

- If necessary, you have to predial an external line code for external calls. For more information, contact your system administrator.
Making a call with one key stroke
Press the display key or function key for the desired subscriber.
Lift the handset.
Redialling
You can redial one of the last 10 (IP Office) or last 5 (I5) numbers called.
Press the "Redial" function key.
↓ Scroll to the desired number, e.g. 06975051234.
Lift the handset.
Making several connections
You can also accept another call while you are already on the phone (Call Waiting). You can speak to several parties alternately and switch back and forth between them as you wish.
You can speak with several callers simultaneously (conference).
Consultation during a call (Refer-back)
During a call:
Press the "Refer-back" function key. The caller waits and cannot hear what you say.
0 ... 9Enter the number you wish to refer back to. Carry out refer-back.
If necessary, disconnect the refer-back extension.
↓ Scroll to the Return to ... menu item.
OK Confirm your selection.
You will now be able to talk to the first party again. The other party is on hold.
Switching between two external callers (brokering)
If you want to speak with a call party (e.g. 06975058) who has been put on hold:
Scroll to the Back to 06975058 menu item.
OK Confirm your selection. The other caller is now waiting.
Forwarding callers
Your caller wishes to be connected to another extension:
Press the "Hold" function key. The caller waits and cannot hear what you say.
0 ... 9 Enter the number to which you want to forward the call.
Replace the handset. The hold extension will be connected to the first caller.

- You do not need to wait until the hold extension picks up the call.
Telephoning as usual
Making several connections
Conference operation - adding a party to a call
During a call (e.g. with 06975058):
Press the "Hold" function key. The other party is on hold.
0 ... 9 Enter number of second conference participant.
When you are connected to this subscriber, you can initiate the conference.
↓ Scroll to the Conference menu item.
OK Confirm your selection.

- Ending the conference: Any participant can switch out of the conference. Replace the handset.
- If the third subscriber whom you are calling does not answer, select the Return to subs ... menu item to return to the first participant.
Telephoning without the handset
You can activate the loudspeaker of your telephone in order to hear the caller without having to use the handset.
You can also make a call with handsfree. You do not then need to pick up the handset. You can also activate handsfree mode during a call and then continue the conversation with the handset on-hook.
Switch on monitoring/handsfree during a call
While telephoning with the handset lifted:
Switching to monitoring:
Press the "Handsfree/Monitoring" function key (LED lights up). You can then hear the caller through the built-in loudspeaker.
Switching to handsfree:
Press the "Handsfree/Monitoring" function key again (LED flashes). The built-in microphone is activated. You can replace the handset and speak handsfree.
Adjusting the loudspeaker volume:
+ Press keys + and -.
Making a call with the handset on-hook (handsfree)
0 ... 9 Enter the desired number.
Press the "Handsfree/Monitoring" function key (LED flashes).
When the desired party answers, you can hear them out loud and you can also talk to them with the handset on-hook.
Handsfree - ending a call
While you are telephoning handsfree with the handset on the hook:
Press the "Handsfree/Monitoring" function key (LED goes out).
Telephoning with ease
Using the call list
If you do not answer a call it is stored in the call list with the time and date. You can display this list at any time and return calls to the subscribers entered in it.
The list contains the 10 most recent entries.
Selecting an entry from the call list
Press the "Call list" function key.
↓ Scroll to the desired entry, e.g. 0069123456.

Lift the handset.
Deleting an entry
Press the "Call list" function key.
↓ Scroll to the entry you want to delete, e.g. 0069123456.
Clear Delete entry.

• 15
Once you return a call stored in the call list, that entry is automatically deleted if the call went through.
IP Office
- If you call an entry from the call list, the entry is automatically deleted.
Using the call list
Symbols in the call list
Examples of an entry in the call list:
| !06975056666 12.06. 17:13 2* |
| Wagner → 14 12.06. 16:34 |
| Clark 11.06. 08:21 |
| 0691234567 11.06. 06:31 |
| Meaning | |
| ! New entry which has not yet been viewed | |
| ▲ Entry which has already been shown | |
| ▼ Call that you have had with an external caller (I5: This displays has to be set) | |
| i- | I5: Symbol for an internal call (this display has to be set) |
| 06975056666 Phone number of caller | |
| Clark Caller's name | |
| 11.06. 06:31 Day and time of last call | |
| 2* The caller called twice | |
| Wagner 14 In the case of a call diversion to your telephone: Caller and the number of the telephone which has diverted or (only I5): MSN number which the caller dial-led (this display has to be set). | |

• Overlong entries will not fit in their entirety in the display. You can view the complete call list entry with the left and right arrows.
- You can accept a call list entry into the directory.
Telephoning with ease
Diverting calls (I5)
You can divert incoming calls to another extension. You may have calls diverted to your telephone from another connection. You have the choice
- whether this should always take place,
- only if the telephone is busy
- or only if the telephone is not answered within a specified time period.

- The time that elapses before forward unconditional "after time" takes place is set in the system.
Diverting calls for your telephone
Press the "Call diversion" function key.
1 ABC DEF GHI 4 Enter the call number to which you would like calls to be diverted, e.g. to 1234. If it is an external number, you will also have to add an external line code (usually "0") in front of it.
Scroll to the Immediately (after time, if busy) menu item.
OK Confirm your selection. The status indication Call diversion to 1234-appears in the display. In addition, a clock symbol is shown for call diversion "after time" or a B for call diversion "if busy".
Diverting calls to your telephone
Press the "Menu" function key.
↓ Scroll to the Call diversion menu item.
OK Confirm your selection.
↓ Scroll to the Follow me here menu item.
OK Confirm your selection.
1 ABC DEF GHI 2 Enter the internal number of the subscriber for whom you want to set up call diversion to your own telephone, e.g. from 1234.
Scroll to the Immediately (after time, if busy) menu item.
OK Confirm your selection. The status indication Follow me here 1234-appears in the display. In addition, a clock symbol is shown for call diversion "after time" or a B for call diversion "if busy".
Diverting calls (I5)
Call diversion, deactivating
In the status menu:
Scroll to the desired call diversion, e.g. Call div. to: 1234-
Clear Delete call diversion.
Telephoning with ease
Diverting calls (IP Office)
You can divert incoming calls to another extension. You may have calls diverted to your telephone from another connection.
You can activate forward unconditional to a previously entered phone number. You have the choice
- whether this should always take place,
- only if the telephone is busy
- or only if the telephone is not answered within a specified time.
You can also set this up for other telephones if you have the authorisation to do so.
Diverting calls for your telephone
Press the "Menu" function key.
↓ Scroll to the Forward menu item.
OK Confirm your selection.
↓ Scroll to the Follow me to menu item.
OK Confirm your selection.
1 ABC DEF GHI 4 Enter the call number to which you would like calls to be diverted, e.g. to 1234. If it is an external number, you will probably also have to predial an external line code (usually "0").
OK Confirm the number. The status indication Follow me to 1234 appears in the display.
Diverting calls to your telephone
Press the "Menu" function key.
↓ Scroll to the Forward menu item.
OK Confirm your selection.
↓ Scroll to the Follow me here menu item.
OK Confirm your selection.
1 ABC DEF GHI 2 Enter the internal number of the subscriber for whom you want to set up call diversion to your own telephone, e.g. from 1234.
OK Confirm the number. The status indication of the diverted telephone Follow me to 1234 appears in the display.
Diverting calls (IP Office)
Forward, deactivating
In the status menu:
Scroll to the desired call diversion, e.g. Follow me to 1234
OK Confirm your selection.
Scroll to the Deactivate menu item.
OK Delete call diversion.
Telephoning with ease
Locking the telephone
You can protect your telephone against unauthorised use by locking it with a PIN (Personal Identification Number). You can enter this PIN yourself and also change it at any time.
It is still possible to answer all incoming calls and dial internal numbers when the telephone is locked.
Locking the telephone
Press the "Menu" function key.
↓ Scroll to the Lock menu item.
OK Confirm your selection.
↓ Scroll to the Lock telephone menu item.
OK Confirm your selection. The telephone is now locked.
Unlocking the telephone
In the idle display:
↓ Scroll to the status message Telephone locked.
OK Confirm your selection.
0 ... 9 Enter the current PIN.
OK If necessary, confirm PIN.
- If you make a mistake when entering your PIN: press the Escape key and start again from the beginning.
- 15: The default setting for the PIN is "0000" IP Office:
- No PIN is set upon delivery.
Using the directory
15:
Your telephone has its own individual directory. You can store up to 100 personal entries in the directory.
Up to 800 numbers and names can be stored in the central directory; these are available to all users. These entries cannot be changed without authorisation.
IP Office:
The directory consists of a central and an individual section. It contains up to 1000 entries.
The entries from the central section are displayed at each telephone. They can only be changed using the "Manager" administration tool.
You can add and change individual entries in your directory. These personal entries are only available at your telephone.
You can then dial all these entries quickly and easily.
Dialling an entry from the directory
Press the "Directory" function key.
ABC ABC DEF DEF 2 2 3 3 ... Enter one or more first letters of the name until the desired subscriber is shown.

Lift the handset. The number is dialled.

- You can also scroll to the desired number using the arrow keys.
Telephoning with ease
Using the directory
Entering new numbers into the directory
Press the "Directory" function key.
↓ Scroll to the New personal entry menu item.
1 ABC 2. Enter the desired number.
OK Confirm the number.
ABC ABC DEF DEF 2 2 3.. Enter the name.
OK Confirm the name and add the individual entry to the directory.
i
- You may need to enter an external line code in front of an external call number. You can obtain more information from your system administrator.
• 15:
- If you want to enter an internal number, you have to select and confirm the Internal call number menu item before making the entry.
- The first directory entries (from destination number 900) are also automatically assigned to display keys. All available levels (from the second level) are thus "filled".
Saving redial numbers in the directory
Press the "Redial" function key.
↓ Scroll to the desired entry, e.g. 0069123456.
OK Confirm your selection.
↓ Scroll to the Directory entry menu item.
OK Confirm your selection.
ABC ABC DEF DEF 2 2 3 3 ... Enter a name for this number.
OK Save in the directory.
i
- You can also save a call list entry in your directory.
Viewing charges (I5)\*
During a call, you can view the currently incurred charges in the local currency or in euros.
You can view the charges for the most recent call.
All call charges incurred since the last reset are stored and totalled in your telephone system for each user. You can examine the charges for each user and each line separately.
Viewing the charges for the last call\*
Press the "Menu" function key.
Scroll to the Charges menu item.
OK Confirm your selection.
OK Calling up the charges for Last call.
Viewing the total charges for a subscriber or a line\*
Press the "Menu" function key.
OK Scroll to the Charges menu item and confirm.
Scroll to the Total subscriber or Total line menu item.
OK Call up the charge display.
1 9Enter the user extension number or the line number, e.g. 19.
Viewing total of all charges\*
Press the "Menu" function key.
↓ OK Scroll to the Charges menu item and confirm.
Scroll to the Total charges menu item.
OK Call up the charge display.
Resetting charge meter\*
Press the "Menu" function key.
↓ OK Scroll to the Charges menu item and confirm.
Select the charge display you want to delete: For example, scroll to the Total charges menu item and call up the charge display.
Scroll to the Reset charge meter menu item and confirm.
Customising your telephone
Setting audio, contrast and language
You can modify various audio settings and the display contrast to suit your requirements.
You can change the language for the text display via the language setting.
If you are not available, you can divert calls to your voicemail.
Setting the acoustics and contrast
You can quickly modify the display and tones of your telephone to suit changing environmental conditions (e.g. sun dazzle, loud repair work).
Press the "Menu" function key.
↓ Scroll to the Settings menu item.
OK Confirm your selection.
↓ Scroll to the Display / Audio menu item.
OK Confirm your selection.
↓ Scroll to the Audio / Contrast menu item.
OK Confirm your selection.
↓ Scroll to the desired menu item.
+ - Increase or decrease the setting. New ring settings are sounded immediately so you can check them.
If necessary scroll to further menu options and change their settings.
OK Exit menu.
The new settings have been saved.

- You can access the acoustics and contrast menu directly from your telephone's basic status using the "+" und "-" keys.
- You can also change any setting by pressing the numeric key for the desired setting.
- If you want to reset the acoustics and contrast settings to their factory settings, scroll to the Basic setting menu item and confirm it via the OK key.
Setting audio, contrast and language
Specifying the language
Press the "Menu" function key.
Scroll to the Settings menu item.
OK Confirm your selection.
Scroll to the Display / Audio menu item.
OK Confirm your selection.
Scroll to the Language menu item.
OK Confirm your selection. The currently set language is highlighted.
↓ Select the desired language.
OK Exit menu. Your telephone will reset itself.
All display texts will now be in the selected language.
Activate voicemail
If voicemail (answering machine) has been set up in your telecommunications system:
After activating voicemail, all incoming calls are automatically diverted to voicemail after a certain period of time. Callers can leave a message there.
Press the "Menu" function key.
↓ OK Scroll to the Settings menu item and confirm.
↓ OK Scroll to the Display / Audio menu item and confirm.
Scroll to the Voicemail menu item.
The current setting is displayed at the right-hand edge of the line.
OK Change setting.
The new setting is displayed at the right-hand edge of the line.
ESC Exit menu.

- Call diversion or forward unconditional settings are considered first, before a call is diverted to voicemail.
- If you have messages on your voicemail, a "Voicemail" entry appears in the status menu. The number of messages is also stated after this entry. You can call up the voicemail directly via the status menu entry.
- Please read the respective operating instructions to learn about voicemail operation.
Customising your telephone
Setting audio, contrast and language
GB
Índice
text_image
Diagram of a classic telephone with numbered parts for identificationtext_image
Diagram of a classic telephone with numbered parts for identificationtext_image
Diagram of a classic telephone with numbered parts for identificationSul display in stand-by:
text_image
Diagram of a classic telephone with numbered parts for identification and labelingDisplay in stand-by: