
BS 981 CB - Vacuum Cleaner BOMANN - Free user manual and instructions
Find the device manual for free BS 981 CB BOMANN in PDF.

| Product type | Wet and dry vacuum cleaner |
| Brand | Bomann |
| Model | BS 981 CB |
| Power supply | 220-240 V, 50 Hz |
| Total container volume | 18 litres |
| Useful volume for liquids | 12 litres |
| Useful volume for dust (permanent filter) | 6 litres |
| Blower function | Yes |
| Included accessories | 2-part suction tube, flexible hose, floor nozzle, parquet brush, crevice nozzle, brush suction head, permanent dust bag, motor protection filter |
| Air regulator | Yes (on hose handle) |
| Float valve | Yes (automatic shut-off when tank full) |
| Castors | 4 (assembly required) |
| Motor protection filter | Washable (at 40°C, air dry) |
| Permanent dust bag | Washable (at 40°C, air dry) |
| Tank cleaning | With clean water, sponge or nylon brush |
| Parking position | Yes (bracket on motor housing for suction head) |
| Warranty | 24 months |
| User manual | Included (66 pages, PDF available) |
Frequently Asked Questions - BS 981 CB BOMANN
User questions about BS 981 CB BOMANN
0 question about this device. Answer the ones you know or ask your own.
Ask a new question about this device
Download the instructions for your Vacuum Cleaner in PDF format for free! Find your manual BS 981 CB - BOMANN and take your electronic device back in hand. On this page are published all the documents necessary for the use of your device. BS 981 CB by BOMANN.
USER MANUAL BS 981 CB BOMANN
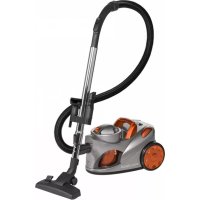
natural_image
Black and gray vacuum cleaner with attached pipe, no visible text or symbols on the device bodyBS 981 CB
DEUTSCH
Inhalt
Overview of the Components ...... Page 3
Instruction Manual...... Page 38
Technical Data Page 41
Guarantee Page
FRANÇAIS
Sommaire
natural_image
Line drawing of a mechanical device with no visible text or symbolsnatural_image
Line drawing of a vacuum cleaner with handle and wheels (no text or symbols)D-47906 Kempen/Germany
natural_image
Line drawing of a portable electric stove with wheels and control panel (no text or symbols)natural_image
Diagram of a coiled cable or ring assembly with labeled component 'a' and directional arrow (no text or symbols beyond label)natural_image
Diagram of a mechanical component with labeled parts (b), showing a cable or spring attached to a cylindrical port (no text or symbols present)natural_image
Line drawing of a vacuum cleaner with handle and wheels (no text or symbols)natural_image
Line drawing of a portable device with buttons and a handle (no text or symbols)natural_image
Diagram of a coiled cable or ring assembly with labeled component 'a' and directional arrow (no text or symbols beyond label)natural_image
Line drawing of a vacuum cleaner with handle and wheels (no text or symbols)Consommation: 1200 W
Classe de protection: ...... II
natural_image
Line drawing of a vintage portable device with buttons and a handle (no text or symbols)natural_image
Line drawing of a vacuum cleaner with handle and wheels (no text or symbols)Recipiente recolector
natural_image
Line drawing of a vintage-style washing machine with no visible text or symbolsnatural_image
Line drawing of a vacuum cleaner with handle and wheels (no text or symbols)natural_image
Line drawing of a vintage portable device with buttons and a handle (no text or symbols)natural_image
Diagram of a coiled cable with labeled component 'a' and directional arrow (no text or symbols beyond label)natural_image
Line drawing of a vacuum cleaner (no text or symbols)natural_image
Line drawing of a portable device with buttons and a handle (no text or symbols)natural_image
Diagram of a coiled cable or ring with labeled component 'a' and directional arrow (no text or symbols beyond label)- Lås den permanente støvsugerposen med klemmene.
- Skyv støvsugerposen inn i holderen (a).
natural_image
Diagram of a device with a coiled cable and labeled component 'b' (no text or symbols beyond label)- Sett slangeenden (tilkoblingen) fast på oppsamlingsbeholderen. Lukkehakene på tilkoblingsdelen griper tak i beholderen.
- Drei tilkoblingsdelen en kort omdreining med klokken. Låsen (b) viser oppover.
natural_image
Line drawing of a vacuum cleaner with handle and wheels (no text or symbols)- På motorhuset har apparatet en holder for gulvmunnstykket.
- Her kan munnstykket "parkeres".
Bruk
Generelt
- Velg ønsket tilbehør.
- Trekk kabelen helt ut.
- Sett kontakten i en forskriftsmessig installert veggkontakt 230 V, 50 Hz.
Tørrstøvsuging
General Safety Instructions
Read the operating instructions carefully before putting the appliance into operation and keep the instructions including the warranty, the receipt and, if possible, the box with the internal packing. If you give this device to other people, please also pass on the operating instructions.
- The appliance is designed exclusively for private use and for the envisaged purpose. This appliance is not fit for commercial use. Do not use it outdoors (except if it is designed to be used outdoors). Keep it away from sources of heat, direct sunlight, humidity (never dip it into any liquid) and sharp edges. Do not use the appliance with wet hands. If the appliance is humid or wet, unplug it immediately. Do not put it in water.
- When cleaning or putting it away, switch off the appliance and always pull out the plug from the socket (pull on the plug, not the cable) if the appliance is not being used and remove the attached accessories.
- Do not operate the machine without supervision. If you should leave the workplace, always switch the machine off or remove the plug from the socket (pull the plug itself, not the lead).
- Check the appliance and the cable for damage on a regular basis. Do not use the appliance if it is damaged.
- Do not try to repair the appliance on your own. Always contact an authorized technician. To avoid the exposure to danger, always have a faulty cable be replaced only by the manufacturer, by our customer service or by a qualified person and with a cable of the same type.
- Use only original spare parts.
- Pay careful attention to the following "Special Safety Instructions".
Children
- In order to ensure your children's safety, please keep all packaging (plastic bags, boxes, polystyrene etc.) out of their reach.
Caution! Do not allow small children to play with the foil as there is a danger of suffocation!
- To protect children from the dangers posed by electrical appliances, make sure that the cable is hanging low and that children do not have access to the appliance.
Symbols in these Instructions for Use
Important information for your safety is specially marked. It is essential to comply with these instructions in order to avoid accidents and prevent damage to the machine:
WARNING:
This warns you of dangers to your health and indicates possible injury risks.
CAUTION:
This refers to possible hazards to the machine or other objects.
i NOTE: This highlights tips and information.
Special Safety Instructions
- Do not suck up hot ashes or pointed or sharp objects!
WARNING: Danger of Electric Shock!
- The vacuum cleaner should only be used in damp rooms if for your protection a residual-current-operated circuit breaker is connected upstream in the electric circuit.
- If you are not sure, ask a qualified electrician for advice.
- If the water-fi lled device should fall over accidentally, always remove the plug from the socket fi rst before uprighting it again.
- Keep hair, clothing and body parts away from the vacuum nozzle during use!
- Keeps the vacuum cleaner away from sources of heat such as radiators, stoves etc.!
WARNING:
- Do not use the device in potentially explosive rooms.
- Never use the device to suck up explosive liquids (such as heating oil, petrol, paint thinner, acetone) or dusts (such as magnesium or aluminium dusts), combustible gases or undiluted solvents and acids - danger of explosion! Turbulence caused by the suction air could lead to the creation of explosive vapours or mixtures. These substances might attack the parts and materials used.
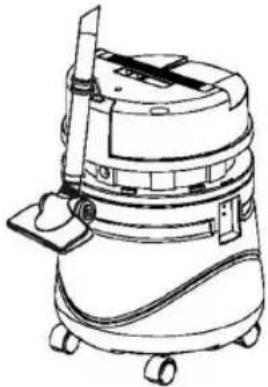
Overview of the Components
| 1 | Motor | housing |
| 2 | I/O On/off switch | |
| 3 | Castors | |
| 4 | Carrying | handle |
| 5 | Collection | vess |
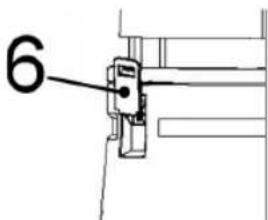
| 6 | Closure | |
| 7 Suction tube, 2-part | ||
| 8 | Hose | connectic |
| 9 | Vacuum | hose |
| 10 | Air | Slide |
| 11 Cable duct | ||
| 12 Connection for blower | ||
| 13 | Parking | assistance |
| 14 | Floor | nozzle |
| 15 Motor protection filter | ||
| 16 | Float | valve |
| Accessories: | ||
| 17 | Parquet | brush |
| 18 | Crevice nozzle | |
| 19 | Brush | nozzle |
| Not shown | ||
| Spanner | ||
| Permanent dust bag | ||
Instructions for Use
Intended Use
- The device is intended for use as a wet/dry vacuum cleaner in accordance with its description and safety instructions.
- The device also has an additional connection with blower function.
- Any other type of use is considered to be in contradiction of the intended use and is not permitted.
Attaching the Castors
Before you can use the device you first have to attach the castors.
natural_image
Line drawing of a portable air purifier with control panel and fan (no text or symbols)- Place the collection vessel (5) on its head.
- Attach the castors by tightening the screws by hand and then with the spanner.
Inserting Dust Bags (only for Dry Vacuuming)
The device has a permanent dust bag. This is easy to empty and can be cleaned.

natural_image
Diagram of a coiled cable or ring with labeled component 'a' and directional arrow (no text or symbols beyond label)- Lock the permanent dust bag with the clip.
- Push the dust bag into the holder (a).
Motor Protection Filter (15)
The motor protection filter is located on the bottom of the motor housing.
• This is required for both wet and dry vacuuming.
- You should check the condition of the fi lter and that it is firmly in place at regular intervals.
Connecting the Hose
i NOTE:
Do not attach the hose until you have inserted the dust bag first.

natural_image
Diagram of a mechanical component with labeled parts (b), showing a coiled cable or wire connection (no text or symbols beyond label)- Attach the end of the hose (connection) to the collection vessel. The locking lugs on the connecting piece grip inside the vessel.
- Turn the connecting piece slightly in a clockwise direction. The catch lever (b) points upwards.
- Releasing the hose: Push the catch lever and turn it in an anticlockwise direction in order to release the hose from the collection vessel.
Attaching the Motor Housing
i NOTE:
- Between the motor housing and the collection vessel there is a black rubber seal.
- Please ensure that this seal is always inserted and correctly fitted in place. If this is not the case the suction power is lost.
i NOTE:
The motor housing can only be attached in one position. The arrow above the hose connection must point to the arrow below the on/off switch.
• Line the motor housing up in such a way that its holder is located above the clips (6) of the collection vessel.
- Then close the clips.
Nozzle Attachment
| Crevice nozzle: For vacuuming upholstery, curtains and in corners and crevices etc. | |
| Floor nozzle(only for dry cleaning): | To clean carpets or smooth surfaces. |
| Smooth floors | Press the lever down with your foot. The brush is now visible. |
| Carpets: | Press the lever In the opposite direction. The brushes are now retracted. |
| Parquet brush:(also for wet cleaning) | The floor nozzle is fitted with rollers for improved manoeuvrability. For large areas such as parquet, laminate or tiles etc. This brush is also ideally suited to soaking up water from large surfaces. |
| Releasing the nozzles: | Pull these off while turning slightly. |
Accessories
- The accessories such as the suction tube, hose and nozzles can be easily joined together.
- Releasing: Pull them off again by turning slightly.
Air Slide
Open the air slide on the hose handle in order to regulate the airflow or to clear any particles sticking to the nozzle.
Blower Aperture
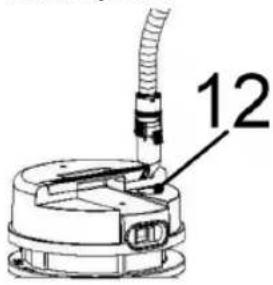
• The device has a blower function. This enables you to blow out dust or leaves.
- Attach the hose connection (8) to the blower aperture (12).
Mains Lead
• To use the device please unwind the entire lead.
• After use you can wind up the lead in the cable duct on the motor housing.
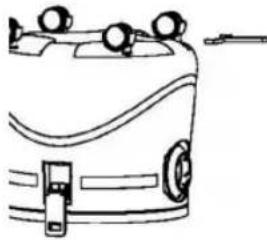
Parking Position
natural_image
Line drawing of a vacuum cleaner with handle and wheels (no text or symbols)- On the motor housing your device has a holder for the floor nozzle.
• Here you can hang up the nozzle in order to "park" it.
Operation
General
- Select the desired accessory.
- Unwind the lead completely.
- Insert the mains plug into a correctly installed 230 V, 50 Hz power socket.
Dry Vacuuming
- Insert the permanent dust bag; it may be necessary beforehand to remove the hose connection.
- Attach the motor housing.
- Assemble the accessory.
- Turn the device on.
• Vacuum at a steady speed. There is no need to exert pressure.
Removing and Emptying the Dust Bag
- Turn the device off with the on/off switch (2). Pull the plug out of the socket.
- Remove the motor housing.
• Take off the hose connection. - Remove the dust bag.
• Empty the dust bag by pulling off the clip. -
Push the clip back in place and reinsert the bag. Check that it is inserted properly in the holder.
-
Reassemble the hose connection and the motor housing.
- Now you can use the device again.
Wet Vacuuming
CAUTION:
- Never use the dust bag when vacuuming up liquids. Allow the hose connection to discharge directly into the collection vessel.
- Do not use the floor nozzle, but the parquet brush.
-
Before the cleaner is used again for dry vacuuming, all components must be dry.
-
Remove the permanent dust bag and reattach the motor housing.
- Assemble the attachment.
- Switch the device on.
CAUTION:
Turn the device off immediately if foam forms, liquid leaks out or if the vessel is full.
i NOTE:
When the vessel is full the float valve (16) closes the suction aperture and the motor runs at a higher speed. Switch the device off immediately and empty it.
Emptying the Collection Vessel
- Turn the device off by the on/off switch (2). Pull the plug out of the socket.
- Remove the motor housing.
• Empty the collection vessel. - Reassemble the hose connection and the motor housing.
- You can now use the vacuum cleaner again.
Cleaning and storage
- Pull the plug out of the socket.
- In order not to damage the surfaces, please do not use any abrasive detergents or scratching cleaning utensils.
Collection Vessel
- Rinse out the collection vessel after use with clean water.
- Any dirt in the vessel can be removed with a sponge or nylon brush.
Permanent Dust Bag
- Quick cleaning: Tap or brush out the dust bag in order to remove any residues.
- Hand wash: If soiling is more severe we recommend a hand wash up to 40°C.
i NOTE:
• The bag should only be allowed to dry in the air!
- Only use the vacuum cleaner again when the dust bag is dry!
Motor Protection Filter
The motor protection fi liter (15) is located at the bottom of the motor housing. You should clean the motor protection fi liter every third to fi fth time it is emptied.
- Remove the motor housing and take out the filter.
- Quick cleaning: Tap or brush out the filter in order to remove any residues.
- Hand wash: If soiling is severe we recommend a hand wash up to 40°C.
i NOTE:
• The filter should only be allowed to dry in the air!
- Only use the vacuum cleaner again when the filter is dry!
Housing
- The housing can be wiped off with a slightly damp cloth. Do not immerse the motor into water!
- Dry off all parts after cleaning with a dry cloth.
Storage
Store the device in a dry room away from frost.
• Empty the collection vessel completely.
• Reattach the motor housing.
- Wind up the lead.
Troubleshooting
• The device does not work.
Remedy:
Check the mains connection.
Check the position of the switch.
• The device does not suck anything up.
Possible Cause:
The dust bag or the collection vessel is full.
Remedy:
Empty the containers.
Possible Cause:
The seal between the motor and the collection vessel is missing.
Remedy:
Check the seal.
Possible Cause:
There is a foreign body in the suction hose or nozzle.
Remedy:
Check the accessories for foreign bodies.
Technical Data
Model: BS 981 CB
Power supply: 220-240 V, 50 Hz
Power consumption: 1200 W
Protection class:....II
Container volume:....18 Litre
Capacity for wet vacuuming: 12 Litre
Capacity with the permanent filter: 6 Litre
This device has been tested according to all relevant current CE guidelines, such as electromagnetic compatibility and low voltage directives, and has been constructed in accordance with the latest safety regulations.
Subject to technical changes without prior notice!
Guarantee
The device supplied by our Company is covered by a 24 month guarantee starting on the date of purchase (receipt).
During the life of the guarantee any fault of the device or its accessories ascribable to material or manufacturing defects will be eliminated free of charge by repairing or, at our discretion, by replacing it. The guarantee services do not entail an extension of the life of the guarantee nor do they give rise to any right to a new guarantee!
Proof of the guarantee is provided by the proof of purchase.
Without proof of purchase no free replacement or repair will be carried out.
If you wish to make a claim under the guarantee please return the entire machine in the original packaging to your dealer together with the receipt.
Defects to consumables or parts subject to wearing as well as cleaning, maintenance or the replacement of said parts are not covered by the guarantee and hence are to be paid!
The guarantee lapses in case of unauthorized tampering.
After the expiry of the guarantee
After the expiry of the guarantee repairs can be carried by the competent dealer or repair service against the payment of the ensuing costs.
Meaning of the "Dustbin" Symbol
Protect our environment: do not dispose of electrical equipment in the domestic waste.
Please return any electrical equipment that you will no longer use to the collection points provided for their disposal.
This helps avoid the potential effects of incorrect disposal on the environment and human health.
This will contribute to the recycling and other forms of reutilisation of electrical and electronic equipment.
Information concerning where the equipment can be disposed of can be obtained from your local authority.
natural_image
Line drawing of a vintage kitchen appliance with three fans and a handle (no text or symbols)natural_image
Line drawing of a vacuum cleaner with control panel and wheels (no text or symbols)natural_image
Line drawing of a vintage portable device with buttons and a handle (no text or symbols)natural_image
Diagram of a coiled cable or hose with a hand holding a clip, labeled 'a' (no text or symbols on the diagram itself)natural_image
Line drawing of a vacuum cleaner with control panel and wheels (no text or symbols)natural_image
Line drawing of a vintage portable device with buttons and a handle (no text or symbols)natural_image
Line drawing of a vacuum cleaner with handle and wheels (no text or symbols)natural_image
Line drawing of a mechanical device with no visible text or symbolsnatural_image
Diagram of a coiled cable or ring assembly with labeled component 'a' and directional arrow (no text or symbols beyond label)natural_image
Line drawing of a vacuum cleaner with handle and wheels (no text or symbols)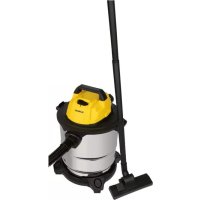
- DEUTSCH
- Inhalt
- FRANÇAIS
- Sommaire
- Recipiente recolector
- Bruk
- Generelt
- Tørrstøvsuging
- General Safety Instructions
- Children
- Symbols in these Instructions for Use
- WARNING:
- CAUTION:
- Special Safety Instructions
- WARNING: Danger of Electric Shock!
- Instructions for Use
- Intended Use
- Attaching the Castors
- Motor Protection Filter (15)
- Connecting the Hose
- i NOTE:
- Attaching the Motor Housing
- Accessories
- Air Slide
- Mains Lead
- Operation
- General
- Dry Vacuuming
- Removing and Emptying the Dust Bag
- Wet Vacuuming
- Emptying the Collection Vessel
- Cleaning and storage
- Collection Vessel
- Permanent Dust Bag
- Motor Protection Filter
- Housing
- Storage
- Troubleshooting
- Technical Data
- Guarantee
- After the expiry of the guarantee
- Meaning of the "Dustbin" Symbol
Brand : BOMANN
Model : BS 981 CB
Category : Vacuum Cleaner