
MASSIVES10 - Loudspeaker Sunstech - Free user manual and instructions
Find the device manual for free MASSIVES10 Sunstech in PDF.
| Product Type | Portable speaker with karaoke |
| Rated Power | ≤50 W |
| Frequency Response | 20 Hz - 20 kHz |
| Input Sensitivity | 800 ± 30 mV |
| Signal-to-Noise Ratio | ≥71 dB |
| Power Supply | AC 100-240 V, 60/50 Hz ; rechargeable battery |
| Charging Time | 8 to 10 hours |
| Battery Indicator | 4 LED (25%, 50%, 75%, 100%) |
| Bluetooth Connectivity | Version 2.1 + EDR, range 10 m, A2DP |
| FM Radio | Yes, with auto scan and recording |
| MP3/WMA/WAV Player | Via USB, SD/MMC card |
| AUX Input (RCA) | 1 x stereo RCA |
| Microphone Input | 2 x 6.35 mm jack |
| Guitar Input | 1 x 6.35 mm jack with dedicated volume |
| Karaoke Function | Echo, mic priority, bass/treble settings |
| Recording Function | On USB/SD/MMC in VOICE format (REC001...) |
| Remote Control | Infrared, range 6 m, angle 30° |
| Remote Control Batteries | Not included, standard type |
| Warranty | 2 years (excluding misuse) |
| Maintenance | Soft slightly damp cloth, no abrasive products |
| Operating Temperature | 20 °C to 60 °C |
Frequently Asked Questions - MASSIVES10 Sunstech
User questions about MASSIVES10 Sunstech
0 question about this device. Answer the ones you know or ask your own.
Ask a new question about this device
Download the instructions for your Loudspeaker in PDF format for free! Find your manual MASSIVES10 - Sunstech and take your electronic device back in hand. On this page are published all the documents necessary for the use of your device. MASSIVES10 by Sunstech.
USER MANUAL MASSIVES10 Sunstech
natural_image
Black Sunitech air conditioner device with digital display and orange buttons (no visible text or symbols on body)


- DO NOT place objects on top of the device, as objects may scratch the device.

- DO NOT expose the device to dirty or dusty environments.

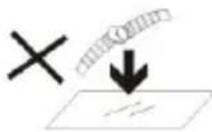
- DO NOT place the device on an uneven or unstable surface.
- DO NOT insert any foreign objects into the device.

- DO NOT expose the device to strong magnetic or electrical field.
- DO NOT expose the device to direct sunlight as it can damage the device. Keep it away from heat sources.
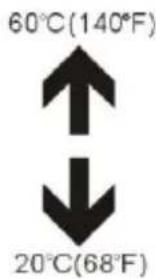
- DO NOT store your device in temperatures higher than 40^ C(104°F). The internal operating temperature for this device is from 20^ C(68°F) to 60^ C(140°F).

- DO NOT use the device in the rain.

natural_image
Illustration of a hand holding a mobile phone inside a circle (no text or symbols)- Please check with your Local Authority or retailer for proper disposal of electronic products.

- The device and adaptor may product some heat during normal operation of charging. To prevent discomfort or injury
from heat exposure, DO NOT leave the device on your lap.the device on your lap.
- POWER INPUT RATING: Refer to the rating label on the device and be sure
that the power adaptor complies with the rating. Only use accessories specified by the manufacturer.

- Clean the device with a soft cloth. If needed, dampen the cloth slightly
before cleaning. Never use abrasives or cleaning solutions.

- Always power off the device to install or remove external devices that do not
support hot-plug.
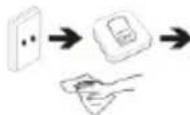
- Disconnect the device from an electrical outlet and power off before cleaning the
device.
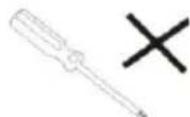
- DO NOT disassemble the device. Only a certified
service technician should perform repair.

- The device has apertures to disperse heat. DO NOT block the device ventilation, the device may become hot and malfunction as a result.
- Risk of explosion if battery replaced by an incorrect type. Dispose of used batteries according to the instruction.
- PLUGGABLE EQUIPMENT: the socket-outlet shall be installed near the equipment and shall be easily accessible.
TROUBLESHOOTING
| Fault | Possible Cause | Solution |
| No sound | 1. No input sound source.2. Volume is too low. | 1. Use a better music signal.2. Adjust volume. |
| Distortion of sound | 1. Volume too high.2. Speaker may be damaged. | 1. Turn down the volume.2. If speaker is damaged, repair or replace it. |
| Karaoke does not work | 1. Microphone plug is not fully inserted.2. Microphone switch is not on.3. Microphone volume knob is at the lowest position.4. Wireless microphone has low battery. | 1. Plug microphone properly into the socket.2. Turn on microphone switch.3. Adjust microphone volume properly.4. Replace battery. |
| MP3 does not play | 1. The song format in the USB disc is incorrect.2. Improper operation has caused a process disorder.3. USB disc/SD card/MMC are disconnected. | 1. Transform song format into Mp3 format.2. Reboot the machine.3. Insert USB disc/SD/MMC properly. |
MAIN TECHNICAL SPECIFICATIONS
Output power----≤50W
Input sensitivity---- 800±30mV
SNR ≥71dB
Frequency responses---- 20Hz-20 kHz
Power supply---- AC100V- AC240V, 60Hz/50Hz
***Above specifications are the specifications of the sampling machine and are for reference purpose only.
***Due to continuous product development, specifications may be subject to change without prior notification.
COMMON FUNCTIONS
• VOL: adjust volume up or down
• TREBLE: adjust treble to influence treble sound
• BASS: adjust bass to influence bass sound.
- MIC.VOL: adjust microphone volume as needed.
- ECHO: adjust echo to increase/ decrease echo effect.
• MIC: Use to connect the microphone
FEATURES OF THE MACHINE
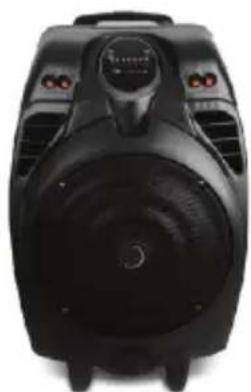
This system can be used with personal computers, mobile phone, DVD, VCD, CD, LD, TV, MP3, radio, electronic piano and any devices which have audio output.
Amplifier circuit are using high-performance, high-fidelity design, coupled with high-quality professional speaker, in order to make the sound field to get positioned so clear, distinct levels effect.
The sound system is outstanding, with deep and powerful bass and the treble effect is strong, with clear and bright pitch.
The professional electronic frequency division circuit enhances the machine's crossover point effect.
Using professional design and manufacture of high-capacity batteries, and dedicated audio power capacitors, to make the speaker's power reserve margin larger, more stable, better dynamics, higher signal to noise ratio.
When charging, connect a matched power adapter to AC100V - AC240V. Charging time is approximately 8 to 10 hours. Once fully charged unplug the power supply as leaving a full battery on charge may cause damage to the battery.
Battery Charge Indicator: LED panel has four battery status indicator lights. The first is for the battery charging status, and the second indicate more than 25% of electricity remaining, the third is more than 50%, the forth is of more than 75%. When only the first indicator lights, please power off and promptly charge to avoid damage to the battery. When charging, the first indicator flashes red light and the power adapter's power indicator lights. The first indicator will stop blinking after full charged. Then please continue to charge the battery for 1-2 hours to extend the battery life.
Warning: If the battery is under voltage, please fully charge it within 48 hours. If the speaker has to be left unused for a long time, please let the battery charge completely, otherwise it will cause damage to the battery!
In the process of playing, keep the unit out of high temperature environments, high magnetic fields and high frequencies. If the system fails to work, turn off the power source or pull out the USB/SD card/MMC card, then reinsert it and it will resume play.
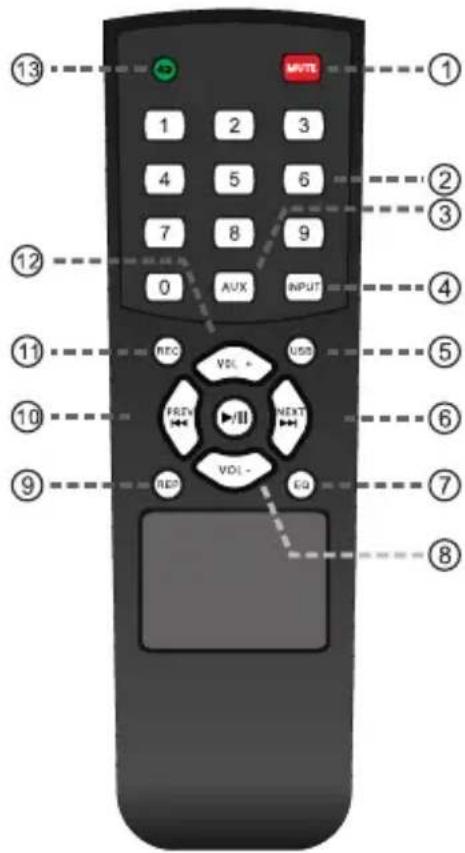
-
Mute
-
Track number
-
AUX input
-
Mode selection
-
USB input
-
Next
-
Effect of sound field
-
Decrease volume
-
Play the recording
-
Previous
-
Record
-
Increase the volume
-
Repeat
***This picture is for reference purposes only.
- Under normal circumstances, the remote control should be aimed directly at the receiving window of the remote control within about 6 meters and within a 30^ angle.
- When operating the remote control, aim the remote control at the remote control at the receiving window the unit and ensure that there are no obstacles between the remote control and the unit.
- If the remote receiver is in a position to directly receive glare, it may fail. In this case, move the speaker away to avoid direct sunlight.
- Avoid mixing old and new batteries. Replace the remote control batteries regularly.
natural_image
Top-down view of a black industrial air purifier device with control panel and ventilation slots (no visible text or symbols)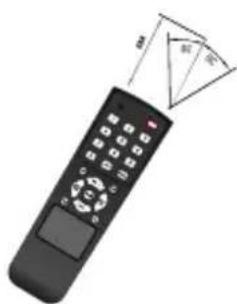
natural_image
Illustration of a black remote control with a triangular pointer indicating the right-hand side (no text or symbols on the device itself)
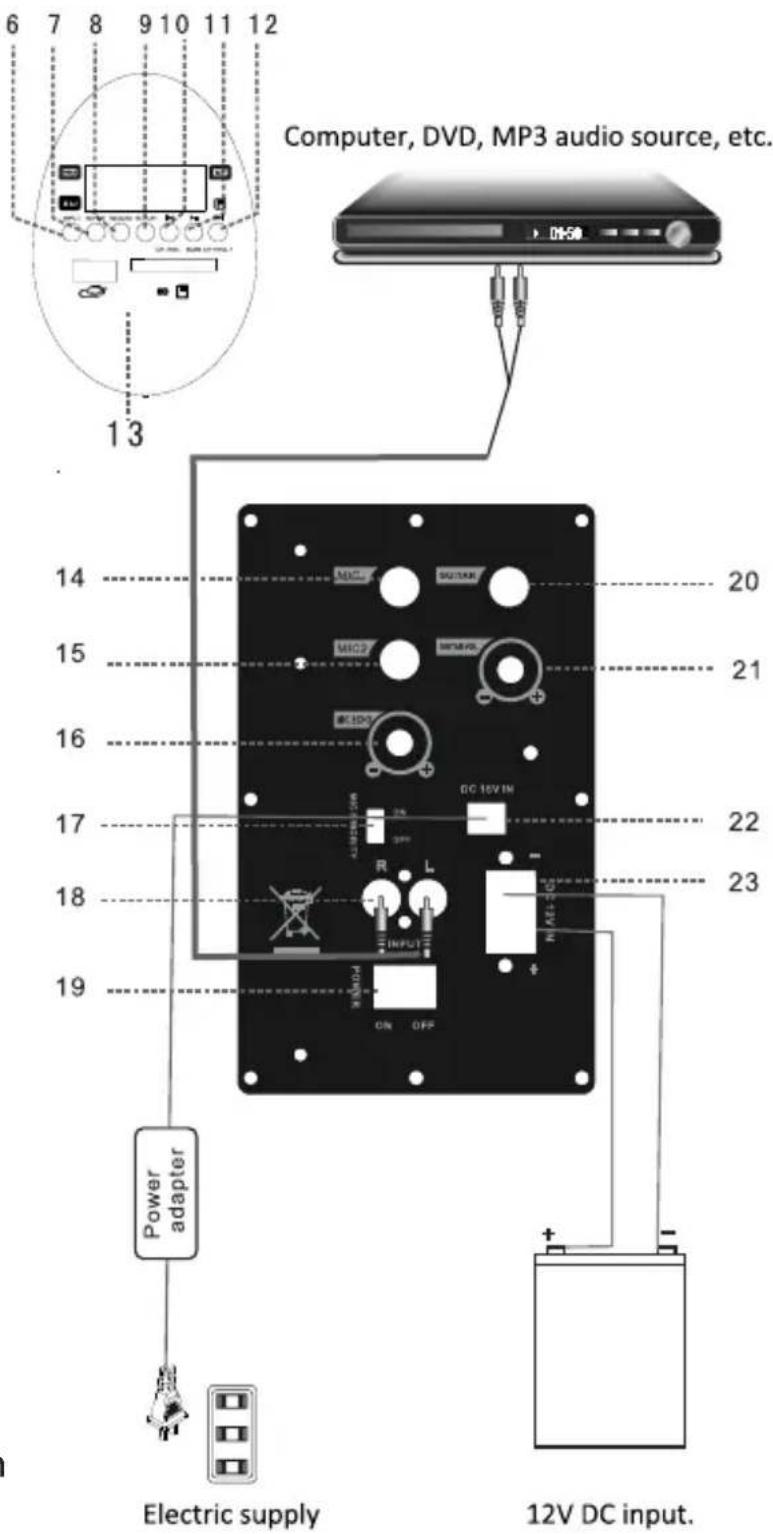
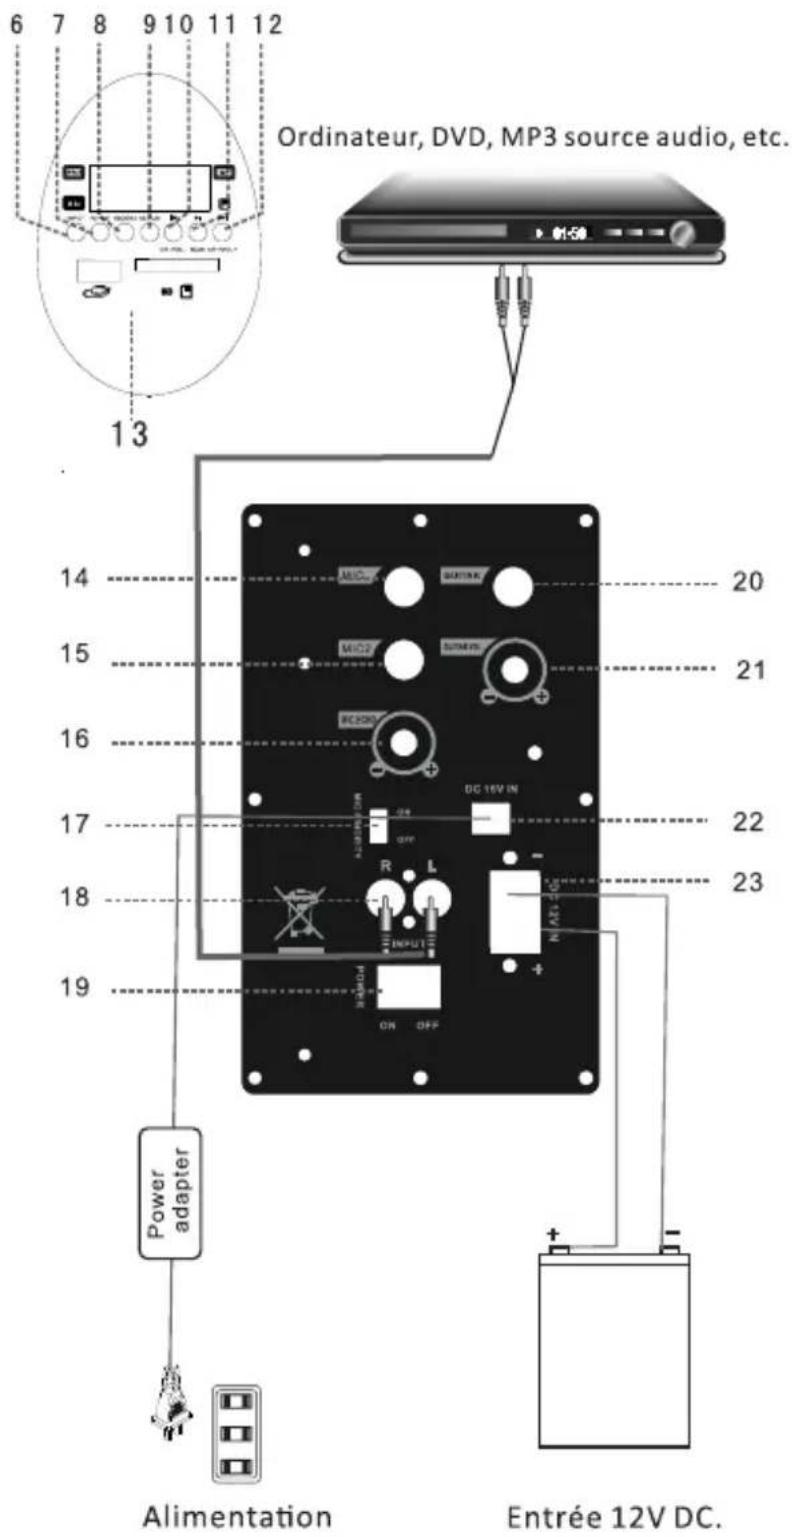
1.Bass
2.Treble
3.MIC volume
4.Volume
5.Power light
6.Input selection
7.Repeat
8.Record
9.Play the recording
10.Previous/CH-/VOL-
11.Play/pause/scan
12. Next/CH+/VOL+
13.USB/SD socket
14.Mic 1 slot
15.Mic 2 sot
16.Mic Echo
17. Microphone priority switch
18. Audio input
19.Power switch
20.Guitar interface
21.Guitar volume
22.DC15 V charging interface
23.External power source, DC 12v input port
GUITAR
• Guitar Jack: connect guitar.
• Guitar VOL: adjust guitar volume
USB AND SD/MMC
- The U disk, SD card or MMC card should be formatted as FAT32 format on your computer.
- The playing sequence of the speaker is based on the file generating sequence. If the file name has keywords append by 01, 02 or 03... The speaker will play 01 file first.
- Copy MP3 or WMA format music files (download) to the root directory of a USB disc/SD card/MMC card. It is advisable to remove unnecessary files and the file catalog in order to read faster and reduce reading error when playing songs.
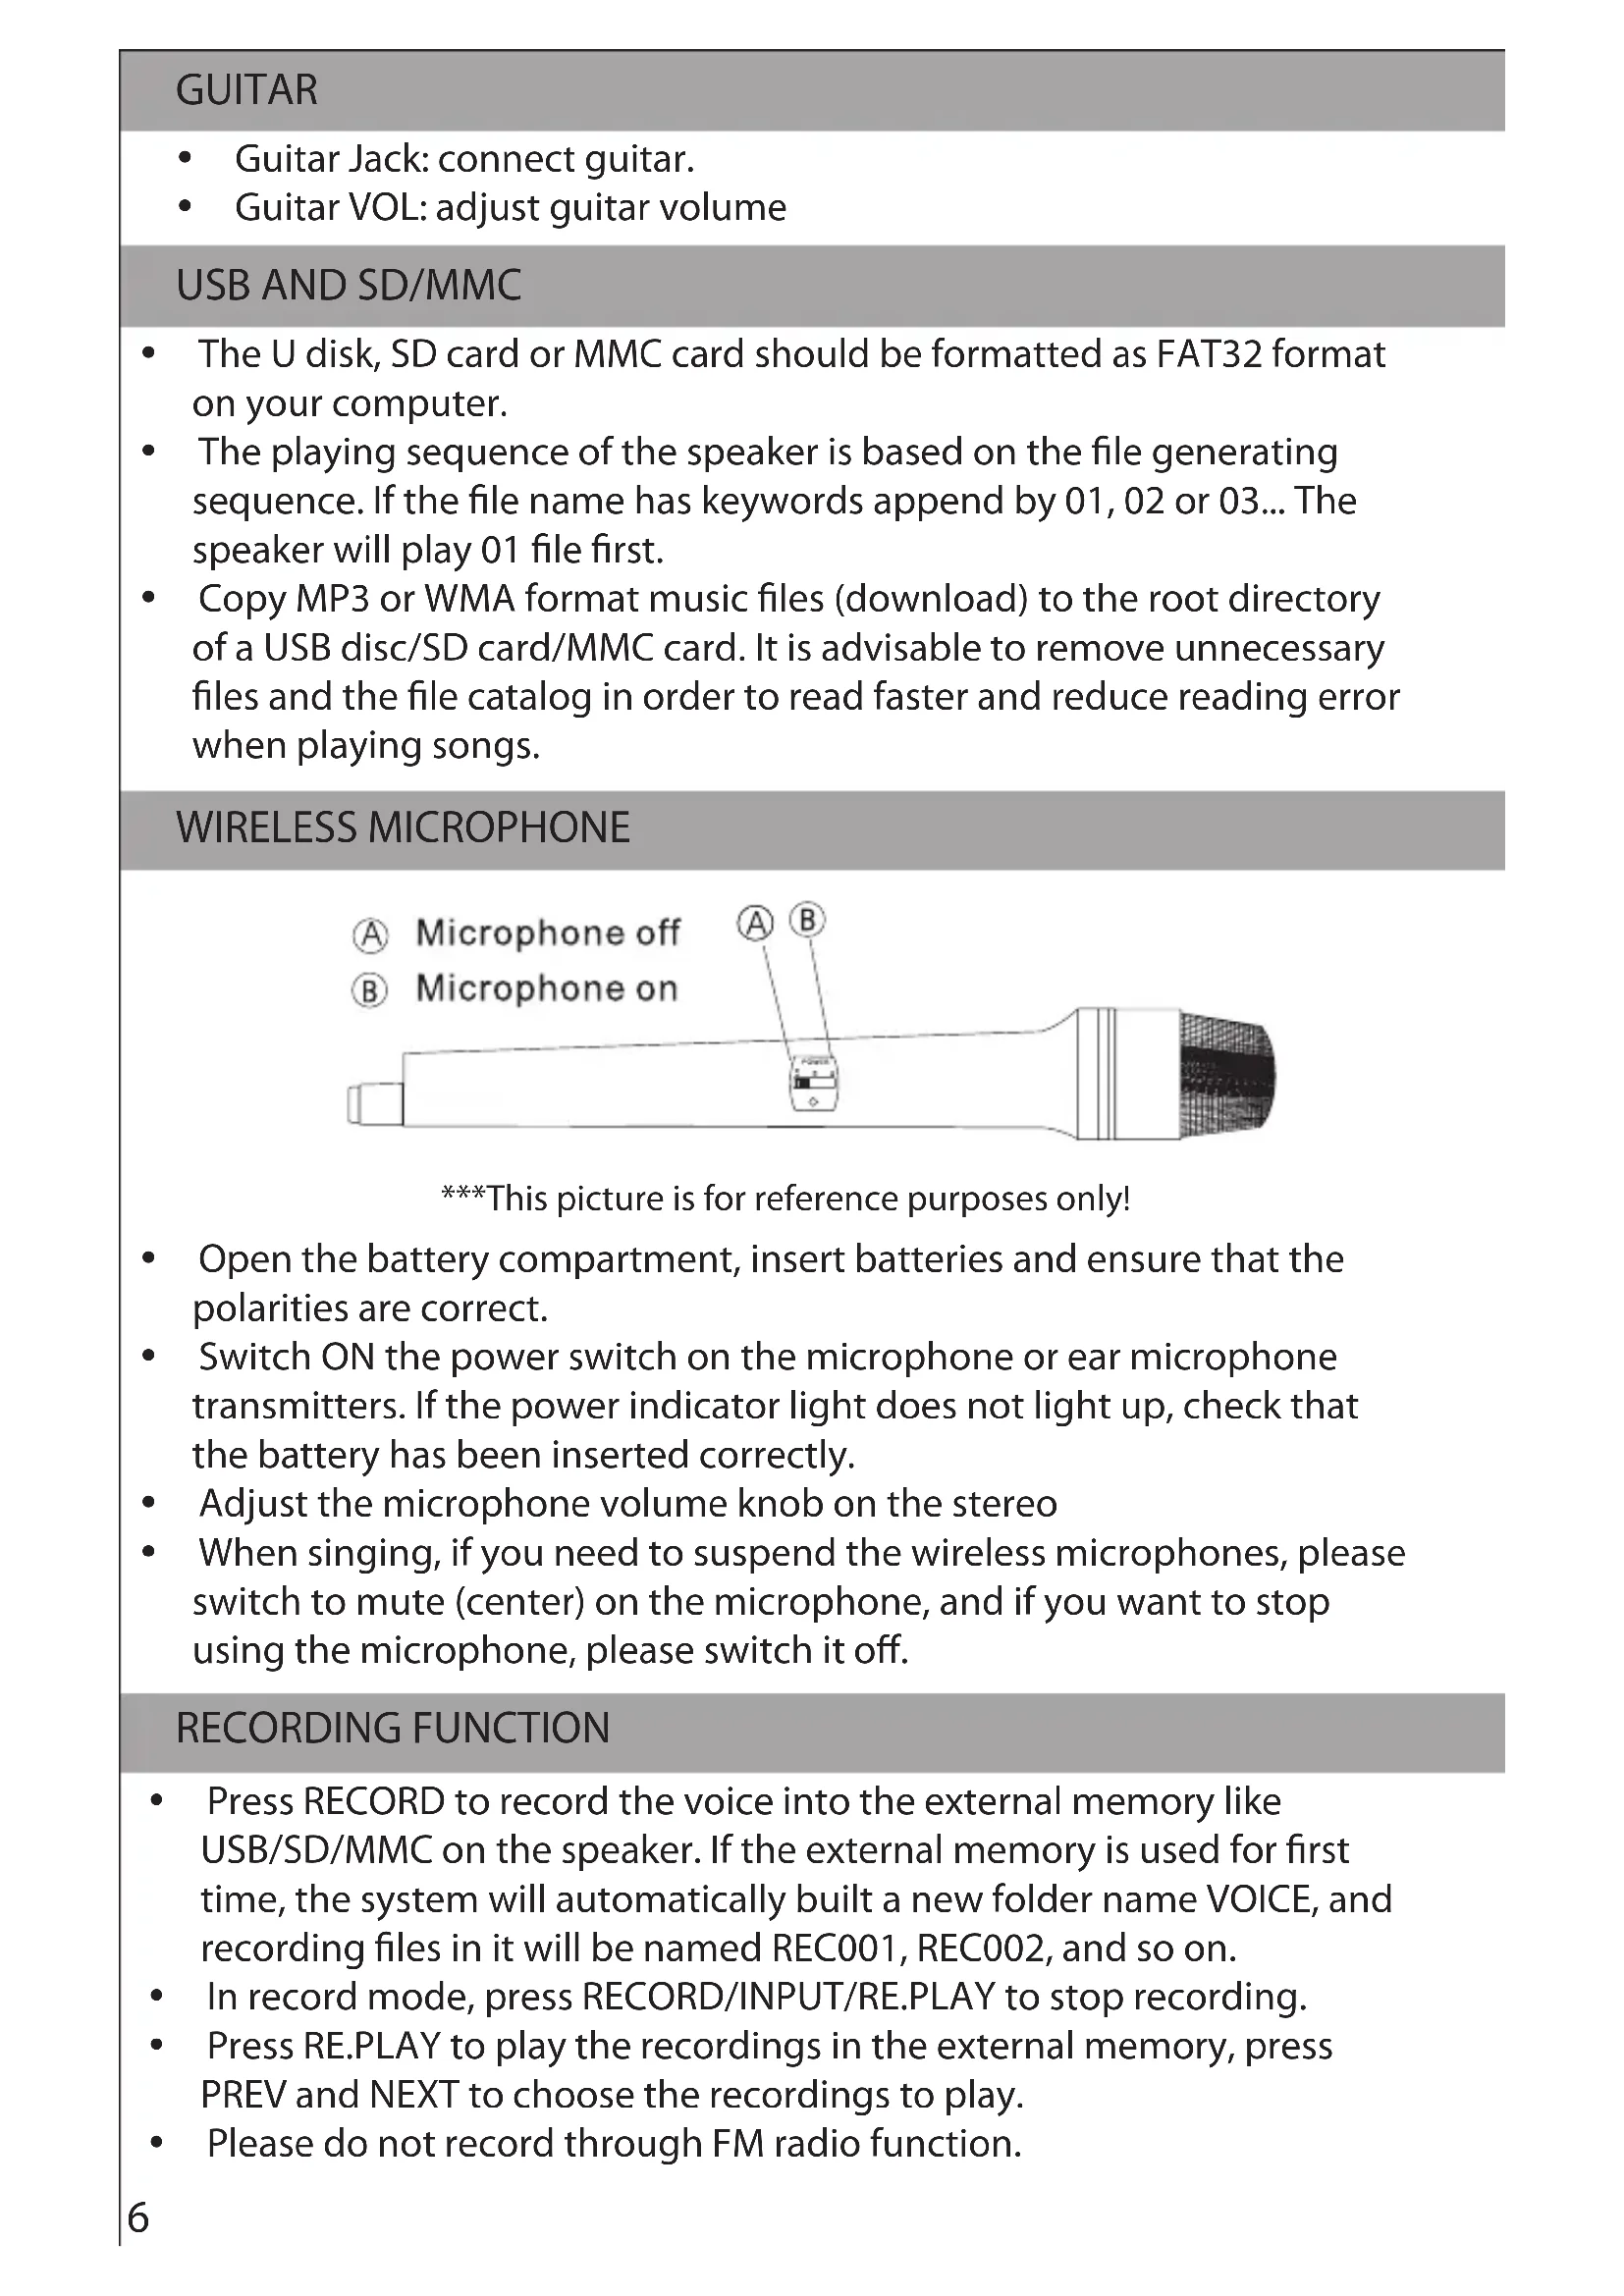
WIRELESS MICROPHONE
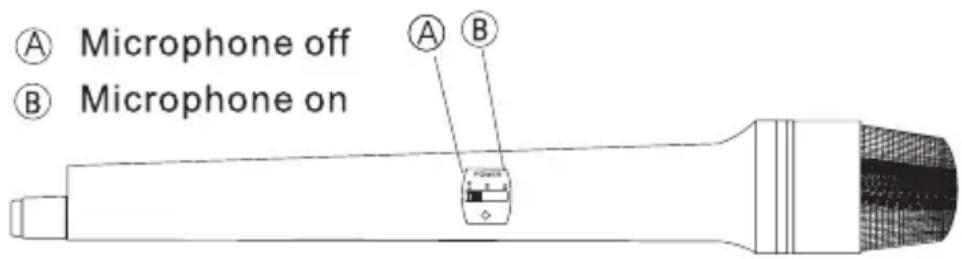
***This picture is for reference purposes only!
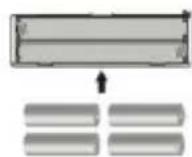
- Open the battery compartment, insert batteries and ensure that the polarities are correct.
- Switch ON the power switch on the microphone or ear microphone transmitters. If the power indicator light does not light up, check that the battery has been inserted correctly.
- Adjust the microphone volume knob on the stereo
- When singing, if you need to suspend the wireless microphones, please switch to mute (center) on the microphone, and if you want to stop using the microphone, please switch it off.
RECORDING FUNCTION
- Press RECORD to record the voice into the external memory like USB/SD/MMC on the speaker. If the external memory is used for first time, the system will automatically built a new folder name VOICE, and recording files in it will be named REC001, REC002, and so on.
• In record mode, press RECORD/INPUT/RE.PLAY to stop recording. - Press RE.PLAY to play the recordings in the external memory, press PREV and NEXT to choose the recordings to play.
- Please do not record through FM radio function.
MP3, WMA AND WAV
• USB DISC Jack: USB port, plug and play.
• SD/MMC Jack: SD/MMC card socket, plug and play.
• Supports music formats of MP3, WMA and WAV with outstanding quality, giving a superior and brand-new music listening experience.
- Input selector key (INPUT): used to switch external (marked as 'LINE' on the rear panel, which connecting to the external RCA sound source such as DVD) Audio / built MP3 / Bluetooth.
- PLAY/PAUSE Button: In play mode, press to suspend playing songs. Press this button again to continue reproduction.
- The PREV/NEXT Button: In play mode, briefly press this button to select songs in the playlists up and down. Long press (more than 2 seconds) for the volume - / volume + keys.
BUILT-IN BT FUNCTIONS
- Choose the input signal source as BT channel when starting the machine.
- Please ensure the BT devices you want to connect is open. Then scan and connect the speaker with the device. When the connection is successful, "tick" tone will prompt. If the speaker can't be connected, please restart the speaker or the device and try again.
- After the mobile phone and the BT are successfully connected, you can play music. To ensure continuous stability of the music signal, try to keep the BT and the mobile phone facing one another.
- This unit supports (version 2.1 + EDR) and other BT mobile devices wirelessly transmitting audio. It supports stereo playing of A2DP.
- The BT of the unit can be used up to 10 meters if there are no barriers.
FM FUNCTIONS
- Choose "INPUT" to switch to FM radio.
- Choose "SCAN" for automatic searching and saving.
- Choose "CH-" and "CH+" to switch channels.
Made in China
Warranty conditions
- The warranty of this product is for 2 years since the purchase date.
- The warranty will exclude breakdowns caused by bad use of the product, wrong installation or
installation in not desirable places for a proper maintenance of the product, rips, updates of the products
that are not the supplied by the brand, pieces wore away for its use or for not domestic or inappropriate
use. Also are excluded breakdowns caused for manipulations of the products by people or companies
alien to our company.
- For any request regarding the warranty terms, the purchase receipt must be attached.
Correct disposal of this Product

natural_image
Symbol of a trash bin crossed with a diagonal line and a horizontal bar, representing waste sorting or disposal (no text or labels)
(Waste Electrical & Electronic Equipment(WEEE)
Your product is designed and manufactured with high quality materials and
components which can be recycled and reused.
This symbol means that electrical and electronic equipment, at their end of-
life should be disposed of separately from your household waste.
Please dispose of this equipment at your local community waste collection/recycling centre.
In the European Union there are separate collection systems for used
electrical and electronic products.Please help us to conserve the
environment we live in!
DECLARATION OF CONFORMITY
Council Directive(s) to which conformity is declared:
Directive (1999/5/EC) - R&TTE Directive (2011/65/EU recasting 2002/95/EC) - RoHS
Application of the Standards:
EN 60065:2002+A1:2006+A11:2008+A2:2010+A12:2011
EN 301 489-1:2008
EN 301 489-17:2009
EN 300 328:2006
IEC 62321:2008
Manufacturer's name: AFEX SUNS, S.A.
Manufacturer's address: C/Pallars 189, 08005 Barcelona
Type of equipment: PORTABLE KARAOKE SPEAKER
Trade: SUNSTECH
Model no.: MASSIVE-S10
We, the undersigned, hereby declare under our sole responsibility that the specified equipment is in conformity with the above Directive(s) and Standard(s)
Place: Barcelona

(Signature)
Víctor Planas Bas
(Full name)
Date: 2 - April - 2015
General Manager
(Position)
natural_image
Illustration of a hand holding a mobile phone inside a circle (no text or symbols)natural_image
Black remote device with a circular vent and a small triangular pointer, shown alongside a smaller remote control (no text or symbols visible)
natural_image
Illustration of a black electronic device with two connected cables (no text or symbols visible)
natural_image
Symbol of a trash bin crossed with a diagonal line, no text or numbers presentDirective (1999/5/EC) - R&TTE Directive (2011/65/EU recasting 2002/95/EC) - RoHS
natural_image
Illustration of a hand holding a mobile phone with a screen, enclosed in a circle (no text or symbols)natural_image
Top-down view of a black electronic device with speaker grille and control panel (no visible text or symbols)
natural_image
Illustration of a black remote control with triangular pointer and control buttons (no text or symbols)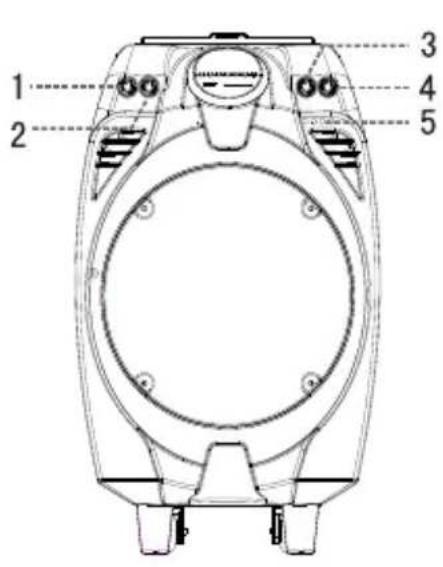
1.Grave
2.Aigus
3.Volume du micro
4.Volume
5.Voyant d'alimentation
natural_image
Symbol of a trash bin crossed with a diagonal line, no text or numbers presentDÉCLARATION DE CONFORMITÉ
Directive (1999/5/EC) - R&TTE Directive (2011/65/EU recasting 2002/95/EC) - RoHS
natural_image
Illustration of a hand holding a mobile phone inside a circle (no text or symbols)natural_image
Black electronic device with visible speaker grille and control panel (no text or symbols)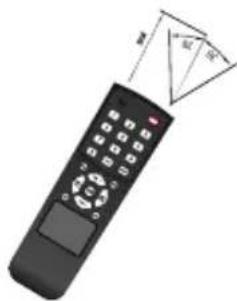
natural_image
Illustration of a remote control with a triangular pointer indicating size (no text or symbols)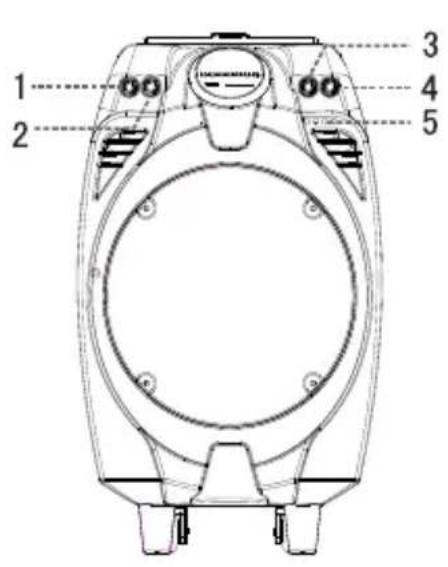
natural_image
Illustration of a black audio device with two connected cables (no text or symbols visible)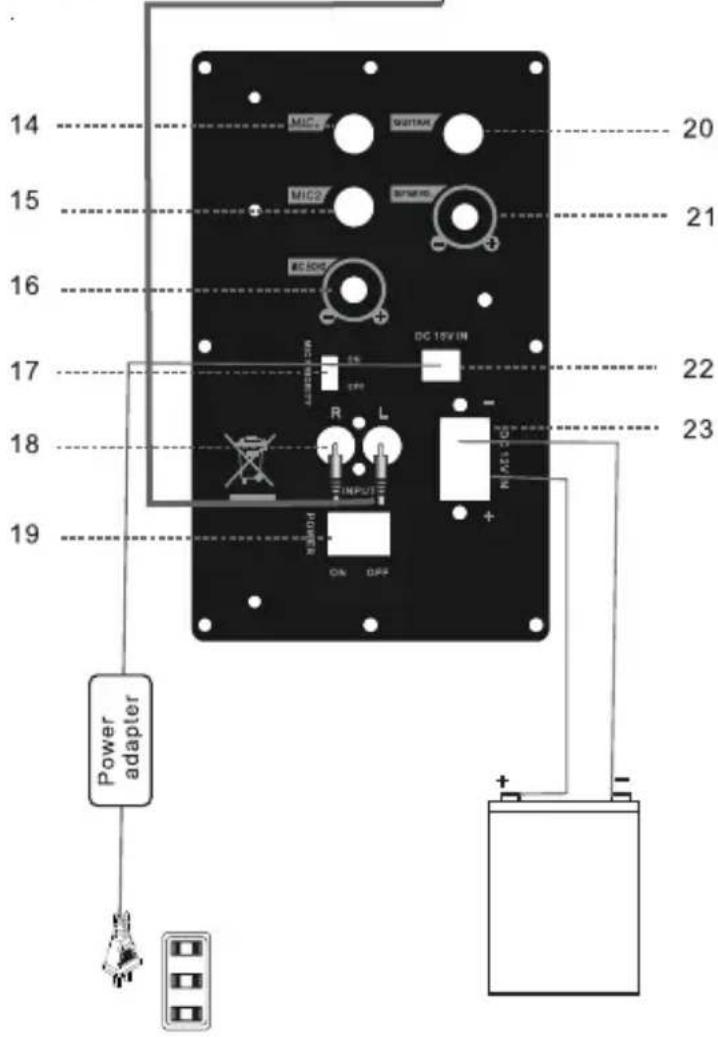
GUITARRA
natural_image
Symbol of a trash bin crossed with a diagonal line, representing no waste or discharge (no text or numbers present)Directive (1999/5/EC) - R&TTE Directive (2011/65/EU recasting 2002/95/EC) - RoHS
- MAIN TECHNICAL SPECIFICATIONS
- COMMON FUNCTIONS
- FEATURES OF THE MACHINE
- GUITAR
- USB AND SD/MMC
- WIRELESS MICROPHONE
- RECORDING FUNCTION
- MP3, WMA AND WAV
- BUILT-IN BT FUNCTIONS
- FM FUNCTIONS
- Made in China
- Warranty conditions
- Correct disposal of this Product
- DECLARATION OF CONFORMITY
- Directive (1999/5/EC) - R&TTE Directive (2011/65/EU recasting 2002/95/EC) - RoHS
- DÉCLARATION DE CONFORMITÉ
- GUITARRA
Brand : Sunstech
Model : MASSIVES10
Category : Loudspeaker