
TechniSound MR2 - Speaker TECHNISAT - Free user manual and instructions
Find the device manual for free TechniSound MR2 TECHNISAT in PDF.
| Product Type | Connected multiroom speaker |
| Brand | TechniSat |
| Model | TechniSound MR2 |
| Dimensions (W x H x D) | 100 mm x 210 mm x 100 mm |
| Weight | 1.24 kg |
| Power supply | AC adapter 100-240 V, 50/60 Hz, output 12 V / 2 A |
| Network standby consumption | < 2 W |
| Output power | 2 x 10 W RMS |
| Reception modes | Internet radio, UPnP, Spotify Connect, AUX input |
| Main functions | Multiroom, Spotify Connect, UPnP, internet radio, programmable standby, built-in equalizer |
| Connectivity | Wi-Fi (home network), AUX (3.5 mm jack), LAN via adapter (not included) |
| Wall mount | 1/4" - 20 UNC thread |
| Package contents | 1 x speaker, 1 x power adapter, 1 x instruction manual |
| Warranty | 24 months (statutory) |
| Maintenance and cleaning | Clean with a soft, dry cloth. Do not use water, solvents or abrasive products. |
| Safety | Do not open the device. Avoid moisture and heat sources. Disconnect during thunderstorms. |
| Repairability | Do not repair yourself. Contact TechniSat customer service. |
| Technical support | Mon-Fri 8am-8pm at +49 (0) 392 592 201 800 |
| Manufacturer | TechniSat Digital GmbH, Julius-Saxler-Strasse 3, 54541 Daun, Germany |
Frequently Asked Questions - TechniSound MR2 TECHNISAT
User questions about TechniSound MR2 TECHNISAT
0 question about this device. Answer the ones you know or ask your own.
Ask a new question about this device
Download the instructions for your Speaker in PDF format for free! Find your manual TechniSound MR2 - TECHNISAT and take your electronic device back in hand. On this page are published all the documents necessary for the use of your device. TechniSound MR2 by TECHNISAT.
USER MANUAL TechniSound MR2 TECHNISAT
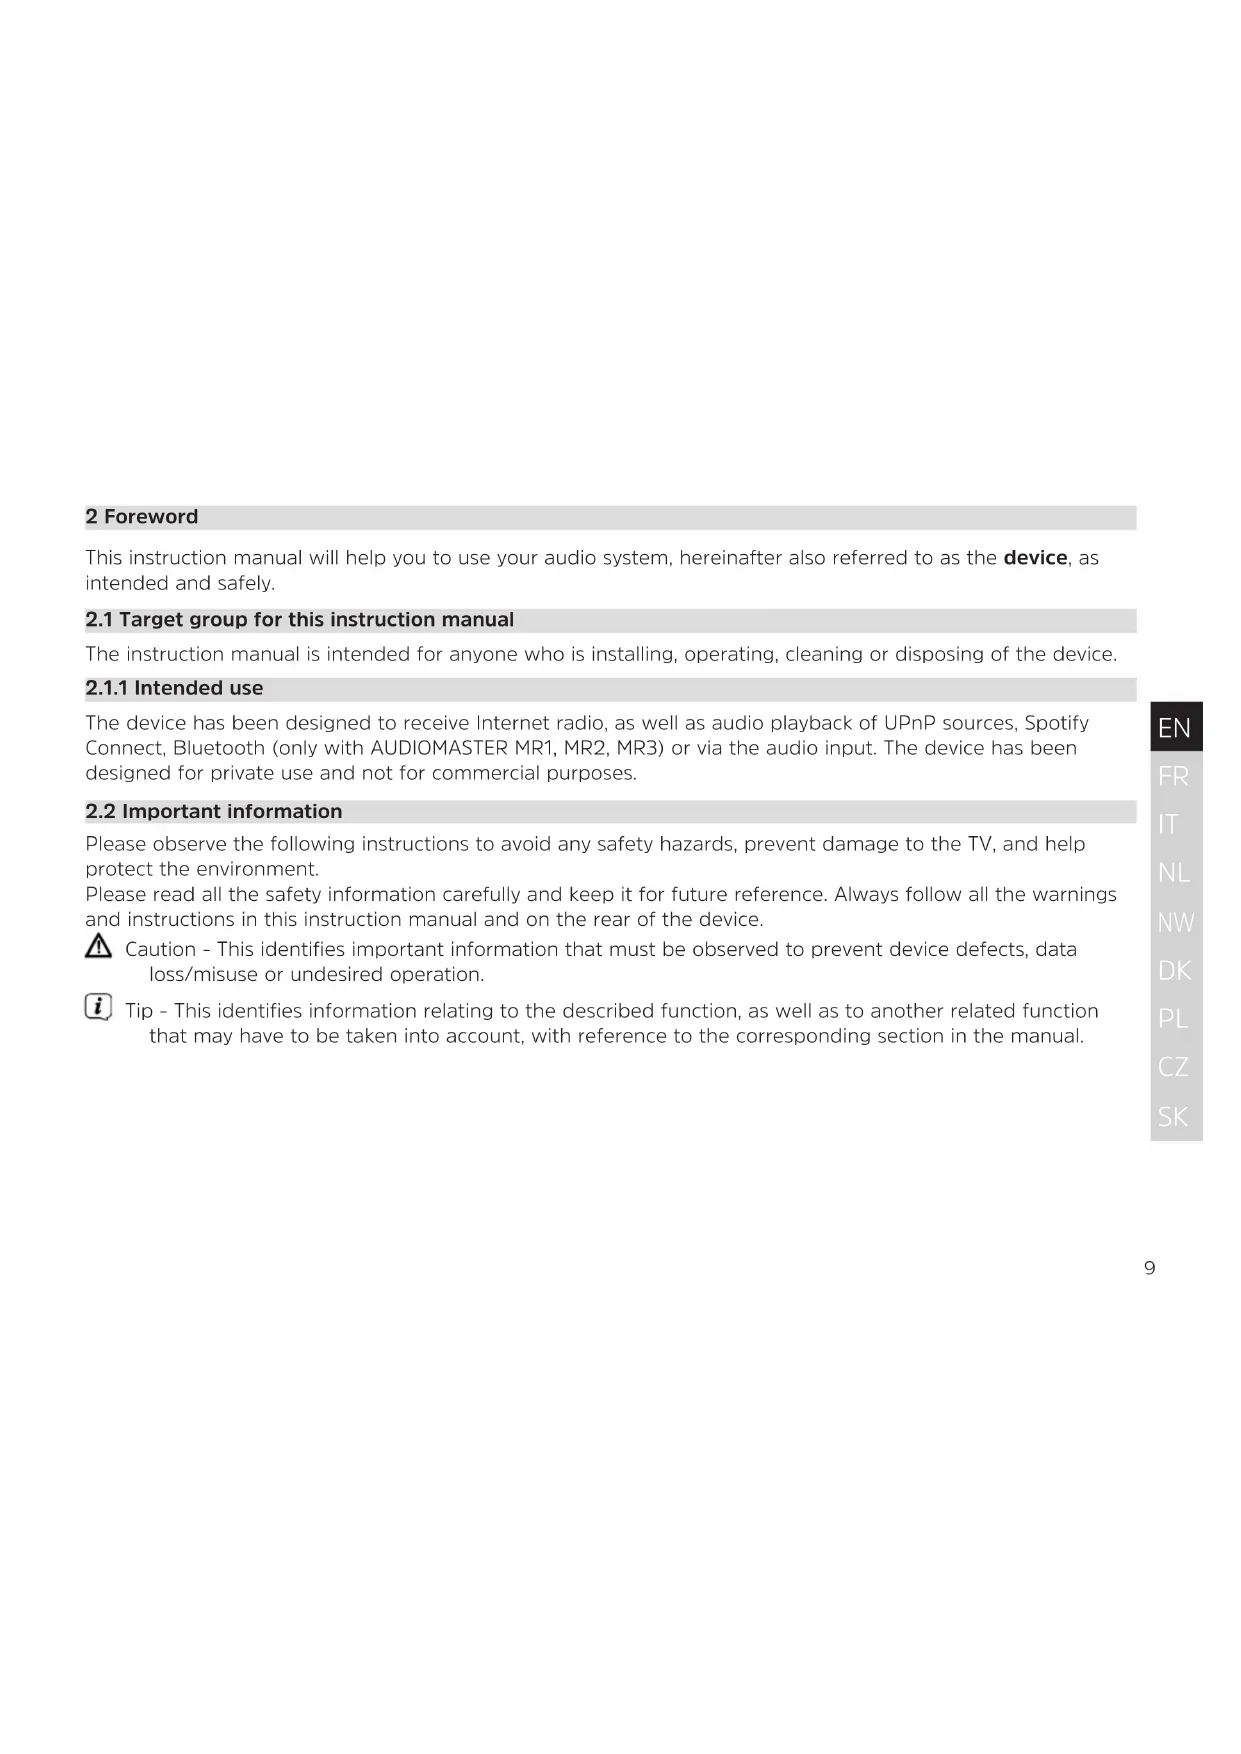
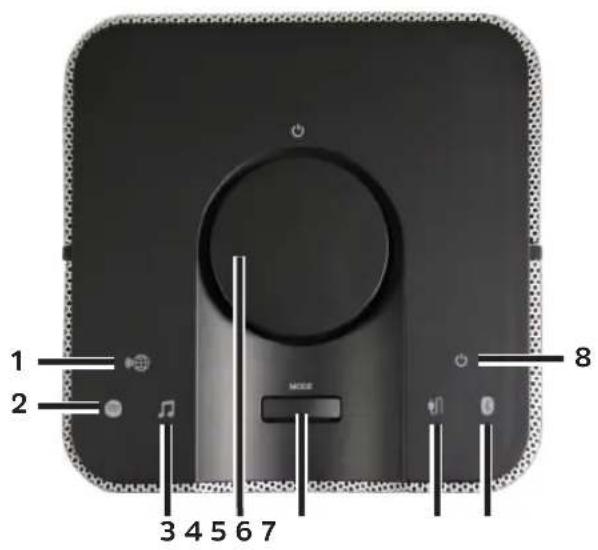
Top of the AUDIOMASTER MR2 and MR3
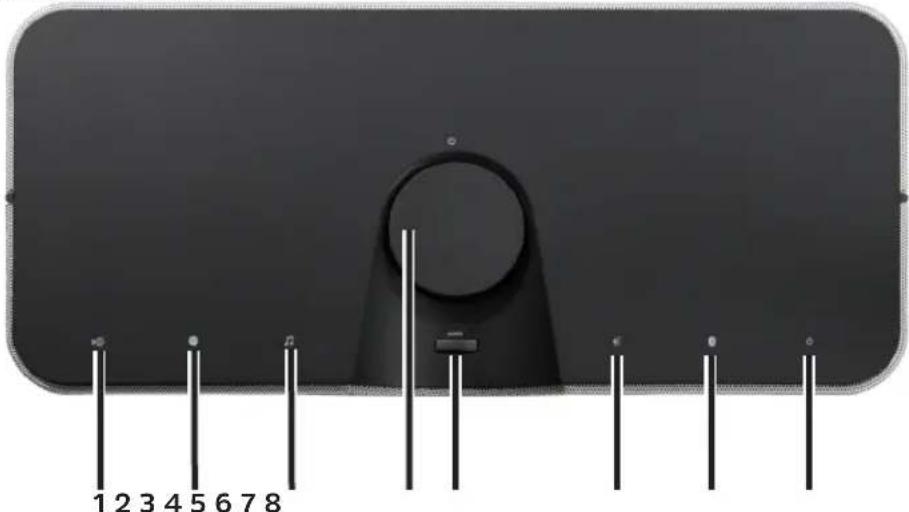
1 Internet radio symbol
2 Spotify symbol
3 Play music symbol
4 On/Standby/Volume up/down knob (TECHNISOUND MR2: On/Standby only)
5 MODE source selection
6 AUX IN external input symbol
7 Bluetooth symbol (AUDIOMASTER MR1, MR2 and MR3 only)
8 On/Standby status display (AUDIOMASTER MR1, MR2 and MR3 only)
9 Volume + (TECHNISOUND MR2 only)
10 Volume - (TECHNISOUND MR2 only)
Device top
AUDIOMASTER
MR1
TECHNISOUND
MR2
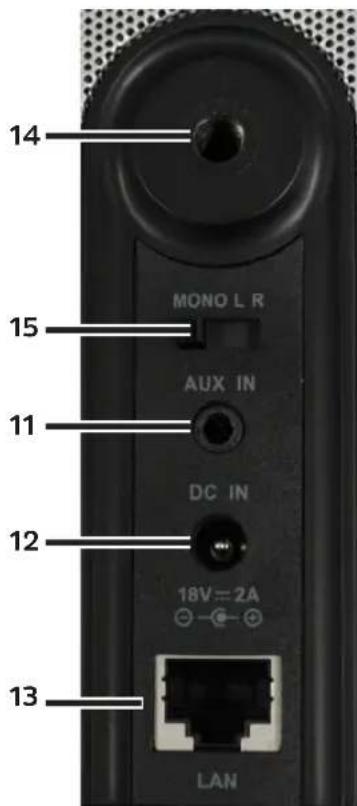
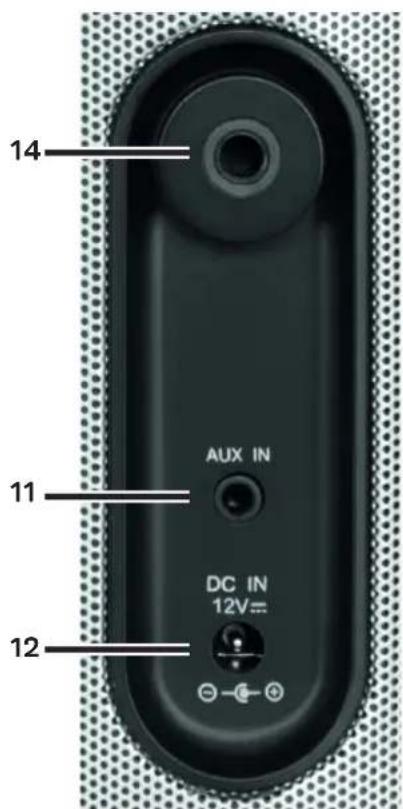
Connections on the rear of the device
AUDIOMASTER MR2 and MR3 AUDIOMASTER MR1 TECHNISOUND MR2
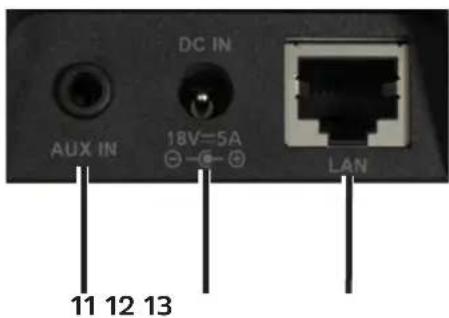
11 AUX IN
12 DC IN
13 LAN connection
14 Mounting option
15Mono/right/left Selector switch
Contents
1 Illustrations 4
2 Foreword 9
2.1 Target group for this instruction manual 9
2.2 Important information 9
3 Setting up the device 17
4 Description of the device. 19
4.1 Scope of delivery 19
4.2 The special features of the device 19
4.3 Preparing the device for use 19
5 Start-up / connection to an existing network 20
5.1 Activating the SET-UP mode 21
5.2 Connecting to and integrating into the existing network 22
5.3 Audio system set-up 22
6 General operation 24
6.1 Switching on and off 25
6.2 Source selection 26
6.3 Listening to Internet radio 27
6.4 Using Spotify 28
6.5 Using the music player / UPnP 29
6.6 Using the audio input 30
6.7 Other buttons on the device 30
7 Operating controls on the 'Now running' view 31
7.1 Accessing and managing the Favourites list 32
7.2 Device selection 33
7.3 Control elements 33
7.4 Settings 33
8 Multi-room 35
8.1 Volume control in multi-room mode 37
8.2 Mono / Stereo mode (AUDIOMASTER MR1 only) 37
9 Bluetooth (AUDIOMASTER MR1/MR2/MR3 only) 38
10 Cleaning 39
11 Troubleshooting 40
12 Technical data 41
13 Disposal Instructions 42
2 Foreword
This instruction manual will help you to use your audio system, hereinafter also referred to as the device, as intended and safely.
2.1 Target group for this instruction manual
The instruction manual is intended for anyone who is installing, operating, cleaning or disposing of the device.
2.1.1 Intended use
The device has been designed to receive Internet radio, as well as audio playback of UPnP sources, Spotify Connect, Bluetooth (only with AUDIOMASTER MR1, MR2, MR3) or via the audio input. The device has been designed for private use and not for commercial purposes.
2.2 Important information
Please observe the following instructions to avoid any safety hazards, prevent damage to the TV, and help protect the environment.
Please read all the safety information carefully and keep it for future reference. Always follow all the warnings and instructions in this instruction manual and on the rear of the device.
Caution - This identifies important information that must be observed to prevent device defects, data loss/misuse or undesired operation.
Tip - This identifies information relating to the described function, as well as to another related function that may have to be taken into account, with reference to the corresponding section in the manual.
2.2.1 Safety
For your own protection you should read the safety precautions carefully before using your new device. The manufacturer accepts no liability for damage caused by inappropriate handling, or by non-compliance with the safety precautions.
Never open the device!
Touching live parts poses a danger to life!
Any necessary repairs to the receiver should only be carried out by qualified personnel.
The device must only be operated in an appropriate climate.

In the event of extended transport in the cold and a subsequent change to warm rooms, do not switch on immediately; wait for the temperature to equalise.
Do not expose the device to dripping or splashing water. If water has penetrated the device, switch it off and inform the Service department.
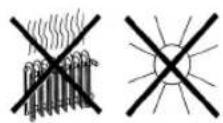
Do not expose the device to heat sources that will heat it up more than normal use.
In the event of a thunderstorm, disconnect the device from the mains. Overvoltage can damage the device.
In the event of an obvious fault with the device, emanation of odour or smoke, substantial malfunctions, damage to the housing or fluid ingress, immediately switch off the device and contact the Service department.
The power supply unit may only be connected to a mains voltage of 100V - 240V 50 / 60~Hz
Never try to operate the device with another voltage.
The power supply unit must not be connected until the installation has been completed according to regulations.
Do not operate the device if the power supply unit is defective or if the device is damaged in any other way.
When removing the power supply unit from the power outlet, pull on the plug, not the cable.
Do not put the device into operation in the vicinity of baths, swimming pools or splashing water.
Never try to repair a faulty device yourself. Always contact one of our customer service locations.
Foreign bodies, e.g. nails, coins, etc., must not be allowed to fall inside the device. Do not touch the connection contacts with metal objects or fingers. This could lead to short-circuits.
Do not place any open flames such as burning candles on the device.
Never allow children to use the device unsupervised.
Even when switched off and on standby, the device is still connected to the mains power supply. If you do not intend to use the device for a prolonged period, remove the mains plug from the power outlet. Only pull on the plug, not on the cable.
Do not listen to music or the radio at high volume. Doing so can cause permanent hearing impairment.
This device is not intended to be used by people (including children) with limited physical, sensory or mental capacities or lack of experience and/or knowledge, unless they are supervised by a person responsible for their safety or they are instructed by them as to how to use the device.
Children must be supervised to ensure that they do not play with the device.
It is forbidden to carry out modifications to the device.
Damaged devices or damaged accessories must not continue to be used.
2.2.2 Disposal
The device packaging is exclusively comprised of recyclable materials. Please sort the components appropriately, and dispose of them in line with your local waste disposal regulations.
At the end of its service life, this device must not be disposed of with your regular household waste. It must be taken to a recycling collection point for electrical and electronic equipment.
This is indicated by the symbol on the product, the instruction manual or the packaging.
The materials are recyclable according to their identification.
An important contribution is made to our environment by recycling, the recovery of materials or other kinds of recycling for old devices.

Please ask local authorities for the location of the relevant disposal point. Please ensure that electronic waste is not disposed of in your regular household refuse, but is correctly disposed of either in special bins for problem waste, or at collection points in the retail trade.

2.2.3 Legal notices

TechniSat herewith declares that the radio system model AUDIOMASTER MR1/MR2/MR3 and TECHNISOUND MR2 corresponds to Directive 2014/53/EU. The complete text of the EU declaration of conformity is available at the following website:
TechniSat accepts no liability for product damage as a result of external influences, wear or improper handling, unauthorized repairs, modifications or accidents.
Changes and printing errors reserved. Version 04/18
Copy and reproduction are subject to the publisher's consent.
The respective current version of the instructions can be downloaded in pdf format in the download area of the TechniSat homepage at www.technisat.de.
This device is intended for use in all countries of the European Union and in Switzerland, Norway,
Liechtenstein and Iceland. Operation within the frequency range 5150 MHz - 5350 MHz is only permitted in enclosed spaces.
AUDIOMASTER MR1/MR2/MR3, TECHNISOUND MR2 and TechniSat are registered trademarks of:
2.2.4 Service instructions
This product is quality-tested and provided with the legal warranty period of 24 months as from the date of purchase. Please keep your receipt as proof of purchase. In the event of warranty claims please contact the product dealer.
Note! Should you experience a problem with this device, or for queries and information, our Technical Hotline is available
Mon. - Fri. 8:00 am - 8:00 pm on tel.:
+49 (0) 3925 9220 1800.
Should you need to return the device, please do so to the following address only:
39418 Staßfurt, Germany
The names of the companies, institutions or makes referred to are trademarks or registered trademarks of the respective owners.
3 Setting up the device
Place the device on a firm, secure and horizontal base. Make sure the area is well ventilated.
Caution!
Do not place the radio on soft surfaces such as carpets and blankets or near to curtains and wall hangings. These could obstruct the ventilation openings. The necessary flow of air could be interrupted as a result. This could potentially lead to fire in the device.
The ventilation slots at the rear and the sides must always be unobstructed. They must not be obstructed by curtains, blankets or newspapers.
Do not place the device near to sources of heat, such as radiators. Avoid direct sunlight and very dusty environments.
Do not select a location for the device with high air humidity, e.g. a kitchen or sauna, as the precipitation of condensation water could damage the device. The device is intended for use in a dry environment and in a moderate climate and must not be exposed to dripping or splashing water.
Please note that the device footings could leave coloured marks on some types of furniture surfaces in certain situations. Place a protective layer between your furniture and the device.
You may only operate the device in a vertical position. Do not use outdoors!
Do not place any heavy objects on the device.
If you move the device from a cold environment to a hot environment, moisture could accumulate inside the device. In such cases, wait approximately one hour before putting it into operation.
Lay the mains cable in such a way that nobody can trip over it.Ensure that the mains cable or the power supply unit are always easily accessible so that the device can be quickly disconnected from the power supply.
The power outlet should be as close to the device as possible. Insert the plug fully into the socket to ensure connection to the mains.
Use a suitable, easy-to-access mains connection and avoid using multiple socket strips.
Do not touch the mains plug with wet hands; electric shock hazard.
In the event of a malfunction or the detection of smoke or odour from the housing, remove the plug from the power outlet immediately.
Remove the plug before a storm starts.
Remove the plug if the device is not going to be used for a prolonged period, e.g. before going away on a long trip.
Do not set up the unit in the vicinity of devices that emit intense magnetic fields (e.g. motors, speakers, transformers).
4 Description of the device
4.1 Scope of delivery
Please ensure that all the following accessories are present:
1 x AUDIOMASTER or TECHNISOUND
1 x power supply unit
1 x instruction manual
4.2 The special features of the device
The device is comprised of an Internet radio, UPnP media player, Bluetooth (AUDIOMASTER MR1/MR2/MR3 only) and AUX input. Moreover, it also offers Spotify Connect and multi-room support. This enables media streaming.
- In conjunction with the MyDigitRadio Pro app, the device offers multi-room support (you can find more information in the MyDigitRadio Pro app and on the website www.technisat.de)
4.3 Preparing the device for use
4.3.1 Connecting the power supply unit
Connect the device to the mains network using the supplied power supply unit.
To supply the device with power, first connect the power supply unit cable to the DC IN (12) jack on the device and then plug the mains plug into the socket.
Ensure that the operating voltage of the power supply unit matches the mains voltage before you insert it into the wall socket.
Only use the power supply unit provided.
When the device is not being used, remove the plug from the socket. Pull on the plug and not on the cable.
Remove the plug before a storm starts. Remove the mains plug if the device is not going to be used for a prolonged period, e.g. before going away on a long trip.
The heat generated during operation must be dissipated by sufficient air circulation. Therefore the device must not be covered or installed in a closed cupboard. Ensure there is free space of at least 10cm around the device.
5 Start-up / connection to an existing network
The device is configured and operated via the MyDigitRadioPro app, using a mobile or tablet. Given that the app supports several TechniSat devices, on the following pages app illustrations are shown which feature menu items which do not apply to the device.
You can download the MyDigitRadioPro app free of charge at Google Play or in the Apple AppStore.


When using the device for the first time or when you wish to connect the device to another network, proceed as follows:
i By way of example, the installation procedure is now shown using the iOS version of the MyDigitRadioPro app. Operation can, however, also be transferred to the Android version of the app.
i Please observe all the information shown to you in the app and follow the instructions.
5.1 Activating the SET-UP mode
The device is in SET-UP mode when started for the first time.
AUDIOMASTER MR1/MR2/MR3:
The On/Standby status display on top of the device flashes blue and the Internet radio symbol is permanently lit (the device takes a few seconds to start).
TECHNISOUND MR2:
The Internet radio symbol on the top of the device flashes (the device takes a few seconds to start).
In this mode, the device acts as a WLAN AccessPoint and is ready for installation.
To switch the device to SET-UP mode after the first installation:
AUDIOMASTER MR1/MR2/MR3:
Press and hold the On/Standby/Volume up/down knob for approx. 10 seconds until a warning sound is heard. After a brief starting phase, the On/Standby status displayl on the top of the device flashes blue and the Internet radio symbol illuminates permanently.
TECHNISOUND MR2:
Pull out the mains plug, then hold down the On/Standby (4) button on the device. While doing so, insert the mains plug in the socket again. Approx. 5 seconds after the device has been supplied with power again, release the On/Standby button on the device. After a brief starting phase, the Internet radio symbol on top of the device starts flashing.
The device is reset and restored to its delivery status, thereby cancelling all settings previously made.
The device is now in SET-UP mode again. This is necessary if you wish to register the device in a new WLAN network.
5.2 Connecting to and integrating into the existing network
Open the WLAN settings on your smartphone or tablet and connect it to the network with the SSID Setup[device name] (the numbers/digits at the end of the SSID represent the MAC address for the device).
Now open the MyDigitRadioPro app.

5.3 Audio system set-up
After available devices have been searched for you can perform the audio system set-up.
To do so, tap the Start audio system set-up button.
In the steps below, connect your device to your existing network.

Please observe all the information shown to you in the app and follow the instructions. Tap the Continue button to go to the next step or Back to go to the previous step. Tap the respective button in the set-up to select or deactivate/activate functions. Follow the instructions on the screen.
5.3.1 Establishing the connection to the AUDIOMASTER MR3
5.3.2 Performing network settings
Use a cable LAN connection preferably - in the network connection step select the LAN item (AUDIOMASTER MR1/MR2/MR3 only).
6 General operation
Use the MyDigitRadio Pro app for general operation of the device.
Some settings can also be made via the web interface on the device.
Operation using the iOS version of the MyDigitRadio Pro app is described below.
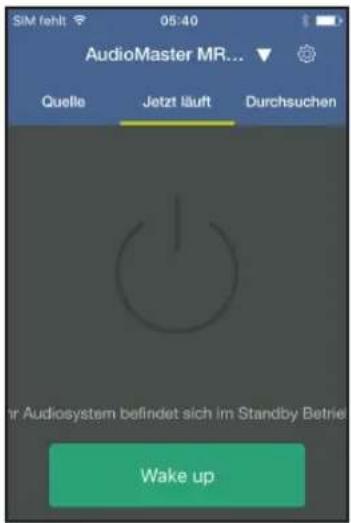
6.1 Switching on and off
6.1.1 On the device
Use the On/Standby/Volume up/down knob (4) on the device to switch the device on or to switch it back to standby.
When switched on, the On/Standby status display (8) lights up in green. When switched off the On/ Standby status display lights up in red (AUDIOMASTER MR1/MR2/MR3 only).
6.1.2 Using the app
Open the MyDigitRadio Pro app.
If required, select your device and tap the Wake Up button.
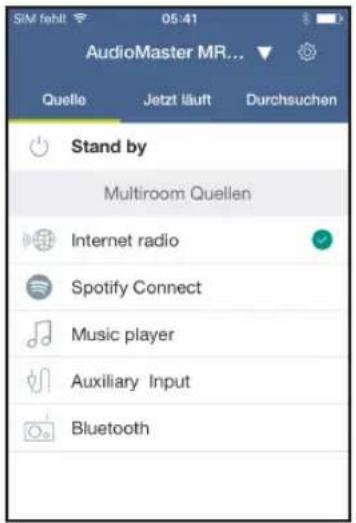
6.2 Source selection
Open Source view in the app.
To do so, tap the Source button.
or:
Swipe the screen from left to right to reach the view.
Now tap one of the sources to select it.
Alternatively, the source can also be selected by pressing the MODE (5) button on the top of the device. The active source is identified in the app by a green tick and on the device by an illuminated symbol.
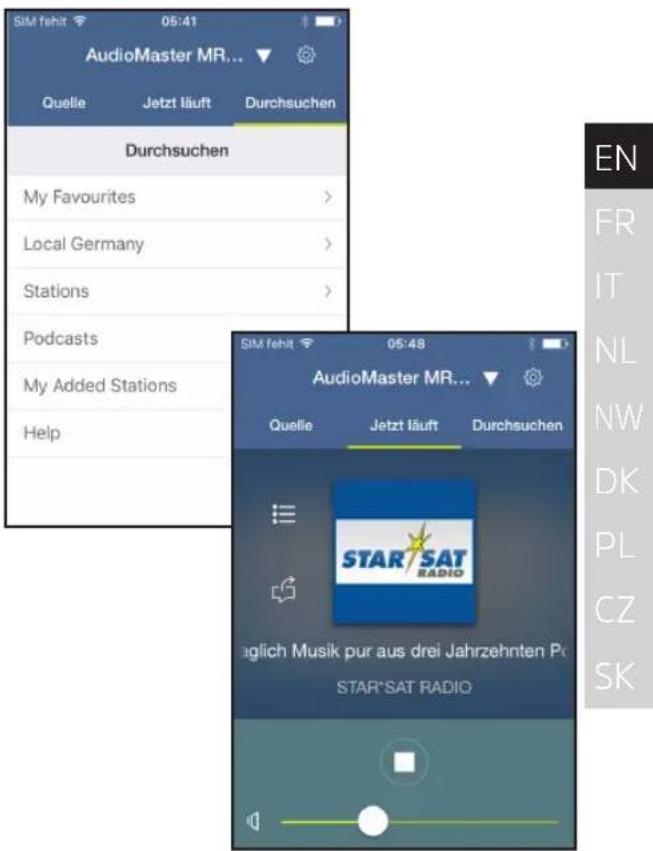
6.3 Listening to Internet radio
Your device is equipped with an Internet radio receiver. In order to receive radio stations/broadcasters, the device must be connected to the Internet.
Tap Source selection on the Internet Radio item.
Provided an Internet radio station has not been selected beforehand, the Browse view now appears.
You can also reach the Browse view by tapping Browse or by swiping as often as required from right to left until the page appears.

Under Browse all Internet radio stations are displayed divided into their different categories.
Then tap the desired station.
The station is now played.
6.4 Using Spotify
Join us in welcoming Spotify Premium
With Spotify Premium you can listen to millions of songs without adverts. Your favourite and up-and-coming artists along with the latest hits - just for you! Simply press "Play" and you can hear any song you want in top quality sound. Test Premium for 30 days free of charge at spotify.com/freetrial
Your new radio has Spotify Connect
With Spotify Connect you can use your mobile phone, tablet or PC to control the music playing on your radio. You can make calls, play games and even switch off your mobile phone - the music will play on. Find out more at spotify.com/connect
How to use Connect
You need Spotify Premium to be able to use Connect.
Tap the Spotify item in Source selection.
- With the new device, establish a connection to the same WLAN network with which your mobile, tablet or PC is connected.
- Open the Spotify app on your mobile phone, tablet or PC and play a track.
- If you are using the app on your mobile phone, tap on the image corresponding to the track at the bottom left of the screen. Go to step 4 if using a tablet or PC.
- Tap the connect symbol.
- Select your device from the list. If it is not displayed, ensure that it is connected to the same WLAN network as your mobile phone, tablet or PC.
And that's it! Have fun listening to your music!
The Spotify software is subject to third-party licences that you can find here: http://www.spotify.com/connect/third-party-licenses
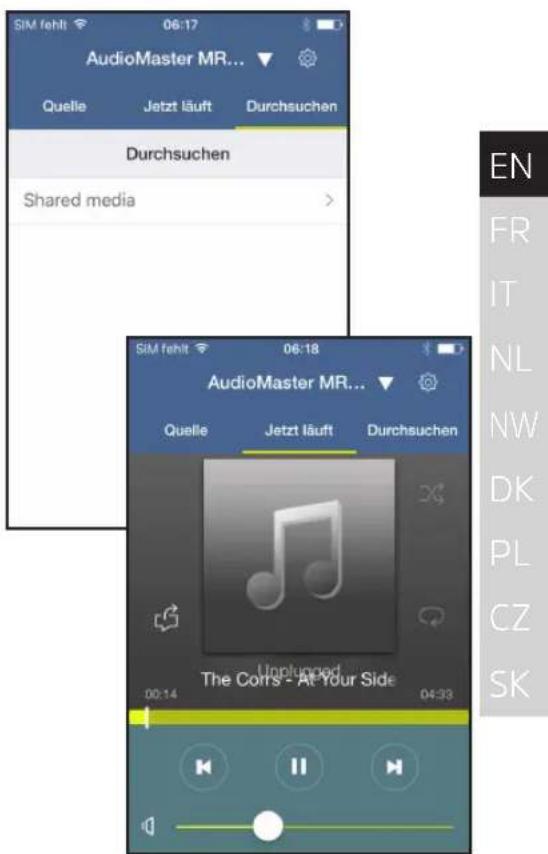
6.5 Using the music player / UPnP
You have the option of using your device to play audio media located on a UPnP server. A connection to your home network (router) is required to do so.
i The UPnP media server must be in the same network as your device.
In Source selection, tap the Music player item.
In the Browse view, you will be shown all the UPnP servers available in the network under the Shared media item.
The view of the folder structure depends on the folder structure on your media server.
Tap the desired item to browse on the UPnP server.
Now tap the desired track to play it.
6.6 Using the audio input
It is possible to play sound from external devices using the analogue audio output.
Connect the external device to the AUX IN connection (11), (3.5mm jack) on the device rear.
In Source selection tap the AUX IN item.
To set the volume optimally, use the volume control both on the device and on the connected external device.
Please note that if the volume on the connected device is very low, while the speakervolume setting is higher, annoying noises/background noise will be amplified and, therefore, will clearly be heard. It is recommended that you set the speaker volume, e.g. on an Internet radio station, switch to the audio input and then to adjust the volume of the connected device in such a way that the overall volume of the audio input corresponds approximately to the volume of the Internet radio station. In this way, you can also avoid considerable differences in volume when switching between the speaker functions.
6.7 Other buttons on the device
The following buttons can be found on the top of the device:
VOL - (10), volume control, down (TECHNISOUND MR2 only)
VOL + (9), volume control, up (TECHNISOUND MR2 only)
7 Operating controls on the 'Now running' view
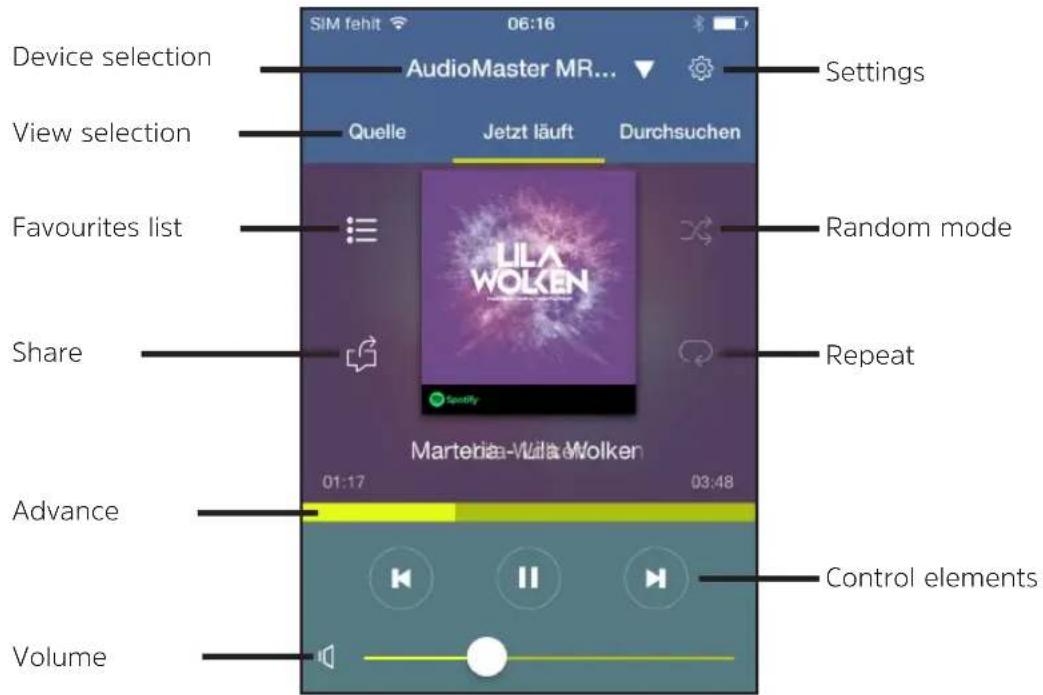
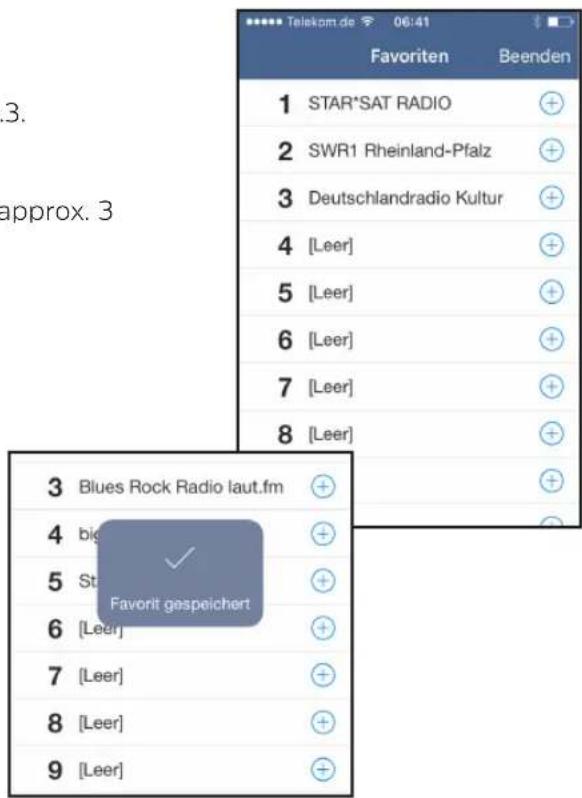
7.1 Accessing and managing the Favourites list
By using the Favourites list you can easily store your favourite stations and quickly retrieve them again.
Press the corresponding button (Section 7) to open the Favourites list.
Accessing stations:
To access a station on this list, simply tap the desired station.
Saving stations:
First select the station you wish to save as described in Section 6.3.
Now open the Favourites list.
Press and hold the desired memory slot in the Favourites list for approx. 3 seconds.
The corresponding message will appear in order to confirm.
7.2 Device selection
In the event that you have, in the meantime, used another device with the MyDigitRadioPro app, you can, at any time, return to the AUDIOMASTER or TECHNISOUND MR2.
To do so, tap the device designation in the very top line of the Now running view.
Now select your Device.
After this, the app automatically returns to the Now running view.
7.3 Control elements
Use the control elements to pause playback or to change to the next or previous track.
Use the Volume bar on the bottom edge of the image to adjust the volume.
By moving the progress bar, you can skip to different parts of a track whilst it is playing.
By tapping the Random mode and Repeat buttons, you can switch the respective function on or off.
The control elements available depend on the selected source. In general, with Internet radio, it is not possible to pause or skip to specific parts.
7.4 Settings
This menu allows you to carry out different settings and to view information.
To open the settings, tap the Gear wheel icon at the top right image edge.
Changing the device name:
Tap on the pen next to the device name to edit it.
Use the keyboard shown on the display to edit the name.
7.4.1 Network information
This shows the current information on your home network, e.g. the network name, the IP address of your device or the signal strength at the location.
7.4.2 Software version
This shows which software version is installed on your device.
7.4.3 Standby
This button enables you to switch the device on or off.
7.4.4 Automatic shutdown
Use this function to switch the device off after a set period. This function corresponds to a sleep timer.
7.4.5 Equaliser
This menu offers you setting options for sound adjustment. There are various default settings available that you can activate.
Tap the Equaliser to open this menu.
Select the desired setting by tapping it.
7.4.6 Changing the PIN
Under certain circumstances, it may be necessary to secure the connection to your device with a PIN.
Tap on this item and enter a four-digit number.
Confirm the entry with OK.
7.4.7 Software update
From time to time software updates may be provided which could contain improvements or bug fixes. The device is therefore always up-to-date.
With the help of this menu item, you can manually check whether any new software exists for your device and download and install it if required.
In order to find and upload software updates, the device must be connected to the Internet. Do not switch the device off during the update process.
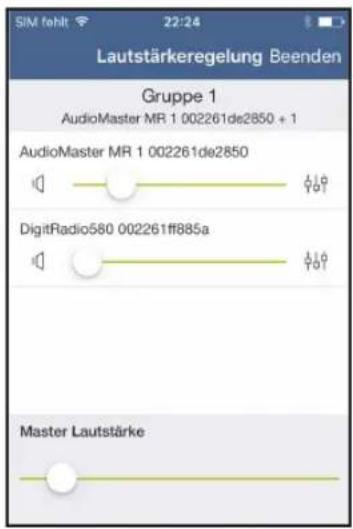
8 Multi-room
Multi-room refers to music streaming which goes above and beyond the one room.
In order to set up a multi-room system, you need a multi-room enabled receiver which you can add to your home network. By virtue of centralised control via the MyDigitRadio Pro app, you can then play your favourite music in separate rooms at the same time. Regardless of the receiver, you can operate different music sources such as Internet radio or Spotify.
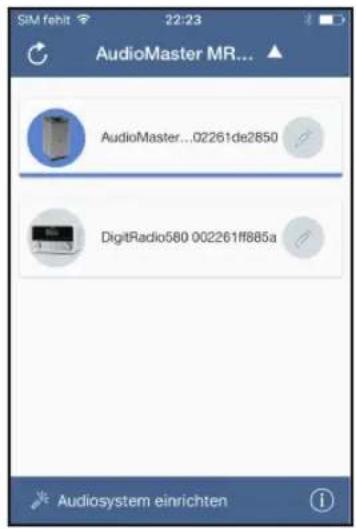
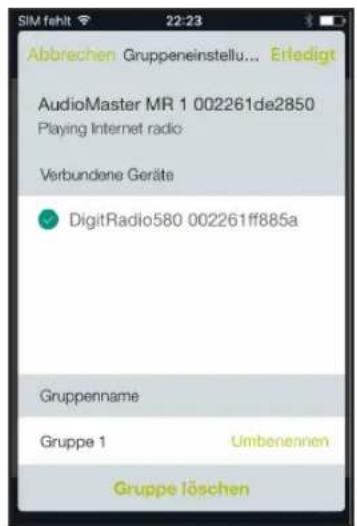
By way of example, the set-up of a multi-room group using the AUDIOMASTER and a DIGITRADIO 580 is shown.
Tap on Device selection and then on the pencil under AUDIOMASTER, to carry out further settings.
Now select the device you would like to add to the group.
You can assign a specific name to the group by tapping Rename.
Finally, tap on Done to add the group.
8.1 Volume control in multi-room mode
Multi-room mode adjusts the volume control.
Tap on the speaker icon to open the volume control.
This is where you can now adjust the volume for each device included in the group.
Move the respective volume control to adjust a specific device.
Use the Master volume to adjust the volume of all the devices.
8.2 Mono / Stereo mode (AUDIOMASTER MR1 only)
Using a second AudiOMaster MR1 you can configure both devices as stereo speaker systems.
Merge both AudiOMaster MR1 devices into one group (Section 8).
On the back of the AUDIOMASTER MR1, select which speaker should be the right-hand one (R) and which should be the left-hand one (L) (depending on the installation of the devices). To do so, move the Mono/Left/Right selector switch (15) to the corresponding position.
If you are only using the one AUDIOMASTER MR1, leave the Mono/Left/Right selector switch at the Monoposition.
9 Bluetooth (AUDIOMASTER MR1/MR2/MR3 only)
In order to play a music source directly on the AUDIOMASTER, the music source must first of all be paired with the AUDIOMASTER.
In Source selection, tap on the Bluetooth item or press the MODE button until the Bluetooth symbol flashes.
The Bluetooth symbol flashes if no device has yet been paired with the AUDIOMASTER or it is out of range. The Bluetooth symbol lights up permanently if there is a connection to a paired device.
Access the Bluetooth settings on your external music source and select AUDIOMASTER from the list of paired devices.
i If a PIN code has to be entered please use the code 0000.
The pairing process should now be concluded and the Bluetooth symbol is permanently lit.
To set the volume optimally, use both the volume control on the AudiOMASTER and on the external music source. Ensure that the source volume is not too low, otherwise background noise will be transmitted.
10 Cleaning
To prevent the risk of an electric shock, you may not clean the device using a wet cloth or under running water. Remove the mains plug prior to cleaning!
You may not use scouring pads, scouring powder and solvents such as alcohol, petrol, spirits, thinners, etc.; they could damage the surface of the device.
Do not use any of the following substances: salt water, insecticides, chlorine or acid-based solvents (ammonium chloride).
Clean the housing using a soft, moist cloth.
Use the cotton cloth to gently rub the surface until it is completely dry.
11 Troubleshooting
If the device does not operate as intended, check the following table for information.
| Symptom Possible cause/remedy | |
| The device cannot be switched on. | The device is not being supplied with power. Connect the power supply unit correctly to the socket and to the device. |
| No sound can be heard. | Increase the volume. Switch the playback device on or increase the volume. Possibly the incorrect source has been selected. |
| Connection to the WLAN router does not work | Check whether the signal strength of the router is sufficient. |
| Check in the router settings whether it accepts new connections. | |
| Check the WLAN password and enter it again. |

If the malfunction has not been resolved, even after performing the checks described, please contact the Technical Hotline.
12 Technical data
Subject to technical changes and errors. The dimensions are approximate values.
| Reception channels AUDIOMASTER | ER MR1/MR2/MR3: Internet, Bluetooth, UPnP, Aux and Spotify |
| TECHNISOUND MR2: Internet, UPnP, Aux and Spotify | |
| Power supply unit input AC Input | 100-240V; 50-60Hz |
| Power supply unit output AUDIOMASTER | MASTER MR1: DC-OUT 18V, 2A |
| AUDIOMASTER MR2: DC-OUT 18V, 2.6A | |
| AUDIOMASTER MR3: DC-OUT 18V, 5A | |
| TECHNISOUND MR2: DC-OUT 12V, 2A | |
| Network standby consumption < | 2W |
| Output power Speaker AUDIOMASTER | STER MR1: 30W RMS |
| AUDIOMASTER MR2: 60W RMS | |
| AUDIOMASTER MR3: 90W RMS | |
| TECHNISOUND MR2: 2 x 10W RMS | |
| Dimensions AUDIOMASTER MR1: | 11mm x 220mm x 111mm |
| AUDIOMASTER MR2: 288mm x 126mm x 185mm | |
| AUDIOMASTER MR3: 388mm x 168mm x 200mm | |
| TECHNISOUND MR2: 100mm x 210mm x 100mm | |
| Weight AudiOMaster MR1: 1.33kg | |
| AUDIOMaster MR2: 2.84kg | |
| AUDIOMaster MR3: 4.65kg | |
| TECHNISOUND MR2: 1.24kg | |
| Thread (wall mounting) | 1/4" - 20 UNC |
| AUDIOMaster MR1/MR2 and TECHNISOUND MR2 only | |
13 Disposal Instructions
Disposal of the packaging
Your new device was protected by packaging on its way to you. All materials used are environmentally friendly and recyclable. Please collaborate and dispose of the packaging in an environmentally-friendly way. Ask for information from your dealer regarding current disposal means or your local disposal facility.
Risk of suffocation! Do not give packaging and parts thereof to children. Risk of suffocation by films and other packaging materials.
Disposal of the device
Old devices constitute valuable waste. Valuable raw materials can be recovered through environmentally-friendly disposal. Consult your town or local authority as to the possibilities for environmentally-friendly and proper disposal of the device.
At the end of its service life, this device must not be disposed of with your regular household waste. It must be taken to a recycling collection point for electrical and electronic equipment. The symbol on the product, the operating manual or the packaging indicates this. The materials are recyclable according to their identification. An important contribution is made to our environment by recycling, recovery of materials or other kinds of recycling for old devices.
Life-threatening hazard! Remove the mains plug in disused devices. Cut through the mains cable and remove with the plug.
Mode d'emploi
AUDIOMASTER MR1
AUDIOMASTER MR2
AUDIOMASTER MR3
TECHNISOUND MR2

1 Illustrations
2.2.4 Service-instructions
5.3 Audiosystem Set-up
Du skal have Spotify Premium for at kinne bruge Connect.
Tryk under kildevalg på punktet Spotify.
http://www.spotify.com/connect/third-party-licenses


- Contents
- Foreword
- Target group for this instruction manual
- Intended use
- Important information
- Safety
- Disposal
- Legal notices
- Service instructions
- Setting up the device
- Caution!
- Description of the device
- Scope of delivery
- The special features of the device
- Preparing the device for use
- Connecting the power supply unit
- Start-up / connection to an existing network
- Activating the SET-UP mode
- AUDIOMASTER MR1/MR2/MR3:
- TECHNISOUND MR2:
- Connecting to and integrating into the existing network
- Audio system set-up
- Establishing the connection to the AUDIOMASTER MR3
- Performing network settings
- General operation
- Switching on and off
- On the device
- Using the app
- Source selection
- Listening to Internet radio
- Using Spotify
- Join us in welcoming Spotify Premium
- Your new radio has Spotify Connect
- How to use Connect
- Using the music player / UPnP
- Using the audio input
- Other buttons on the device
- Operating controls on the 'Now running' view
- Accessing and managing the Favourites list
- Device selection
- Control elements
- Settings
- Changing the device name:
- Network information
- Software version
- Standby
- Automatic shutdown
- Equaliser
- Changing the PIN
- Software update
- Multi-room
- Volume control in multi-room mode
- Mono / Stereo mode (AUDIOMASTER MR1 only)
- Bluetooth (AUDIOMASTER MR1/MR2/MR3 only)
- Cleaning
- Troubleshooting
- Technical data
- Disposal Instructions
- Disposal of the packaging
- Disposal of the device
- Mode d'emploi
- Illustrations
- Service-instructions
- Audiosystem Set-up
Brand : TECHNISAT
Model : TechniSound MR2
Category : Speaker