Z 02609 - Coffee machine Coffeemaxx - Free user manual and instructions
Find the device manual for free Z 02609 Coffeemaxx in PDF.
| Product type | Espresso machine |
| Brand | Coffeemaxx |
| Model | Z 02609 |
| Manufacturer article number | JK40401 |
| Power supply | 220 – 240 V ~ 50 Hz |
| Power | 480 W |
| Protection class | II |
| Water tank capacity | Up to the MAX mark (about 6 cups) |
| Number of cups | 3 or 6 cups |
| Usable coffee type | Medium ground coffee/espresso powder, not tamped |
| Main functions | Preparation of espresso and coffee |
| Included accessories | Funnel-shaped filter holder, intermediate filter |
| Spare parts available | Rubber gasket, filter holder, intermediate filter (via www.service-shopping.de) |
| Care and cleaning | Manual cleaning with hot water and mild detergent; do not put in dishwasher; do not immerse base |
| Safety | Safety valve, manual stop via on/off switch |
| Intended use | Household use only for coffee and espresso |
| Warranty | Excludes defects due to improper use or normal wear |
| Country of origin | Not specified in the manual (importer: DS Produkte GmbH, Germany) |
Frequently Asked Questions - Z 02609 Coffeemaxx
User questions about Z 02609 Coffeemaxx
0 question about this device. Answer the ones you know or ask your own.
Ask a new question about this device
Download the instructions for your Coffee machine in PDF format for free! Find your manual Z 02609 - Coffeemaxx and take your electronic device back in hand. On this page are published all the documents necessary for the use of your device. Z 02609 by Coffeemaxx.
USER MANUAL Z 02609 Coffeemaxx
natural_image
Modern kitchen blender with clear glass and gray casing, no visible text or symbolsGebrauchsanleitung
ab Seite 3
Instruction manual
starting on page 12
Mode d'emploi
www.service-shopping.de
natural_image
Close-up of a glass pouring liquid into a container (no text or symbols visible)natural_image
Hand holding a small metallic object on a white surface (no text or symbols visible)natural_image
Hand pouring dark granular substance from a small container onto a smooth, metallic object (no text or symbols visible)natural_image
Hand placing a small object into a metallic cylindrical device (no text or symbols visible)natural_image
Hand pouring dark granular substance from a spoon into a small stand mixer (no text or symbols visible)natural_image
Hand holding a small glass coffee maker with a handle, placed on a plain surface (no text or symbols visible)natural_image
Hand inserting a small electronic device into a power socket on a white surface (no text or symbols visible)Meaning of the Symbols in These Instructions 13
Safety Instructions 13
Intended Use 13
Danger of Injury 13
Health-Specific Safety Instructions 14
Danger of Electric Shock and Fire 14
Material and Device Damage 14
Warranty Terms 15
Items Supplied and Device Overview 16
Before Initial Use 16
Unpacking the Items Supplied 16
Cleaning Before Initial Use 17
Use 17
Ordering More Accessories 19
Cleaning and Storage 19
Troubleshooting 20
Technical Data 20
Disposal 21
Dear Customer,
We are delighted that you have chosen our espresso maker. You can now easily make and enjoy an espresso at home every single day!
We hope you have a lot of fun with the espresso maker!
If you have any questions, contact the customer service department via our website:
www.service-shopping.de

Before using the device for the first time, please read the instructions through carefully and store them in a safe place. If the device is given to someone else, it should always be accompanied by these instructions. The manufacturer and importer will not accept liability if the directions in these instructions are not observed!
We reserve the right to modify the product, packaging or enclosed documentation at any time in conjunction with our policy of continuous development.
Meaning of the Symbols in These Instructions
All safety instructions are marked with this symbol. Read these instructions carefully and follow them to avoid injury to persons or damage to property.

Tips and recommendations are marked with this symbol.
Suitable for use with food.
Safety Instructions
Intended Use
☐ The device is suitable exclusively for brewing coffee and espresso.
☐ The device is not suitable for making cocoa or tea.
☐ Only ever use pure espresso/coffee powder which is not ground too fine. Coffee substitute or coffee extract contain sticky substances which can block the sieves of the espresso maker.
☐ This device is for personal use only and is not intended for commercial applications.
☐ Use the device only as described in the operating instructions. Any other use is deemed to be improper.
Danger of Injury
☐ Keep children and animals away from the packaging material. There is a danger of suffocation!
☐ This device should not be used by people (including children) with impaired sensory or mental faculties or who do not have adequate experience and/or knowledge of such devices, unless they are supervised by a person responsible for their safety, or have received instructions from such a person on how to use the device. Children must be supervised in order to ensure that they do not play with the device.
☐ Keep the device out of the reach of children!
☐ Danger of burns! The espresso maker will become very hot during use! Only ever touch the device by its handles and use oven gloves if necessary to prevent injuries.
☐ Danger of scalding! The espresso maker emits hot steam! Keep your face and hands out of the danger zone during the brewing process!
☐ Danger of scalding! Make sure that the safety valve on the water reservoir is not pointing towards the user. If the safety valve is triggered, hot steam will escape from the opening!
Health-Specific Safety Instructions
☐ There may still be some production residues on the device. To avoid harmful effects to your health, clean it thoroughly before you first use it (see the "Cleaning and Storage" chapter).

Danger of Electric Shock and Fire
☐ Only connect the device to a socket that is properly installed and corresponds with the technical data of the device (see the "Technical Data" chapter).
Lay the cable in such a way that it does not become squashed or bent and does not come into contact with hot surfaces (this also applies to the hot surfaces of the espresso maker!).
☐ Remove the mains plug from the mains socket:
– before you remove the espresso maker from the base station,
– when the device is not in use,
– before a thunderstorm or
– before you clean the device.
☐ When you want to remove the mains plug from the socket, always pull the plug and not the cable.
☐ Never immerse the base station and the bottom of the water reservoir in water or other liquids! Make sure that the base station, the bottom of the water reservoir, the cable and plug cannot fall into water or become wet.
☐ Should the base station fall into water, switch off the power supply immediately.
☐ Never touch the base station, the bottom of the water reservoir, the cable or the plug with wet hands. Make sure that the base station and the bottom of the water reservoir are completely dry during use. Otherwise this may cause a short-circuit of the device.
- Maintain a sufficient distance from sources of heat such as hobs or ovens.

Material and Device Damage
□ Always check the device for damage before putting it into operation. The device must not be used if the espresso maker, the base station, the cable or the plug show obvious signs of damage.
☐ If the device or parts of the device are defective, do not attempt to repair the device yourself. In the event of any damage, contact our customer service department.
☐ Use only the accessories supplied, or accessories expressly recommended by the manufacturer. Use only original spare parts from the manufacturer.
☐ The device should only be used when it is fully assembled, undamaged, and in working order!
☐ The rubber seal of the espresso pot must be kept clean and replaced on a regular basis. To order any additional spare parts, visit our website: www.service-shopping.de !
☐ The espresso maker operates electrically. Do not place it on hobs or an open fire for the purpose of brewing coffee or espresso!
☐ The device should only be used in closed rooms.
☐ Never operate the device without water to prevent damage to the device.
Fill the water reservoir no higher than the MAX marking. The valve of the water reservoir must not be situated in the water area as otherwise it may fur up and thus have an adverse effect on how the valve works and on safety.
☐ Only ever operate the device with water! You should never pour milk or other liquids into the water reservoir!
☐ Ensure that it is not possible for others to trip over the connected mains cable. Do not allow the cable to hang over the edge of tables or kitchen counters. Others may become caught and pull the device down.
☐ Do not drop the device or allow it to be knocked violently.
□ Always place the base on a dry, even and firm surface.
☐ Do not expose the device to extreme temperatures, wide temperature variations, moisture or direct sunlight.
Warranty Terms
The following are excluded from the warranty: all defects caused by improper handling, damage or unauthorised attempts to repair. The same applies for normal wear.
Items Supplied and Device Overview
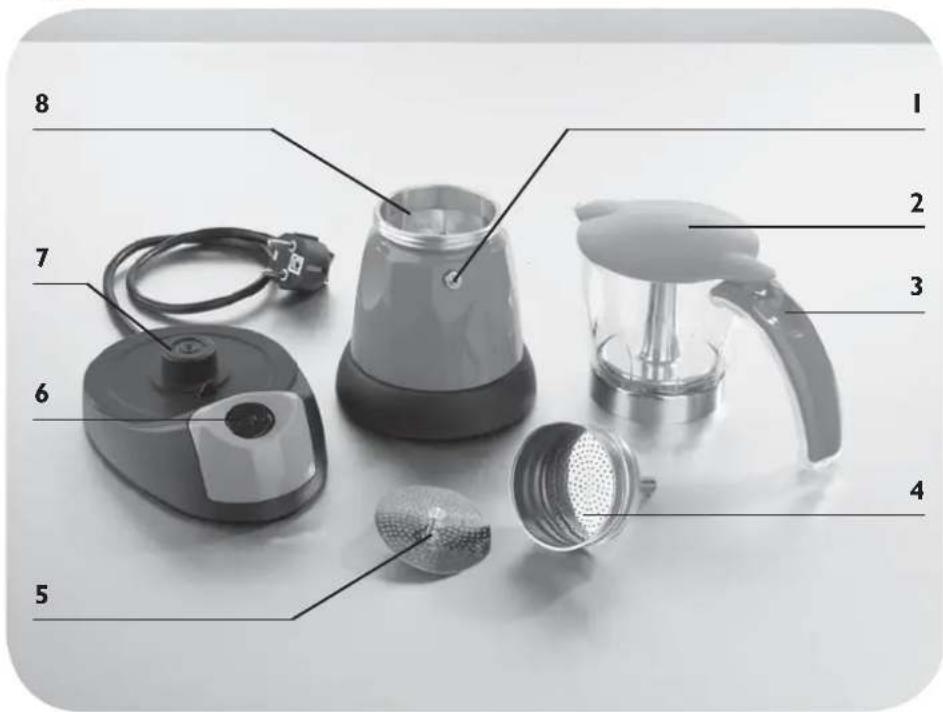
I Safety valve
2 Espresso pot lid
3 Espresso pot handle
4 Funnel-shaped sieve insert
5 Intermediate sieve insert
6 On/Off switch
7 Electric base station
8 Water reservoir

If you want to order more original spare parts/accessories, visit our website: www.service-shopping.de
Before Initial Use
Before you can use the device, you must:
- unpack the items supplied,
- clean the device.
Unpacking the Items Supplied

CAUTION!
□ Keep children and animals away from the packaging material. There is a danger of suffocation!
Unpack all parts and check the items supplied for completeness (see the "Items Supplied and Device Overview" chapter) and transport damage. If you find any damage to the components, do not use them (!), but contact our customer service department.
Cleaning Before Initial Use
I. Clean the device in the manner described in the "Cleaning and Storage" chapter.
- Before you use the espresso maker for the first time, we recommend that you carry out 1 – 2 brewing operations and dispose of the coffee in order to rid the device completely of any production residues. Note the instructions provided in the "Use" chapter before you start using the espresso maker.
Use
CAUTION!
☐ Do not operate the espresso maker when it is unattended! The espresso maker does not switch off automatically!
☐ Do not unscrew the espresso maker and take it apart before it has been disconnected from the mains power and cooled down.
☐ Do not open the lid before the brewing process has completed. Hot steam will escape!
Before each use, check that the rubber seal on the bottom of the espresso pot is in good working order.
☐ Only ever use pure espresso/coffee powder which is not ground too fine. Coffee substitute or coffee extract contain sticky substances which can block the sieves of the espresso maker.
☐ Only ever operate the device with water! You should never pour milk or other liquids into the water reservoir!
☐ Fill the water reservoir no higher than the MAX marking!
☐ Never use the espresso maker without water in the water reservoir!
To enjoy the best espresso, we recommend a medium grinding fineness of espresso powder. Espresso powder which is ground too fine can clog up the sieve insert!
I. Place the base station on a flat, stable surface.
2. Unscrew and take apart the espresso maker by turning the upper half of the pot and the water reservoir in opposite directions.
3. Remove the funnel-shaped sieve insert from the water reservoir.
natural_image
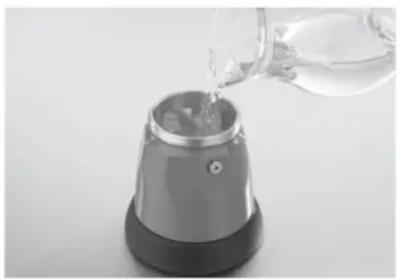
Close-up of a glass bottle pouring liquid into a small container (no text or symbols visible)4a. If you want to brew 6 cups of espresso, pour water into the water reservoir up to the MAX marking.
4b. If you want to brew 3 cups of espresso, pour slightly less water into the water reservoir (up to approx. 2 cm below the MAX marking).
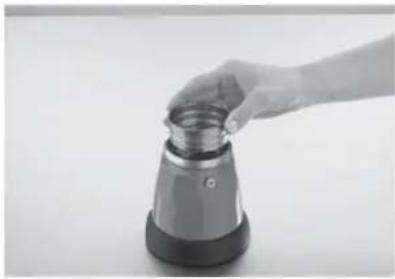
natural_image
Hand holding a small metallic object on a plain surface (no text or symbols visible)- Insert the funnel-shaped sieve insert back into the water reservoir.
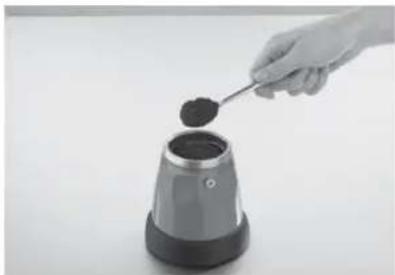
natural_image
Hand pouring dark granular substance from a small container onto a smooth, metallic object (no text or symbols visible)6a. If you want to brew 6 cups of espresso, fi ll the funnel-shaped sieve insert up to its edge with espresso powder and smooth down the fi lled powder and remove any excess espresso powder.
IMPORTANT: Only smooth down the powder. DO NOT COMPRESS IT!
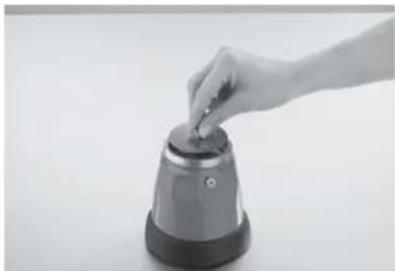
natural_image
Hand placing a small object into a metallic cylindrical container (no text or symbols visible)6b. If you want to brew 3 cups of espresso, insert the intermediate sieve into the sieve insert.
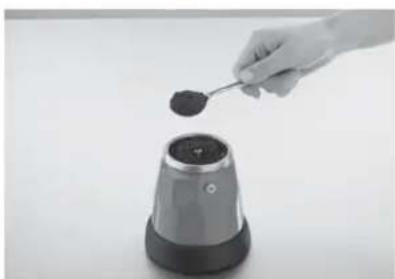
natural_image
Hand pouring dark granular substance from a spoon into a small stand mixer (no text or symbols visible)Then fi ll the intermediate sieve up to the edge with espresso powder and smooth down the fi lled powder and remove excess espresso powder.
IMPORTANT: Only smooth down the espresso powder. DO NOT COMPRESS IT!
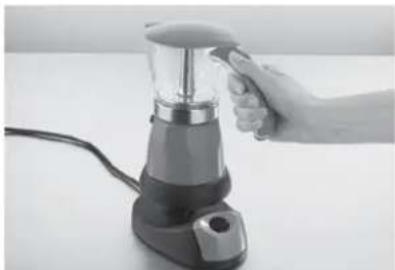
- Screw the espresso pot onto the water reservoir.
natural_image
Hand holding a small white object next to a black and silver coffee maker on a white surface (no text or symbols visible)-
Place the espresso maker onto the electric base station. Make sure that the lid of the espresso pot is closed.
-
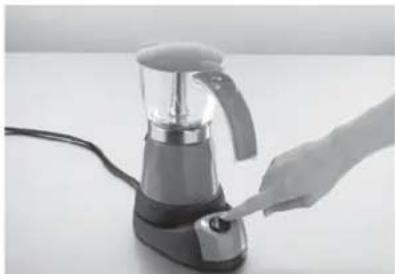
Connect the base station to a plug socket that has been properly installed.
natural_image
Hand inserting a plug into a small appliance on a white surface (no text or symbols visible)- Move the On/Off switch to position 1. The operating lamp lights up when the device is switched on. The brewing process begins a few moments after the device is switched on.
II. Move the On/Off switch to position 0 when the brewing process has ended and no more espresso is trickling into the espresso pot. The brewing process need up to 10 minutes.
12. Remove the mains plug from the mains socket.
13. Remove the espresso maker from the base station and serve your espresso.
14. Allow the espresso maker to cool down completely after each use before you use it again or clean it.
Ordering More Accessories
To order more original spare parts/accessories, visit our website: www.service-shopping.de
Cleaning and Storage
CAUTION!
☐ Remove the plug from the mains socket before cleaning the device.
☐ Allow the device to cool down completely before cleaning it!
☐ Never immerse the base station or the water reservoir in water or other liquids! Make sure that the base station, the bottom of the water reservoir, the cable and plug cannot fall into water or become wet.
☐ Not suitable for cleaning in the dishwasher!
☐ Do not use corrosive or abrasive cleaning agents to clean the device. These could damage the surface.
- Unscrew the espresso maker and remove the sieve insert. Dispose of the espresso powder in an environmentally friendly manner.
- Remove any remaining water from the water reservoir. If necessary, wipe the water reservoir with a damp cloth and then wipe it down with a dry cloth.
- If necessary, wipe the base station with a damp cloth and then wipe it down with a dry cloth.
- Rinse the espresso pot (without the water reservoir!) and the sieve inserts if necessary with warm water and mild detergent.
- Only reassemble the espresso maker once all of the parts are completely dry.
• Store the espresso maker in a dry, clean place.
Troubleshooting
If the device should stop working properly, first check whether you are able to correct the problem yourself. Otherwise, contact our customer service department.
Do not try to repair a faulty device yourself!
| Problem Possible cause/solution | |
| The device does not work. | Is the plug inserted in the mains socket correctly?Is the plug socket defective? Try another plug socket.Check the fuse of your mains connection.Is the device switched on? Move the On/Off switch to the I position to switch on the device. |
| The espresso does not trickle into the espresso pot. | Is water in the water reservoir? Fill the water reservoir with water.Is espresso powder in the sieve? The device does not work without espresso powder! Fill espresso powder in the sieve.Is the sieve clogged up? The espresso powder may be too finely ground and may be blocking the espresso sieve. Use espresso powder with a medium grinding fi neness.Have you pressed the espresso powder too hard into the sieve insert? Make sure that you do not press down on the powder when removing excess espresso powder! |
| Espresso escapes during the brewing process. | Are the water reservoir and espresso pot screwed together correctly? Make sure that the espresso pot is seated correctly.Is the rubber seal in the espresso pot porous? Replace the rub-ber seal. |
Technical Data
Model: JK40401
Article number: Z 02609
Voltage supply: 220 – 240 V\~ 50 Hz
Power: 480 W
Protection class: II


Disposal
The packaging can be recycled. Please dispose of it in an environmentally friendly manner and take it to a recycling centre.
Dispose of the device in an environmentally friendly manner. It should not be disposed of in the normal domestic waste. Dispose of it at a recycling centre for used electrical and electronic devices. You can obtain more information from your local authorities.
Sommaire
www.service-shopping.de

natural_image
Close-up of a laboratory glassware setup with a conical flask and a transparent container (no visible text or symbols)natural_image
Hand holding a small metallic object on a white surface (no text or symbols visible)natural_image
Hand pouring dark granular substance from a small container onto a white surface (no text or symbols visible)natural_image
Hand placing a small object into a metallic cylindrical container (no text or symbols visible)natural_image
Hand pouring dark granular substance from a small spoon into a modern blender (no text or symbols visible)natural_image
Hand holding a small tool next to a modern coffee maker on a white surface (no text or symbols visible)natural_image
Hand inserting a plug into a small electric shaver on a white surface (no text or symbols visible)www.service-shopping.de