2 Go Thermo Star - Coffee machine Coffeemaxx - Free user manual and instructions
Find the device manual for free 2 Go Thermo Star Coffeemaxx in PDF.
| Product type | Coffee machine with insulated cup |
| Brand | Coffeemaxx |
| Model | 2 Go Thermo Star (YCM-2019) |
| Power supply | 230 V ~ 50 Hz, 650 W |
| Protection class | I |
| Water tank capacity | Approx. 300 ml (insulated cup included as measuring cup) |
| Main functions | Coffee brewing, programmable timer, auto shut-off, anti-drip |
| Filter type | Permanent filter (washable) + compatible paper filter |
| Maintenance | Clean removable parts with hot water, descale regularly |
| Safety | Overheat protection, auto shut-off, do not immerse |
| Spare parts available | Additional insulated cup (order online) |
| Warranty | Legal warranty, excluding normal wear and improper use |
| Included accessories | Insulated cup, permanent filter, user manual |
Frequently Asked Questions - 2 Go Thermo Star Coffeemaxx
User questions about 2 Go Thermo Star Coffeemaxx
0 question about this device. Answer the ones you know or ask your own.
Ask a new question about this device
Download the instructions for your Coffee machine in PDF format for free! Find your manual 2 Go Thermo Star - Coffeemaxx and take your electronic device back in hand. On this page are published all the documents necessary for the use of your device. 2 Go Thermo Star by Coffeemaxx.
USER MANUAL 2 Go Thermo Star Coffeemaxx
natural_image
Modern digital coffee maker with black handle and digital display, placed on a table with scattered coffee beans against a patterned background (no text or symbols visible)Coffee Maxx 2 Go Thermo Star
natural_image
Close-up of a black spherical object with a white arrow pointing to its side (no text or symbols visible)natural_image
Close-up of a black appliance with a funnel and lid, showing a hand pouring liquid from a container (no text or symbols visible)Meaning of the Symbols in These Instructions 13
Safety Instructions 13
Intended use 13
Danger of injury 13
Health-Specific Safety Instructions 13
Setup and Connection 14
Use 14
Warranty Terms 15
Scope of Supply and Device Overview 16
Before Initial Use 17
Unpacking 17
Cleaning 17
Use 17
Commissioning and making basic settings 18
Brewing coffee 18
Timer function 19
Care and Descaling 19
Descaling 20
Troubleshooting 20
Technical data 21
Disposal 21
Ordering Replacement Parts 21
Customer service 21
Dear Customer,
We are delighted that you have chosen the "Coffee Maxx 2 Go Thermo Star". With this coffee machine, you can make delicious coffee for at home and on the go.
We hope you have a lot of fun with your new "Coffee Maxx 2 Go Thermo Star".

Before using the device for the first time, please read the instructions through carefully and store them in a safe place. If the device is given to someone else, it should always be accompanied by these instructions. The manufacturer and importer will not accept liability if the directions in these instructions are not observed!
12
Meaning of the Symbols in These Instructions

All safety instructions are marked with this symbol. Read these instructions carefully and follow them to avoid injury to persons or damage to property.

Tips and recommendations are marked with this symbol.

Suitable for use with food.
Safety Instructions

Intended use
☐ This device is intended to be used to make coffee.
☐ The device is not designed to be operated with an external timer or a separate remote control system.
☐ This device is for personal use only and is not intended for commercial applications.
☐ The device must only be used as described in the operating instructions. Any other use is deemed to be improper.


Danger of injury
☐ Please keep the packaging and the device out of the reach of children and pets.
☐ This device should not be used by people (including children) with impaired sensory or mental faculties or who do not have adequate experience and/or knowledge of such devices, unless they are supervised by a person responsible for their safety, or have received instructions from such a person on how to use the device. Children must be supervised in order to ensure that they do not play with the device.
☐ Danger of scalding! During use, hot steam emerges. Avoid coming into contact with hot steam.
☐ Danger of burns! Parts of the product will become very hot during use. Avoid coming into contact with hot parts of the device.

Health-Specific Safety Instructions
☐ Damage to health as a result of contamination! Clean the device before using it for the first time It is possible that manufacturing residues may still be adhering to the surfaces. It is essential that you follow the cleaning instructions as explained in the section entitled "Before using for the first time" and "Care and descaling."
13


Setup and Connection
☐ The device should only be used in closed rooms.
□ Always place the device on a dry, level, firm and heat-resistant surface.
- Maintain a sufficient distance from heat sources such as hobs or ovens in order not to damage the device.
☐ The device should only be connected to a properly installed socket with earthing contacts. The socket must also be readily accessible after connection. The mains voltage must be the same as that stated in the technical data of the device. Only use suitable extension cables whose technical data is the same as that of the device.
☐ Ensure that it is not possible for others to trip over the connected mains cable. Do not allow the cable to hang over the edge of tables or kitchen counters. Others may become caught and pull the device down.
☐ Position the cable in such a way that it does not become squashed or bent and does not come into contact with hot surfaces.

Use
Always check the device for damage before putting it into operation. If the device, cable, or plug shows visible signs of damage, the device must not be used. Do not use the device if it has malfunctioned or been dropped.
☐ If the device is broken, do not attempt to repair it yourself. In the event of damage, please contact our Customer Service department (see the "Customer Service" section).
☐ Remove the mains plug from the mains socket,
- if you are not going to use the device over a lengthy period of time,
- if a fault occurs during operation,
– before a thunderstorm,
– before you clean it.
☐ When you want to remove the mains plug from the socket, always pull the plug and not the cable.
☐ Never immerse the device in water or other liquids. Ensure that the device, cable, or plug do not fall into water or become wet. Should the device fall into water, switch off the power supply immediately.
☐ Never touch the device, cable or plug with wet hands.
☐ Do not leave the device unattended when it is switched on.
☐ Do not drop the device or allow it to be knocked violently.
☐ To make coffee, use only fresh drinking water at room temperature.
☐ Never place the thermal cup on a hot stovetop or other hot surfaces.
☐ Do not use the thermal cup to heat up liquids in the microwave.
☐ Do not use the coffee machine without water.
☐ Never use the device when the thermal cup is damaged. Only use the thermal cup with this device.
☐ The prepared coffee is hot; be careful when handling hot liquids.

☐ Never fill water into a machine that is already on. In the worst case, you could scald yourself on a sudden burst of steam.
☐ Use only the accessories supplied or accessories expressly recommended by the manufacturer.
Do not place the device below kitchen wall units or similar cupboards. The rising steam could cause damage to them!
Warranty Terms
The following are excluded from the warranty: all defects and damage caused by improper handling or unauthorised attempts to repair. The same applies for normal wear.
15

Scope of Supply and Device Overview
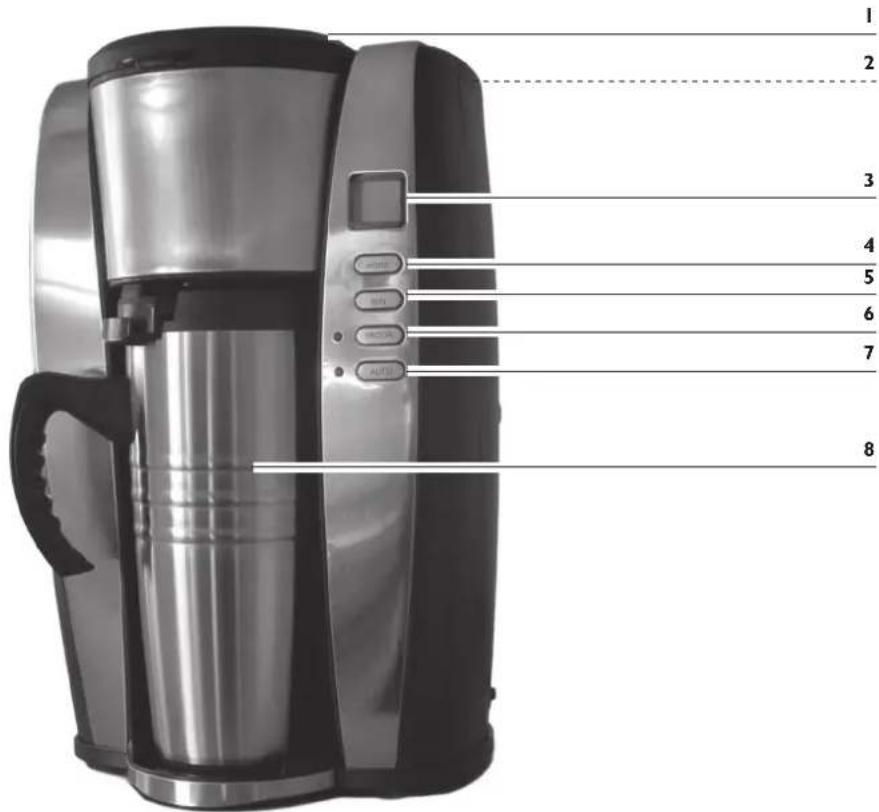
I. Filter compartment cover
2. Water reservoir
3. Display with time indicator
4. STD button for setting the hour
5. MIN button for setting the minutes
6. PROG button for activating the timer
7. Start/Stop button for switching the device on/off
8. Thermal cup
Not shown:
- Filter insert
• Permanent filter
• These operating instructions
Before Initial Use
Before you can use the device, you must:
- unpack the items supplied,
- clean the device.
Unpacking

PLEASE NOTE!
Keep children and animals away from the packaging material. There is a danger of suffocation!
Unpack all parts and check the scope of supply for completeness (see "Scope of Supply" section); also check for transport damage. If you find any damage to the components, do not use them (!), but contact our customer service department.
Cleaning

PLEASE NOTE!
☐ Do not use corrosive or abrasive cleaning agents to clean the device. These could damage the surface.
I. Clean the filter insert, the permanent filter and the thermal cup with hot water and a little detergent if necessary.
2. Then dry all parts and place them in the coffee machine.
3. We recommend that, prior to first use, you operate the device three times with just water (no coffee) to flush through all the lines etc. Before first using the device, please also note the information in the "Use" section.
Use

PLEASE NOTE!
☐ Do not overfill the water reservoir. Never pour water into the water reservoir above the MAX marking.
☐ Never operate the device without water.
☐ RISK OF SCALDING! Never open the filter compartment during the brewing procedure. Hot steam may emerge.
☐ The device has overheating protection which prevents the device from being switched on again directly after a brewing procedure for safety reasons. After a brewing procedure, you should therefore wait for a few minutes until the device has cooled down before you start another brewing procedure.
☐ The coffee machine has a non-drip valve which only works in combination with the thermal cups which are supplied with the product. Do not attempt to place other vessels beneath the coffee discharge opening.

Commissioning and making basic settings
I. Place the device on a level, firm and heat-resistant surface.
2. Connect the device to a mains socket that has been properly installed.
3. The preset time "00:00" will flash on the display.
4. Set the time using the STD (hours) and MIN (minutes) buttons.
- Then press the PROG button to confirm your entry. The display will then stop flashing.
Brewing coffee
I. Use the thermal cups which are supplied with the product to fill the device, as this will help to ensure you do not overfill the water reservoir.
2. Unscrew the lid of the thermal cup and fill the thermal cup with tap water at room temperature.
3. Open the water reservoir cover and fill the water reservoir.
natural_image
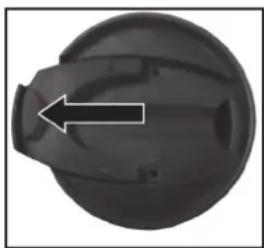
Close-up of a black spherical object with a white arrow pointing to a small protrusion (no text or symbols visible)- Screw the lid back onto the thermal cup. Open the drinking cap and place the cup beneath the coffee discharge opening. It is essential for the drinking cap to be open in order to open the non-drip valve. If the drinking cap is not open, the water cannot flow out of the filter compartment and in the worst-case scenario it will overflow!
natural_image
Close-up of a kitchen appliance with a funnel and lid, showing a hand holding a container (no visible text or symbols)-
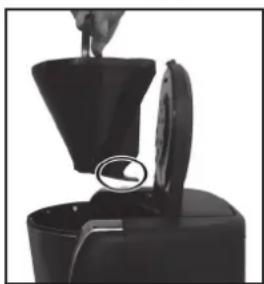
Open the filter compartment and insert the filter insert. Make sure that you place the filter insert into the filter compartment correctly. The spring for opening the non-drip valve must be pointing in the direction of the water reservoir.
-
Place the permanent filter into the filter insert and fill it with the necessary amount of coffee powder.
- Make sure that the handle of the filter insert and of the permanent filter is folded down so that the filter compartment cover can close correctly.
- Then close the water reservoir cover.
- Press the Start/Stop button twice to switch on the device and start the brewing procedure. The device is switched on when the red Start/Stop control lamp is lit up and the word "ON" appears on the display.
-
When the brewing procedure comes to an end, the Start/Stop control lamp goes out and a cup symbol on the display indicates to you that your coffee is ready to drink. If you wish to stop the brewing procedure before it ends automatically, simply press the Start/Stop button. The brewing procedure will be interrupted directly.
-
Once the brewing procedure has ended, you can remove the thermal cup from the device.
- Press the Start/Stop button once to switch the device to stand-by mode. The Start/Stop control lamp will light up for a short period of time and the time which is set will then appear on the display.
- Clean the device after each use as described in the "Care and Descaling" section.
Timer function
The coffee machine has an automatic coffee brewing function. You can select a starting time at which the coffee machine automatically starts the brewing procedure. To do so, take the following steps.
I. Fill the coffee machine in the manner described in the "Brewing coffee" sections.
2. Now set the automatic starting time by pressing the PROG button until the time display fl ashes.
3. Set the automatic starting time using the STD (hour) and MIN (minute) buttons.
4. Then press the PROG button to confirm your time entry.
5. The green control lamp will light up and indicate to you that you have switched on the timer function.
6. The coffee machine now starts the brewing procedure at the set time. The green PROG control lamp will go out and the red Start/Stop control lamp will light up and indicate to you that the brewing procedure is beginning.
7. You can also start the brewing procedure at any time before the set starting time. To do this, simply press the Start/Stop button once. The red Start/Stop control lamp will light up and indicate to you that the brewing procedure has been started.
8. Once the brewing procedure has ended, you can remove the thermal cup from the device.
9. Press the Start/Stop button once to switch the device to stand-by mode. The Start/Stop control lamp will light up for a short period of time and the time which is set will then appear on the display.
10. Clean the device after each use as described in the "Care and Descaling" section.
Care and Descaling

PLEASE NOTE!
☐ Never immerse the device, the cable or the plug in water or other liquids.
☐ Danger of scalding! First allow the device to cool down sufficiently before cleaning it.
☐ Do not use corrosive or abrasive cleaning agents to clean the device. These could damage the surface.
I. Empty the filter after every use. Dispose of the old coffee grounds in the household rubbish bin.
2. Clean the filter insert, the permanent filter and the thermal cup with hot water and a little mild detergent if necessary. Let all parts dry well before storing them away.
- Clean the device with a damp cloth and then wipe it with a dry one.
Descaling
If the water only runs very slowly through the device or the device is louder than usual during the brewing procedure, you should descale it.
I. Pour the mixture of water and descaling agent into the water reservoir and switch on the device. Pay attention to the directions for use of the descaling agent in regard to the ratio of water to descaling agent.
2. Let the mixture run through the machine completely. Repeat this procedure if the water still runs through slowly.
3. After descaling, let water (without coffee) run through the device at least three times to flush the lines etc.
Troubleshooting
If the device should stop working properly, first check whether you are able to correct the problem yourself. Otherwise, contact our Customer Service department. Do not try to repair a faulty device yourself!
| Problem Possible cause/solution | |
| The device does not work. | Is the plug inserted in the mains socket correctly?Is the mains socket defective? Try another mains socket.Check the fuse of your mains connection.Is the fi lter insert correctly inserted?Is the thermal cup placed correctly beneath the coffee discharge opening?Is water in the water reservoir? |
| The device overfl ows or brews only very slowly. | Did you use too much coffee powder?Is the coffee powder ground too fi nely? A medium grain size brings optimum results.Is the device scale-encrusted? Clean it thoroughly.Is the thermal cup placed correctly beneath the coffee discharge opening?Is the drinking cap of the thermal cup open? |
| The red Start/Stop control lamp lights up, but the brewing procedure does not start. | Pull the plug out of the socket to reset the device settings to the default factory setting. Wait a few minutes and then plug the device back into the socket.Start the brewing procedure again. |
Technical data
M o d e l :
Device: "Coffee Maxx 2 Go Thermo Star Duo"
Voltage supply: 230 V \~ 50 Hz
Output: 650 W
Protection class: I


Y C M - 2
Disposal

The packaging can be recycled. Please dispose of it in an environmentally friendly manner and take it to a recycling centre.
Dispose of the device in an environmentally friendly manner. Dispose of it at a recycling centre for used electrical and electronic devices. You can obtain more information from your local authorities.
Ordering Replacement Parts
You have the option of ordering additional thermal cups at www.service-shopping.de.


Customer service
If you have any questions about this device, please contact our customer service department:
DS Produkte GmbH, 19258 GALLIN, GERMANY
Tel. 0180-5003530 *)
E-mail: service@dspro.de
*) Calls subject to a charge
We reserve the right to modify the product, packaging or enclosed documentation at any time in conjunction with our policy of continuous development.
Importer:
DS Produkte GmbH, Am Heisterbusch I, 19258 GALLIN, GERMANY
All rights reserved.
21

FR
Sommaire
natural_image
Top-down view of a black spherical object with a white arrow pointing to a small protrusion (no text or symbols)natural_image
Close-up of a hand pouring liquid into a black container with a lid, showing a magnified view of the lid (no text or symbols visible)natural_image
Close-up of a black circular mechanical component with a white arrow pointing to a small feature (no text or symbols visible)natural_image
Close-up of a kitchen appliance with a funnel and lid, showing a hand holding a tool (no text or symbols visible)natural_image
Pure geometric lines with no text, numbers, or symbols
natural_image
Two identical black crosshair icons on white background, no text or symbols present| 44 | |
| 2018 | 3,567 |
| 2019 | 3,605 |
| 2020 | 3,615 |
| 2021 | 3,625 |
| Thereafter | $3,635 |