
SDT 1.7 A3 - Telephone SILVERCREST - Free user manual and instructions
Find the device manual for free SDT 1.7 A3 SILVERCREST in PDF.
| Product type | DECT phone with digital answering machine |
| Brand | SilverCrest |
| Model | SDT 1.7 A3 |
| Standards | DECT / GAP |
| Base power supply | Power adapter Tenpao S003GV0500060, input 100-240 V~, output 5 V / 600 mA |
| Handset batteries | 2 rechargeable AAA NiMH 1.2 V / 600 mAh batteries |
| Standby time | Approximately 100 hours |
| Talk time | Approximately 10 hours |
| Charging time | Approximately 16 hours |
| Answering machine recording time | 3 minutes maximum per message |
| Phonebook capacity | 100 entries |
| Call list capacity | 30 entries |
| Maximum number of handsets | 4 |
| Main functions | Answering machine, SMS, phonebook, call list, handsfree, mute, intercom, conference, alarm, appointment, timer, keypad lock, handset locator, remote listening |
| Base dimensions (W x H x D) | 136 x 70 x 77 mm |
| Handset dimensions (W x H x D) | 51 x 155 x 29 mm |
| Base weight | Approximately 190 g (with power adapter) |
| Handset weight | Approximately 117 g (with rechargeable batteries) |
| Operating temperature range | +5 °C to +40 °C |
| Maximum relative humidity | 85% (without condensation) |
| Dialing mode | Tone (DTMF) / Pulse |
| Security | System PIN code (4 digits), answering machine security code (3 digits) |
| Warranty | 3 years |
| Maintenance | Clean with a dry cloth; do not use aggressive liquids |
Frequently Asked Questions - SDT 1.7 A3 SILVERCREST
User questions about SDT 1.7 A3 SILVERCREST
0 question about this device. Answer the ones you know or ask your own.
Ask a new question about this device
Download the instructions for your Telephone in PDF format for free! Find your manual SDT 1.7 A3 - SILVERCREST and take your electronic device back in hand. On this page are published all the documents necessary for the use of your device. SDT 1.7 A3 by SILVERCREST.
USER MANUAL SDT 1.7 A3 SILVERCREST
Loansfesg as 62404 SOBT
DEUTSCHLAND / GERMANY
Operating instructions and safety instructions
(4) (3)
Comfort telefoon
natural_image
Electrical components including a power plug, battery pack, and cable with labeled parts (C, D, E, F) and an open book illustration below.(Abbildung ähnlich)
Aufladen der Akkus

natural_image
Symbol of a trash bin crossed with no text or numbers, representing waste sorting or disposal (no text present)Technical specifications....56
Safety instructions....56
Copyright 59
Overview....60
Handset....60
Menu and phonebook button functions....61
Display icons....62
Base....63
Bottom view of base....64
Before you start 65
Connecting the Base 65
Inserting the Batteries into the Handset....66
Charging the Batteries 66
Getting started 67
Switching the Handset On and Off....67
Setting the language 67
Setting the handset language....67
Setting the answering machine language....67
Setting the date and time....68
Setting the time format 68
Menu....69
Menu overview....69
Ans Machine (Answering Machine) 70
Play Message 70
Delete Msgs (Delete messages) 70
Ans On/Off (Answering machine on/off)....70
Record Memo....71
Outgoing Msg (Outgoing Message)....71
Ans Settings (Answering Machine Settings) 71
SMS....73
Write Message....73
Inbox....74
Outbox....75
Drafts....76
Templates....76
SMS Settings 77
Phonebook....77
New Entry....78
Edit Entry 78
Show Details....78
Copy Entry....78
Copy Append....79
Copy All....79
Delete Entry 80
Delete All 80
Mem Status....80
Call Lists 80
Outgoing Calls 80
Accepted Calls 80
Missed Calls 80
Handset....80
Ring Tone 81
Ringer Volume 81
Handset Name 81
Keypad Beep 81
Contrast....82
Auto Talk 82
Backlight Time....82
Confirm Beep....82
Select Base 82
Language 82
Registration 83
Hs Default 83
Base Settings 84
Ring Tone 84
Ringer Volume 84
Dial Mode 85
Recall....85
First Ring....85
System PIN 85
BS Default 86
Time 86
Set Alarm 86
Date and Time 87
Set Time Format 87
Tools 87
Appointment....87
Stop Watch....88
Everyday Use....89
Making calls 89
External calls....89
Calling a number from the phonebook....89
Internal calls....89
Redial 90
Answering incoming calls 90
Calls list....90
Calling a phone number from the calls list 91
Hands-free function 91
Muting the microphone....91
Call forwarding 92
Intercom and conference calls....92
Locking the keypad 92
Switching the ringtone off 93
Search function....93
Answering machine....94
Remote listening to the messages / Remotely configuring your answering machine 95
Troubleshooting 96
Cleaning / Maintenance 96
Environmental regulations and disposal information 97
Conformity notes....97
Warranty and servicing advice 98
Congratulations!
By purchasing the SilverCrest SDT 1.7 A3 DECT telephone with answer machine, hereinafter referred to as the telephone, you have opted for a quality product.
Before first using it, familiarise yourself with the way the telephone works and read these operating instructions through carefully. Be careful to follow the safety instructions and only use the telephone as described in the operating instructions and for the applications given.
Keep these operating instructions in a safe place. If you pass the telephone on to someone else, make sure to give them all the relevant documents with it.
Intended use
This is a communications technology device. You can connect the SilverCrest SDT 1.7 A3 DECT telephone to the analogue telephone network. In order to use the device, it has to be installed properly first. The DECT telephone has been designed for wireless telephone conversations, sending and receiving text messages and answering calls automatically. The device may only be used for private use, not industrial or commercial use. Furthermore, the telephone, the base and the power adapter may not be used in tropical climates. Do not use the base or the power adapter outdoors. This device fulfils all standards and directives listed in the Declaration of Conformity. In the case of unauthorised modifications to the device, compliance with these standards shall no longer be guaranteed. The manufacturer shall not be liable for any damage or malfunctions resulting from such modifications. Only use accessories recommended by the manufacturer. Any use other than that mentioned above does not correspond to the intended use.
Observe the regulations and laws in the country of use.
Package contents
Please unpack all parts and check if the package contents are complete. Remove all package material. If you find anything missing or damaged, please contact the Customer Service.
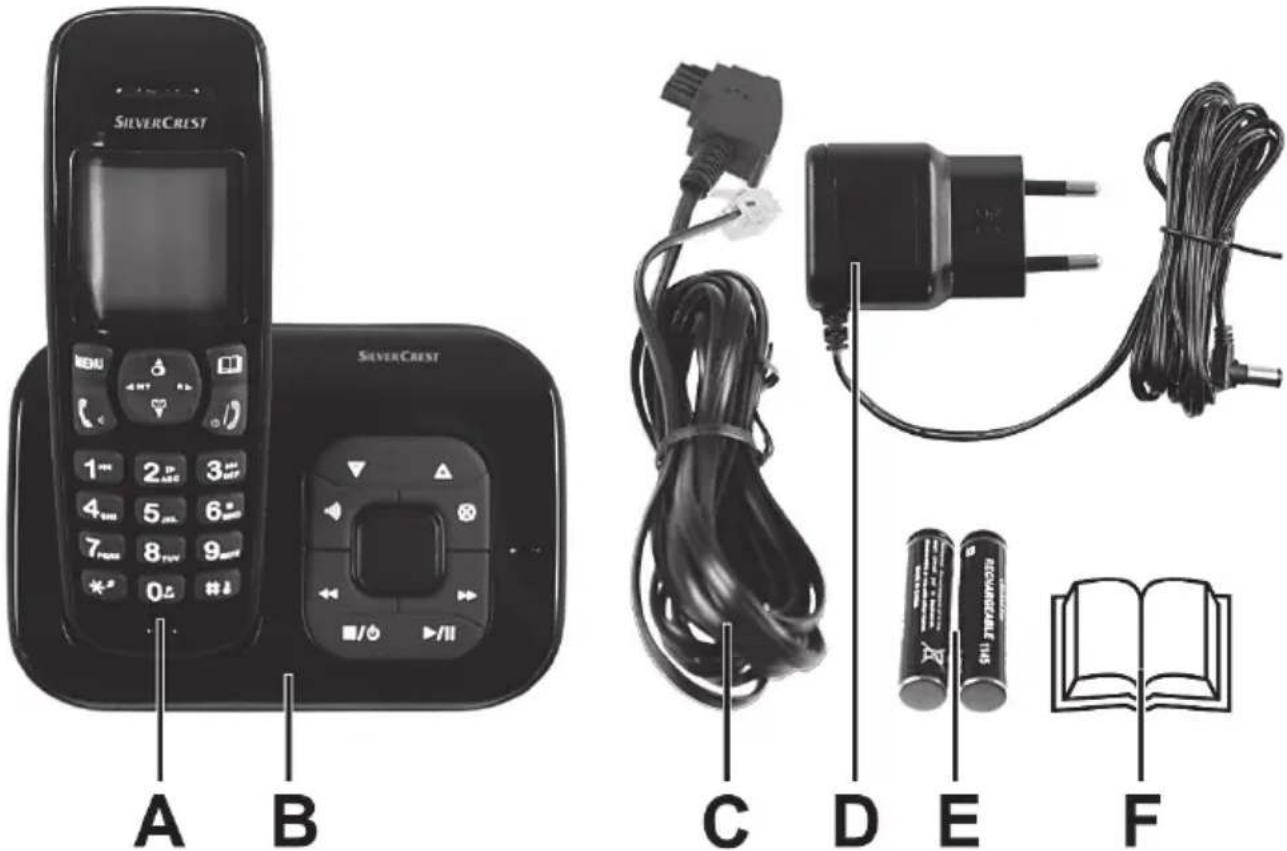
A Handset
B Base
C Telephone cord (illustration may differ according to country)
D Power adapter (illustration may differ according to country)
Manufacturer: Tenpao
Model number: S003GV0500060
E 2 x AAA batteries (similar to illustration)
F These operating instructions (linear illustration)
Technical specifications
| Telephony standards DECT / | GAP |
| Power supply | Manufacturer: TenpaoModel number: S003GV0500060Input: 100 - 240 VAC, 50/60Hz, 150mAOutput: 5V = 600mAPower consumption: Standby < 0.5WOperation max. 2W |
| Handset, rechargeable batteries 2 rechargeable AAA / HR03 / Micro batteries (NiMH), 1.2V / 600mAh | |
| Handset, standby approx. 100 hours in standby mode | |
| Handset, talk time approx. 10 hours | |
| Handset, charging time approx. 16 hours | |
| Answering machine recording time max. 3 minutes per message | |
| Dial modes | Tone dialPulse dial |
| Operating temperature range +5 °C to +40 °C | |
| Storage temperature range 0 °C to +60 °C | |
| Relative humidity max. 85 % (non-condensing) | |
| Dimensions (width x height x depth) | |
| Base | 136 mm x 70 mm x 77 mm |
| Handset | 51 mm x 155 mm x 29 mm |
| Weight | |
| Base | approx. 190 g incl. power adapter |
| Handset | approx. 117 g incl. rechargeable batteries |
The technical data and design may be changed without prior notice.
Safety instructions
Before you use this device for the first time, please read the following notes and heed all warnings, even if you are familiar with handling electronic devices. Keep this manual in a safe place for future reference. If you sell the device or pass it on, it is essential that you also hand over this manual, as it is part of the product.
Explanation of danger-alerting symbols used in this manual

DANGER! This symbol and the word "Danger" alert you to a potentially dangerous situation. Ignoring it can lead to severe injury or even death.

WARNING! This symbol and the word "Warning" denote important information required for the safe operation of the product and for the safety of its users.

This symbol denotes harmful electric voltage.

When encountering this symbol on the device, the user must note the following: Please only use the supplied power adapter (manufacturer: Tenpao / model number: S003GV0500060) for the base.

This symbol denotes further information on the topic.

WARNING! Always make sure that
• the device is not exposed to direct heat sources (e.g. radiators);
• no direct sunlight or bright artificial light reaches the device;
- contact with water spray and drops and aggressive fluids is avoided and the device is never operated near water;
- the device is never submerged (do not place any items containing liquids, such as drinks, vases, etc. on or near the device);
• the device is never placed near magnetic fields (e.g. speakers);
- no naked flames (e.g. burning candles) are placed on or near the device;
- no foreign bodies can penetrate into the device
- the device is not subjected to any major temperature fluctuations as this can cause condensation and short-circuiting. If the device has been exposed to strong temperature fluctuations, wait for it to reach the ambient temperature before switching it on (about 2 hours).
- the device should not be subjected to excessive shocks and vibrations;
Failure to heed the warnings above may result in damage to the device or injury.

DANGER! Children and persons with disabilities
Electrical devices are not suitable for children. Children may not understand that they can be dangerous. Also persons with reduced physical, sensory or mental capabilities should only use electrical devices in appropriate circumstances. Never allow children to use electrical devices unsupervised. unless they are instructed accordingly and supervised by a competent person responsible for their safety. Children should always be supervised to ensure that they do not play with the product. Small parts can represent choking hazards. Keep the packaging away from children and persons with disabilities.

DANGER! Danger of suffocation!

DANGER! Power adapter

Please only use the supplied power adapter (manufacturer: Tenpao / model number: S003GV0500060) for the base. Never connect the power adapter to other devices. Only plug the power adapter into a suitable and easily accessible power socket. Do not touch the power adapter with wet hands as this could cause an electric shock. If the power adapter has to be replaced, it must be replaced only by a power adapter of the same type and manufacturer. Never open the housing of the base or the power adapter. Opening the housing can expose you to a lethal electric shock. Unplug the power adapter from the mains under the following circumstances:
• in any dangerous situation
- if the power adapter makes an unusual noise or gives off smoke
• before a storm and/or thunderstorm
- when the power adapter or the power cord have been damaged
- if the power adapter has been exposed to rain, liquids or high levels of humidity
- when you wish to clean it
- The power adapter consumes electricity even in Standby mode. In order to completely disconnect the device from the mains, the power adapter must be pulled out from the power socket.
Please follow these instructions to avoid risk of potential fatal injury or fire! Never cover the power adapter, otherwise there is a risk of fire.

WARNING! Cables
Unplug all cables by holding the plugs and never pull on the cables themselves. Never place pieces of furniture or other heavy objects on the cables and take care that they do not become damaged, especially at the plugs and sockets. Never tie knots in a cable and do not tie them to other cables. All cables must be laid so that nobody can trip over them or be obstructed by them.

DANGER! Rechargeable Batteries
Insert the rechargeable batteries with the correct polarity. Never throw any rechargeable batteries into fire. Remove the rechargeable batteries if the device is not going to be used for a long time. Improper use could cause explosions or leaks. Rechargeable batteries are not toys! If a rechargeable battery is swallowed, seek medical help immediately.
Batteries must never be opened or deformed. Otherwise any leaking battery fluids may cause injuries. If the battery fluid comes into contact with the skin or eyes, rinse immediately with plenty of water and seek medical aid.
Never use conventional (non-rechargeable) batteries instead of the rechargeable batteries. Only use rechargeable batteries of the same type. Always use two rechargeable batteries of the same type and capacity. You will find this information in the "Technical specifications" chapter.
Rechargeable batteries must be disposed of at specific collection points. For more information about rechargeable battery disposal, please see the "Environmental regulations and disposal information" chapter.
Operating environment
The device is not designed for use in environments with high humidity (e.g. bathrooms) or excessive levels of dust. Operating temperature and operating humidity: +5°C to +40 °C, max. 85 % relative humidity.
Storage when not in use
When left unused for a long period of time, remove the rechargeable batteries from the handset. Unplug the power adapter from the mains and disconnect it from the base. Also make sure that the storage temperature is maintained between 0 °C and +60 °C Humidity must not exceed 85% rel. humidity.
Copyright
All the contents of this user manual are protected by copyright and provided to the reader for information only. Copying data and information without the prior explicit written consent of the author is strictly forbidden. This also applies to any commercial use of the contents and information. All texts and diagrams are up-to-date as of the date of printing.
Overview
An additional illustration of the items and controls and their corresponding numbers can be found on the inner page of the fold-out cover of this user manual. You can keep this page folded out whilst reading the different chapters of this user manual. This allows you to refer to the relevant controls at any time.
Handset
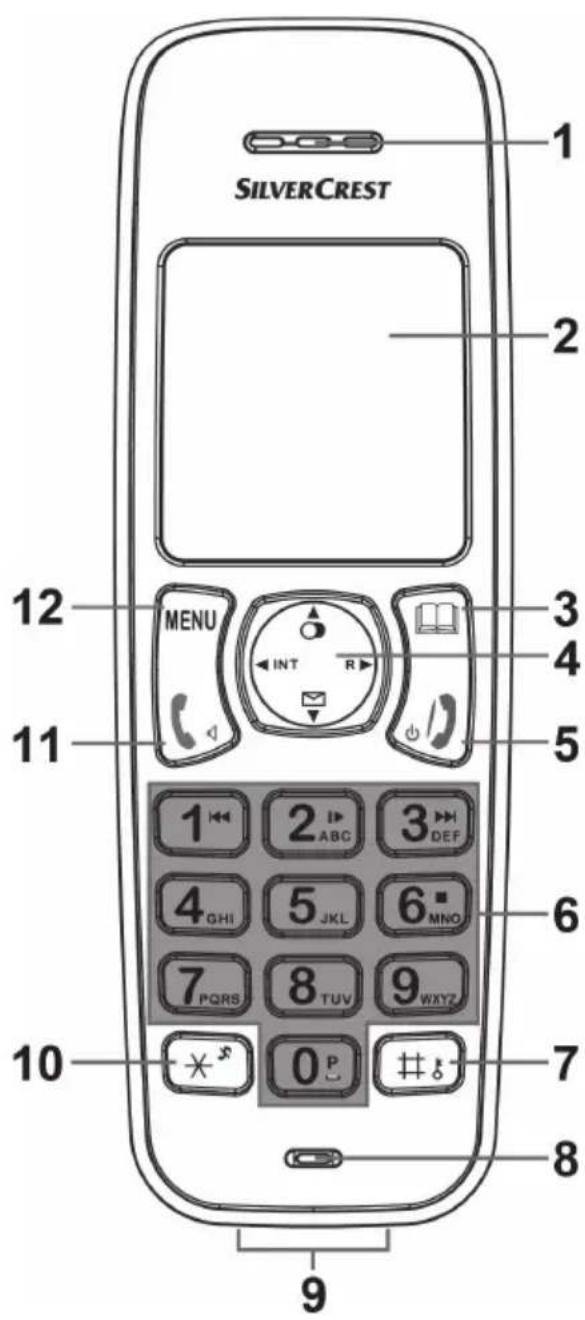
- Slots for speaker output
- Display
- Phonebook button
- Directional control (▲▼◀▶)

Redial

Recall/Flash (R) button

Call Lists

Internal call
- End call (On/Off button)
- Numeric buttons
- Hash button (Button lock)
- Microphone
- Charging contacts
- Asterisk button (ringtones on or off / toggles between upper and lower case)
- Dial button (hands-free)
- Menu button
Menu and phonebook button functions
The Menu button [12] and the Phonebook button [3] on the handset may have different functions depending on the operation mode. The currently assigned function will be indicated by a small display [2] icon just above the buttons.
Possible functions:
 | OK / Confirm | |
 | Delete | |
 | Mute (Mute the sound) | |
 | Back | |
 | Cancel | |
 | Play message | |
 | Next message | |
 | Accept the call | |
 | Microphone mute off | |
 | Opens another options menu | |
 | Save entry | |
 | Mute ringtone |
In standby mode the buttons have the following functions assigned:
Menu button [12] Phonebook button [3]
| Menu |

Phonebook
Display icons
The following icons may appear on the top display line:
 | Phonebook opened |
| General | Battery level:  Batteries empty Batteries empty |
| General | Handset ringtone off |
| General | Hands-free enabled |
| General | Keypad locked |
| General | Incoming call answered |
| General | Microphone off (muted) |
 | Answering machine on |
| General | New text message (SMS) |
| General | Calls list:- entry in calls list (steady indication)- new entry in calls list (flashing) |
| General | Antenna icon:- within RF range (steady indication)- out of range (flashing) |
| General | Internal call, paging |
Base
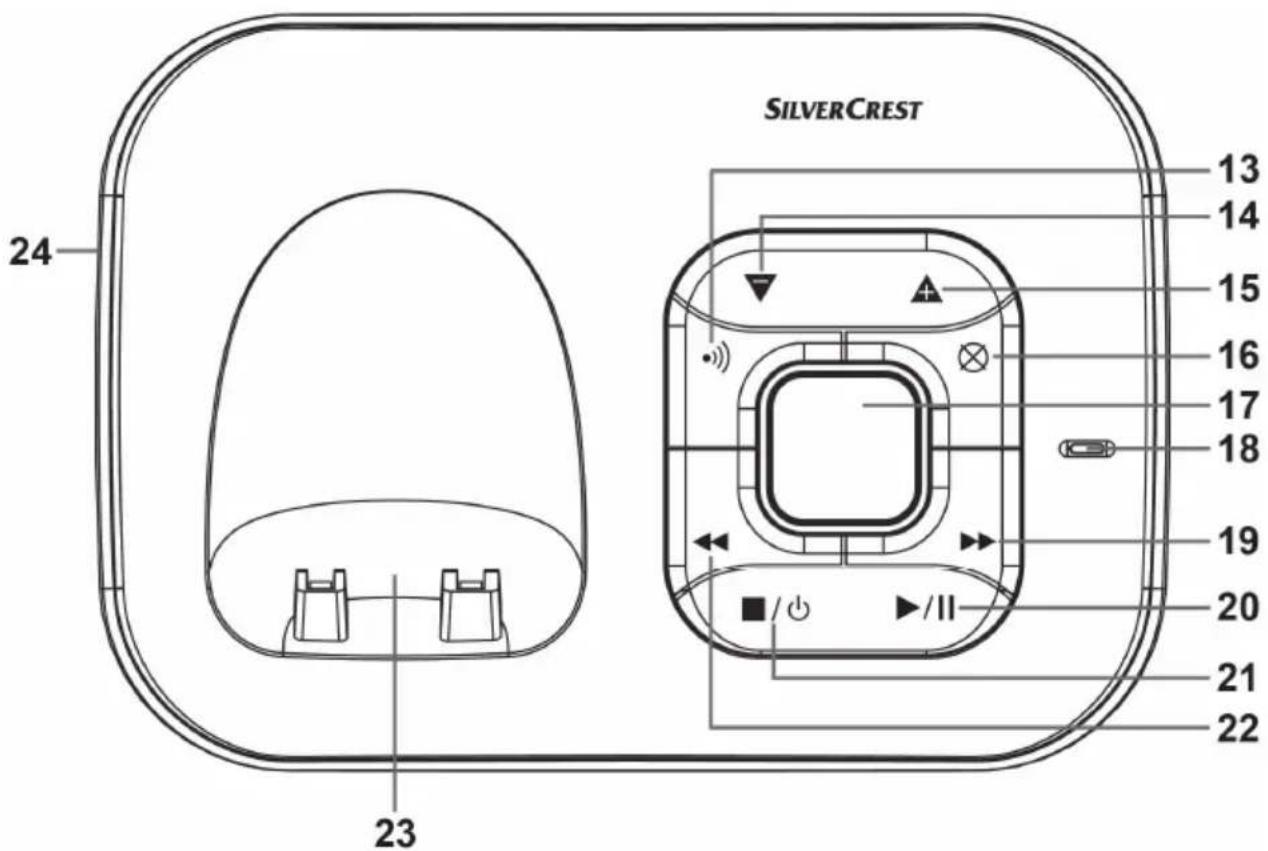
13 Paging (search the handset)
14 Reduce audio volume (press briefly: reduce audio volume / keep pressed: set answer delay of answering machine, use buttons 19 and 22 to select, use button 14 to confirm)
15 Increase audio volume (press briefly: increase audio volume / keep pressed: set security code of answering machine, use buttons 19 and 22 to select, use button 15 to confirm)
16 Delete messages
17 Display
18 Microphone
19 Next (press briefly: skip to next message / keep pressed: record a message)
20 Playback/Pause
21 Answering machine on/off or Stop
22 Back (press briefly: goto previous message or play the current outgoing message / keep pressed: record an outgoing message)
23 Charger cradle with charging contacts
24 Speaker (back panel)
Bottom view of base
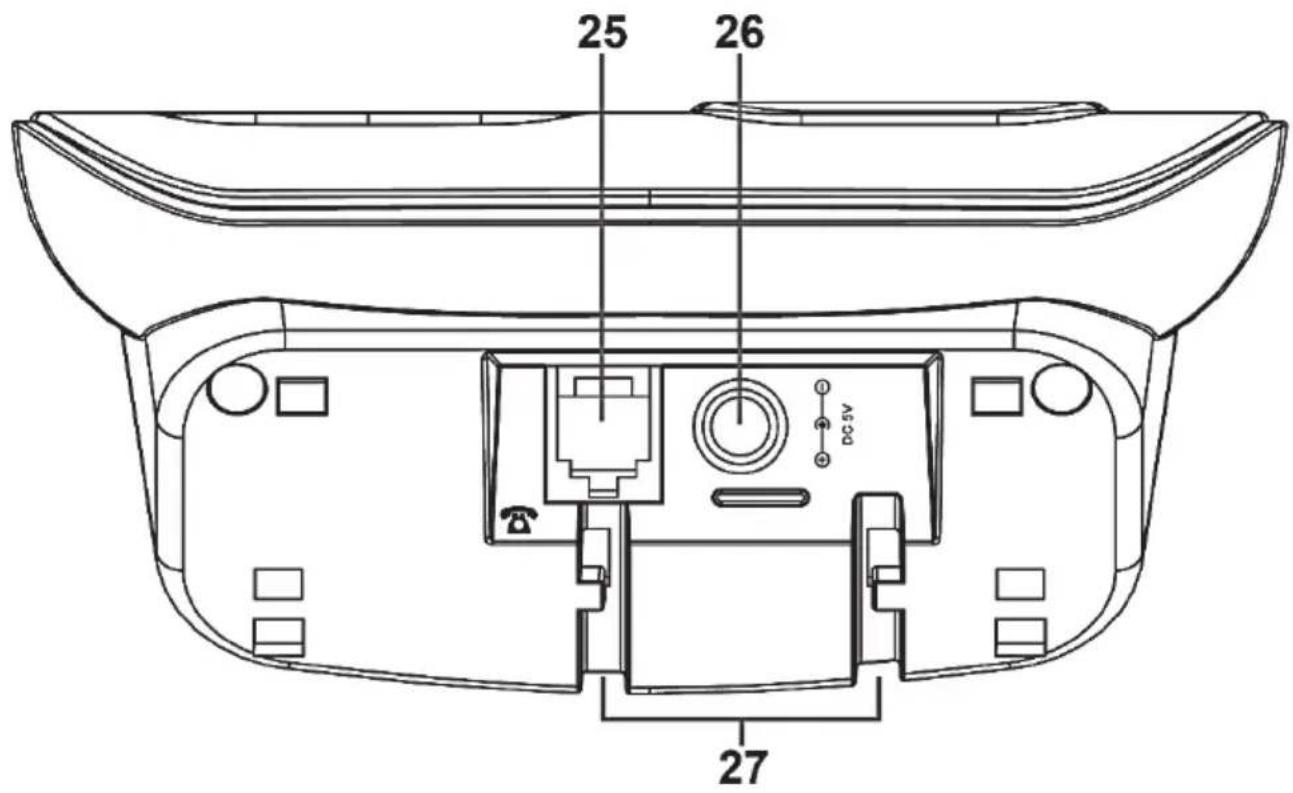
25 Telephone connection socket
26 Power adapter socket
27 Cable guides
Before you start
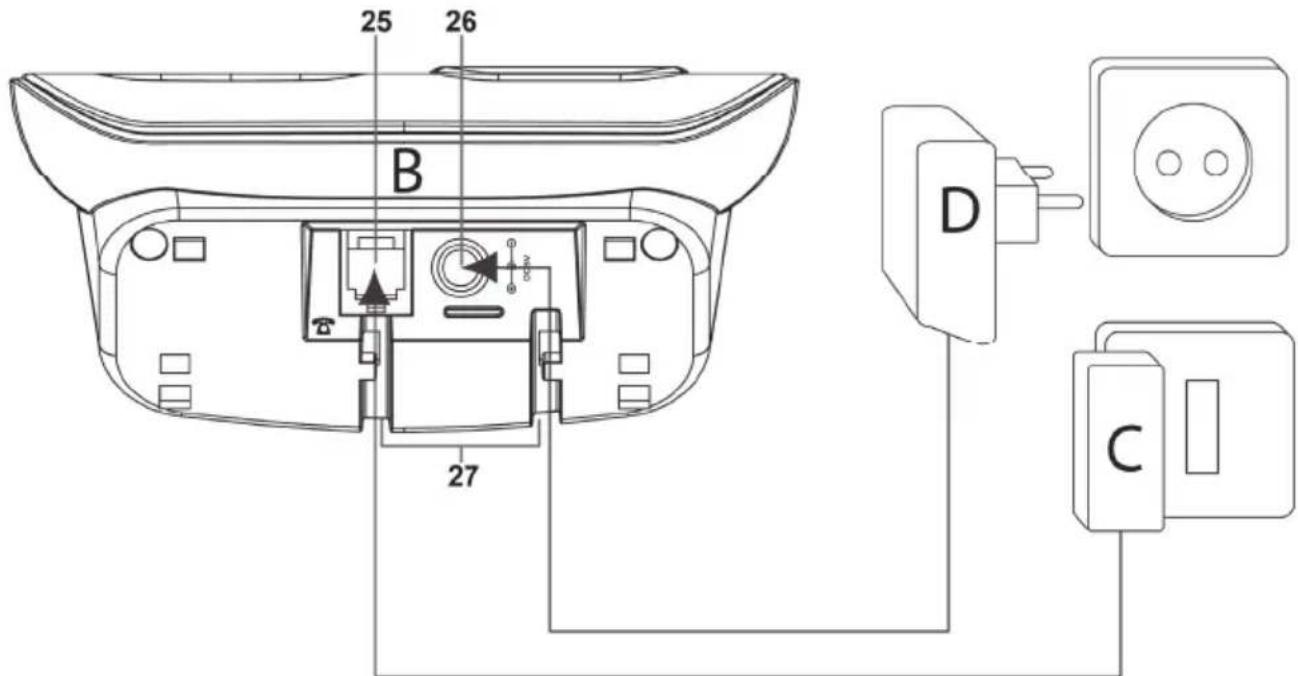
Connecting the Base

An illustration of the components mentioned below can be found in the Package Contents section on page 55.
- Using the supplied telephone cord [C], connect the telephone connection socket [25] on the bottom of the base [B] to the telephone wall jack.
- Connect the power adapter plug [D] to the power adapter socket [26] on the bottom of the base [B]. Plug the power adapter [D] into an easily accessible wall outlet.
Please only use the supplied power adapter (manufacturer: Tenpao / model number: S003GV0500060) for the base.
- Secure the cables in the corresponding cable guides [27].

If possible, do not place the base in living rooms or bedrooms. Choose a place where you are usually not present all the time (e.g. on the corridor). The low-power ECO mode will already avoid unnecessary exposure to radiation.
Inserting the Batteries into the Handset
Open the battery compartment by gently pressing the ribbed area of the battery compartment cover and then sliding it downwards. Next remove the battery compartment cover. Insert the rechargeable batteries into the handset [A] as illustrated below. Take care to insert the batteries into the handset [A] observing the correct polarity (+ and -). The correct polarity is labelled on the batteries and inside the battery compartment. Replace the cover to close the battery compartment.
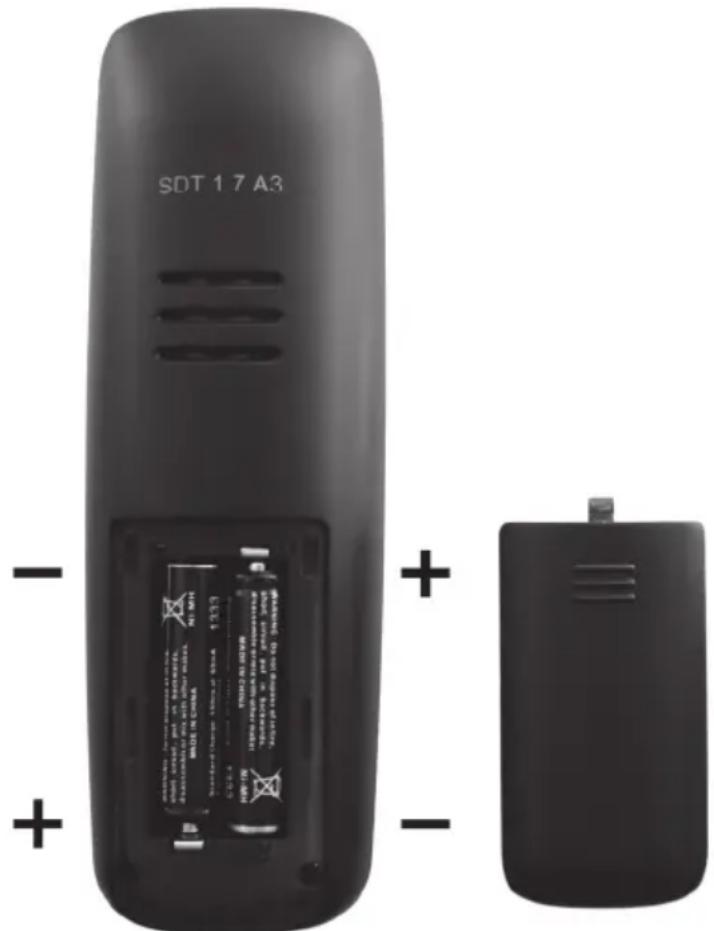
(The figure is representational)
Charging the Batteries

DANGER! Never place the handset on the base without inserting the battery compartment cover!
Once the batteries have been inserted in the handset [A], they must be charged using the base [B] for at least 16 hours before using the handset for the first time. To do so, place the handset [A] with the display [2] facing forward onto the base [B]. A confirmation beep will sound.

On delivery, the batteries are not charged.
Getting started
Switching the Handset On and Off
As soon as a handset is placed onto the base it powers on automatically. You can also use the End call button [5] to power your handset on or off. To do so, press and hold the End call button [5] for longer than five seconds.
Setting the language
You can set the language for the handset and for the answering machine independently.
Setting the handset language
Proceed as follows to set the handset language:
• While the handset is in standby mode, press the Menu button [12] to show the menu.
- Press the ▲ or ▼ buttons on the directional control [4] to select the "Handset" menu.
- Press the Phonebook button [3] to confirm your selection.
- Press the ▲ or ▼ buttons on the directional control [4] to select the "Language" item.
- Press the Phonebook button [3] to confirm your selection.
- Press the ▲ or ▼ directional control buttons [4] to select the desired language (e.g. "English") from the list.
- Press the Phonebook button [3] to confirm your selection.
- A confirmation beep can be heard.
Setting the answering machine language
Proceed as follows to set the answering machine language:
• While the handset is in standby mode, press the Menu button [12] to show the menu.
- Press the ▲ or ▼ buttons on the directional control [4] to select the "Ans Machine" menu.
- Press the Phonebook button [3] to confirm your selection.
- Press the ▲ or ▼ buttons on the directional control [4] to select the "Ans Settings" item.
- Press the Phonebook button [3] to confirm your selection.
- Press the ▲ or ▼ buttons on the directional control [4] to select the "Language" item.
- Press the Phonebook button [3] to confirm your selection.
- Press the ▲ or ▼ directional control buttons [4] to select the desired language (e.g. "English") from the list.
- Press the Phonebook button [3] to confirm your selection.
• A confirmation beep can be heard.
Setting the date and time
When powering the device on for the first time, please set the date and time prior to using it. Proceed as follows:
• While the handset is in standby mode, press the Menu button [12] to show the menu.
- Press the ▲ or ▼ buttons on the directional control [4] to select the "Time" item.
- Press the Phonebook button [3] to confirm your selection.
- Press the ▲ or ▼ buttons on the directional control [4] to select the "Date and Time" item.
- Press the Phonebook button [3] to confirm your selection.
- Next you can set the day, the month and the year in sequence. Enter the desired value via the numeric buttons [6]. Select "Save" or press the Phonebook button [3] to confirm your input. You can now enter the hours and the minutes. Select "Save" or press the Phonebook button [3] to confirm your input. The time has to be entered in 24-hour format. If you enter a wrong value, a warning beep will sound.
• A beep will sound after the entire input has been completed.
Setting the time format
Upon factory delivery the time format is set to "24 HOUR". You can customise the clock time format as follows:
• While the handset is in standby mode, press the Menu button [12] to show the menu.
- Press the ▲ or ▼ buttons on the directional control [4] to select the "Time" item.
- Press the Phonebook button [3] to confirm your selection.
- Press the ▲ or ▼ buttons on the directional control [4] to select the "Set Time Format" item.
- Press the Phonebook button [3] to confirm your selection.
- Press the ▲ or ▼ buttons on the directional control [4] to select the "24Hour" option for 24-hours clock display or select "12Hour" for 12-hours clock display.
- Press the Phonebook button [3] to confirm your selection.
• A confirmation beep can be heard.

To distinguish ante meridian (morning) and post meridian (afternoon) time for the 12-hour display, "am" will display for ante meridian and "pm" for post meridian clock hours.
Menu
The handset features an easy-to-use menu. While the handset is in standby mode, press the Menu button [12] to show the menu.
Press the ▲ or ▼ buttons on the directional control [4] to navigate the menu. Press the Phonebook button [3] to confirm your selection.
Press the Menu button [12] to go back step by step. Press the End call button [5] to directly exit the menu without saving.
If no input is made during approx. 20 seconds, the menu is closed automatically.
Menu overview
| Ans Machine Play MsgsDelete MsgsAns On/OffRecord MemoOutgoing MsgAns Settings | MSG | |
| SMS | WriteInboxOutboxDraftsTemplatesSMS Settings | |
| Phonebook | New Entry*Edit Entry*Show Details*Copy Entry*Copy Append*Copy All*Delete Entry*Delete All*Mem Status* | |
| Call Lists Outgoing CallsAccepted CallsMissed Calls | ||
| Handset | Ring ToneRinger VolumeHandset NameKeypad Beep | |
| ContrastAuto TalkBacklight TimeConfirm BeepSelect BaseLanguageRegistrationHs Default | |
| Base Settings De-register | Ring ToneRinger VolumeDial ModeRecallFirst RingSystem PINBS Default |
| Time | SetDate and TimeSet Time Format |
| Tools | AppointmentStop Watch |
* These menu items will only be available if the "Option" item has been confirmed by using the Phonebook button [3] and at least one entry has been saved in the phonebook. If no entry was saved previously, only the "New Entry" and "Mem Status" items are available.
Ans Machine (Answering Machine)
This menu allows you to adjust the answering machine settings. Proceed as follows to open this menu:
- While the handset is in standby mode, press the Menu button [12] to show the menu.
- Press the ▲ or ▼ buttons on the directional control [4] to select the "Ans Machine" menu.
- Press the Phonebook button [3] to confirm your selection.
- Press ▲ or ▼ on the directional control [4] to select the desired menu item and then press the Phonebook button [3] to confirm.
Play Message
This allows you to play messages. The following options are available:
- Play New Msgs (Play New Messages)
Plays any new messages only. If no new messages exist, a corresponding voice message will sound and "00 New Msgs" will appear on the display.
• Play All Msgs (Play All Messages)
Plays all messages stored on the answering machine.
While listening to the messages, the Menu and Phonebook buttons have the following functions:
Menu button [12]: delete
Phonebook button [3]: skip to next message.
Delete Msgs (Delete messages)
This menu item allows you to delete all old messages. Press the Phonebook button [3] to delete the old messages.
Ans On/Off (Answering machine on/off)
Here you can enable or disable the answering machine.
Press the ▲ or ▼ directional control buttons [4] to select the desired option. Press the Phonebook button [3] to confirm the selected option. A confirmation beep can be heard.

You can also enable or disable the answering machine directly on the base. To do so, briefly press the "Answering machine on/off" button [21].

If you keep the "Answering machine on/off" button [21] pressed you can choose whether the callers can leave a voice message or not.
Record Memo
After the confirmation tone you can record a message on the answering machine. Press the Phonebook button [3] to save the message. The memo will be saved as a message.

You can also record messages directly on the base. Press and hold the Next button [19] of the base for at least 2 seconds to start recording. Press the Stop button [21] to stop recording.
Outgoing Msg (Outgoing Message)
The answering machine already contains two registered outgoing messages (welcome messages for "Answer and record" and for "Answer only"). Alternatively, you may record a custom message.
To record a custom outgoing (welcome) message, select the "Record" menu item, select "Play" to listen to the recorded message, or select "Default" to restore the default outgoing message.
In all cases you can select one of the following outgoing messages:
- Answer&Record
After this outgoing message, the caller can leave a message for you.
- Answer Only
After this outgoing message, the caller is not able to leave a message. In addition, the calls are logged in the calls list.

If you record a message, it will be played once automatically.

You set the outgoing message to be played in the "Ans Settings" under the "Answer Mode" item.
Ans Settings (Answering Machine Settings)
Here you can configure your answering machine.
Answer Mode
This lets you select the answering machine operating mode.
- Answer&Record
With this setting, the caller can leave a message for you after this outgoing message.
- Answer Only
With this setting, the caller can't leave any message after having listened to the outgoing message.
Press the ▲ or ▼ directional control buttons [4] to select the desired mode. To save the selected setting, press the Phonebook button [3].
Answer Delay
Here you can set how many times the telephone should ring before the answering machine picks-up the call. You can set between 2 and 9 rings or use the "Toll Saver" setting.
In toll saver mode the answering machine will answer after 5 rings if no new messages had been recorded. If new messages exist, it will answer after the second ring.
This setting is useful if you want to listen to the answering machine messages when you are absent. If it takes more than 2 rings, there are no new messages and you can dial off before the answering machine answers the call.
Language
This lets you select the answering machine language. Press the ▲ or ▼ directional control buttons [4] to select the desired language. To save the selected setting, press the Phonebook button [3].
If you use one of the pre-recorded outgoing messages, its language will also be changed accordingly.
Security Code
To edit the security code for the remote listening function, proceed as follows:
- Enter the new 3-digit code.
- Press the Phonebook button [3] to confirm your entry.

You will need this code for remote listening to the messages left on the answering machine. When resetting the answering machine, the security code of the base is reset to 000.
Tam Default (Reset Answering Machine)
This lets you restore the answering machine to its factory settings. To do so, you must enter the 4-digit PIN (default 0000). Press the Phonebook button [3] to confirm your entry.
SMS
This telephone lets you send and receive text messages (SMS). To be able to use this function, the following requirements must be met:
- Your phone line must have the Caller ID function enabled.
- Landline SMS must be supported by your telephone provider.
- Your telephone provider has enabled the sending and receiving of SMS messages for your telephone line.

For more information, check with your telephone network provider.
In order to be able to send or receive SMS messages, a few settings have to be configured for your telephone. This procedure is described in the "SMS Settings" chapter on page 77. Proceed as follows to open the "SMS" menu:
• While the handset is in standby mode, press the Menu button [12] to show the menu.
- Press the ▲ or ▼ buttons on the directional control [4] to select the "SMS" menu.
- Press the Phonebook button [3] to confirm your selection.
- Press ▲ or ▼ on the directional control [4] to select the desired menu item and then press the Phonebook button [3] to confirm.
Write Message
Input the SMS message text via the numeric buttons [6]. Press the Asterisk button [10] to toggle between upper case and lower case. You can select a different character set by keeping the Hash button [7] pressed. The currently selected input method will be indicated in the upper-right corner of the display. You can press the 0 or 1 buttons to enter special characters and press 0 for spacebar. A maximum of 160 characters is supported for text messages (SMS).
While typing a text message you can press the Phonebook button [3] to choose from the following options:
Send To
Input the phone number you want to send the message to or select the desired phonebook contact by pressing the right Phonebook button [3].
Press the Phonebook button [3] to send the message.
Save Message
The created message will be saved in Drafts. After the message has been saved, a confirmation beep will sound.
Use Template
With this function you can use a template. There are five templates that you can customise. Select a template with the directional control buttons [4] ▲ or ▼ and then press the Phonebook button [3] to confirm your selection. The template will be inserted in the current text message.
Inbox
This list contains all incoming SMS messages until you delete them manually.
For each message, the sender's phone number, name, date and time and status (new or old) will be shown.
Press the ▲ or ▼ directional control buttons [4] to navigate between this information for the individual SMS messages. Press the Phonebook button [3] to read the message.
The following options are available. You can also open them by pressing the Phonebook button [3].
Delete
The previously shown SMS will be erased after you confirm by pressing the Phonebook button [3]. Press the Menu button [12] to cancel.
Reply
To reply to the previously read SMS. After you have written your message, press the Phonebook button [3]. Now you can send your message, save it or use it as a template. To send the message, after selecting this option, input the desired phone number or select the desired phonebook contact by pressing the Phonebook button [3].
Forward
To forward the previously read SMS. After you have written your message, press the Phonebook button [3]. Now you can send your message, save it or use it as a template. To forward the message, after selecting this option, input the desired phone number or select the desired phonebook contact by pressing the Phonebook button [3].
Dial Number
As soon as you select this option, the number of the sender will be dialled.
Save Number
To save the phone number in the phonebook. Here you have to input the name, the phone number and the ringtone in sequence.
Delete All
After confirming by pressing the Phonebook button [3], all text messages will be deleted from the handset. Press the Menu button [12] to cancel.
Outbox
This list contains all outgoing and sent SMS messages until you delete them manually. Already sent SMS messages show an open envelope icon while all queued SMS messages show a closed envelope icon. An "X" appears in the list to indicate that a text message could not be send.
Press the ▲ or ▼ directional control buttons [4] to select the desired message. Press the Phonebook button [3] to confirm your selection.
The following options are available. You can also open them by pressing the Phonebook button [3].
Send To
The phone number is shown where the SMS message has been sent to. You can send the SMS to this phone number again or enter a new number to send it to. If you delete the phone number by pressing the Menu button [12] you can press the Phonebook button [3] to select a contact from the phonebook.
Press the Phonebook button [3] to send the message.
Save Message
The message will be saved in Drafts. After the message has been saved, a confirmation beep will sound.
Use Template
With this function you can use a template. Press the Phonebook button [3] to confirm your selection.
Dial Number
As soon as you select this option, the number of the sender will be dialled.
Delete
The previously shown message will be erased after you confirm by pressing the Phonebook button [3]. Press the Menu button [12] to cancel.
Delete All
After confirming by pressing the Phonebook button [3], all outgoing messages will be deleted from the handset. Press the Menu button [12] to cancel.
Drafts
Your saved drafts will be placed here.
Press the ▲ or ▼ directional control buttons [4] to select the desired draft. Press the Phonebook button [3] to confirm your selection. You can now edit your draft.
The following options are available. You can also open them by pressing the Phonebook button [3].
Send To
Input the phone number you want to send the message to or select the desired phonebook contact by pressing the right Phonebook button [3].
Press the Phonebook button [3] to send the message.
Save Message
The created message will be saved in Drafts. After the message has been saved, a confirmation beep will sound. The display also reads "Saved".
Use Template
With this function you can use a template. Press the Phonebook button [3] to confirm your selection.
Dial Number
As soon as you select this option, the number of the sender will be dialled.
Delete
The previously shown draft will be erased after you confirm by pressing the Phonebook button [3]. Press the Menu button [12] to cancel.
Delete All
After confirming by pressing the Phonebook button [3], all drafts will be deleted from the handset. Press the Menu button [12] to cancel.
Templates
You can use these templates for sending an SMS. Press the ▲ or ▼ directional control buttons [4] to select the desired template. Press the Phonebook button [3] to confirm your selection. Next you can edit or delete your template. To do so, press the Phonebook button [3] to open the options.
Edit
You can edit your message. To save the changes, press the Phonebook button [3].
Delete
The previously shown template will be erased after you confirm by pressing the Phonebook button [3]. Press the Menu button [12] to cancel.
SMS Settings

Text messages (SMS) are transferred via the SMS Service Centers of service providers. To be able to send or receive any text messages you have to register your provider's information. For more information, please contact your network or service provider. When using the telephone on a private PBX with external dial out (for example with the prefix "0"), this has to be preset to the dial number for the SMS service centre. Then you have to enter the SMS message recipient number without the dial-out prefix.
Register your provider's information under the following options:
• Service Center
Here you can add up to four (1 to 4) service centres.
- Send Service
Select the SMS service centre (1 to 4) that you want to use to send your text messages.
Phonebook
This displays the phonebook entries. Proceed as follows to open this menu:
• While the handset is in standby mode, press the Menu button [12] to show the menu.
- Press the ▲ or ▼ buttons on the directional control [4] to select the "Phonebook" menu.
- Press the Phonebook button [3] to confirm your selection.

If no new messages have been recorded on the answering machine, you can also press the Phonebook button [3] to open the phonebook directly.
To create a new entry or to edit an existing entry, press the Phonebook button [3] to open the phonebook options.
To edit an existing entry, you'll first have to select it by using the ▲ or ▼ directional control buttons [4]. Press the Phonebook button [3] to confirm your selection.

When opening the options while the phonebook is empty, the only available function is "New Entry".
New Entry
Here you have to input the name and the phone number in sequence. A maximum of 16 characters is allowed for the name and a maximum of 24 digits for the phone number.
Name
Input the name via the numeric buttons [6]. Press the Asterisk button [10] to toggle between upper case and lower case. If necessary, you can select a different character set. Press the hash button [7] longer and multiple times to toggle between the different character sets. The currently selected input method will be indicated in the upper-right corner of the display. You can press the 0 or 1 buttons to enter special characters and press 0 for spacebar. Press the Phonebook button [3] to save.
Number
Input the phone number via the numeric buttons [6]. To set a dial pause (for example after dialling "0" for external dial out), keep the "0" button pressed for a longer time. Press the Phonebook button [3] to save.
Edit Entry
Here you can edit the name, the phone number and the ringtone for an existing entry in sequence. Press the ▲ or ▼ buttons on the directional control [4] to select a different ringtone. There are 19 ringtones to choose from.
You have to confirm each input selecting "Save" or by pressing the Phonebook button [3].
Show Details
This will display the name, the phone number and the assigned ringtone for a previously selected phonebook entry.
You can dial the phone number by pressing the Phonebook button [3] or the Dial button [11].
Press the Menu button [12] to return to the phonebook.
Copy Entry
If more than one handset is registered with the base, you can copy the selected phonebook entry to a different handset of the same type.
- Select the number of the handset where you want to copy the entry to.
- Press the Phonebook button [3] to confirm your selection.
- The display will show "Copying to Handset x" (x = number of the handset).
• Receipt must be confirmed on the other handset by pressing the Phonebook button [3].
- If you do not confirm receipt or you press the Menu button [12] to reject it, the entry will not be copied.
Copy Append
If more than one handset is registered with the base, you can use this function to append the phonebook entries from one handset to the phonebook on a different handset of the same type.

No entries will be erased nor overwritten. Please note that any existing entries may appear twice after the transfer.
- Select the number of the handset where you want to copy the entry to.
- Press the Phonebook button [3] to confirm your selection.
- The display will show "Copying to Handset x" (x = number of the handset).
- Receipt must be confirmed on the other handset by pressing the Phonebook button [3].
- If you do not confirm receipt or you press the Menu button [12] to reject it, the phonebook entries will not be copied.
Copy All
If more than one handset is registered with the base, you can use this function to copy the phonebook from one handset to a different handset of the same type.

The existing phonebook will be overwritten, i.e. any existing entries will be deleted.
- Select the number of the handset where you want to copy the entry to.
- Press the Phonebook button [3] to confirm your selection.
- The display will show "Copying to Handset x" (x = number of the handset).
- On the other handset the message "Replace All Phonebook Record?" is displayed. Press the Phonebook button [3] to confirm.
- If you do not confirm the message or you press the Menu button [12] to reject it, the entries will not be copied.
Delete Entry
The previously marked phone book entry will be erased after you confirm by pressing the Phonebook button [3]. Press the Menu button [12] to cancel.
Delete All
After confirming by pressing the Phonebook button [3], all phonebook entries of the handset will be deleted. Press the Menu button [12] to cancel.
Mem Status
Shows how many of the 100 list entries are occupied.
Call Lists
You can use this menu to view the last dialled numbers, the last answered calls and the missed calls. If the phone numbers have been saved in the phonebook, the corresponding name will be shown. Furthermore, the date and time of the corresponding call are shown.
The list has capacity for up to 30 entries. After all list entries have been filled, the oldest entry will be overwritten with the current call information.
Outgoing Calls
Shows a list of the last dialled phone numbers.
Accepted Calls
Shows a list of the last accepted phone calls.
Missed Calls
Shows a list of missed calls.
Handset
This menu allows you to perform more settings for your handset. Proceed as follows to open this menu:
• While the handset is in standby mode, press the Menu button [12] to show the menu.
- Press the ▲ or ▼ buttons on the directional control [4] to select the "Handset" menu.
- Press the Phonebook button [3] to confirm your selection.
- Press ▲ or ▼ on the directional control [4] to select the desired menu item and then press the Phonebook button [3] to confirm.
Ring Tone
External
Press the ▲ or ▼ buttons on the directional control [4] to select a ringtone for external call. There are 19 ringtones to choose from. Press the Phonebook button [3] to save. A confirmation beep can be heard.
Internal
Press the ▲ or ▼ buttons on the directional control [4] to select a ringtone for internal call. There are 19 ringtones to choose from. Press the Phonebook button [3] to save. A confirmation beep can be heard. Please note that a second handset is needed to make internal calls.
Ringer Volume
You can adjust the ringer volume in 5 levels (5 = very high; 1 = very low). Press the ▲ or ▼ directional control buttons [4] to set the desired volume. Or select "Volume Off" to disable the ringtone. To save the selected setting, press the Phonebook button [3]. A confirmation beep can be heard.
Handset Name
Here you can change the name of the handset (default "Handset"). The handset name can contain up to 11 characters.
Press the Menu button [12] to erase the existing name character by character. Enter the handset name via the numeric keys [6]. Press the Asterisk button [10] to toggle between upper case and lower case. You can select a different character set by keeping the Hash button [7] pressed. The currently selected input method will be indicated in the upper-right corner of the display. You can press the 0 or 1 buttons to enter special characters and press 0 for spacebar. Press the Phonebook button [3] to confirm your entry. A confirmation beep can be heard.

The entered name will be suffixed by the number of the handset when shown on the display [2].
Keypad Beep
Press the ▲ or ▼ directional control buttons [4] to enable or disable the keypad beep. The confirmation beep is not affected by this setting. To save the selected setting, press the Phonebook button [3]. A confirmation beep can be heard.
Contrast
Here you can set the display contrast in 8 levels (1=low contrast; 8=high contrast). Press the ▲ or ▼ directional control buttons [4] to set the desired contrast. To save the selected setting, press the Phonebook button [3]. A confirmation beep can be heard.
Auto Talk
If the handset is on the base when an incoming call arrives, the call can be accepted automatically by removing the handset from the base. Press the ▲ or ▼ directional control buttons [4] to switch this function on or off. To save the selected setting, press the Phonebook button [3]. A confirmation beep can be heard.
Backlight Time
This lets you choose how long the display should stay illuminated after pressing a button. The possible values are 10S, 20S, 30S or 40S. Press the ▲ or ▼ directional control buttons [4] to select the desired option. Press the Phonebook button [3] to confirm your selection. A confirmation beep can be heard.
Confirm Beep
Press the ▲ or ▼ directional control buttons [4] to enable or disable the confirm beep. To save the selected setting, press the Phonebook button [3]. A confirmation beep will sound if it was not disabled at this time.
Select Base
This allows you to select the base where you want to register a handset. As you will normally have one base only, you can use the default setting "Auto". Where several bases are available, you can use the "Manual" option to select the desired base manually from the list. After an available base a "+" is shown in the list. Please note that the handset must be located within RF range of the base.
Language
Set the language for the handset as follows:
- Press the ▲ or ▼ directional control buttons [4] to select the desired language (e.g. "ENGLISH") from the list. The following languages are available: English, French, Spanish, German and Italian.
- Press the Phonebook button [3] to confirm your selection.
- A confirmation beep can be heard.
Registration
Registration
You can register up to 4 handsets with one base. By default, the handset supplied has already been registered with the base (Base 1). To register a de-registered or a new handset with the base, proceed as follows:
Notice for using handsets from different manufacturers

If you want to register third-party DECT handsets that support the GAP standard with your SilverCrest base, please read the documentation of their manufacturers. However, it cannot be guaranteed that third-party handsets will be fully compatible even when using the GAP standard.
- Press the ▲ or ▼ directional control buttons [4] on the handset to select the base from the list to which you want to register the handset. Then press the Phonebook button [3].
- Enter the phone's four-digits PIN code (default 0000) and press the Phonebook button [3] to confirm.
• The display [2] reads "Searching" and the number of the available base.
Notice for using bases from different manufacturers

If you want to register the SilverCrest handset with the base of a different manufacturer that supports the GAP standard, please read the documentation of the third-party manufacturer. However, it cannot be guaranteed that the SilverCrest handset will be fully compatible even when using the GAP standard.
- Press and hold the Paging button [13] on the base for about 5 seconds. The base starts searching for handsets.
- As soon as the handset has established a connection to the base, a beep can be heard and the name and number of the handset are shown on the display [2].
Hs Default
This lets you reset the handset. To do so, you must enter the 4-digit PIN (default 0000). Press the Phonebook button [3] to confirm your entry. The language, all sound settings and all call lists are reset. The phonebook will be preserved.
Base Settings
This menu allows you to perform more settings for the base. Proceed as follows to open this menu:
- While the handset is in standby mode, press the Menu button [12] to show the menu.
- Press the ▲ or ▼ buttons on the directional control [4] to select the "Base Settings" menu.
- Press the Phonebook button [3] to confirm your selection.
- Press ▲ or ▼ on the directional control [4] to select the desired menu item and then press the Phonebook button [3] to confirm.
De-register
This menu item allows you to de-register a handset that is currently registered with the base. Proceed as follows:
- Enter the phone's four-digits PIN code (default 0000) and press the Phonebook button [3] to confirm.
- Select the handset that you want to de-register (1 to 4).
- Press the Phonebook button [3] to confirm your entry.
• After the handset has been de-registered, a confirmation beep will sound. - Instead of the name of the handset, the de-registered handset display [2] will show "Not Registered".

It is not possible to de-register the handset you are using. It is only possible to de-register other handsets.
Ring Tone
Press the ▲ or ▼ buttons on the directional control [4] to select a ringtone. There are 10 ringtones to choose from. Press the Phonebook button [3] to save. A confirmation beep can be heard.
Ringer Volume
You can adjust the ringer volume in 5 levels (5 = very high; 1 = very low). Press the ▲ or ▼ directional control buttons [4] to set the desired volume. Or select "Volume Off" to disable the ringtone. To save the selected setting, press the Phonebook button [3]. A confirmation beep can be heard.
Dial Mode
There are two different options you can use.
Tone
Tone dialling is the most popular dialling method nowadays.
Pulse
Pulse dialling is normally used with older PBX devices.
Press the ▲ or ▼ directional control buttons [4] to select the desired option. To save the selected setting, press the Phonebook button [3]. A confirmation beep can be heard.
Recall
You can use the Recall/Flash (R) function with the Recall/Flash button R▶ [4] on your handset during a phone call. When using your phone with a PBX, this feature also allows you to put an external call on hold and make an internal call, or to forward the external call to a different extension. The Recall/Flash function will cause a short, temporary line interruption.
The following options are available:
Short
100 ms interruption.
Long
300 ms interruption.
Press the ▲ or ▼ directional control buttons [4] to select the desired option. To save the selected setting, press the Phonebook button [3]. A confirmation beep can be heard.

The Recall/Flash function allows you to use specific services for external phone calls, e.g. "Call Waiting". The requirement for this is that your network provider supports this feature. It may also be used for additional functions or switching to an internal conversation when using a PBX.
First Ring
By default, this functions is set to "ON". This will generate the first ring tone as soon as the first incoming signal is detected. When set to "OFF", the first ring tone will be generated after the second incoming signal is detected.
System PIN
The PIN must consist of 4 digits. To change the PIN code of your phone, proceed as follows:
- After confirming by pressing the Phonebook button [3] the message "System PIN:" appears on the display [2].
- Enter the phone's old PIN code (default 0000) and press the Phonebook button [3] to confirm.
- "New PIN:" will appear on the display [2]. Enter a new PIN code for your phone and press the Phonebook button [3] to confirm.
- "Again:" will appear on the display [2]. Enter the new PIN code again and press the Phonebook button [3] to confirm.
- A confirmation beep can be heard.
- Please make sure you remember the System PIN or keep it in a safe place.
In case that you have lost your PIN, please contact our Service Hotline (see page 99).
BS Default
This lets you restore the base to its factory settings. To do so, you must enter the 4-digit PIN (default 0000). Press the Phonebook button [3] to confirm your entry. However, the system PIN will not be reset.
Time
This menu lets you set alarm and the date and time as well as the clock format. Proceed as follows to open this menu:
• While the handset is in standby mode, press the Menu button [12] to show the menu.
- Press the ▲ or ▼ buttons on the directional control [4] to select the "Time" menu.
- Press the Phonebook button [3] to confirm your selection.
- Press ▲ or ▼ on the directional control [4] to select the desired menu item and then press the Phonebook button [3] to confirm.
Set Alarm
For each alarm (Once, Every Day, Mon to Fri) you can set the time and the melody. To disable the alarm, select "Off".
- Input the time via the numeric buttons [6]. Press the Phonebook button [3] to save.
- Select a melody. Press the Phonebook button [3] to save.
• An alarm icon appears on the display [2] while the alarm is enabled.

The handset will play the selected melody at the time of the set alarm. Press the Menu button [12] to stop the alarm sound. Press the Phonebook button [3] for snooze. After approx. 5 minutes the melody will play.
Date and Time
This lets you set the date and time. Proceed as follows:
- Next you can enter the day, month, year, hours and minutes in sequence. Enter the desired value via the numeric buttons [6]. Press the Phonebook button [3] to confirm each entry.
• A beep will sound after the entire input has been completed.
Set Time Format
Upon factory delivery the time format is set to "24 HOUR". You can customise the clock time format as follows:
- Press the ▲ or ▼ buttons on the directional control [4] to select the "24Hour" option for 24-hours clock display or select "12Hour" for 12-hours clock display.
- Press the Phonebook button [3] to confirm your selection.
• A confirmation beep can be heard.

To distinguish ante meridian (morning) and post meridian (afternoon) time for the 12-hour display, "am" will display for ante meridian and "pm" for post meridian clock hours.
Tools
This menu lets you set appointments and use the stop watch. Proceed as follows to open this menu:
• While the handset is in standby mode, press the Menu button [12] to show the menu.
- Press the ▲ or ▼ buttons on the directional control [4] to select the "Tools" menu.
- Press the Phonebook button [3] to confirm your selection.
- Press ▲ or ▼ on the directional control [4] to select the desired menu item and then press the Phonebook button [3] to confirm.
Appointment
You can set up to 5 appointments. If no appointment has been set yet, a list from 1 to 5 will be displayed. Select the desired entry and press the Phonebook button [3].
Next you can choose the Edit or Delete option.
Edit
For an appointment enter the Title, Date, Time and Ringtone.
- Title
Input the title via the numeric buttons [6]. Press the Asterisk button [10] to toggle between upper case and lower case. You can select a different character set by keeping the Hash button [7] pressed. The currently selected input method will be indicated in the upper-right corner of the display. You can press the 0 or 1 buttons to enter special characters and press 0 for spacebar. Press the Phonebook button [3] to save the title.
- Date
Input the date via the numeric buttons [6]. Press the Phonebook button [3] to save.
- Time
Input the time via the numeric buttons [6]. Press the Phonebook button [3] to save.
- Melody
Next assign a melody to the new entry. There are 19 melodies to choose from. Press the Phonebook button [3] to save. After the input is completed, a confirmation beep will sound and the "Saved" message will appear for a few seconds on the display [2].
Delete
The previously marked appointment will be erased after you confirm by pressing the Phonebook button [3]. Press the Menu button [12] to cancel.
Stop Watch
Press the Phonebook button [3] to start the stop watch. Press the Menu button [12] to stop the stop watch.
If you have already taken a time you can press the Menu button [12] to resume the stop watch.
While the time has been stopped you can press the Phonebook button [3] to reset the stop watch.
Everyday Use
Making calls
External calls
Use the numeric buttons [6] to enter a telephone number. After you have entered the phone number, press the Dial button [11] to call the entered number.

Press the Menu button [12] to clear the entered phone digits step by step.

To reduce the volume during a call, press the button of the directional control [4]. To increase the volume during a call, press the button of the directional control [4]. The current volume level is shown on the display [2].
Calling a number from the phonebook
If you want to use a number stored in the phone book, press the Phonebook button [3] while in standby mode. Press the ▲ or ▼ directional control buttons [4] to select the desired entry and then press the Dial button [11] to call the selected entry.

Press the numeric keys [6] to enter a letter and display the entries beginning with this letter.
Press the End call button [5] to hang up.

For more information about adding a new phone book entry, please read the chapter "Phonebook" on page 77.
Internal calls
If you have registered multiple handsets with your base you can make internal calls. Press the INT button on the directional control [4] to make an internal call. "Internal" will appear on the display [2]. Next enter the number of the handset that you want to call. The connection will be established immediately after entering the number.
Redial
Press the ⬆ button on the directional control [4] to show a list with the last 20 dialled phone numbers. If the phone number has been saved in the phonebook, the corresponding name will be shown.
To call the last dialled phone number again, just press the Dial button [11], as the last phone number is already highlighted.
To call any other number on the list, press the ▲ or ▼ directional control buttons [4] to select the desired number and then press the Dial button [11] to call it.
Answering incoming calls
When receiving a call, the number of the caller will be shown on the handset display [2]. If the phone number has been saved in the phonebook, the corresponding name will be shown. The requirement for this feature to work is that your phone line has the Caller ID function enabled and the caller does not hide his ID.
Press the Dial button [11] to answer the call.
Calls list
The phone numbers and their associated names in the phonebook, if any, of all incoming calls are saved in the calls list. The calls list can save up to 30 incoming calls. The requirement for this feature to work is that your phone line has the Caller ID function enabled and the caller does not hide his ID. After all list entries have been filled, the oldest entry will be overwritten with the current call information.
A new call will appear with a flashing 🔊 icon on the display [2]. The display [2] also shows the number of missed calls. To open the calls list, press the ▼ button on the directional control [4]. The following submenus appear:
Accepted Calls
Shows a list of the last accepted phone calls.
Missed Calls
Shows a list of missed calls.
The last received call is displayed together with its date and time. If the selected list is empty, the display [2] shows it accordingly.

If the entry is longer than the display [2] width, press the ◀ or ▶ directional control buttons [4] to show the other digits.
Press the ▲ or ▼ directional control buttons [4] to scroll through the calls list. To exit the calls list menu, press the Menu button [12]. Press the Phonebook button [3] to choose from the following options:
Option
Save Number
To save the phone number in the phonebook. Here you have to input the name, check or edit the phone number and set the ringtone in sequence.
Delete
The previously selected entry will be erased after you confirm by pressing the Phonebook button [3].
Delete All
After confirming by pressing the Phonebook button [3], all list entries will be deleted from the handset. Press the Menu button [12] to cancel.
Calling a phone number from the calls list
To dial a phone number from the calls list, proceed as follows:
- Press the ▲ or ▼ directional control buttons [4] to select the entry that you want to call from the calls list.
- Then press the Dial button [11] to call the selected entry.
- To end the call press the End call button [5].
Hands-free function
To enable the hands-free function, press the Dial button [11] twice while in standby mode or press it once during a phone call. When the hands-free function is enabled, the icon will show on the display [2].
Press the Dial button [11] again to switch the hands-free function back off.

To reduce the hands-free speaker volume during a call, press the ▼button of the directional control [4]. To increase the hands-free speaker volume, press the ⬆ button of the directional control [4]. The current volume level is shown on the display [2].
Muting the microphone
You can mute the microphone during a call so you can speak without the other party hearing you. To do this, press the Menu button [12] during a call. The microphone will be muted and the icon appears on the display [2].
Press the Menu button [12] again to switch the microphone back on.
Call forwarding
If you have registered multiple compatible handsets with your base you can make inter Press the INT button on the directional control [4] during an external call. "Internal" will appear on the display [2]. Next enter the number of the handset that you want to call. As soon as the connection to the other handset has been established, you can talk internally. Press the End call button [5] to end the external call and to forward it to the other handset.
Intercom and conference calls
If you have registered multiple compatible handsets with your base you can make inter conference calls. Press the INT button on the directional control [4] during an external call. "Internal" will appear on the display [2]. Next enter the number of the handset that you want to call. As soon as the connection to the other handset has been established, you can talk internally. Press the INT button on the directional control [4] to toggle between the external and the internal call.
Press the Phonebook button [3] to make a conference call. After pressing the Phonebook button [3], a confirmation beep can be heard and the conference starts.
Locking the keypad
Press and hold the Hash button [7] for approx. 2 seconds to lock the keypad against accidental input. However, you will still be able to answer any incoming calls by pressing the Dial button [11].
To unlock the keypad, press and hold the Hash button [7] again for approx. 2 seconds.
When the keypad is locked, the icon will show on the display [2].

It is still possible to dial the pan-European emergency number 112 while the keypad is locked.
Switching the ringtone off
Press and hold the Asterisk button [10] for approx. 2 seconds to switch the ringtone off. To switch the ringtone back on, press and hold the Asterisk button [10] again for approx. 2 seconds.
When the ringtone is off, the icon will show on the display [2].
Search function
This features lets you locate your handset if you have misplaced it. To do so, briefly press the Paging button [13] on the base. The handset emits a tone for approx. 1 minute and the display [2] illuminates.
To disable the search function, press any button on the handset or press the Paging button [13] again on the base.
Answering machine
When setting the device up for the first time, the answering machine will be enabled by default with the preset outgoing message. Decide whether you want the answering machine to be on or off. You can recognise the enabled answering machine from the activated display [17] on the base.

You can conveniently configure the answering machine from the handset. For a detailed description, see the "Ans Machine (Answering machine)" chapter on page 70. You can also set some options directly on the base. For more information, see the chapter "Base" on page 63.
If new messages have been left on the answering machine, this will be indicated on the handset. The number of new messages will flash on the base display [17].
You can listen to the messages simply by pressing the Play button [20] on the base.
If the display [17] reads "FL" the answering machine memory is full. No more messages can be recorded, even if the answering machine is enabled. Delete any messages to be able to record more messages.
To delete all old messages press and hold the Delete Message button [16]. After the prompt, press the Delete Message button [16] again to erase the messages.
On the handset you can listen to new messages easily by pressing the Phonebook button [3].

If messages have already been listened to but not deleted, the base display [17] will show the number of messages. This indication does not flash.

If the answering machine has already started answering an incoming call you can still take it over by pressing the Phonebook button [3].
Remote listening to the messages / Remotely configuring your answering machine
The answering machine supports a remote listening function. This enables you to listen to your messages or configure the answering machine when on the move. However, this feature requires performing the following steps from a telephone with tone dial mode.
Proceed as follows:
- Call your device.
The answering machine will answer the call and you will listen to the outgoing message and a confirmation beep. You can cancel at any time the message playback by pressing the * button.
- Press the * button twice.
• You are prompted to enter the remote access security code. - Enter the 3-digit code (default 000).
• A confirmation beep will sound.
The following options are available:
0 button: to delete all messages
2 button: to listen to the messages
1 button: skip to previous message
3 button: skip to next message
7 button: delete the current message
4 button: to play the outgoing message
5 button: to record an outgoing message
6 button: to stop recording; exit remote listening
8 button: to switch the answering machine off
9 button: toggles between the outgoing messages; switch the answer machine on ^*1

*1 When the answering machine is switched off, press the * button twice and enter the remote access security code. This enables you to switch the answering machine on.

If you frequently listen to your messages remotely, we recommend configuring the Toll Saver mode. In Toll Saver mode the device will answer the call after 5 rings if there are no new messages. When there are new messages, incoming calls will be answered after the second ring. If it takes more than 2 rings, there are no new messages and you can dial off before the answering machine answers the call and costs are incurred. This function is described in the "Ans Machine (Answering machine)" chapter.
Troubleshooting
| Handset does not work / blank display | Batteries inserted incorrectly - insert the rechargeable batteries with the correct polarity.Batteries are flat - recharge the batteries.Handset powered off - press and hold the End call button [5] to power the handset on. |
| The antenna icon is flashing | Handset out of range - take the handset closer to the base.Base has no power - check the base power supply.The handset is not connected to the base - register the handset with the base. |
| No ringtone from handset or base | Re-activate the ringtone or increase the ringer volume. |
| No ring or dial tone for outgoing calls | Telephone cable not connected properly - make sure that you have connected the telephone cable properly. |
| The answering machine does not record any message. | Check the answering machine operating mode.The memory is full. Delete old messages. |
| Impossible to dial out | Keypad locked - disable the key lock function. |

When using the pulse dial mode with a PBX, malfunctions may occur. This is because the PBX misinterprets the dial pulses. Switch to tone dial mode.
Cleaning / Maintenance
Repairs are required if this device has been damaged in any way, for example, if the power adapter, charging cradle or housing is damaged, if liquid or objects have penetrated the device, if the product has been exposed to rain or moisture or if the product does not work normally or has been dropped. If you notice any smoke, unusual noise or strange smells, switch off the device immediately and pull the power adapter from the mains socket. If this occurs, do not continue to use the device and have it checked out by an expert. All servicing work must be carried out by qualified specialist personnel. Never open the housing of the device, the power adapter or the accessories. Opening the housing can expose you to a lethal electric shock. Only use a clean, dry cloth for cleaning. Never use aggressive liquids.
Environmental regulations and disposal information

natural_image
Symbol of a trash bin crossed with a diagonal line, no text or numbers presentDevices marked with this symbol are subject to the European Directive 2012/19/EU. All electrical and electronic devices must be disposed of separately from household waste at official disposal centres. Proper disposal of old devices prevents damage to the environment or your health. For further information about proper disposal, contact your local council, recycling centre or the shop where you bought the device.
Respect the environment. Old batteries must not be disposed of with domestic waste. They must be handed in at a collection point for waste batteries. Please note that batteries must be disposed of fully discharged at appropriate collection points for old batteries. If disposing of batteries that are not fully discharged, take precautions to prevent short circuits. To prevent any short circuits cover the battery poles with insulating tape.
Dispose of all packaging in an environmentally friendly manner. Cardboard packaging can be taken to paper recycling centres or public collection points for recycling. Any film or plastic contained in the packaging should be taken to your public collection points for disposal.
Conformity notes

This device complies with the basic and other relevant requirements of the R&TTE Directive 1999/5/EC, the Low-voltage Directive 2014/35/EU, the ErP Directive 2009/125/EC and the RoHS Directive 2011/65/EU.
In order to receive the complete EU declaration of conformity, please send an e-mail to the following e-mail address: ce@targa.de
Warranty and servicing advice
Warranty of TARGA GmbH
Dear Customer,
This device is sold with three years warranty from the date of purchase. In the event of product defects, you have legal rights towards the seller. These statutory rights are not restricted by our warranty as described below.
Warranty conditions
The warranty period commences upon the date of purchase. Please keep the original receipt in a safe place as it is required as proof of purchase. If any material or manufacturing faults occur within three years of purchase of this product, we will repair or replace the product free of charge as we deem appropriate.
Warranty period and legal warranty rights
The warranty period is not extended in the event of a warranty claim. This also applies to replaced and repaired parts. Any damage or defects discovered upon purchase must be reported immediately when the product has been unpacked. Any repairs required after the warranty period will be subject to charge.
Scope of warranty
The device was carefully manufactured in compliance with stringent quality guidelines and subjected to thorough testing before it left the works. The warranty applies to material and manufacturing faults. This warranty does not cover product components which are subject to normal wear and which can therefore be regarded as wearing parts, or damage to fragile components such as switches, rechargeable batteries or components made of glass. This warranty is void if the product is damaged, incorrectly used or serviced. To ensure correct use of the product, always comply fully with all instructions contained in the user manual. The warnings and recommendations in the user manual regarding correct and incorrect use and handling of the product must always be observed and complied with. The product is solely designed for private use and is not suitable for commercial applications. The warranty is rendered void in the event of incorrect handling and misuse, if it is subjected to force, and also if any person other than our authorised service technicians interfere with the device. No new warranty period commences if the product is repaired or replaced.
Submitting warranty claims
To ensure speedy handling of your complaint, please note the following:
- Before using your product for the first time, please read the enclosed documentation carefully. Should any problems arise which cannot be solved in this way, please call our hotline.
- Always have your receipt, the product article number as well as the serial number (if available) to hand as proof of purchase.
- If it is not possible to solve the problem on the phone, our hotline support staff will initiate further servicing procedures depending on the fault.

Service

Phone: 020 - 70 49 04 03
E-Mail: service.GB@targa-online.com

Phone: 01-4370121
E-Mail: service.IE@targa-online.com

Phone: 027 78 11 03
E-Mail: service.MT@targa-online.com

Phone: 02 - 20 09 025
E-Mail: service.CY@targa-online.com
IAN: 279401

Manufacturer
Please note that the following address is not a service address. First contact the service point stated above.
TARGA
GmbH
Coesterweg 45
59494 SOEST
GERMANY
Table des matières
Bip confirm. (Bip de confirmation)....131
natural_image
Electrical components including a power plug, charging cable, battery pack, and open book (no text or symbols visible)DANGER ! Piles rechargeables
Bip confirm. (Bip de confirmation)
natural_image
Symbol of a trash bin crossed with no text or labels, accompanied by a black rectangular block below (no readable text or symbols)Cher client, chère cliente,
Cher client, chère cliente,
Delete Msgs (Berichten wissen)....170
Delete Entry (Invoer wissen) 180
Delete All (Alles wissen) 180
Mem Status (Geheugenstatus) 180
Ring Tone (Beltoon)....181
Ringer Volume (Belvolume) 181
Handset Name (Naam handset) 181
Keypad Beep (Toetstoon)....181
Contrast....182
Auto Talk (Autom. aannemen) 182
Ring Tone (Beltoon)....184
Ringer Volume (Belvolume) 184
Dial Mode (Kiesmodus)....185
Recall (Flash, R-toets) 185
First Ring (Eerste belsignaal)....185
System PIN (Pincode systeem) 185
BS Default (Basisstation terugzetten) 186
Time (Tijd)....186
Set Alarm (Wekker instellen) 186
Stop Watch (Stopwatch) 188
WAARSCHUWING! Kabels
Delete Msgs (Berichten wissen)
Delete All (Alles wissen)
Delete All (Alles wissen)
Delete All (Alles wissen)
Delete Entry (Invoer wissen)
Delete All (Alles wissen)
Stop Watch (Stopwatch)
Delete All (Alles wissen)
natural_image
Symbol of a trash bin crossed with no text or labels, accompanied by a black rectangular block below (no readable text or symbols)Delete Msgs (Odstranit zprávy)....219
Delete All (Odstranit vše)....229
Registration (Registrace) 232
Appointment (Událost)....236
Stop Watch (Stopky) 237
natural_image
Electrical components including a power plug, battery pack, and cable with labeled parts (C, D, E, F) — no readable text or symbols beyond labels.Delete All (Odstranit vše)
Delete All (Odstranit vše)
Delete All (Odstranit vše)
Delete All (Odstranit vše)
Registration (Registrace)
Registrace
Appointment (Událost)
Delete All (Odstranit vše)
natural_image
Symbol of a trash bin crossed with a diagonal line, no text or numbers presentRestablecer base (Rest. base)....284
Hora 284
Despertador (Config alarma)....284
Fecha y hora....285
Formato de hora....285
Herramientas 285
Cita 285
Cronómetro....286
Uso cotidiano 287
Restablecer base (Rest. base)
natural_image
Symbol of a trash bin with crossed lines indicating no waste or restriction, and a solid black rectangle below (no text or labels)Acertar a data e as horas 315
Definir o formato das horas....315
Menu 316
Vista geral do menu....316
Delete Msgs (Apagar Mensagens) 317
Ans On/Off (Atendedor de Chamadas Ligado/Desligado) 317
Record Memo (Gravar Memo)....318
New Entry (Novo Item)....325
Edit Entry (Editar Item)....325
Show Details (Ver Detalhes)....325
Copy Entry (Copiar Item)....325
Copy Append (Copiar Adicionando)....326
Copy All (Copiar Tudo) 326
Delete Entry (Apagar Item)....327
Delete All (Apagar Tudo) 327
Appointment (Compromisso)....334
natural_image
Electrical components including a power plug, battery pack, and cable with labeled parts (C, D, E, F) — no readable text or symbols beyond labels.Acertar a data e as horas
| Ans Machine Play MsgsDelete MsgsAns On/OffRecord MemoOutgoing MsgAns Settings | |
| SMS | WriteInboxOutboxDraftsTemplatesSMS Settings |
| Phonebook | New Entry*Edit Entry*Show Details*Copy Entry*Copy Append*Copy All*Delete Entry*Delete All*Mem Status* |
| Call Lists Outgoing CallsAccepted CallsMissed Calls | |
| Handset | Ring ToneRinger VolumeHandset NameKeypad BeepContrast |
Message
| Auto TalkBacklight TimeConfirm BeepSelect BaseLanguageRegistrationHs Default | |
| Base Settings De-register | Ring ToneRinger VolumeDial ModeRecallFirst RingSystem PINBS Default |
| Time | SetDate and TimeSet Time Format |
| Tools | AppointmentStop Watch |
Delete Msgs (Apagar Mensagens)
Delete All (Apagar Tudo)
Delete All (Apagar Tudo)
Delete All (Apagar Tudo)
New Entry (Novo Item)
Show Details (Ver Detalhes)
Tal mostra o nome, o número de telefone e o toque do item da lista telefónica previamente selecionado.
Delete Entry (Apagar Item)
Delete All (Apagar Tudo)
Appointment (Compromisso)
Delete All (Apagar Tudo)
natural_image
Symbol of a trash bin crossed with no text or labels, accompanied by a black rectangular block below (no readable text or symbols)


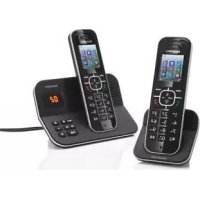
- Aufladen der Akkus
- Everyday Use....89
- Troubleshooting 96
- Cleaning / Maintenance 96
- Environmental regulations and disposal information 97
- Conformity notes....97
- Warranty and servicing advice 98
- Congratulations!
- Intended use
- Package contents
- Safety instructions
- Explanation of danger-alerting symbols used in this manual
- WARNING! Always make sure that
- DANGER! Children and persons with disabilities
- DANGER! Danger of suffocation!
- DANGER! Power adapter
- WARNING! Cables
- DANGER! Rechargeable Batteries
- Operating environment
- Storage when not in use
- Copyright
- Overview
- #
- Menu and phonebook button functions
- Display icons
- Before you start
- Connecting the Base
- Inserting the Batteries into the Handset
- Charging the Batteries
- Getting started
- Switching the Handset On and Off
- Setting the language
- Setting the handset language
- Setting the answering machine language
- Setting the date and time
- Setting the time format
- Menu
- Ans Machine (Answering Machine)
- Play Message
- - Play New Msgs (Play New Messages)
- • Play All Msgs (Play All Messages)
- Delete Msgs (Delete messages)
- Ans On/Off (Answering machine on/off)
- Record Memo
- Outgoing Msg (Outgoing Message)
- Ans Settings (Answering Machine Settings)
- Answer Mode
- Answer Delay
- Language
- Security Code
- Tam Default (Reset Answering Machine)
- SMS
- Write Message
- Send To
- Save Message
- Use Template
- Inbox
- Delete
- Reply
- Forward
- Dial Number
- Save Number
- Delete All
- Outbox
- Drafts
- Templates
- Edit
- SMS Settings
- Phonebook
- New Entry
- Name
- Number
- Edit Entry
- Show Details
- Copy Entry
- Copy Append
- Copy All
- Delete Entry
- Mem Status
- Call Lists
- Outgoing Calls
- Accepted Calls
- Missed Calls
- Handset
- Ring Tone
- External
- Internal
- Ringer Volume
- Handset Name
- Keypad Beep
- Contrast
- Auto Talk
- Backlight Time
- Confirm Beep
- Select Base
- Registration
- Notice for using handsets from different manufacturers
- Notice for using bases from different manufacturers
- Hs Default
- Base Settings
- De-register
- Dial Mode
- Tone
- Pulse
- Recall
- Short
- Long
- First Ring
- System PIN
- BS Default
- Time
- Set Alarm
- Date and Time
- Set Time Format
- Tools
- Appointment
- - Title
- - Date
- - Time
- - Melody
- Stop Watch
- Everyday Use
- Making calls
- External calls
- Calling a number from the phonebook
- Internal calls
- Redial
- Answering incoming calls
- Calls list
- Option
- Calling a phone number from the calls list
- Hands-free function
- Muting the microphone
- Call forwarding
- Intercom and conference calls
- Locking the keypad
- Switching the ringtone off
- Search function
- Answering machine
- Remote listening to the messages / Remotely configuring your answering machine
- Troubleshooting
- Cleaning / Maintenance
- Environmental regulations and disposal information
- Conformity notes
- Warranty and servicing advice
- Warranty of TARGA GmbH
- Warranty conditions
- Warranty period and legal warranty rights
- Scope of warranty
- Submitting warranty claims
- Service
- Manufacturer
- Table des matières
- DANGER ! Piles rechargeables
- Bip confirm. (Bip de confirmation)
- WAARSCHUWING! Kabels
- Delete Msgs (Berichten wissen)
- Delete All (Alles wissen)
- Delete Entry (Invoer wissen)
- Stop Watch (Stopwatch)
- Delete All (Odstranit vše)
- Registration (Registrace)
- Registrace
- Appointment (Událost)
- Uso cotidiano 287
- Restablecer base (Rest. base)
- Acertar a data e as horas
- Delete Msgs (Apagar Mensagens)
- Delete All (Apagar Tudo)
- New Entry (Novo Item)
- Show Details (Ver Detalhes)
- Delete Entry (Apagar Item)
- Appointment (Compromisso)
Brand : SILVERCREST
Model : SDT 1.7 A3
Category : Telephone