
Big Button Phone SGKT 50 A2 - Telephone SILVERCREST - Free user manual and instructions
Find the device manual for free Big Button Phone SGKT 50 A2 SILVERCREST in PDF.


| Product Type | DECT cordless telephone with large buttons (big button) and additional handset with charging cradle |
| Model | SilverCrest SGKT 50 A2 |
| Dimensions (Base) | Approx. 199 x 80 x 182 mm |
| Dimensions (Handset) | Approx. 181 x 56 x 28 mm |
| Dimensions (Charger cradle) | Approx. 100 x 104 x 60 mm |
| Weight (Base incl. power adapter) | Approx. 770 g |
| Weight (Handset without batteries) | Approx. 130 g |
| Weight (Charger cradle incl. power adapter) | Approx. 142 g |
| Power Supply (Base) | Input: 100-240V~ 50/60Hz 0.15A; Output: 6V 0.5A |
| Power Supply (Charger cradle) | Input: 100-240V~ 50/60Hz 0.15A; Output: 7V 0.42A |
| Battery | 2 x AAA NiMH rechargeable, 1.2V, 600 mAh |
| Standby Time (Handset) | Up to 100 hours |
| Talk Time (Handset) | Up to 10 hours |
| Charging Time (Handset) | 16 hours |
| Phonebook Memory | 50 entries each for base and handset |
| Calls List | Up to 30 incoming calls |
| Speed Dial Buttons | 3 (M1, M2, M3) on base |
| Dial Modes | Tone (DTMF) and Pulse |
| Operating Temperature | +5 °C to +45 °C |
| Storage Temperature | 0 °C to +60 °C |
| Maximum Humidity | 85% relative humidity |
| Safety Features | Keypad lock, ringer off, handset locator, mute, child-resistant usage warnings |
| Cleaning Instructions | Disconnect from mains; use dry cloth; do not use solvents |
| Warranty | 3 years from date of purchase (subject to conditions) |
| Standards | DECT / GAP, CE compliant |
Frequently Asked Questions - Big Button Phone SGKT 50 A2 SILVERCREST
User questions about Big Button Phone SGKT 50 A2 SILVERCREST
0 question about this device. Answer the ones you know or ask your own.
Ask a new question about this device
Download the instructions for your Telephone in PDF format for free! Find your manual Big Button Phone SGKT 50 A2 - SILVERCREST and take your electronic device back in hand. On this page are published all the documents necessary for the use of your device. Big Button Phone SGKT 50 A2 by SILVERCREST.
USER MANUAL Big Button Phone SGKT 50 A2 SILVERCREST
Big Button Phone SGKT 50 A2
TARGA GMBH
Coeflerseg 45
39494 SOUST GERMANY
2、基本情况简介
User manual and service information
DE AT
Technical specifications....7
Safety instructions....8
Storing When Not Using the Product 11
Copyright 11
Overview 12
Handset....12
Display icons 13
Base 14
Display icons 15
Base back panel.... 15
Charger cradle....16
Before you start 16
Connecting the telephone receiver 16
Connecting the Base 16
Wall-mounting the base....17
Connecting the Charger Cradle....17
Inserting the Batteries into the Handset 18
Charging the Batteries 18
Getting started 18
Setting the Menu Language 18
Setting the handset menu language 19
Setting the base menu language 19
Setting the date and time....19
Setting the time format 20
Handset Menu 21
PHONEBOOK 21
Creating a new entry 22
Editing an entry 22
Deleting an entry 23
Deleting all entries....23
HANDSET 23
RING TONE 23
HANDSET NAME 24
KEYPAD BEEP 24
SELECT BASE 24
RESET....24
LANGUAGE 25
BASE 25
DIAL MODE 25
RECALL 25
SYSTEM PIN 26
DATE TIME....26
REGISTER 27
DE-REGISTER 27
Base Menu 28
PHONEBOOK....28
Creating a new entry 29
Editing an entry....29
Deleting an entry 30
Deleting all entries....30
RING TONE 30
EXTERNAL....30
INTERNAL....30
VOLUME 31
KEYPAD BEEP 31
LANGUAGE 31
BASE....31
DIAL MODE....31
RECALL 31
SYSTEM PIN 32
TIME 33
DATE TIME....33
FORMAT 33
REMOVE HS 33
RESET 34
Handset - Everyday use....34
Making calls 34
External calls....34
Calling a number from the phonebook....35
Internal calls....35
Redial 35
Answering incoming calls 35
Calls list....35
Calling a phone number from the calls list....36
Removing a phone number from the calls list....36
Removing all phone numbers from the calls list 36
Saving a phone number from the calls list to the phonebook 37
Hands-free function 37
Muting the microphone....38
Call forwarding....38
Intercom and conference calls 38
New message in voice mail 38
Locking the keypad....39
Switching the ringtone off....39
Base - Everyday use 39
Making calls....39
External calls....39
Calling a number from the phonebook 40
Internal calls....40
Redial 40
Answering incoming calls 40
Calls list....41
Calling a phone number from the calls list....41
Saving a phone number from the calls list to the phonebook 42
Saving a phone number from the calls list to the speed dial buttons 42
Removing a phone number from the calls list....43
Removing all phone numbers from the calls list 43
Speed dialling 43
Saving a number for speed dial....43
Speed dial 44
Editing the speed dial number....44
Deleting a speed dial number....44
Hands-free function 45
Muting the microphone....45
Call forwarding....45
Intercom and conference calls 45
New message in voice mail 45
Handset locator....46
Troubleshooting 46
Environmental regulations and disposal information ....47
Conformity notes....47
Warranty and Service Information....48
Introduction
Thank you for choosing this SilverCrest SGKT 50 A2 comfort telephone with large keypad buttons, additional handset and charging cradle, hereinafter referred to as the device. The DECT standard allows phone conversations without any interference.
Before you use this device for the first time, please read the following notes and heed all warnings, even if you are familiar with handling electronic devices. Keep this manual in a safe place for future reference. If you sell the device or pass it on, it is essential that you also hand over this manual, as it is part of the product.
Intended use
This is a telecommunications technology device. It has been designed to make telephone calls over the analogue telephone network. The telephone can be connected to a main terminal socket or to a private PBX. In order to use the device, it has to be installed properly first. The device may only be used for private use, not industrial or commercial use. The device may also not be used in tropical climates. Do not use the base, the power adapter or the charger cradle with power adapter outdoors. The handset may be used outdoors. However, protect the handset from moisture, spray and dripping water, especially when using it outdoors. In addition, the handset must never be immersed. This device fulfils all that relates to CE Conformity, relevant norms and standards. In the case of unauthorised modifications to the device, compliance with these standards shall no longer be guaranteed. The manufacturer shall not be liable for any damage or malfunctions resulting therefrom. Only use accessories recommended by the manufacturer. Any use other than that mentioned above does not correspond to the intended use.
Observe the regulations and laws in the country of use.
Package contents
Remove the device and all the accessories from the packaging. Remove the packaging material and check whether all the parts are complete and undamaged. In the case that you find anything missing or damaged, please contact the manufacturer. Damaged devices or accessories must not be put into operation.

A Power adapter (illustration may differ according to country)
B Base
C. Coiled handset cord
D Charging cradle with power adapter (illustration may differ according to country)
E Handset
F 2 x AAA batteries (similar to illustration)
G Telephone cord (illustration may differ according to country)
H These operating instructions (lineart illustration)

Remove the protective film from the handset display [2] and from the base display [17]. To do this, place your fingernail under the flap of the protective film. Lift the flap up and pull the protective film away.
Technical specifications
| Telephony standards DECT / | GAP |
| Base power adapter | Manufacturer 5ESPModel number: 5E-AD060050-BInput: 100-240V~ 50/60Hz 0.15AOutput: 6 V..., 0.5APower consumption: Standby < 0.5WPowered on max. 3 W |
| Charger cradle/handset power adapter | Manufacturer 5ESPModel number: 5E-AD070042-BInput: 100-240V~ 50/60Hz 0.15AOutput: 7 V...,0.42APower consumption: Standby < 0.5WPowered on max. 3 W |
| Handset, rechargeable batteries 2 rechargeable AAA-sized batteries (NiMH), 1.2V / 600mAh | |
| Handset, standby 100 hours in standby mode | |
| Handset, talk time 10 hours | |
| Handset, charging time 16 hours | |
| Phone number memory(base and handset) | 50 each |
| Dial modes | Tone dialPulse dial |
| Operating temperature range +5 °C to +45 °C | |
| Storage temperature range 0 °C to +60 °C | |
| Relative humidity Max. 85% | |
| Dimensions (H x W x D) | |
| Base approx. 199 mm x 80 mm x 182 mm | |
| Handset | approx. 181 mm x 56 mm x 28 mm |
| Charger cradle | approx. 100 mm x 104 mm x 60 mm |
| Weight | |
| Base approx. 770 g incl. power adapter | |
| Handset | approx. 130 g (without rechargeable batteries) |
| Charger cradle | approx. 142 g incl. power adapter |
Safety instructions
Explanation of danger-alerting symbols used in this manual

CAUTION! This symbol and the word "Caution" alert you to a potentially dangerous situation. Ignoring it can lead to severe injury or even death.

WARNING! This symbol and the word "Warning" denote important information required for the safe operation of the product and for the safety of its users.

When encountering this symbol on the device, the user must note the following: Please only use the supplied power adapter (manufacturer: 5ESP /model number: 5E-AD060050-B) for the base.

This symbol denotes further information on the topic.

WARNING! Always make sure that
- the device is not exposed to direct heat sources (e.g. radiators)
- the device is not exposed to direct sunlight or bright artificial light
- contact with water sprays or drops and corrosive liquids is avoided and the device is never operated near water; in particular the device may never be immersed in liquids (do not place any objects containing liquids, such as vases or drinks, on or near the device)
- the device is never placed near magnetic fields (e.g. speakers)
- no naked flames (e.g. burning candles) are placed on or near the device
- no foreign bodies can penetrate into the device
- the device is not subject to any extreme temperature changes as this may cause moisture through condensation and cause short-circuits
- the device should not be subjected to excessive shocks and vibrations
Failure to heed the warnings above may result in damage to the device.

CAUTION! Children and persons with disabilities
Electrical devices are not suitable for children. People with disabilities should only use electrical devices within the limits of their abilities. Do not allow children or persons with disabilities to use electrical devices unsupervised. They may not comprehend the potential risks. Children should be supervised to ensure that they do not play with the telephone. Small parts can represent choking hazards. Keep the packaging away from children and persons with disabilities.

CAUTION! There is a risk of suffocation.

CAUTION! Power adapter
Please only use the supplied power adapter for the base. Never connect the power adapter to other devices. Do not cover the power adapters to prevent overheating. Do not open the power adapters! Plug the power adapter into a suitable and easily accessible power socket only. Unplug the power adapter from the mains under the following circumstances:
• before a storm and/or thunderstorm
- when the power adapter or the power cord have been damaged
- if the power adapter has been exposed to rain, liquids or high levels of humidity
- when you wish to clean it
- to save energy. The power adapter consumes electricity in the Standby mode. In order to completely disconnect the power adapter from the mains, the power adapter must be pulled out from the wall outlet.
Please follow these instructions to avoid risk of potential fatal injury or fire!

WARNING! Cables
Unplug all cables by holding the plugs and never pull on the cables themselves. Never place pieces of furniture or other heavy objects on the cables and take care that they do not become damaged, especially at the plugs and sockets. Never tie knots in a cable and do not tie them to other cables. All cables must be laid so that nobody can trip over them or be obstructed by them.

CAUTION! Rechargeable Batteries
Rechargeable batteries can represent choking hazards. Keep the rechargeable batteries out of reach. If a battery is swallowed, seek medical help immediately.
Insert the rechargeable batteries with the correct polarity. The correct polarity is labelled on the batteries and inside the battery compartment. Never throw any rechargeable batteries into fire. Remove the rechargeable batteries if the handset is not going to be used for a long time. Improper use could cause explosions or leaks.
Never use conventional (non-rechargeable) batteries instead of the rechargeable batteries. If you want to replace the rechargeable batteries (because they are worn-out, for example), only use rechargeable batteries of the same type and nominal capacity. Please check the technical specifications on page 7.

CAUTION! Repairs
Repairs are required if this device has been damaged in any way, for example if the device housing is damaged, if liquids or objects have penetrated the device or if the product has been exposed to rain or moisture. Repairs are also necessary when the product does not perform normally or if it has been dropped. If smoke, unusual noises or smells are noticed, disconnect the device from the mains immediately. If this occurs, do not continue to use the device and have it checked out by an expert. All repairs must be carried out by qualified service personnel. Never open the housing of the device. Opening the housing can exposes you to a lethal electric shock. Opening the device could also damage it and you would void your warranty.

CAUTION! Cleaning
Disconnect the device from the mains before cleaning it, otherwise there is danger of electric shock.
To clean use a dry cloth. Never use any solvents or cleaners that may damage the plastic materials. Make sure that no liquid gets into the housing. For more stubborn dirt, use a slightly damp cloth.
Operating environment
The device is not designed for use in environments with high humidity (e.g. bathrooms) or excessive levels of dust. Operating temperature and operating humidity: +5 °C to +45 °C, max. 85% relative humidity. Please note that caring products for furniture surfaces may contain substances that can damage the device housing, so be careful if you have been using this type of products.
Storing When Not Using the Product
When left unused for a long period of time, remove the rechargeable batteries from the handset. Unplug the power adapter from the mains and disconnect it from the base. Also make sure that the storage temperature is maintained between 0 °C and +60 °C. Humidity must not exceed 85% RH.
Copyright
All the contents of this user manual are protected by copyright and provided to the reader for information only. Copying data and information without the prior explicit written consent of the author is strictly forbidden. This also applies to any commercial use of the contents and information. All texts and diagrams are up-to-date as of the date of printing.
Overview
An additional illustration of the items and controls and their corresponding numbers can be found on the inner page of the fold-out cover of this user manual. You can keep this page folded out whilst reading the different chapters of this user manual. This allows you to refer to the relevant controls at any time.
Handset
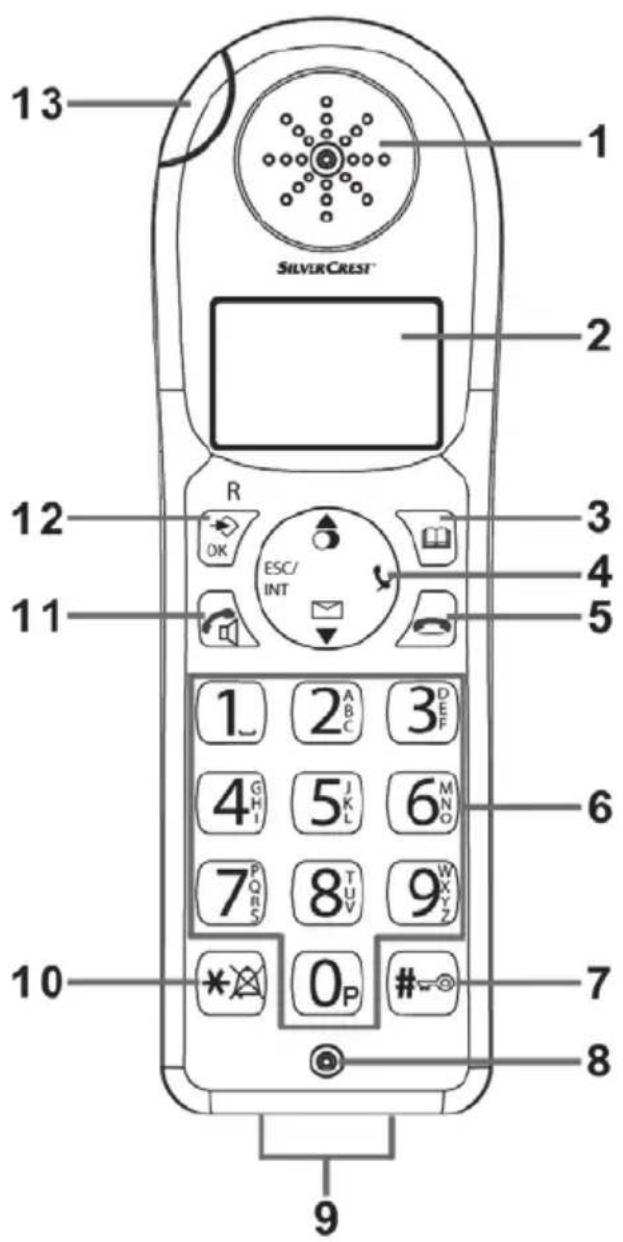
- Receiver
- Display
- Phonebook button
- Multifunction control

Redial / In the menu: navigate upwards

Mute on or off / Delete

Calls list / In the menu: navigate downwards

ESC / Internal call
- End call button
- Numeric buttons
- Hash button (Button lock)
- Microphone
- Charging contacts
- Asterisk button (ringtones on or off)
- Dial button (handsfree)
- Menu/OK button (Flash/Recall)
- Call LED
Display icons
 | Scroll display to the left |
 | Phonebook opened |
| [0647] | Battery level: Rechargeable batteries fully charged Rechargeable batteries empty |
 | Handset ringtone off |
 | Handsfree enabled |
| [TTXK] | Keypad locked |
| [XXXH] | Call in progress (handset picked up) |
| [78DH] | Microphone off (muted) |
| [TXBK] | New message in voice mail |
| [###] | New calls list entry |
| [###] | Antenna icon:- within RF range (steady indication)- out of range (flashing) |
| [###] | Internal call |
 | Scroll display to the right |
Base

14 ESC button
15 Menu/OK button
16 Multifunction control *
17 Display
18 Antenna
19 Phonebook button
20 Calls list button (Recall/Flash)
21 Speed dial buttons
22 Handsfree button
*

Redial / Up

Move down
23 Call LED
24 Numeric buttons
25 Locator (internal call)
26 Mute on or off / Delete
27 Reduce volume
28 Increase volume
29 Speaker
30 Telephone receiver fix (wall-mount)
31 Telephone receiver holder (wall-mount)
Move right
Move left
Display icons
 | Base ringtone off |
 | Scroll display to the left |
 | New message in voice mail |
 | New calls list entry |
 | Phonebook opened |
| head | Handsfree enabled |
| head | Handset picked up |
| header | Microphone off (muted) |
| ram | Internal call |
 | Scroll display to the right |
Base back panel

-
Power adapter socket
-
Telephone connection socket

On the bottom of the base [B] you'll find two retractile feet that allow to install the base [B] in an inclined position.
Charger cradle

-
Charging contacts
-
Battery level indicator
Before you start
Connecting the telephone receiver
Connect the telephone receiver to the left side of the base, as illustrated.

Connecting the Base

An illustration of the components mentioned below can be found in the Package Contents section on page 6.
- Plug the power adapter [A] into a wall outlet. Connect the plug using the power adapter socket [32] on the back of the base [B].
- Using the supplied telephone cord [G], connect the telephone connection socket [33] on the back of the base [B] to the telephone wall jack.
Wall-mounting the base
You can also mount the base on the wall. Proceed as follows:
- Drill two holes with a vertical distance of 102 mm.

- Insert suitable rawlplugs into the drilled holes.
- Insert suitable screws into the rawlplugs and turn them in until they protrude approx. 5 mm from the wall.
- Hang the base [B] on the screw heads and then pull it downwards until it becomes fixed.
- Turn the telephone receiver fixing [30] on the base [B] 180° so you can mount the telephone receiver.

When wall-mounted, if you wish to put the telephone receiver aside without ending a phone conversation, you can place the receiver onto the telephone receiver holder [31] on the base [B].
Connecting the Charger Cradle
- Connect the charging cradle plug to a power socket using power adapter [D].
Inserting the Batteries into the Handset
Open the battery compartment by gently pressing the indentation of the battery compartment cover and then sliding it downwards. Insert the rechargeable batteries into the handset [E] as illustrated below. Take care to insert the batteries into the handset [E] observing the correct polarity (+ and - ). The correct polarity is labelled on the batteries and inside the battery compartment. Reinstall the battery compartment cover.

(The figure is representational)
Charging the Batteries
Once the batteries have been inserted in the handset [E], they must be charged using the charger cradle with power adapter [D] for at least 16 hours before using the handset for the first time. The charging indicator [35] will light during charging.

On delivery, the batteries are not charged.
Getting started
Setting the Menu Language
You can set the menu language for the handset and for the base independently. The default menu language depends on the supplying country.
Setting the handset menu language
Proceed as follows to set the handset menu language:
- While the handset is in standby mode, press the Menu/OK button [12] to show the menu.
- Press the ▲ or ▼ buttons on the multifunction control [4] to select the "HANDSET" menu.
- Press the Menu/OK button [12] to confirm your selection.
- Press the ▲ or ▼ buttons on the multifunction control [4] to select the "LANGUAGE" item.
- Press the Menu/OK button [12] to confirm your selection.
- Press the ▲ or ▼ directional control buttons [4] to select the desired language (e.g. "ENGLISH") from the list.
- Press the Menu/OK button [12] to confirm your selection.
- A confirmation beep will sound and the "SAVED" message will appear for a few seconds on the display [2].
Setting the base menu language
Proceed as follows to set the base menu language:
• While the base is in standby mode, press the Menu/OK button [15] to show the menu.
- Press the ▲ or ▼ buttons on the multifunction control [16] to select the "LANGUAGE" item.
- Press the Menu/OK button [15] to confirm your selection.
- Press the ▲ or ▼ directional control buttons [16] to select the desired language (e.g. "ENGLISH") from the list.
- Press the Menu/OK button [15] to confirm your selection.
- A confirmation beep will sound and the "SAVED" message will appear for a few seconds on the display [17].
Setting the date and time
When powering the device on for the first time, please set the date and time on the base prior to using it. Proceed as follows:
• While the base is in standby mode, press the Menu/OK button [15] to show the menu.
- Press the ▲ or ▼ buttons on the multifunction control [16] to select the "TIME" item.
- Press the Menu/OK button [15] to confirm your selection.
- Press the ▲ or ▼ buttons on the multifunction control [16] to select the "DATE/TIME" item.
- Press the Menu/OK button [15] to confirm your selection.
- Next you can set the year, month, day, hours and minutes in sequence. Enter the desired value via the numeric buttons [24]. Press the Menu/OK button [15] to confirm each entry.
- A confirmation beep will sound to confirm the completed setting and the "SAVED" message will appear for a few seconds on the display [17].

The setting will be applied to all handsets registered with the base.
Setting the time format
Upon factory delivery the time format is set to "24 HOUR". You can customise the clock time format as follows on the base:
- While the base is in standby mode, press the Menu/OK button [15] to show the menu.
- Press the ▲ or ▼ buttons on the multifunction control [16] to select the "TIME" item.
- Press the Menu/OK button [15] to confirm your selection.
- Press the ▲ or ▼ buttons on the multifunction control [16] to select the "FORMAT" item.
- Press the Menu/OK button [15] to confirm your selection.
- Press the ▲ or ▼ buttons on the multifunction control [16] to select the "24 HOUR" option for 24-hours clock display or select "12 HOUR" for 12-hours clock display.
- Press the Menu/OK button [15] to confirm your selection.
- A confirmation beep will sound and the "SAVED" message will appear for a few seconds on the display [17].

To distinguish ante meridian (morning) and post meridian (afternoon) time for the 12-hour display, "AM" will show for ante meridian and "PM" for post meridian clock hours on the display [17].
Handset Menu
The handset features an easy-to-use menu. While the handset is in standby mode, press the Menu/OK button [12] to show the menu.
Press the ▲ or ▼ buttons on the multifunction control [4] to navigate the menu. Press the Menu/OK button [12] to confirm your selection.
Press the ESC/INT button on the multifunction control [4] to go back step by step. Press the End call button [5] to completely exit the menu.
If no button is pressed for approx. 20 seconds, the menu is closed automatically.
Menu Structure Overview:
| PHONEBOOK | |
| HANDSET | RING TONEHANDSET NAMEKEYPAD BEEPSELECT BASERESETLANGUAGE |
| BASE | DIAL MODERECALLSYSTEM PIN |
| DATE TIME | |
| REGISTER | |
| DE-REGISTER |
PHONEBOOK
This displays the phonebook entries. You can save up to 50 phone numbers with names. The phone number may contain up to 24 digits and the name up to 16 characters.
Creating a new entry
To create a new entry, proceed as follows:
- Press ▲ or ▼ on the multifunction control [4] to select any phonebook entry and then press the Menu/OK button [12]. If no entry was made previously, only the "EMPTY" entry is available.
- Press ▲ or ▼ on the multifunction control [4] to select the "NEW ENTRY" menu item and then press the Menu/OK button [12] to confirm. If no entry was made previously, only the "NEW ENTRY" menu item is available.
- "NAME?" will appear on the display [2]. Next enter the name you want via the numeric buttons [6]. You can press the "1" button to enter the special characters +, - and /. Press the ↘ button on the multifunction control [4] to erase any mistyped character. Keep the ↘ button on the multifunction control [4] pressed to clear the entire entry. Press the Menu/OK button [12] to save the name.
- "NUMBER?" will appear on the display [2]. Next enter the corresponding telephone number via the numeric buttons [6]. Press the ↘ button on the multifunction control [4] to erase any mistyped digit. Keep the ↘ button on the multifunction control [4] pressed to clear the entire entry. Press the Menu/OK button [12] to save the phone number.
- A confirmation beep will sound and the "ENTRY SAVED" message will appear for a few seconds on the display [2].
Editing an entry
To edit an entry, proceed as follows:
- Press ▲ or ▼ on the multifunction control [4] to select the phonebook entry you want to edit and then press the Menu/OK button [12].
- Press ▲ or ▼ on the multifunction control [4] to select the "EDIT ENTRY" menu item and then press the Menu/OK button [12] to confirm.
- The name will appear on the display [2]. Now you can edit the name via the numeric buttons [6]. Press the ↘ button on the multifunction control [4] to erase a character. Keep the ↘ button on the multifunction control [4] pressed to clear the entire entry. Press the Menu/OK button [12] to save the name.
- The phone number will appear on the display [2]. Now you can edit the phone number via the numeric buttons [6]. Press the ↘ button on the multifunction control [4] to erase a digit. Keep the ↘ button on the multifunction control [4] pressed to clear the entire entry. Press the Menu/OK button [12] to save the phone number.
- A confirmation beep will sound and the "ENTRY SAVED" message will appear for a few seconds on the display [2].
Deleting an entry
To delete an entry, proceed as follows:
- Press ▲ or ▼ on the multifunction control [4] to select the phonebook entry you want to delete and then press the Menu/OK button [12].
- Press ▲ or ▼ on the multifunction control [4] to select the "DELETE ENTRY" menu item and then press the Menu/OK button [12] to confirm.
- "DELETE?" will appear on the display [2]. Press the Menu/OK button [12] to delete the entry or the ESC/INT button on the multifunction control [4] to cancel.
• After the entry has been deleted, a confirmation beep will sound.
Deleting all entries
- Press ▲ or ▼ on the multifunction control [4] to select any phonebook entry and then press the Menu/OK button [12].
- Press ▲ or ▼ on the multifunction control [4] to select the "DELETE ALL" menu item and then press the Menu/OK button [12] to confirm.
- "DELETE ALL?" will appear on the display [2]. Press the Menu/OK button [12] to delete all entries or the ESC/INT button on the multifunction control [4] to cancel.
• After all entries have been deleted, a confirmation beep will sound.
HANDSET
This menu allows you to perform more settings for your handset.
RING TONE
Here you can set the ring tone for external and for internal calls. There are 9 different melodies available for each call type.
EXTERNAL
Press the ▲ or ▼ buttons on the multifunction control [4] to select a ringtone for external call. Press the Menu/OK button [12] to save. A confirmation beep will sound and the "SAVED" message will appear for a few seconds on the display [2].
INTERNAL
Press the ▲ or ▼ buttons on the multifunction control [4] to select a ringtone for internal call. Press the Menu/OK button [12] to save. A confirmation beep will sound and the "SAVED" message will appear for a few seconds on the display [2].
VOLUME
You can adjust the ringer volume in 5 levels (5 = very high; OFF = no ringtone). Press the ▲ or ▼ multifunction control buttons [4] to set the desired volume. To save the selected setting, press the Menu/OK button [12]. A confirmation beep will sound and the "SAVED" message will appear for a few seconds on the display [2]. Setting the volume to "OFF" shows the 🔒 icon and the message "RINGER OFF" on the display [2].
HANDSET NAME
Here you can change the name of the handset (default HANDSET). The name can consist of up to 9 characters. The handset number is added automatically as a name suffix.
Press the button on the multifunction control [4] to erase the existing name character by character. Keep the button on the multifunction control [4] pressed to clear all entered characters. Enter the handset name via the numeric buttons [6] and press the Menu/OK button [12] to confirm. A confirmation beep will sound and the "SAVED" message will appear for a few seconds on the display [2].
KEYPAD BEEP
Press the ▲ or ▼ multifunction control buttons [4] to enable or disable the keypad beep. To save the selected setting, press the Menu/OK button [12]. A confirmation beep will sound and the "SAVED" message will appear for a few seconds on the display [2]. The confirmation beep still sounds even when the keypad beep has been disabled.
SELECT BASE
This allows you to select the base where you want to register a handset. As you will normally have one base only, you can use the default setting "AUTO". Where several bases are available, you can use the "MANUAL" option to select the desired base manually from the list. Please note that the handset must be located within RF range of the base.
RESET
You can reset the handset and the base. All settings will be completely erased. Proceed as follows to reset the handset and the base:
- After confirming by pressing the Menu/OK button [12] the message "RESET?" appears on the display [2].
- Press the Menu/OK button [12] again, the message "PIN-" appears on the display [2].
- Enter your PIN code (default 0000) and press the Menu/OK button [12] to confirm. Or press the ESC/INT button on the multifunction control [4] to cancel.
• After the handset and the base have been reset, a beep can be heard.

Please note that a reset erases all saved information (redial, phonebook, calls list and speed dial numbers) from the handset and the base.

If you want to reset the base only, you have to execute this function directly on the base.
LANGUAGE
Set the menu language for the handset as follows:
- Press the ▲ or ▼ directional control buttons [4] to select the desired language (e.g. "ENGLISH") from the list.
- Press the Menu/OK button [12] to confirm your selection.
- A confirmation beep will sound and the "SAVED" message will appear for a few seconds on the display [2].
BASE
This menu allows you to perform more settings for the base.
DIAL MODE
There are two different options you can use.
TONE
Tone dialling is the most popular dialling method nowadays.
PULSE
Pulse dialling is normally used with older PBX devices.
Press the ▲ or ▼ buttons on the multifunction control [4] to select the desired option. To save the selected setting, press the Menu/OK button [12]. A confirmation beep will sound and the "SAVED" message will appear for a few seconds on the display [2].
RECALL
You can use the Recall/Flash function with the Menu/OK button [12] on your handset or the Calls list (Recall/Flash) button [20] on the base during a phone call. If your telephone is connected to a PBX, you can use this function for switching to an internal conversation or to forward the call. The Recall/Flash function of the handset or base will cause a short, temporary line interruption.
The following options are available:
SHORT
100 ms interruption.
LONG
300 ms interruption.
Press the ▲ or ▼ buttons on the multifunction control [4] to select the desired option. To save the selected setting, press the Menu/OK button [12]. A confirmation beep will sound and the "SAVED" message will appear for a few seconds on the display [2].

The Recall/Flash function on your handset or base allows you to use specific services for external phone calls, e.g. "Call Waiting". The requirement for this is that your network provider supports this feature.
SYSTEM PIN
To change the PIN code, proceed as follows:
- After confirming by pressing the Menu/OK button [12] the message "OLD PIN-" appears on the display [2].
- Enter the old PIN code (default 0000) and press the Menu/OK button [12] to confirm.
- "NEW PIN-" will appear on the display [2]. Enter a new 4-digits PIN code and press the Menu/OK button [12] to confirm.
- "AGAIN-" will appear on the display [2]. Enter the new PIN code again and press the Menu/OK button [12] to confirm.
- A confirmation beep will sound and the "PIN CHANGED" message will appear for a few seconds on the display [2].
- Please make sure you remember the PIN code or keep it in a safe place.
When resetting, the PIN will not be reset. In case that you have lost your PIN, please contact our Service Hotline (see page 49).
DATE TIME
This menu lets you set the date and time as well as the clock format. To set the date and time, proceed as follows:
- After confirming by pressing the Menu/OK button [12] you can set the year, month, day, hours and minutes in sequence. Enter the desired value via the numeric buttons [6]. Press the Menu/OK button [12] to confirm each entry.
• A beep will sound after the entire input has been completed.

The setting will be applied to all handsets registered with the base.
REGISTER
You can register up to 5 handsets with one base. By default, the handset supplied has already been registered with the base. To register a de-registered or a new handset with the base, proceed as follows:
- Press and hold the Locator button [25] on the base for about 10 seconds. "REGISTER" will appear on the display [17].
Notice for using handsets from different manufacturers

If you want to register third-party DECT handsets that support the GAP standard with your SilverCrest base, please read the documentation of their manufacturers. However, it cannot be guaranteed that third-party handsets will be fully compatible even when using the GAP standard.
- Press the ▲ or ▼ multifunction control buttons [4] on the handset to select the base from the list to which you want to register the handset. Then press the Menu/OK button [12].
- Enter your four-digits PIN code (default 0000) and press the Menu/OK button [12] to confirm.
- As soon as the handset has established a connection to the base, a beep can be heard and the name and number of the handset are shown on the display [2].

Notice for using bases from different manufacturers
If you want to register the SilverCrest handset with the base of a different manufacturer that supports the GAP standard, please read the documentation of the third-party manufacturer. However, it cannot be guaranteed that the SilverCrest handset will be fully compatible even when using the GAP standard.
DE-REGISTER
This menu item allows you to de-register a handset that is currently registered with the base. Proceed as follows:
- Enter your four-digits PIN code (default 0000) and press the Menu/OK button [12] to confirm.
- Enter the number of the handset that you want to de-register (1 to 5).
- Press the Menu/OK button [15] to confirm your entry.
• After the handset has been de-registered, a confirmation beep will sound. - Instead of the name of the handset, the de-registered handset display [2] will show "NOT REGISTER".

If you have one handset only, it is only possible to de-register it from the base. For more information, please read the "REMOVE HS" chapter on page 33.
Base Menu
The base features an easy-to-use menu. While the base is in standby mode, press the Menu/OK button [15] to show the menu. It is only possible to open this menu while the telephone receiver is not picked up.
Press the ▲ or ▼ buttons on the multifunction control [16] to navigate the menu. Press the Menu/OK button [15] to confirm your selection.
Press the ESC button [14] to go back step by step.
If no button is pressed for approx. 20 seconds, the menu is closed automatically.
Menu Structure Overview:
| PHONEBOOK | |
| RING TONE EXTERNAL | INTERNALVOLUME |
| KEYPAD BEEP | |
| LANGUAGE | |
| SETTINGS | DIAL MODERECALLSYSTEM PIN |
| TIME | DATEFORMAT |
| REMOVE HS | |
| RESET |
PHONEBOOK
This displays the phonebook entries. While the phonebook is opened, the telephone number of the currently selected phonebook entry is shown next to the book icon on the display [17] . You can save up to 50 phone numbers with names. The phone number may contain up to 24 digits and the name up to 16 characters.
Creating a new entry
To create a new entry, proceed as follows:
- Press ▲ or ▼ on the multifunction control [16] to select any phonebook entry and then press the Menu/OK button [15]. If no entry was made previously, only the "EMPTY" entry is available.
- Press ▲ or ▼ on the multifunction control [16] to select the "NEW ENTRY" menu item and then press the Menu/OK button [15] to confirm. If no entry was made previously, only the "NEW ENTRY" menu item is available.
- "NAME?" will appear on the display [17]. Next enter the name you want via the numeric buttons [24]. Press the DEL button [26] to erase any mistyped character. Press the Menu/OK button [15] to save the name.
- "NUMBER?" will appear on the display [17]. Next enter the corresponding telephone number via the numeric buttons [24]. Press the DEL button [26] to erase any mistyped digit. Press the Menu/OK button [15] to save the phone number.
- A confirmation beep will sound and the "ENTRY SAVED" message will appear for a few seconds on the display [17].
Editing an entry
To edit an entry, proceed as follows:
- Press ▲ or ▼ on the multifunction control [16] to select the phonebook entry you want to edit and then press the Menu/OK button [15].
- Press ▲ or ▼ on the multifunction control [16] to select the "EDIT ENTRY" menu item and then press the Menu/OK button [15] to confirm.
- The name will appear on the display [17]. Now you can edit the name via the numeric buttons [24]. Press the DEL button [26] to erase a character. Press the Menu/OK button [15] to save the name.
- The phone number will appear on the display [17]. Now you can edit the phone number via the numeric buttons [24]. Press the DEL button [26] to erase a digit. Press the Menu/OK button [15] to save the phone number.
- A confirmation beep will sound and the "ENTRY SAVED" message will appear for a few seconds on the display [17].
Deleting an entry
To delete an entry, proceed as follows:
- Press ▲ or ▼ on the multifunction control [16] to select the phonebook entry you want to delete and then press the Menu/OK button [15].
- Press ▲ or ▼ on the multifunction control [16] to select the "DELETE ENTRY" menu item and then press the Menu/OK button [15] to confirm.
- "DELETE ?" will appear on the display [17]. Press the Menu/OK button [15] to delete the entry or the ESC button [14] to cancel.
• After the entry has been deleted, a confirmation beep will sound.
Deleting all entries
- Press ▲ or ▼ on the multifunction control [16] to select any phonebook entry and then press the Menu/OK button [15].
- Press ▲ or ▼ on the multifunction control [16] to select the "DELETE ALL" menu item and then press the Menu/OK button [15] to confirm.
- "DELETE ALL ?" will appear on the display [17]. Press the Menu/OK button [15] to delete all entries or the ESC button [14] to cancel.
• After all entries have been deleted, a confirmation beep will sound.
RING TONE
Here you can set the ring tone for external and for internal calls. There are 9 different melodies available for each call type.
EXTERNAL
Press the ▲ or ▼ buttons on the multifunction control [16] to select a ringtone for external call. Press the Menu/OK button [15] to save. A confirmation beep will sound and the "SAVED" message will appear for a few seconds on the display [17].
INTERNAL
Press the ▲ or ▼ buttons on the multifunction control [16] to select a ringtone for internal call. Press the Menu/OK button [15] to save. A confirmation beep will sound and the "SAVED" message will appear for a few seconds on the display [17].
VOLUME
You can adjust the ringer volume in 5 levels (5 = very high; OFF = no ringtone). Press the ▲ or ▼ multifunction control buttons [16] to set the desired volume. To save the selected setting, press the Menu/OK button [15]. A confirmation beep will sound and the "SAVED" message will appear for a few seconds on the display [17].
KEYPAD BEEP
Press the ▲ or ▼ multifunction control buttons [16] to enable or disable the keypad beep. To save the selected setting, press the Menu/OK button [15]. A confirmation beep will sound and the "SAVED" message will appear for a few seconds on the display [17].
LANGUAGE
Set the menu language for the base as follows:
- Press the ▲ or ▼ directional control buttons [16] to select the desired language (e.g. "ENGLISH") from the list.
- Press the Menu/OK button [15] to confirm your selection.
- A confirmation beep will sound and the "SAVED" message will appear for a few seconds on the display [17].
BASE
This menu allows you to perform more settings for the base.
DIAL MODE
There are two different options you can use.
TONE
Tone dialling is the most popular dialling method nowadays.
PULSE
Pulse dialling is normally used with older PBX devices.
Press the ▲ or ▼ multifunction control buttons [16] to select the desired option. To save the selected setting, press the Menu/OK button [15]. A confirmation beep will sound and the "SAVED" message will appear for a few seconds on the display [17].
RECALL
You can use the Recall/Flash function with the Menu/OK button [12] on your handset or the Calls list (Recall/Flash) button [20] on the base during a phone call. If your telephone is connected to a
PBX, you can use this function for switching to an internal conversation or to forward the call. The Recall/Flash function of the handset or base will cause a short, temporary line interruption.
The following options are available:
SHORT
100 ms interruption.
LONG
300 ms interruption.
Press the ▲ or ▼ multifunction control buttons [16] to select the desired option. To save the selected setting, press the Menu/OK button [15]. A confirmation beep will sound and the "SAVED" message will appear for a few seconds on the display [17].

The Recall/Flash function on your handset or base allows you to use specific services for external phone calls, e.g. "Call Waiting". The requirement for this is that your network provider supports this feature.
SYSTEM PIN
To change the PIN code, proceed as follows:
- After confirming by pressing the Menu/OK button [15] the message "OLD PIN-" appears on the display [17].
- Enter the old PIN code (default 0000) and press the Menu/OK button [15] to confirm.
- "NEW PIN-" will appear on the display [17]. Enter a new 4-digits PIN code and press the Menu/OK button [15] to confirm.
- "AGAIN-" will appear on the display [17]. Enter the new PIN code again and press the Menu/OK button [15] to confirm.
- A confirmation beep will sound and the "SAVED" message will appear for a few seconds on the display [17].
- Please make sure you remember the PIN code or keep it in a safe place.
When resetting, the PIN will not be reset. In case that you have lost your PIN, please contact our Service Hotline (see page 49).
TIME
This menu lets you set the date and time as well as the clock format.
DATE TIME
To set the date and time, proceed as follows:
- After confirming by pressing the Menu/OK button [15] you can set the year, month, day, hours and minutes in sequence. Enter the desired value via the numeric buttons [24]. Press the Menu/OK button [15] to confirm each entry.
- A confirmation beep will sound to confirm the completed setting and the "SAVED" message will appear for a few seconds on the display [17].

The setting will be applied to all handsets registered with the base.
FORMAT
To set the clock format, proceed as follows:
- Press the ▲ or ▼ buttons on the multifunction control [16] to select the "24 HOUR" option for 24-hours clock display or select "12 HOUR" for 12-hours clock display.
- Press the Menu/OK button [15] to confirm your selection.
- A confirmation beep will sound and the "SAVED" message will appear for a few seconds on the display [17].

To distinguish ante meridian (morning) and post meridian (afternoon) time for the 12-hour display, "AM" will show for ante meridian and "PM" for post meridian clock hours on the display [17].
REMOVE HS
This menu items allows you to de-register a handset. Proceed as follows:
- Enter your four-digits PIN code (default 0000) and press the Menu/OK button [15] to confirm
- Enter the number of the handset that you want to de-register (1 to 5). Please note that the entered number does not show on the display [17] of the base.
- Press the Menu/OK button [15] to confirm your entry.
- A confirmation beep will sound and the "DELETED" message will appear for a few seconds on the display [17].
- Instead of the name of the handset, the de-registered handset display [2] will show "NOT REGISTER".
RESET
You can reset the base. All settings will be completely erased. Proceed as follows to reset the base:
- After confirming by pressing the Menu/OK button [15] the message "RESET?" appears on the display [17].
- Press the Menu/OK button [15] again, the message "PIN-" appears on the display [17].
- Enter your PIN code (default 0000) and press the Menu/OK button [15] to confirm. Or press the ESC button [14] to cancel.
- After the base has been reset, a confirmation beep will sound and the "COMPLETED" message will appear for a few seconds on the display [17].

Please note that a reset erases all saved information (redial, phonebook, calls list and speed dial numbers) from the base.

If you want to reset the handset and the base, you have to execute this function directly on the handset.
Handset - Everyday use
Making calls
External calls
Use the numeric buttons [6] to enter a telephone number. After you have entered the phone number, press the Dial button [11] to call the entered number.

Press the button on the multifunction control [4] to clear the entered digit. Keep the button on the multifunction control [4] pressed to clear all entered digits.

You can press the ⏻ button on the multifunction control [4] to adjust the volume of the receiver [1] during a call. The current volume level is shown on the display [2]. Only while the current volume level is shown on the display [2] you can press the ⏻ button on the multifunction control [4] to increase the volume.
Calling a number from the phonebook
If you want to use a number stored in the phone book, press the Phonebook button [3] while in standby mode. Press the ▲ or ▼ multifunction control buttons [4] to select the desired entry and then press the Dial button [11] to call the selected entry.
Press the End call button [5] to hang up.

For more information about adding a new phone book entry, please read the chapter "PHONEBOOK" on page 21.
Internal calls
Press the ESC/INT button on the multifunction control [4] to make an internal call. "INTERNAL" will appear on the display [2]. Enter the number 0 for calling the base or, when using more registered handsets, enter the number of the handset you want to call. The connection will be established immediately after entering the number.
Redial
Press the ⬆ button on the multifunction control [4] to show a list with the last three dialled phone numbers.
To call the last dialled phone number again, just press the Dial button [11], as the last phone number is already highlighted.
To call any other number on the list, press the ▲ or ▼ multifunction control buttons [4] to select the desired number and then press the Dial button [11] to call it.
Answering incoming calls
When receiving a call, the number of the caller will be shown on the handset display [2] and the Call LED [13] flashes. If the phone number has been saved in the phonebook, the corresponding name will be shown. The requirement for this feature to work is that your phone line must have the Caller ID function enabled.
Press the Dial button [11] to answer the call.
Calls list
The phone numbers and their associated names in the phonebook, if any, of all incoming calls are saved in the calls list. The calls list can save up to 30 incoming calls. The requirement for this feature to work is that your phone line must have the Caller ID function enabled.
A new call will appear with a flashing 🔊 icon on the display [2]. The display [2] also tracks the number of missed calls followed by the message "MISSED". To open the calls list, press the
button on the multifunction control [4]. The last received call is shown. If the calls list is empty, "EMPTY" is shown on the display [2].
Press the ▲ or ▼ multifunction control buttons [4] to scroll through the calls list. Press the Phonebook button [3] to show more information (like phone number or date and time) for the highlighted entry. You can press the Phonebook button [3] multiple times to toggle through the different information. Press the ESC/INT button on the multifunction control [4] to exit the calls list.

If an entry of the calls list is longer than 12 digits or characters, the ➤ icon appears on the display [2]. Then press the Phonebook button [3] to show the other digits. Now the ◀ icon appears on the display [2].
Calling a phone number from the calls list
To dial a phone number from the calls list, proceed as follows:
- Press the ▲ or ▼ multifunction control buttons [4] to select the entry that you want to call from the calls list.
- Then press the Dial button [11] to call the selected entry.
• To end the call press the End call button [5].
Removing a phone number from the calls list
To remove a phone number from the calls list, proceed as follows:
- Press the ▲ or ▼ multifunction control buttons [4] to select the entry that you want to remove from the calls list and then press the Menu/OK button [12].
- Press ▲ or ▼ on the multifunction control [4] to select the "DELETE" menu item and then press the Menu/OK button [12] to confirm.
• After the entry has been deleted, a confirmation beep will sound.
Removing all phone numbers from the calls list
To remove all phone numbers from the calls list, proceed as follows:
- Press the ▲ or ▼ multifunction control buttons [4] to select any entry from the calls list and then press the Menu/OK button [12].
- Press ▲ or ▼ on the multifunction control [4] to select the "DELETE ALL" menu item and then press the Menu/OK button [12] to confirm.
- "DELETE ALL?" will appear on the display [2]. Press the Menu/OK button [12] to delete all entries or the ESC/INT button on the multifunction control [4] to cancel.
• After all entries have been deleted, a confirmation beep will sound.
Saving a phone number from the calls list to the phonebook
To save a phone number from the calls list to the phonebook, proceed as follows:
- Press the ▲ or ▼ multifunction control buttons [4] to select the phone number from the calls list that you want to save to the phonebook and then press the Menu/OK button [12].
- Press ▲ or ▼ on the multifunction control [4] to select the "SAVE TO PB" menu item and then press the Menu/OK button [12] to confirm.
- "NAME?" will appear on the display [2]. Next enter the name you want via the numeric buttons [6]. Press the ↗ button on the multifunction control [4] to erase any mistyped character. Keep the ↘ button on the multifunction control [4] pressed to clear the entire entry. Press the Menu/OK button [12] to save the name.
- The phone number will appear on the display [2]. Now you can edit the phone number via the numeric buttons [6]. Press the ↘ button on the multifunction control [4] to erase a digit. Keep the ↘ button on the multifunction control [4] pressed to clear the entire entry. Press the Menu/OK button [12] to save the phone number.
- A confirmation beep will sound and the "ENTRY SAVED" message will appear for a few seconds on the display [2].
Hands-free function
To enable the hands-free function, press the Dial button [11] twice while in standby mode or press it once during a phone call. When the hands-free function is enabled, the icon will show on the display [2].
Press the Dial button [11] again to switch the hands-free function back off.

You can press the ▼ button on the multifunction control [4] to adjust the volume of the speaker for the hands-free function. The current volume level is shown on the display [2]. Only while the current volume level is shown on the display [2] you can press the ⬆ button on the multifunction control [4] to increase the volume.
Muting the microphone
You can mute the microphone during a call so you can speak without the other party hearing you. To do this, press the 🎨 button on the multifunction control [4] during a call. The microphone will be muted and the Ⓧ icon appears on the display [2].
Press the ↘ button on the multifunction control [4] again to switch the microphone back on.
Call forwarding
Press the ESC/INT button on the multifunction control [4] during an external call. "INTERNAL" will appear on the display [2]. Enter the number 0 for calling the base or, when using more registered handsets, enter the number of the handset you want to call. As soon as the connection to the base or the other handset has been established, you can talk internally. Press the End call button [5] to forward the external call to the base or the other handset. To recover the external call, your internal conversation partner just needs to hang up.
Intercom and conference calls
Press the ESC/INT button on the multifunction control [4] during an external call. "INTERNAL" will appear on the display [2]. Enter the number 0 for calling the base or, when using more registered handsets, enter the number of the handset you want to call. As soon as the connection to the base or the other handset has been established, you can talk internally. Press the ESC/INT button on the multifunction control [4] to toggle between the external and the internal call.
Press and hold the ESC/INT button on the multifunction control [4] for approx. 3 seconds to make a conference call. Whenever a conference call is initiated, a sequence of short beeps can be heard and the message "CONF CALL" appears on the display [2].
New message in voice mail
If there are new messages in the voice mail, the icon 📞 appears on the display [2]. After you have listened to the voice mail message, the icon 📞 disappears.

To be able to use the voice mail, your provider must support it.
Locking the keypad
Press and hold the Hash button [7] for approx. 2 seconds to lock the keypad against accidental input. However, you will still be able to answer any incoming calls by pressing the Dial button [11].
To unlock the keypad, press and hold the Hash button [7] again for approx. 2 seconds.
When the keypad is locked, the ⚙ icon will show on the display [2].

It is still possible to dial the pan-European emergency number 112 while the keypad is locked.
Switching the ringtone off
Press and hold the Asterisk button [10] for approx. 2 seconds to switch the ringtone off. To switch the ringtone back on, press and hold the Asterisk button [10] again for approx. 2 seconds.
When the ringtone is off, the 🔒 icon will show on the display [2].
Base - Everyday use
Making calls
External calls
Use the numeric buttons [24] to enter a telephone number. After you have entered the phone number, pick up the receiver to call the entered number.

Press the DEL button [26] to clear the entered digit.

You can adjust the receiver volume during a call by pressing the ▼ button [27] to reduce the volume or the ▲ button [28] to increase it. The current volume level is shown on the display [17].
You can also pick up the receiver first and dial the number afterwards using the numeric buttons [24]. Please note that in this case the entered phone number is dialled immediately.
Calling a number from the phonebook
If you want to use a number stored in the phone book, press the Phonebook button [19] while in standby mode. Press the ▲ or ▼ multifunction control buttons [16] to select the desired entry and then pick up the receiver to call the selected entry.
Put down the receiver to end the call.
You can also pick up the receiver first and then dial the number from the phonebook. To do this, press the Phonebook button [19] and then use the ▲ or ▼ multifunction control buttons [16] to select the desired entry. Next press the Menu/OK button [15] to confirm your selection. Press the ▲ or ▼ multifunction control buttons [16] to select the "DIAL NUMBER" menu item and then press the Menu/OK button [15] to call the selected entry.

For more information about adding a new phone book entry, please read the chapter "PHONEBOOK" on page 28.
Internal calls
To make an internal call, do not pick up the receiver and press and hold the Locator (internal call) button [25] for approx. 3 seconds (a short beep can be heard). "INT" will appear on the display [17]. Next enter the number of the handset that you want to call. The connection will be established immediately after entering the number. After the connection has been established, you can also pick up the receiver to make the call.
Redial
Press the ⬆ button on the multifunction control [16] to show a list with the last three dialled phone numbers.
To call the last dialled phone number again, simply pick up the receiver, as the last phone number is already highlighted.
To call any other number on the list, press the ▲ or ▼ multifunction control buttons [4] to select the desired number and then pick up the receiver to call it.

When picking up the receiver first before pressing the ⚠ button on the multifunction control [16], the last dialled number will be redialled automatically.
Answering incoming calls
When receiving a call, the number of the caller will be shown on the base display [17] and the Call LED [23] flashes. If the phone number has been saved in the phonebook, the corresponding name will be shown. The requirement for this feature to work is that your phone line must have the Caller ID function enabled.
Pick up the receiver to answer the call.
Calls list
The phone numbers and their associated names in the phonebook, if any, of all incoming calls are saved in the calls list. The calls list can save up to 30 incoming calls. The requirement for this feature to work is that your phone line must have the Caller ID function enabled.
A new call will appear with a flashing "CLIP" on the display [17]. The display [17] also tracks the number of missed calls followed by the message "MISSED". Press the Calls list (Recall/Flash) button [20] to open the calls list. The last incoming call is shown together with its date and time. If the calls list is empty, "EMPTY" is shown on the display [17].
Press the ▲ or ▼ multifunction control buttons [16] to scroll through the calls list. To exit the calls list menu, press the ESC button [14].

If an entry of the calls list is longer than 12 digits or characters, the ➤ icon appears on the display [17]. Press the ▶ button on the multifunction control [16] to show the other digits. Now the ◀ icon appears on the display [17]. Press the ◀ button on the multifunction control [16] to show the first digits again.

If the phone number has been saved in the phonebook, the corresponding name will be shown. Press the ▶ button on the multifunction control [16] to show the telephone number.
Calling a phone number from the calls list
To dial a phone number from the calls list, proceed as follows:
- Press the ▲ or ▼ multifunction control buttons [16] to select the entry that you want to call from the calls list.
• Pick up the receiver to call the selected entry.
• To finish the call, put down the receiver again.
Saving a phone number from the calls list to the phonebook
To save a phone number from the calls list to the phonebook, proceed as follows:
- Press the ▲ or ▼ multifunction control buttons [16] to select the phone number from the calls list that you want to save to the phonebook and then press the Menu/OK button [15].
- Press ▲ or ▼ on the multifunction control [16] to select the "SAVE TO PB" menu item and then press the Menu/OK button [15] to confirm.
- "NAME?" will appear on the display [17]. Next enter the name you want via the numeric buttons [24]. Press the DEL button [26] to erase any mistyped character. Press the Menu/OK button [15] to save the name.
- The phone number will appear on the display [17]. Now you can edit the phone number via the numeric buttons [24]. Press the DEL button [26] to erase a digit. Press the Menu/OK button [15] to save the phone number.
- A confirmation beep will sound and the "ENTRY SAVED" message will appear for a few seconds on the display [17].
Saving a phone number from the calls list to the speed dial buttons
To save a phone number from the calls list to a speed dial button, proceed as follows:
- Press the ▲ or ▼ multifunction control buttons [16] to select the phone number from the calls list that you want to save to a speed dial button and then press the Menu/OK button [15].
- Select the desired speed dial button from the menu items "SAVE TO M1", "SAVE TO M2" or "SAVE TO M3" by pressing the ▲ or ▼ buttons on the multifunction control [16] and then press the Menu/OK button [15] to confirm.
- "NAME?" will appear on the display [17]. If the phone number has been saved in the phonebook, the corresponding name will be shown. Next enter the name you want via the numeric buttons [24]. You may change an existing name if necessary. Press the button [26] to erase any mistyped character. Press the Menu/OK button [15] to save the name.
- The phone number will appear on the display [17]. Now you can edit the phone number via the numeric buttons [24]. Press the DEL button [26] to erase a digit. Press the Menu/OK button [15] to save the phone number.
- A confirmation beep will sound and the "SAVED" message will appear for a few seconds on the display [17].
Removing a phone number from the calls list
To remove a phone number from the calls list, proceed as follows:
- Press the ▲ or ▼ multifunction control buttons [16] to select the entry that you want to remove from the calls list and then press the Menu/OK button [15].
- Press ▲ or ▼ on the multifunction control [16] to select the "DELETE" menu item and then press the Menu/OK button [12] to confirm.
• After the entry has been deleted, a confirmation beep will sound.
Removing all phone numbers from the calls list
To remove all phone numbers from the calls list, proceed as follows:
- Press the ▲ or ▼ multifunction control buttons [16] to select any entry from the calls list and then press the Menu/OK button [15].
- Press ▲ or ▼ on the multifunction control [16] to select the "DELETE ALL" menu item and then press the Menu/OK button [15] to confirm.
- "DELETE ALL ?" will appear on the display [17]. Press the Menu/OK button [15] to delete all entries or the ESC button [14] to cancel.
• After all entries have been deleted, a confirmation beep will sound.
Speed dialling
You can use the three speed dial buttons [21] for phone numbers that you call frequently.
Saving a number for speed dial
To save a new speed dial number to a speed dial button, proceed as follows:
- Press any of the speed dial buttons M1, M2 or M3 [21] to which you wish to save the speed dial number. As there was no entry set previously, "EMPTY" appears on the display.
- Press the Menu/OK button [15].
- "NEW ENTRY" will appear on the display [17]. Press the Menu/OK button [15] again.
- "NAME?" will appear on the display [17]. Next enter the name you want via the numeric buttons [24]. Press the DEL button [26] to erase any mistyped character. Press the Menu/OK button [15] to save the name.
- "NUMBER?" will appear on the display [17]. Next enter the corresponding telephone number via the numeric buttons [24]. Press the DEL button [26] to erase any mistyped digit. Press the Menu/OK button [15] to save the phone number.
- A confirmation beep will sound and the "SAVED" message will appear for a few seconds on the display [17].
Speed dial
To call a speed dial number, proceed as follows:
- Press any of the speed dial buttons M1, M2 or M3 [21] that you want to call. The name will appear on the display [17].
- Pick up the receiver to call the speed dial number.
- Put down the receiver to end the call.

If you pick up the receiver first and then press any of the speed dial buttons M1, M2 or M3 [21], the speed dial number is called automatically.
Editing the speed dial number
To edit the speed dial number, proceed as follows:
- Press any of the speed dial buttons M1, M2 or M3 [21] for which you wish to edit the number. The name will appear on the display [17].
- Press the Menu/OK button [15].
- Press ▲ or ▼ on the multifunction control [16] to select the "EDIT ENTRY" menu item and then press the Menu/OK button [15] to confirm.
- The name will appear on the display [17]. Now you can edit the name via the numeric buttons [24]. Press the DEL button [26] to erase a character. Press the Menu/OK button [15] to save the name.
- The phone number will appear on the display [17]. Now you can edit the phone number via the numeric buttons [24]. Press the DEL button [26] to erase a digit. Press the Menu/OK button [15] to save the phone number.
- A confirmation beep will sound and the "SAVED" message will appear for a few seconds on the display [17].
Deleting a speed dial number
To delete a speed dial number, proceed as follows:
- Press any of the speed dial buttons M1, M2 or M3 [21] for which you wish to delete the number. The name will appear on the display [17].
- Press the Menu/OK button [15].
- Press ▲ or ▼ on the multifunction control [16] to select the "DELETE" menu item and then press the Menu/OK button [15] to confirm.
- "DELETE ?" will appear on the display [17]. Press the Menu/OK button [15] to delete the entry or the ESC button [14] to cancel.
• After the entry has been deleted, a confirmation beep will sound.
Hands-free function
You can enable the hands-free function while the receiver is put down by pressing the button [22]. When the hands-free function is enabled, the icon will show on the display [17].
Press the button [22] again to switch the hands-free function back off or to end the current call.

You can reduce the hands-free speaker [29] volume by pressing the ▼ button [27] or increase it by pressing the ▲ button [28]. The current volume level is shown on the display [17].
Muting the microphone
You can mute the microphone during a call so you can speak without the other party hearing you. To do this, press the DEL button [26] during a call. The microphone will be muted and the Licon appears on the display [17].
Press the DEL button [26] again to switch the microphone back on.
Call forwarding
During an external call press and hold the Locator button [25] for approx. 3 seconds (a short beep can be heard). "INT" will appear on the display [17]. Next enter the number of the handset that you want to call. As soon as the connection to the handset has been established, you can talk internally. Put down the receiver to end the external call and to forward it to the handset.
Intercom and conference calls
During an external call press and hold the Locator button [25] for approx. 3 seconds (a short beep can be heard). "INT" will appear on the display [17]. Next enter the number of the handset that you want to call. As soon as the connection to the handset has been established, you can talk internally. Press the Locator button [25] to toggle between the external and the internal call.
Press and hold the locator button [25] for approx. 3 seconds to make a conference call.
New message in voice mail
If there are new messages in the voice mail, the icon 📄 appears on the display [17]. After you have listened to the voice mail message, the icon 📄 disappears.

To be able to use the voice mail, your provider must support it.
Handset locator
This features lets you locate your handset if you have misplaced it. While the base is in standby mode, press the Locator button [25]. The handset emits a tone for approx. 30 seconds and the Call LED [13] flashes. The locator ring will sound even if the ringtone has been disabled.
To disable the tone and the flashing Call LED [13] press any button on the handset.
Troubleshooting
| Handset does not work / blank display | Batteries inserted incorrectly - insert the rechargeable batteries with the correct polarity.Batteries are flat - recharge the batteries. |
| The antenna icon Y0 is flashing | Handset out of range - take the handset closer to the base.Base has no power - check the base power supply. |
| No ringtone from handset or base | Switch the ringtone back on. |
| No ring or dial tone for outgoing calls | The phone cord is defective. |
| The time and date display flash on the base | Time and date have not been entered. Enter the time and the date.The power supply has been interrupted. Enter the time and the date again. |

When using the pulse dial mode with a PBX, it is possible for malfunctions to occur. This is because the PBX misinterprets the dial pulses. Switch to tone dial mode.
Environmental regulations and disposal information

Devices marked with this symbol are subject to the European Directive 2012/19/EU. All electrical and electronic devices must be disposed of separately from household waste at official disposal centres. Proper disposal of old devices prevents damage to the environment or your health. For further information about proper disposal, contact your local council, recycling centre or the shop where you bought the device.
Respect the environment. Old batteries must not be disposed of with domestic waste. They must be handed in at a collection point for waste batteries. Please note that batteries must be disposed of fully discharged at appropriate collection points for old batteries. If disposing of batteries that are not fully discharged, take precautions to prevent short circuits.
Dispose of all packaging in an environmentally friendly manner. Cardboard packaging can be taken to paper recycling centres or public collection points for recycling. Any film or plastic contained in the packaging should be taken to your public collection points for disposal.
Conformity notes
CE
This device complies with the basic and other relevant requirements of the R&TTE Directive 1999/5/EC, the Low-voltage Directive 2006/95/EC, the ErP Directive 2009/125/EC and the RoHS Directive 2011/65/EU. The Declaration of Conformity can also be found at the end of this Manual.
Warranty and Service Information
Warranty of TARGA GmbH
Dear Customer,
This device is sold with three years warranty from the date of purchase. In the event of product defects, you have legal rights towards the seller. These statutory rights are not restricted by our warranty as described below.
Warranty conditions
The warranty period commences upon the date of purchase. Please keep the original receipt in a safe place as it is required as proof of purchase. If any material or manufacturing faults occur within three years of purchase of this product, we will repair or replace the product free of charge as we deem appropriate.
Warranty period and legal warranty rights
The warranty period is not extended in the event of a warranty claim. This also applies to replaced and repaired parts. Any damage or defects discovered upon purchase must be reported immediately when the product has been unpacked. Any repairs required after the warranty period will be subject to charge.
Scope of warranty
The device was carefully manufactured in compliance with stringent quality guidelines and subjected to thorough testing before it left the works. The warranty applies to material and manufacturing faults. This warranty does not cover product components which are subject to normal wear and which can therefore be regarded as wearing parts, or damage to fragile components such as switches, rechargeable batteries or components made of glass. This warranty is void if the product is damaged, incorrectly used or serviced. To ensure correct use of the product, always comply fully with all instructions contained in the user manual. The warnings and recommendations in the user manual regarding correct and incorrect use and handling of the product must always be observed and complied with. The product is solely designed for private use and is not suitable for commercial applications. The warranty is rendered void in the event of incorrect handling and misuse, if it is subjected to force, and also if any person other than our authorised service technicians interfere with the device. No new warranty period commences if the product is repaired or replaced.
Submitting warranty claims
To ensure speedy handling of your complaint, please note the following:
Before using your product for the first time, please read the enclosed documentation carefully. Should any problems arise which cannot be solved in this way, please call our hotline.
- Always have your receipt, the product article number as well as the serial number (if available) to hand as proof of purchase.
- If it is not possible to solve the problem on the phone, our hotline support staff will initiate further servicing procedures depending on the fault.

Service

Phone: 0207-36 50 744
E-Mail: service.GB@targa-online.com

Phone: 01 - 242 15 83
E-Mail: service.IE@targa-online.com

Phone: 800 - 62 175
E-Mail: service.MT@targa-online.com

Phone: 800 - 92 496
E-Mail: service.CY@targa-online.com
IAN: 107109

Manufacturer
Please note that the following address is not a service address. First contact the service point stated above.
TARGA GmbH
Coesterweg 45
59494 SOEST
GERMANY
Inhaltsverzeichnis
Einleitung 53
(Abbildung ähnlich)
Aufladen der Akkus
EU-Declaration of Conformity
Address:
TARGA GmbH
Coesterweg 45
59494 Soest, Germany
Product:
DECT Big Button Phone
Model:
Silvercrest SGKT 50 A2
IAN:
107109
The product complies with the requirements of the following European directives:
1999/5/EC
R&TTE
2006/95/EC
Low Voltage directive
2009/125/EC
Energy Related Products
2011/65/EC
Restriction of the use of certain hazardous substances in electrical and electronic equipment
Compliance was proved by the application of the following standards:
EMC/R&TTE:
EN 301 489-1 V1.9.2
EN 301 489-6 V1.3.1
EN 61000-3-2:2006 +A1:2009 +A2:2009
EN 61000-3-3:2008
EN 301406 V2.1.1
Safety/Health:
EN 60950-1:2006+A11:2009+A1:2010
+A12:2011
EN 50360:2001 +A1:2012
EN 50385:2002
EN 62311:2008
ErP:
EN 50564:2011 with Regulation 1275/2008
EN 50563:2011 with Regulation 278/2009
ROHS:
EN 50851:2012
Soest, 30th of December 2014

Matthias Klauke, Managing Director


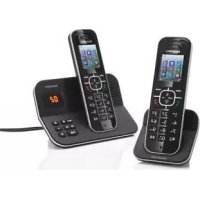
- BASE MENU 28
- HANDSET - EVERYDAY USE....34
- BASE - EVERYDAY USE 39
- TROUBLESHOOTING 46
- INTRODUCTION
- INTENDED USE
- PACKAGE CONTENTS
- SAFETY INSTRUCTIONS
- EXPLANATION OF DANGER-ALERTING SYMBOLS USED IN THIS MANUAL
- WARNING! ALWAYS MAKE SURE THAT
- CAUTION! CHILDREN AND PERSONS WITH DISABILITIES
- CAUTION! POWER ADAPTER
- WARNING! CABLES
- CAUTION! RECHARGEABLE BATTERIES
- CAUTION! REPAIRS
- CAUTION! CLEANING
- OPERATING ENVIRONMENT
- STORING WHEN NOT USING THE PRODUCT
- COPYRIGHT
- OVERVIEW
- HANDSET
- DISPLAY ICONS
- BASE BACK PANEL
- CHARGER CRADLE
- BEFORE YOU START
- CONNECTING THE TELEPHONE RECEIVER
- CONNECTING THE BASE
- WALL-MOUNTING THE BASE
- CONNECTING THE CHARGER CRADLE
- INSERTING THE BATTERIES INTO THE HANDSET
- CHARGING THE BATTERIES
- GETTING STARTED
- SETTING THE MENU LANGUAGE
- SETTING THE HANDSET MENU LANGUAGE
- SETTING THE BASE MENU LANGUAGE
- SETTING THE DATE AND TIME
- SETTING THE TIME FORMAT
- HANDSET MENU
- PHONEBOOK
- CREATING A NEW ENTRY
- EDITING AN ENTRY
- DELETING AN ENTRY
- DELETING ALL ENTRIES
- RING TONE
- EXTERNAL
- INTERNAL
- VOLUME
- HANDSET NAME
- KEYPAD BEEP
- SELECT BASE
- RESET
- LANGUAGE
- BASE
- DIAL MODE
- TONE
- PULSE
- RECALL
- SHORT
- LONG
- SYSTEM PIN
- DATE TIME
- REGISTER
- NOTICE FOR USING HANDSETS FROM DIFFERENT MANUFACTURERS
- NOTICE FOR USING BASES FROM DIFFERENT MANUFACTURERS
- DE-REGISTER
- BASE MENU
- MENU STRUCTURE OVERVIEW
- TIME
- FORMAT
- REMOVE HS
- HANDSET - EVERYDAY USE
- MAKING CALLS
- EXTERNAL CALLS
- CALLING A NUMBER FROM THE PHONEBOOK
- INTERNAL CALLS
- REDIAL
- ANSWERING INCOMING CALLS
- CALLS LIST
- CALLING A PHONE NUMBER FROM THE CALLS LIST
- REMOVING A PHONE NUMBER FROM THE CALLS LIST
- REMOVING ALL PHONE NUMBERS FROM THE CALLS LIST
- SAVING A PHONE NUMBER FROM THE CALLS LIST TO THE PHONEBOOK
- HANDS-FREE FUNCTION
- MUTING THE MICROPHONE
- CALL FORWARDING
- INTERCOM AND CONFERENCE CALLS
- NEW MESSAGE IN VOICE MAIL
- LOCKING THE KEYPAD
- SWITCHING THE RINGTONE OFF
- BASE - EVERYDAY USE
- SAVING A PHONE NUMBER FROM THE CALLS LIST TO THE SPEED DIAL BUTTONS
- SPEED DIALLING
- SAVING A NUMBER FOR SPEED DIAL
- SPEED DIAL
- EDITING THE SPEED DIAL NUMBER
- DELETING A SPEED DIAL NUMBER
- HANDSET LOCATOR
- TROUBLESHOOTING
- ENVIRONMENTAL REGULATIONS AND DISPOSAL INFORMATION
- CONFORMITY NOTES
- WARRANTY AND SERVICE INFORMATION
- WARRANTY OF TARGA GMBH
- WARRANTY CONDITIONS
- WARRANTY PERIOD AND LEGAL WARRANTY RIGHTS
- SCOPE OF WARRANTY
- SUBMITTING WARRANTY CLAIMS
- SERVICE
- MANUFACTURER
- INHALTSVERZEICHNIS
- EINLEITUNG 53
- AUFLADEN DER AKKUS
- EU-DECLARATION OF CONFORMITY
- ADDRESS
- PRODUCT
- MODEL
- IAN
- 1999/5/EC
- EMC/R&TTE
- SAFETY/HEALTH
- ERP
- ROHS
Brand : SILVERCREST
Model : Big Button Phone SGKT 50 A2
Category : Telephone