3in1 Coffee & Espresso Center 26160 - Coffee machine Espressione - Free user manual and instructions
Find the device manual for free 3in1 Coffee & Espresso Center 26160 Espressione in PDF.

User questions about 3in1 Coffee & Espresso Center 26160 Espressione
0 question about this device. Answer the ones you know or ask your own.
Ask a new question about this device
Download the instructions for your Coffee machine in PDF format for free! Find your manual 3in1 Coffee & Espresso Center 26160 - Espressione and take your electronic device back in hand. On this page are published all the documents necessary for the use of your device. 3in1 Coffee & Espresso Center 26160 by Espressione.
USER MANUAL 3in1 Coffee & Espresso Center 26160 Espressione
natural_image
Illustration of a portable toaster with control panel and side-mounted dish (no text or symbols)After Sales Service/Warranty Repairs
Call us at 201-439-1700
http://www.electra-craft.com
Electra-Craft, Inc.
41 Woodbine Street
Bergenfi eld, NJ 07621-3513
Follow instructions to download repair order form

Espressione
c/o The Smith Agency, Ltd.
P.O. Box 669307
Marietta, Georgia USA 30066.0106
Phone 770.509.3006
Fax 770.509.8736
espressione@smithagy.net
3-in-1
Coffee & Espresso Center

Espressione
text_image
Exploded view diagram of a kitchen appliance with numbered parts and control panelFig. 1
text_image
A B AUTO C 17:00 D CLOCK PM PM E F G H I L AUTO CATE PROG. V EPPRESSOFig. 2
text_image
Diagram showing a device with labeled parts and a magnified view of its internal structure.Fig. 3
natural_image
Diagram showing a mechanical component with two arrows pointing to a specific area (no text or symbols present)Fig. 4 Fig. 5
natural_image
Diagram showing a container with arrows indicating rotation or movement, no text or symbols presentFig. 6 Fig. 7
natural_image
Illustration of a hand holding a bag and a small object, with no visible text or symbolsFig. 8 Fig. 9
natural_image
Illustration of hands holding a medical device with a black arrow indicating force or insertion (no text or symbols present)Fig. 10 Fig. 11
natural_image
Illustration of a hand holding a small object with an arrow indicating rotation (no text or symbols)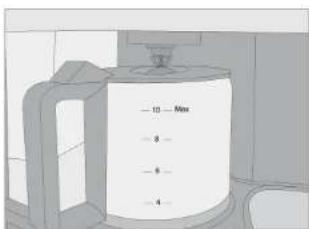
text_image
10 Max 8 6 4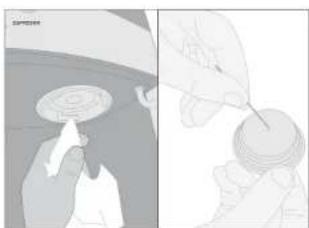
natural_image
Two-panel illustration showing a person adjusting a circular object with a ring, and another hand holding a small round object (no text or symbols)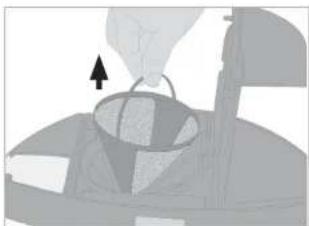
natural_image
Diagram of a mechanical component with an arrow indicating direction (no text or symbols present)SAFEGUARDS
When using electrical appliances, basic safety precautions should always be followed to reduce the risk of fire, electric shock, and/or injury to persons; in particular, we recommend that you:
- Read all instructions and information in this instruction book and any other literature included in the package referring to this product before operating or using this appliance.
- Do not touch hot surfaces. Use handles or knobs.
- Children should be supervised to ensure that they do not play with the appliance.
- This appliance is intended to be used in household and similar applications such as staff kitchen areas in shops, offices and other working environments; farm hotels; by clients in hotels, motels and other residential type environments; bed and breakfast type environments.
- To protect against fire, electric shock and personal injury do not immerse cord, plugs, or the appliance in water or other liquid.
- Close supervision is necessary when any appliance is used by or near children.
- Switch off and unplug this appliance when not in use and before cleaning. To cool down before putting on or taking off parts, and before cleaning the appliance.
- Do not operate any appliance with a damaged cord or plug or after the appliance malfunctions, or has been damaged in any manner. Return appliance to authorized service centre for examination, repair or adjustment.
- If the supply cord is damaged, it must be replaced by the manufacturer, its service agent or similarly qualified persons in order to avoid a hazard.
- The use of an accessory attachments not recommended by the appliance manufacturer may result in fire, electric shock or injury to person.
- Do not use this appliance outdoors.
- Do not let cord hang over edge of table or counter, or touch hot surfaces.
- Do not place on or near a hot gas or electric burner, or in a oven.
- Always attach plug to appliance first, then plug cord into the wall outlet, to disconnect, switch off any control, then remove plug from wall outlet.
- Do not use appliance for other than intended use.
- Do not open top lid and turn off filter holder while the machine is in operation. Wait until brewing cycle is completed and all water and steam has been used out.
This appliance is not intended for use by person (including children) with reduced physical, sensory or mental capabilities, or lack of experience and knowledge, unless they have been given supervision or instruction concerning use of the appliance by a person responsible for their safety.
Appliances with glass carafes.
A. The carafe is designed for use with this appliance only. It must never be used on a range top
B. Do not put a hot carafe on a wet or cold surface.
C. Do not use a cracked carafe or a carafe having a loose or weakened handle.
D. Do not clean carafe with cleansers, steel wool pads, or other abrasive material.
ALWAYS SAVE THESE INSTRUCTIONS.
POLARIZED PLUG
This appliance has a polarized plug (one blade is wider than the other). As a safety feature, this plug will fit into a polarized outlet only one way. If the plug does not fit fully into the outlet, reverse the plug. If it still does not fit, contact a qualified electrician. Do not attempt to modify the plug in any way.
DO NOT DEFEAT THE SAFETY PURPOSE OF THE POLARIZED PLUG.
Special Cord Set Instruction:
- A short power-supply cord (or detachable power-supply cord) is provided to reduce the risk resulting from becoming entangled in or tripping over a longer cord.
- Longer detachable power-supply cords or extension cords are available and may be used if care is exercised in their use.
- If a long detachable power-supply cord or extension cord is used,
a. The marked electrical rating of the detachable power-supply cord or extension cord should be at least as great as the electrical rating of the appliance,
b. If the appliance is the grounded type, the extension cord should be a grounding-type 3-wire cord,
c. The longer cord should be arranged so that it will not drape over the countertop or tabletop where it can be pulled on by children or tripped over.
Caution!
This appliance is for household use. Any servicing other than cleaning and user maintenance should be performed by an authorized service representative.
- Do not immerse this coffee machine in water or any other liquid.
- To reduce the risk of fire or electric shock, do not remove the base. No user serviceable parts inside. Repair should be done by authorized service personnel only.
- Check voltage to be sure that the voltage indicated on the bottom agrees with your voltage.
- Never use warm or hot water to fill the water container, use cold water only.
- Never refill the water chamber while this coffee machine is running. Turn the coffee machine off before refi lling with water.
- Do not place carafe on a hot surface or in a heated oven.
- Before turning on this coffee machine, please make sure that carafe sits flat on inside circle of heating plate.
- Never remove carafe before brewing is completely finished, i.e. dripping from the filter holder into the carafe has stopped completely.
- Keep your hands and the cord away from hot parts of the machine during operation.
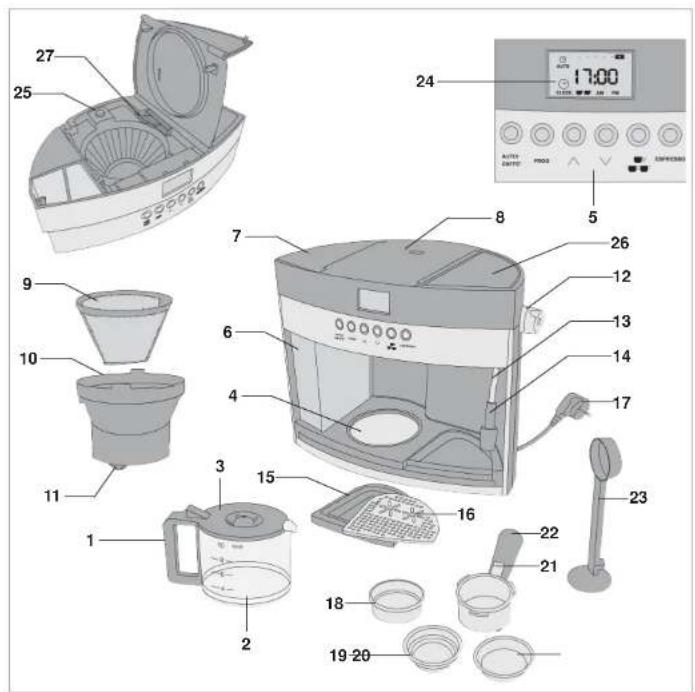
DESCRIPTION OF THE APPLIANCE (FIG.1)
1 - Carafe handgrip
2 - Carafe
3 - Carafe lid
4 - Hotplate for carafe
5 - Function keys
6 - Tank filling compartment
7 - Tank cover
8 - American coffee fi lter lid
9 - American coffee filter
10 - Filter support
11 - Dispenser
12 - Steam dispensing valve
13 - Steam wand
14 - Cappuccino maker
15 - Drip tray
16 - Cup rack
17 - Power cord + plug
18 - 1-cup coffee filter
19 - 2-cup coffee filter
20 - Coffee pod filter
21 - Filter block stop
22 - Filter holder for coffee powder
23 - Coffee presser/measure
24 - LCD display
25 - Filter support release button
26 - Cup warmer
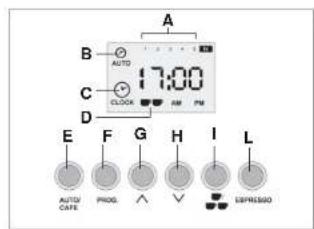
DESCRIPTION OF FUNCTION KEYS (FIG.2)
A - Heating plate heat conservation hours
B - Programme setting clock icon
I - 1 cup / 2 cups Button
L - ESPRESSO Button
Operation
Make sure that the domestic mains voltage is the same as that on the appliance rating plate. Place the machine on a fl at surface.
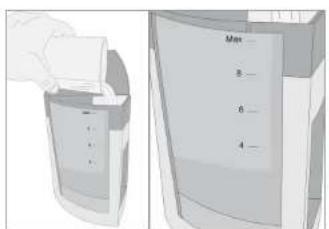
Open the tank cover (7).
Fill the tank with tap water (max. 15° hardness) (Fig. 3).
NEVER fi ll the tank above the MAX level.
Plug the appliance into the mains socket, which must be earthed.
First Use
Before using the appliance for the first time and also after a long period of non-use, prepare several cups of water (without any coffee) to rinse the system through completely:
To rinse the Espresso and cappuccino maker
- Place one of the three filters in the filter holder (22)
- Tighten the filter holder on the left facing the external marking and turn it firmly to the right
- Place a large enough container under the filter holder.
- Turn steam control knob (12) to close position ‘●’
- Press "1cup/2cups" button on (I), then continue to press "ESPRESSO" button (L).
So the pump is then activated. If the boiler tank (water heating system) is empty (on first use for example) it will fill with water with a characteristic filling noise.
As soon as the water is running out of the filter holder, press "ESPRESSO" button (L) off.
- Allow the appliance to fi nish heating the water.
- Once the “ESPRESSO” light, (L) is off, press “ESPRESSO” button (L) again, allow 1 cup (green light) water to run through button (I).
Repeat the action and pour the equivalent of two cups of water, pressing the button (I) (red light) and three cups of water pressing the button (I) (blue light), interchanging the three filters every time.
Important!
After pouring coffee, wait at least ten seconds before disengaging the filter holder, turn it slowly to from right to left, to prevent sprays or splashes of water or coffee.
Important!
Like on professional coffee machines, never remove the filter holder when the machine is operating; scalding hazard!
- Interrupt each time the process by pressing "ESPRESSO" button again.
To rinse the steam wand
- Place a container under the steam wand (13)
- Turn the steam control knob to ‘’ position
- As soon as the “ESPRESSO” light is off, slowly turn the steam control knob (12) to ‘MAX’ direction and allow the steam to escape for about 10 seconds.
- Turn steam control knob (12) to close position"●'
- Press "1cup/2cups" button (I) until the lit indicator switches off.
Important!
During the steam dispensing stage, never touch the surface of the steam wand, as they are very hot. Danger of scalding.
It is also necessary to use containers in a material suitable for high temperatures (ceramic or steel).
To clean the American Coffee elements
We recommend rinsing the machine parts with one or two cycles with running water only, without coffee powder. This will remove all traces of powder deposited during transport.
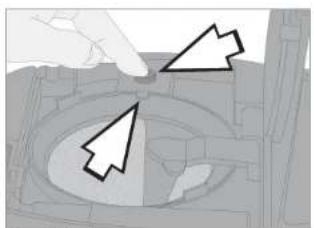
- Place the filter support (10) inside the machine, taking care that the notch in the support meets with the release button (25) see (Fig.4).
- Place the American coffee filter (9) in the filter support (10).
- Close the top lid (8).
- Place the carafe (2) on the hot plate (4).
- Switch on the "AUTO/CAFFE" button (E).
- As soon as the water comes out of the spout (11) in the filter support (10), switch off the “AUTO/CAFFE” button (E).
Warning!
The hot plate (4) switches on as soon as the American Coffee is poured and therefore, during this stage, it is necessary to keep hands well away from it and to remove the carafe using the handle (1).
Remove all water from tank, glass carafe and overflow grill after upon action.
Now you can start to use this machine for making your delicious coffee.
HOW TO MAKE ESPRESSO
- Fill the water tank (6) with fresh water.
- Turn the steam control knob to the ‘●’ position.
- Press “1cup/2cups” button (I) to select the amount of coffee to pour. Press once to select pouring of one cup of coffee, at the same time the green light will be illuminated;
- Press twice to select two cups of coffee, the red light will be illuminated; Three times to select 3 cups or one cup of pod coffee will be made, the blue light will switch on. Press again to shut off pouring.
- Continue to press “ESPRESSO” button (L). The pump is then activated. The “ESPRESSO” light (L) will be flashed. Wait until a small amount of water flows out, which means that the boiler is pressurised.
- Press "ESPRESSO" button (L) off. As soon as the system has reached the required temperature, the "ESPRESSO" light (L) will be off.
- Preheat the coffee cups by putting them on the cup rack (26) • Insert the correct filter into the filter holder, choose the one-cup filter (18), the two-cup filter (19) or the pod filter (20).
- If using the filters (18) or (19), fill them with one or two measures of ground coffee and press down with the measure (23); alternatively use the filter (20) and insert the standard 7g coffee pods.
- Insert the filter holder and turn it firmly to the right..
If too much ground coffee is put inside the filter, turning the filter holder may prove difficult and/or you may get leaks from the filter holder when the coffee is being dispensed.
- Place one or two espresso cups beneath the filter holder (Place one cup if using pods).
- As soon as the "ESPRESSO" light is off, Then press "ESPRESSO" button on again.
- When a sufficient quantity has run through (normally one filter coffee grounds or one pod can make about 60ml coffee), the machine will be auto shut off the pump. Otherwise you can press “ESPRES-SO” button to interrupted the produce. (if you want to pour a lower coffee).
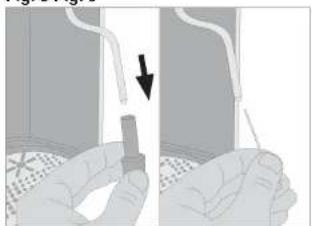
To remove coffee residues from the filter, lift the release to block the filter (21) over the edge of the filter itself. Turn the filter holder upside down and tap it gently (Fig. 5).
When warming up, your appliance may release small puffs of steam from the filter holder; this is perfectly normal.
Filling the water tank during use.
No special operation is necessary when the water in the tank runs out. Turn off the machine. Unplug it from the socket-outlet. Open the lid (7). Pour cool tap water in up to the MAX level.
EN
USEFUL TIPS FOR PREAPARING A GOOD ITALIAN ESPRESSO
The ground coffee in the filter holder has to be pressed lightly. Whether the coffee is stronger or weaker depends on the degree the coffee is ground, the quantity put into the filter holder and the pressing. Just a few seconds are needed for the coffee to flow down into the cups. If the dispensing time is longer, this means that the coffee is ground too fine or that the coffee put into the filter holder has been pressed too much.
HOW TO MAKE DRIP COFFEE
Manual mode
- Open the upper lid (7) and (8).
- Check the proper water level in the tank (7) and, if need be, fill with fresh still water. The reference marks of the carafe (2) and the water tank (6) are intended to make drip coffee, even though the dispensed coffee level is slightly lower than the filled water level as ground coffee absorbs some water.
The use of paper filter is recommended for a deeper cleaning of the components.
- Lift the hot water pour nozzle (27) (Fig.6)
- Position the paper filter onto the filter (9) by adapting it on the rim.
- Pour the ground coffee into the filter.
Initially the use of a measuring spoon of ground coffee is recommended for a stronger coffee, then the amount of coffee to be used will suit your own taste. Besides an overly ground coffee is not recommended as it could obstruct water £1 ow while dispensing.
- Lower the hot water pour nozzle (27) (Fig.6)
- Close the upper lid (7) and (8).
- Place the carafe (2) onto the hotplate (4).
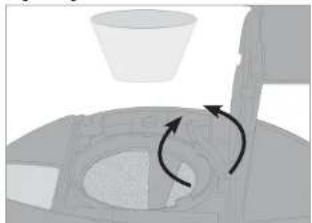
Make sure the dispenser (11) of the filter support (10) is aligned with the hole situated on the carafe lid (Fig. 7) in order to avoid coffee leakage.
- Press the button (E) "AUTO/CAFFE" twice to start the manual mode.
- Stop dispensing by pressing the button (E) “AUTO/CAFFE” again once the required amount has been reached.
If the carafe is removed before the end of dispensing process to pour a cup of coffee, be careful to put it back under the dispenser (11) within 30 seconds to avoid hot water or coffee leaks.
Automatic mode
- Once having carried out the filling procedures of water and coffee and the proper positioning of the carafe, as described in the manual mode, proceed as follows:
- Press the button (E) "AUTO/CAFFE" once to start the "Auto Start" function. The LCD display (24) lights up and shows the duration of the function "Heating plate heat maintaining" (A) for 5 seconds.
- Press the button "PROG"(F) to check the automatic mode activation time setting.
HOW TO MAKE CAPUCCINO
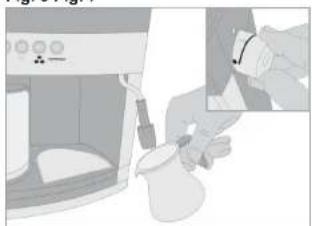
- Pour approximately 200ml of skimmed milk into a small but high container into which the steam wand (13) can be inserted.
Please Note: use quality, fresh and cold milk; the container must be cold, too, therefore do not rinse with warm water before the use.
- Position the steam dispensing valve (12) in position ‘’. (Fig.8)
- Place a container with milk under the steam wand (13).
- Press the button 1 cup/2 cups (I), the button "ESPRESSO" starts flashing.
- Once the button “ESPRESSO” turns off, rotate the steam dispensing valve (12) anti-clockwise slowly to “MAX” position direction.
- During the froth preparing phases, be careful the capuccino maker (14) does not touch the container bottom to avoid obstruction of steam dispensing.
- Once having got the froth (this could take 10-30 seconds), reposition the steam dispensing valve (12) into position ‘●’ and remove the container.
- After the above steps, dispense steam for few seconds to clean the hole of the steam wand (13) and remove possible milk remains. Clean the outside part of the steam wand and the capuccino maker (14) by means of a damp cloth.
Warning!
Do not touch the steam nozzle parts during the dispensing phases as they are very hot. Burn hazard.
Use only containers with material suitable for high temperatures (ceramic or steel).
SETTABLE FUNCTIONS
The machine is equipped with three settable functions.
- Drip coffee auto start time setting.
- Heat maintaining time setting.
- Digital clock setting.
When the appliance is connected to an electric socket, the “LCD Display” (24) shows the default time setting by proposing the value 12:00AM.
- At every press of the button "PROG" (F) the following function is selected:
Drip coffee auto start (in hours)
Drip coffee auto start (in minutes)
Heating plate heat maintaining (in hours)
Clock (in hours)
Clock (in minutes)
Exit (settable functions)
Please Note: In programming mode, in case of a delay over 10 seconds between the press of a button and the next one, the program quits automatically the programming mode by maintaining the last shown values, then the display turns off.
If the appliance is disconnected or blackout occurs, settings are resetted.
Auto start programming (Drip coffee automatic start time setting)
- Press the button "programming"(F) only once.
The icon (B) starts fl ashing together with the time.
- Press the arrow buttons “√” to set the time. (As the clock has a 12 hour display, every single time the value 12 is reached, “AM” or “PM” are shown alternatively).
- Press the button "programming"(F) again.
The digits of minutes start fl ashing.
- Press the arrow buttons “∨” to set the minutes.
The Auto start function is on and programmed to make coffee at the set time.
- Press the button “programming”(F) for the third time to enter the heating plate heat maintaining programming.
Heating plate heat maintaining programming
The default duration of this function and the following automatic switching off is set in 2 hours from the last dispensing cycle.
- The 1 digit value of the duration (in hours) of the function flashes.
- Set the required hour number (from 1 to 5) by pressing the arrow buttons “ √ ” or “ ∧ ” several times.
The function "Heating plate heat maintaining time programming" is set.
- Press the button "programming"(F) for the fourth time to enter the clock setting.
Clock setting
The icon (C) starts flashing together with the time.
- Press the arrow buttons “√” ““∧” to set the time. (As the clock has a 12 hour display, every single time the value 12 is reached, “AM” or “PM” are shown alternatively).
- By pressing the button “programming” (F) for the fifth time, the above described settings are stored.
Please Note: The flashing of “:” between hours and minutes shows that the clock is working properly and the exit from the programming mode.
APPLIANCE CLEANING
Warning!
Before carrying out the following cleaning procedures, switch the appliance off and disconnect it from the plug socket.
Warning!
Maintenance and cleaning on regular basis preserve the appliance and keep it efficient for a longer period. Never wash the appliance components in the dishwasher. Never use direct water jets.
Warning!
Every intervention has to be carried out when the appliance is cold.
Espresso filter cleaning containing ground coffee
Make sure the coffee dispensing hole is not obstructed and, if need be, clean it by means of a pin (Fig.9). Make the filter holder dispense hot water with the filter mounted without powder to dissolve or remove possible coffee remains or impurities.
Warning!
Remove and slowly disconnect the filter holder as the possible residual pressure could cause squirts or splashes.
SIt is recommended to clean the filters (18-19-20) with care approximately every 3 months by using the suitable detergent tablets available at the selling points and the Authorized Service Centers and following the instructions on the packaging or, alternatively, by using a simple cleaner tablet (without sparkling aid or other chemical additives) for dishwasher as follows:
- Insert a dishwasher tablet into the filter (without coffee) when the appliance is very hot (after at least 5 heating minutes).
- Insert one of the three filters into the filter holder (22).
- Close the filter holder with the handgrip facing left and rotate it tightly to the right.
- Place a container big enough under the filter holder.
- Rotate the steam handgrip to the closed ‘●’ position.
- Press the button 1 cup/2 cups (I), then press and maintain the button “ESPRESSO” (L) pressed to start water dispensing and dispense water for 15-20 seconds.
- Stop dispensing and let the tablet work for at least 15 minutes by maintaining the filter holder inserted in the appliance.
- Repeat the water dispensing procedure by letting the pump work for approximately 15-20 seconds, then leaving it to rest for other 15-20 seconds until two water tanks are exhausted.
- Remove the filter holder from the appliance, take the filter out and rinse it under running water thoroughly.
- Turn the appliance off by pressing the button 1 cup/2 cups (I) three times, disconnect the power supply from the plug socket and clean the filter holder fastening seat with a sponge to remove possible cleaner remains.
- Switch the appliance on again, reposition the filter holder and dispense at least 2 water cups to complete the rinse cycle.
If the coffee maker is used on a daily basis, it is recommended to carry out the cleaning procedure every three months.
Cleaning the fi Iter holder seat
With time, coffee residue may accumulate on the filter holder seat. It can be removed with a toothpick, a sponge (Fig. 9), or by letting water run through without fitting the filter holder.
Cleaning the steam pipe
Warning!
Perform this operation when the chrome-plated pipe is cold so as to prevent burns.
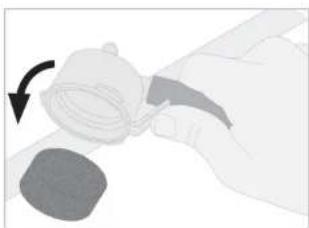
Disconnect the cappuccino maker (14) from the steam pipe(13) (Fig. 10). Wash it with running water. The steam pipe can be cleaned with a non-abrasive cloth. Put the cappuccino maker back on as far as it will go. If necessary, clean the small steam outlet hole again with a pin (Fig. 10). After use, always let the steam nozzle run for a few seconds so to free the outlet from any possible residue.
Cleaning the tank
Periodically clean the inside of the tank with a sponge or damp cloth.
Cleaning the cup grill and drip tray
Remember to empty the drip tray (15) from time to time.
Remove the grill (16) and wash it under running water; remove the drip tray (15) from the machine, empty it and wash it under running water.
Cleaning the machine body
Warning!
Clean the fixed parts of the machine using only a damp, non-abrasive cloth so as to not damage the body.
Rinsing the drip coffee fi Iter
Take the filter (9) out of the support (10). Empty it and rinse it under running water.
Rinsing the filter support
Open the filter lid (8) after lifting the hot water pour nozzle (27) (Fig.6) and remove the filter (9) by lifting it out by the handgrip (Fig.11). Take out the support (10), pressing the release button (25) (Fig. 4). Wash the filter support with a mild detergent and rinse thoroughly with plenty of water.
To refit the support on the machine, follow the removal steps in reverse order.
Cleaning the carafe
Warning!
Clean the carafe using a non-abrasive sponge. Wash the carafe with neutral soap and thoroughly rinse with water.
DECALCIFICATION
Good maintenance and regular cleaning will keep the machine in good working order for longer, greatly limiting the risks of lime scale deposits forming in the appliance. If, in spite of this, appliance operation becomes affected by frequent use with hard water, it is possible to remove the scale build up to prevent malfunctions.
Only use specific citric-acid-based products. The manufacturer of this machine cannot accept any liability for damage to the internal components of the coffee machine caused by the use of non-conforming products due to the presence of chemical additives.
Warning!
Do not use vinegar. It could damage the appliance.
Any damages due to failure to clean the machine periodically are not covered by the warranty. Decalcification is to be performed periodically, its frequency is based on the hardness of the water as shown in the table, or in any case every time you notice the appliance has abnormal difficulty in dispensing coffee.
| water hardness decalcify after decalcifi care dopo | ||
| (fH) French degrees | (fH) German degrees | (n° cups of coffee) |
| 36 20 300 | ||
| 18 10 600 | ||
| 0 0 1200 | ||
Scale removal from the espresso coffee circuit
To remove the scale, proceed as follows:
- Switch off the machine and unplug it from the mains power.
If the appliance is disconnected from the mains power, the settings will all be reset.
- Pour the contents of the sachet in a litre of water, taking care to allow the product to dissolve completely.
- Pour the prepared solution in the tank (7).
- Place a container with a capacity of at least half a litre under the filter holder. Press the 1 cup/2 cup button (I) to switch on the machine. When the light on the “ESPRESSO” button (L) stops flashing, press it and pour about half of the tank’s contents. Stop pouring by pressing the “ESPRESSO” button (L). Wait for about 15 minutes and then pour out the other half of the contents of the tank.
- Switch off the machine by pressing the 1 cup/2 cups button (I) three times and unplug the machine.
- Refi II the tank to the MAX level with fresh still water.
- Place a container with a capacity of at least half a litre under the filter holder seat.
- Press the 1 cup/ 2 cup button (I) to switch on the machine and start the espresso coffee function.
When the “ESPRESSO” button (L) light stops flashing, press the button and pour out about half of the contents of the tank. - Stop pouring by pressing the 1 cup/2 cup button (I) three times. Wait for about 15 minutes and then pour out the other half of the contents of the tank.
- At this point the appliance is once again ready for use.
Scale removal from the drip coffee circuit
To clean and remove scale, proceed as follows:
- Switch off the machine and unplug it from the mains power.
If the appliance is disconnected from the mains power, the settings will all be reset.
- Pour the contents of the sachet in a litre of water, taking care to allow the product to dissolve completely.
- Pour the prepared solution in the tank (7).
- Place the carafe (2) under the dispenser (11) (Fig.7).
Press the AUTO/CAFFE button (E) twice and after a few seconds, the solution will start to come out of the pour nozzle (27). Pour out about half of the tank's contents. Stop the pouring by pressing the AUTO/CAFFE (E) button for the third time. Wait for about 15 minutes and then pour out the other half of the contents of the tank.
- Switch off the machine and unplug it from the mains power.
If the appliance is disconnected from the mains power, the settings will all be reset.
- Refi II the tank to the MAX level with fresh still water.
- Place the carafe (2) under the dispenser (11) (Fig.7).
Press the AUTO/CAFFE button (E) twice and after a few seconds, water will start to come out of the pour nozzle (27). Pour out about half the contents of the tank. - Stop pouring by pressing the AUTO/CAFFE (E) button for the third time. Wait about 15 minutes and then pour out the other half of the contents of the tank.
- At this point, the appliance is once again ready for use
It is important that during this operation, you use the carafe (2) provided, since the lid (3) has a spout that serves to open the valve of the dispenser (11)
PUTTING OUT OF SERVICE
If you want to put the machine out of service, you must disconnect it electrically, empty the water tank and drip tray and clean it (see the paragraph on “Cleaning the appliance”).
In the case of scrapping, you must separate the various materials used in making the machine and dispose of them based on their composition and on the legal provisions in force in the country of use.
TROUBLESHOOTING
Warning!
If there are problems with operation, immediately turn off the machine and unplug it from the socket-outlet.
| Problems Causes Solutions | ||
| The coffee maker does not supply boiling water for tisanes. | Probably an excess amount of ground coffee has been placed in the fi l-ter ring preventing the fi lter ring from being correctly tightened into its housing. | Make sure the tank is properly inserted and that the water is not below the mini-mum level. Repeat the operations descri-bed in the “Preliminary phases for use” paragraph. |
| Cappuccino steam exit hole clogged. | Unclog any deposits that may have for-med in the hole of the cappuccino maker with a pin. | |
| Steam coming out of the edges of the fi lter holder. | The machine is trying to dispense coffee with the steam function on. Make sure that the steam dial is not turned on for any rea-son. | Stop pouring coffee, turn the steam di-spensing valve(12) to position‘•’ to stop the steam. Wait for the light on the "ESPRESSO" button (L) to switch off be-fore pouring a new coffee. |
| The coffee maker does not supply steam. | There is little water and the pump does not suck it up. | Check that the water level in the tank is correct. If necessary, fi ll it with cool tap water. |
| Cappuccino steam exit hole clogged | Unclog any deposits that may have for-med in the hole of the cappuccino maker with a pin. | |
| A few drops of water come out of the caraffe | The caraffe is not well-positioned under the nylon fi lter support dispenser. | Centre the carafe lid under the dispenser in the fi lter support. |
| The water level in the tank exceeds the maximum le-vel. | Fill the tank up to the MAX level. | |
| Problems Causes Solutions | ||
| Coffee ove- fl owing from the edges of the fi Iter ring. | Probably an excess amount of ground coffee has been placed in the fi lter ring preventing the fi Iter ring from being cor-rectly tightened into its housing. | Slowly remove and disconnect the fi Iter holder because any remaining pressure could cause splashes or squirts. Clean the coupling seat with a sponge (Fig. 9). Repeat the operation placing the correct quantity of coffee in the fi Iter. |
| Residues of ground co-fee have remained on the gasket of the fi Iter holder coupling seat. | Clean the seal with a toothpick or a spon-ge (Fig. 9). | |
| The fi Iter containing ground coffee has a blo-cked outlet hole. | Remove and slowly disengage the fi Iter holder as any residual pressure could lead to sprays or splashes. Use a pin to clean out the blocked outlet hole. Clean the fi Iter with the special tablets and fol-lowing the instructions in the instruction booklet | |
| The coffee is not supplied or fi owstoo slowly. | The holes of the perfora-ted disc in the fi Iter holder coupling seat are clogged. | Turn on the machine without the fi Iter holder, making the water run. Turn on the machine without the fi Iter holder, making the water run. If the water still does not come out from all the holes evenly, carry out the descaling cleaning operation using the Ariete NOCAL pro-duct found at Ariete service centres, fol-lowing the instructions provided in the package. |
| The fi Iter containing ground coffee has a blo-cked outlet hole. | Remove and slowly disengage the fi Iter holder as any residual pressure could lead to sprays or splashes. Use a pin to clean out the blocked outlet hole. Clean-se the fi Iter with the special tablets and following the instructions in the instruc-tion booklet | |
| The coffee blend is ground too fi ne. | Try using coarser coffee blends. | |
| The coffee blend is pres-sed down too much. | Amper coffee inside the fi Iter using less pressure. | |
| There is little water and the pump does not suck it up. | Check that the water level in the tank is correct. If necessary, fi ll it with cool tap water. | |
| The coffee is too watery and cold. | The blend has been ground too coarsely. | A more fi nely ground blend must be used to obtain a more concentrated and hotter coffee. |
PRESCRIPTIONS DE SECURITE
I - Poussoir 1 tasse /2 tasses
L - Poussoir ESPRESSO