Santos - Coffee machine Solis - Free user manual and instructions
Find the device manual for free Santos Solis in PDF.
User questions about Santos Solis
0 question about this device. Answer the ones you know or ask your own.
Ask a new question about this device
Download the instructions for your Coffee machine in PDF format for free! Find your manual Santos - Solis and take your electronic device back in hand. On this page are published all the documents necessary for the use of your device. Santos by Solis.
USER MANUAL Santos Solis
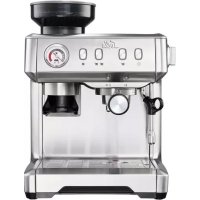
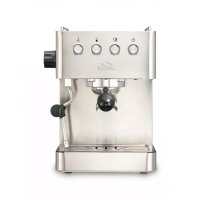
Coffee machine for portions
1 Brewing unit
2 Removable coffee waste container
3 Removable drip tray
4 Cup grille
5 Removable water tank (nominal content: 1.4 litres)
6 Swivel Hot water nozzle
7 Coffee/Hot water switch
8 On/Off switch
9 Operating temperature indicator
10 Coffee outlet
11 Brewing unit lock
12 Brewing unit cover
13 Water tank cover
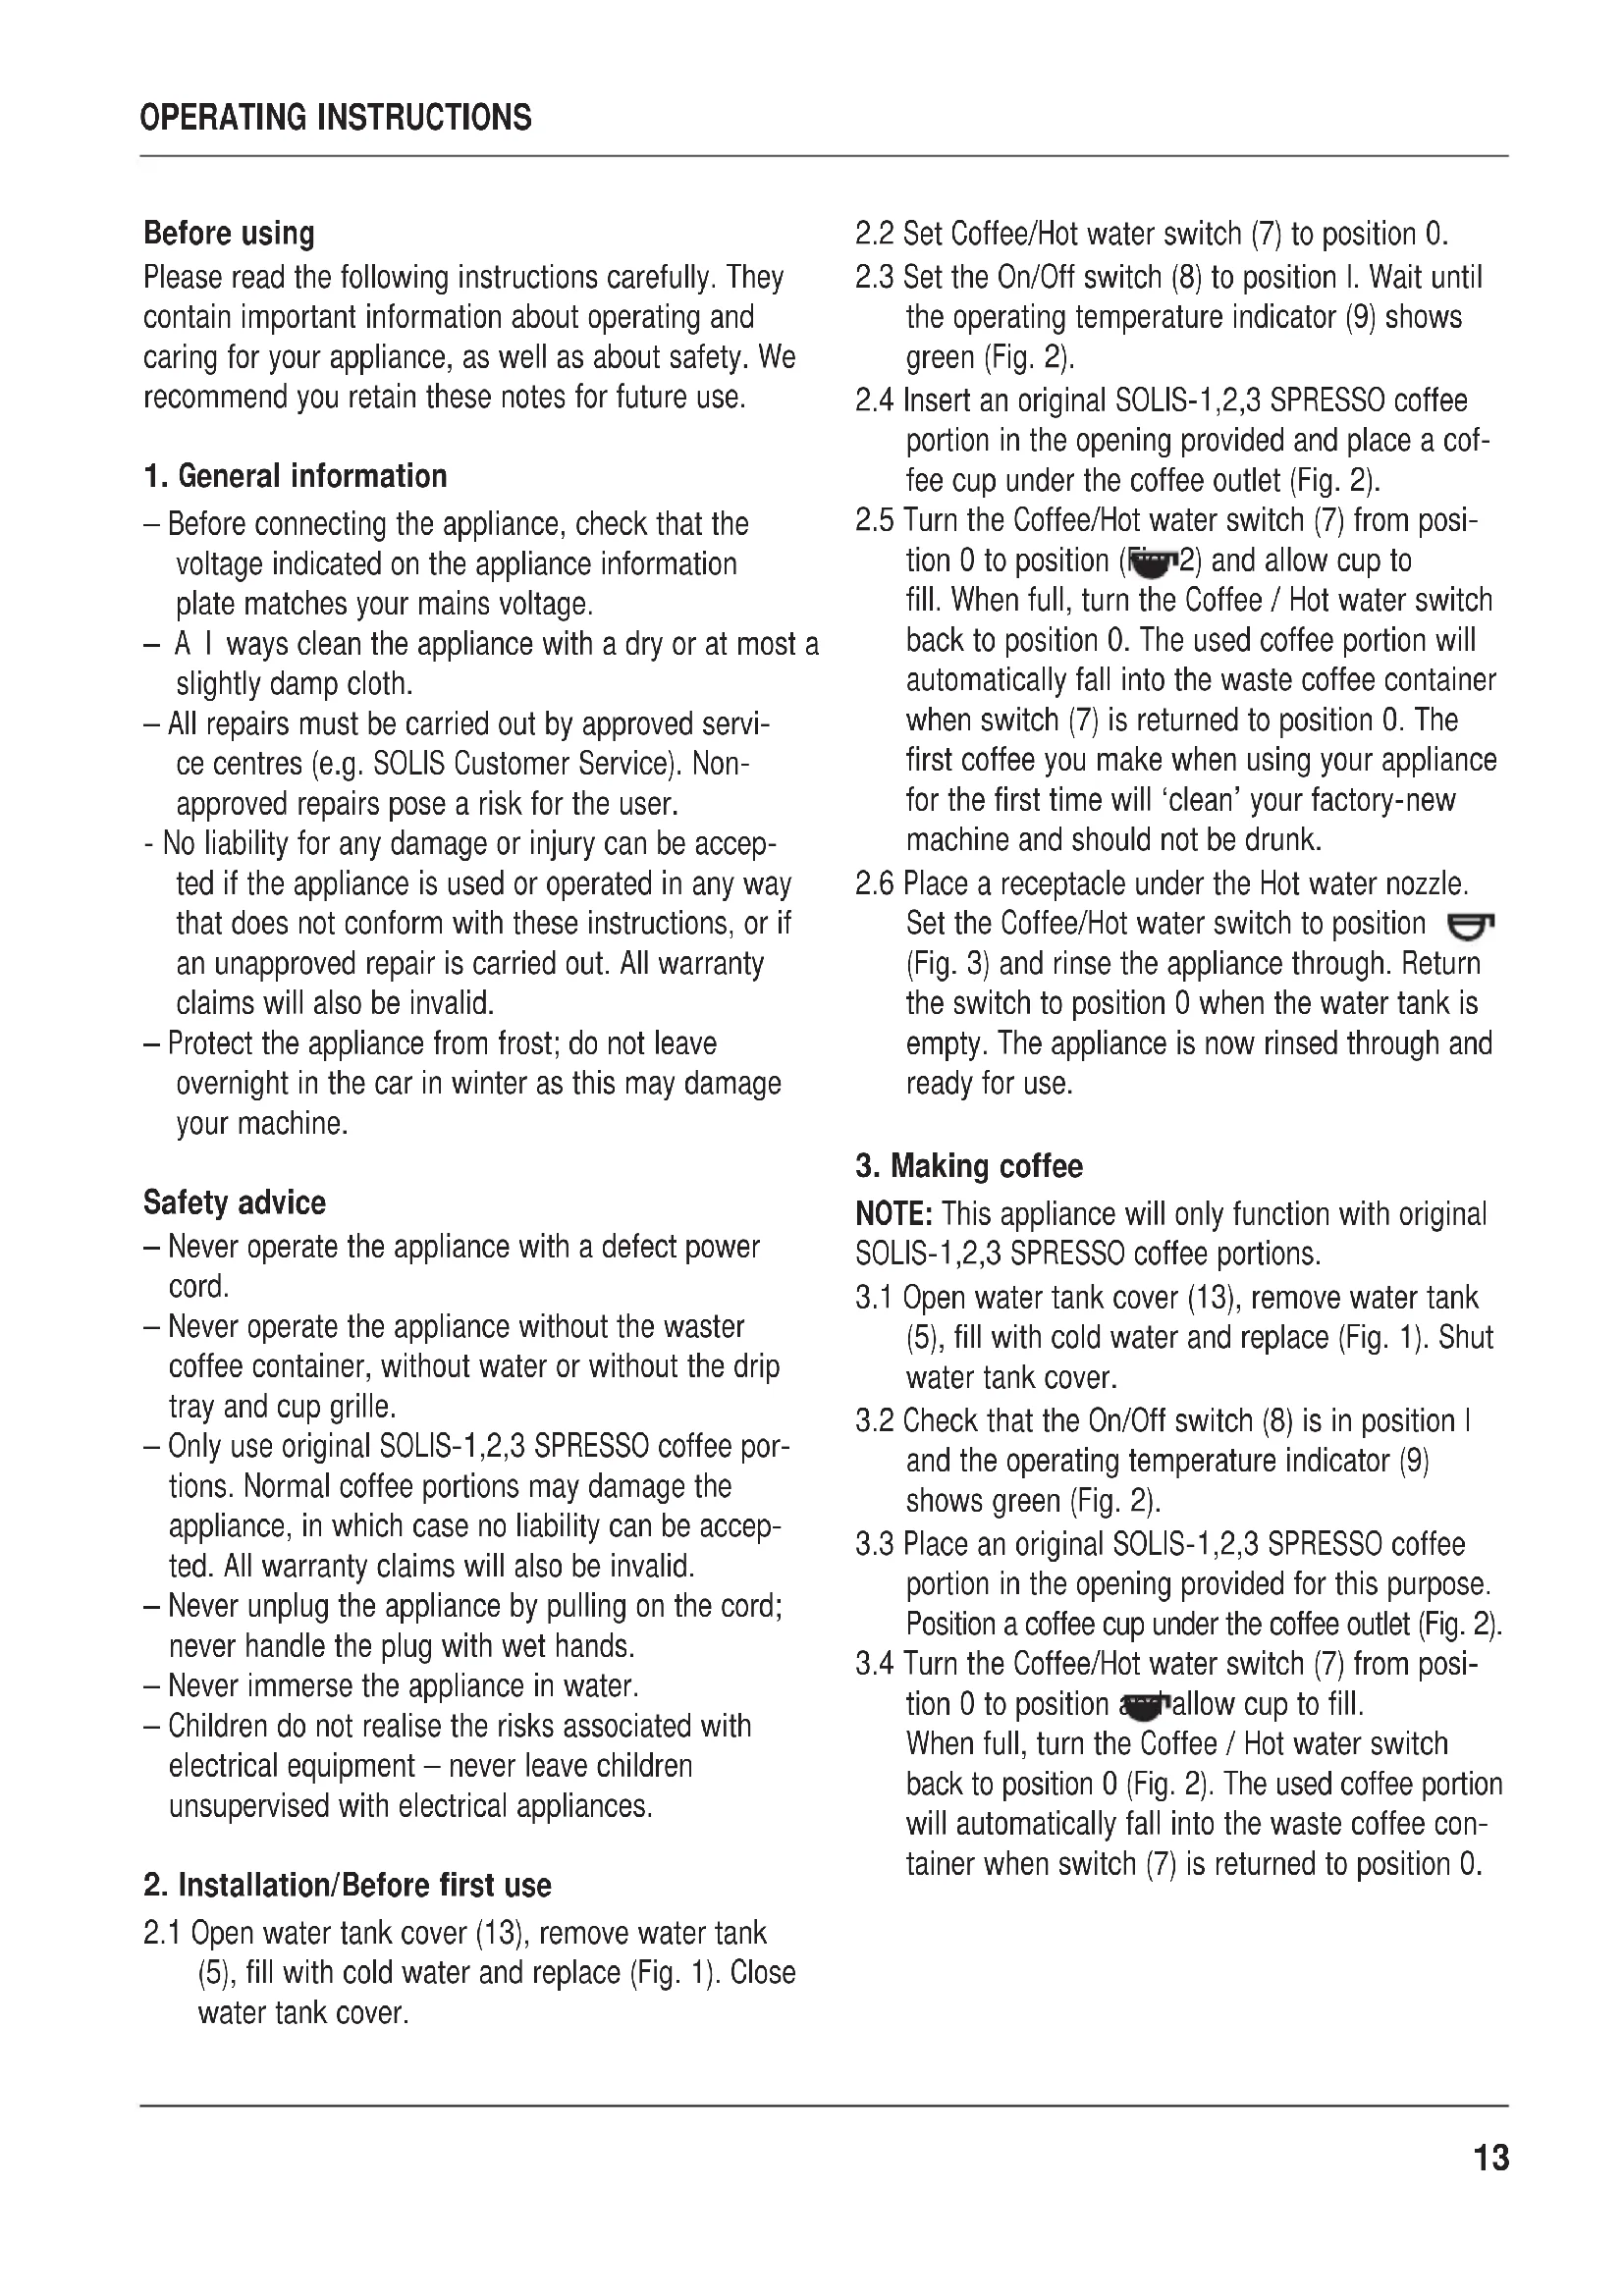
Please read the following instructions carefully. They contain important information about operating and caring for your appliance, as well as about safety. We recommend you retain these notes for future use.
1. General information
Before connecting the appliance, check that the voltage indicated on the appliance information plate matches your mains voltage.
- A I ways clean the appliance with a dry or at most a slightly damp cloth.
- All repairs must be carried out by approved service centres (e.g. SOLIS Customer Service). Non-approved repairs pose a risk for the user.
- No liability for any damage or injury can be accepted if the appliance is used or operated in any way that does not conform with these instructions, or if an unapproved repair is carried out. All warranty claims will also be invalid.
- Protect the appliance from frost; do not leave overnight in the car in winter as this may damage your machine.
Safety advice
- Never operate the appliance with a defect power cord.
- Never operate the appliance without the waster coffee container, without water or without the drip tray and cup grille.
- Only use original SOLIS-1,2,3 SPRESSO coffee portions. Normal coffee portions may damage the appliance, in which case no liability can be accepted. All warranty claims will also be invalid.
- Never unplug the appliance by pulling on the cord; never handle the plug with wet hands.
- Never immerse the appliance in water.
- Children do not realise the risks associated with electrical equipment - never leave children unsupervised with electrical appliances.
2. Installation/Before first use
2.1 Open water tank cover (13), remove water tank (5), fill with cold water and replace (Fig. 1). Close water tank cover.
2.2 Set Coffee/Hot water switch (7) to position 0.
2.3 Set the On/Off switch (8) to position I. Wait until the operating temperature indicator (9) shows green (Fig. 2).
2.4 Insert an original SOLIS-1,2,3 SPRESSO coffee portion in the opening provided and place a coffee cup under the coffee outlet (Fig. 2).
2.5 Turn the Coffee/Hot water switch (7) from position 0 to position (1-2) and allow cup to fill. When full, turn the Coffee / Hot water switch back to position 0. The used coffee portion will automatically fall into the waste coffee container when switch (7) is returned to position 0. The first coffee you make when using your appliance for the first time will 'clean' your factory-new machine and should not be drunk.
2.6 Place a receptacle under the Hot water nozzle. Set the Coffee/Hot water switch to position (Fig. 3) and rinse the appliance through. Return the switch to position 0 when the water tank is empty. The appliance is now rinsed through and ready for use.
3. Making coffee
NOTE: This appliance will only function with original SOLIS-1,2,3 SPRESSO coffee portions.
3.1 Open water tank cover (13), remove water tank (5), fill with cold water and replace (Fig. 1). Shut water tank cover.
3.2 Check that the On/Off switch (8) is in position I and the operating temperature indicator (9) shows green (Fig. 2).
3.3 Place an original SOLIS-1,2,3 SPRESSO coffee portion in the opening provided for this purpose. Position a coffee cup under the coffee outlet (Fig. 2).
3.4 Turn the Coffee/Hot water switch (7) from position 0 to position a shallow cup to fill. When full, turn the Coffee / Hot water switch back to position 0 (Fig. 2). The used coffee portion will automatically fall into the waste coffee container when switch (7) is returned to position 0.
4. Preparing hot water
For making tea or soup, etc., provided the appliance is ready to use (the operating temperature indicator is green) and the water tank is full.
4.1 Set the Coffee/Hot water switch (7) to position 0.
4.2 Place the Hot water nozzle into an empty, heat-resistant glass or cup (Fig. 3) and turn the Coffee/Hot water switch (7) from position 0 to position . turn the Coffee/Hot water switch to position 0 as soon as you obtain the required amount of hot water (Fig. 3). Do not remove glass or cup until the switch has been successfully returned to its starting position.
WARNING: The Hot water nozzle gets very hot when hot water is being supplied. Avoid direct skin contact. Risk of scalding.
5. Care and cleaning
Keeping your SOLIS 1,2,3 SPRESSO clean and well maintained will ensure optimum coffee quality and prolong the service life of your appliance.
Always switch your appliance off and unplug at the mains before cleaning.
5.1 Clean the water tank (5), drip tray (3), cup grille (4) (Fig. 4) and waste coffee container (2) (Fig. 5) daily using hot water and a nonscouring detergent if need be.
5.2 We recommend cleaning the Brewing unit (1) on a monthly basis. The Brewing unit is very easy to remove (Fig. 6):
5.2.1 Remove water tank
5.2.2 Open Brewing unit cover (12). Turn Brewing unit lock (11) to the left as far as it will go.
5.2.3 Carefully pull the Brewing unit forwards, keeping it level. Clean with hot water only. Dry Brew-ing unit.
5.2.4 Carefully replace clean Brewing unit, keeping it level. Ensure that you insert the water connection at the bottom of the Brewing unit into the water connection on the appliance (Fig. 6A). Push Brewing unit backwards and turn the lock to the right as far as it will go.
5.2.5 Shut the Brewing unit cover and reinsert the water tank.
6. Dscaling
Depending on the hardness of your water supply, the machine should be descaled regularly (even if you use a water filter), i.e. every 4-6 months at least. In areas with very hard water, descaling should be more frequent.
Descaling should only be carried out using the SOLIS tablets made especially for the Solis 1,2,3 Spesso automatic portion machine.
IMPORTANT: Regular descending helps to prevent expensive repairs. Damage due to failure to carry out the required descending, improper handling or noncompliance with these descending instructions is not covered by the guarantee.
Please note that you must not, under any circumstances, use vinegar or any other conventional descaling agents containing amidosulfuric acid as these would destroy the plastic (POM).
Dscaling instructions:
6.1 Turn machine on and heat up.
6.2 Add 2 Solis descaling tablets and 1/2 litre of lukewarm water to the water reservoir. Leave to stand for approx. 15 minutes until the tablets have dissolved completely.
6.3 Turn off the main switch
6.4 Turn the function switch (7) on the right-hand side to Coffee and insert the descending seal into the top of the coffee portion slot. Reset the function switch to 0. The seal should remain inserted in the machine throughout the descending and rinsing processes.
6.5 Turn on the main switch
6.6 Place a container under the hot water and coffee nozzle. Briefly turn function switch (7) to Hot water (approx. 5 sec.), then turn to Coffee. Allow coffee water to run for approx. 5 sec. and then turn function switch back to 0. Leave machine to stand like this for approx. 10 min.
6.7 Repeat procedure once more.
6.8 Use the remaining solution to rinse through the hot water and coffee duct. Turn the function switch (7) alternately between Hot water and Coffee until the water reservoir is empty. Turn function switch back to 0.
6.9 Rinse out water reservoir.
6.10 Fill water reservoir half full with cold water and place in position.
6.11 Turn the function switch (7) alternately between Hot water and Coffee until the water reservoir is empty. Turn function switch back to 0 and turn off main switch.
6.12 Pull descending seal upwards and clean.
6.13 Clean all containers.
6.14 Fill up with fresh water. Machine is now ready to use again.
Safety remarks:
Keep out of children's reach. Do not swallow. Avoid contact with eyes. Follow instructions on packaging.
Disposal:
Product residues can be disposed of via the mains water supply.
7. Faults and possible causes
Please read the following points carefully before sending in your appliance for repair. You will often find you are able to resolve the problem yourself, saving yourself trouble and inconvenience.
7.1 Coffee is not hot enough:
- Wait for the green operating temperature indicator to come on.
Cup is too cold. Pre-heat.
7.2 No coffee comes out of the machine:
- No water in the tank.
- The water tank is not properly inserted
7.3 The appliance will not switch on:
- Appliance is not properly connected to power supply/check fuse
Brewing unit cover is not shut properly.
7.4 Water pump makes a loud noise:
Not enough water in the tank.
If you cannot resolve the problem after checking these points please return the appliance in its original packaging, with details of the defect, to our Customer Service Unit or an approved Service Centre.
Schweiz
SOLIS AG
Solis-Haus
Europastrasse 11
8152 Glattbrugg
Tel. 044/8746464
Fax. 044/874 64 99