BR340HSS - Bread maker Holland Electro - Free user manual and instructions
Find the device manual for free BR340HSS Holland Electro in PDF.

| Product type | Bread machine |
| Brand | Holland Electro |
| Model | BR340HSS |
| Power supply | 230 V ~ 50 Hz |
| Power (estimated) | 600 W |
| Bread capacity | 1.5 lb or 2 lb (pounds) |
| Number of programs | 8 (Basic, Whole Wheat, French, Sweet, Ultrafast-1, Quick, Dough, Bake) |
| Crust setting | Light, medium, dark |
| Delay start | Up to 13 hours |
| Keep warm | 60 minutes after baking |
| Display type | LCD |
| Pan coating | Non-stick |
| Included accessories | Pan, kneading paddle, hook (depending on model) |
| Recommended ambient temperature | 15°C to 34°C |
| Cleaning | Pan: wipe with damp cloth; paddle: soak in hot water; removable lid |
| Safety | Unplug before cleaning, do not immerse, avoid contact with moving parts |
| Warranty | 12 months from purchase date |
Frequently Asked Questions - BR340HSS Holland Electro
User questions about BR340HSS Holland Electro
0 question about this device. Answer the ones you know or ask your own.
Ask a new question about this device
Download the instructions for your Bread maker in PDF format for free! Find your manual BR340HSS - Holland Electro and take your electronic device back in hand. On this page are published all the documents necessary for the use of your device. BR340HSS by Holland Electro.
USER MANUAL BR340HSS Holland Electro
INSTRUCTION MANUAL .... 7
MODE D' EMPLOI 11
natural_image
Illustration of a silver wheat bread machine with control panel and brand logo (no text or symbols on the device itself)type:BR340HSS
art.nummer:10005521

INLEIDING
Basic, Whole weat, French, Sweet, Ultrafast, Quick, Dough, Bake
VEILIGHEIDSVOORSCHRIFTEN:
INTRODUCTION
The breadmaker type BR340HSS is suitable for making a wide range of bread.
It is only meant for domestic use.
The machine has 8 menu functions:
Basic, Whole wheat, French, Sweet, Ultra fast, Dough, Bake
SAFETY PRESCRIPTIONS:
Read this instruction carefully before using the machine.
Keep this instruction, the guarantee certificate, the payment proof and, when possible, the box and inside packing. The machine is only meant for private use and may not be used for commercial aims. Always pull out the plug when the machine is not on, you want to add accessories, you want to clean the machine or with jamming.
Never leave children with electric devices without supervision. Therefore, place the machine out of reach for children. Make sure the wiring isn't hanging down. Check the machine and wire on damage regularly.
Don't use the machine when it's damaged. Don't repair the machine yourself but use a known electrical company. It's necessary for your safety that a broken or damaged plug will be replaced by the manufacturer, our service department or a known electrical company. Make sure the machine isn't been exposed to heat, direct sunlight or liquid and doesn't make contact with sharp edges etc.
Don't leave a working machine without supervision.
Make sure there is no power on the machine when it isn't used, even for a short while.
Only use original accessories.
Don't use the machine outside.
Never place the machine in water or another liquid and don't let it contact liquid.
Don't use the machine with wet hands.
Immediately pull out the plug when the machine gets wet.
Don't let your hands contact the water.
Only use the machine where it's meant for as given on the type sign.
Don't use the machine when the output is damaged.
Don't touch moving or spinning parts of the machine. When you're using the breadmaker for the first time:
Check the baking form and clean the rest of the baking space. Don't use sharp object and don't scour it. The baking form is provided with an anti-burning-layer. Grease the baking form and make the machine work for 10 minutes. Clean the baking form again. Place the kneader on the ash in the baking space.
ELECTRICAL CONNECTION:
The machine must be connected on a 230 V 50Hz safety socket.
FUNCTIONS AND WORKING:
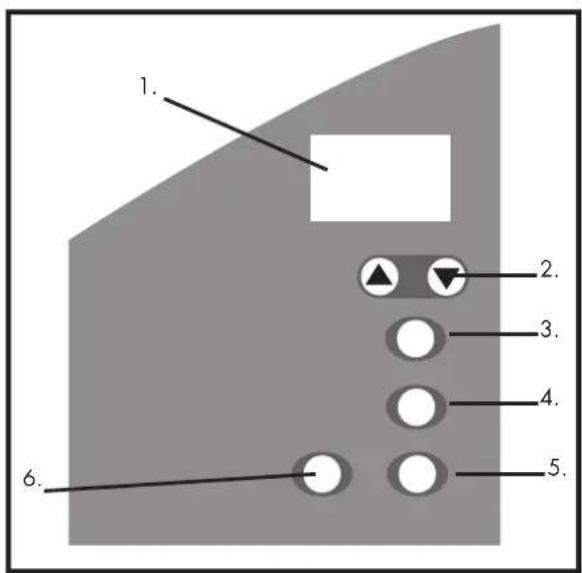
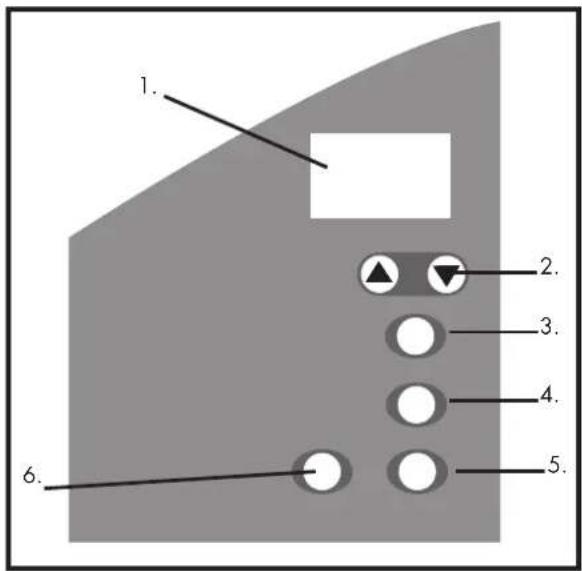
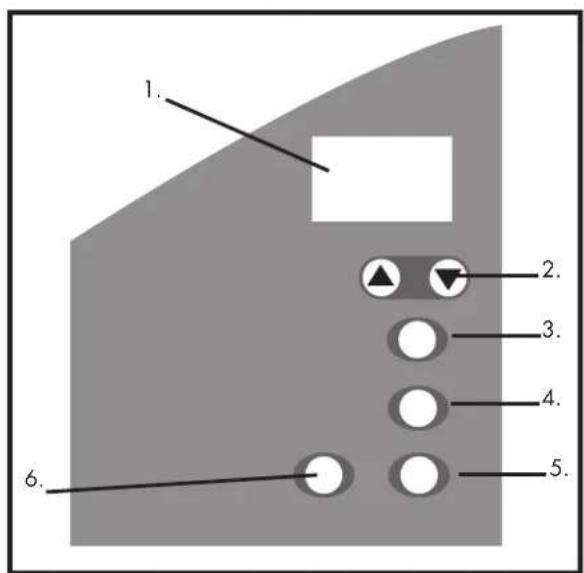
Control panel
The breadmaker has 6 control buttons; the program shows these on the control panel with LCD displays.
Program menu (menu button):
By pushing this button, you select the baking program. You can select another program by pushing this button. You will hear a short beep. The led will show the current program. The machine has 8 program menus.
Colour of the crust (colour button):
With this function you can set the colour of the crust, light, medium or dark.
Loafsize (bread size)
Choose a whole or half bread (2 or 1,5 American pounds)
START/STOP-button:
This button is used to start and stop the selected baking program.
Start: Push the "start/stop" button for 1 second to start a program. The program will be started. Clear the selected baking program.
Stop: To end a program; push "start/stop" for about 2 seconds until a beeping sound confirms that the program is turned off.
On/off
The double dot is blinking: the program is being cleared.
The double dot isn't blinking anymore: the program is cleared.
Delaying (push the up and down arrows)
You can set the baking time of the bread with the up and down functions. First; set the baking method and browning rate with “:”, “>” adds 10 minutes to the baking process (“+ 10 minutes”), with “<” 10 minutes will be taken from the time (“- 10 minutes”). The timer shows the remaining baking time after it is set. The maximum delay is 13 hours.
EXAMPLE: It's 20:30. You want your bread ready the next morning at seven (so; in 10 hours and 30 minutes). Push the > arrow until 10:30 appears on the screen: the period of 10 hours and 30 minutes between "now" (20:30) and the time you want the bread to be ready (seven 'o clock in the morning). The delay function isn't suitable for use with decaying ingredients like eggs, fresh milk, etc.
Keep warm function:
The bread will be kept warm during 60 minutes after baking it. When you want to take the bread out of the machine; shut down the program by pushing the START/STOP-button.
Warning on the screen:
When "H:HH" appears on the screen after you pushed START; the temperature in the machine is still to hot. Push STOP open the lid, and let the machine cool down for about 10-20 minutes.
When "E:EE" appears on the screen after you pushed START, the temperature detector isn't connected; let it be checked by a known company.
Environment
The machine will function well with both high and low temperatures, but the bread can get bigger or smaller when the environmental temperature is very high or very low. We recommend a constant environmental temperature between 15^ C and 34^ C.
The program menu:
Basic kneading, rising and baking like normal bread
Whole wheat kneading, rising and baking of wholemeal bread
Please note: 30 minus time to rest in advance. The breadmachine will slightly preheat the ingredienten during 30 minus for a better bakingresult
French kneading, rising and baking with a longer rising time
Sweet kneading, rising and baking sweet bread
Ultrafast-1 kneading, rising and baking bread of ca. 680g in a short time
Quick kneading, rising and baking with cleansing salt
Dough only kneading and rising
Bake only baking
Placing and taking out the baking form:
Placing: Push lightly until the baking form is on its right place.
Taking out: Pull the grip; wear oven gloves while doing this.
Baking bread:
Take the baking form out of the machine.
Place the kneader on the ash.
Place the ingredients in the baking form. All the ingredients, including the liquid, have to be on room temperature. Stick to the, according to the recipe, right order. Add yeast LAST: put some salt and sugar around the mix. Make a hole in the mix and place the yeast there.
Place the baking form inside the machine.
Close the lid.
Put the plug in the socket.
Select the baking program and the colour of the crust.
When necessary, use the delay function.
Push the start-button ":" is blinking.
When you hear a beeping sound during the baking process, you can add fruit and nuts. It is possible that, during the baking process, steam will come out of the ventilation shafts in the lid. This is normal.
Finish off
At the end of the baking process, you will hear one beep and the machine will automatically turning on the "keeping warm" function for the next 60 minutes; then you will hear 10 beeping sounds, which indicate that the program is completed. When you want to take out the bread earlier, you can stop the keep warm function by pushing the "START/STOP"-button. Open the lid and take the bread out of the baking form.
The baking from is hot. Therefore use oven gloves, or something like that when you're grabbing it. Next, turn the baking form and shake it gently until the bread lets go. When the kneader is still in the bread, lose it with a knife or another suitable object. Let the bread cool down.
Pull the plug out of the socket.
ATTENTION: when a hook is delivered with the machine (depending on the model) this is used for pulling the kneading hook out of the bread.
RECIPE:
Basic baking method:
Water 11/3 cup
Sugar 3 table-spoons
Oil 3 table-spoons
Salt 2 table-spoons
Milk powder 3 table-spoons
Bread-flower 4 cups
Yeast 3 table-spoons
Consort a cooking-book for more recipes.
QUICK BAKING
You can fasten the baking process when you are using baking powder and cleansing salt, that are activated by warmth and liquid. Te be ensured of good results we recommend to put all the liquids on the bottom of the pan en put the dry ingredients on top of them; during the first mixing process of the quick baking batter, dry ingredients can gather in the edges of the baking form; mix a bit beforehand to prevent clotting.
CLEANING AND PUTTING AWAY:
Pull the plug out of the socket and let the machine cool down before cleaning it.
Baking form: Rub the in, and outside with a wet rag. Don't use biting product.
Kneader: When it's hard to remove the kneader from its ash, fill the baking form with warm water and leave it for a while.
Lid and screen. The lid can be removed for cleaning. Clean the lid on the inside and outside with a clean soft and wet rag.
This machine lives up to expectations of the CE- guidelines for radio-disturbance of electrical devices, safety on lowpower- equipment and the current safety demands.
GUARANTEE:
A guarantee period of 12 months from the date of buying our product is valid (payment proof); any lack on the machine will be repaired or the machine will be replaced when it's the fault of a material- or manufacturing error. The guarantee doesn't work when the owner made modifications to the machine. For repair; send the machine to the supplier where you bought it within the guarantee period. You have to take the payment proof.
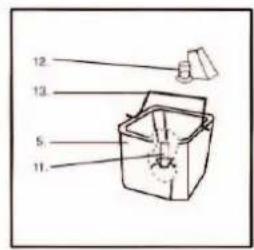
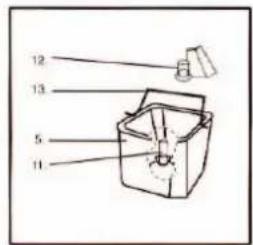
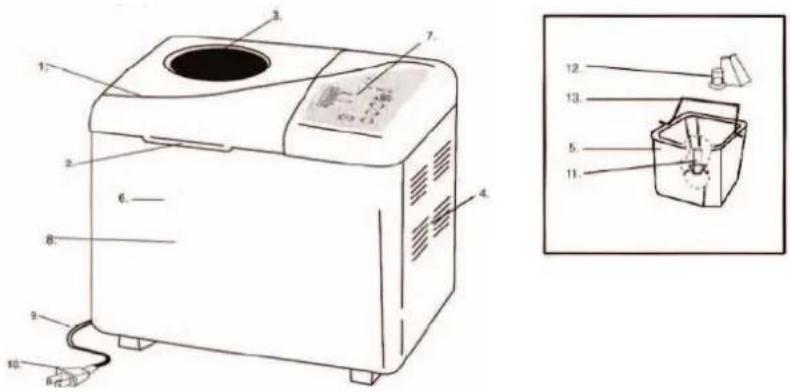
- Lid 8. Front plate
- Grip 9. Wire
- Window 10. Plug
- Ventilation shaft 11. Kneading hook
- Baking can 12. Kneading hook
- Front plate 13. Lever
-
Operating panel
-
Display
- Timer higher and lower
- Set baking program
- Colour darker or brighter
- Size of the bread
- Start/ stop
INTRODUCTION
Basic (Base), Whole weat (Pain complet), French (Pain français), Sweet (Sucré),
EINLEITUNG