
EXP09CKEWI - Air conditioner ELECTROLUX - Free user manual and instructions
Find the device manual for free EXP09CKEWI ELECTROLUX in PDF.
| Product type | Monoblock portable air conditioner |
| Model | EXP09CKEWI |
| Brand | Electrolux |
| Cooling mode | Yes |
| Heating mode | Yes (on certain models) |
| Fan mode | Yes |
| Dehumidification mode | Yes |
| Power supply | 220-240 V ~ 50 Hz, 10 A |
| Refrigerant | R290, 235 g or 245 g (depending on label) |
| Dimensions (L × D × H) | Approx. 35 × 35 × 70 cm |
| Weight | Approx. 25 kg |
| Noise level | Approx. 65 dB(A) |
| Cooling capacity (estimated) | 9000 BTU/h (approx. 2.6 kW) |
| Recommended area | Up to 25-30 m² |
| Exhaust hose length | 38 cm to 150 cm (extendable) |
| Washable filter | Yes, clean every 2 weeks |
| Remote control | Yes (with AAA batteries) |
| Timer | Yes, 24 h |
| Sleep mode | Yes |
| Vent swing | Yes |
| Casters | Yes, for easy mobility |
| Included accessories | Window kit, foam seals, exhaust hose, remote control, batteries, screws |
| Safety | Overheating protection, 3-minute delayed restart, automatic shutdown if reservoir is full |
| Maintenance | Clean filter every 2 weeks, drain condensate before storage |
| Storage | In a cool, dry place, away from sunlight |
Frequently Asked Questions - EXP09CKEWI ELECTROLUX
User questions about EXP09CKEWI ELECTROLUX
0 question about this device. Answer the ones you know or ask your own.
Ask a new question about this device
Download the instructions for your Air conditioner in PDF format for free! Find your manual EXP09CKEWI - ELECTROLUX and take your electronic device back in hand. On this page are published all the documents necessary for the use of your device. EXP09CKEWI by ELECTROLUX.
USER MANUAL EXP09CKEWI ELECTROLUX
WE'RE THINKING OF YOU
Thank you for purchasing an Electrolux appliance. You've chosen a product that brings with it decades of professional experience and innovation. Ingenious and stylish, it has been designed with you in mind. So whenever you use it, you can be safe in the knowledge that you'll get great results every time.
Welcome to Electrolux.
Visit our website to:

Get usage advice, brochures, trouble shooter, service information:
www.electrolux.com/webselfservice

Register your product for better service:
www.registerelectrolux.com

Buy Accessories, Consumables and Original spare parts for your appliance:
www.electrolux.com/shop
CUSTOMER CARE AND SERVICE
Always use original spare parts.
When contacting our Authorised Service Centre, ensure that you have the following data available: Model, PNC, Serial Number.
The information can be found on the rating plate.

Warning / Caution-Safety information.
General information and tips.
Environmental information.
Subject to change without notice.
1. ⚠️ SAFETY INFORMATION

WARNING!
- This appliance can be used by children aged from 8 years and above and persons with reduced physical, sensory or mental capabilities or lack of experience and knowledge if they have been given supervision or instruction concerning use of the appliance in a safe way and understand the hazards involved.
• Children shall not play with the appliance. - If the supply cord is damaged, it must bereplaced by the manufacturer, its service agent or similarly qualified persons in order to avoid a hazard.
This manual explains the proper use of your new air conditioner. Please read this manual carefully before using the product. This manual should be kept in a safe place for handy reference.

CAUTION!
- Contact authorised service technician for repair or maintenance of this unit.
- Contact the installer for installation of this unit.
- The air conditioner is not intended for use by young children of infirmed persons without supervision.
- Young children should be supervised to ensure that they do not play with the air conditioner.
- There are local council rules regarding maximum allowable noise levels emitted by air conditioners.
- If the power cord is to be replaced, replacement work shall be performed by authorised personnel only.
- Installation work must be performed in accordance with the national wiring standards by authorised personnel only(if applicable). Incorrect connection can cause overheating and fire.
- Take care not to catch fingers on fan when adjusting horizontal louvres.
- The fuse is 250V 3.15A.
- Cleaning and user maintenance shall not be made by children without supervision. Be aware that refrigerants may not contain an odour.
1.1 Important notes
- Do not operate unit without the air filter.
- Do not operate unit near any heat source or open fire.
- Do not expose the unit to direct sunlight.
- Always store or move the unit in an upright position.
- Do not cover the appliance when in operation or immediately after use.
- Always drain condensate before storing unit.
1.2 Point to Keep in Mind When Using Your Air Conditioner

CAUTION!
Warnings for use
- Do not modify any part of this product.
- Do not insert anything into any part of the unit.
- Ensure the power supply used has an appropriate voltage rating. Only use a 220V - 240V, 50Hz, 10A mains electricity supply. Use of a power supply with an improper voltage rating can result in damage to the unit an possibly fire.
- Always use a circuit breaker or fuse with the proper amp rating. Do not, under any circumstances, use wire, pins or other objects in place of a proper fuse.
- In the event of any abnormality with the air conditioner (eg. a burning smell), turn it off immediately and disconnect the power supply.

CAUTION!
Warning for power supply cord
- This power plug must only be plugged into an appropriate wall socket. Do not use in conjunction with any extension cords.
- Push the power plug securely into the socket and make sure it is not loose.
- Do not pull, deform. or modify the power supply cord, or immerse it in water. Pulling or misuse of the power supply cord can result in damage to the unit and cause electrical shock.
- If the supply cord is damaged, it must be replaced by the manufacturer or its service agent or a similarly qualified
person in order to avoid a hazard. Use only the manufacturer specified power cord for replacement.
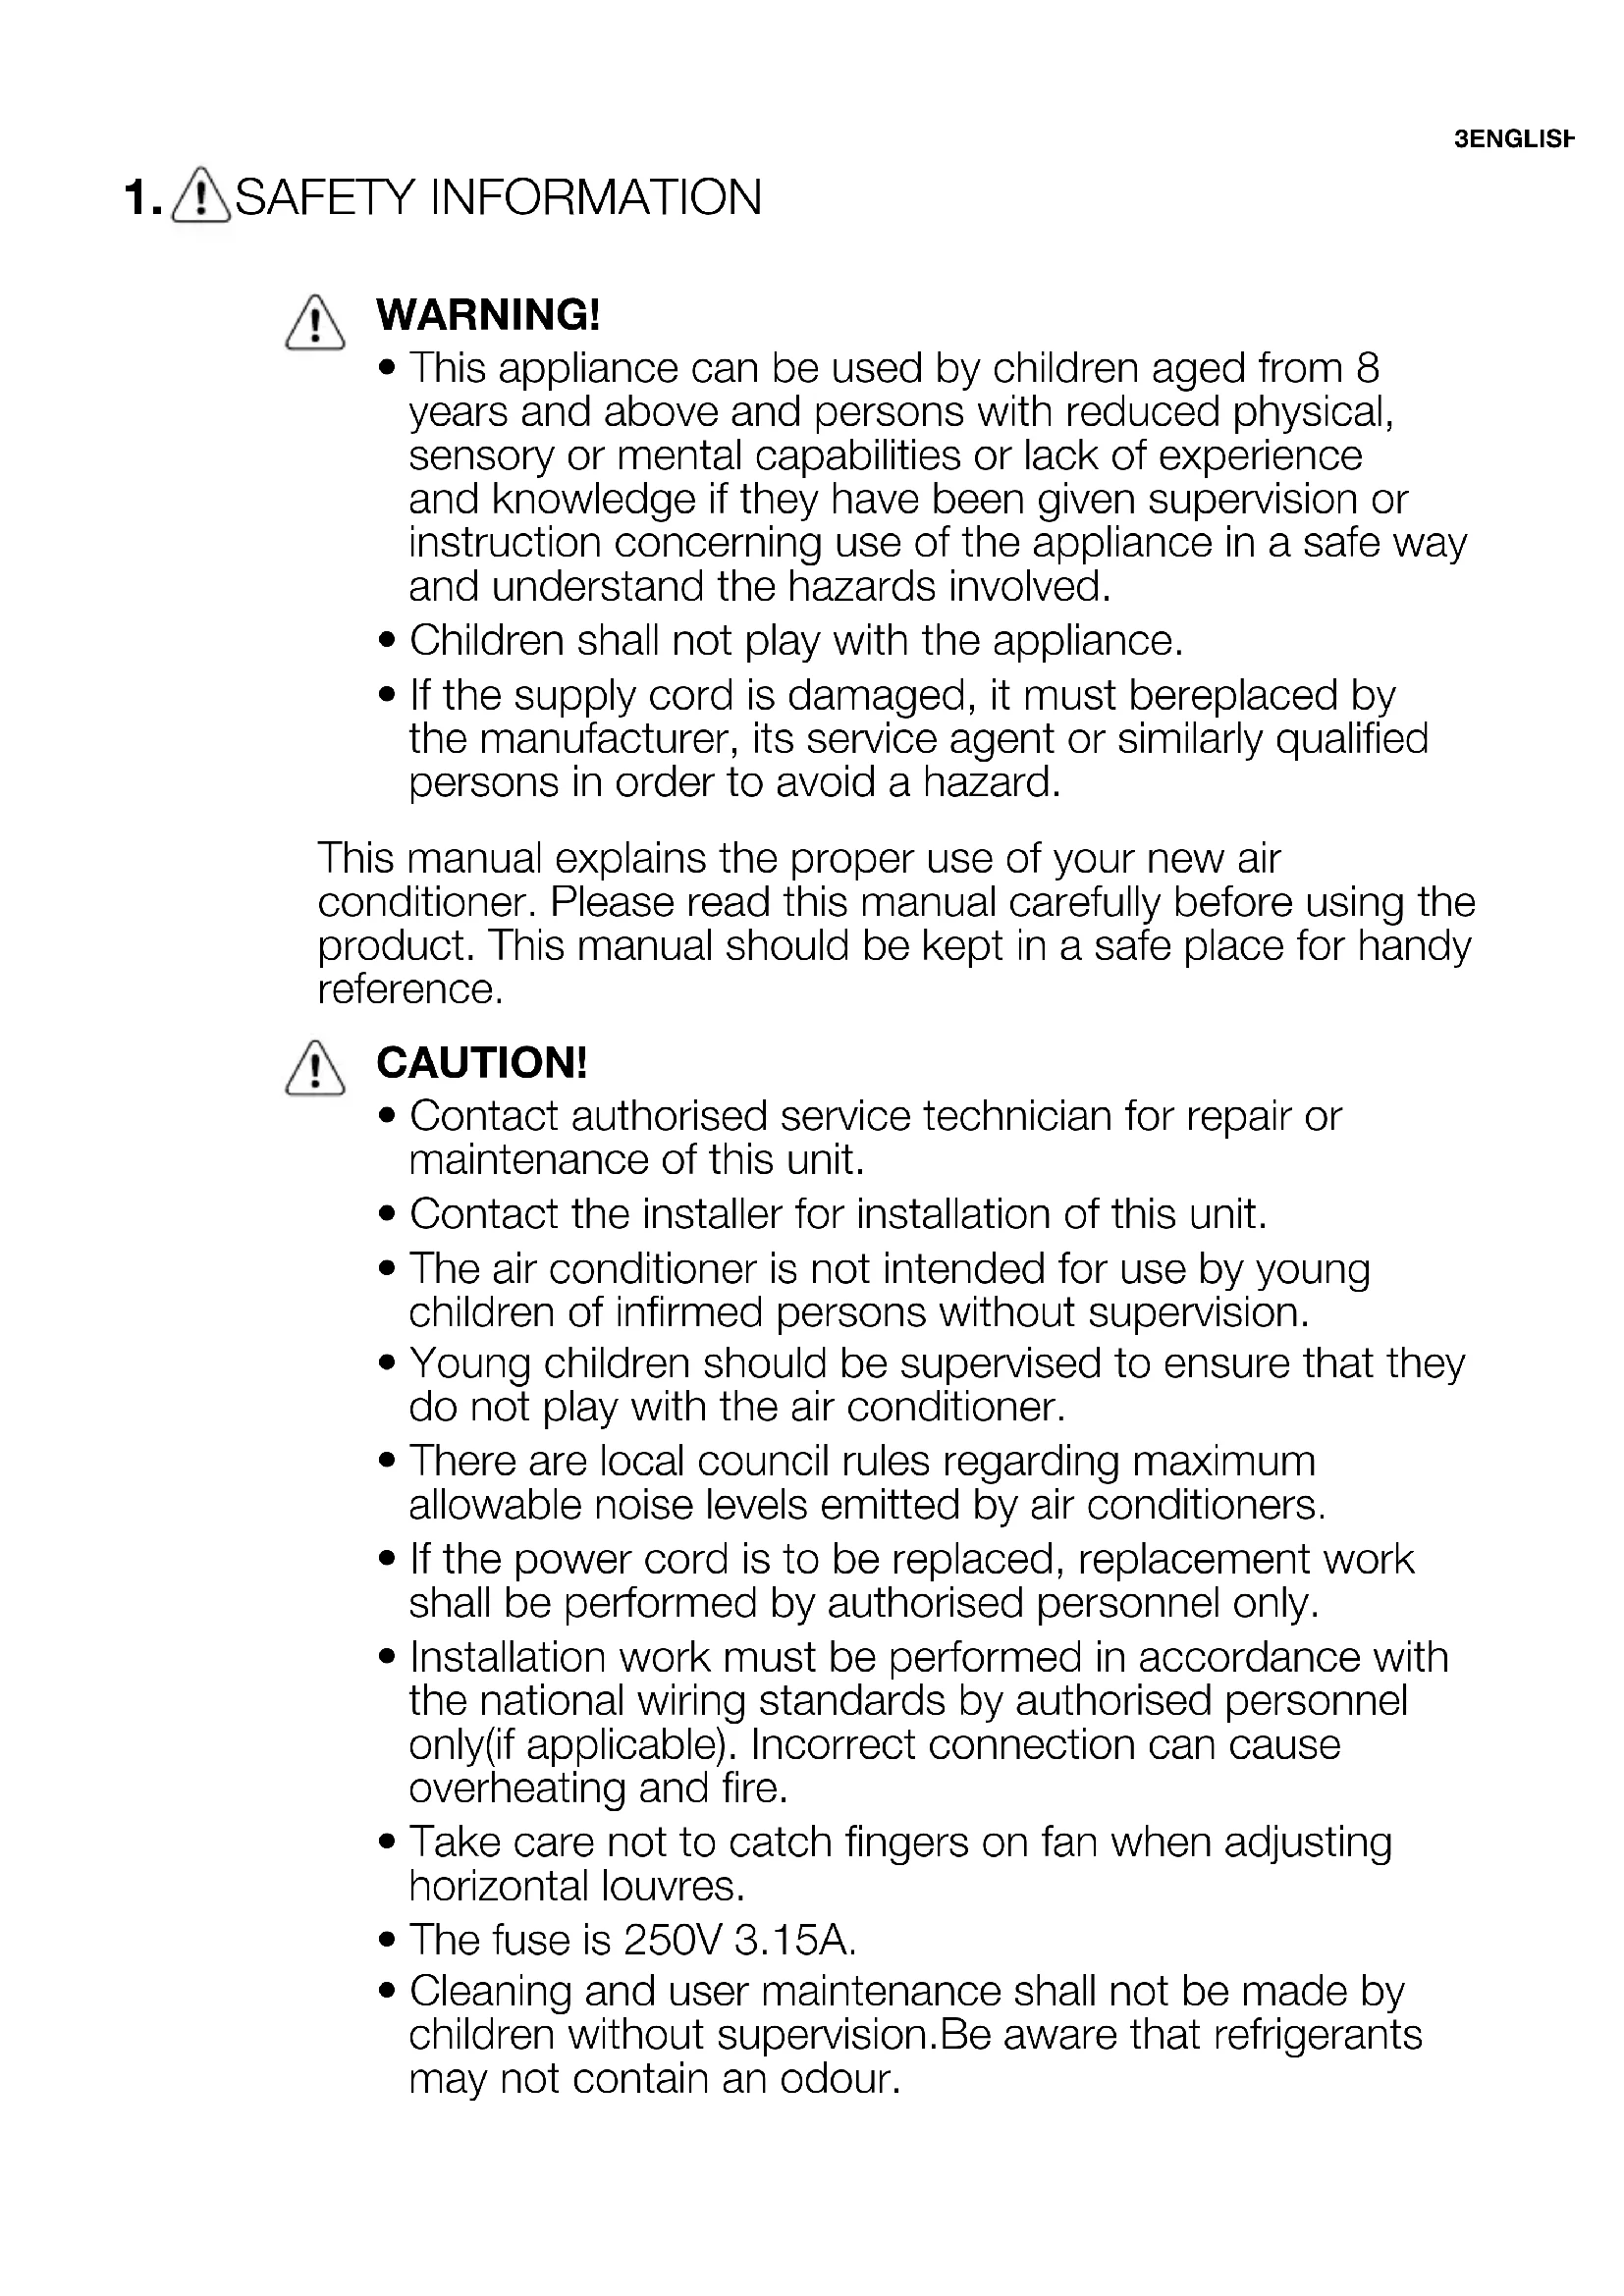
- This appliance must be earthed. This appliance is equipped with a cord having an earth wire. The plug must be plugged into an outlet that is properly installed and earthed.
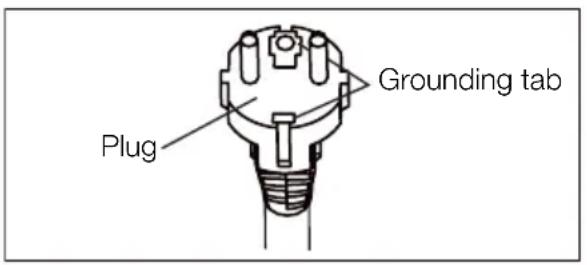
- This appliance is equipped with a cord that has a earthed wire connected to an earthed pin. The plug must be plugged into a socket that is properly installed and earthed. Do not under any circumstances cut or remove the square earthed pin from this plug.
1.3 Usage cautions
- Be sure to turn the unit off and disconnect the power supply cord before performing any maintenance or cleaning.
- Do not splash or pour water directly onto the unit. Water can cause electrical shock or equipment damage.
- Drainage should be performed whenever moving the air conditioner (see page 14). If any water remains in the tank, it may spill out while being moved.
- To ensure proper drainage, the drainage hose must have no kinks and must not be elevated during dehumidification mode. If not, the drained water may spill out into the room.
- The temperature around the drainage hose must not be below freezing point when used. Drained water may freeze inside the hose, causing water inside the unit to overflow into the room.
- Do not block the exhaust air outlet with obstacles. Cooling
performance may be reduced or stop completely.
- Provide a residual current device (RCD) in order to protect against electric shock in accordance with British Standard and Wiring Rules.
- Exposure to direct airflow for an extended period of time could be hazardous to your health. Do not expose occupants, pets, or plants to direct airflow for extended periods of time.
- Do not use this air conditioner for non-specified special purposes (e.g. preserving precision devices, food, pets, plants, and art objects). Usage in such a manner could harm such property.
2. SAFETY INSTRUCTION
2.1 Notes on Operation
- Allow 3 minutes for the compressor to restart cooling. If you turn the air conditioner off and immediately restart it, allow 3 minutes for the compressor to restart cooling. There is an electronic device in the unit that keeps the compressor turned off for 3 minutes for safety.
- In the event of a power failure during use, allow 3 minutes before restarting the unit. After power is reinstated, restart the air conditioner. If the power was off for less than three minutes, be sure to wait at least three minutes before restarting the unit. If you restart the air conditioner within three minutes, a protective device in the unit may cause the compressor to shut off. This protective device will prevent cooling for about 5 minutes. Any previous setting will be cancelled and the unit will return to its initial setting.
- Low temperature operation: Is your unit freezing up? Freezing may occur when the unit is set close to 18^ C in low ambient temperature conditions, especially at night. In these conditions, a further temperature drop may cause the unit to freeze. Setting the unit to a higher temperature will prevent it from freezing.
• Dehumidification mode increases room
temperature. The unit generates heat during dehumidification mode and the room temperature will rise. Warm air will be blown out from the exhaust air outlet, but this is normal and does not indicate a problem with the unit.
- This air conditioner blows the warm air generated by the unit outside the room via the exhaust hose while in cool mode. In the mean time, the same amount of air will enter the room from outside through any openings of the room.
- Do not use means to accelerate the defrosting process or to clean, other than those recommended by the manufacturer.
-
The appliance shall be stored in a room without continuously operating ignition sources (for example: open flames, an operating gas appliance or an operating electric heater).
-
Do not pierce or burn.
- Compliance with national gas regulations shall be observed.
- Keep ventilation openings clear of obstruction.
- The appliance shall be stored in a well-ventilated area where the room size larger than 13 m^2 .
- Any person who is involved with working on or breaking into a refrigerant circuit should hold a current valid certificate from an industry-accredited assessment authority, which authorises their competence to handle refrigerants safely in accordance with an industry recognised assessment specification.
- Servicing shall only be performed as recommended by the equipment manufacturer. Maintenance and repair requiring the assistance of other skilled personnel shall be carried out under the supervision of the person competent in the use of flammable refrigerants.
- This product contains a lithium button/coin cell battery. If a new or used lithium button/coin cell battery is swallowed
or enters the body, it can cause severe internal burns and can lead to death in as little as 2 hours. Always completely secure the battery compartment. If the battery compartment does not close securely, stop using the product, remove the batteries, and keep it away from children. If you think batteries might have been swallowed or placed inside any part of the body, seek immediate medical attention.
natural_image
Warning sign depicting a flame inside a triangle (no text or symbols)
natural_image
Simple line drawing of an open book with no text or symbols visibleTo prevent injury to the user or other people and property damage, the following instructions must be followed. Incorrect operation due to ignoring instructions may cause harm or damage. The seriousness is classified by the following indications:

WARNING!
This symbol indicates the possibility of death or serious injury.

CAUTION!
This symbol indicates the possibility of injury or damage to property.
Meanings of symbols used in this manual are shown below:

This symbol indicates never to do this.

This symbol indicates always do this.
2.2 Warning during usage

WARNING!
Warning during usage
| Warning meaning | |
| Plug in power plug properly Otherwise, it may cause electric shock or fire due to excess heat generation | |
| Do not operate or stop the unit by inserting or pulling out Die power plug | It may cause electric shock or fire due to heat generation |
| Do not damage or use an unspecified power cord | It may cause electric shook or fire. If the power cord is damaged, it must be replaced by the manufacturer or an authorised service centre or a similarly qualified person in order to avoid a hazard |
| Do not modify power cord length or share the outlet with other appliances | It may cause electric shock or fire due to heat generation |
| Do not operate with wet hands or in damp environment | It may cause electric shock |
| Do not direct airflow at room occupants This could harm your health | |
| Always ensure effective earthing Incorrect earthing may cause electric shock | |
| Do not allow water to run into electric parts | It may cause failure of unit or electric shock |
| Always install circuit breaker and a dedicated power circuit | Incorrect installation may cause Are and electric shock |
| Unplug the unit if strange sounds, smell, or smoke comes from it | It may cause fire and electric shock |
| Do not use the socket if it is loose or damaged | It may cause fire and electric shock |
| Do not open the unit during operation It may cause fire and electric shock | |
| Keep firearms away It may cause fire | |
| Do not use the power cord close to heating appliances | It may cause fire and electric shock |
| Do not use the power cord near flammable gas or combustibles, such as gasoline, benzene, thinner, etc. | It may cause an explosion or fire |
| Ventilate room before operating air conditioner if there is a gas leakage from another appliance | It may cause explosion, fire and burns |
| Do not disassemble or modify unit It may cause failure and electric shock | |

CAUTION!
caution meaning
| When the air filter is to be removed, do not touch the metal parts of the unit | It may cause an injury |
| Do not clean the air conditioner with water Water may enter the unit and degrade the insulation. It may cause an electric shock | |
| Ventilate the room well when used together with a stove, etc. | An oxygen shortage may occur |
| When the unit is to be cleaned, switch off, and turn off the circuit breaker | Do not clean unit when power is on as it may cause fire and electric shock, it may cause an injury |
| Do not place a pet or house plant where it will be exposed to direct air flow | This could injure the pet or plant |
| Do not use for special purposes Do not use this air conditioner to preserve precision devices, food, pets, plants, and art objects. It may cause deterioration of quality, etc. | |
| Stop operation and close the window in storm or cyclone | Operation with windows opened may cause wetting of indoor and soaking of household furniture |
| Hold the plug by the head of the power plug when taking it out | It may cause electric shock and damage |
| Turn off the main power switch when not using the unit for a long time | It may cause failure of product or fire |
| Do not place obstacles around air-inlets or inside of air-outlet | It may cause failure of appliance or accident |
| Always insert the filters securely. Clean filter once every two weeks | Operation without filters may cause failure |
| Do not use strong detergent such as wax or thinner - use a soft cloth | Appearance may be deteriorated due to change of product colour or scratching of its surface |
| Do not place heavy object on the power cord and ensure that the cord is not compressed | There is danger of fire or electric shock |
| Do not drink water drained from air conditioner | It contains contaminants and could make you sick |
| Use caution when unpacking and installing Sharp edges could cause injury | |
| If water enters the unit, turn the unit off at the power outlet and switch off the circuit breaker. Isolate supply by taking the power-plug out and contact a qualified service technician | It could cause electric shock and damage |
3. UNIT DESCRIPTION
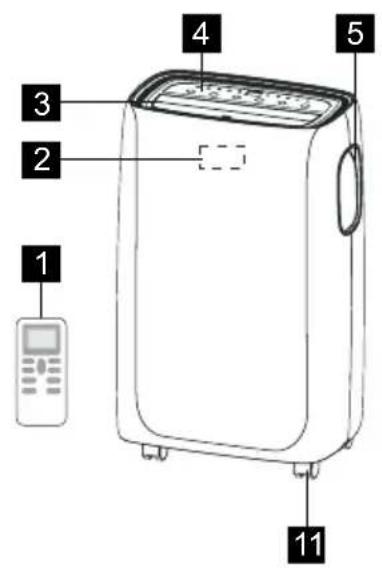
1 Remote control
2 Signal receiver
3 Room air outlet Bottom drain outlet
4 Control panel
5 Carrying handle(both sides)
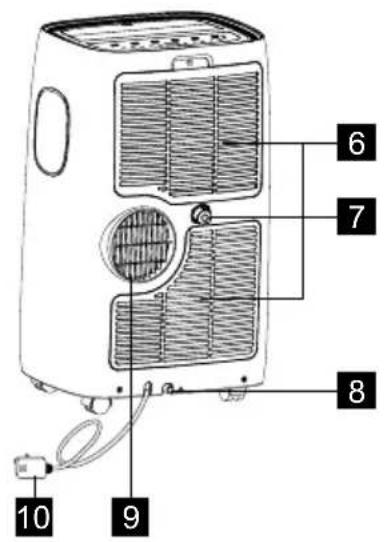
6 Air intake
7 Continuous drain outlet
8
9 Air exhaust
10 Power cable
11 Castor
4. ACCESSORIES INCLUDED
PARTS PARTS NAME: QUANTITY:
| 1 | Window kit connector A | 1 pc | |
| 2 | Exhaust connector B | 1 pc | |
| 3 | 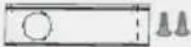 | Window sliding kit | 1 set |
| 4 | Exhaust hose | 1 pc | |
| 5 | Screws | 4 pcs 12.7 screws2 pcs 19 screws | |
| 6 | Safety lock | 1 pc | |
| 7 | Bolts | 2 pcs | |
| 8 | Foam seal A | 2 pcs | |
| 9 | Foam seal B | 1 pc | |
| 10 | Remote control | 1 set | |
| 11 | Bettery | 2 pcs |
- Check all the accessories are included in the package and please refer to the installation instructions for their usage.
5. INSTALLATION INSTRUCTIONS
5.1 Exhausting hot air
In the Cool Mode the appliance must be placed close to a window or opening so that the warm exhaust air can be ducted outside. First position unit on a flat floor and make sure there's a minimum of 30mm clearance around the unit, and is within the vicinity of a single circuit outlet power source.
- Extend either side of the hose(Fig.1) and screw the hose to connector A (Fig.2).

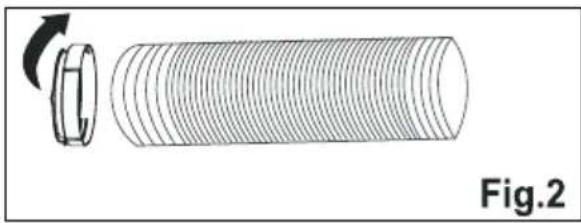
natural_image
Diagram of a cylindrical mechanical component with a rotating arrow indicating rotation (no text or symbols)- Extend the other side of the hose and screw it to connector B (Fig. 3).

natural_image
Diagram of a cylindrical device with internal structure and a separate component, labeled Fig.3 (no text or symbols on the diagram itself)- Install the connector B into the unit (Fig.4).
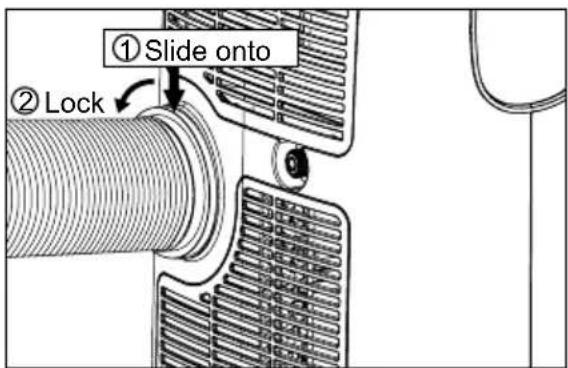
Fig. 4
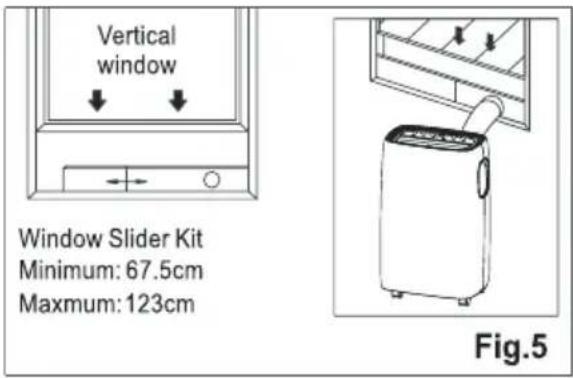
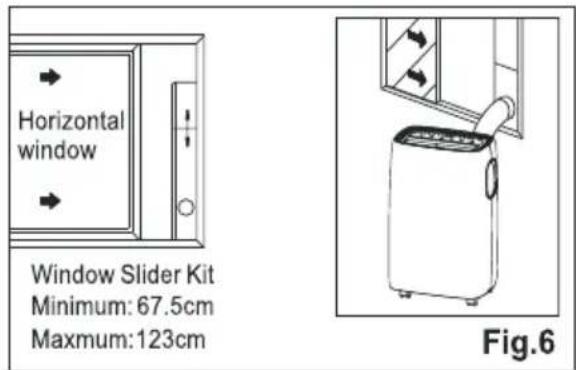
- Affix the connector A into the window slider kit and seal. (Fig.5&6)
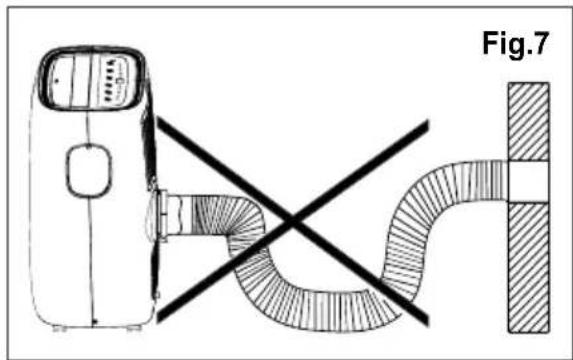
The hose can be extended from its original length of 38cm up to 150cm, but it is the best to keep the length to minimum required. Also make sure that the hose does not have any sharp bends or sags. (Fig. 7)
natural_image
Diagram showing a car with a switch and a curved pipe, labeled Fig.7 (no text or symbols on the diagram itself)5.2 Installation in a double-hung sash window
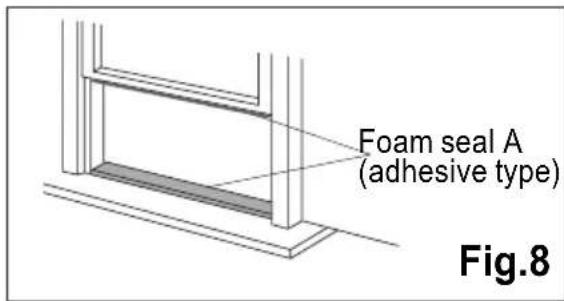
- Cut the foam seals A(adhesive type) to the proper lengths and attach them to the window and stool.(Fig.8)
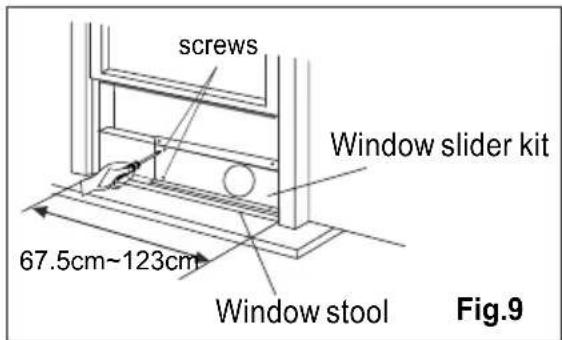
- Open the window sash and place the window slider kit on the window stool (Fig.9). Attach the window slider kit to the window stool. Adjust the length of the window slider kit according to the width of window. Screw down the two screws on the window slider kit. See Fig.9.
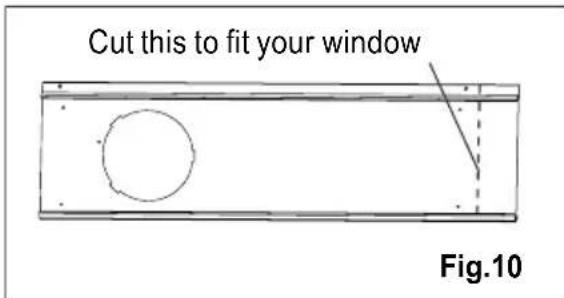
Cut the adjustable window slider kit if the width of window is less than 67.5 cm (Fig.10).
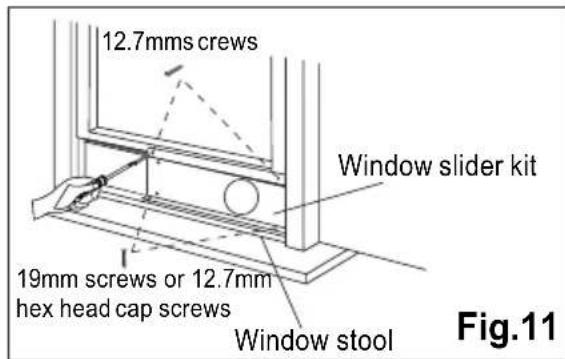
- Close the window sash securely against the window slider kit.(Fig.11)
- Drive two 12.7mm screws to secure the window slider kit to the window sash. (Fig.11)
- Secure the window slider kit to the window stool(Fig.11):
A: For wooden window: Use 19mm screws for securing.
B: For Vinyl-Clad windows: Use 12.7 hex head cap screws for securing.
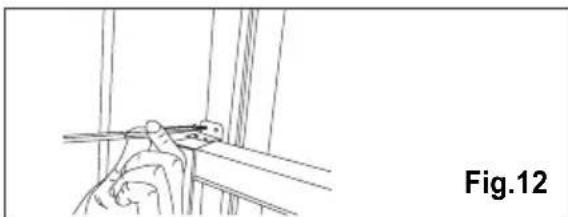
- To secure lower sash in place, attach right angle sash lock with 12.7mm screw as shown(Fig.12).
It is difficult to lock the windows with the safety lock for Vinyl-Clad windows, so you can use lock by window itself.
natural_image
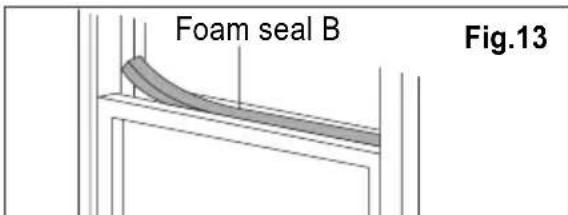
Line drawing of a hand holding a tool near a vertical structure, labeled Fig.12 (no text or symbols on the diagram itself)- Cut the foam seal B to an appropriate length and seal the open gap between the top window sash and outer window sash, as shown in Fig.13.
5.2 Installation in a sliding sash window
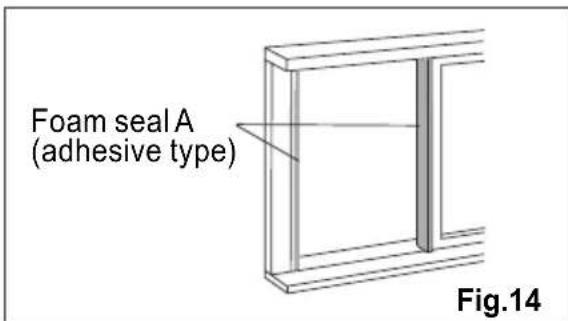
- Cut the foam seals A(adhesive type) to the proper lengths and attach them to the window frame. See Fig.14.
- Open the window sash and place the window slider kit on the window stool (Fig.15). Attach the window slider kit to the window stool. Adjust the length of the window slider kit according to the height of window. Screw down the two screws on the window slider kit. See Fig.15. Cut the adjustable window slider kit if the height of window is less than 67.5cm (Fig.10).

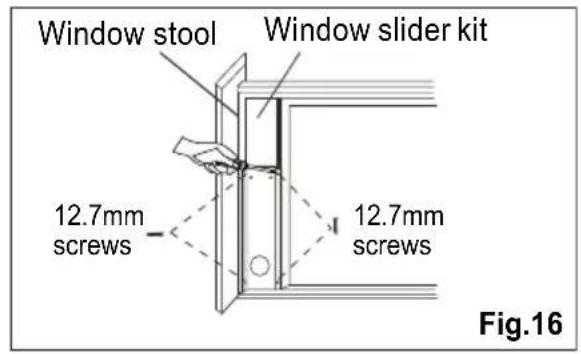
- Close the window sash securely against the window slider kit.(Fig.16)
- Drive two 12.7 mm screws to secure the window slider kit to the window sash.(Fig.16)
- Drive two 19 mm screws to secure the window slider kit to the window stool. (Fig.16)
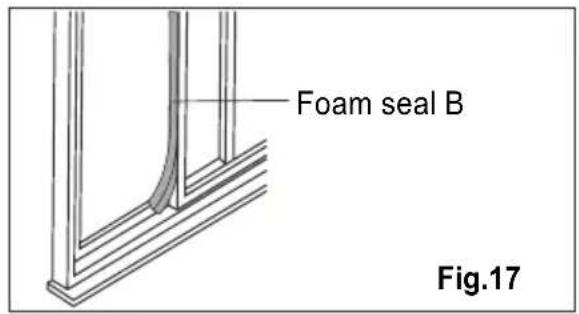
- Cut the foam seal B to an appropriate length and seal the open gap between the sliding sash and outer window sash, as shown in Fig.17.
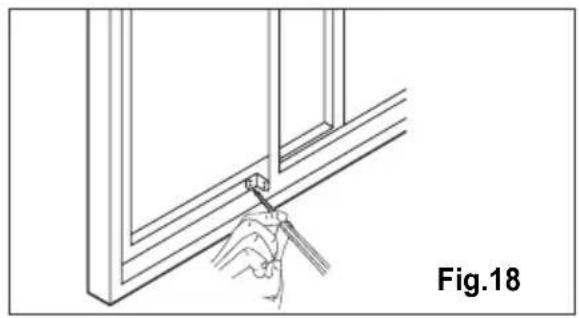
- To secure sliding sash in place, attach right angle safety lock with 12.7mm screw as shown(Fig.18).
natural_image
Line drawing of a hand using a tool to install or install a window frame (no text or symbols)6. AIR CONDITIONER FEATURES
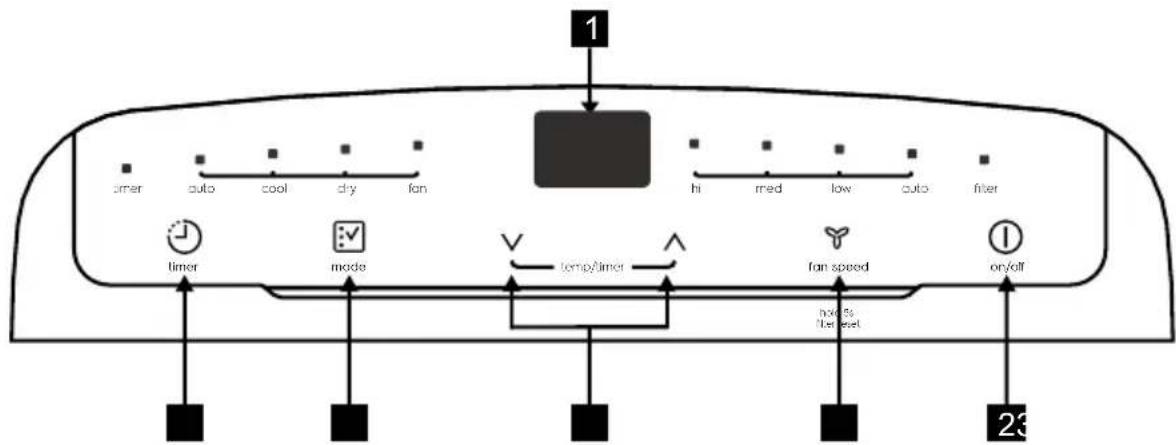
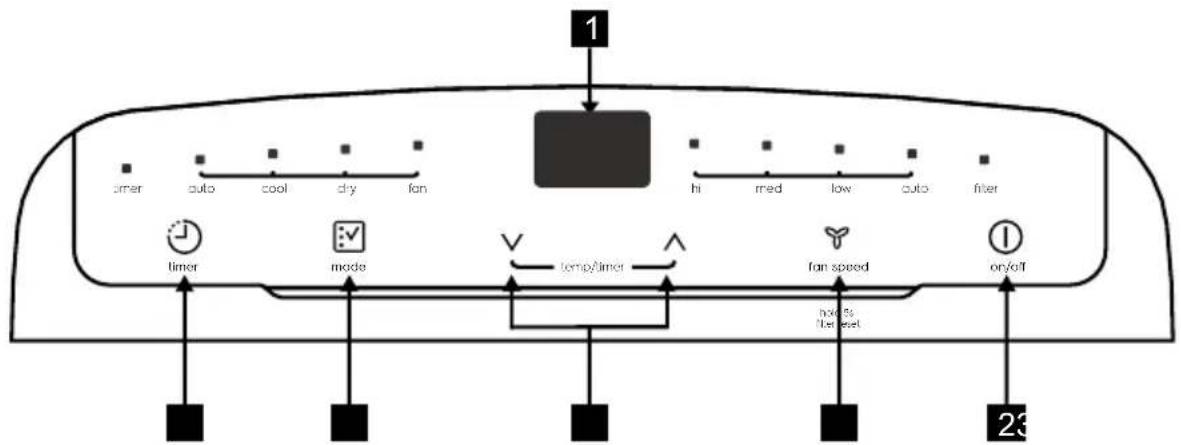
6.1 CONTROL PANEL
flowchart
graph TD
    A["1"] --> B["air"]
    B --> C["mode"]
    C --> D["temperature"]
    D --> E["fan speed"]
    E --> F["on/off"]
    style A fill:#f9f,stroke:#333
    style B fill:#ccf,stroke:#333
    style C fill:#cfc,stroke:#333
    style D fill:#fcc,stroke:#333
    style E fill:#cff,stroke:#333
    style F fill:#ffc,stroke:#333
1 Displays temperature/time
2 Power ON/OFF
3 Fan Speed / Filter Reset
4 Adjust Temperature or Timer
5 Mode Selection
6 Timer
7. OPERATING INSTRUCTIONS

Some of the following instructions can only be used by using the Control Panel.
7.1 Usage of the Control Panel
Heating mode (on some models)
In this mode the exhaust adaptor hose MUST be used.
In this mode, fan speed cannot be selected.
-
Press the "mode" button until the "Heat" indicator is lit.
-
Press the "V" & "^" Temp buttons for desired setting.
-
Connected drain hose. See 7.3 Drainage section.
Cooling mode
In this mode the exhaust adaptor hose MUST be used.
-
Press the "mode" button until the Cool mode indicator is lit.
-
Press the "fan speed" button to choose the fan speed according to the illumination of the fan speed indicator. You can choose the "hi", "med", "low", or "auto" fan speed setting.
-
Press the "V" or "^" button to choose the temperature you want.

It is not necessary to use the drainage hose in the "cool" mode.
Dry mode
Press the "mode" button until the Dry mode indicator is lit. The screen displays the room temperature.
At the same time, the "low" fan indicator lights.
Note: In this mode, fan speed cannot be selected.
Fan mode
In this mode, there is no need to use the exhaust hose or drainage hose.
- Press the "mode" button until the Fan mode indicator is lit.
- Press the "Fan speed" button to choose the desired fan speed.
- The fan will run at the selected speed and the display will show the room temperature.
Auto mode
Always have the exhaust hose attached in this mode.
When you set the air conditioner in Auto mode, it will automatically select cooling, heating (inapplicable for cooling only models), or fan only operation depending on what temperature you have selected and the room temperature. The air conditioner will control room temperature automatically round the temperature point set by you.
Under AUTO mode, you can not select the fan speed.
- Press the "mode" button until the "Auto mode" indicator lights.
After the "Auto mode" is selected the unit will run automatically according to the actual room air temperature.
Timer mode
The timer facilitates the user to delay the unit startup or shutdown.
How to delay startup
Plug in the unit, so the unit turns to standby.
Press the "timer" button, then the Timer indicator and number of hours on the screen will flash.
Tap or hold the UP arrow "∧" or the DOWN arrow "∨" to change delay start timer at 0.5 hour increments up to 10
hours, then at 1 hour increments up to 24 hours.
After 5 seconds, the Timer indicator and the display stop flashing. The control will count down the time remaining until startup.
The unit will start up in the mode as previously set.
To cancel the setting, press the "timer" button again. The timer indicator will switch off.
How to delay shutdown
You can delay shutdown when the unit is on.
Press the "timer" button, then the Timer indicator and number of hours on the screen will flash.
Tap or hold the UP arrow "∧" or the DOWN arrow "∨" to change delay stop timer at 0.5 hour increments up to 10 hours, then at 1 hour increments up to 24 hours.
After 5 seconds, the Timer indicator and the display stop flashing, and the display shows the time remaining until the unit shuts down.
To cancel the setting, press the "timer" button again. The timer indicator will switch off.
Filter reset
This feature is a reminder to clean the Air Filter (See Care and Cleaning) for more efficient operation.
The filter indicator will illuminate after 250 hours of operation. To reset after cleaning the filter, hold the “fan speed” button for 5 seconds, then the “filter” indicator will go off.
7.2 Remote Control
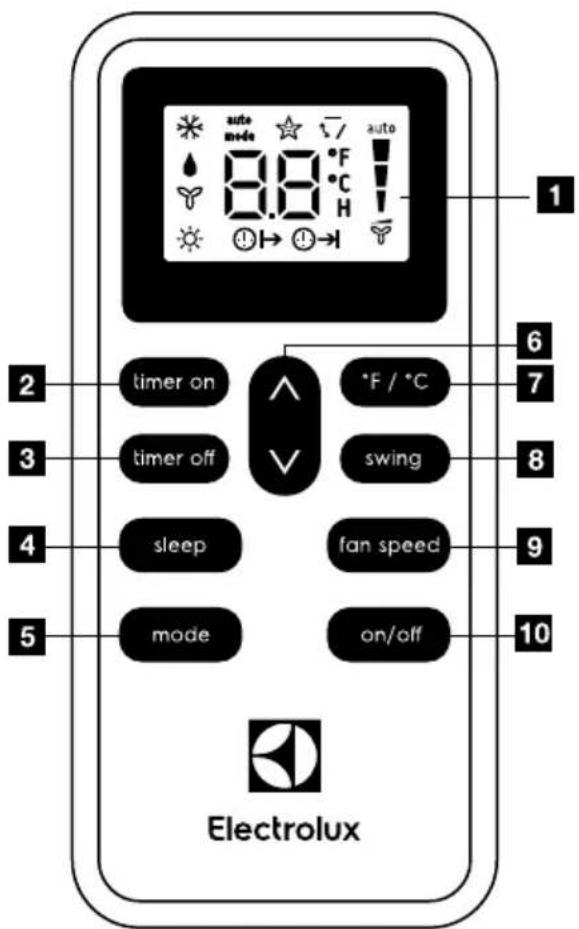
1 Remote Control screen
2 Timer on button
3 Timer off button
4 Sleep button
5 Mode button
6 Temp/Timer setting button
7 °F/°C button
8 Swing button
9 Fan Speed button
10 On/Off button
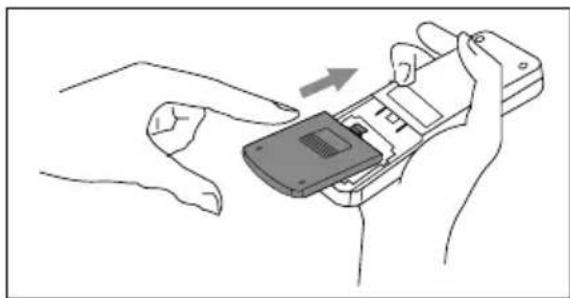
Battery Installation and Important Instructions
Remove the cover at the back of the remote control.
Insert the provided batteries correctly(see the instructions inside the battery compartment).
Close up the cover.
To replace the old batteries(which have been used up)
with two new R03P "AAA" 1.5V batteries, repeat the steps above.
natural_image
Line drawing of hands inserting a mobile phone into a device (no text or symbols)If the remote control unit is replaced or discarded, the batteries must be removed and disposed of in accordance with local legislation as they do harm to the environment.
Do not mix old and new batteries.
Do not mix alkaline, standard (carbon-zinc) or rechargeable (nickel-cadmium) batteries.
Do not dispose of batteries in fire. Batteries may explode or leak. If the remote control is not used for a long time, remove the batteries from the remote control.
The remote control must be handled with extreme care. Do not drop it or expose it to direct sunlight or sources of heat.
This device complies with Part 15 of the FCC Rules. Operation is subject to the following two conditions:
(1) This device may not cause harmful interference, and (2) this device must accept any interference received, including interference that may cause undesired operation.
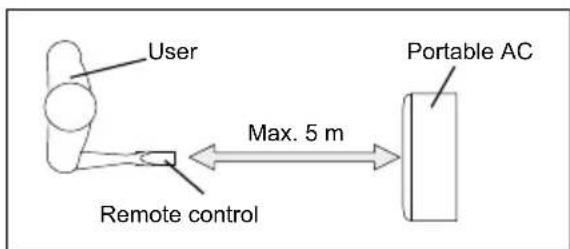
Point the remote control at the location of the signal receiver. The remote control must be no more than 16 ft(5 meters) away from the unit (without obstacles between the remote control and the unit).
How to Use the Remote Control
TURNING THE UNIT ON
Plug in the unit, then press the "on/off" button (when turned on, the unit will operate as the last setting before shutdown.
To switch the unit off, press "on/off" button again, then remove the plug.
Do NOT switch the unit off by removing the plug.
Always switch the unit off by pressing the "on/off" button and wait for few minutes before removing the plug.
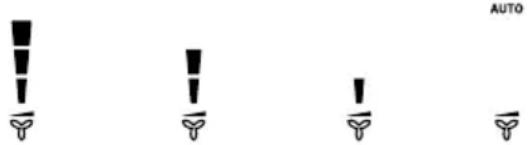
Cool mode
Press the "mode" button until the left side of LCD screen displays "*".
Press the “fan speed” button to choose the fan speed “Hi”, “Med”, “Low”, and “Auto”.
Press the “V” and “^” button to choose the temperature you want
High Medium Low Auto
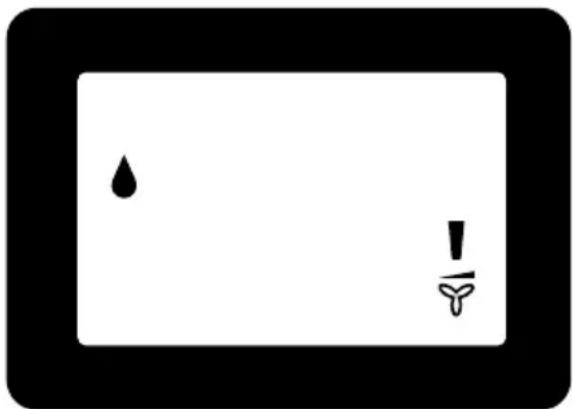
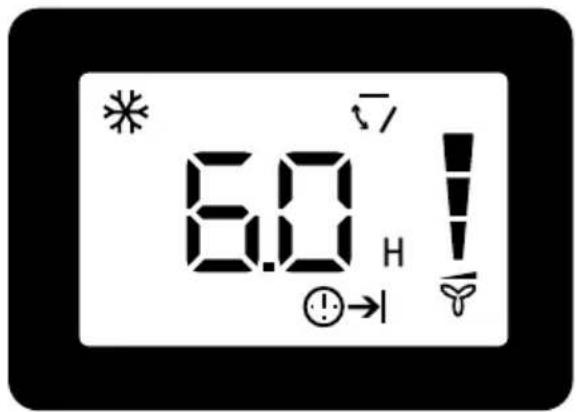
Dry mode
Press the "mode" button until the left side of LCD screen displays "▲".
At the same time, the "low" fan symbol appears on the screen.
Note: In this mode, fan speed cannot be selected.
natural_image
Simple diagram with a droplet and an exclamation mark inside a rectangular frame (no text or symbols)Fan mode
Press the "mode" button until the left side of LCD screen displays "Y".
In this mode, you can select fan speed "Hi", "Med", "Low" or "Auto" by pressing the Fan speed button and referring to the diagram.
Note: In this mode, the air exhaust hose does not need to be connected.
natural_image
Simple black-and-white diagram with two small icons and a vertical exclamation mark, no text or symbols present.Heat mode(For Heat & Cool models only)
Press the "mode" button until the left side of LCD screen displays "☀️".
Press the “V” and “A” button to choose the temperature you want. At the same time, the “low” fan indicator lights.
Note: In this mode, fan speed cannot be selected.
AUTO mode
Press the "mode" button until the upper side of LCD screen displays "auto".
Under AUTO mode, you can not select the fan speed.
Press the “V” and “^” button to choose the temperature you want.
Sleep mode
When the unit is in Cool, Heat or auto mode, you can press the “sleep” button to make the unit run in Sleep mode. In this mode, the fan speed will be set as “low” automatically, which cannot be changed. In Cool mode the selected temperature will increase by 1 °C 30 minutes after
the mode is selected. The temperature will then increase by another 1 °C after an additional 30 minutes. This new temperature will be maintained for 7 hours before it returns to the originally selected temperature. This ends the "Sleep" mode and the unit will shut down automatically. The "Sleep" mode program can be cancelled at any time during operation by pressing the "Sleep", "mode" or "fan speed" button.
Note: In Fan or Dry mode, Sleep mode cannot be set.
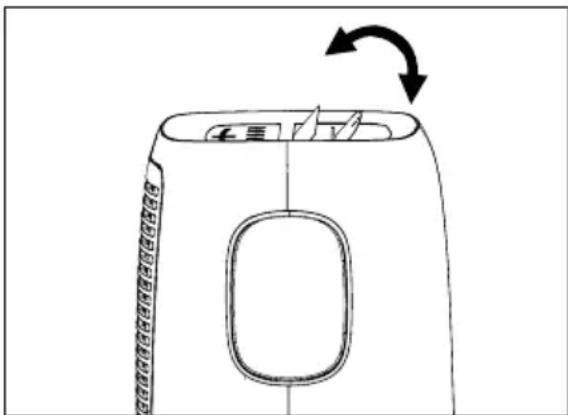
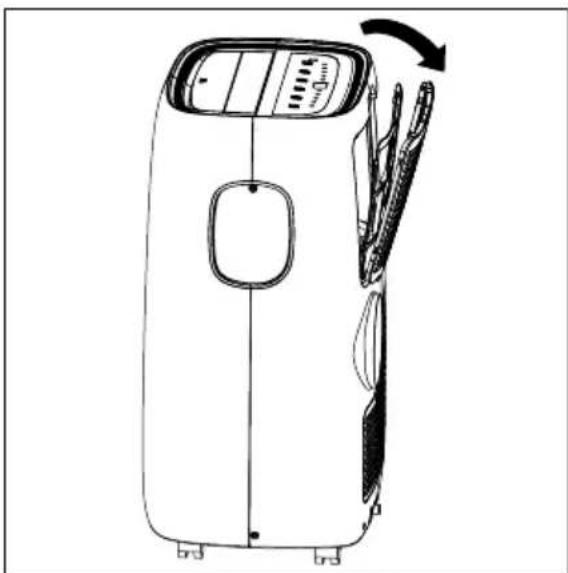
Louver Swing Function
Press the “swing” button to enable louver swing function, and the upper side of screen will display “√”. The louver on the top panel will swing up and down. Press this button again to disable the louver swing function.
natural_image
Line drawing of a device with a handle and arrow indicating rotation (no text or symbols)°F/°C function
Press the “°F/°C” button to switch between degree Fahrenheit and degrees Celsius. Under Dry/Fan mode, you can not select °F/°C.
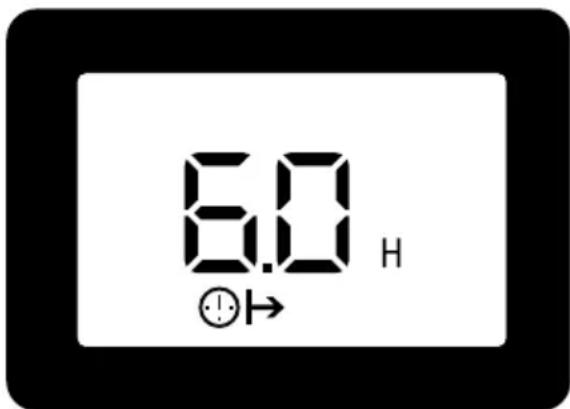
Timer mode
How to delay startup
Plug in the unit, so the unit turns to standby.
Press the “timer on” button, the screen will display “⇨” and “H”.
Tap or hold the UP arrow "A" or the DOWN arrow "V" to change delay start timer at 0.5 hour increments up to 10 hours, then at 1 hour increments up to 24 hours. After 2 seconds, the setting will be memorized. The control will count down the time remaining until startup. The unit will start up in the mode as previously set. To cancel the setting, press the "timer on" button again.
How to delay shutdown
You can delay shutdown when the unit is on.
Press the "timer off" button, the screen displays "→" and "H".
Tap or hold the UP arrow "∧" or the DOWN arrow "∨" to change delay stop timer at 0.5 hour increments up to 10 hours, then at 1 hour increments up to 24 hours. After 2 seconds, the setting will be memorized, and the display will show the time remaining until the unit shuts down. To cancel the setting, press the "timer off" button again.
7.3 Fault code
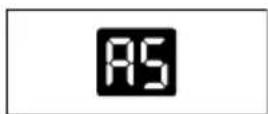
If the display reads "AS", the room temperature sensor has failed. Contact your Authorized Electrolux Service Centre.
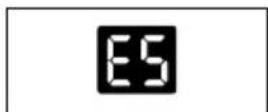
If the display reads "ES", the evaporator temperature sensor has failed. Contact your Authorized Electrolux Service Centre.
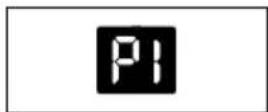
If the display reads "P1", bottom tray is full. Carefully move the unit to a drain location, remove the bottom drain plug and let the water drain away. Restart the machine until the "P1" symbol disappears. If error repeats, call for service.
7.4 Drainage instruction
Continuous Drainage
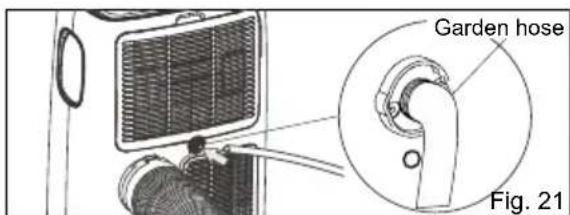
During the DRY mode, you will need a garden hose (sold separately) to drain the condensate from the unit.
Follow the steps below:
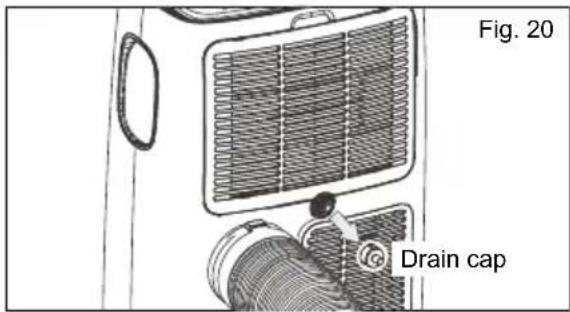
- Unscrew the drain cap of continuous drain outlet(Fig.20).
- Connect one end of the garden hose (sold separately) to the drain outlet then lead the other end into a drain that is lower than the unit(Fig.21).
NOTE:
- Condensate may flow out after removing the drain cap, if the unit is running in Cool or Auto mode. When you want to remove the garden hose, prepare a drip tray (not supplied) to collect the condensate from the drain outlet.
- Please be sure that the height of the drain and section of the drain hose should not be higher than that of the drain outlet, or the continuous drainage may not work properly.
- During Cool or Auto mode, it is recommended to disable continuous drainage by replacing the drain cap to the drain outlet, to reach the maximum performance
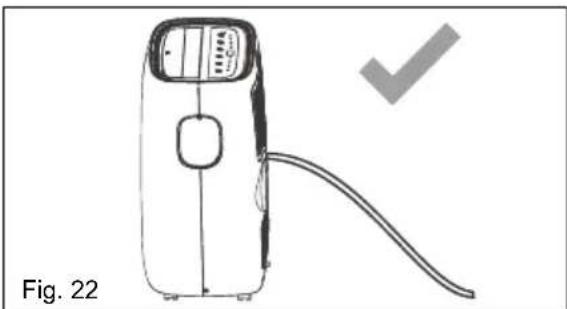
natural_image
Line drawing of a portable air purifier with a cord and handle, labeled Fig. 22 (no text or symbols on the device itself)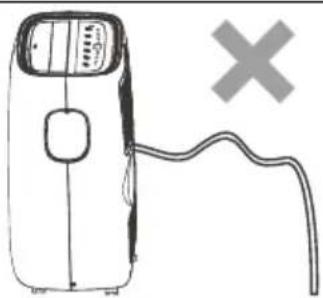
natural_image
Simple line drawing of a portable electric vehicle with a cable and a cross symbol (no text or labels)Emptying the condensate residue inside the unit during winter storage.
Put a drip tray (not supplied) under bottom drain outlet, then pull out the drain cap to allow the condensate to flow into the drip tray.
Replace the drain cap to the continuous drain outlet when no condensate flows out.
Put the drip tray under the bottom drain outlet, then remove the rubber stopper from the drain outlet, to allow the condensate to flow into the drip tray. If your drip tray can't hold all the condensate, a number of fills will be needed.
Replace the drain cap to the bottom drain outlet when no condensate flows out.
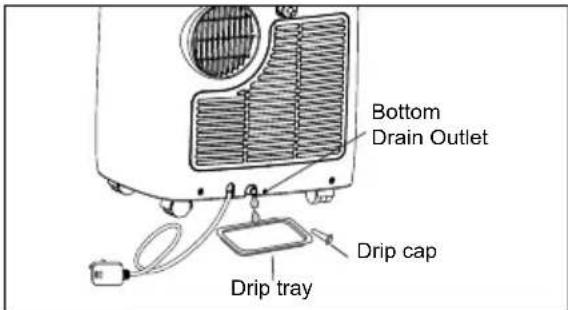
NOTE: To ensure all condensate residue has been removed, tilt the unit by lifting it slightly upwards from the front until no more condensate comes out from the drain outlet.
8. CARE & CLEANING
Clean your air conditioner occasionally to keep it looking new. Be sure to unplug the unit before cleaning to prevent shock or fire hazards
8.1 Cleaning the unit
The cabinet and front may be dusted with an oil-free cloth or washed with a cloth dampened in a solution of warm water and mild liquid dishwashing detergent.
Never use harsh cleaners, wax or polish on the cabinet front.
Be sure to wring excess water from the cloth before wiping around the controls. Excess water in or around the controls may cause damage to the air conditioner.
8.2 Cleaning the filters
To keep your air conditioner working efficiently, you should clean the filters every two weeks of operation.
- Grasp the upper panel tab and take off the filter which behind the grill of the back panel as shown the below figure.
natural_image
Line drawing of a car interior showing front and rear views with no text or symbols-
Wash the filter using liquid dishwashing detergent and warm water under 40^ C. Rinse filter thoroughly. Gently shake excess water from the filter. Be sure filter is thoroughly dry before replacing. Or, instead of washing you may vacuum the filter clean.
-
Replace the filter after the filter is dry.
i Be sure filter is thoroughly dry before replacing.
8.3 Winter Storage
If the air conditioner will not be used for an extended period of time:
-
Drain the water collection tank completely and leave the bottom drain cap and rubber plug long time enough to allow any residual water to drain out. Once the tank is completely drained and no more water flows out, reinstall the rubber plug and cap.
-
Remove and clean the filter, allow it to dry completely, then reinstall it.
- Remove the batteries from the remote control.
- Store the air conditioner in a cool, dry location, away from direct sunlight, extreme temperature, and excessive dust.
Before using the air conditioner again:
- Make sure the filter and drain cap are in place.
- Check the cord to make sure it is in good condition, without cracks or damage.
- Place new batteries in the remote control.
- Install the air conditioner as described in the Installation Instructions.
9. TROUBLE SHOOTING
Before calling for service, review this list. It may save you time and expense. This list includes common occurrences that are not the result of defective workmanship or materials in this appliance.
Air conditioner will not operate.
- Wall plug disconnected. Push plug firmly into wall outlet.
- House fuse blown or circuit breaker tripped. Replace fuse with time delay type or reset circuit breaker.
- Control is OFF. Turn Control ON and set to desired setting.
- P1 appears in the display window. Drain water as described in 7.3 Drainage Section.
- Room Temperature lower than the set temperature (Cool Mode). Reset the temperature.
Air from unit does not feel cold enough.
- Room temperature below 16 °C. Cooling may not occur until room temperature rises above 16 °C.
- Reset to a lower temperature.
- Compressor shut-off by changing modes. Wait approximately 3 minutes and listen for compressor to restart when set in the COOL mode.
Air conditioner cooling, but room is too warm - NO ice forming on cooling coil behind decorative front.
- Outdoor temperature below 16 °C. To defrost the coil, set Fan mode.
- Air filter may be dirty. Clean filter. Refer to 8. Care and Cleaning section. To defrost, set to Fan mode.
- Temperature is set too low for nighttime cooling. To defrost the coil, set to Fan mode. Then, set temperature to a higher setting.
- Exhaust duct not connected or blocked. See 5.1 Exhausting hot air Section.
Air conditioner cooling, but room is too warm - ice forming on cooling coil behind decorative front
- Dirty air filter - air restricted. Clean air filter. Refer to 8. Care and Cleaning section.
- Temperature is set too high. Set temperature to a lower setting.
- Air directional louvers positioned improperly. Position louvers for better air distribution.
- Front of unit is blocked by drapes, blinds, furniture, etc. - restricts air distribution. Clear blockage in front of unit.
- Doors, windows, registers, etc. open - cool air escapes. Close doors, windows, registers, etc.
- Unit recently turned on in hot room. Allow additional time to remove “stored heat” from walls, ceiling, floor and furniture.
Air conditioner turns on and off rapidly.
- Dirty air filter - air restricted. Clean air filter.
- Outside temperature extremely hot. Set FAN speed to a faster setting to bring air through cooling coils more frequently.
Room too cold.
- Set temperature too low. Increase set temperature.
PLEASE NOTE: CHECK THE PLATE FOR THE TYPE OF REFRIGERANT GAS USED IN YOUR APPLIANCE.

WARNING!
Specific information regarding appliances with R290 refrigerant gas.
• Thoroughly read all of the warnings.
- When defrosting and cleaning the appliance, do not use any tools other than those recommended by the manufacturing company.
• The appliance must be placed in an
area without any continuous sources of ignition (for example: open flames, gas or electrical appliances in operation).
• Do not puncture and do not burn.
• Refrigerant gases can be odourless.
- The appliance must be installed, used and stored in an area that is greater than 13 m^2 .
- This appliance contains 235g or 245g (see rating label back of unit) of R290 refrigerant gas.
- R290 is a refrigerant gas that complies with the European directives on the environment. Do not puncture any part of the refrigerant circuit.
- If the appliance is installed, operated or stored in a nonventilated area, the room must be designed to prevent the accumulation of refrigerant leaks resulting in a risk of fire or explosion due to ignition of the refrigerant caused by electric heaters, stoves, or other sources of ignition.
- The appliance must be stored in such a way as to prevent mechanical failure.
- Individuals who operate or work on the refrigerant circuit must have the appropriate certification issued by an accredited organisation that ensures competence in handling refrigerants according to a specific evaluation recognized by associations in the industry.
- Repairs must be performed based on the recommendations from the manufacturing company. Maintenance and repairs that require the assistance of other qualified personnel must be performed under the supervision of an individual specified in the use of flammable refrigerants.
10. ENVIRONMENTAL CONCERNS
Recycle the materials with the symbol. Put the packaging in applicable containers to recycle it. Help protect the environment and human health and to recycle waste of electrical and electronic
appliances. Do not dispose appliances marked with the symbol ✉ with the household waste. Return the product to your local recycling facility or contact your municipal office.
TABLE DES MATIÈRES
- INFORMATIONS SUR LA SECURITE 25
- INSTRUCTIONS SUR LA SECURITE ......28
- DESCRIPTION DE LA MACHINE 32
- ACCESSOIRES INCLUS 32
- INSTRUCTIONS D'INSTALLATION ......33
- FONCTIONS DU CLIMATISEUR ......36
- INSTRUCTIONS SUR LE FONCTIONNEMENT ......36
- ENTRETIEN ET NETTOYAGE 43
- DEPANNAGE 44
- QUESTIONS ENVIRONNEMENTALES 45
NOUS TENONS COMPTE DE VOS BESOINS
natural_image
Warning sign depicting a flame inside a triangle (no text or symbols)natural_image
Simple line drawing of an open book with no text or symbols visiblenatural_image
Diagram of a cylindrical object with a side view showing internal structure and rotation arrow (no text or symbols)natural_image
Diagram of a cylindrical device with internal channels and a separate component, labeled Fig.3 (no text or symbols on the diagram itself)natural_image
Diagram showing a car with a switch and a curved pipe, labeled Fig.7 (no text or symbols on the diagram itself)natural_image
Line drawing of a hand securing a cable with a bracket (no text or symbols)natural_image
Line drawing of a hand using a tool to install or install a window frame (no text or symbols)6. FONCTIONS DU CLIMATISEUR
6.1 PANNEAU DE COMMANDE

flowchart
graph TD
    A["1"] --> B["air"]
    B --> C["cooler"]
    B --> D["auto"]
    B --> E["cool"]
    B --> F["dry"]
    B --> G["lan"]
    B --> H["boxy"]
    B --> I["hi"]
    B --> J["med"]
    B --> K["low"]
    B --> L["auto"]
    B --> M["filter"]
    N["timer"] --> O["mode"]
    P["amp/limer"] --> Q["amp/liter"]
    R["fan speed"] --> S["on/off"]
    T["23"] --> U["box"]
    V["box/s filter set"] --> W["box/s filter set"]
natural_image
Line drawing of hands inserting a flip into a mobile phone (no text or symbols)natural_image
Simple black-and-white diagram showing a droplet and an exclamation mark inside a rectangular frame (no text or symbols)natural_image
Pure diagram of a device with two warning symbols and an exclamation mark, no text or labels present.natural_image
Line drawing of a device with a handle and arrow indicating rotation (no text or symbols)Fonction °F/°C
natural_image
Line drawing of a portable electric vehicle with a cable, labeled Fig.21 (no text or symbols on the device itself)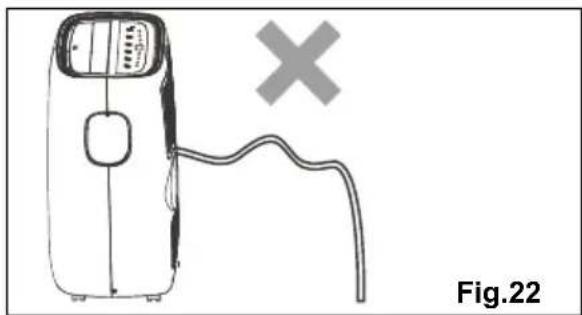
natural_image
Simple line drawing of a portable device connected to a cable with a cross symbol (no text or labels)natural_image
Line drawing of a car interior showing the door, seat, and window (no text or symbols)STIAMO PENSANDO A TE
natural_image
Warning sign depicting a flame inside a triangle (no text or symbols)natural_image
Simple line drawing of an open book with no text or symbols visible4. ACCESSORI INCLUSI
PARTI NOMI PARTI: QUANTITA:
natural_image
Diagram of a cylindrical object with concentric grooves and a directional arrow, labeled Fig.1P (no text or symbols on the object itself)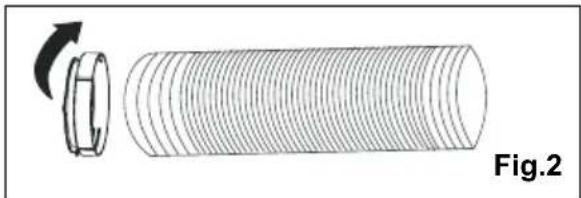
natural_image
Diagram of a cylindrical object with a rotating arrow, labeled Fig.2 (no text or symbols on the object itself)natural_image
Diagram of a cylindrical object with internal parallel grooves and a separate rectangular component, labeled Fig.3 (no text or symbols on the object itself)natural_image
Diagram of a car with a switch and curved pipe, labeled Fig.7 (no text or symbols on the diagram itself)natural_image
Line drawing of a person using a tool on a ladder, labeled Fig.12 (no text or symbols in the diagram itself)natural_image
Technical line drawing of a window frame with a hand holding a tool, labeled Fig.18 (no text or symbols on the diagram itself)6. CARATTERISTICHE DEL CONDIZIONATORE
6.1 PANNELLO DI CONTROLLO
flowchart
graph TD
    A["1"] --> B["air"]
    B --> C["auto"]
    C --> D["cool"]
    D --> E["dry"]
    E --> F["fan"]
    F --> G["box"]
    G --> H["hi"]
    H --> I["med"]
    I --> J["low"]
    J --> K["auto"]
    K --> L["filter"]
    L --> M["timer"]
    M --> N["mode"]
    N --> O["temp/limer"]
    O --> P["amp speed"]
    P --> Q["on/off"]
    Q --> R["23"]
1 Display temperatura/ora
natural_image
Illustration of hands holding a mobile phone with an arrow indicating the device's direction (no text or symbols present)natural_image
Simple diagram with a droplet and an exclamation mark inside a rectangular frame (no text or symbols)natural_image
Pure diagram of a device with two small icons and an exclamation mark, no text or symbols present.natural_image
Line drawing of a device with a handle and arrow indicating rotation (no text or symbols)Funzione °F/°C
NOTA:
natural_image
Line drawing of a portable device with a cable and a handle, labeled Fig.21 (no text or symbols on the device itself)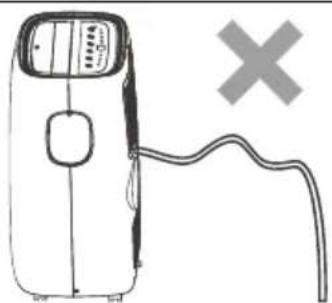
natural_image
Simple line drawing of a portable device with a cable and a cross symbol (no text or labels)Fig.22
natural_image
Line drawing of a car interior showing front and rear views with no text or symbolsnatural_image
Simple line drawing of an open book with no text or symbols visiblenatural_image
Diagram of a cylindrical mechanical component with a rotating arrow indicating rotation (no text or symbols)natural_image
Diagram of a cylindrical object with a separate rectangular component and curved arrow indicating rotation (no text or symbols)natural_image
Line drawing of a rope being inserted into a pipe, labeled 'Afb.12' (no other text or symbols)natural_image
Line drawing of a hand using a tool to install or install a window frame (no text or symbols present)6. EIGENSCHAPPEN AIRCONDITIONER
6.1 CONTROLEPANEEL

flowchart
graph TD
    A["1"] --> B["air"]
    B --> C["mode"]
    C --> D["time/lim"]
    D --> E["amp speed"]
    E --> F["on/off"]
    style A fill:#f9f,stroke:#333
    style B fill:#ccf,stroke:#333
    style C fill:#cfc,stroke:#333
    style D fill:#fcc,stroke:#333
    style E fill:#cff,stroke:#333
    style F fill:#ffc,stroke:#333
natural_image
Line drawing of hands inserting a device into a mobile phone (no text or symbols)natural_image
Simple diagram with a droplet and an exclamation mark inside a rectangular frame (no text or symbols)Fan (Ventilator) mode
natural_image
Simple diagram with two butterfly symbols and a vertical exclamation mark inside a rectangular frame (no text or labels)natural_image
Line drawing of a device with a handle and arrow indicating rotation (no text or symbols)°F/°C functie
7.3 Storingscode
OPMERKING:
natural_image
Line drawing of a portable air purifier device with a cord and control panel, labeled 'Afb.21' (no text or symbols on the device itself)
natural_image
Simple line drawing of a handheld device with a cable and a cross mark, labeled 'Afb.22' (no text or symbols on the device itself)natural_image
Line drawing of a car interior showing front and rear views with no text or symbols9. PROBLEEMOPLOSSING
natural_image
Simple line drawing of an open book with no text or symbols visiblenatural_image
Diagram of a cylindrical mechanical component with a rotating arrow and label Abb. 2 (no text or symbols on the diagram itself)natural_image
Technical line drawing of a cylindrical mechanical component with a separate inset showing a curved arrow and dimension label (no text or symbols on the diagram itself)natural_image
Line drawing of a mechanical joint or bracket with no visible text or symbolsnatural_image
Line drawing of a window frame with a hand holding a tool, labeled 'Abb. 18' (no other text or symbols)6. FUNKTIONEN DES KLIMAGERÄTS
6.1 BEDIENFELD

flowchart
graph TD
    A["1"] --> B["box"]
    B --> C["time timer"]
    C --> D["mode"]
    D --> E["amp speed"]
    E --> F["on/off"]
    style A fill:#f9f,stroke:#333
    style B fill:#ccf,stroke:#333
    style C fill:#cfc,stroke:#333
    style D fill:#fcc,stroke:#333
    style E fill:#cff,stroke:#333
    style F fill:#ffc,stroke:#333
natural_image
Line drawing of hands inserting a device into a mobile phone (no text or symbols)natural_image
Simple black-and-white diagram with a droplet and an exclamation mark inside a rounded rectangle (no text or symbols)Modus Fan (Lüften)
natural_image
Pure diagram of a device with two small icons and an exclamation mark, no text or symbols present.natural_image
Line drawing of a device with a scroll wheel and arrow indicating rotation (no text or symbols)Funktion °F/°C
natural_image
Line drawing of a portable air purifier device with a curved cable, labeled Abb. 21 (no text or symbols on the device itself)
natural_image
Line drawing of a portable device with a cable and a cross symbol, labeled Abb. 22 (no text or symbols on the device itself)natural_image
Line drawing of a car interior with door, seat, and window (no text or symbols)natural_image
Simple line drawing of an open book with no text or symbols visiblenatural_image
Diagram of a cylindrical mechanical component with a rotating arrow, labeled Rys.2 (no text or symbols on the diagram itself)natural_image
Diagram of a cylindrical object with internal grooves and a separate rectangular component labeled Rys.3, showing no text or symbols beyond the label.natural_image
Line drawing of a hand holding a tool near a vertical structure, labeled 'Rys.12' (no other text or symbols)natural_image
Line drawing of a hand holding a tool near a window frame, labeled 'Rys.18' (no other text or symbols)6. CECHY KLIMATYZACJI
6.1 PANEL STEROWANIA

flowchart
graph TD
    A["1"] --> B["box"]
    B --> C["timer"]
    B --> D["auto"]
    B --> E["cool"]
    B --> F["dry"]
    B --> G["lan"]
    B --> H["hi"]
    B --> I["med"]
    B --> J["low"]
    B --> K["auto"]
    B --> L["filter"]
    M["timer"] --> N["mode"]
    O["amp/limor"] --> P["lan speed"]
    Q["box"] --> R["on/off"]
    S["box"] --> T["box"]
    U["box"] --> V["box"]
    W["box"] --> X["box"]
Tryb Fan (Wentylator)
natural_image
Illustration of hands inserting a mobile phone into a mobile device (no text or symbols visible)natural_image
Four identical black-and-white icons with downward arrows, each containing a stylized symbol (no text or numbers present)Tryb Dry (Suszenie)
natural_image
Simple black-and-white diagram showing a droplet and an exclamation mark inside a rectangular frame (no text or symbols)Tryb Fan (Wentylator)
natural_image
Simple black-and-white diagram with two small symbols: a butterfly and an exclamation mark inside a rectangular frame (no text or labels)natural_image
Line drawing of a device with a scroll wheel and arrow indicating rotation (no text or symbols)Funkcja °F/°C
natural_image
Line drawing of a portable air purifier device with a handle and control panel, labeled Rys.21 (no text or symbols on the device itself)
natural_image
Line drawing of a portable electronic device with a cable and a switch, labeled 'Rys.22' (no text or symbols on the device itself)natural_image
Line drawing of a car interior showing the door, seat, and window (no text or symbols)natural_image
Warning sign depicting a flame inside a triangle (no text or symbols)
natural_image
Simple line drawing of an open book with no text or symbols visiblenatural_image
Diagram of a cylindrical mechanical component with a hexagonal nut and rotational arrow, labeled 'Obr.2' (no text or symbols on the diagram itself)natural_image
Diagram of a cylindrical object with internal parallel grooves and a separate rectangular component labeled Obr.3, showing no text or symbols beyond the label.natural_image
Line drawing of a hand holding a tool near a window frame, labeled 'Obr.12' (no other text or symbols)natural_image
Line drawing of a hand using a tool to install or install a window frame (no text or symbols)6. VLASTNOSTI KLIMATIZAČNÍ JEDNOTKY 6.1 OVLÁDACÍ PANEL
flowchart
graph TD
    A["1"] --> B["box"]
    B --> C["timer"]
    B --> D["auto"]
    B --> E["cool"]
    B --> F["dry"]
    B --> G["lan"]
    B --> H["hi"]
    B --> I["med"]
    B --> J["low"]
    B --> K["auto"]
    B --> L["filter"]
    M["timer"] --> N["mode"]
    O["amp/limor"] --> P["lan speed"]
    Q["box % line set"] --> R["on/off"]
    S["23"] --> T["box"]
natural_image
Line drawing of hands holding a mobile phone with an arrow indicating the change (no text or symbols present)natural_image
Simple black-and-white diagram showing a droplet and an exclamation mark inside a rectangular frame (no text or symbols)natural_image
Simple diagram with two Y-shaped symbols and a vertical exclamation mark inside a rectangular frame (no text or labels)natural_image
Line drawing of a device with a handle and arrow indicating rotation (no text or symbols)Funkce °F/°C
natural_image
Line drawing of a portable air purifier device with a curved cable and a digital display (no text or symbols on the device itself)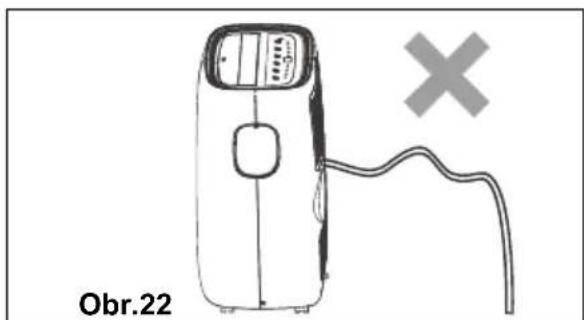
natural_image
Line drawing of a car interior showing the door, seat, and window (no text or symbols)This symbol on the product or on its packaging indicates that this product must not be disposed of with your other household waste. Instead, it is your responsibility to dispose of your waste equipment by handing it over to a designated collection point for the recycling of waste electrical and electronic equipment. The separate collection and recycling of your waste equipment at the time of disposal will help to conserve natural resources and ensure that it is recycled in a manner that protects human health and the environment. For more information about where you can drop off your waste equipment for recycling, please contact your local city office, your household waste disposal service or the shop where you purchased the product.
CE

natural_image
Repeating pattern of gray geometric shapes on white background, no text or symbols present- WE'RE THINKING OF YOU
- Visit our website to:
- CUSTOMER CARE AND SERVICE
- ⚠️ SAFETY INFORMATION
- WARNING!
- CAUTION!
- Important notes
- Point to Keep in Mind When Using Your Air Conditioner
- Usage cautions
- SAFETY INSTRUCTION
- Notes on Operation
- Warning during usage
- UNIT DESCRIPTION
- ACCESSORIES INCLUDED
- INSTALLATION INSTRUCTIONS
- Exhausting hot air
- Installation in a double-hung sash window
- AIR CONDITIONER FEATURES
- CONTROL PANEL
- OPERATING INSTRUCTIONS
- Usage of the Control Panel
- Remote Control
- Battery Installation and Important Instructions
- How to Use the Remote Control
- Cool mode
- Dry mode
- Fan mode
- AUTO mode
- Sleep mode
- Fault code
- Drainage instruction
- Continuous Drainage
- NOTE:
- CARE & CLEANING
- Cleaning the unit
- Cleaning the filters
- Winter Storage
- TROUBLE SHOOTING
- Air conditioner will not operate.
- Air from unit does not feel cold enough.
- Air conditioner cooling, but room is too warm - NO ice forming on cooling coil behind decorative front.
- Air conditioner cooling, but room is too warm - ice forming on cooling coil behind decorative front
- Air conditioner turns on and off rapidly.
- Room too cold.
- ENVIRONMENTAL CONCERNS
- TABLE DES MATIÈRES
- NOUS TENONS COMPTE DE VOS BESOINS
- FONCTIONS DU CLIMATISEUR
- PANNEAU DE COMMANDE
- STIAMO PENSANDO A TE
- ACCESSORI INCLUSI
- CARATTERISTICHE DEL CONDIZIONATORE
- PANNELLO DI CONTROLLO
- NOTA:
- EIGENSCHAPPEN AIRCONDITIONER
- CONTROLEPANEEL
- Storingscode
- OPMERKING:
- PROBLEEMOPLOSSING
- FUNKTIONEN DES KLIMAGERÄTS
- BEDIENFELD
- CECHY KLIMATYZACJI
- PANEL STEROWANIA
- Tryb Dry (Suszenie)
- Tryb Fan (Wentylator)
- Funkcja °F/°C
- VLASTNOSTI KLIMATIZAČNÍ JEDNOTKY 6.1 OVLÁDACÍ PANEL
- Funkce °F/°C
Brand : ELECTROLUX
Model : EXP09CKEWI
Category : Air conditioner