
Kick 15 - Speaker ALTO - Free user manual and instructions
Find the device manual for free Kick 15 ALTO in PDF.
| Product Type | Bi-amplified powered loudspeaker |
| Brand | Alto |
| Model | Kick 15 |
| Peak Power | 400 watts |
| Continuous Power | 200 watts |
| Low Frequency Transducer | 15 inches |
| High Frequency Transducer | 1 inch |
| Number of Mixing Channels | 4 channels with stereo line inputs and XLR input on channel 1 |
| Effects Processor | Built-in (Alesis), 256 effects (16 effects × 16 variations) |
| Equalization | Bass and treble per channel |
| Audio Inputs | 1 XLR microphone input, 4 1/4" line inputs, 1 stereo RCA auxiliary input |
| Audio Outputs | XLR and 1/4" main outputs, 1/4" headphone output with volume control, parallel output, subwoofer output |
| Footswitch Input | Yes, for effect on/off switching |
| Power Supply | AC power cord included |
| Grounding | Ground lift switch to reduce noise |
| Ventilation | Vent with fan |
| Stand | Built-in folding steel stand for monitoring angle |
| Maintenance | Keep vent clear; use a dry cloth for cleaning |
| Safety | Turn off device before connecting/disconnecting; volume at zero before powering on |
| Repairability | Contact authorized service center for repairs |
| Included Accessories | Power cord, user guide, safety instructions book |
Frequently Asked Questions - Kick 15 ALTO
User questions about Kick 15 ALTO
0 question about this device. Answer the ones you know or ask your own.
Ask a new question about this device
Download the instructions for your Speaker in PDF format for free! Find your manual Kick 15 - ALTO and take your electronic device back in hand. On this page are published all the documents necessary for the use of your device. Kick 15 by ALTO.
USER MANUAL Kick 15 ALTO
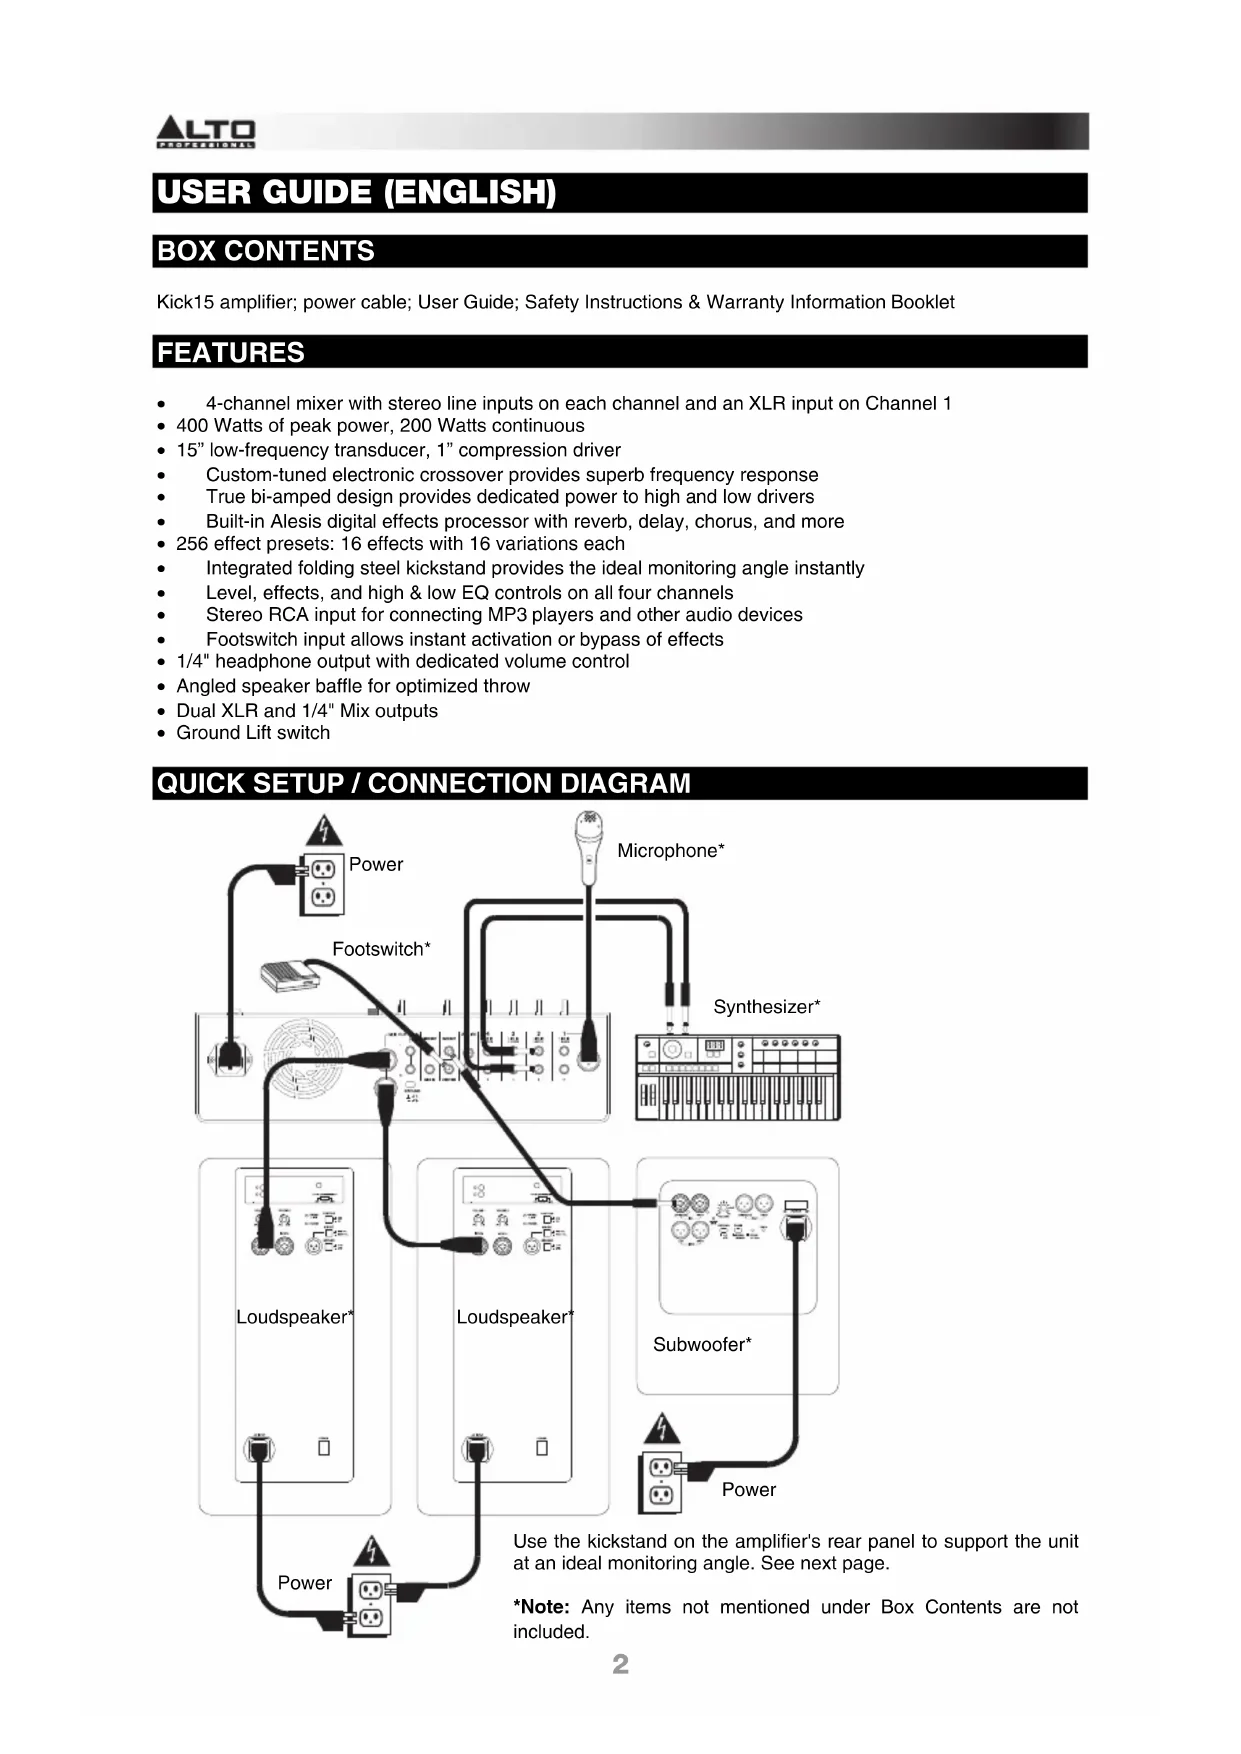
Kick15 amplifier; power cable; User Guide; Safety Instructions & Warranty Information Booklet
FEATURES
4-channel mixer with stereo line inputs on each channel and an XLR input on Channel 1
- 400 Watts of peak power, 200 Watts continuous
15" low-frequency transducer, 1" compression driver
- Custom-tuned electronic crossover provides superb frequency response
True bi-amped design provides dedicated power to high and low drivers
Built-in Alesis digital effects processor with reverb, delay, chorus, and more
- 256 effect presets: 16 effects with 16 variations each
- Integrated folding steel kickstand provides the ideal monitoring angle instantly
Level, effects, and high & low EQ controls on all four channels
- Stereo RCA input for connecting MP3 players and other audio devices
Footswitch input allows instant activation or bypass of effects
- 1/4" headphone output with dedicated volume control
- Angled speaker baffle for optimized throw
- Dual XLR and 1/4" Mix outputs
Ground Lift switch

QUICK SETUP / CONNECTION DIAGRAM
Use the kickstand on the amplifier's rear panel to support the unit at an ideal monitoring angle. See next page.
*Note: Any items not mentioned under Box Contents are not included.
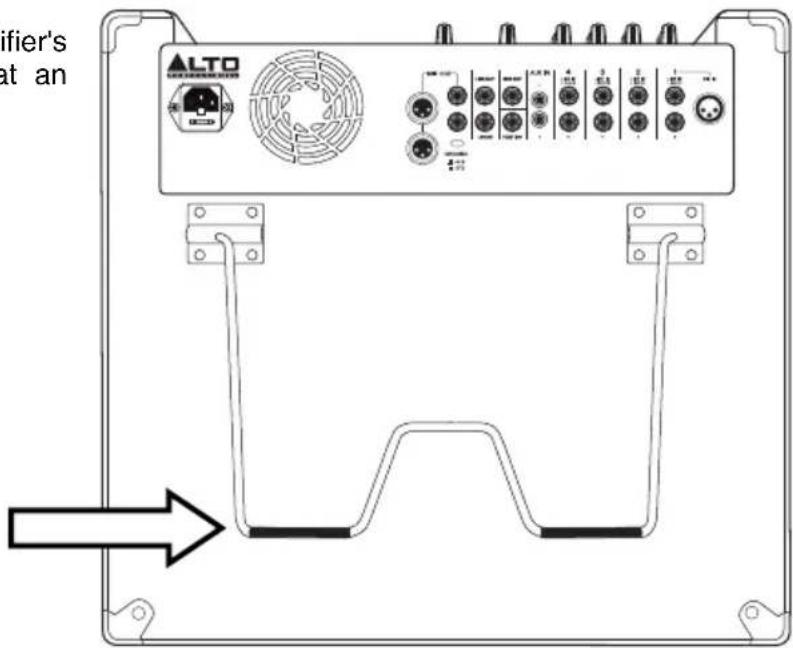
KICKSTAND
Use the kickstand on the amplifier's rear panel to support the unit at an ideal monitoring angle.
TOP PANEL
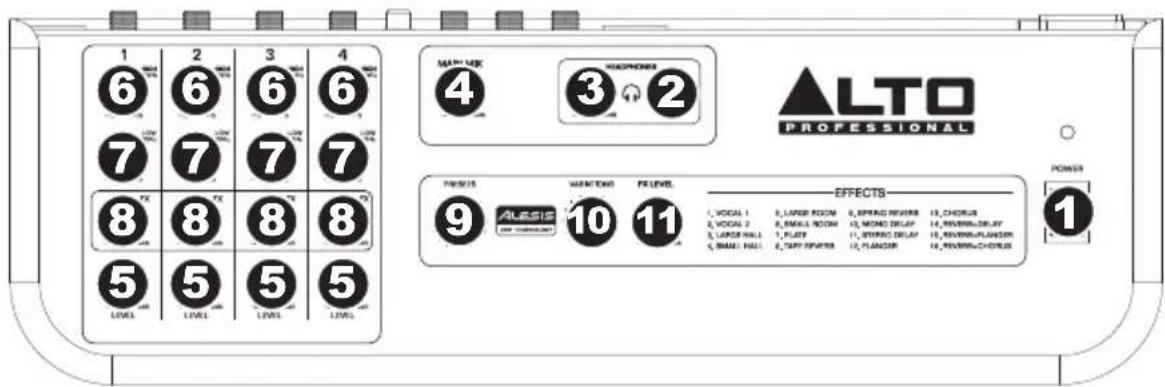
- POWER SWITCH - Turns the amplifier on/off. Make sure the MAIN VOL and HEADPHONES VOLUME knobs are set to "zero" before turning it on. The LED above this switch illuminates when the amplifier is on.
- HEADPHONES OUTPUT - Connect your 1/4" stereo headphones here.
- HEADPHONES VOLUME - Turn this knob to adjust the level of the HEADPHONE OUTPUT.
- MAIN VOL - Turn this knob to adjust the amplifier's main volume.
- CHANNEL LEVEL - Turn this knob to adjust the level of the corresponding channel.
- CHANNEL HIGH EQ - Turn this knob to adjust the level of the channel's high frequencies (treble).
- CHANNEL LOW EQ - Turn this knob to adjust the level of the channel's low frequencies (bass).
- CHANNEL FX - Turn this knob to adjust how much of the currently selected effect is applied to the channel.
- EFFECT PRESETS - Turn this knob to select an effect.
- EFFECT VARIATIONS - Turn this knob to select different variations of the selected effect.
- FX LEVEL - Turn this knob to adjust how much of the currently selected effect is applied to the entire mix.
REAR PANEL
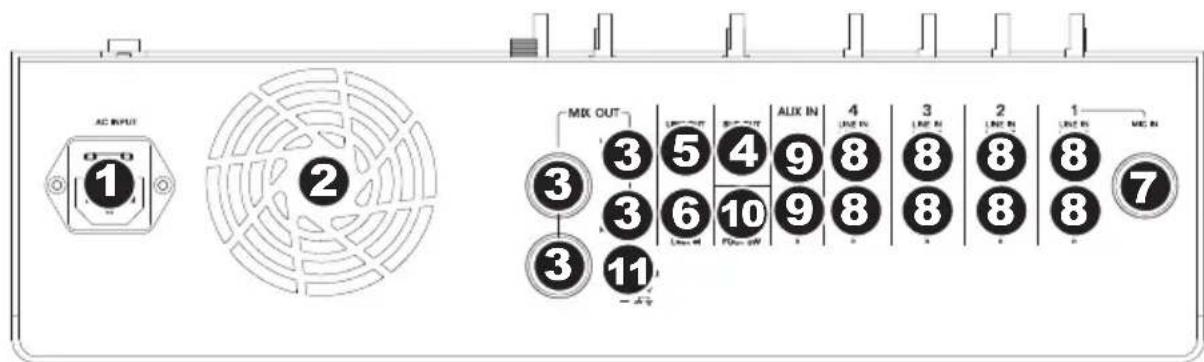
- POWER INPUT - Connect the included power cable to this input and connect the other end of the cable to a power source. Make sure the top panel's POWER SWITCH is set to "off" when plugging and unplugging the cable.
- COOLING FAN - Keep the area in front of this vent clear from obstructions. The fan behind the vent cools the amplifier, preventing overheating.
- MIX OUT - Use standard balanced XLR cables or balanced 1/4'' mono TRS cables to connect these outputs to the inputs of your active loudspeakers.
- SUB OUT - Use a standard balanced 1/4'' mono TRS cable to connect this output to the input of an optional powered subwoofer.
- LINK OUT - Use a standard unbalanced 1/4'' stereo TRS cable to connect this output to the
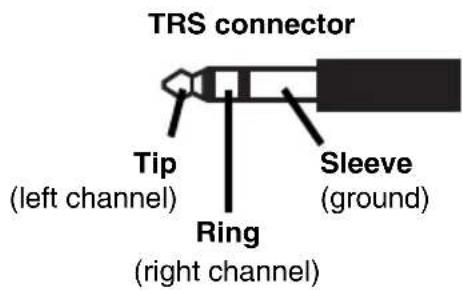
LINK IN of an optional second Kick amplifier (sold separately). When using this output, this amplifier will be the "master"; it controls the audio, volume, etc. sent to the "slave" amplifier connected to this output (each amplifier will output the same signal in parallel). Alternatively, you may use a 1/4" stereo TRS splitter cable to connect this output to two separate loudspeakers (left and right), two channels (left and right) of an external mixer, etc.
6. LINK IN - Use a standard unbalanced 1/4 stereo TRS cable to connect this input to the LINK OUT of an optional second Kick amplifier (sold separately). When using this input, this amplifier will be the "slave"; its levels will be controlled by the "master" amplifier connected to this input (each amplifier will output a summed mono signal).
7. MIC IN - Use a standard XLR cable to connect a microphone to this input.
8. LINE IN - Use standard 1/4" TRS cables to connect line-level instruments or sound sources to these inputs. When connecting a mono sound source, use only the "L/MONO" input.
9. AUX IN - Use a standard stereo RCA cable to connect a line-level sound source to these inputs.
10. FOOT SW - You can connect a standard 1/4'' TRS latching footswitch (sold separately) to this input. A connected footswitch will allow you to activate/deactivate the amplifier's built-in effects processor.
11. GROUND SWITCH - Depressing this switch grounds the amplifier, which can reduce hum or noise.
GUIA DEL USUARIO (ESPANOL)
CONTENIDO DE LA CAJA
Output Power: 400 W Peak (270 W LF @ 8 Ω + 130 W HF @ 8 Ω) 200 W Continuous RMS (135 W LF @ 8 Ω + 65 W HF@ 8 Ω) Headphone output: 105 mW, 75 kΩ
Crossover: 3 kHz
Frequency Response: 65 Hz - 19kHz( +3 dB)
Low Frequency: 15^ (381 mm) woofer, 2^ (51 mm) voice coil
High Frequency: Compression driver, 1^ (25 mm)
Input Level: XLR (Mic, Ch. 1): -10 dBu max 1/4": -10 dBV nominal, 0 dBV max RCA: -10 dBV nominal, 0 dBV max
Channel Gain: -to +10 dB (Ch. 1 to Ch. 4)
Output Gain: -to +10 dB (main mix output)
Maximum Available Gain: XLR (Mic, Ch. 1): 40 dB Line: 30 dB (including fixed preamp gain)
Connectors: Inputs: One XLR Eight 1/4"TRS (4 stereo pairs) One RCA stereo pair One 1/4"TRS link One 1/4"TS footswitch
Outputs: Two XLR (L/R)
Two 1/4" (L/R)
One 1/4" TRS subwoofer
One 1/4" TRS link
One 1/4" TRS headphone
Effects: Alesis DSP, 16 effects, 16 variations per effect Vocal: Vocal 1, Vocal 2 Reverb: Large Hall, Small Hall, Large Room, Small Room, Plate Reverb, Tape Reverb, Spring Reverb Delay: Mono, Stereo Modulation: Flanger, Chorus
Power supply: 100 VAC (-10% / + 15%) , 120 VAC (-10% / + 15%) or 240 VAC (-10% / + 15%) . 50 / 60~Hz IEC connector Inrush current at initial switch-on: 1.01 A Inrush current after power supply interruption: 1.81 A
Enclosure: Composite wood; perforated steel grille; 2 side handles, 1 top handle Dimensions (H x W x D): 21.5" x 19" x 14.6" (546 mm x 483 mm x 371 mm
Weight: Net (unit): 43.6 lbs.; 19.8 kg Gross (shipping): 50.2 lbs.; 22.8 kg