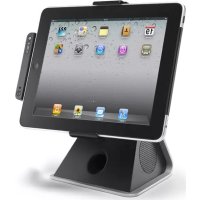
IPS260 - Speaker LENCO - Free user manual and instructions
Find the device manual for free IPS260 LENCO in PDF.


| Product Type | Audio system with docking station for iPhone/iPod/iPad |
| Brand | Lenco |
| Model | IPS260 |
| Dimensions (approx.) | 300 x 150 x 200 mm |
| Weight (approx.) | 2 kg |
| Power supply | AC/DC adapter 100-240 V, 50/60 Hz / Output 5 V DC, 4000 mA |
| Speakers | 2 integrated stereo speakers + subwoofer |
| Docking station | 30-pin connector for iPhone/iPod/iPad (charging and playback) |
| Auxiliary input | 3.5 mm audio connector (AUX) |
| Video output | Composite RCA connector for external TV |
| Remote control | Infrared with CR2025 battery (included) |
| iPad stand | Removable stand for iPad 2, 90° rotating head, tilt hinge |
| Main functions | Playback and charging of iPhone/iPod/iPad, AUX mode, volume control, standby, enable/disable video output |
| Maintenance and cleaning | Clean with a damp cloth (not wet). Do not use solvents or detergents. |
| Safety | Do not expose to water or moisture, do not obstruct ventilation, use only the supplied adapter, unplug during thunderstorms, do not open the casing |
| Spare parts and repairability | Remote control, power adapter, iPad stand. Reset possible via Reset button. For any repair, contact a qualified technician. |
| General information | Compatibility: iPod classic, iPod nano, iPod shuffle, iPod touch, iPhone, iPad. Apple registered trademarks. |
Frequently Asked Questions - IPS260 LENCO
User questions about IPS260 LENCO
0 question about this device. Answer the ones you know or ask your own.
Ask a new question about this device
Download the instructions for your Speaker in PDF format for free! Find your manual IPS260 - LENCO and take your electronic device back in hand. On this page are published all the documents necessary for the use of your device. IPS260 by LENCO.
USER MANUAL IPS260 LENCO
Important Safety Instructions
When used in the directed manner, this unit has been designed and manufactured to ensure your personal safety. However, improper use can result in potential electrical shock or fire hazards. Please read all safety and operating instructions carefully before installation and use, and keep these instructions handy for future reference. Take special note of all warnings listed in these instructions and on the unit.
- Water and Moisture
The transmitter should not be used near water. For example: near a bathtub, washbowl, kitchen sink, laundry tub, swimming pool or in a set basement.
- Ventilation
The unit should be situated so that its location or position does not interfere with its proper ventilation. For example, it should not be situated on a bed, sofa, rug or similar surface that may block the ventilation openings. The ventilation should not be impeded by covering the ventilation openings with items, such as newspapers, table-cloths, curtains, etc. Also, it should not be placed in a built-in installation, such as a bookcase or cabinet, which may impede the flow of air through the ventilation openings.
- Heat & Flame
The unit should be situated away from heat sources such as radiators, heat registers, stoves or other appliances (including amplifiers) that produce heat. No naked flame sources, such as lighted candles, should be placed on the apparatus.
- Power Source
The unit should be connected to a power supply only of the type described in the operating instructions or as marked on the appliance. Where the AC/DC Adaptor is used as the disconnect device, the disconnect device shall remain readily operable.
- Power Con
Power supply cords should be routed so that they are not likely to be walked on or pinched by items placed upon or against them. It is always best to have a clear area from where the cord exits the unit to where it is plugged into an AC outlet.
- Cleaning
The unit should be cleaned only as recommended. See the section "Care and Maintenance" of this manual for cleaning instructions.
- Object and Liquid Entry
Care should be taken so that objects do not fall and liquids are not spilled into any openings or vents located on the transmitter. It shall not be exposed to dripping or splashing and that no objects filled with liquids, such as vases, shall be placed on the apparatus.
- Attachments
Do not use attachments no recommended by the product manufacturer.
- Lightning and Power Surge Protection
Unplug the unit from the wall outlet and disconnect the periods of time. This will prevent damage to the product due to lightning and power-line surges.
- Overloading
Do not overload wall outlets, extension cords, or integral convenience receptacles as this can result in a risk of fire of electric shock.
- Damage Requiring Service
This unit should be serviced by qualified service personnel when:
A. The power supply cord or plug has been damaged.
B. Objects have fallen into or liquid has been spilled into the enclosure.
C. The unit has been exposed to rain
D. The unit has been dropped or the enclosure damaged.
E. The unit exhibits a marked change in performance or does not operate normally.
- Periods of Nonuse
If the unit is to be left unused for an extended period of time, such as a month or longer, the power cord should be unplugged from the unit to prevent damage or corrosion.
- Servicing
The user should not attempt to service the unit beyond those methods described in the user's operating instructions. Service methods not covered in the operating instructions should be referred to qualified service personnel.
Features
Thank you for purchasing the Music System for iPad / iPhone / iPod Docking
This model incorporates following features:
- Different iPad / iPod / iPhone models Player / Re-charger
- Audio auxiliary (AUX-IN) input for connecting other digital audio player
Built-in 2 High Fidelity Speakers
- Heavy Bass Subwoofer
- AC-DC power adaptor operated
-Remote Control operation
Robust Aluminum sland
"Made for iPod" and "Made for iPhone" mean that an electronic accessory has been designed to connect specifically to iPod or iPhone respectively and has been certified by the developer to meet Apple performance standards. Apple is not responsible for the operation of this device or its compliance with safety and regulatory standards. Please note that the use of this accessory with iPhone or iPod may affect wireless performance.
iPhone, iPod, iPod classic, iPod nano, iPod shuffle and iPod touch are trademarks of Apple Inc., registered in the U.S. and other countries. iPod is a trademark of Apple Inc.
Installation
Remote Control
The remote control operates on one CR2025 battery (Included).
To activate the remote control, remove the insulation tab attached in the battery compartment.
Warnings:
Battery shall not be exposed to excessive heat such as sunshine, re or the like.
- Be sure that the battery are installed correctly. Wrong polarity may damage the unit.
- Do not mix old and new batteries.
- Do not mix alkaline, standard (carbon-zinc) or rechargeable (nickel-cadmium) batteries.
Only batteries of the same or equivalent type as recommend are to be used.
- If the unit is not to be used for an extended period of time, remove the battery.
- Do not dispose of batteries in re, battery may explode or leak
Danger of explosion if battery is incorrectly replaced.
AC-DC Power Adaptor Connection
The unit is powered by an external AC-DC power adaptor, required the output DC 5V 4000mA (included).
(1) Firmly and securely plug the adaptor's AC plug into AC main outlet.
(2) Connect the adaptor's DC output plug to the DC-in jack of the unit.
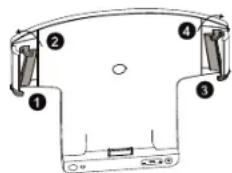
iPad 2 Bracket Installation
- Allach the lower part of the iPad 2 bracket onto the lower part of the left dock arm.
- Press the upper part of the iPad 2 bracket onto the upper part of the left dock arm until it snaps into place.
- Allach the lower part of the iPad 2 bracket onto the lower part of the right clock arm.
- Press the upper part of the iPad 2 bracket onto the upper part of the right dock arm until it snaps into place.

GB

GB
Description of Parts
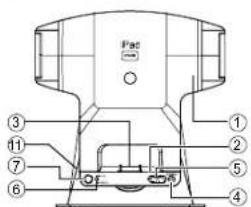
Main Unit Front View
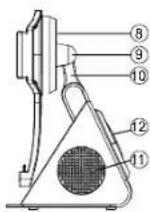
Slide View
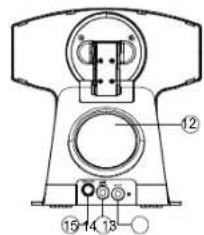
Rear View
- iPad Support Frame
- Docking Platform
- iPad / iPhone / iPod docking connector
- POWER / FUNCTION Button --- Tum the unit on and off; Select iPad / iPhone or AUX-IN mode.
- VOL +/ - Button --- Adjust volume level up or down
- Status LED Indicator ---- In standby mode, the LED indicator will be off.
In iPad/iPhone mode, the LED indicator lights Green.
In AUX-IN mode, the LED indicator lights Red. - Remote Control Infrared Sensor
- Rotating Head ---- Allow the iPad Support Frame to be rotated 90 degrees counterclockwise for landscape operation / viewing on your Apple device.
- View angle Hinge --- To adjust the viewing angle of iPad / iPhone clock forward or back.
- Support Arm
- Speakers
12.Suiwoofoer
13.AUX-INJack----Auxiliary audio signal Input - DC-in Jack ---For the connection of external DC power supply
- Video Out Jack ---- Composite video output
Description of Parts
Remote Control
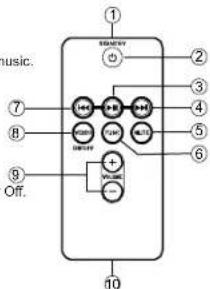
- Infrared Transmitter
2.STANDBY button----Tum the unit on and off. - button -In iPad / iPhone mode:Play/ Pause iPod music.
- button----In iPad / iPhone mode ; Skip tracks
Forward: perform high-speed search. - MUTE button --- Mute the volume
- FUNC Button --- the function button, select iPad/Phone
or AUX-IN mode - button --- In iPad / iPhone mode : Skip tracks
Backward; perform high-speed search. - VIDEO ON/OFF button --- Press to turn video output On or Off.
- VOLUME + / - button -- Adjust volume level up or down
- Battery Compartment
Listening to iPad / iPhone / iPod
This model adopts different iPad / iPhone / iPod models.
- Insert your iPad / iPhone / iPod into the docking port by placing the connector on the bottom
of the iPad / iPhone / iPod onto the connector at the docking platform.
Caution :
Please be careful when seating the iPad / iPhone / iPod into the docking to avoid damaging the
I please be baeal when coating the lid / if none / if go into the docking
-
Press the POWER / FUNCTION button to turn on the unit.
-
Press the POWER FUNCTION button until the IRad / iPhone mode is selected, the Status
Green LED Indicator lights on steadily
From your iPad / iPhone ( iPod :
To start playback music, press the PLAY button.
To save the music, press the PAU85 button.
To pao the mice, prs the PAose 10ion.
When a song playback, press and hold the button to perform high speed search.
forward / backward.
To skip to next of previous song, press the button.
From the main unit
- You may press the VOL + / - button to adjust the volume to a desired level.
Note :The volume level cannot be adjusted by the volume control of your iPad / iPhone / iPod
after being docked
- To turn off the unit, press and hold the POWER / FUNCTION button and the Status LED
indicator lights off.
When the unit is powered by the external DC adaptor and once the iPad / iPhone / iPod
connected to the docking port, the unit recharges the iPad / iPhone / iPod battery.
VIDEO OUT ON/OFF SELECTION FROM MAIN UNIT AND REMOTEL CONTROL
To select main unit video out OFF (watch movie on Apple device screen)
When the unit is at standby mode, just press the POWER / FUNCTION button from the main
unit or the STANDBY button from the remote control which will tum on the unit and it will be In
video out OFF status.

GB

GB
Listening to iPad / iPhone / iPod
To select main unit video out ON (watch movie on TV set):
When the unit is at standby mode, press and hold the main unit VOL +/- button then press the POWER / FUNCTION button which will turn on the unit and it will be in video out ON status.
To select main unit video out ON / OFF by remote control;
When the unit is in iPad / iPhone mode, you may also press theVIDEO ON/OFF button from the remote control to toggle between video out ON (watch movie on TV set) or OFF (watch movie on iPad / iPhone / iPod screen) mode, if necessary.
When the unit is switched between video out ON/OFF modes by pressing theVIDEO ON/OFF button from remote control and different Apple device will behave differently.
(a) During watching movie on Apple device screen then press the VIDEO ON/OFF button from the remote control switching to video out ON mode for watching movie on external TV set.
| iPad: The movie will be paused and automatically return to the selected movie screen. You may press the Play button to carry on playback the movie on external TV set. |
| iPhone / iPod Touch: The movie will be paused and automatically return to the movie library screen. You may tap on the same (or other) movie to be playback on external TV set. |
| Earlier iPod with video models (with click wheel): The movie will carry on playback on iPod screen and need to press the MENU button of your iPod returning to the movie library screen. You may select the same (or other) movie to be playback on external TV set. |
(b) During watching movie on external TV set then press theVIDEO ON/OFF button from the remote control switching tovideo out OFF mode for watching movie on Apple device screen.
| iPod: | The movie will be paused and automatically return to the selected movie screen. You maypress the Play button to carry on playback the movie on your iPod screen. |
| iPhone / iPod Touch: | The movie will be paused and automatically return to the movie library screen. You maytap on the same (or other) movie to be playback on your Apple device screen. |
| Earlier iPod with video models (with click wheel): | The movie will carry on playback on external TV set and need to press the MENU button of your iPod returning to the movie library screen. You may select the same (or other) movisto be playback on the iPod screen. |
TV Out (VIDEO OUT) SETTING FROM iPad / iPhone / iPod
Before you watch movie from either the Apple device screen or from the external TV set, you need to set your iPod's TV Outsetting first.
For earlier iPod with video models (with click wheel)
iPod : On the main menu choose video then select video setting. iPod : Set the TV Out section to "ON".
iPod: Switch back to the movie library and ready for playback a movie of your choice.
For iPad, iPhone and iPod touch
TV Out will be automatically set in iPad, iPhone and iPod touch which TV Out on/off setting is not available for user's selection.
Note: If TV Out (iPod) is set to ON, Pressing the VIDEO ON/OFF button from the remote control can enable the mainunit video out ON/OFF. It can playback movie on iPod screen when main unit
Listening to iPad / iPhone / iPod
video out is set to OFF (disabled) and playback the movie on external TV set when main unit video out is set to ON (enabled).
If TV Out (iPod) is set to OFF, it will playback movie on the iPod screen only and no video signal from the iPod can be output to external TV set even we press theVIDEO ON/OFF button from the remote control.
WATCHING MOVIES ON YOUR APPLE DEVICE SCREEN
-
Press the POWER FUNCTION button on the main unit or the STANDBY button from remote control to turn on the unit.If necessary, press the POWER / FUNCTION button to select iPad / iPhone mode. The Status Green LED Indicator will light steadily.
-
Select the video you wish to watch from the menu on your Apple device and press either the Play / Pause button on remote control or the play button on the Apple device.
Note: iPad / iPhone mode : The Status LED Indicator will light Green. AUX-IN mode : The Status LED Indicator will light Red
In case the unit is in AUX-IN mode, you may press the FUNCTION button to select iPad / iPhone mode, where the Status Green LED Indicator will light steadily. Press theVIDEO ON/OFF button from the remote control to select thedesired video out ON/OFF mode, if necessary.
WATCHING MOVIES ON AN EXTERNAL TV
- You can connect this unit to a television or other video display that has a composite video input. 2. Securely lock your iPod / iPhone / iPad with video.
- Securely lock your iPad / iPhone / iPad with video. 3. Connect one end of a RCA cable to rear RCA video
- Connect the other end of the RCA cable toVIDEO-IN of the television or video display.
- When the unit is at standby mode, press and hold the VOL + button then press the POWER / FUNCTION button to turn on the unit.
If necessary, press the POWER / FUNCTION button to select iPad / iPhone mode. The Status Green LED Indicator will light steadily. The video out signal from the unit will be enabled and you can watch movie from your television or external video display. - Select the video you wish to watch from the menu on your Apple device and press either the Play / Pause button on remote control or the play button on the Apple device.
Listening to an External Audio Source
The unit provides an auxiliary audio signal input for connecting external audio device
- Connect an audio cable (not included) with 3.5mm stereo plug to the AUX-IN jack located at the back of the unit.
- Connect the other end of the cable to Line Out jack or Headphone Jack of your external audio device. 3. Turn on the external audio device.
- Press the POWER /FUNCTION button to turn on the unit.
- Press the POWER / FUNCTION button again to select AUX-IN mode, the Status LED Indicator will lights Red.
- The volume level can now be controlled through the main unit. Operate all other functions on the auxiliary device as usual.
No
If you're connected the Line Out Jack of your external device then you only need to adjust the volume control offthis unit. If you're connected the Headphone Jack of your external device, then you may need to adjust both thevolume control of your external device and the volume control of this unit to find the most desirable volume setting.
Press and hold the POWER / FUNCTION button turning off the unit when you finish listening. Don't forget to switch off the power of your external device as well.

GB DE

Care and Maintenance
-Do not subject the unit to excessive force, shock, dust or extremetemperature.
-Do not tamper the internal components of the unit.
Clean your unit with a damp (neverwet) cloth. Solvent or detergent should never be used.
-Avoid leaving your unit in direct sunlight or in hot, humid or dusty places.
- Keep your unit away from heating appliances and sources of electrical noise such as fluorescent lamps or motors.
Resetting the Unit
If the unit experiences a power surge or electric shock, it is possible that the internal micro
controllermay lock up and the unit will not respond to any commands from the panel controls.
1. In this event, unplug and then reconnect the AC power plug into the wall outlet.
2. Use a straightened paper clip, toothpick or similar objectsto press the RESET button locatedat the your previous settings will be erased.rear of the iPod Support Frame (see the below figure). The reset operation clears the system memory and all of
CAUTION:DONOTUSHARP,POINTEDOBJECTTOPRESSOTHERESETBUTTON.ITMAYDAMAGE, THERESET SWITCH INSIDE THE UNIT.
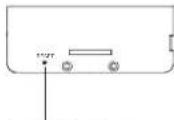
RESET button
Technical Data
PowerAdaptor:InputAC100V-240V\~50/60Hz
Output DC 5V 4000mA
Power Supply for the unit: DC 5V 4000mA

If at any time in the future you want to dispose of this product, please note that waste electrical products should not be disposed of with household waste. Find out where your nearest recycling centre is. Consult your local authority or retailer for more details (Waste Electrical and Electronic Equipment Directive).
THE SPECIFICATION AND EXTERNAL APPEARANCE OF THE SET ARE SUBJECT TO CHANGE WITHOUT PRIOR NOTICE.
Lenco
IPS-260

m = 311

- Important Safety Instructions
- Features
- Installation
- Remote Control
- Warnings:
- AC-DC Power Adaptor Connection
- iPad 2 Bracket Installation
- Description of Parts
- Listening to iPad / iPhone / iPod
- Caution :
- WATCHING MOVIES ON YOUR APPLE DEVICE SCREEN
- WATCHING MOVIES ON AN EXTERNAL TV
- Listening to an External Audio Source
- Care and Maintenance
- Technical Data
- Lenco
- IPS-260
Brand : LENCO
Model : IPS260
Category : Speaker