
FRDP3 - Radio Sunstech - Free user manual and instructions
Find the device manual for free FRDP3 Sunstech in PDF.
| Product type | Radio alarm clock with projector |
| Brand | Sunstech |
| Model | FRDP3 |
| Power supply | Mains adapter 100-240 V, 50/60 Hz, output 5 V 1.5 A |
| Backup battery | Lithium battery CR2032 3 V |
| Frequency range | FM 87.50 - 108.00 MHz |
| Number of presets | 10 |
| Speaker | Built-in |
| Display | LED with adjustable brightness (high, low, off) |
| Projector | 180° rotation and image flip |
| Alarms | 2 independent alarms (buzzer or radio), adjustable frequency (1-5, 1-7, 6-7) |
| Snooze | 9 minutes |
| Sleep timer | 10 to 90 minutes (in 10-minute steps) |
| USB port | Charge external devices (5 V, max 1.5 A) |
| Dimensions | Approximately 18 x 8 x 8 cm |
| Weight | Approximately 400 g |
| Care | Soft damp cloth, do not use abrasive products |
| Safety | Do not expose to water, do not open, storage temperature < 40 °C |
| Repairability | Repair by certified technician only |
| Package contents | Radio, mains adapter, user manual |
Frequently Asked Questions - FRDP3 Sunstech
User questions about FRDP3 Sunstech
0 question about this device. Answer the ones you know or ask your own.
Ask a new question about this device
Download the instructions for your Radio in PDF format for free! Find your manual FRDP3 - Sunstech and take your electronic device back in hand. On this page are published all the documents necessary for the use of your device. FRDP3 by Sunstech.
USER MANUAL FRDP3 Sunstech
natural_image
Abstract geometric design with a white sphere, a white circle, and a gray book-like shape against a dark background (no text or symbols)FRDP3
RADIO ALARM CLOCK
USER GUIDE
ENGLISH
User guide
FRDP3
CONTENT
GENERAL INFORMATION .... 1
PRODUCT CONTENTS 1
OVERVIEW PRODUCT 2
GETTING STARTED 3
Connecting to power 3
Backup system 3
Setting the clock 3
Using the antenna 4
Controlling the sound volume 4
LISTENING TO RADIO 4
Setting preset stations 4
USING THE ALARMS 5
Setting alarms 5
Turning the alarms on or off 5
Deactivating a sounding alarm 5
Snooze 6
Sleep 6
DISPLAY INFORMATION 6
This user manual accompanies this clock radio (below: radio). It contains important information on use and care.
Before using the radio, read the user manual carefully. This particularly applies to the safety notes. Failure to follow the instructions in this user manual may result in injury or damage to the radio.
Store the user manual for future use. It you pass the radio on to a third party please be absolutely sure to include this user manual.
PRODUCT CONTENTS
Check to make sure that all contents have been received. Do not use the radio if there is damage.
- Clock radio
- Power adapter
- User manual
ENGLISH
User guide
FRDP3
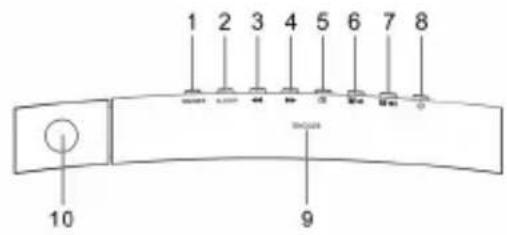
OVERVIEW PRODUCT
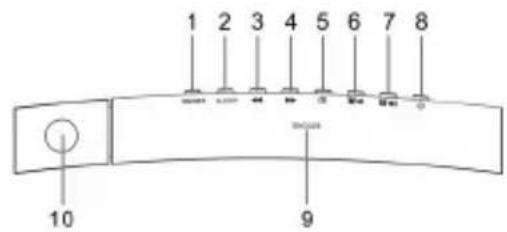
- PROJECTOR ON/OFF button / 180° FLIP button
- SLEEP button / DIMMER button
- BACKWARD button
- FORWARD button
- CLOCK button / MEM/M+ button / SET button / Y-M-D button
- ALARM 1 button / VOL DOWN button / ALARM OFF button
- ALARM 2 button / VOL UP button / ALARM OFF button
- POWER button / ALARM OFF button
- SNOOZE button
- Projector
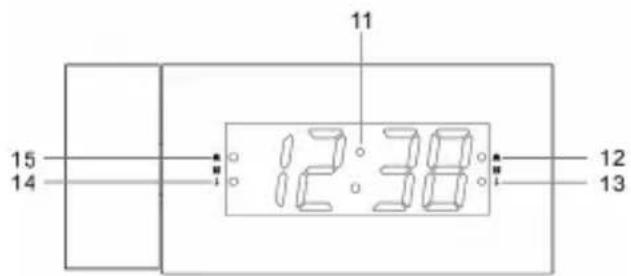
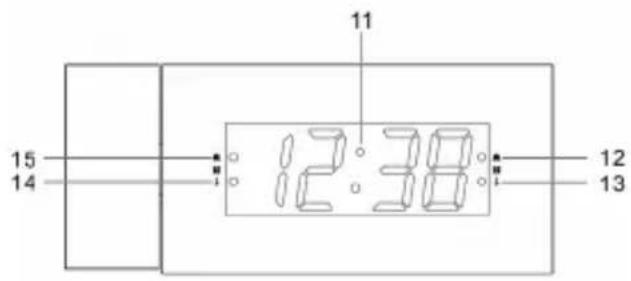
- Display
- Alarm 2 indicator (alarm)
- Alarm 2 indicator (radio)
- Alarm 1 indicator (radio)
- Alarm 1 indicator (alarm)
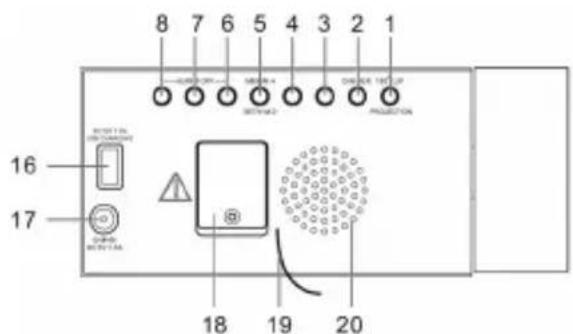
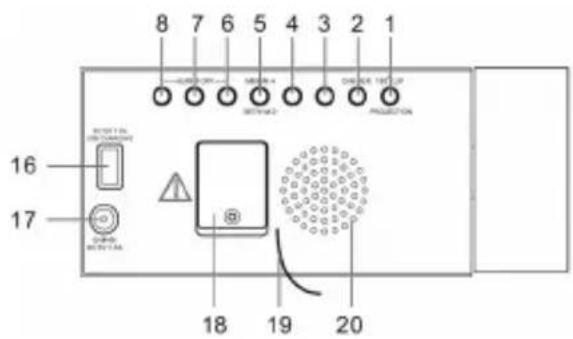
- USB charging port
ENGLISH
User guide
FRDP3
- DC IN jack
- Battery compartment
- Antenna
- Speaker
GETTING STARTED
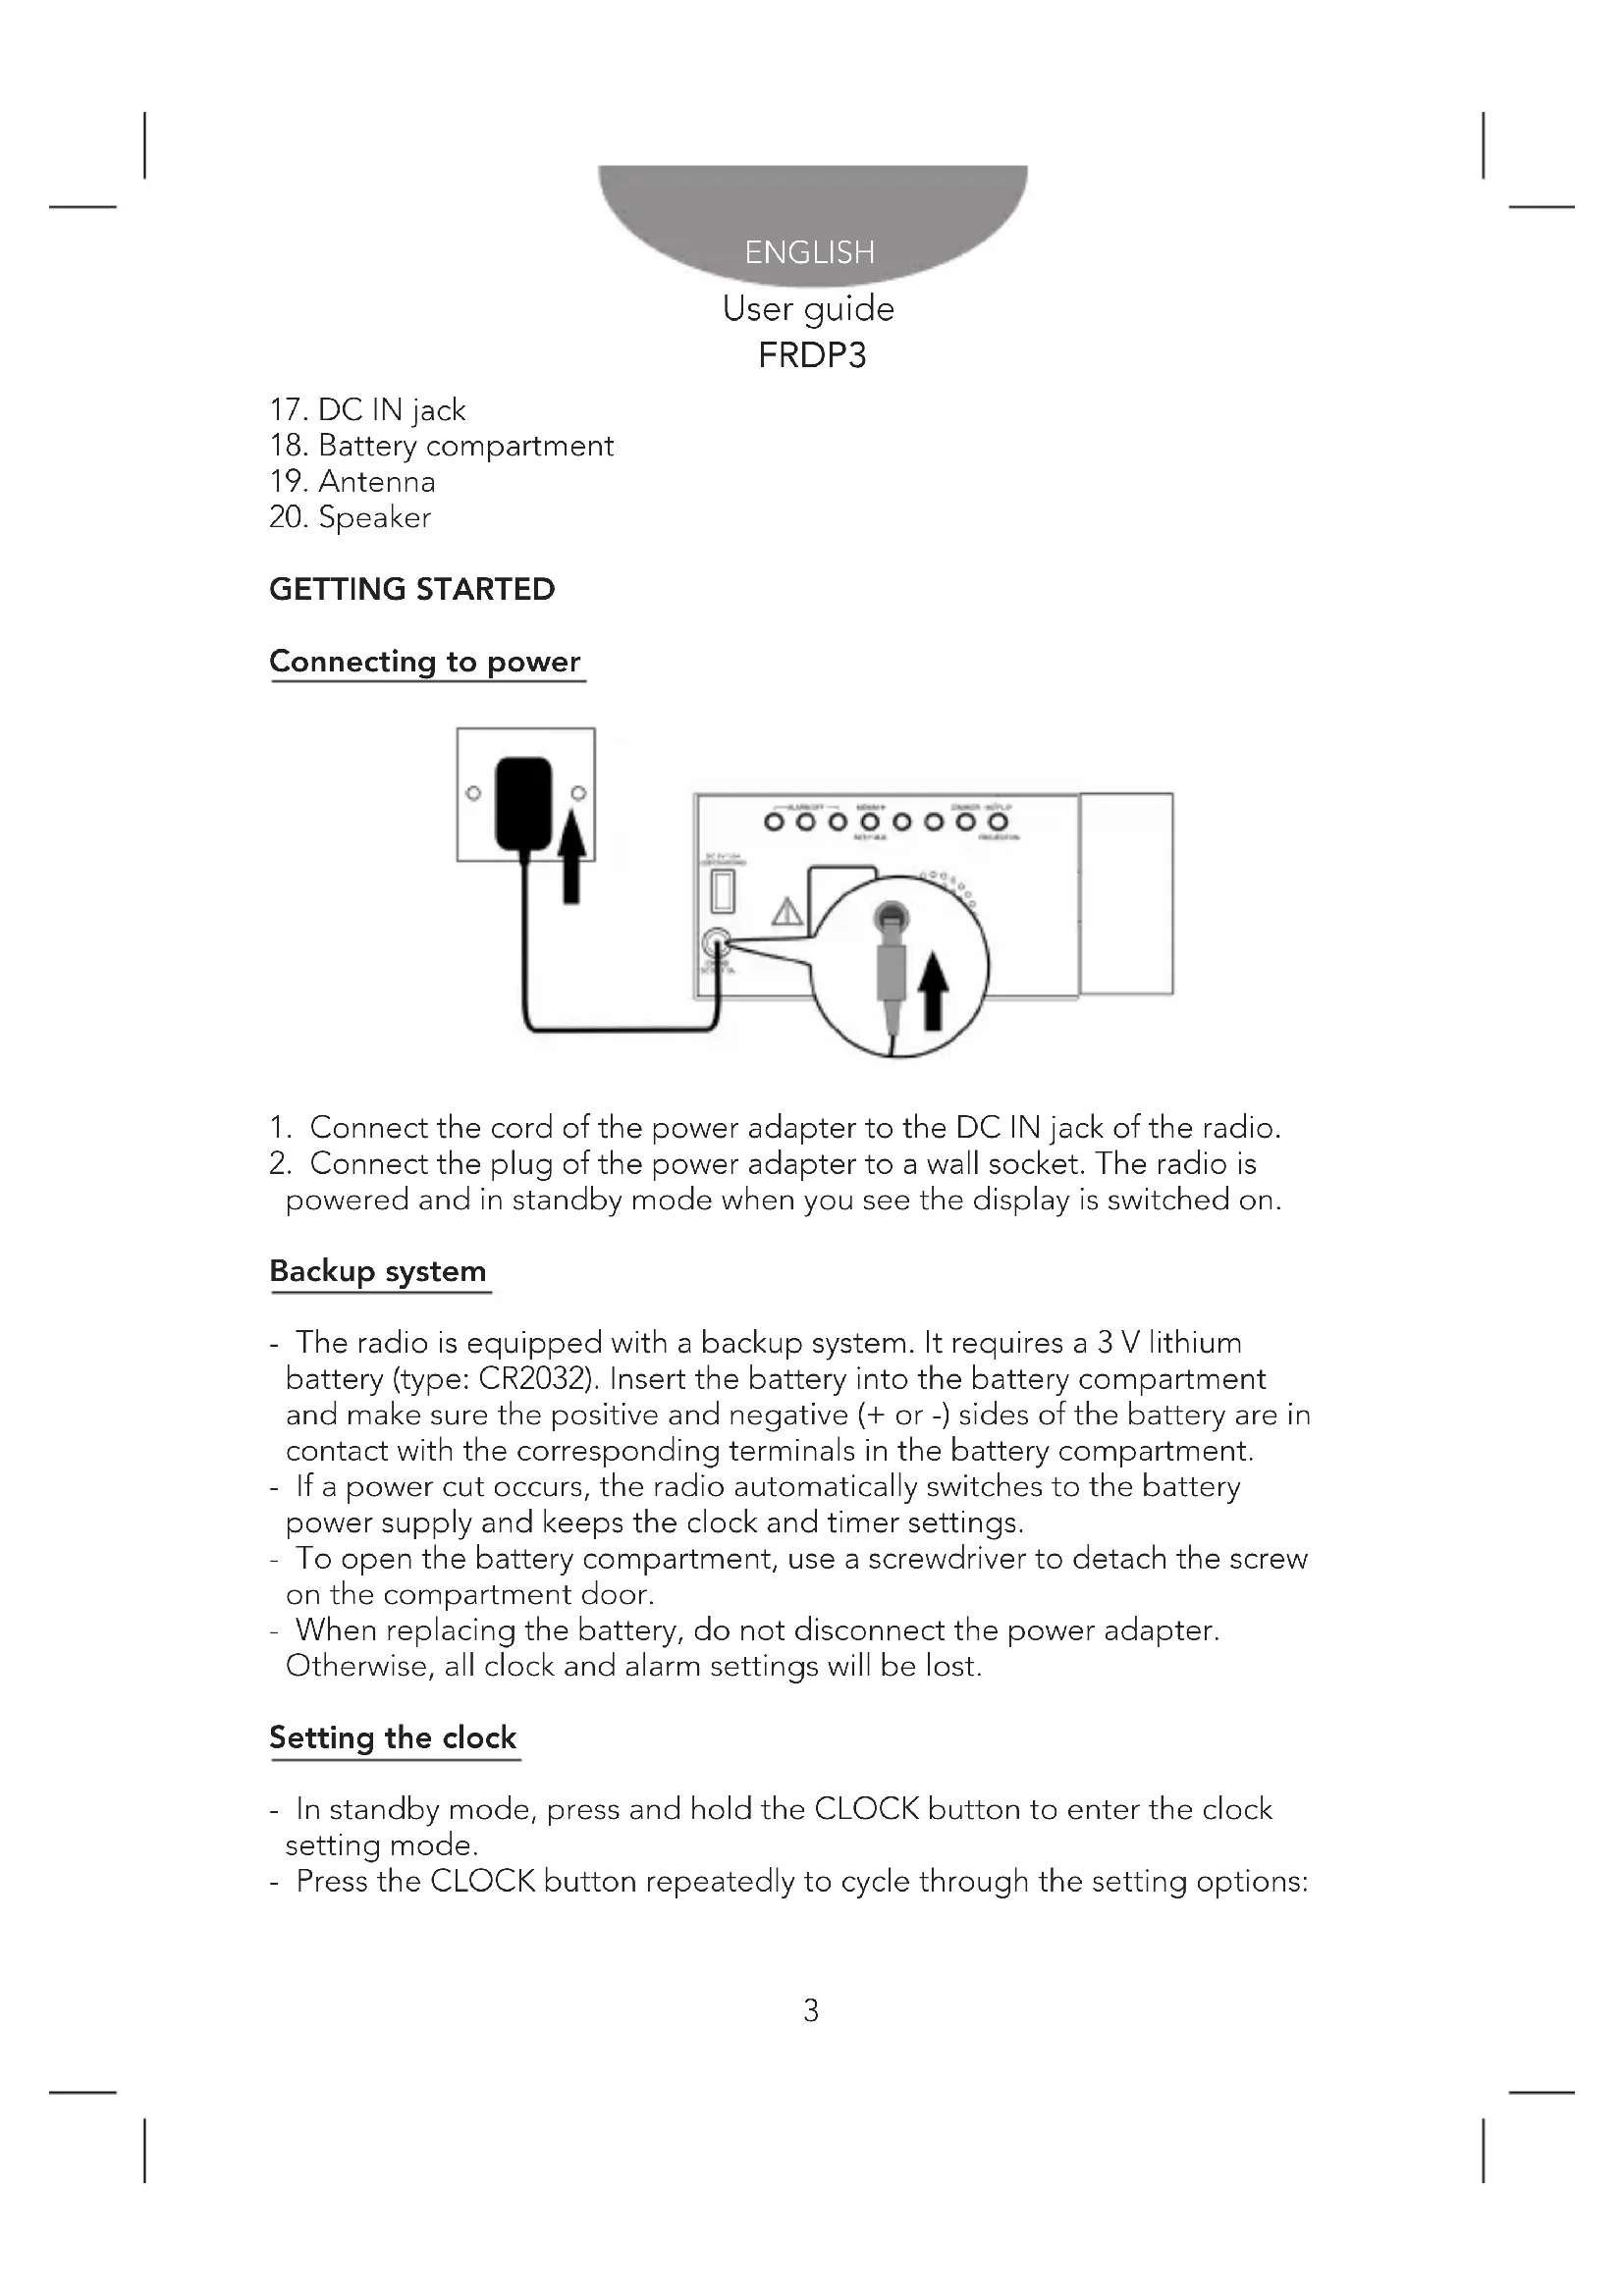
Connecting to power
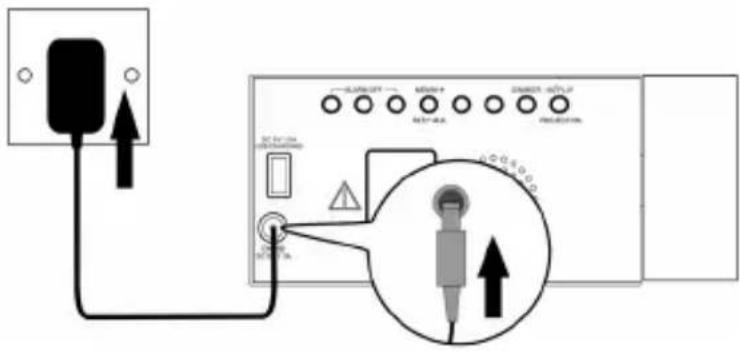
- Connect the cord of the power adapter to the DC IN jack of the radio.
- Connect the plug of the power adapter to a wall socket. The radio is powered and in standby mode when you see the display is switched on.
Backup system
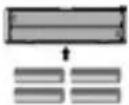
- The radio is equipped with a backup system. It requires a 3 V lithium battery (type: CR2032). Insert the battery into the battery compartment and make sure the positive and negative (+ or -) sides of the battery are in contact with the corresponding terminals in the battery compartment.
- If a power cut occurs, the radio automatically switches to the battery power supply and keeps the clock and timer settings.
- To open the battery compartment, use a screwdriver to detach the screw on the compartment door.
- When replacing the battery, do not disconnect the power adapter. Otherwise, all clock and alarm settings will be lost.
Setting the clock
- In standby mode, press and hold the CLOCK button to enter the clock setting mode.
- Press the CLOCK button repeatedly to cycle through the setting options:
ENGLISH
User guide
FRDP3
Year > Month/Day > Time
- Setting year: Press the BACKWARD or FORWARD button.
- Setting month/day: Press the BACKWARD button to set the month and FORWARD button to set the day.
- Setting the time: Press the BACKWARD button to set the hour time and FORWARD button to set the minute time.
Press the SET button to confirm each setting option.
Using the antenna
Unroll and extend the antenna to improve FM signal reception.
Controlling the sound volume
While listening to the radio, press the VOL UP or DOWN button to control the volume.
LISTENING TO RADIO
- Press the POWER button to switch the radio on.
- Press the BACKWARD or FORWARD button to adjust frequency.
- Press and hold the BACKWARD or FORWARD button to automatically tune to the next available FM station.
- Press the POWER button to switch the radio off.
Setting preset stations
You can store up to 10 preset stations.
- Tune to a station.
- Press and hold the MEM/M+ button until "P01" (or the next available preset slot) shows on the display.
- Press the BACKWARD or FORWARD button to select a preset number (P01-P10).
- Press the SET button to confirm. The preset station has been set up.
- Press the MEM/M+ button repeatedly while listening to the radio to select a preset station. Alternatively, press the MEM/M+ button once and then press the BACKWARD or FORWARD button to select a preset station.
ENGLISH
User guide
FRDP3
USING THE ALARMS
Setting alarms
The radio lets you have 2 alarm settings. To set the alarms:
- In standby mode, press and hold the ALARM 1 or ALARM 2 button to enter the alarm time setting mode.
- In the alarm setting mode, press the ALARM 1 or ALARM 2 repeatedly to cycle through the setting options:
Alarm time > Alarm sound source > Alarm frequency
- Setting alarm time: Press the BACKWARD to set the hour time and FORWARD button to set the minute time.
- Setting alarm sound source: Press the BACKWARD or FORWARD button to select the alarm or radio as the alarm sound source. The corresponding alarm indicator will turn on according to your selection.
- Setting alarm frequency: Press the BACKWARD or FORWARD button to select an alarm frequency (1-5 = Monday to Friday, 1-7 = Everyday, 6-7 = Weekend only).
Once the alarm setting is done, the alarm will be automatically activated with the corresponding alarm indicator (alarm or radio) switched on.
Turning the alarms on or off
When the clock time is displayed, press and hold the ALARM 1 or ALARM 2 button to enable or disable the respective alarm. The corresponding Alarm 1 or Alarm 2 indicator (alarm or radio) will switch on when the alarm is enabled.
Deactivating a sounding alarm
- Press any ALARM OFF button to switch off a sounding alarm.
- When the alarm sounds, the corresponding Alarm 1 or Alarm 2 indicator (alarm or radio) flashes on the display.
- For one day alarm setting, just set the desired alarm time one day before. Press any ALARM OFF button to switch off the alarm. After having switched off the alarm, press the ALARM button again to clear the alarm setting (the alarm indicator will be switched off).
To set another one day alarm, just repeat the above steps.
ENGLISH
User guide
FRDP3
Snooze
- To temporarily silence a sounding alarm, press the SNOOZE button. The alarm will sound again when the snooze period (9 minutes) is over.
- The corresponding Alarm 1 or Alarm 2 indicator (alarm or radio) flashes on the display during the snooze period.
- To cancel the snooze period and the alarm, press any ALARM OFF.
Sleep
- This sleep function defines the duration of time before the radio switches itself off automatically.
- When the radio is switched on, press the SLEEP button repeatedly to select a sleep period (Options: Off, 10, 20, 30, 40, 50, 60, 70, 80 and 90 minutes).
- The radio will automatically switch off when the sleep period is over.
- Press the SLEEP button to check the remaining time before the radio switches off.
- Press the POWER button to cancel this function.
DISPLAY INFORMATION
- In standby mode, press the Y-M-D button repeatedly to change showing the year, date, time and day of the week (d1 = Monday, d2 = Tuesday, d3 = Wednesday, d4 = Thursday, d5 = Friday, d6 = Saturday and d7 = Sunday).
- In radio mode, press the BACKWARD or FORWARD button once to briefly change the display from the clock time to the current radio frequency.
DISPLAY BRIGHTNESS
In standby mode, press the DIMMER button to change the brightness level of the display (low level, high level or off).
PROJECTOR
- Press the PROJECTOR button to project the current clock time on a wall.
- Rotate the projector (up to 180^ ) to adjust the projection angle.
- Press the 180° FLIP button to flip the projected image.
ENGLISH
User guide
FRDP3
CHARGING EXTERNAL DEVICE
Connect an external device (e.g. smartphone, mp3 player) via a USB cable (not provided) to the USB jack on the back of the radio for charging. The radio cannot access the contents in the connected external device.
SPECIFICATIONS
Tuner Range FM: 87.50 - 108.00 MHz
Number of preset radio stations: 10
AC power adaptor: Input: AC 100-240 V, 50/60Hz
Output: DC 5 V 1.5A
CARE AND MAINTENANCE
- Clean the radio with a soft damp cloth and let all parts dry completely after cleaning.
- Do not use any aggressive cleaners, brushes with nylon bristles, sharp or metallic cleaning utensils, knives, hard scrapers and the like. They could damage the surfaces of the radio.
- Do not immerse the radio in water and do not let water getting into the housing of the radio.
STORAGE
- Unplug the power adapter and clean the radio before storage.
- Always store the radio in a dry and clean place.
ENGLISH
User guide
FRDP3
WARNINGS
 | Correct disposal of this Product(Waste Electrical & Electronic Equipment)(WEEE)Your product is designed and manufactured with high quality materials and components which can be recycled and reused.This symbol means that electrical and electronic equipment, at their end of-life should be disposed of separately from your household waste.Please dispose of this equipment at your local community waste collection/recycling centre.In the European Union there are separate collection systems for used electrical and electronic products. Please help us to conserve the environment we live in! |
 | DO NOT place objects on top of the device, as objects may scratch the device. |
 | DO NOT expose the device to dirty or dusty environments. |
 | DO NOT place the device on an uneven or unstable surface. |
 | DO NOT insert any foreign objects into the device. |
 | DO NOT expose the device to strong magnetic or electrical field. |
 | DO NOT expose the device to direct sunlight as it can damage the device. Keep it away from heat sources. |
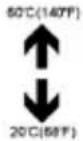 | DO NOT store your device in temperatures higher than 40°C(104°F).The internal operating temperature for this device is from 20°C(68°F) to 60°C(140°F). |
 | DO NOT use the device in the rain. |
 | Please check with your Local Authority or retailer for proper disposal of electronic products. |
 | The device and adaptor may product some heat during normal operation of charging. To prevent discomfort or injury from heat exposure, DO NOT leave the device on your lap. |
ENGLISH
User guide
FRDP3
| [IMAGE] | POWER INPUT RATING: Refer to the rating label on the device and be sure that the power adaptor complies with the rating. Only use accessories specified by the manufacturer. |
 | Clean the device with a soft cloth. If needed, dampen the cloth slightly before cleaning. Never use abrasives or cleaning solutions. |
 | Always power off the device to install or remove external devices that do not support hot-plug. |
 | Disconnect the device from an electrical outlet and power off before cleaning the device. |
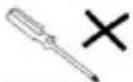 | DO NOT disassemble the device. Only a certified service technician should perform repair. |
 | The device has apertures to disperse heat. DO NOT block the device ventilation, the device may become hot and malfunction as a result. |
 | Risk of explosion if battery replaced by an incorrect type. Dispose of used batteries according to the instruction. |
 | PLUGGABLE EQUIPMENT: the socket-outlet shall be installed near the equipment and shall be easily accessible. |
 | European Union: Disposal Information.This symbol means that according to local laws and regulations your product and/or its battery shall be disposed of separately from household waste. When this product reaches its end of life, take it to a collection point designated by local authorities. The separate collection and recycling of your product and/or its battery at the time of disposal will help conserve natural resources and ensure that it is recycled in a manner that protects human health and the environment. |
| MADE IN CHINA | |

natural_image
Abstract geometric design with a white sphere, a white circle, and a gray book-like shape against a dark background (no text or symbols)FRDP3
RADIO DESPERTADOR
GUÍA DE USUARIO
ESPAÑOL
Guía de usuario
FRDP3
CONTENIDO
natural_image
Abstract illustration of a stylized book with a large circle and a crescent moon against a dark background (no text or symbols)FRDP3
RADIO ALARME
GUIDE DE L'UTILISATEUR
FRANÇAIS
PRESENTATION DU PRODUIT 2
POUR COMMENCER 3
Branchement 3
PRESENTATION DU PRODUIT
natural_image
Abstract geometric design with a white sphere, a white circle, and a gray book-like shape against a dark background (no text or symbols)FRDP3
RÁDIO-DESPERTADOR
GUIA DO UTILIZADOR
PORTUGUÊS
Guia do utilizador
FRDP3
CONTEÚDO
INFORMAÇÕES GERAIS ...... 1
CONTEÚDO DA EMBALAGEM 1
PANORÂMICA SOBRE O PRODUTO 2
PRIMEIROS PASSOS 3
For you. For everyone.


- FRDP3
- RADIO ALARM CLOCK
- ENGLISH
- User guide
- CONTENT
- PRODUCT CONTENTS
- OVERVIEW PRODUCT
- GETTING STARTED
- Connecting to power
- Backup system
- Setting the clock
- Using the antenna
- Controlling the sound volume
- LISTENING TO RADIO
- Setting preset stations
- USING THE ALARMS
- Setting alarms
- Turning the alarms on or off
- Deactivating a sounding alarm
- Snooze
- Sleep
- DISPLAY INFORMATION
- DISPLAY BRIGHTNESS
- PROJECTOR
- CHARGING EXTERNAL DEVICE
- SPECIFICATIONS
- CARE AND MAINTENANCE
- STORAGE
- RADIO DESPERTADOR
- ESPAÑOL
- Guía de usuario
- CONTENIDO
- RADIO ALARME
- FRANÇAIS
- PRESENTATION DU PRODUIT
- PORTUGUÊS
- Guia do utilizador
- CONTEÚDO
Brand : Sunstech
Model : FRDP3
Category : Radio