
CUBTS200 - Radio Sunstech - Free user manual and instructions
Find the device manual for free CUBTS200 Sunstech in PDF.


| Brand | Sunstech |
| Model | CUBTS200 |
| Product type | Portable radio |
| Dimensions (approx.) | 15 x 8 x 3 cm |
| Weight (approx.) | 300 g |
| Power supply | 3 AA batteries (not included) |
| Estimated battery life | Approximately 20 hours with alkaline batteries |
| Frequency ranges | FM 87.5-108 MHz, AM 530-1710 kHz |
| Antenna | Telescopic for FM, ferrite core for AM |
| Speaker | 3 W (mono) |
| Headphone jack | 3.5 mm jack |
| Main functions | Auto scan, station memory, sleep, key lock |
| Care and cleaning | Soft dry cloth, do not use abrasive products |
| Safety | Do not expose to water or moisture |
| Spare parts available | Batteries, antenna (standard) |
| Repairability | Battery and speaker replacement possible |
| General information | User manual downloadable in PDF format |
Frequently Asked Questions - CUBTS200 Sunstech
User questions about CUBTS200 Sunstech
0 question about this device. Answer the ones you know or ask your own.
Ask a new question about this device
Download the instructions for your Radio in PDF format for free! Find your manual CUBTS200 - Sunstech and take your electronic device back in hand. On this page are published all the documents necessary for the use of your device. CUBTS200 by Sunstech.
USER MANUAL CUBTS200 Sunstech
natural_image
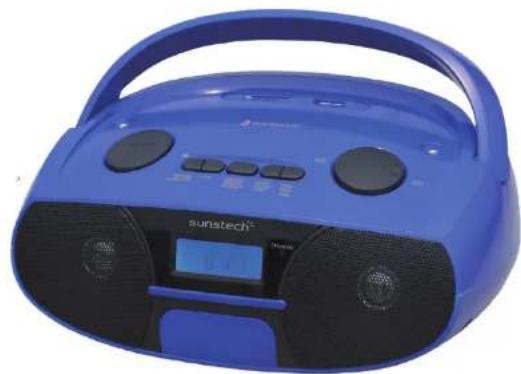
Blue Sunbedi portable radio with black buttons and a digital display (no visible text or symbols on device body)CUBTS200
AM/FM STEREO RADIO WITH PLL TUNING
CD/MP3/AUX /USB/BLUETOOTH/ALARM
Know these
safety symbols

CAUTION: TO REDUCE THE RISK OF ELECTRIC SHOCK, DO NOT REMOVE COVER (OR BACK). NO USER-SERVICEABLE PARTS INSIDE. REFER SERVICING TO QUALIFIED SERVICE PERSONNEL.

- DO NOT place objects on top of the device, as objects may scratch the device.

- DO NOT expose the device to dirty or dusty environments.

- DO NOT place the device on an uneven or unstable surface.

- DO NOT insert any foreign objects into the device.

- DO NOT expose the device to strong magnetic or electrical field.

- DO NOT expose the device to direct sunlight as it can damage the device. Keep it away from heat sources.

- DO NOT store your device in temperatures higher than 40°C(104°F). The internal operating temperature for this device is from 20°C(68°F) to 60°C(140°F).

- DO NOT use the device in the rain.

- Please check with your Local Authority or retailer for proper disposal of electronic products.
For Customer Use
Enter below the Serial No. which is located On the bottom of the cabin et. Retain this Information for future reference.
Mode No.:
Serial No.:

- The device and adaptor may product some heat during normal operation of charging. To prevent discomfort or injury from heat exposure, DO NOT leave the device on your lap.

- POWER INPUT RATING: Refer to the rating label on the device and be sure that the power adaptor complies with the rating. Only use accessories specified by the manufacturer.

- Clean the device with a soft cloth. If needed, dampen the cloth slightly before cleaning. Never use abrasives or cleaning solutions.

- Always power off the device to install or remove external devices that do not support hot-plug.

- Disconnect the device from an electrical outlet and power off before cleaning the device.

- DO NOT disassemble the device. Only a certified service technician should perform repair.

- The device has apertures to disperse heat. DO NOT block the device ventilation, the device may become hot and malfunction as a result.

- Risk of explosion if battery replaced by an incorrect type. Dispose of used batteries according to the instruction.

- PLUGGABLE EQUIPMENT: the socket outlet shall be installed near the equipment and shall be easily accessible.

EN-1
PREPARATION FOR USE
Unpacking and Setup
* Carefully remove the unit from the display carton and remove all packing material from the unit itself.
* Remove any descriptive labels that may be found on either the front or top cabinet of the unit. Do not remove any labels located on either the back or button cabinet of the unit.
Power Sources
Using AC Power
Connect the AC power into Standard household wall outlet.
Power Supply
Using AC power
-
check if the power voltage, as shown on the type plate located on the bottom of the set, corresponds to your local ac power supply if it does not consult your dealer or service centre.
-
connect the power cord to the ac mains inlet and the wall outlet. the power supply is now connected and ready for use.
-
to switch off completely, unplug the power cord from the wall outlet.
- unplug the power cord from the wall outlet to protect your set during heavy thunderstorms.
Batteries for the unit (not included)
Open the battery compartment and insert six batteries, type LR14, UM-2 or C-cells, (preferably Alkaline) with the correct polarity as indicated by the + and - symbols inside the compartment.
Batteries contains chemical substances, so they should be disposed of properly.
Incorrect use of batteries can cause electrolyte leakage and will corrode the compartment or cause the batteries to burst. Therefore:
- Do not mix battery types: e.g. alkaline with carbon Zinc. Only use batteries of the same type for the set.
- When inserting new batteries, do not try to mix old batteries with new ones. Remove the batteries if the set is not be used for a long time.


- STEREO HEADPHONE JACK
- VOLUME BUTTON
- POWER/ALARM OFF BUTTON
- SD CARD JACK
- FUNCTION BUTTON
- SNOOZE/REPEAT/MEMORY BUTTON
- PLAY/PAUSE/TIME BUTTON
- USB JACK
- STOP/SLEEP BUTTON
- CLOCK-(BACK)/CLOCK-(NEXT) BUTTON
- AUX JACK
- LCD DISPLAY
- STANDBY INDICATOR
- LEFT & RIGHT SPEAKER
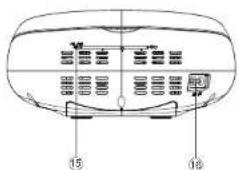
- FM ANTENNA
- AC SOCKET
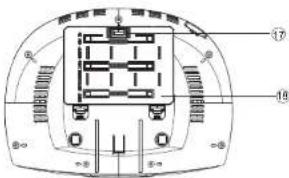
17.VOLTAGE SELECTOR - BATTERY DOOR
English
CONTROLS
POWER SUPPLY
BASIC FUNCTION see 1 )(fig)
1. STEREO HEADPHONE JACK
To insert a 3.5mm stereo headphone.
2. VOLUME BUTTON
Adjust volume level.
3. POWER/ALARM OFF BUTTON
Press POWER button to turn on/off power.
Shut down the alarm.
To delete the alarm setup.
4. SD CARD JACK
-To listen to your SD card with Mp3 music files.
5. FUNCTION SELECTOR
-To select mode by ALARM/USB/SD/BLUE/
AUX/RADIO.
-Setup the time format by 12h or 24h.
6. SNOOZE/REPEAT/MEMORY BUTTON
-Press to stop alarm, after Nine
minutes alarm will again ringing.
-To repeat a track of the USB/SD.
-FM 30 preset memories, AM 30 preset memories.
7. PLAY/PAUSE/TIME BUTTON
-To start or pause USB/SD/BLUE play.
In the radio mode, long press the play/pause/time
button enter the automatic channel scan mode.
-To setup the time of the unit.
To setup the alarm time.
8. USB JACK
To listen to your USB with Mp3 music files.
9. STOP/SLEEP BUTTON
To stop USB/SD play.
-To setup the power off time.
-To setup the sleep time.
10. CLOCK-(BACK)/CLOCK-(NEXT) BUTTON
CLOCK (BACK) BUTTON
To setup the time of unit.
-To select back track of USB/SD/BLUE.
Press this button 1.5 sec backward search intra track.
- In the radio mode, press this button will enter
the low end of the manual channel scan mode.
CLOCK (NEXT) BUTTON
-To setup the time of unit.
-To select next track of USB/SD.
- Press this button 1.5 sec forward
search intra track.
In the radio mode, press this button will enter
the high-end manual channel scan mode.
11. AUX JACK
-Select AUX mode, inset aux jack to play
mp3, discman, walkman.
12. LCD DISPLAY
-To show the time and tracks number of
the USB and the frequency of the radio.
13. STANDBY INDICATOR
-To open battery compartment.
USE RADIO
Radio reception
-
Press FUNCTION button select RADIO mode.
-
Press BAND to select the desired wave band: AM, FM.
-
Tune to required station by press BACK or NEXT or PLAY/PAUSE/TIME.
Manual Tuning: Press BACK or NEXT and then release within 1 sec.
Auto Tuning: Long press the PLAY/PAUSE/TIME button enter the automatic channel scan mode, and to be put automatically sets.
Preset Channel:(FM 30 preset memories, AM 30 preset memories)
(1) Press BACK or NEXT select desired station.
(2) Press MEMORY button once, the memory number indicator begins steady in the display.
(3) Press BACK or NEXT buttons to select the desired number.
(4) Press MEMORY button to save that station.
(5) Repeat steps (1) to (4) procedures for other stations.
-
After end of program. Press the PLAY / PAUSE / TIME button on the unit, select the frequency you want play.
-
Press [VOL-] or [VOL+] to adjust the volume.
-
Extend TELESCOPIC ANTENNA to its full length if you are listening to FM broadcasting.
-
Turn off the radio by press FUNCTION button select other mode or press power button to off the unit.
-
Switch on again after shut down, the memory frequency still exists.
NOTE: automatic channel scan after, you want to save stations manually, you must to chosen next program number saved( such as the auto scan saved 10 station then P01,P02-P10, you want to save stations manually, you must to use P11,P12—etc saved. Otherwise the previous memory stations will be instand of.
USE USB/SD
To listen to your USB/SD with Mp3 music files.
-Press the FUNCTION selector to USB/SD.
-Insert one USB/SD, the unit will read the USB/SD and playback automatically.
-Press PLAY/PAUSE button to play or pause playback;
-Press STOP button to stop playback;
Press [VOL-] or [VOL+] to adjust the volume.
-Press BACK or NEXT to select tracks of the USB/SD;
-Press and hold on BACK or NEXT more than 1.5 sec to forward or backward search fast intra track;
In playing in the USB/SD, begin to default all repeat, repeat according to a single button to repeat, press two times cancel repeat play, according to three back to the default state.
NOTE: long press BACK button to return to the beginning of the current track.
*Press BACK or NEXT to select the track.
*Press PLAY button to start playback.
USB BLUETOOTH
Press MODE button select to BLUE (BT) mode. Search bluetooth equipment "CUBTS200" math connection, such as need to enter pass word for "0000".
-
Press PLAY/PAUSE button to play or pause playback.
-
Press [VOL-] or [VOL+] to adjust the volume size.
-
Press NEXT button to select tracks.
NOTE: Bluetooth effective receiving distance of about 10M, different bluetooth devices may be slightly different operation, please read carefully before operation you use the bluetooth device (IPHONE, IPAD, MOBILE PHONE, ETC.) instructions.
USE AUX
To listen music with a mp3, discman, walkman.
-
Connect to the AUX like below picture.
-
Press function selector to AUX, the sound source of the mp3
or discman or walkman will output from the unit.
-Press the volume control to adjust the volume.
-The unit can't control the player.
USE CLOCK
to setup the time of the unit
-
Connect the ac on (The following operation must be in standby mode).
-
Short according to the TIME button, the time will flashing on the lcd display.
-
Press clk-, clk+ to select the number of the time.
-
Press time button to confirm.
-
Then you can set the hour and the minute with the same method of steps 3-4.
Note: When switch off power completely, If you want to maintain the clock running,
can insert two batteries in the battery compartment(As shown following FIG).

USE ALARM
To setup the alarm of the unit
-
Connect the AC on.
-
Hold on the TIME button more than 1.5 sec to into alarm setup whenever the unit power on or off. the time number will flashing on the LCD display.
-
Press CLK, CLK to select the hour of the time.
-
Press TIME button to confirm.
-
Then you can set the minute with the same method of steps 3-4.
-
How to shut down the alarm ring when the alarm time is up:
- Press ALARM OFF button to shut down the ring.
-
Press SNOOZE button to shut down the ring, then the alarm will ringing again after 9 minutes. SNOOZE can repeat ringing 5 times. No effect after more than 5 times. The alarm buzzer ring duration 2 minutes if you don't turn off the.
-
If want to cancel the alarm, you long press ALARM OFF button, also want to restore alarm, long press ALARM OFF button again.
Note:
*In standby state set alarm time.
*Press function button set alarm to choose model (BLUE/AUX/USB/SD/RADIO/ALARM).
USE OTHER IMPORTANT BUTTON
POWER/ALARM OFF BUTTON
-Push this key to power on/off the system.
-When the unit idle on USB/SD/BLUE/AUX mode over 10 min. Then the unit will Power Off mode automatically, for saving energy.
- Under power off mode, all control keys has no function except Time, Alarm, Sleep and Snooze. STOP/SLEEP BUTTON
-In normal working condition, hold on the SLEEP button more than 1.5 sec adjustable sleep time.
*Press this button to set the sleep countdown time. Press once is 00 minutes, press twice 90 minutes, and press more time will reduce 10 minutes until press 10 times to close sleep function.
Precaution & General Maintenance
- Place the set on a hard and flat surface so that the system does not tilt.
- Do not expose the set, batteries or CDs to humidity, rain, sand or excessive heat caused by heating equipment or direct sunlight.
- Do not cover the set. Adequate ventilation with a minimum gap of 6 dentitionedise
ventilation holes and surrounding surfaces is necessary to prevent heat build-up. •The mechanical parts of the set contain self lubricating bearings and must not be oiled or lubricated.
• To clean the set, use a soft dry cloth. Do not use any cleaning agents containing alcohol, ammonia,
benzene or abrasives as these may harm the housing.

Environmental Information
*We have done our best to reduce the packaging and make it easy to separate into 3 materials: Cardboard, paper pulp and expandable polyethylene.
*Your set consists of materials which can be recycled if disassembled by a specialized company. *Please observe the local regulations regarding the disposal of packaging, dead batteries and Old equipment.
TECHNICAL SPECIFICATIONS
GENERAL
Power Requirement AC:220V\~50Hz
Power consumption AC:14 Watts
Dimensions.....Approx.236 mm(L)x175 mm(W) x109.5 mm(H)
Operation temperature....+5 ℃ - +35 ℃
RECEIVER SECTION
Receiving Bands......AM/FM ST.
Tuning Range......AM:520-1620KHz
FM:88-108KHz
AUDIO SECTION
Power output ......Maximum 1.5 Watt x 2
Headphone Impedance 4 - 32 Ohms
ACCESSORIES
Instruction Booklet....1
Ac line cord....1
Made in China
Warranty conditions
- The warranty of this product is for 2 years since the purchase date.
- The warranty will exclude breakdowns caused by bad use of the product, wrong installation or installation in not desirable places for a proper maintenance of the product, rips, updates of the products that are not the supplied by the brand, pieces wore away for its use or for not domestic or inappropriate use. Also are excluded breakdowns caused for manipulations of the products by people or companiesalien to our company.
- For any request regarding the warranty terms, the purchase receipt must be attached.

Correct disposal of this Product
(Waste Electrical & Electronic Equipment(WEEE)
Your product is designed and manufactured with high quality materials and components which can be recycled and reused.
This symbol means that electrical and electronic equipment, at their endof-life should be disposed of separately from your household waste.
Please dispose of this equipment at your local community waste collection/recycling centre.
In the European Union there are separate collection systems for used electrical and electronic products. Please help us to conserve the
environment we live in!

sunstech ^12

natural_image
Blue Sunstech portable radio with black buttons and a digital display (no visible text or symbols on device body)CUBTS200
CD/MP3/AUX/USB/BLUETOOTH/ALARMA

Inglés
CONTROLES
ALIMENTACIÓN
FUNCIONES BASICAS (ver fig 1)
Dimensiones .... Approx.236 mm (L) x175 mm (AN) x109.5 mm (AL)
MANUEL D'INSTRUCTIONS
natural_image
Blue sunstech portable radio with black buttons and a digital display (no visible text or symbols on device body)CUBTS200
APPAREL RADIO STÉRÉO AM/FM AVEC SYNTONISATION PAR BOUCLE À PHASE ASSETUE
CD/MP3/AUX/USB/BLUETOOTH/PREVEIL


- PRISE D'ÉCOUTEURS STÉRÉO
- BOUTON DE VOLUME
- BOUTON POWER/ALARM OFF
- PRISE DE CARTE SD
- BOUTON DE FONCTIONS
- BOUTON SNOOZE/REPEAT/MEMORY
- BOUTON PLAY/PAUSE/TIME
- PRISE USB
- BOUTON STOP/SLEEP
- CLOCK-(BACK) / CLOCK+(NEXT)
- PRISE AUX
12.AFFICHAGE LCD - INDICATEUR DE VEILLE
- HAUT-PARLEURS DROIT ET GAUCHE
- ANTENNE FM
- PRISE CA
- SÉLECTEUR DE TENSION
- PORTE DE COMPARTIMENT À PILES
Français
CONTRÖLES
ALIMENTATION
natural_image
Blue Sunstech portable radio with black buttons and a digital display (no visible text or symbols on device body)CUBTS200
AM/FM RÁDIO ESTÉREO COM PLL SINTONIA
CD/MP3/AUX /USB/BLUETOOTH/ALARME
Conhecer esses
1.TOMADA DE ESTÉ
2.BOTÃO DE VOLUME
3.BOTÃO DE DESLIGAR ENERGIA/ALARME


- Know these
- safety symbols
- PREPARATION FOR USE
- Unpacking and Setup
- Power Sources
- Power Supply
- Using AC power
- Batteries for the unit (not included)
- Batteries contains chemical substances, so they should be disposed of properly.
- English
- CONTROLS
- BASIC FUNCTION see 1 )(fig)
- STEREO HEADPHONE JACK
- VOLUME BUTTON
- POWER/ALARM OFF BUTTON
- SD CARD JACK
- FUNCTION SELECTOR
- SNOOZE/REPEAT/MEMORY BUTTON
- PLAY/PAUSE/TIME BUTTON
- USB JACK
- STOP/SLEEP BUTTON
- CLOCK-(BACK)/CLOCK-(NEXT) BUTTON
- CLOCK (NEXT) BUTTON
- AUX JACK
- LCD DISPLAY
- STANDBY INDICATOR
- USE RADIO
- USE USB/SD
- USB BLUETOOTH
- USE AUX
- USE CLOCK
- USE ALARM
- USE OTHER IMPORTANT BUTTON
- TECHNICAL SPECIFICATIONS
- Warranty conditions
- Correct disposal of this Product
- FUNCIONES BASICAS (ver fig 1)
- Conhecer esses
Brand : Sunstech
Model : CUBTS200
Category : Radio