
RPDS800 - Radio Sunstech - Free user manual and instructions
Find the device manual for free RPDS800 Sunstech in PDF.


| Product Type | Portable DAB+/FM Radio |
| Brand | Sunstech |
| Model | RPDS800 |
| Radio Bands | DAB/DAB+, FM (87.5-108 MHz) |
| Preset Stations | 20 (DAB) + 20 (FM) |
| Display | LCD with backlight |
| Power Supply | AC adapter (included) or 3x AA batteries (not included) |
| Battery Life | Approximately 20 hours (alkaline) |
| Audio Output | Built-in speaker, 3.5mm headphone jack |
| Additional Input | Auxiliary input (3.5mm) |
| Alarm | Dual alarm with snooze |
| Sleep Timer | Yes, up to 90 minutes |
| Dimensions | 200 x 130 x 70 mm |
| Weight | 0.5 kg (without batteries) |
| Manual Languages | English, Spanish, Portuguese (PDF download) |
| Cleaning | Wipe with dry cloth; do not use liquid cleaners |
| Safety | Keep away from water and heat sources |
| Spare Parts | Contact Sunstech support for replacement parts |
| Repairability | Refer to qualified service center; user manual includes basic troubleshooting |
Frequently Asked Questions - RPDS800 Sunstech
User questions about RPDS800 Sunstech
0 question about this device. Answer the ones you know or ask your own.
Ask a new question about this device
Download the instructions for your Radio in PDF format for free! Find your manual RPDS800 - Sunstech and take your electronic device back in hand. On this page are published all the documents necessary for the use of your device. RPDS800 by Sunstech.
USER MANUAL RPDS800 Sunstech
1 Power on/off
2 Display button
3 FM ST. button
4 FM / ATS button (FM band selector and Auto Tuning Storage)
5 MW / LW button (MW / LW band selector & Auto Tuning Storage)
6 SW/ ATS button (SW meter band selector & Auto Tuning Storage)
7 ENTER / DEL ETE button
8 0-9 Numeric keys
9 Memory button (Storing radio stations) / Batteries type selector
10 AM / BW button (AM IF bandwidth selector)
11 VM (View Memory) & Scan button (Memory)
12 VF (View Frequency) & SCAN button (Frequency)
13 ETM (Easy Tuning Mode) button
14 LIGHT / SNOOZE
15 LOCK button
16 TIME Setting
17 ALARM On/Off & Setting
18 Earphone jack
19 USB 5V DC-IN jack
20 FM & SW telescopic antenna
21 Multifunctional tuning knob
22 Back stand
23 Volume knob
24 Battery compartment
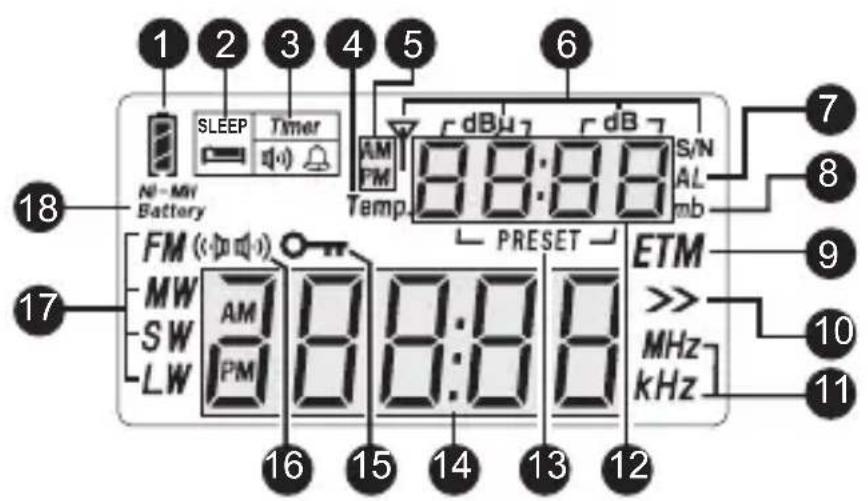
1 Battery consumption indicator / Charging indicator
2 Sleep timer indicator
3 Alarm on/off indicator
" " alarm on by radio
" " alarm on by buzzer
4 Temperature (Temp.)
5 AM, PM indicator for 12-hour format clock
6 Signal indicators dBu: signal strength unit dB : Signal to Noise Ratio (S/N) unit
7 Alarm time indicator
8 SW meter band indicator
9 ETM indicator
10 Tuning speed:
"> " Slow Tuning
" >> " Fast Tuning
11 kHz: frequency unit for MW, LW & SW
MHz: frequency unit for FM
12 Digital number display (4 Digits)
With radio off: world time, alarm time, temperature
With radio on: word time, signal strength / SNR, alarm time, temperature, local time, memory address, meter band.
13 Preset memory address
14 Digital number display
With radio off: local time
With radio on: frequency display, band display
15 Key-lock indicator
16 FM stereo status indicator
17 Band indicator
18 Rechargeable batteries indicator
INSTALLING BATTERIES
Remove the battery compartment cover and install 3 x AA alkaline batteries into the battery compartment, observing the battery polarity diagram on the back of the radio.
Display screen would show battery capacity, time, etc.
Note: If the radio is not able to be turned on. Please check if the batteries were installed correctly, battery capacity is sufficient or the lock function had been applied with symbol "○" displayed on screen.
TUNE INTO STATIONS
Short press [POWER] button to turn on your radio, then select your desired band by short pressing the [FM], [MW/LW], SW [√] or [^] button. In case of receiving FM/SW broadcasting, fully extend the telescopic antenna for a better reception.
Now, you can turn into your favorite station with any of the below tuning methods:
Method 1: ETM (Easy Tuning Mode)
The ETM function allows you to tune into stations easily and temporally store them into the ETM storage; 100 stations for FM/MW/LW & 250 stations for SW.
Note: Scanned stations will not be stored in the regular 550 memories, but will remain in the ETM temporary storage until next ETM scanning within each band.
HOW TO USE ETM
- Turn on the radio and select your desired band by pressing either the FM, MW/LW or SW [√] or [^] button.
-
Short press the [ETM] button with [ETM] shows on the display to enter Easy Tuning Mode.
-
Long press the [ETM] button until the frequency running to auto scan the stations within present band.
- When the frequency stop running, turn around the [TUNING] knob for those scanned stations.
- Short press either the [VF] & [VM] button with frequency flashing and the disappearance of ETM on the display to exist ETM mode.

Notes:
FM station: When you are in a different city or country, you should perform the ETM function again, because this will not delete any of the stations already within the memory.
MW station: It is recommendable to perform the ETM function during day time as well as night time, because there usually are more stations that start broadcasting at night
SW station: It is recommendable to perform the ETM function in the morning, afternoon as well as night time, because the transmitting signal of SW is very unstable and there usually are more stations that start broadcasting in the late afternoon.
Method 2: MANUAL TUNING Turn on the radio, short press the [VF] button to switch into frequency mode. Rotate the [TUNING] knob to select your station.
FAST/SLOW tuning is shown in the chart below for each band.
| band\step | Slow tuning mode | Fast tuning mode |
| FM | 0.01 MHz | 0.1 MHz |
| MW | 1 kHz | 9 /10 kHz |
| LW | 1 kHz | 9 kHz |
| SW | 1 kHz | 5 kHz |
Method 3: AUTO BROWSE STATION
-
Turn on the radio and short press the [VF] button with the frequency flashing.
-
Long press the [VF] button with [>> ] moving to scan from one station to another, staying on each stations for about 5 seconds.
-
To stop auto browse function, simply press the [VF] button.

Note: When the radio search & stop to a station, just press [M] button once to store it.
Method 4: AUTO BROWSE MEMORY
-
Turn on the radio, short press the [VM] button with memory page shows in the upper right corner and disappears in 5 seconds.
-
Long press [VM] button with "PRESET" flashing to scan from one memory to another, staying on each station memory for about 5 seconds.
-
To stop auto search memory, simply press the [VM] button.
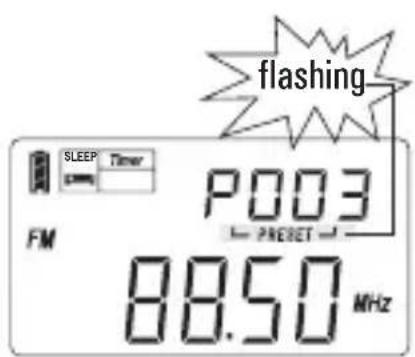
Auto-scan memory with pre-listening
Note: Please first read [Working with Memory] in next page before using this function.
Method 5: DIRECT KEY-IN FREQUENCY
Short press the [VF] button to enter the frequency mode, press the numeric keys [0] - [9] to enter the station frequency directly.
Note:
- Ignore the decimal point for FM band when input the frequency numbers.
For example, FM 89.0 MHz, Just ENTER 8 9 0 .
- If the entered frequency rate is not within the covering area, the display would display "Err" error symbol.
WORKING WITH MEMORIES
There are total 550 preset memories within RP-DS800. For FM, MW, and LW, each band has 100 preset memories; and 250 preset memories for SW.
Method 1: ATS - Auto Tuning Storage
Turn on the radio and select the band that you want to ATS to take place in, either FM or MW/LW. Long press the [FM] or [MW/LW] button and notice that the "PRESET" number (P001) appears in the display's upper right corner with the presets to the right increasing as the band is scanned and frequencies are stored into memory.

Auto Tuning Storage
There are two modes for SW ATS function:
Mode A: In SW band, long press the [A /√ ] button to ATS the stations within all meter bands.
Mode B: In SW band, long press the [B /^ ] button to ATS the stations within present meter band only.
Note:
During ATS process in FM, MW / LW or SW (mode A), pre-stored radio stations will be replaced automatically by the new searched stations.
With ATS in SW (mode B), those existing memories will not be replaced; all the newly found radio stations would be stored in the blank memories addresses.
Method 2: MANUALLY STORING STATION
- Tune to your desired station, press the [M] button once and notice the PRESET number flashing in the upper right corner of the display.
- While it flashing, press the [M] button to store it into the memory or wait for 3 seconds to store it automatically. If you want to store it into another PRESET memory, just rotate the tuning knob of your choice, and press the [M] button to confirm.
Method 3: SEMI-AUTO STORING STATION
- Short press the [VF] button to enter frequency status.
- Long press [VF] button with [ >> ] moving to activate the Auto-browse function.
- While tuning to your favor station, you can direct store it into the next available memory by pressing on the [M] button with PRESET flashing. The Auto frequency browsing keeps on going unless you short press the [VF] button again.
Method 1: MANUAL DELETE MEMORY
- Turn on the radio and press the [VM] button causing PRESET stations appears in the display's upper right corner.
- Rotate the [TUNING] knob to select the memory that you want to delete.
- Long press [DELETE] button with "DEL" flashing in the display, press the [DELETE] button again to confirm.
Note: If "dEL" is flashing more than 3 seconds without confirmation, it will exit the delete function automatically.
Method 2: SEMI AUTO-DELETE MEMORY
In VM mode, long press the [VM] button to activate the Auto-Browse function of memory. Once previewing your unwanted station, simply press the [DELETE] button with "del" shows for 2 seconds and then keep on browsing other stations. To stop the browsing function, short press the [VM] button to exist.
Method 3: DELETE ALL MEMORY
Short press the [VM] button to enter VM / Memory mode, long press the [DELETE] button for 3 seconds with "del" shows on the upper right corner of the display, press again the [DELETE] button to remove all memory.
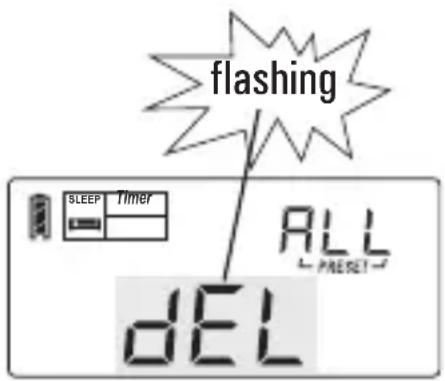
Delete all memories
Note: If "del" is flashing more than 3 seconds without confirmation, it will exit the delete function automatically.
SLEEP FUNCTION
With sleep function, you can adjust the length of time for the radio to turn off automatically.
The default setting for the auto-turn off time is 30 minutes if the radio being turned on by short pressing the [POWER] button.
To change the sleep timer, long press the [POWER] button with [ON / 01\~120] & [SLEEP] appear on the display, rotate the [TUNING] knob to select sleep timer from 1 \~ 120 minutes or permanently "On" Wait for 3 seconds until "SLEEP" symbol stops flashing to confirm.
Note: Short press the [POWER] button to directly turn on the radio with previous preset sleep timer; long press it to change the timer.
SETTING THE CLOCK
- Long press the [TIME] button until you see the hour flashing. Rotate the [TUNING] knob to set the correct hour, then short press the [TIME] button and notice the minutes are flashing.
- While it's flashing turn the [TUNING] knob to set the correct minutes, then press [TIME].
Note: You can also directly key-in the numeric key instead of rotating the [TUNING] knob to set the correct clock.
SETTING THE ALARM TIME
- Long press the [ALARM] button until both the HOUR & AL flashing, rotate the [TUNING] knob to adjust the hour, then short press [ALARM] with the minutes flashing.
- Rotate the [TUNING] knob to adjust the minutes and short press the [ALARM] button with the "SLEEP" symbol flashing.
- Rotate the [TUNING] knob to select 1 \~ 90 minutes to set the Auto Alarm Off Timer.
- Short press the [ALARM] button to confirm and notice " 🔊 " shows on display to activate the alarm by buzzer (BB sound). Short press twice with " 🔊 " appears to set the alarm by radio.
- To turn off the alarm function, repeat short pressing the [ALARM] button and notice both " 🔊 " & " 🔊 " disappear.
PRESET ALARM STATION
- Turn on the radio, then tune into your favorite alarm radio station and adjust your desired alarm volume level.
- Short press the [M] button to store the alarm station into memory.
- Repeat short pressing the [ALARM] button and notice " 🔊" shows on the display to confirm the preset alarm station.
SNOOZE / LIGHT FUNCTION
After alarm was activated with buzzer or radio broadcasting, press & release [LIGHT / SNOOZE] with a "B" sound. Then the radio would be turned off temporary, it will start to alarm again 5 minutes later.
For the LCD backlight function, short press the [LIGHT] button to illuminates the LCD for 3 seconds. Long press it for permanently illumination. Press again the [LIGHT/SNOOZE] button to turn off the light.
TURN OFF THE ALARM
When the unit is alarmed by radio, press the [POWER] button twice to turn off the alarm.
When the unit is alarmed by buzzer (BB sound), simply press the [POWER] button once to turn off the alarm.
DISPLAY MODE
With radio OFF: Short press the [DISPLAY] button to view on Temperature, Alarm time.
With radio ON: Short press the [DISPLAY] button to view on Alarm time, Temperature, Local time, signal strength/ SNR.
KEY LOCK FUNCTION
Long press the [0-π] button with "0-π" symbol appears in the display to lock up all keys / buttons. Long press it again with the symbol disappears to unlock the keys/buttons.
FM ST. (FM STEREO) BUTTON
While listening to FM station via stereo earphones, short press the [FM.ST] button with " <> <> " appears over the left side of the frequency in the display to activate the STEREO mode once it receives the FM stereo station.
AM BW (BANDWIDTH) BUTTON
Short press the [AM BW] button to choose 6, 4, 3, 2, 1 kHz AM IF bandwidth. This may help to reduce interference on some frequencies. Using WIDE usually results in better audio fidelity, while using narrow limits the audio fidelity is somewhat dull in sound. You can use it in MW, LW and SW band.
Frequency range setting for FM
Turn off the radio, long press [FM SET] button, until 87.5-108MHz, 64-108MHz, 76-108MHz, or 87-108MHz appears in the display. Quickly keep pressing on the [FM SET] button to select suitable frequency range for your local FM.
Changing the clock format
Turn off the radio, long press [12/24] button, until "12H "or "24H " appears in the display. If "12H " appears in the display, which means the clock system will be in the 12 hour format.
MW(AM) step setting
Turn off the radio, long press [9/10kHz] button until "9kHz" or "10kHz" appears in the display. By long pressing again, the alternative band step would be shown. The temperature is also shown on screen at the same time.
In general practice, the frequency step of 10kHz is to be used for broadcasting MW(AM) as well as the temperature in the degree of Fahrenheit ( F ) to be used in the North America.
In order to provide convenience to the end users, the "10kHz" of frequency step is default to be displayed with temperature in the degree of Fahrenheit ( ) together as well as "9kHz" to be displayed with temperature in the degree of Centigrade ( ) together.
If the display shows "10kHz" with degree of Fahrenheit ( F ), which means this radio is set to 10 kHz step for MW(AM) with temperature in Fahrenheit ( F ) which is for the North America region.
LW on/off setting
Turn off the radio. Press and hold the [MW/LW] button until "LW ON" or "LW OFF" appears in the display to turn ON or OFF the LW respectively.
Turn off the "Bi" sound
Turn off the radio, press and hold the [☐ / 0] button until "OFF" or "On" appears in the display; If "OFF" appears in the display, which means "Bi" sound is turned off.
Turn on / off intelligent lighting function
This radio bears the intelligent lighting function which the backlight would be on for 3 seconds when tuning or pressing any key.
With radio off, press & hold the [ ] key with the " OFF " shows in the display to deactivate the lighting function; long press again with " On " shows up to activate it.
Note: After shutting off the intelligent lighting function, the [LIGHT/SNOOZE] key is still workable for turning on or off the backlight.
Turn ON/OFF charging function & exchange battery consumption display
Press & hold the [saw] key with "CHA On" & "Ni-MH Battery" shows up to activate the consumption display of rechargeable batteries and the built-in charging system. Press & hold the [saw] key with "CHA OFF" shows up & "Ni-MH Battery" disappear to activate the consumption display of alkaline batteries and turn off the built-in charging function.
Note: This radio is default to use alkaline batteries for power supply. In case of using rechargeable batteries, you should switch the radio in rechargeable batteries mode in order to show the correct power capacity.
USING THE INTELLIGENT CHARGING FUNCTION
With radio off, install 3 x UM3 (AA) rechargeable batteries and then press & hold the [ ] key with " CHA On " & " Ni-MH Battery " displays to activate the built in charging function.
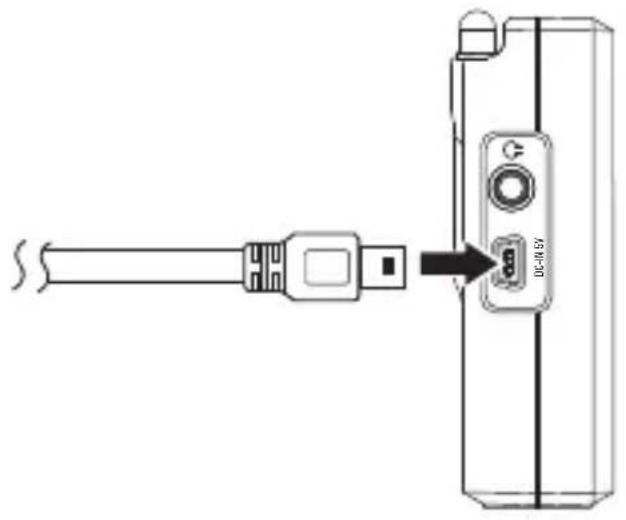
- Use any 5V external adaptor with USB plug to connect this radio, the symbol " [REDACT] " will advance from the bottom to top during power charging. It stops when batteries are fully charged.
- You can also use any USB cable to connect the radio with your PC for charging.
Connect USB 5V to external power sources
natural_image
Diagram showing a USB cable inserted into a device labeled 'DC-46.59' (no text or symbols on the diagram itself)Notes for charging power:
- Insisting to use up all power of rechargeable batteries before charging again, this could extend the life time of battery and keeping them in good conditions.
- 3 pcs of batteries to be used as a group and don't separate them to other usage. Also don't mix to use batteries with different power capacity.
Caution: Don't charge on any non-rechargeable batteries in the radio, this will cause a hazard or damage to your radio.
IMPORTANT MATTERS FOR USING BATTERIES
- If no battery has been installed inside for long time, clock of radio would stop to work. However, pre-stored frequencies are still kept. Clock would work again after new batteries being re-installed inside.
- When the battery power is low, the "☐" symbol in the display will flash to alert you for changing new batteries. Besides it will turn off automatically when the power is gone.
- Mix using the used & new batteries would cause damage of radio and also display the capacity of power incorrectly.
- In case of radio not to be used for a long period, draw out the batteries for preventing liquid leakage and damaging the parts of radio.
"Bi" SOUND CHART
| Function | Button | Status | Sound | Display |
| Radio on or off | POWER | Radio on | B | |
| Radio permanently | B-- (long) | "On" display | ||
| Radio off | BB | "OFF" display | ||
| Adjust auto-off time | POWER & TUNING KNOB | Rotate at 30, 60, 90, 120 mins. | B | Display the time for auto-off |
| Radio permanently | BB | "On" display | ||
| FM ST.FM | STEREO STEREO MONO. | B | "(p <") " display | |
| BB | "(p <") " disappear | |||
| FM | FM FM | B | "FM" in the display | |
| MW (AM) or LW | MW/LW | MW | B | "MW" in the display |
| LW | B-- (long) | "LW" in the display | ||
| SW BAND METER BAND | √ or ^ | SW | B | "SW" & SW frequency |
| METER BAND | B | Meter band on the right corner | ||
| ATS (Auto Tuning Storage) | FM MW/LW SW (√ or ^) | ATS on | B | Freq. & memory address are running |
| ATS off | B-- (long) | Display 01 memory address and Frequency | ||
| ETM | ETM | ETM On | B | "ETM" in the display |
| Frequency Scanning | VF | Frequency mode | B | Radio freq. numbers flashing. |
| Memory Scanning | VM | Memory mode | BB | Memory address on the top right corner |
| Auto browsing (Scanning) | VF | Frequency mode | B | Radio freq. running |
| VM | Memory mode | B | Memory address running | |
| AM band width | AM BW | 1kHz, 2kHz, 3kHz, 4kHz, 6kHz | B | Display equivalent band width |
| Store memory | MEMORY | On | B | Memory address flashing on the top right corner |
| Confirmed / Auto confirm | B-- (long) | Stopped |
CONTROL LOCATIONS
| Function | Button | Status | Sound | Display |
| Delete memory | DEL ETE | Delete single memory | B | Memory address and "del" are flashing |
| Delete all memory | BB | "RLL" & "del" are flashing | ||
| Confirmed | B-- (long) | Back to Freq. display | ||
| BACKLIGHT | SNOOZE/LIGHT | Illuminate short time | BB | Backlight on for 3 seconds |
| Illuminate permanently | B-- (long) | Backlight on | ||
| Turn off | B | Backlight off | ||
| SNOOZE | SNOOZE/LIGHT | Temporary off | B | " " or " " and the auto turn-on time are flashing |
| Lock | Lock | B-- (long) | " " display | |
| Unlock | B | " " disappear | ||
| Time setting | TIME | Hour setting | B | hour flashing |
| Minute setting | BB | minute flashing | ||
| Confirm or Auto confirm | B-- (long) | Flashing stop | ||
| Auto radio on / off function | ALARM | Hour setting | B | "hour" flashing |
| Minute setting | BB | "minute" flashing | ||
| Adjust the length of alarm | BB | 1~90 minutes display, " " or " " and " " are flashing | ||
| confirmed | B-- (long) | Display time | ||
| Select alarm by radio | B | Display " " | ||
| Select alarm by buzzer | BB | Display " " | ||
| Select alarm off | B-- (long) | " " and " " disappear | ||
| In/out SW meter band | TUNING | Inside SW meter band | B | Meter band appear on the top right corner |
| Out of SW meter band | B | Meter band disappear | ||
| FM freq. range | FM SET | Select FM freq. | B | 87.5-108MHz,64-108MHz, 76-108MHz or 87-108MHz |
| 12/24 format | 2/24 | Select 12 format | B | " 12H " in the display |
| Select 24 format | BB | " 24H " in the display | ||
| MW(AM) STEP | 9/10kHz | Select 9kHz step | B | "9kHz" and "C" in the display |
| Select 10kHz step | BB | "10kHz" and "F" in the display | ||
| Charge on/off | On | B | "CHR On" & "N-MK" in display | |
| Off | BB | "CHR OFF" in display & "N-MN" disappeared | ||
| Bi sound on/off | On | B | "On" in the display | |
| Off | BB | "OFF" in the display | ||
| Intelligent lighting on/off | On | B | "On" in the display | |
| Off | BB | "OFF" in the display | ||
| LW on / off | MW/LW | On | B | "LW On" display |
| Off | BB | "LW OFF" display |
SPECIFICATIONS
1. Frequency range
FM
87\~108 MHz
Russia 64\~108MHz
Japan 76\~108 MHz
Eu, USA 87.5\~108 MHz
MW
522\~1620 (USA 520\~1710) kHz
LW
153\~513 kHz
SW
2300\~21950 kHz
2. Sensitivity
F M (S/N=30dB)
Less than 3 µV
MW (S/N=26dB)
Less than 1mV/m
LW (S/N=26dB)
Less than 10mV/m
SW (S/N=26dB)
Less than 20 μV
3. Selectivity
FM
60 dB
MW
60 dB
LW
60 dB
MW
60 dB
- FM Stereo crosstalk
Less than 35 dB
- Memory
550
- Output
350 mW
- Power
UM3 or AA X 3
USB 5V DC
- Speaker
φ50mm, 500mW/16 Ohm
- Earphone Jack
φ8.5mm, 8\~32 Ohm, Stereo type
- Dimensions Approx.
135(W) X 86(H) X 26(D) mm
- Weight
200g (Batteries not included)

You can help protect the environment!
Please remember to respect the local regulations: hand in the non-working electrical equipments to an appropriate waste disposal center.
SUNSTECH RP-DS800
RECEPTOR / MF / SW / LWMULTIBANDA MANUAL DE USO
| MF | 522~1620 (USA 520~1710) kHz |
| LW | 153~513 kHz |
| SW | 2300~21950 kHz |
- Sensibilidad
| FM (S/N=30dB) | Menos de | 3μV |
| MF (S/N=26dB) | Menos de | 1mV/m |
| LW (S/N=26dB) | Menos de | 10mV/m |
| SW (S/N=26dB) | Menos de | 20μV |
3.Selectividad
| FM | >60 dB |
| MW | >60 dB |
| LW | >60 dB |
| MW | >60 dB |
Notas:
Auto-scan with pre-listening
Auto Tuning Storage
BOTÃO FM EST. (FM ESTÉREO)
- INSTALLING BATTERIES
- TUNE INTO STATIONS
- Method 1: ETM (Easy Tuning Mode)
- HOW TO USE ETM
- Notes:
- Method 3: AUTO BROWSE STATION
- Method 4: AUTO BROWSE MEMORY
- Method 5: DIRECT KEY-IN FREQUENCY
- Note:
- WORKING WITH MEMORIES
- Method 1: ATS - Auto Tuning Storage
- Method 2: MANUALLY STORING STATION
- Method 3: SEMI-AUTO STORING STATION
- Method 1: MANUAL DELETE MEMORY
- Method 2: SEMI AUTO-DELETE MEMORY
- Method 3: DELETE ALL MEMORY
- SLEEP FUNCTION
- SETTING THE CLOCK
- SETTING THE ALARM TIME
- PRESET ALARM STATION
- SNOOZE / LIGHT FUNCTION
- TURN OFF THE ALARM
- DISPLAY MODE
- KEY LOCK FUNCTION
- FM ST. (FM STEREO) BUTTON
- AM BW (BANDWIDTH) BUTTON
- Frequency range setting for FM
- Changing the clock format
- MW(AM) step setting
- LW on/off setting
- Turn off the "Bi" sound
- Turn on / off intelligent lighting function
- Turn ON/OFF charging function & exchange battery consumption display
- USING THE INTELLIGENT CHARGING FUNCTION
- Notes for charging power:
- IMPORTANT MATTERS FOR USING BATTERIES
- "Bi" SOUND CHART
- CONTROL LOCATIONS
- SPECIFICATIONS
- Frequency range
- Sensitivity
- Selectivity
- SUNSTECH RP-DS800
- Notas:
- BOTÃO FM EST. (FM ESTÉREO)
Brand : Sunstech
Model : RPDS800
Category : Radio