DAR050 - Cd player/recorder LENCO - Free user manual and instructions
Find the device manual for free DAR050 LENCO in PDF.

| Product type | CD player/recorder with FM/DAB radio |
| Brand | Lenco |
| Model | DAR050 |
| Dimensions (approx.) | 260 x 150 x 210 mm |
| Weight (approx.) | 1.5 kg |
| Power supply | AC/DC adapter 100-240V, 50/60 Hz; remote control: 2 AAA batteries (not included) |
| Screen | LCD with backlight |
| Main functions | Audio CD and MP3 playback, USB MP3 playback, FM/DAB radio, auxiliary input, clock, alarm, sleep timer |
| Connectivity | 3.5 mm headphone jack, 3.5 mm auxiliary input, line output, USB port, FM antenna |
| Radio | FM (RDS) and DAB/DAB+ |
| Supported media | Audio CD, CD-R/RW with MP3, USB flash drive (MP3 format only) |
| Audio formats | MP3 (bitrate 32-320 kbps, sampling 32/44.1/48 kHz) |
| Alarm / Timer | Programmable wake-up (CD, FM, DAB, USB); sleep timer (max 90 min) |
| Remote control | Infrared, AAA batteries (not provided) |
| Antenna | FM wire antenna |
| Maintenance and cleaning | Soft dry cloth; do not use abrasive products |
| Safety | Instructions: do not expose to moisture, do not open, avoid heat sources, provide sufficient ventilation |
| Warranty | Complies with European legislation; repair through the retailer |
| After-sales service | www.lenco.com |
| Repairability | Not user-serviceable; refer to qualified personnel |
Frequently Asked Questions - DAR050 LENCO
User questions about DAR050 LENCO
0 question about this device. Answer the ones you know or ask your own.
Ask a new question about this device
Download the instructions for your Cd player/recorder in PDF format for free! Find your manual DAR050 - LENCO and take your electronic device back in hand. On this page are published all the documents necessary for the use of your device. DAR050 by LENCO.
USER MANUAL DAR050 LENCO
The ligh ng ( ash and arrow head within the triangle is warning sign aler ng you of dangerous voltage inside the product
CAUTION
RISK OF ELECTRIC SHOCK DO NOT OPEN
CAUTION: TO REDUCE THE RISK OF ELECTRIC SHOCK, DO NOT REMOVE COVER (OR BACK). NO USER SERVICIABLE PARTS INSIDE. REFER SERVICING TO QUALIFIED SERVICE PERSONNEL.

The exclama on point within the triangle is a warning sign aler ng you of important instruc ons accompanying the product
IMPORTANT SAFETY INSTRUCTIONS:
- Read the instructions. All uses guidelines must be read before start device.
- Keep the instruc ons for future use.
- Attention, use and security guidelines must be respected.
- The device must not be used near water or be put in contact with moisture.
- Make sure has no liquid is spilled on device and device openings.
- Move device carefully, avoid shocks.
- Do not block the breakdown of the device outputs.
- Do not place the device near from a heat source (e.g. radiator). Do not expose it to the Sun.
- Plug the device as indicate on this information form.
- For cleaning the device, please follow the recommenda ons of the notice.
- Unplug the main plug if you don't use the device for a longer period.
- Device shall be repaired by a quali ed person when:
a. the power cord is damaged,
b. objects have fallen into the apparatus or a liquid has been spilled into device,
c. device was exposes to the rain,
d. device does not work correctly without notable exterior change,
e. device is broken.
- The user shall not try to maintain device beyond that which is described in this informa on form. The guarantee would negate.
- The apparatus shall not be exposed to dripping or splashing and that no objects lled with liquids, such as vases, shall be placed on apparatus.
- "To be completely disconnect the power input, the mains plug of apparatus shall be disconnected from the mains." as the disconnect devices is the mains plug of apparatus.
- The mains plug of apparatus should not be obstructed OR should be easily accessed during intended use.
- Ba ery shall not be exposed to excessive heat such as sunshine, fire or the like.
- Excessive sound pressure form earphones and headphones can cause hearing loss.
-
Minimum distance (150-180mm) around the apparatus for su cient ventila ons;
-
The ven lation should not be impeded by covering the ventilation opening with items such as newspaper, table-cloths, curtain etc;
- No naked ame sources such as lighted candles should be placed on the apparatus;
- Attention should be drawn to the environmental aspects of battery disposal;
- The use of apparatus in moderate climates

CLASS I LASER PRODUCT
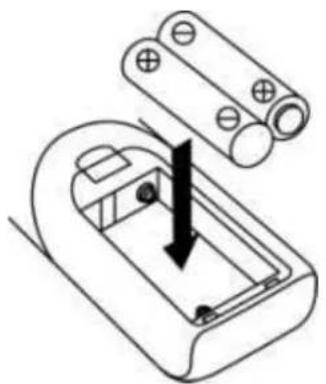
BATTERY REPLACEMENT
The ba ery compartment is located on the back of the remote control.
- Remove the battery compartment door by pressing in on the tab and li ing it o .
- Insert two (2) AAA size batteries (not included) into the bary compartment following the polarity markings inside the bary compartment.
- Replace the ba ery compartment door.
Battery Precautions
- Replacement of batteries must be done by an adult.
- Do not mix old and new batteries.
Do not mix alkaline, standard (carbon-zinc) or rechargeable (nickel-cadmium) batteries
The supply terminals are not to be short-circuited.
Non-rechargeable batteries are not to be recharged. - Exhausted batteries are to be removed.
- Only batteries of the equivalent type are to be used.
- Batteries are to be inserted with the correct polarity.
- Dispose of batteries properly. Do not dispose of batteries in fire. The batteries may explode or leak.
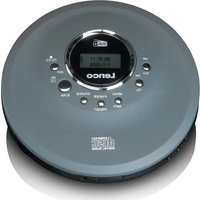
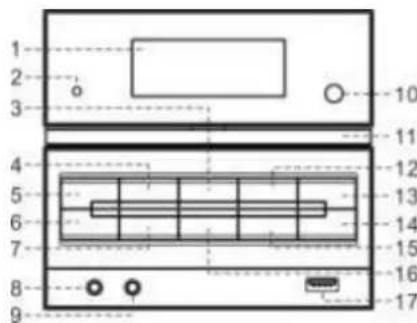
LOCATION OF CONTROL
1) LCD display
2) Standby LED
3) Play/pause II/Scan bu on
4) Stop Enter bu on
5) On/standby bu on
6) Open/close bu on
7) Func on bu on
8) 3.5mm headphone jack
9) Aux in jack
10) Remote sensor
11) CD tray
12) Skip/Tuning down du on
13) Skip/tuning upbu on
14) Volume up bu on
15) Volume down bu on
16) Menu/Mem/clock-adjust bu on
17) USB socket
18) FM antenna
19) Line out socket
20) DC jack

Cau on:
Usage of controls or adjustments or performance of procedures other than those speci ed herein may result in hazardous radia on exposure.
This unit should not be adjusted or repaired by anyone except quali ed service personnel.
Important:
Since movement of the CD mechanism and the sensitive circuitry may cause interference to the radio tuner nearby, switch this unit o while oper ng other radio devices.
Due to the complexity of MCU control, please un-plug the main power supply of the unit if found the unit hang up during opera on!
This is not a malfunc on of the system!
Precau ons for use
Installa on
- Unpack all parts and remove protec ve material.
- Do not connect the unit to the mains before checking the main voltage and before all other connec ons have been made.
- Do not cover any vents and make sure that there is a space of several centimeters around the unit for ven la on.
Connec on
- Connect the DC plug of the included AC/DC adaptor to DC jack (20) then the AC/DC adaptor connect to the AC outlet.
-
When you first plug the unit into the mains, the unit will go into standby mode. The Standby LED (2) will light up
-
Turn on the unit by pressing "On/Standby" button (5). If the LCD display (1) is on with backlighting, it means the power supply is normal. Now the system is ready to play the music.
Se ng the clock
- Set unit in standby mode.
- Press and hold the "Menu/Mem/clk-adj" bu on (16), display will show 24hour, press Skip down (12) or Skip up (13) bu on to select 12 or 24 hrs format, then press "Menu/Mem/clk-adj" button (16) to con rm, the hour digit will flash on LCD display (1), Press the Skip down (12) or Skip up (13) button to set the correct hour. Press the "Menu/Mem/clk-adj" button (16) to store the hour then minute digit will flash.
- Press the Skip down (12) or Skip up (13) bu on to set the correct minutes.
- Press "Menu/Mem/Menu/clk-adj" bu on (16) to store the correct hour.
The pre-set time will be re-set completely if dis-connecting the main power supply. You are recommended to switch the system into standby mode for convenience usage.
The clock will synchronous to RDS/DAB clock once receive the RDS/DAB signal if clock did not se ng in advance.
Listening to radio
Opera on
Manual tuning
- Turn on the unit by On/standby button (5) & then press the Func on button (7) until it reach the "FM" mode.
- Press the Skip down (12) or Skip up (13) bu on to tune your desired sta on.
- Adjust volume up/down bu on (14/15) for the desired volume level.
Auto tuning
- Set the unit to FM mode.
-
Press the auto scan button (3) once, unit will start to scan at tuning up direct until radio sta on received. Press tuning down bu on (12) once and then press the auto scan bu on (3), the unit will scan to tuning down direc on. If the radio data system (RDS) broadcas ng signal received, the unit will set the actual me automa cally.
-
Adjust volume knob (14/15) for the desired volume level
FM scan se ng
A er auto tuning if many unwanted weakness radio sta on received, you can select strong sta on only to iter the weakness signal sta on.
- In FM mode, press "Menu/Mem/clk-adj" bu on (16) to enter the "Menu", then press Skip down (12) or Skip up (13) bu on to select "Scan setting".
- Press "Stop/Enter" button (4) to enter the "Scan setting", then press Skip down (12) or Skip up (13) button to select "Strong station only". Then press "Stop/Enter" button on (4) to confirm the setting.
- Perform the auto tuning opera on again as above.
FM & FM-stereo recep on
- The unit will default the FM mode at Mono. Thus, if FM stereo signal received, set the FM mode to Stereo by press Menu bu on (16), then press Skip down (12) or Skip up (13) bu on to select Audio se ng, press Enter bu on (4) and press Skip down (12) or
Skip up (13) again to select FM stereo, then press Enter bu on (4) to con rm. When stereo signals are weak and noisy. It is preferable to change the FM mode by same procedure.
Hints for best recep on:-
FM: the receiver has rod antenna (18) hanging at the rear cabinet. This antenna should be totally unraveled and extended for best reception on.
Radio data system (RDS) (On remote control only)
This is the features to display the informa on which released from the radio broadcast and will showed on LCD display step by step as below by pressing the Play mode/info bu on continuously (on remote control).
Radio text program type frequency mono/stereo time date
Digital audio broadcas ng (DAB) radio
- Set the unit to DAB mode by press Func on bu on (7).
- Press the Play/pause /Scan button (3) once, unit will start to full scan from range 11b-12d one me. Press Skip down (12) or Skip up (13) bu on to select your desired DAB channel then press "Stop/Enter" bu on (10) to con rm the selected channel.
- Press the Play mode/info bu on (on remote control) con nuously to check the below info released by DAB. signal strength program type Group name frequency signal error transfer rate me date
- Adjust volume knob (14/15) for the desired volume level.
Dynamic range control
This apparatus provide three dynamic range mode to match different program type in DAB mode.
- In DAB mode, press "Menu/Mem/clk-adj" bu on (16) to enter the "Menu", then press Skip down (12) or Skip up (13) bu on to select "DRC".
- Press "Stop/Enter" button (4) to enter the "DRC" set ng, then press Skip down (12) or Skip up (13) bu on to select "DRC high/low/off" mode. Then press "Stop/Enter" button (4) to confirm the setting.
- In any state press "Menu/Mem/clk-adj" button (16) to quit the se ing mode
Language se ng
This apparatus provide 4 language for FM/DAB opera on display.
- In DAB/FM mode, press "Menu/Mem/clk-adj" button (16) to enter the "Menu", then press Skip down (12) or Skip up (13) button to select "System".
- Press "Stop/Enter" bu on (4) to enter the "System" se ing, then press Skip down (12) or Skip up (13) bu on to select "Language" then press "Stop/Enter" button to enter language mode, then press Skip down (12) or Skip up (13) bu on to select your desired language between English/French/German/Italian. Then press "Stop/Enter" bu on (4) to confirm the setting.
- In any state press "Menu/Mem/clk-adj" button (16) to quit the se ing mode
Preset sta ons
You can store up to total of 20 radio sta ons in the memory (10-FM/10-DAB).
- Set to FM/DAB mode.
- Turn to the desired radio station by "manual" or "auto" tuning method.
-
Press and hold the "Mem/clk-adj" button (16) to enable memory state.
-
Press Skip down (12) or Skip up (13) bu on to select the desired sta on memory for storage.
- Press "Stop/Enter" button (4) to con rm the setting.
- Repeat step 2 to 5 to store other sta ons.
- Set to FM/DAB mode
- Press Pre-up or Pre-down bu on (on remote control) to enable memory recall state.
- Press Skip down (12) or Skip up (13) button to select the desired recall sta on.
- Press "Stop/Enter" bu on (4) again to con rm the recall sta on.
DAB/FM reset:
If case would like to erase all the FM/DAB programed memory sta on, operation as below.
- Set in DAB or FM mode, press "Menu/Mem/clk-adj" button (16) to enter the "Menu", then press Skip down (12) or Skip up (13) button to select "System".
- Press "Stop/Enter" button (4) to enter the "System" setting, then press Skip down (12) or Skip up (13) button to select "Factory reset". Then press "Stop/Enter" button (4) to enter factory reset mode, press Skip down (12) or Skip up (13) button to select "Y", then press "Stop/Enter" button (4) confirm the factory reset.
- Apparatus will switch to DAB mode auto scan once and erase all the programmed memory sta on, perform the preset sta on again as above.
Playing CD/MP3 disc
- Ge ng start
- Press Function button (7) to select CD mode.
- Open the CD door by pressing the Open/close bu on (6). Put a CD disc into the compartment and close the CD door.
- Focus search is performance if disc is inside. Total number of tracks is read.
Play/pause mode
- If Play/Pause bu on (3) is pressed during stop mode, the rst track will be played.
- If Play/Pause on (3) is pressed during playback, system go to pause mode and the "pause" will appear at the LCD display (1). Press again to resume normal playback.
- Stop mode
- If Stop button (10) is pressed during play or pause mode. Go to stop mode and display total number of track on the LCD display (1).
- Skip mode (skip up >>/skip down)
- During play or pause mode, if skip up button (13) is pressed it will go to next track and keep in play or pause mode.
- During play or pause mode, if Skip down button (12) is pressed, it will go back to previous track and keep in play or pause mode.
For MP3 disc/ le
- Place the MP3-CD to CD compartment. A er focus search is performing, the total number of track will be shown on the LCD display (2).
- Press Skip up or Skip down (12/13) button to select the track number.
- When the desired track and album is being selected, press the "Play/Pause " bu on (3) to start playback.
Remark
- Press "Folder up ▲ or Folder▼" button on remote control can select the MP3 folder upward or backward directly.
- The track number will display on LCD (1) and then it will play to the number of the track when press Play/Pause bu on (3).
- Repeat/Random mode (on remote control only)
Press the "Play mode" button on remote control during playback to select repeat and random function, a single track, single folder (MP3 only) or all the tracks can be played in di erence mode as follow:-
For CD


For MP3 disc/ le
| (1) Repeat 1 → (2) Repeat 1 folder → (3) Repeat all tracks → (4) Random → |
| (5) O mode |
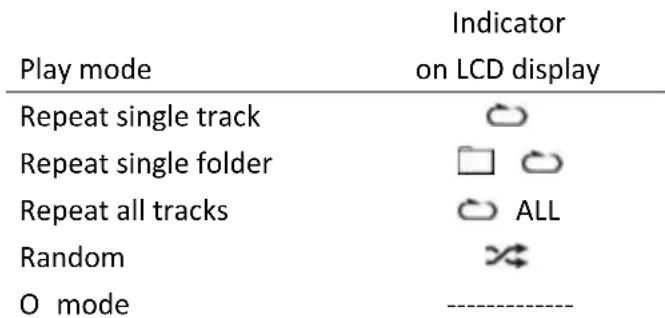
Repeat play
You can listen the desired tracks or folder repeatedly by this func on.
- Random play
You can listen all the tracks in a random order by this func on
CD/MP3 disc programming
Up to 20 tacks can be programmed for disc play in any order. Before use, be sure to press the stop bu on.
- Set in CD mode.
-
Press the Memory button (16), "P01 & T000" will appear on LCD display (1).
-
Select a desired track by using the Skip up /Skip down buns (13/12).
- Press the Memory bu on (16) to enter the track into the memory.
- Repeat steps 3 and 4 to enter addi onal tracks into the memory if necessary.
- When all the desired tracks have been programmed, press "Play/Pause " bu on (3) to play the disc in the order you have programmed.
- Press "Stop" bu on (4) to terminate program play.
Press "Stop" button twice (4) at CD stop mode to cancel all programmed memory un I the "MEM" indicator disappear on LCD display (1).
For MP3 disc/ le, press the "Folder up" button on remote control to select the 1^st track of next folder directly and hence to speed up the song selec on.
The programming mode will automa cally stop if no bu on is being pressed in a period of about 10 seconds a er pressing the Memory bu on (16).
Remark:-
MP3 track format requirement:-
- Bit rate: 32 kbps~320kbps, sampling rate: 32kHz, 44.1kHz and 48 kHz decodable
- The performance of playing MP3 disc is various from the quality of recording disc and the method of recording. Furthermore, the searching lead-time for MP3-CD is longer than normal CD due to difference format.
Playback of MP3 song via USB storage media
Connec ng
The system is able to decode and playback all MP3 file which stored in the memory media with USB connec ng port.
- Set the system at Standby mode rst or other func on except USB mode.
-
Plug-in the USB pen-drive with the face up & make sure it going into completely.
-
Connecting the USB upside down or backwards could damage the audio system or the storage media (USB thumb driver). Check to be sure the direction is correct before connec on.
-
Turn on the unit again by On/standby bu on (5) and set press Function button (7) to select USB mode. The system will start reading the storage media automa cally a er connec ng, and LCD display (1) will show the total number of MP3 les being detected.
- Repeat the same playback procedure as playing CD/MP3 disc as above.
Remark
The system can detect and read the le under MP3 format only at USB mode but not other music le format.
- If connect the system to MP3 player via the USB socket, due to variances in le system format, some MP3 player may not be able to play via the USB socket. This is not a malfunction on of the system.
- USB port does not support connec on with USB extension cable and is not designed for communica on with computer directly
Aux-in connec on
Connect another audio device, e.g. (portable) CD player, MP3 player, (portable) cassette player, iPod, etc. To this system via a cord with 3.5mm dia jack plugs (not supplied). Connect one end of this cord to the headphones jack of the external device and the other end to the aux-in jack (9) at
the side of the unit. Then press Func on button (3) to "AUX" mode. Start to playback your external device to enjoy your music.
More features (on remote control only)
This func on allows the system to turn on automatically and wake you up CD, FM/DAB, or USB mode. Set the system at standby mode, then press and hold the "Timer" key to enter the Timer se ing mode, LCD (1) will show Timer On me, Moreover, the timer clock will flash the hour digit, means the unit already enter mer se ng mode.
1) On me se ng: Press the skip up or down (13/12) to set the hour. Then press Timer bu on to store the mer star ng hour, minute digit will ash, press skip up or down (13/12) to set the minute. Then press Timer bu on to store the mer on me
2) O me se ng: After above step, the LCD (1) will show "Timer Off" and hour digit was ashing. Press skip up or down 13/12 to set the hour. Then press Timer bu on to store the mer o hour, minute digit will ash, press skip up or down 13/12 to set the minute.
3) Mode: Then press skip up or down (13/12) to select mer on mode. Then press Timer bu on to store the mer on mode. Press skip up or down (13/12) to select mer on volume level and press Timer bu on to complete the mer se ng. Unit will return to standby mode display will show timer icon "②".
Ac ve/de-ac ve mer func on (In standby mode only)
- To acve mer function, press the "Timer" bu on once the mer indicator " ① " is appear on LCD display (1).
- To cancel mer func on, press again "Timer" bu on again the timer indicator " ② " disappear.
Remark:-
If there is no music source being detected (CD or USB) when the preset me is reached, system will default to "FM" function for wake up mode automatically. The system will preset at the latest radio frequency being listened before switching o
For FM/DAB wake up, the system will preset at the latest radio frequency being listened before switching o.
There are about 4 seconds for alarm se ing mode, this system will return to normal mode automatically if no keys being pressed in this time frame.
During the alarm on mode, press the "On/standby" button (5) will switch o the system.
B. Sleep func on (on remote control only)
- Press "Sleep" button "SLP-90" will show on the LCD display (1).
- Keep pressing the button to adjust the sleep timer in the order of 90 > 80 > 70 > 10 minutes respectively and sleep icon "zzZ" will indicate on LCD.
- System will stop and go to standby mode automa cally a er running the selected time.
- To cancel the sleep mode, press "Sleep" button un I "SLP-o" displayed and the "zzz" indicator disappear on LCD display.
Remark (for Europe market only): Due to ErP stage two requirement and protect the environment. The unit will switch to standby mode automatically once no any music playing over 15 minutes.
Control func ons
Ba ery installa on (ba ery not provided)
The infra-red transmi er require 2 pc "AAA" size ba ery for opera on.
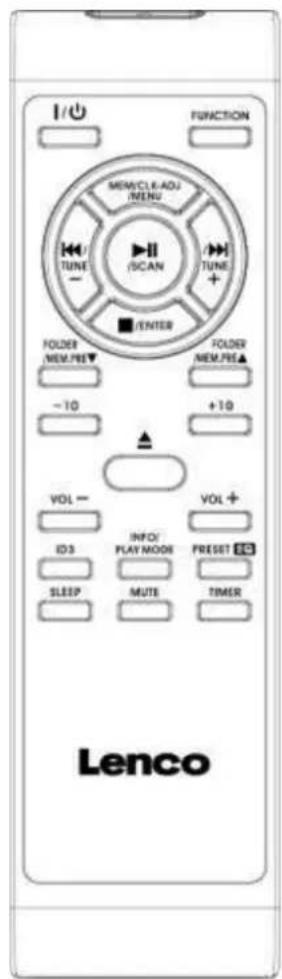
Bu on descrip on
| On/standby | Press to power on/standby the system |
| Func on | Select the func on between CD/FM/DAB/USB/Aux |
| Play/Pause /Scan | In CD/USB mode: press to start playback/pause mode; In FM/DAB mode, press to perform sta on Auto Scan func on |
| Mem/_clk-adj/Menu | In CD/USB/FM/DAB mode: press to preset memory; In Standby mode: press & hold to adjust clock; In FM/DAB mode: press to ac ve preset sta on mode or enter menu |
| Skip up /↑/down /←/ | Press to select previous/next tracks at CD/USB mode; |
| Tune+/- | Press to step up/down of radio frequency at FM/DAB mode |
| Stop /Enter | In CD/USB mode: press to stop the playback; In FM/DAB mode: press to enter the selected command |
| Folder/Mem Pre Up-Down | In USB mode: press to select folder up/down; In FM/DAB mode: press to select preset memory up/down |
| -10/+10 | In CD/MP3 mode: skip up/down 10 tracks |
| Open/Close | In CD mode: open/close the CD tray |
| Volume -/+ | Press to adjust volume level up/down |
| ID3 | To ac ve the ID3 func on. |
| Info/Play mode | In FM/DAB mode: see the broadcast sta on informa on; In CD mode: press to ac ve random/repeat func on |
| Preset EQ | Press to select di erence EQ mode for enjoyment |
| Sleep | Press to ac ve sleep func on |
| Mute | Press to ac ve mute func on (not available for Line out) |
| Timer | Press to set the mer func on |
Guarantee
Lenco offers service and warranty in accordance to European law, which means that in case of repairs (both during and a period) you should contact your local dealer.
Important note: It is not possible to send products that need repairs to Lenco directly.
Important note: If this unit is opened or accessed by a non-o cial service center in any way, the warranty expires.
This device is not suitable for professional use. In case of professional use, all warranty obliga ons of the manufacturer will be voided.
Disclaimer
Updates to Firmware and/or hardware components are made regularly. Therefore some of the instruc on, speci cations and pictures in this documentation may di er slightly from your par cular situa on. All items described in this guide for illustration purposes only and may not apply to par cular situation. No legal right or entitlements may be obtained from the description made in this manual.

Disposal of the Old Device
This symbol indicates that the relevant electrical product or ba ery should not be disposed of as general household waste in Europe. To ensure the correct waste treatment of the product and ba ery, please dispose them in accordance to any applicable local laws of requirement for disposal of electrical equipment or ba erys. In so doing, you will help to conserve natural resources and improve standards of environmental protec on in treatment and disposal of electrical waste (Waste Electrical and Electronic Equipment Direc ve).

CE Marking
Products with the CE marking comply with the EMC Direc ve (2014/30/EU) and the Low Voltage Direc ve (2014/35/EU) issued by the Commission of the European Community.
Hereby, Lenco Benelux BV, Thermiekstraat 1a, 6361 HB Nuth, The Netherlands, declares that this product is in compliance with the essen al requirements.
The declara on of conformity may be consulted at techdoc@lenco.com
Service
For more informa on and helpdesk support, please visit www.lenco.com Lenco Benelux BV, Thermiekstraat 1a, 6361 HB, The Netherlands.