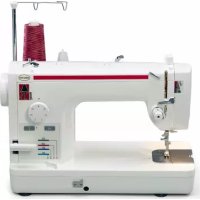
Jane BL510A - Sewing machine BABY LOCK - Free user manual and instructions
Find the device manual for free Jane BL510A BABY LOCK in PDF.


User questions about Jane BL510A BABY LOCK
0 question about this device. Answer the ones you know or ask your own.
Ask a new question about this device
Download the instructions for your Sewing machine in PDF format for free! Find your manual Jane BL510A - BABY LOCK and take your electronic device back in hand. On this page are published all the documents necessary for the use of your device. Jane BL510A by BABY LOCK.
USER MANUAL Jane BL510A BABY LOCK
text_image
A-LINE SERIESJane
A-LINE SERIES Model BL510A
Instruction and Reference Guide

text_image
baby lockFOR THE LOVE OF SEWING
To register your machine warranty and receive Baby Lock product updates and offers, go to www.babylock.com/profile. If you have questions with registration, visit your Authorized Baby Lock Retailer.
Baby Lock Consumer Helpline: 800-313-4110 www.babylock.com
INTRODUCTION
Thank you for purchasing this machine. Before using this machine, carefully read the "IMPORTANT SAFETY INSTRUCTIONS", and then study this manual for the correct operation of the various functions.
In addition, after you have finished reading this manual, store it where it can quickly be accessed for future reference.
IMPORTANT SAFETY INSTRUCTIONS
Please read these safety instructions before attempting to use the machine.
⚠️ DANGER
- To reduce the risk of electrical shock
1 Always unplug the machine from the electrical outlet immediately after using, when cleaning, making any user servicing adjustments mentioned in this manual, or if you are leaving the machine unattended.
WARNING
- To reduce the risk of burns, fire, electrical shock, or personal injuries.
2 Always unplug the machine from the electrical outlet when making any adjustments mentioned in this instruction manual.
- To unplug the machine, switch the machine to the symbol "O" position to turn it off, then grasp the plug and pull it out of the electrical outlet. Do not pull on the cord. Plug the machine directly into an electrical outlet. Do not use an extension cord. Always unplug your machine if there is a power failure.
3 Electrical Hazards:
- This machine should be connected to an AC power source within the range indicated on the rating label. Do not connect it to a DC power source or power transformer. If you are not sure what kind of power source you have, contact a qualified electrician. This machine is approved for use in the country of purchase only.
4 Never operate this machine if it has a damaged cord or plug, if it is not working properly, has been dropped or damaged, or water is spilled on the unit. Return the machine to the nearest authorized Baby Lock retailer for examination, repair, electrical or mechanical adjustment.
- While the machine is stored or in use if you notice anything unusual, such as an odor, heat, discoloration or deformation, stop using the machine immediately and unplug the power cord.
- When transporting the machine, be sure to carry it by its handle. Lifting the machine by any other part may damage the machine or result in the machine falling, which could cause injuries.
- When lifting the machine, be careful not to make any sudden or careless movements, which may cause a personal injury.
5 Always keep your work area clear:
- Never operate the machine with any air openings blocked. Keep ventilation openings of the machine and foot control free from the build up of lint, dust, and loose cloth.
Do not store objects on the foot controller. •
Never drop or insert foreign objects in any opening.
- Do not operate where aerosol (spray) products are being used or where oxygen is being administered.
- Do not use the machine near a heat source, such as a stove or iron; otherwise, the machine, power cord or garment being sewn may ignite, resulting in fire or an electric shock.
- Do not place this machine on an unstable surface, such as an unsteady or slanted table, otherwise the machine may fall, resulting in injuries.
6 Special care is required while sewing:
Always pay close attention to the needle. Do not use bent or damaged needles.
Keep fingers away from all moving parts. Special care is required around the machine needle.
- Switch the machine to the symbol "O" position to turn it off when making any adjustments in the needle area.
Do not use a damaged or incorrect needle plate, as it could cause the needle to break.
- Do not push or pull the fabric while sewing, and follow the instructions carefully when free motion stitching so that you do not deflect the needle and cause it to break.
7 This machine is not a toy:
Your close attention is necessary when the machine is used by or near children.
- The plastic bag that this machine was supplied in should be kept out of the reach of children or disposed of. Never allow children to play with the bag due to the danger of suffocation.
Do not use outdoors.
8 For a longer service life:
- When storing this machine, avoid direct sunlight and high humidity locations. Do not use or store the machine near a space heater, iron, halogen lamp, or other hot objects.
• Use only neutral soaps or detergents to clean the case. Benzene, thinner, and scouring powders can damage the case and machine, and should never be used. - Always consult the Instruction and Reference Guide when replacing or installing any assemblies, the presser feet, needle, or other parts to assure correct installation.
9 For repair or adjustment:
If the light unit is damaged, it must be replaced by an authorized Baby Lock retailer.
- In the event a malfunction occurs or adjustment is required, first follow the troubleshooting table in the back of the Instruction and Reference Guide to inspect and adjust the machine yourself. If the problem persists, please consult your local authorized Baby Lock retailer.
Use this machine only for its intended use as described in the manual.
Use accessories recommended by the manufacturer as contained in this manual.
The contents of this manual and specifications of this product are subject to change without notice.
For additional product information, visit our website at www.babylock.com
SAVE THESE INSTRUCTIONS This machine is intended for household use.
FOR USERS IN COUNTRIES EXCEPT EUROPEAN COUNTRIES
This appliance is not intended for use by persons (including children) with reduced physical, sensory or mental capabilities, or lack of experience and knowledge, unless they have been given supervision or instruction concerning use of the appliance by a person responsible for their safety. Children should be supervised to ensure that they do not play with the appliance.
FOR USERS IN EUROPEAN COUNTRIES
This appliance can be used by children aged from 8 years and above and persons with reduced physical, sensory or mental capabilities or lack of experience and knowledge if they have been given supervision or instruction concerning use of the appliance in a safe way and understand the hazards involved. Children shall not play with the appliance. Cleaning and user maintenance shall not be made by children without supervision.
FOR USERS IN THE UK, EIRE, MALTA AND CYPRUS ONLY
IMPORTANT
- In the event of replacing the plug fuse, use a fuse approved by ASTA to BS 1362, i.e. carrying the m mark, rating as marked on plug. Always replace the fuse cover. Never use plugs with the fuse cover omitted.
- If the available electrical outlet is not suitable for the plug supplied with this equipment, you should contact your authorized Baby Lock retailer to obtain the correct lead.
CONTENTS
INTRODUCTION 1
IMPORTANT SAFETY INSTRUCTIONS .... 1
Accessories 6
Machine Features 7
Before You Begin (1) 8
Power Cord and Foot Controller ....8
Main Power Switch 8
Thread Tension Dial 8
Handwheel 8
Stitch Length Regulator 8
Reverse Stitch Lever 8
Presser Foot Lever 9
Knee Lifter 9
Presser Foot Pressure Adjustment Dial ....9
Fabric Extension Table 9
Before You Begin (2) 10
Thread Cutter Button 10
Needle Stop Position Button....10
Feed Dog Adjustment Knob 10
Changing Needles 11
Changing the Needle ....11
Changing the Feed Pin ....11
Threading (1) 12
Bobbin Winding ....12
Bobbin Installation ....14
Threading (2) 15
Upper Threading....15
Using the Automatic Needle Threader ....16
Using the Spool Net 16
Stitch Samples and Needle Chart 17
Stitch Samples 17
Thread Tension 17
Changing Presser Feet 18
Changing Presser Feet (Zipper Foot) .....18
Presser Feet 18
Basic Sewing (1) 19
Basic Sewing 19
Pin Feeding (for hard-to-handle fabrics) .....19
Basic Sewing (2) 20
Rolled Hem Foot 20
Basic Sewing (3) 21
Zipper Foot 21
Invisible Zipper Foot 22
1/4" Foot 22
Free Motion Quilting Foot 23
Walking Foot 23
Seam Guide 24
Caring for Your Machine 25
Cleaning the Machine 25
Lubrication Points 25
Trouble Shooting 26
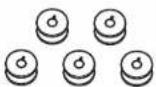
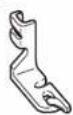
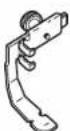
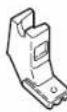
Accessories
2

3
4
5
6
7

8

9
10
11

12
13
14
15
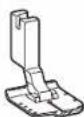
16
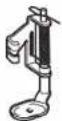
17

18
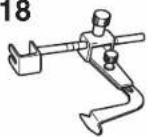
19
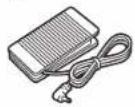
20
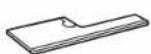
21
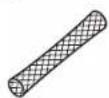
22
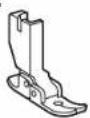
23

Note (For U.S.A. only)
• Foot controller: Model T
- This foot controller is used for sewing machine model BL510A.
| No. | Part Name Part Code | |
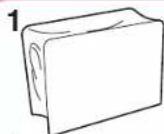
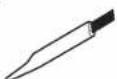
| 1 | Soft Cover XA0917-054 | |
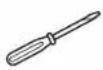
| 2 | Medium Screwdriver XC9541-051 | |
| 3 | Small Screwdriver X55468-051 | |
| 4 | Cleaning Brush X59476-051 | |
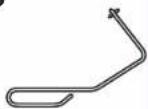
| 5 | Knee Lifter XA0830-051 | |
| 6 | Needles and Case(ORGAN HLX5)1 Size 9, 2 Size 11, 1 Size 14,1 Size 16, 1 Ballpoint Needle | X80805-151 |
| 7 | Feed Pin 138483-051 | |
| 8 | Feed Pin Changer XC1407-051 | |
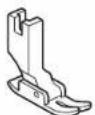
| 9 | General Purpose Foot XA1425-001 | |
| 10 | Bobbin (5) 100376-051 | |
| 11 | Spool Cap XA2111-050 | |
| 12 | Rolled Hem Foot | X57138-101 |
| 13 | Zipper Foot | 112797-001 |
| 14 | Invisible Zipper Foot | XC0093-001 |
| 15 | 1/4" Foot | XA7258-001 |
| 16 | Free Motion Quilting Foot | XA7255-301 |
| 17 | Walking Foot | XA7253-001 |
| 18 | Seam Guide | XA7256-001 |
| 19 | Foot Controller | XC8816-051 |
| 20 | Fabric Extension Table | XC3117-051 |
| 21 | Spool Net | XA5523-050 |
| 22 | Flex Reaction Foot(on machine) | 136021-001 |
| 23 | Spool Cone Holder(on machine) | XF2071-001 |
Machine Features
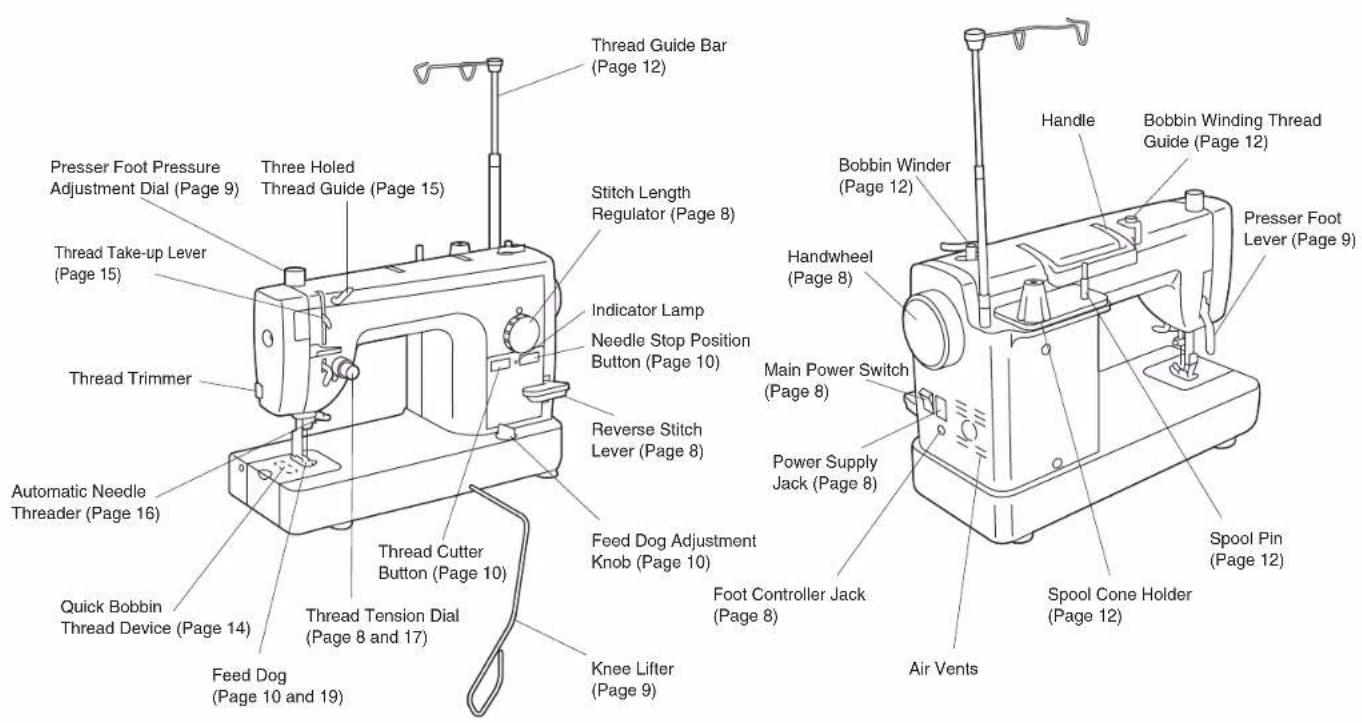
text_image
Presser Foot Pressure Adjustment Dial (Page 9) Thread Take-up Lever (Page 15) Thread Trimmer Automatic Needle Threader (Page 16) Quick Bobbin Thread Device (Page 14) Feed Dog (Page 10 and 19) Thread Tension Dial (Page 8 and 17) Thread Cutter Button (Page 10) Knee Lifter (Page 9) Thread Guide Bar (Page 12) Three Holed Thread Guide (Page 15) Stitch Length Regulator (Page 8) Indicator Lamp Needle Stop Position Button (Page 10) Reverse Stitch Lever (Page 8) Feed Dog Adjustment Knob (Page 10) Foot Controller Jack (Page 8) Power Supply Jack (Page 8) Handwheel (Page 8) Main Power Switch (Page 8) Bobbin Winder (Page 12) Handle Bobbin Winding Thread Guide (Page 12) Presser Foot Lever (Page 9) Spool Pin (Page 12) Air Vents Spool Cone Holder (Page 12)Before You Begin (1)
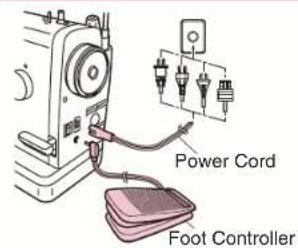
Power Cord and Foot Controller
WARNING
Please use common household current.
attach power cord.
- insert foot controller jack into machine.
When you press the foot controller down lightly, the machine will run at a low speed. When more pressure is applied to foot controller, the machine's speed will increase. When you remove your foot from the foot controller, the machine will stop.
Main Power Switch
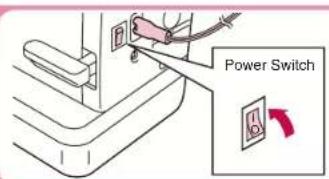
Press power switch toward the "I" position to turn machine on. To turn the machine off, press the power switch toward the "O" position.
text_image
Power Cord Foot Controller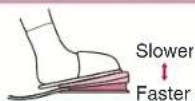
text_image
Power SwitchThread Tension Dial
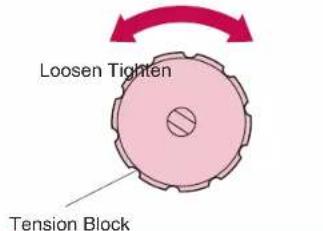
When tighter thread tension is desired, turn the tension dial to the right. Upper and bobbin threads will meet on right side of the fabric.
When looser thread tension is desired, turn tension dial to the left. Upper and lower threads will then meet on wrong side of fabric.
When looser thread tension is desired, turn tension dial to the left. Upper and lower threads will then meet on wrong side of fabric.
Upper Thread Tension
text_image
Loosen Tighten Tension BlockHandwheel
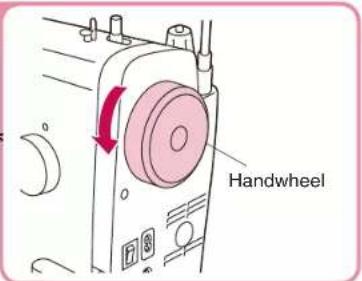
Position needle using handwheel.
Always turn handwheel towards * you.
CAUTION
Be sure to keep the area under and around the needle clear.
Stitch Length Regulator
Adjust desired stitch length ● using stitch regulator dial.
text_image
HandwheelStitch Length
Reference Mark
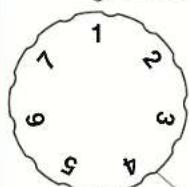
Stitch Length Regulator
Lower number = shorter stitches Higher number = longer stitches
Reverse Stitch Lever
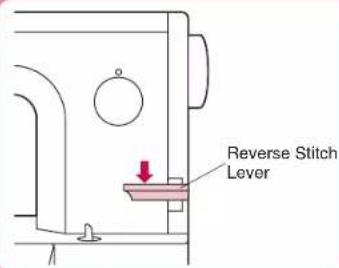
Sewing in reverse is possible ● when the reverse stitch lever is in the lowered position.
*Make sure to continuously press the lever to its lowest position when reverse sewing is desired.
*When the stitch regulator dial is set between 5-7 mm, the reverse stitch length is always 5 mm.
text_image
Reverse Stitch LeverPresser Foot Lever
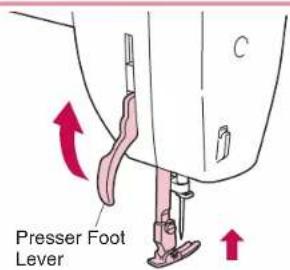
Lowering the presser foot lever lowers the sewing foot down onto the fabric and engages the thread tension function. When working with heavy * fabrics or other fabrics that don't slide easily under the foot, raise the presser foot lever to position the fabric.
text_image
Presser Foot LeverKnee Lifter
Using the convenient knee lifter to lift and lower the presser foot easily, leaving both of your hands free.
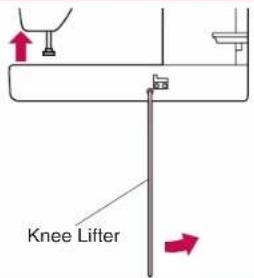
text_image
Knee Lifter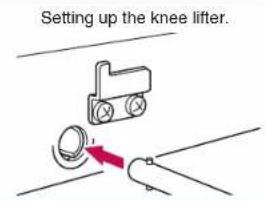
text_image
Setting up the knee lifter.Push the knee lifter bar all the * way into the socket.
When knee lifter is not in use, * it can be stored beneath the fabric extension table.
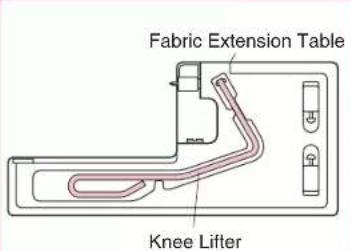
text_image
Fabric Extension Table Knee Lifter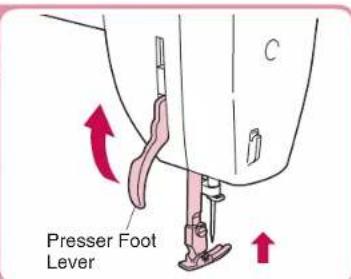
text_image
Presser Foot LeverPresser Foot Pressure Adjustment Dial
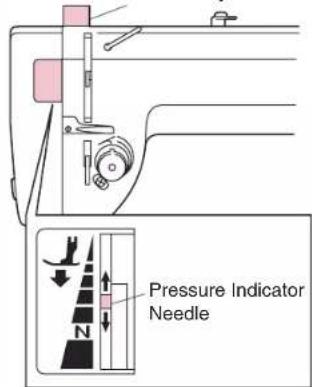
Turning the pressure adjustment dial raises and lowers the pressure indicator needle as the amount of pressure on the presser foot changes. See also: "Feed Dog Adjustment Knob" on page 10.
See "Thread Tension" on page 17. Coordinate the color coding for proper foot pressure and feed dog settings.
Presser Foot Pressure Adjustment Dial
text_image
Pressure Indicator NeedleFabric Extension Table
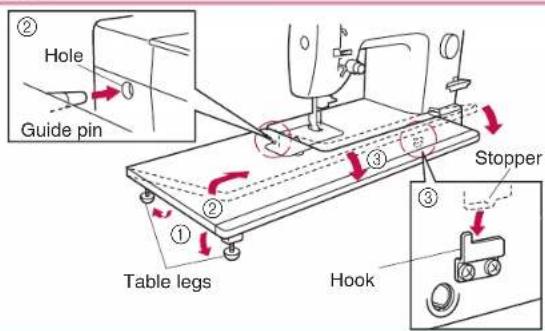
●ower the adjustable table feet and slide the fabric extension table on to the machine.
text_image
② Hole Guide pin ③ ① ② Table legs Hook StopperBefore You Begin (2)
Thread Cutter Button
CAUTION
When the machine stops due to jammed threads and so forth, do not press on the foot controller; turn power off, and move the needle with the handwheel to check the situation. Otherwise broken needles could result.
●The thread cutter trims upper and bobbin threads at the end of seams.
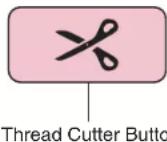
Press with the presser lever down. *
Needle Stop Position Button
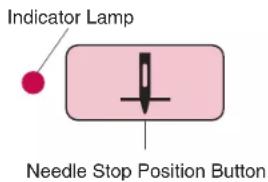
- When indicator lamp is lit up, the machine will stop sewing with the needle lowered through the fabric. When indicator lamp is off, the needle position when sewing stops, will be random. - the safety mechanism is activated, for example if the thread becomes tangled, the red lamp flashes.
text_image
Indicator Lamp Needle Stop Position ButtonFeed Dog Adjustment Knob
Height of feed dog can be ● adjusted to coincide with fabric weights.
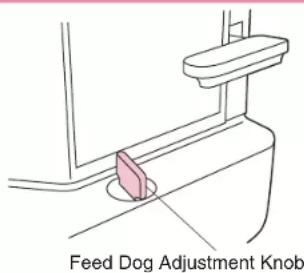
text_image
Feed Dog Adjustment KnobFoot Pressure and Feed Dog Position
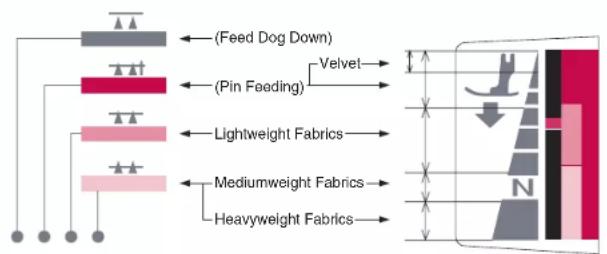
text_image
(Feed Dog Down) (Pin Feeding) Velvet Lightweight Fabrics Mediumweight Fabrics Heavyweight FabricsSelect one of four feed dog positions according to your needs.
Note
- If a setting other than is selected, the pin feed mechanism will not operate.
Coordinate the color coding for proper foot pressure and feed dog settings.
Changing Needles
CAUTION
Please make sure the power to the machine is turned off before carrying out the following operations. There is a chance of injury if the machine accidentally starts running during this operation.
Changing the Needle
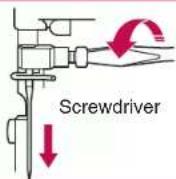
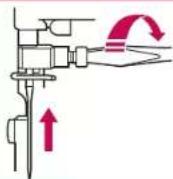
Turn the sewing machine off. ① Raise needle to highest position using handwheel, and lower presser foot. Loosen screw with screwdriver, ② and remove needle. Hold the needle with the flat ③ side to the right, and insert the needle as far as it will go. Make sure needle is securely set in the needle chamber by screwing in tightly.
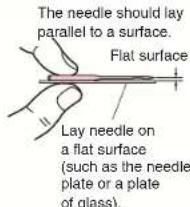
If the needle is not adequately inserted or the screw is loose, this may break the needle or cause a breakdown and the needle threader will not work. Check needles on a flat surface to make sure they are not bent.
text_image
The needle should lay parallel to a surface. Flat surface Lay needle on a flat surface (such as the needle plate or a plate of glass).Note
HLX5 needles should be used; however, Schmetz 130/705H may also be used under normal circumstances.
Changing the Feed Pin
Set the feed dog to the "velvet" ① position. (See page 10.)
Remove needle, presser foot ② and needle plate.
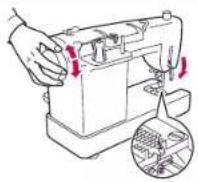
Lower presser foot and turn ③ handwheel until feed pin is in its highest position.
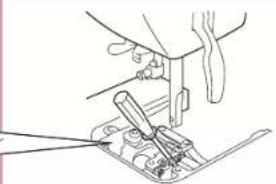
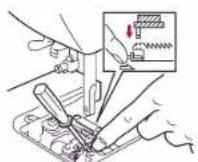
Insert small screwdriver ④ (included) as shown in diagram.
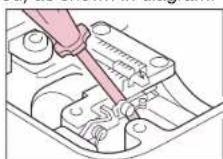
While holding spring with ⑤ fingertip, lower the feed pin changer onto the needle to pick it up.
Attach new feed pin to feed pin ⑥ changer, lower and attach while holding spring with fingertip.
⑦ Remove screwdriver.
⑧ Re-attach needle plate, needle and presser foot.
natural_image
Line drawing of a hand using a sewing machine to adjust or install a component (no text or symbols visible)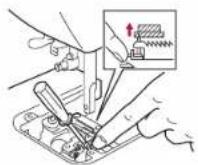
Threading (1)
Bobbin Winding
CAUTION
Do not move bobbin winding clutch while machine is running.
text_image
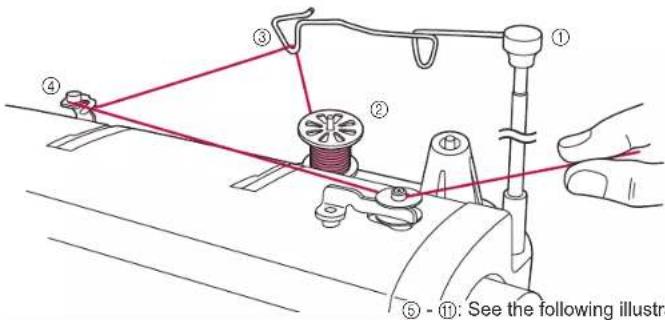
① ② ③ ④ ⑤ - ⑪: See the following illustra*1
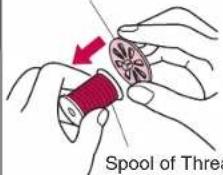
Spool Cap
text_image
Spool of Thread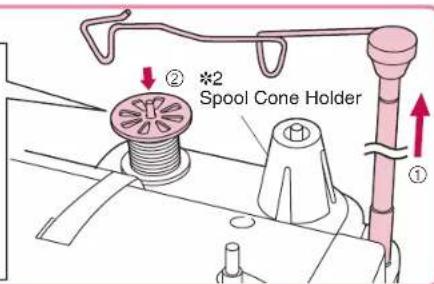
text_image
② *2 Spool Cone Holder ①Raise the thread guide bar all the way.①
Mount a spool of thread on the spool pin.②
*1 Use spool cap when using parallel-wound thread.
*2 Use spool cone holder to stabilize cone shaped spools of thread.
natural_image
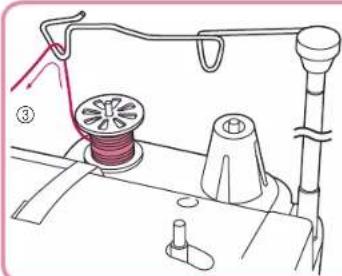
Line drawing of a sewing machine with spool, handle, and base (no text or symbols)Pass the thread through the ③ triangular hole.
natural_image
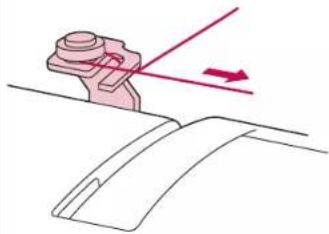
Diagram showing a mechanical component with a red arrow indicating direction, no text or symbols presentPass thread through bobbin winding ④ thread guide as shown in drawing.
text_image
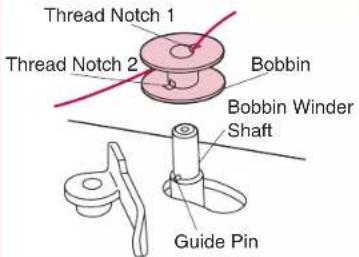
Thread Notch 1 Thread Notch 2 Bobbin Bobbin Winder Shaft Guide PinRun thread through top ⑤ thread notch 1, and turning the bobbin align bottom thread notch 2 of the bobbin with guide pin on bobbin winder shaft.
text_image
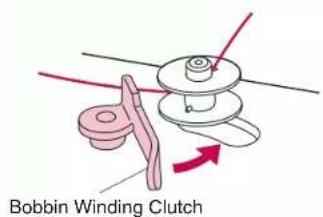
Bobbin Winding ClutchPress bobbin winding clutch up against ⑥ empty bobbin. If the bobbin stop does not slide easily between the top and bottom of the bobbin, check that the bobbin is seated properly with the guide pin (⑤) inserted into the lower notch.
natural_image
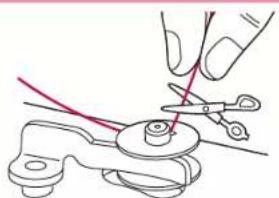
Line drawing of a hand using scissors to cut a piece of cable or wire (no text or symbols present)* Place the thread end so that it does not protrude from the bobbin.
text_image
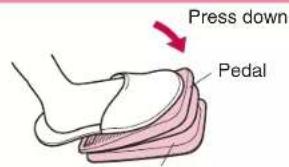
Press down Pedal* Pressing down on the controller harder increases the winding speed.
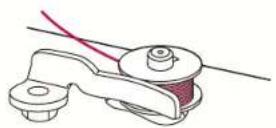
Stop winding process when bobbin ⑨ is full. Remove your foot from the foot controller.
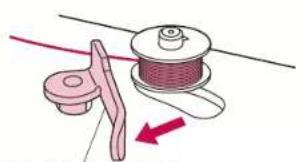
natural_image
Illustration of a thread spool being sewn into a mechanical component with a red arrow indicating rotation (no text or symbols)Bobbin Winding Clutch
While holding the end of the thread, ⑦ press on the foot controller for a few seconds. Once enough thread has wound itself around the bobbin to hold itself in place, release the foot controller and trim the excess thread.
Start winding the bobbin again by Ⓗ pressing down on the foot controller.
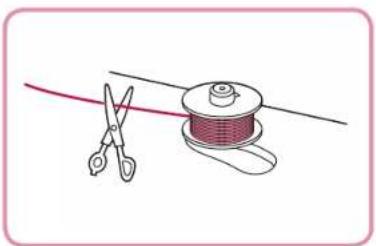
natural_image
Illustration of scissors cutting a red thread into a spool of thread (no text or symbols)Cut thread and remove bobbin.⑪
Bobbin Installation
CAUTION – Moving parts –
To reduce risk of injury, turn the power to the machine off before servicing. Open covers.
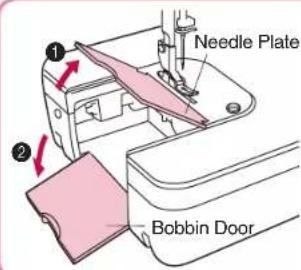
text_image
Needle Plate Bobbin DoorLift needle plate and open ① bobbin door.
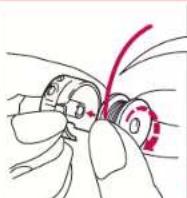
* Bobbin should be positioned so it winds to the left.
10 cm (4 inches)
text_image
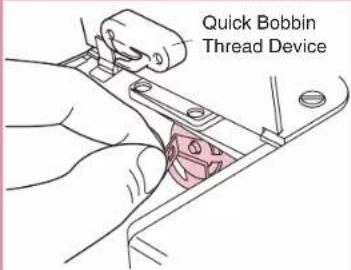
Quick Bobbin Thread DevicePull the latch lever of the bobbin ③ case out and push the bobbin case into the shuttle race and release the latch lever.
text_image
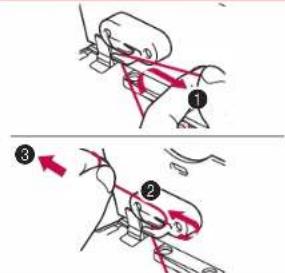
Illustration showing two-step instructions for a person performing a physical maneuver, labeled with numbers ① and ②.Pass the thread through the quick ④ bobbin thread device in the order numbered ① ②, pull in the direction of the arrow ③, then cut the thread.
text_image
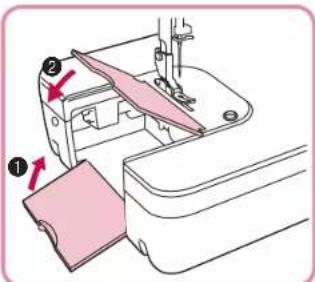
Diagram of sewing machine operation showing fabric being inserted into a slot, with numbered callouts indicating steps ① and ②.Lower slide plate and close ⑤ bobbin door, following numbers
① ② above in order.
Place bobbin inside the bobbin case.②
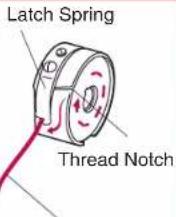
Run thread through thread notch and * under latch spring, so that a length of thread is exposed.
Always use the bobbin case that was * supplied with this machine. A secondary bobbin case can be ordered from your Baby Lock retailer.
*If the latch lever on the bobbin case is not set securely on the hook, it may fly off during sewing and cause lower thread breakage. Rotate the handwheel one full rotation towards you to check that the bobbin case is set securely.
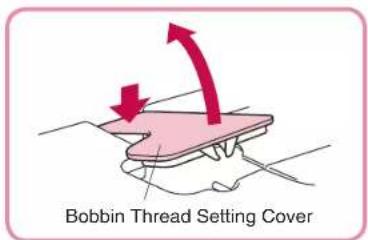
When the fabric extension table is set in place ●
text_image
Bobbin Thread Setting CoverOpen the bobbin thread setting cover beforehand, then following the above directions set the bobbin thread in place. (You can set the bobbin thread in place without removing the fabric extension table.)
★ Quick Bobbin Thread Device This device cuts the bobbin thread end to an appropriate length after the bobbin has been replaced and holds it at that length. Following this process eliminates the need to manually pull the bobbin thread through the hole in the needle plate. Simply close the bobbin case and continue the upper threading process.
★ Quick Bobbin Thread Device This device cuts the bobbin thread end to an appropriate length after the bobbin has been replaced and holds it at that length. Following this process eliminates the need to manually pull the bobbin thread through the hole in the needle plate. Simply close the bobbin case and continue the upper threading process.
Threading (2)
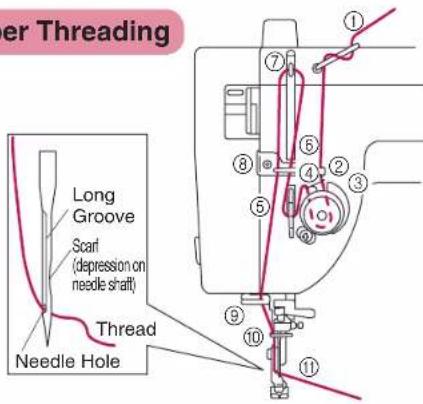
Upper Threading
text_image
Outer Threading Long Groove Scarf (depression on needle shaft) Thread Needle HoleCAUTION
Turn off the power to the machine before using the automatic needle threader. Otherwise, it may cause injuries if you unintentionally press down on the foot controller.
text_image
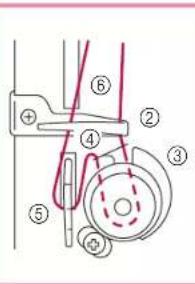
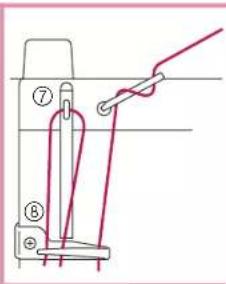
Diagram showing a rope being inserted into a cable with labeled parts and motion arrows●take sure thread take-up lever (⑦) is in highest position and presser foot is up.
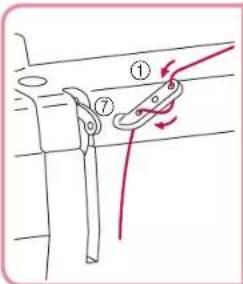
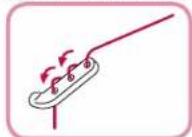
When using polyester thread or thread that tangles or breaks, run the thread through all three holes of the thread guide.
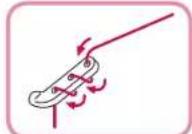
* the thread still tangles or breaks, run the thread through the holes backwards as shown in diagram.
text_image
Technical diagram of a mechanical assembly with numbered components, likely for assembly or maintenance instructions.Thread tension may not be adjusted * adequately unless the thread runs correctly through the take-up spring.
text_image
Technical diagram showing a mechanical assembly with labeled parts and a tool interacting with a component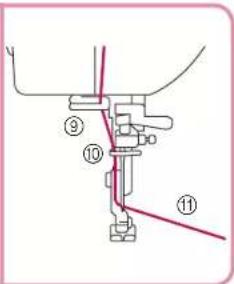
text_image
Technical diagram showing mechanical assembly with numbered parts and a red line indicating connection or alignment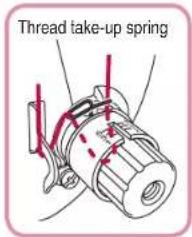
text_image
Thread take-up springUsing the Automatic Needle Threader
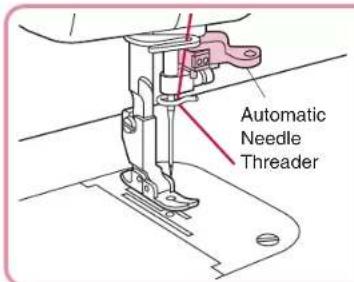
text_image
Automatic Needle ThreaderRotate handwheel towards you until ① needle is in the highest position, and lower presser foot. Take thread in your left hand, and ② gently pull it forward.
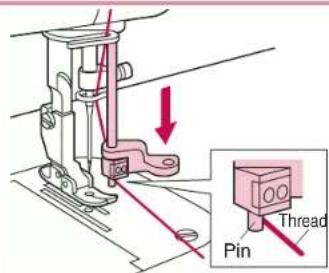
text_image
Technical diagram of a sewing machine with labeled parts including Pin, Thread, and directional arrow indicating motion or assembly.Lower automatic needle threader.③ *Pull thread along the right side of the pin. *Do not force the needle threader lower than the eye of the needle. Be sure that the needle is in the highest position.
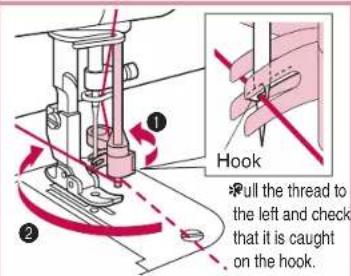
text_image
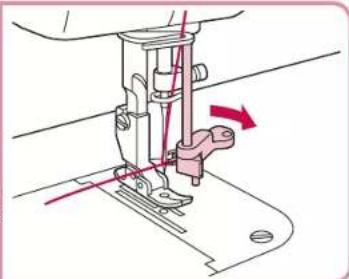
Hook Pull the thread to the left and check that it is caught on the hook.④ Turn the needle threader lever all the way in the direction of ① and when the hook extends from the needle hole, pull the thread in the direction of ② to catch it on the hook.
natural_image
Technical line drawing of a sewing machine needle with red motion arrows indicating movement (no text or symbols)⑤ While holding the thread gently, return the needle threader lever to the right. As you do this the hook that has caught the thread will move as well, pulling a loop of thread through the eye of the needle.
text_image
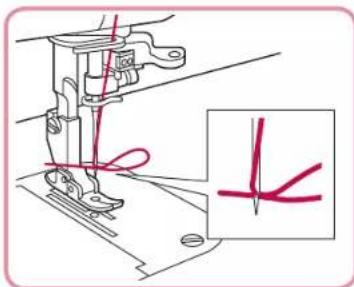
Technical diagram of a sewing machine with red annotation lines and an inset showing a hand-drawn 'X' mark.⑥ Before sewing, pull the thread loop to the right and then pull the thread tail towards the back of the machine following the opening in the presser foot.
| Needle (HLX5) Thread |
| #9 #20 #30 #50 #60 |
| #11 #20 #30 |
| #14 #20 #30 |
| #16 #20 |
●The automatic needle threader cannot be used with the thread-needle combinations illustrated in the chart shown above. Transparent nylon thread can be used regardless of the chart, providing the needle used is a #14 or #16.
Using the Spool Net
flowchart
graph TD
    A["Step ①: Fabricated basket"] --> B["Step ②: Spine"]
    B --> C["Step ③: Top filter with down arrow"]
    C --> D["Step ④: Top filter with up arrow"]
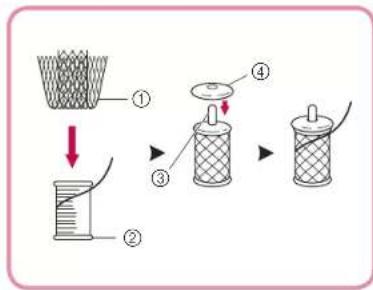
If using transparent nylon thread, metallic thread, or other strong thread, place the included spool net over the spool before using. If the spool net is too long, fold it once to match it to the spool size before placing it over the spool.
Spool net①
Thread spool②
Spool pin③
Spool cap④
Stitch Samples and Needle Chart
Stitch Samples
Set stitch length regulator to ① desired stitch length.
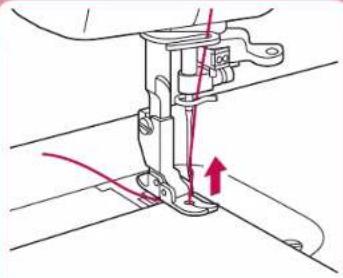
Make sure approximately 15 ② cm (6 inches) of upper thread is pulled under the presser foot and toward the rear of the machine. While needle is in raised position, insert a test strip from the garment fabric under the foot.
Lower presser foot.③
Turn the handwheel toward you ④ to lower the needle through the fabric, then press gently on the foot controller to begin.
⑤ Turn the handwheel toward you to raise the needle and thread take-up lever to their highest positions.
Raise the presser foot, remove ⑧ fabric and then manually cut the thread with the cutter on the left side of the head of the machine or with a pair of scissors.
When using thread cutter: *
⑤ Press the thread cutter button while the presser foot lever is in the down position.
⑥ Raise presser foot and remove fabric.
natural_image
Technical line drawing of a sewing machine needle with red measurement lines and an upward arrow indicating measurement direction (no text or symbols)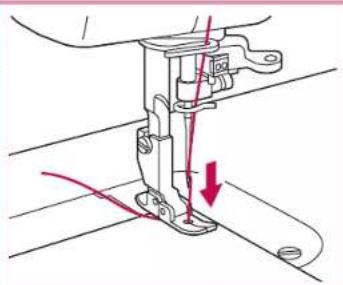
natural_image
Technical line drawing of a sewing machine needle with red measurement arrows indicating thread direction (no text or symbols)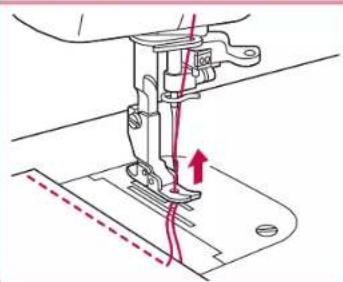
natural_image
Technical line drawing of a sewing machine needle and foot (no text or symbols)Thread Tension
Bobbin thread should feed smoothly. Adjust bobbin thread * to match that of upper thread. (If bobbin thread is too tight it may cause fabric to bunch up.)
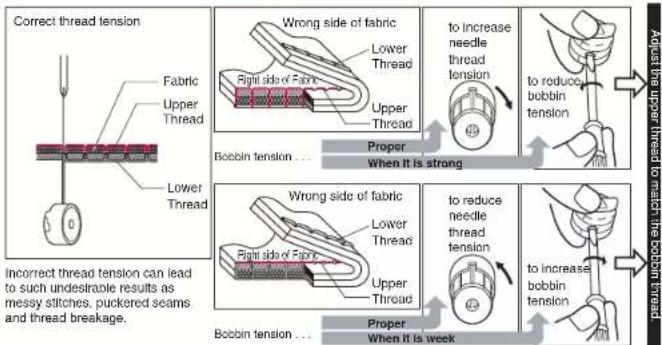
Incorrect thread tension can lead to such undesirable results as messy stitches, puckered seams and thread breakage.
- Selecting the proper needle for use with the fabric and thread you are working with The following chart applies to many different fabric, thread and needle combinations. *
| Fabric - Thread - Needles | HLX5 | Schmetz130/709H | |||
| Cloth | Thread | Needle (HLX5) | |||
| Specialty fabrics | Velvet | Silk, Polyester #30 – #50 | #11 – #14 | #9 | #65 |
| Quilt | Polyester #20 – #50 | #11 – #16 | #11 | #75 | |
| Synthetic Suede | Polyester #20 – #50 | #14 | #90 | ||
| Knit | Polyester #20 – #50 | #16 | #100 | ||
| Coating | Polyester #50 | #11 – #14 | #18 | #110 | |
| Light weight fabrics | Lawn | Cotton #80 | #9 | ||
| Tricot | Polyester #60 | ||||
| Silk Georgette | Silk #50 | ||||
| Wool Georgette | Silk, Polyester #50 | #11 | |||
| Medium weight fabrics | Gingham | Cotton #60 – #80 | #11 – #14 | ||
| Lightweight Jersey | Polyester #60 | #11 | |||
| Gabardine, Flannel | Silk #50 | ||||
| Heavy weight fabrics | Denim | Cotton #20 – #50 | #14 – #18 | ||
| Jersey | Polyester #20 – #50 | #11 – #16 | |||
| Tread | Silk #20 – #50 | ||||
*HLX5 needles are recommended; however, Schmetz 130/705H needles may also be used under normal sewing conditions.
* Adjust the pressure adjustment dial and the feed dog adjustment knob according to the chart on the sewing machine.
* When sewing on knit fabrics such as jersey or tricol, use a ballpoint needle or a needle designed for use with knit fabrics.
*For best results when using metallic threads, sew with a good quality thread, set upper tension on 2, and use metallic needle.
Changing Presser Feet
CAUTION
Make sure the power to the machine is off before changing presser feet.
Changing Presser Feet (Zipper Foot)
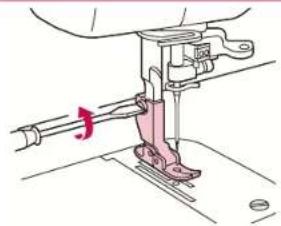
Raise presser foot, and raise ① needle to highest position. Loosen and remove screw using ② screwdriver.
Attach zipper foot and tighten ③ screw.
Use the same method to attach * the other feet that come with your machine. See page 23 for directions on * attaching the "Walking Foot".
Use the position knob on back of the zipper foot to adjust position of foot in relation to needle. Only the zipper foot has a * position knob. You can begin sewing with all other presser feet immediately after attaching.
natural_image
Technical line drawing of a sewing machine needle and foot (no text or symbols)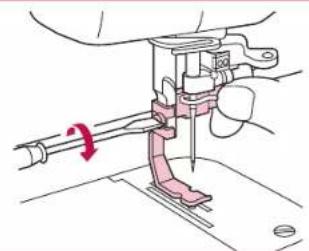
natural_image
Mechanical assembly diagram showing a hand operating a sewing machine with a red arrow indicating motion (no text or symbols present)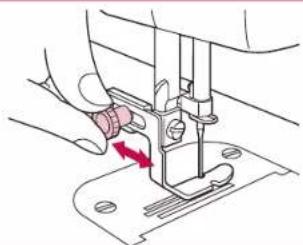
natural_image
Illustration of a sewing machine needle being inserted into a base, with a red arrow indicating the needle direction (no text or symbols present)Presser Feet
●lex Reaction Foot
For perfect stitching on otherwise difficult fabrics like velvet, leather and suede.
- Rolled Hem Foot
Use on the edge of fabric, such as on hems of dress shirts, to fold the edge of the fabric in three while sewing.
Walking Foot ●
For sewing or quilting on fabrics which stick or tend to slip. Useful for sewing multiple layers as in quilting.
●ree Motion Quilting Foo
Spring action foot for darning, quilting or free motion embroidery.
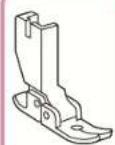
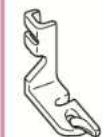
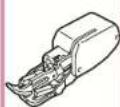
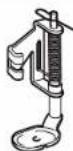
Use only foot supplied with your machine. Each foot is specially designed for this machine and has clearance for the pin at the rear of each foot. Use of other presser feet may damage or break the pin feed mechanism.
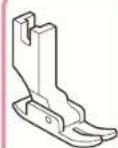
General Purpose Foot
This foot is used for most sewing. (Can also be used for sewing thick fabrics or seams.)
When sewing thick seams, lightly guide the fabric with your hand on the downward side of the seam.
*an also be used with pin feeding.
●visible Zipper Foot Use to attach concealed fasteners.
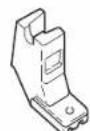
Clipper Foot
Use to attach fasteners other than concealed fasteners. The zipper foot can also be used to secure piping in place as you sew. Use the side of the foot closest to the needle to rest against the edge of the piping as you sew.
1/4" Foot ●
For quilt and patchwork piecing with 1/4" or 1/8" seam allowance.
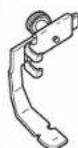

Basic Sewing (1)
Basic Sewing
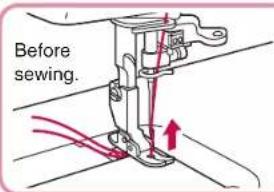
text_image
Before sewing.Raise presser foot, pull ① about 15 cm (6 inches) of upper and bobbin thread under and behind foot, and position fabric under foot.
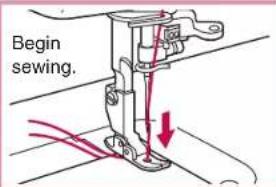
text_image
Begin sewing.Lower presser foot lever to ② lower foot.
③ Turn the handwheel toward you to lower the needle through the fabric, then press gently on the foot controller to begin.
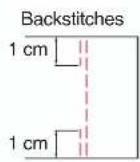
At the beginning and end * of a seam, press down the reverse stitch lever and backstitch about 1 cm (3/8 inch).
text_image
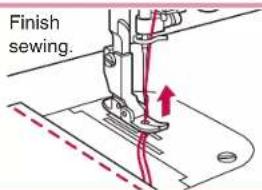
Finish sewing.④ Raise needle to highest position. Raise presser foot, remove ⑤ fabric and cut thread. When using thread trimmer: *
④ Push thread trimmer button (this will cause the upper and bobbin threads to be cut automatically and the needle to stop in a raised position).
⑤ Raise presser foot and remove fabric.
text_image
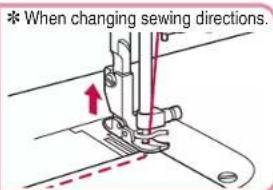
* When changing sewing directions.Make sure needle is pierced ① all the way through fabric. Raise presser foot, and turn ② fabric using needle as an axis.
Lower presser foot and ③ continue sewing.
Pin Feeding (for hard-to-handle fabrics)
Velvet, quilt fabric, synthetic suede, knits and other fabrics can be joined evenly by activating the pin feed mechanism.
● Machine Set-up for Pin Feeding
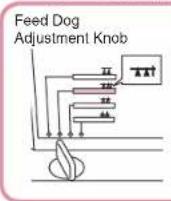
Move feed ① adjustment knob to pin feeding position.
text_image
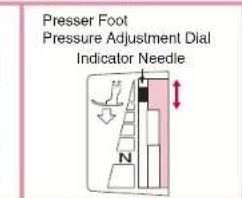
Presser Foot Pressure Adjustment Dial Indicator Needle② Adjust pressure adjustment dial until indicator needle is in the right position in the matching color coded area.
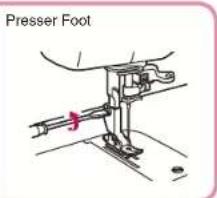
text_image
Presser Foot③ Attach flex reaction presser foot for perfect stitching on difficult fabrics like velvet, leather and suede.
● Pin Feeding Mechanism

text_image
Feed Pin Fabric Feed Pin Feed DogThe feed pin passes up through all layers of fabric moving with the feed dog's motion to feed all layers of the fabric evenly.
For safety, the feed pin is automatically lowered when presser foot is raised. *
- Start to Sew
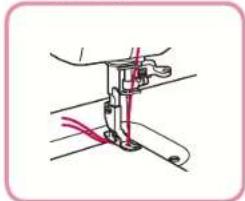
natural_image
Line drawing of a sewing machine needle with red thread (no text or symbols)Gently pull thread until feed pin catches fabric and sew.
CAUTION
While the presser foot lever is lowered, the feed pin appears up through the feed dog. Keep your fingers away from the feed pin.
Basic Sewing (2)
CAUTION
Make sure the power to the machine is off before changing presser feet.
Rolled Hem Foot
Attach rolled hem foot.①
Refer to page 18 for instructions * on changing sewing feet.
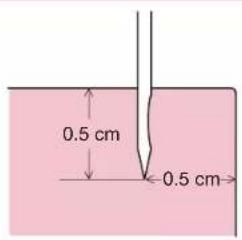
Position the fabric (reverse side ② facing up) under the presser foot. Insert needle approximately 0.5 cm (3/16 inch) from the edge of the fabric and sew 2 stitches.
Turn the handwheel towards you to raise the needle, raise the presser foot, then pull the fabric forward.
Be sure not to unthread the * fabric while pulling it forward.
Hold the 4 threads in your left ④ hand.
text_image
0.5 cm 0.5 cm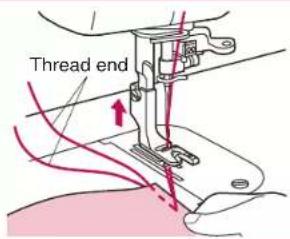
text_image
Thread end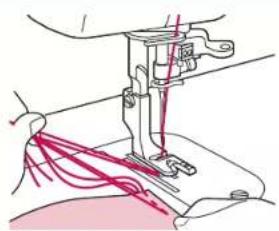
natural_image
Line drawing of a sewing machine needle stitching a garment (no text or symbols)With your right hand, put the ⑤ edge of the rolled hem under the presser foot, from the spot where the threads come out. Insert the edge so that it lies directly under the needle. Lower the presser foot.
Pull gently on threads in left ⑥ hand while sewing the first 3-4 stitches to hold them in place. Fold hem over about 0.5 cm ⑦ (3/16 inch) and continue feeding folded hem under foot while sewing towards the curved guide on the foot.
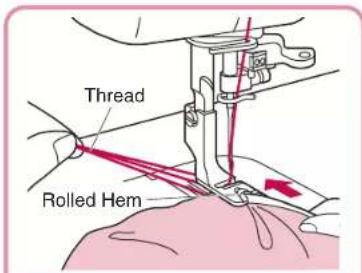
text_image
Thread Rolled Hem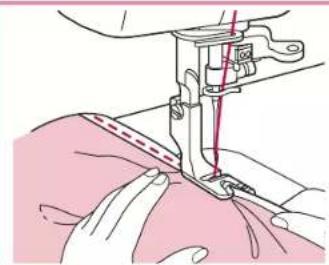
natural_image
Illustration of a sewing machine needle stitching fabric, showing stitching details (no text or symbols)Basic Sewing (3)
CAUTION
Make sure the power to the machine is off before changing feet. When attaching zippers to stretch fabrics, use the pin feed method and adjust foot pressure accordingly. The zipper foot can also be used as a guide when attaching piping to fabric.
Zipper Foot
Attach zipper foot.① See "Changing Presser Feet * (Zipper Foot)" on page 18.
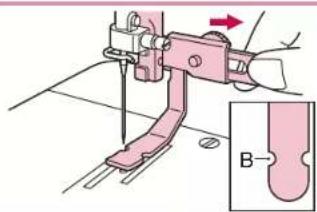
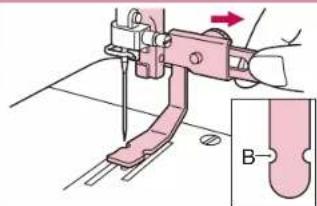
② Turn the handwheel towards you to lower the needle and adjust the position of the foot relative to the needle using the adjustment screw to slide the foot from left to right.
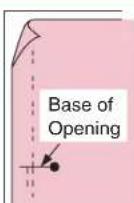
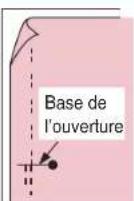
Line up zipper to the section of ③ fabric it will be attached to, and mark the base of the opening on the fabric. It should be set approximately 0.5 cm (3/16 inch) below zipper stop. Sew from below the base of the opening.
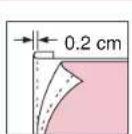
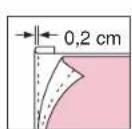
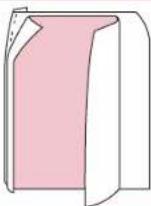
Divide the seam margin. Fold ④ the seam margin with the overlap of the zipper position facing down 0.2 cm (1/16 inch) on the outside of the mark.
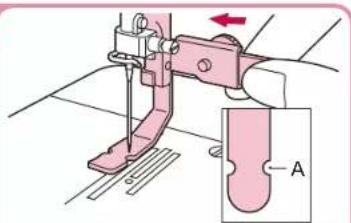
text_image
Technical diagram of a sewing machine with labeled component A and directional arrow indicating movement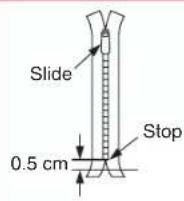
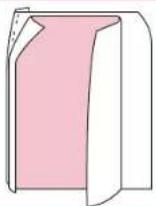
Secure the zipper with basting ⑤ and sew along the mark.
CAUTION
Make sure the needle does not strike the metal part of the zipper when sewing. The needle may break and cause injury.
Line up the folded hem on the ⑥ opposite side with the stitches.
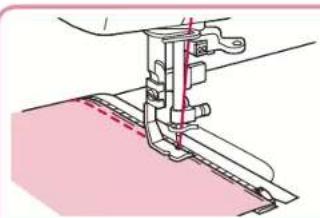
Change position of zipper foot.⑦ Turn the handwheel to lower the ⑧ needle and position the presser foot.
⑨ With the fabric right side up, baste the zipper onto the fabric, then sew the edge of the basting.
- Reinforce base of opening by sewing over it twice.
* the zipper slide gets in the way, lower the needle all the way through the fabric, raise the foot, and move the slider out of the way.
natural_image
Technical line drawing of a sewing machine needle and base (no text or symbols)
text_image
Technical diagram showing a sewing machine needle with labeled parts and directional arrow, including section B.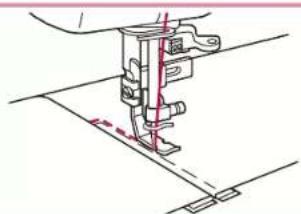
natural_image
Technical line drawing of a sewing machine needle and base (no text or symbols)Invisible Zipper Foot
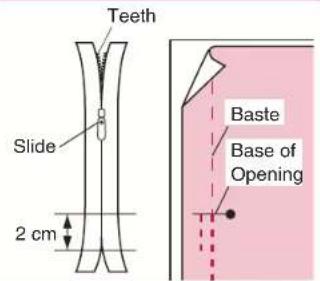
Attach invisible zipper foot.① Align zipper with fabric. Mark ② the base of the opening approximately 2 cm (3/4 inch) above the end of the zipper.
Baste the zipper position.③ Separate the seam allowance.④ With the zipper mounted, baste ⑤ just the seam margin on one side of the zipper. Close the zipper and baste the ⑥ other side of the zipper. Remove the basting at the ⑦ zipper position.
Fit the zipper teeth into the ⑧ presser foot groove, guide the teeth to prevent them from coming out of the groove, and sew to the base of the opening.
When sewing with the teeth to * the right, the left side of the foot should line up with the left teeth of the zipper.
text_image
Teeth Slide 2 cm Baste Base of Opening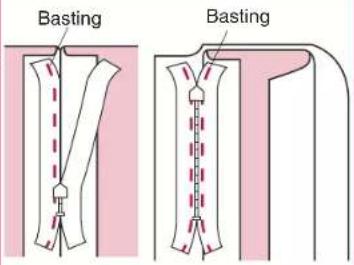
text_image
Basting Basting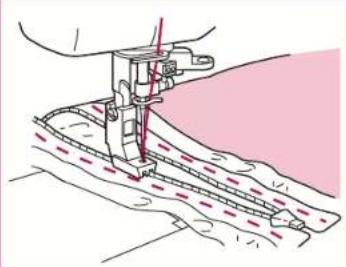
natural_image
Technical line drawing of a sewing machine needle stitching fabric (no text or symbols)1/4" Foot
Sewing machine settings: ● Stitch length = 2 - 2.5 mm
- Sew a consistent seam allowance (1/4", 6.4 mm) when piecing together a quilt.
- Use guides (mark) to begin, end, or pivot 1/4" (6.4 mm) from edge of fabric.
- Accurately top stitch 1/8" (3.2 mm) from seam.
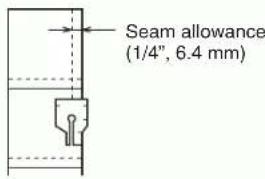
text_image
Seam allowance (1/4", 6.4 mm)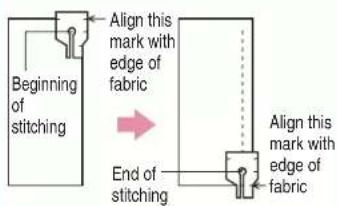
text_image
Beginning of stitching Align this mark with edge of fabric End of stitching Align this mark with edge of fabric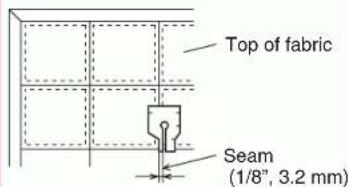
text_image
Top of fabric Seam (1/8", 3.2 mm)Free Motion Quilting Foot
Reduce the foot pressure and turn the dial on the machine lowering the feed dog for free motion quilting.
Note
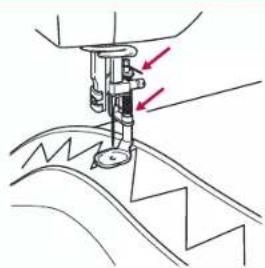
If the foot is frequently used, be sure to apply a small amount of oil about once a month to the area indicated by the arrows. (If too much oil is applied, wipe off the excess with a cloth.) For best results when using metallic or monofilament threads for free motion quilting, sew with a good quality thread, set upper tension 1-2, and use a metallic needle.
natural_image
Line drawing of a sewing machine needle stitching a textured surface (no text or symbols)Walking Foot
Note
Do not press the foot controller • all the way down.
Try to keep the sewing speed low (500 r.p.m. or less).
The fabric may not feed • properly if you sew at high speeds.
The feed dog for feeding the cloth may not move if the foot pressure on the fabric is too strong. Use the presser foot pressure adjustment dial to achieve the desired results.
It is not advisable or necessary • to use the Pin Feed mode with the walking foot.

text_image
Forked part of operation lever Secure the cap screw with a screwdriver.Insert the forked part of the ① operation lever, while raised in an upright position, onto the screw on the right side of the needle bar, as shown and then insert the cap screw.
Tighten the screw securely ② with a screwdriver. Tightening adequately is important as the screw might loosen due to the foot and forked operation lever vibration.
Seam Guide
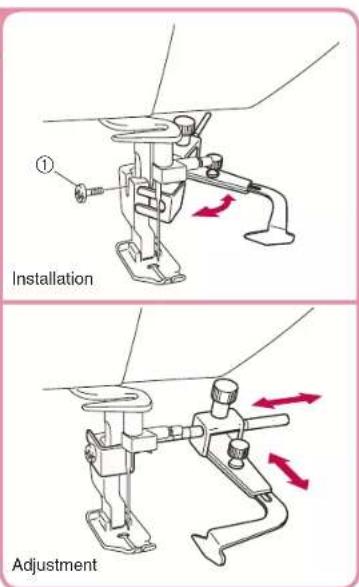
Tighten the screw securely ① with a screwdriver since it might otherwise loosen due to vibration.
Turn adjustment screws as arrow images suggest to set the position of the Seam Guide foot.
Caring for Your Machine
Cleaning the Machine
CAUTION
Make sure the power to the machine is off before cleaning sewing machine.
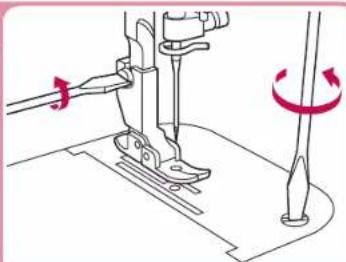
Turn machine off.①
Remove presser foot.②
Remove needle plate.③
Clean out dust and thread ④ scraps.
Thread scraps can be swept out * through the bobbin door.
When the area under the needle ⑤ plate is cleaned out, oil the hook of bobbin case with sewing machine oil.
Use a cloth to clean the machine of any excess oil.
Use only good quality sewing * machine oil.
Attach needle plate and presser ⑥ foot.
natural_image
Line drawing of a sewing machine needle and screw base with red motion arrows indicating rotation (no text or symbols)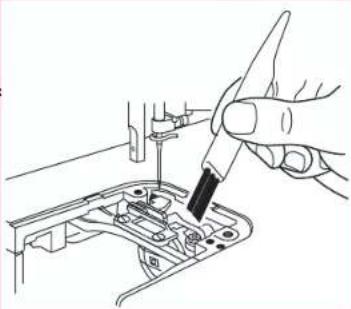
natural_image
Line drawing of a hand using a screwdriver to adjust or install electronic components on a circuit board (no text or symbols)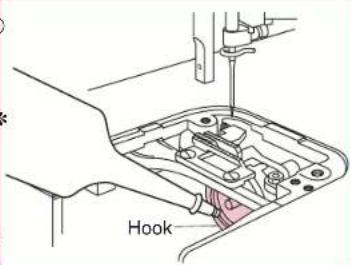
text_image
HookLubrication Points
- When using the sewing machine every day, apply a few drops of oil* to each location indicated twice a month.
Use a cloth to wipe the machine clean of any oil spilled near the lubrication points.
* Use only good quality sewing machine oil.
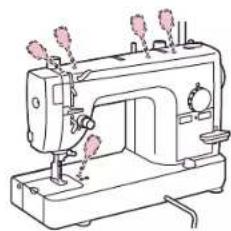
natural_image
Line drawing of a sewing machine with three spools and no visible text or symbols■ Keep Your Sewing Machine Clean
Please use a soft, dry cloth to wipe off light dirt and dust. If sewing machine is very dirty, wipe with a cloth soaked in warm water, or in warm water containing a neutral detergent. Then wipe off any detergent residue, and wipe off any excess water with a dry cloth.
■ Precautions
Please keep sewing machine away from heat sources such as irons and space heaters. Do not use chemicals like benzine or thinner to clean your machine. When machine is not in use, please keep machine out of direct sunlight.
| Item | Specification | ||
| Sewing Speed (maximum) | 1,500 stitches per minute | ||
| Stitch Length (pitch) | 0 – 7 mm | ||
| Stroke of Needle | 34.1 mm | ||
| Stroke of Thread Take-Up Lever | 64.7 mm | ||
| Foot Height | Foot Lift | One | 6 mm |
| Two | 9 mm | ||
| Knee Lifter | Over | 10 mm | |
| Item | Specification |
| Height of feed dog | 0.7 mm, 1.1 mm |
| Height of lower needle | 3 mm - 3.5 mm |
| Needles that may be used | HLX5#9 - #18 SCHMETZ 130/705H #65 - #110 Bed dimensions 438 mm × 178 mm (17 1/4 × 7 inches) |
| Total weight | 11 kg (24 1/4 lbs.) |
| Sewing Light | LED |
| Sewing area | 595 mm × 285 mm(23 3/8 × 11 1/4 inches) |
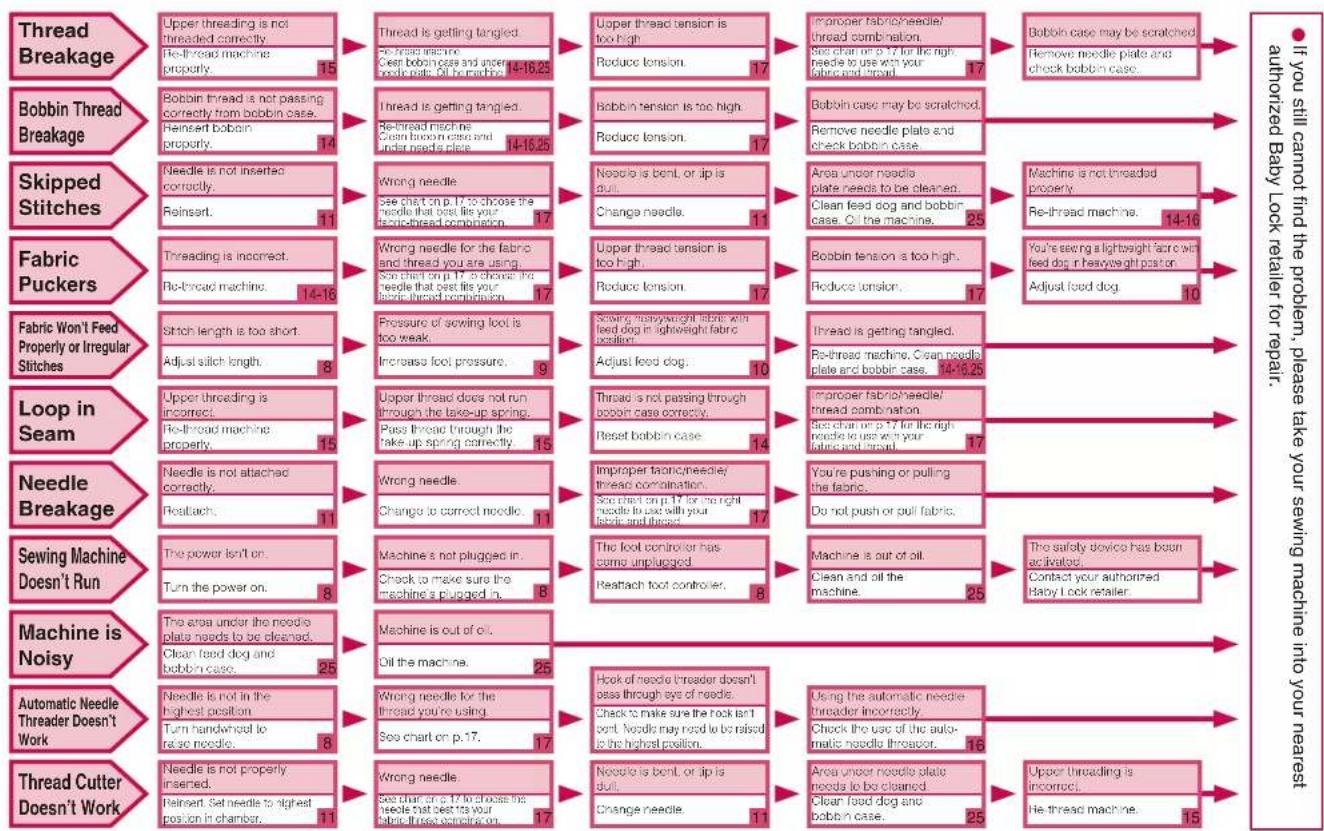
Trouble Shooting
Before taking your sewing machine in for service, check the following chart. *
flowchart
graph TD
    A["Thread Breakage"] --> B["Upper threading is not threaded correctly"]
    A --> C["Re-thread machine properly. 15"]
    D["Bobbin Thread Breakage"] --> E["Bobbin thread is not passing correctly from bobbin case. 14"]
    F["Skipped Stitches"] --> G["Needle is not inserted correctly. 11"]
    H["Fabric Puckers"] --> I["Threading is incorrect. 14-16"]
    J["Fabric Won't Feed Properly or Irregular Stitches"] --> K["Stitch length is too short. 8"]
    L["Loop in Seam"] --> M["Upper threading is incorrect. 15"]
    N["Needle Breakage"] --> O["Needle is not attached correctly. 11"]
    P["Sewing Machine Doesn't Run"] --> Q["The power isn't on. 8"]
    R["Machine is Noisy"] --> S["The area under the needle plate needs to be cleaned. 25"]
    T["Automatic Needle Threader Doesn't Work"] --> U["Needle is not in the highest position. 8"]
    V["Thread Cutter Doesn't Work"] --> W["Needle is not properly inserted. 11"]
    X["Thread is getting tangled. 14-16,25"] --> Y["Thread is getting tangled. 14-16,25"]
    Z["Re-thread mache Clean bobsin case and under needs plate. 14-16,25"] --> AA["Re-thread mache Clean bobsin case and under needs plate. 14-16,25"]
    AB["Wrong needle"] --> AC["See chart on p.17 to choose the needle that best like your electric thread combination. 17"]
    AD["Wrong needle for the fabric and thread you are using. See chart on p.17 to choose the needle that best like your electric thread combination. 17"] --> AE["See chart on p.17 to choose the needle for the fabric and thread you are using. See chart on p.17 to choose the needle for the fabric and thread you are using. See chart on p.17 to choose the needle for the fabric and thread you are using. See chart on p.17 to choose the needle for the fabric and thread you are using. See chart on p.17 to choose the needle for the fabric and thread you are using. See chart on p.17 to choose the needle for the fabric and thread you are using. Septure of sewing tool is too weak. 9"]
    AF["Thread is not high. 17"] --> AG["Reduce tension. 17"]
    AH["Upper thread tension is too high. 17"] --> AI["Reduce tension. 17"]
    AJ["Lower thread tension is too high. 17"] --> AK["Reduce tension. 17"]
    AL["Lower thread tension is too high. 17"] --> AM["Reduce tension. 17"]
    AN["Lower thread tension is too high. 17"] --> AO["Reduce tension. 17"]
    AP["Lower thread tension is too high. 17"] --> AQ["Reduce tension. 17"]
    AR["Lower thread tension is too high. 17"] --> AS["Reduce tension. 17"]
    AT["Lower thread tension is too high. 17"] --> AU["Reduce tension. 17"]
    AV["Lower thread tension is too high. 17"] --> AW["Reduce tension. 17"]
    AX["Lower thread tension is too high. 17"] --> AY["Reduce tension. 17"]
    AZ["Lower thread tension is too high. 17"] --> BA["Reduce tension. 17"]
    BB["Lower thread tension is too high. 17"] --> BC["Reduce tension. 17"]
    BD["Lower thread tension is too high. 17"] --> BE["Reduce tension. 17"]
    BF["Lower thread tension is too high. 17"] --> BG["Reduce tension. 17"]
    BH["Lower thread tension is too high. 17"] --> BH
    BI["Lower thread tension is too high. 17"] --> BJ["Reduce tension. 17"]
    BK["Lower thread tension is too high. 17"] --> BL["Reduce tension. 17"]
    BM["Lower thread tension is too high. 17"] --> BN["Reduce tension. 17"]
    BO["Lower thread tension is too high. 17"] --> BP["Reduce tension. 17"]
    BP --> BR["Reduce tension. 17"]
    BS["Lower thread tension is too high. 17"] --> BS
    BT["Lower thread tension is too high. 17"] --> BT
    BU["Lower thread tension is too high. 17"] --> BV["Reduce tension. 17"]
    BW["Lower thread tension is too high. 17"] --> BX["Reduce tension. 17"]
    BY["Lower thread tension is too high. 17"] --> BY
    CA["Lower thread tension is too high. 17"] --> CB["Reduce tension. 17"]
    CC["Lower thread tension is too high. 17"] --> CB
    CD["Lower thread tension is too high. 17"] --> CE["Reduce tension. 17"]
    CF["Lower thread tension is too high. 17"] --> CF
    CG["Lower thread tension is too high. 17"] --> CG
    DH["Lower thread tension is too high. 17"] --> DH
    DI["Lower thread tension is too high. 17"] --> DI
    DJ["Lower thread tension is too high. 17"] --> DJ
    DK["Lower thread tension is too high. 17"] --> DK
    LE["Lower thread tension is too high. 17"] --> LE
    MF["Lower thread tension is too high. 17"] --> MF
    NG["Lower thread tension is too high. 17"] --> NG
    DO["Lower thread tension is too high. 17"] --> DO
    DP["Lower thread tension is too high. 17"] --> DP
    DR["Lower thread tension is too high. 17"] --> DR
    DS["Lower thread tension is too high. 17"] --> DS
    DT["Lower thread tension is too high. 17"] --> DT
    DV["Lower thread tension is too high. 17"] --> DV
    DW["Lower thread tension is too high. 17"] --> DW
    DX["Lower thread tension is too high. 17"] --> DX
    DXB["Bobbin case may be scratched."] --> DC["Bobbin case may be scratched."] --> DC
    DC["Bobbin case may be scratched."] --> DC
    DC["Bobbin case may be scratched."] --> DC
    DC["Bobbin case may be scratched."] --> DC
    DC["Bobbin case may be scratched."] --> DC
    DC["Bobbin case may be scratched."] --> DC
    DC["Bobbin case may be scratched."] --> DC
    DC["Bobbin case may be scratched."] --> DC
    DC[Bobbin case may be scratched.)Remove needle plate and check bobbin case.
Bobbins can be scratched.
Remove needle plate and check bobbin case.
Area under needle plate needs to be cleaned.
Clean feed dog and bobbin case.
Clean feed dog and bobbin case.
Area under needle plate needs to be cleaned.
Clean feed dog and bobbin case.
Area under needle plate needs to be cleaned.
Clean feed dog and bobbin case.
Area under needle plate needs to be cleaned.
Clean feed dog and bobbin case.
Area under needle plate needs to be cleaned.
Clean feed dog and bobbin case.
Area under needle plate needs to be cleaned.
Clean feed dog and bobbin case.
Area under needle plate needs to be cleaned.
Clean feed dog and bobbin case.
Area under needle plate needs (repeated) --> AC[Bobbins can be scratched.
Bobbins can be scratched.
Bobbins can be scratched.
Bobbins can be scratched.
Bobbins can be scratched.
Bobbins can be scratched.
Bobbins can be scratched.
Bobbins can be scratched.
Bobbins can be scratched.
Bobbins can be scratched.
Bobbins can be scratched.
Bobbins can be scratched.
Bobbins can be scratched.
Bobbins can be scratched.
Bobbins can be scratched.
BobbINS can be scratched.
Bobbins can be scratched.
Bobbins can be scratched.
Bobbins can be scratched.
Bobbins can be scratched.
Bobbins can be scratched.
Bobbins can be scratched.
Bobbins can be scratched.
Bobbins can be scratched.
Bobbins can be scratched.
Bobbins can be stained.
Bobbins can be stained.
Bobbins can be stained.
Bobbins can be stained.
Bobbins can be stained.
Bobbins can be stained.
Bobbins can be stained.
Bobbins can be stained.
Bobbins can be stained.
Bobbins can be stained.
Bobbins can be stained.
Bobbins can be stained.
Bobbins can be stained.
Bobbins can be stained.
Bobbins can be stained.
Cobbins can be stained.
Bobbins can be stained.
Bobbins can be stained.
Bobbins can be stained.
Bobbins can be stained.
Bobbins can be stained.
Bobbins can be stained.
Bobbins can be stained.
Bobbins can be stained.
Bobbins can be stained.
Bobbins can be stained.
Bobbins can be stained.
Bobbins can be stained.
Bobbins can be stained.
Bobbns can be stained.
Bobbns can be stained.
Bobbns can be stained.
Bobbns can be stained.
Bobbns can be stained.
Bobbns can be stained.
Bobbns can be stained.
Bobbns can be stained.
Bobbns can be stained.
Bobbns can be stained.
Bobbns can be stained.
Bobbns can be stained.
Bobbns can be stained.
Bobbns can be stained.
Bobbns can have unulged or unulged
Bobbns can have unulged or unulged
Bobbns can have unulged or unulged
Bobbns can have unulged or unulged
Bobbns can have unulged or unulged
Bobbns can have unulged or unulged
Bobbns can have unulged or unulged
Bobbns can have unulged or unulged
Bobbns can have unulged / unulged / unulged / unulged / unulged / unulged / unulged / unulged / unulged / unulged / unulged / unulged / unulged / unulged / unulged / unulged / unulged / unulged / unulged / unulged / unulged / unulged / unulged / unulged / unulged / unulged/ unulged / unulged / unulged / unulged / unulged / unulged / unulged / unulged / unulged / unulged / unulged / unulged / unulged / unulged / unulged / unulged / unulged / unulged / unulged / unulged / unulged / unulged / unulged / unulged / unulged - unulged / unulged / unulged / unulged / unulged / unulged / unulged / unulged / unulged / unulged / unulged / unulged / unulged / unulged / unulged / unulged / unulged / unulged / unulged / unulged / unulged / unulged / unulged / unulged / unulged |

flowchart
graph LR
    A["Handwheel Doesn't Rotate"] --> B["Thread is getting tangled.<br>Re-thread machine.<br>Clear bobbin case and under<br>needle plate. On the machine. 14-16.25"]
    C["Thread Gets Tangled on Wrong Side of Fabric"] --> D["Upper threading is not<br>threaded correctly.<br>Re-thread machine<br>property. 15"]
    B --> E["Needle is not attached<br>correctly.<br>Routlatch. 11"]
    D --> F["Upper thread tension is<br>too low<br>Increase tension. 17"]
    E --> G["Needle is bent, or tip is<br>null.<br>Change needle. 11"]
    F --> H["Boobin case may be scratched.<br>Remove needle plate and<br>check bobbin case."]
    G --> I["If you still can<br>authorized Back"]
    H --> I
* If you find it difficult to turn the handwheel, you may also see "Sewing Machine Doesn't Run" in "Trouble Shooting".
INTRODUCTION
natural_image
Simple line drawing of a toy car and a hand holding a ring, with no text or symbols present.natural_image
Pure technical line drawing of a mechanical or electrical component without any text, numbers, or symbolsLevier au genou
natural_image
Line drawing of a toilet with a pink lid on the toilet door (no text or symbols)natural_image
Line drawing of a sewing machine with a spool, rope, and base (no text or symbols)natural_image
Pure technical diagram showing a mechanical component with an arrow indicating direction, no text or symbols presentnatural_image
Illustration of hands using scissors to cut a mechanical component (no text or symbols)natural_image
Illustration of scissors cutting a red thread next to a spool of thread (no text or symbols)text_image
Illustration showing two-step instructions for using a tool, labeled with arrows and numbered parts.text_image
Diagram of sewing machine steps showing fabric being sewn, with numbered instructions and directional arrows indicating movement.text_image
Diagram showing a rope knot with labeled parts and directional arrows indicating motion or forcetext_image
Technical diagram of a mechanical assembly with numbered componentstext_image
Diagram showing a mechanical assembly with numbered parts and a connecting rod, likely illustrating a folding or lifting process.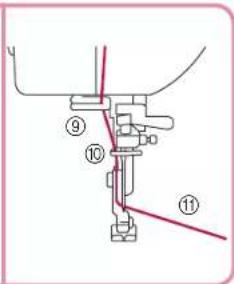
text_image
Technical diagram showing mechanical assembly with numbered parts and red lines indicating connection or alignmenttext_image
Technical diagram showing sewing machine needle positioning with labeled parts: Axle, Fil, and directional arrownatural_image
Technical line drawing of a sewing machine needle with red motion arrows indicating movement (no text or symbols)text_image
Technical diagram of a sewing machine with red annotation lines and an inset showing a red 'X' mark.flowchart
graph TD
    A["Step ①: Fabricated basket"] --> B["Step ②: Spool"]
    B --> C["Step ③: Top filter with drop"]
    C --> D["Step ④: Top filter with drop"]
natural_image
Technical line drawing of a sewing machine needle with red thread and arrow indicating measurement (no text or symbols)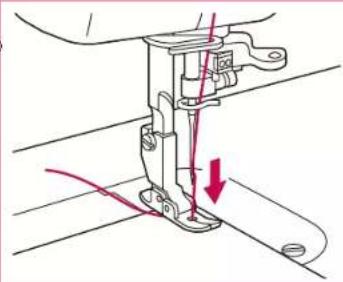
natural_image
Technical line drawing of a sewing machine needle with red motion arrows indicating thread direction (no text or symbols)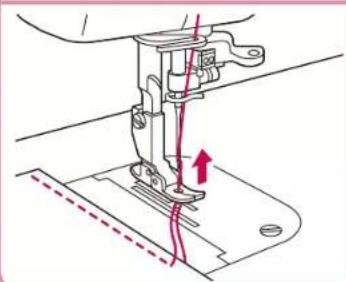
natural_image
Technical line drawing of a sewing machine needle with red thread and arrow indicating measurement (no text or symbols)Tension des fils
natural_image
Line drawing of a sewing machine needle stitching fabric (no text or symbols)natural_image
Illustration of a sewing machine needle stitching fabric, with hands operating the seam (no text or symbols visible)Couture de base (3)
ATTENTION
text_image
Diagram showing a sewing machine needle stitching with labeled part A, indicating assembly or repair instructions.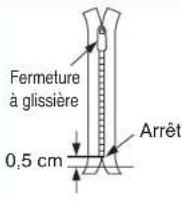
natural_image
Technical line drawing of a sewing machine needle and fabric (no text or symbols)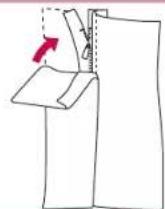
text_image
Technical diagram showing a sewing machine needle stitching with labeled component B and directional arrow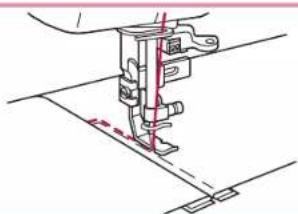
natural_image
Technical line drawing of a sewing machine needle with red measurement lines (no text or symbols)natural_image
Pure mechanical assembly diagram showing a zigzag component inserted into a T-shaped structure (no text or symbols)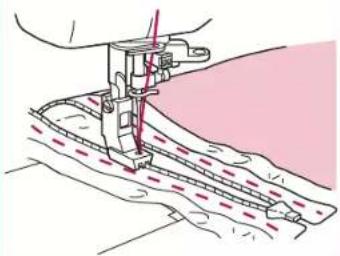
natural_image
Diagram of a sewing machine needle stitching fabric, showing thread and seam details (no text or symbols)Pied 1/4"
natural_image
Line drawing of a sewing machine needle stitching a textured surface (no text or symbols)natural_image
Line drawing of a sewing machine needle and foot, showing mechanical components and rotation indicator (no text or symbols)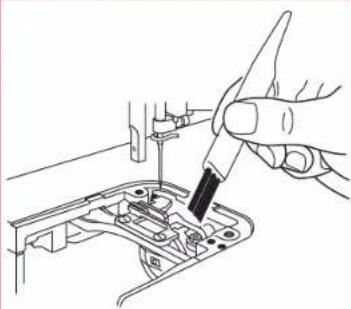
natural_image
Line drawing of a hand using a screwdriver to adjust internal components (no text or symbols)