
Diana - Sewing machine BABY LOCK - Free user manual and instructions
Find the device manual for free Diana BABY LOCK in PDF.


| Product Type | Combination Overlock, Chain Stitch and Cover Stitch Machine |
| Brand | Baby Lock |
| Model | Diana (BL480A) |
| Dimensions (W x D x H) | 360 mm x 290 mm x 300 mm |
| Weight | 9.0 kg / 19.5 lbs |
| Power Supply | 120V (USA/Canada) or 220-240V; Foot Controller Type 4C-316B (USA/Canada) |
| Maximum Sewing Speed | 1,300 stitches per minute |
| Stitch Length | 1 - 4 mm (standard N = 2.5 mm) |
| Differential Feed Ratio | 1:0.6 to 1:2 |
| Overedge Stitch Width | Rolled hem 1.5 mm; ordinary overedge 3.0 - 9.8 mm |
| Cover Stitch Needle Gauge | Two needles: 2.8 mm (narrow), 5.6 mm (wide); Triple needles: 5.6 mm |
| Needle Type | HAx1 (130/705H) or ELx705, sizes #14/90 and #11/80 |
| Number of Threads | 2 to 5 |
| Included Accessories | Screwdrivers, movable knife, spool caps (5), thread nets (5), oiler, allen wrench, tweezers, needle set, brush, 2-thread converter, seam guide plate, spool holder (5), waste tray, machine cover, instruction manual, foot controller/power cord, thread antenna, knife cover |
| Optional Accessories | Elastic foot, blindhem foot, ruffling foot, beading foot, cording foot, taping foot |
| Safety Features | Polarized plug, automatic power-off switch, caution against unattended operation, finger guards |
| Cleaning | Regular lint removal from looper and knife area using dry brush |
| Oiling | Periodic oiling of specified points with sewing machine oil |
Frequently Asked Questions - Diana BABY LOCK
User questions about Diana BABY LOCK
0 question about this device. Answer the ones you know or ask your own.
Ask a new question about this device
Download the instructions for your Sewing machine in PDF format for free! Find your manual Diana - BABY LOCK and take your electronic device back in hand. On this page are published all the documents necessary for the use of your device. Diana by BABY LOCK.
USER MANUAL Diana BABY LOCK
Diana
A-LINE SERIES Model BL480A
Instruction and Reference Guide

FOR THE LOVE OF SEWING
To register your machine warranty and receive Baby Lock product updates and offers, go to www.babylock.com/profile. If you have questions with registration, visit your Authorized Baby Lock Retailer.
Baby Lock Consumer Helpline: 800-313-4110
www.babylock.com
PREFACE
Thank you for your purchase of this Combination Overlock, Chain Stitch and Cover Stitch Machine. This machine, that is intended for household use will provide you with excellent performance in sewing from light to heavy material (lawn to denim).
Please refer to this Instruction manual for proper use and optimum service. To get the most out of your serger, read the entire Instruction manual before attempting to operate the machine. Then familiarize yourself with the machine by following the Instruction manual page by page.
To ensure that you are always provided with the most modern serging capabilities, the manufacturer reserves the right to change the appearance, design or accessories of this sewing machine when considered necessary without notification or obligation.
For additional product information and updates, visit our website at www.babylock.com
"IMPORTANT SAFETY INSTRUCTIONS"
When using overlock machine, basic safety precautions should always be followed, including the following.
Read all instructions before using this overlock machine.
DANGER - To reduce the the risk of electric shock:
- The overlock machine should never be left unattended when plugged in. Always unplug this overlock machine from the electrical outlet immediately after using and before cleaning.
WARNING - To reduce the risk of burns, fire, electric shock, or injury to persons.
-
Do not allow to be used as a toy. Close attention is necessary when the sewing machine is used by or near children.
-
Use this overlock machine only for its intended use as described in this manual. Use only attachments recommended by the manufacturer as contained in this manual.
-
Never operate this overlock machine if it has a damaged cord or plug, if it is not working properly, if it has been dropped or damaged, or dropped into water. Return the overlock machine to the nearest authorized dealer of service center for examination, repair, electrical or mechanical adjustment.
-
Never operate the overlock machine with any air openings blocked. Keep ventilation openings of the overlock machine and foot controller free from the accumulation of lint, dust, and loose cloth.
-
Never drop or insert any object into any opening.
-
Do not use outdoors.
-
Do not operate where aerosol (spray) products are being used or where oxygen is being administered.
-
To disconnect, turn the main switch to the symbol "O" position which represents off, then remove plug from outlet.
-
Do not unplug by pulling on cord. To unplug, grasp the plug, not the cord.
-
Keep fingers away from all moving parts. Special care is required around the overlock machine needle.
-
Always use the proper needle plate. The wrong needle plate can cause the needle to break.
-
Do not use bent needles.
-
Do not pull of push fabric while stitching. It may deflect the needle(s) causing it to break.
-
Switch the overlock machine to the symbol "O" position when making any adjustments in the needle area, such as threading needle, changing needle, threading looper, or changing presser foot, and the like.
-
Always unplug the overlock machine from the electrical outlet when removing covers, lubricating, or when making any of the user servicing adjustments mentioned in the instruction manual.
-
Keep fingers away from moving parts, especially the area near the blades.
-
Please note that on disposal, this product must be safely recycled in accordance with relevant National legislation relating to electrical / electronic products. If in doubt please contact your retailer for guidance.
-
The appliance is not intended for use by young children or infirm persons without supervision.
-
Young children should be supervised to ensure that they do not play with the appliance.

"SAVE THESE INSTRUCTIONS"
"This overlock machine is intended for household use."
TABLE OF CONTENTS
Page
Page
-
Principal Parts.... 4
-
Accessories.... 6
-
Needle Information.... 6
-
How to Open Front Cover.... 7
-
Principal Parts Behind the Front Cover...... 7
-
Connecting Machine to Power Supply.... 7
-
Removal and Replacement of Waste Tray.... 8
-
Preparation for Threading.... 9
Setting up the thread antenna.... 9
Thread Net.... 9
Spool cap.... 9
-
How to Disengage Movable Upper Knife.... 10
-
To Convert Upper Looper to 2-Thread Converter 11
To use the 2-Thread converter.... 11
To disengage to upper looper.... 11
- Standard Overlock and Rolled Hem Stitching.... 12
To sew standard overlock.... 12
To sew rolled hem.... 12
- How to Remove and Insert Needles.... 13
Needle position.... 13
To remove needle(s).... 13
To insert needle(s).... 13
- Threading the Machine.... 14
Threading diagram ......sequence 14
Tension color code.... 14
To thread the machine correctly.... 15
Threading the upper looper (Green).... 15
Threading the lower looper (Blue).... 16
Threading the chain/ cover stitch looper (Purple).... 18
Threading the overlock right needle (Yellow).... 19
Threading the chain stitch needle (Red).... 21
Threading the cover stitch needles.... 23
Threading the cover stitch left needle (Red) 23
Threading the cover stitch middle/chain stitch needle (Yellow).... 24
Threading the cover stitch right needle(Green)..... 26
-
How to Change Threads / Tie on Method...... 28
-
How to Adjust the Seam Width.... 29
Width adjustment by changing needle position..... 29
Width adjustment with adjustment knob.... 29
-
How to Adjust the Stitch Length.... 30
-
How to Adjust the Presser Foot Pressure...... 30
-
Differential Feed.... 31
Gathered overedge.... 31
Stretch overedge.... 32
-
Presser Foot Markings.... 33
-
Presser Foot Lifter.... 33
-
Chaining Off and Test Sewing.... 33
-
Selection Stitches & Auto Tension.... 34
-
Handy Reference Chart.... 37
-
Suggested Tension Setting.... 39
Chain Stitch....39
2-Thread Wrapped Edge Overlock.... 40
2-Thread Overlock (Narrow/ Wide)......41
3-Thread Overlock....42
3-Thread Flatlock....43
3-Thread Mock Safety Stitch.... 44
4-Thread Mock Safely Stitch....45
4-Thread Chain Stitch-2-Thread Overlock...... 46
5-Thread Chain Stitch-3-Thread Overlock......47
- How to Sew a Cover Stitch.... 48
Machine set up.... 48
- How to Sew a Rolled Hem.... 53
3-Thread Narrow Hem 54
3-Thread Rolled Hem 54
2-Thread Narrow Hem....55
2-Thread Rolled Hem.... 55
- Stitch Variations and Sewing Techniques..... 57
Decorative Flatlocking.... 58
How to sew an overlock blindhem.... 59
How to sew a pin tucks.... 59
Turning square corners.... 60
Pin placement.... 61
Securing the thread chain.... 61
How to reinforce a seam....62
Braiding by chaining off.... 62
- Machine Maintenance....63
Cleaning the machine....63
Oiling the machine....63
How to replace the moveable knife.... 64
How to change light bulb.... 65
-
Snap On Presser Foot Removal/Replacement 66
-
Optional Presser Feet....67
Elastic Foot 67
Blindhem Foot 67
Ruffling Foot 67
Beading Foot....67
Cording Foot....67
Taping Foot....67
-
Troubleshooting Chart.... 68
-
Fabric, Thread and Needle Guide....69
-
Specification....70
1. PRINCIPAL PARTS
- Thread antenna
- Handle
- Left needle thread tension fine tuning (red)
- Right needle thread tension fine tuning (yellow)
- Upper looper thread tension fine tuning (green)
- Lower looper thread tension fine tuning (blue)
- Chain stitch looper thread tension fine tuning (purple)
- Needle plate
- Side cover
- Front cover
- Power & light switch
- Stitch length dial
- Handwheel
- Spool stand
- Cone adaptor
- Spool pin
- Waste tray
- Auto tension dial8
- Machine socket
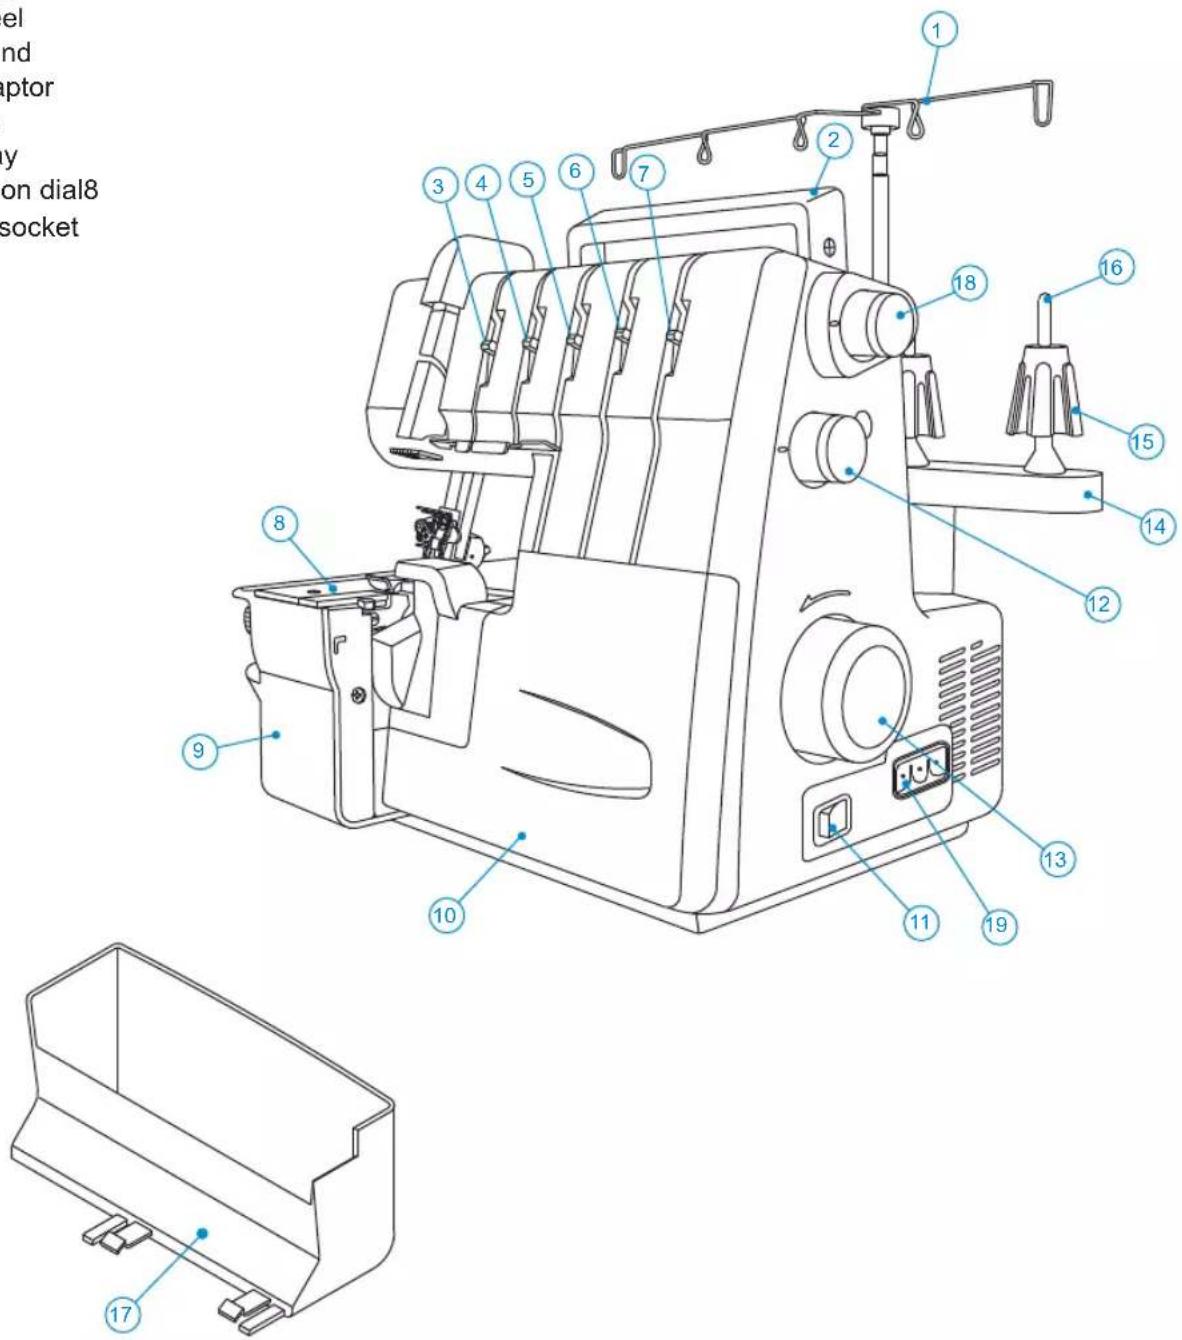
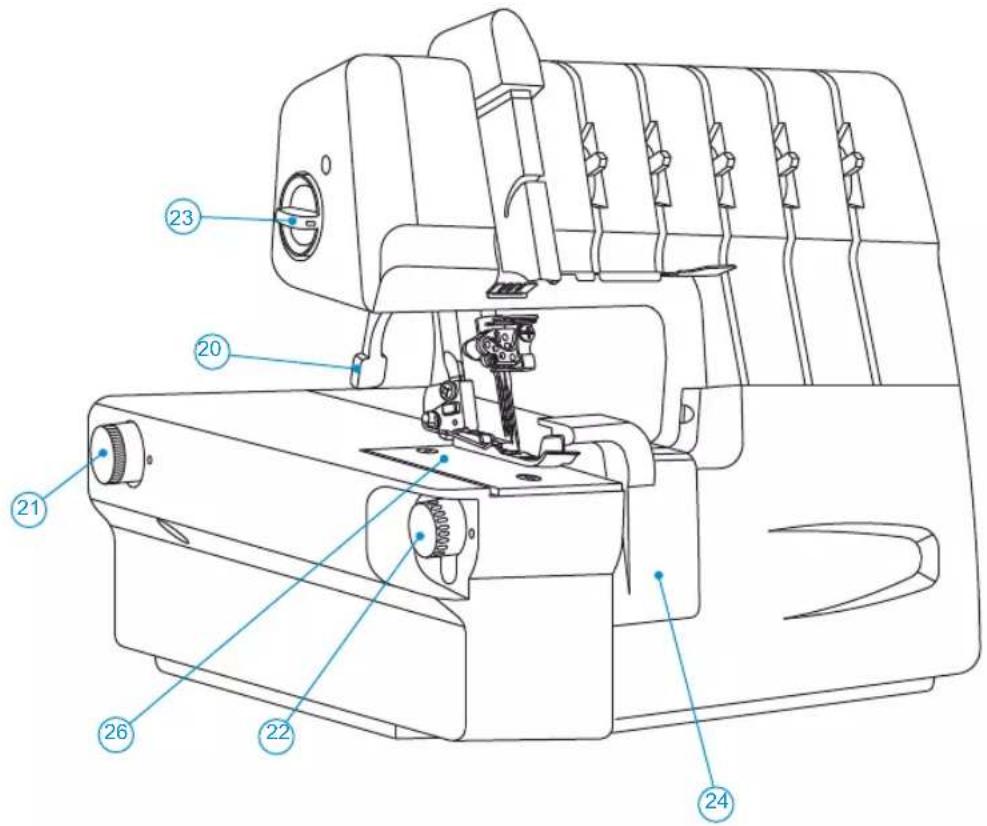
- Presser bar lifter and tension release
- Differential feed adjusting dial
- Width adjustment dial
- Foot pressure adjusting dial
- Knife cover
- Seam guide plate
- Seam width finger lever

natural_image
Technical line drawing of a mechanical component with mounting holes and a numbered annotation (25), no readable text or symbols beyond the number.
2. ACCESSORIES
Accessories are contained in the accessory case
- Screw driver (large size) 1
- Knife (movable) 1
- Spool cap(s) 5
- Thread net(s) 5
- Oiler 1
- Allen wrench (small) 1
- Tweezers 1
- Needle set 1
- Brush 1
10.2-Thread converter 1 - Seam guide plate 1
Accessories in box with machine
- Spool holder 5
- Waste tray 1
- Machine cover 1
- Instruction manual 1
- Foot controller/Power cord 1
- Thread Antenna 1
- Knife cover 1
Optional Accessories
- Elastic foot...... BL408A-EF
- Blindhem foot .... BL408A-BHF
- Ruffling foot...... BL408A-RF
- Beading foot...... BL408A-BF
- Cording foot...... BL408A-CF
- Taping foot...... BL408A-TF
3. NEEDLE INFORMATION
- This overlock uses a flat shank needle that eliminates the possibility of inserting the needle backwards.
- HAx1 needle size 14/90 is furnished with the machine.
- Only use Needle HAx1/ ELx705 in size 14/90 and 11/80.

HAx1/ ELx705
Overlock needle
4. HOW TO OPEN FRONT COVER

CAUTION
Be sure to turn off power switch.

CAUTION
Be sure front cover is closed when sewing.
① Push the cover to the right as far as it will go.
② Pull cover down toward you.
5. PRINCIPAL PARTS BEHIND THE FRONT COVER
① Upper looper
② Moveable Upper knife
③ Presser foot
④ Fixed lower knife
⑤ Lower looper
⑥ Chain/Cover looper
⑦ Rolled Hem
⑧ Upper looper clutch / Driving clutch
6. CONNECTING MACHINE TO POWER SUPPLY
① Connect the machine/foot control plug to the machine receptacle.
② Plug power line into electric outlet.
③ Power Switch: Push "I" mark side to turn "ON" Push "O" mark side to turn "OFF"
④ To run the machine and control the speed, press the controller.
• The harder you press, the faster the machine will sew.
- To stop the machine from sewing, remove your foot from the controller.
Note: Always make sure that the machine is in the off position, before connecting to power supply.

POLARIZED PLUG INFORMATION (FOR U.S.A. & CANADA ONLY)
This appliance has a polarized plug (one blade wider than the other). To reduce the risk of electric shock, this plug is intended to fit in a polarized outlet only way. If the plug does not fit fully in the outlet, reverse the plug. If it still does not fit contact a qualified electrician to install the proper outlet. Do not modify the plug in any way.

Warning:
* Be sure that the electrical voltage of the electric outlet (wall receptacle) is the same as the rated voltage of the motor.
* Handle the foot controller with care and avoid dropping it on the floor. Be sure not to place anything on top of it when not in use.
* Disconnect the power line plug from the electric outlet when changing needles, presser feet or when leaving the machine unattended. This eliminates the possibility of starting the machine by accidentally pressing the controller.
7. REMOVAL AND REPLACEMENT OF WASTE TRAY
Replacement
① Insert the waste tray under the looper cover.
② Be sure the left side of clean pocket is mounted near the cutter where the scraps drop.
Removal
③ To remove, hold the waste tray as shown and pull it outward.

8. PREPARATION FOR THREADING
Setting Up the Thread Antenna
- Take out the thread antenna from the top of styrofoam, and insert it as shown in first illustration.
- This machine is shipped with the thread antenna on the top of styrofoam.
• Fully extend the thread antenna. - The two joints on the telescope will click into place when they are correctly positioned as shown in second illustration
• Center the thread guides above the spool pins. - Place thread over the cone adapters on the spool pins.
Note: Your new machine is threaded to sew Triple Cover Stitch. Refer to Page 28 for instructions on tying on to the threads.
Thread Net
- When using synthetic threads that easily spill off the cone, slip the thread net furnished with the machine over the thread from the bottom of the cone leaving the thread end hanging free at the top as shown on the right.
Spool Cap
- When using a regular thread spool, fit the spool cap supplied with the machine onto the thread spool as shown at right.

9. HOW TO DISENGAGE MOVABLE UPPER KNIFE

Caution: Be sure to turn off power switch.
To place movable knife in nonworking position
① Open front cover (page 7). Pull the movable knife holder to the right as far as it will go.
② Turn the holder counter clockwise until the knife clicks into the locked position.

To place movable knife in working position
① Open front cover. Pull the movable knife holder to the right as far as it will go.
② Turn the holder clockwise until the knife clicks into the working position

Caution: Always close cover before operatingfront machine.
10. TO CONVERT UPPER LOOPER TO 2-THREAD CONVERTER

Caution: Be sure to turn off power switch
When not threading the upper looper, the 2-thread converter must be engaged into the upper looper eye.
To Use the 2-Thread converter
① To engage the 2-Thread converter, insert the point of the converter into the back of the eye of upper looper.
② Straddle the square part of the converter over the upper looper and lower the converter till it lightly snaps into position. See illustration.
To Disengage 2-Thread converter
③ To disengage the 2-Thread converter, raise the square end of the converter and remove from the upper looper. See illustration.
Note: When using the upper looper, the 2-Thread converter must be disengaged.


natural_image
Technical line drawing of a mechanical bracket component with an upward arrow and circled number 3 (no text or symbols)11. STANDARD OVERLOCK AND ROLLED HEM STITCHING
To Sew Standard Overlock
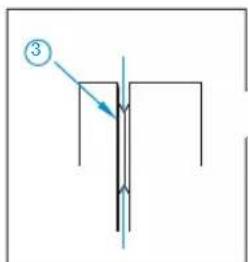
Set seam width finger lever N to move seam width finger to standard overedge sewing position.
Note: Beasure to push seam width finger lever as will go in the direction of setting N.
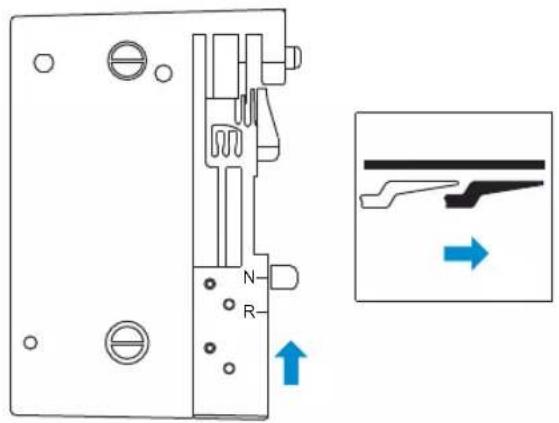
To Sew Rolled Hem
Set seam width finger lever to R to retract the seam width finger and set it for rolled hem.
Note: Be sure to push seam width finger lever as far will go in the direction of setting R.

12. HOW TO REMOVE AND INSERT NEEDLES
Needle Position
- With this machine, five needles can be inserted into the needle clamp as shown in the drawing but only one, two or three needles are to be used at one time.
- The Instruction manual refers to different needle positions by illustrating the needle clamp at right.
Note: When both the left and right overedge needles are inserted, the left needle will be slightly higher than the right. When all cover stitch needles are inserted, the left needle will be slightly higher than the others.
To Remove Needle (s)

Caution: Be sure to disconnect the machine from the electric outlet before removing needle(s).
- Turn the handwheel toward you until the needles are at their highest position.
- Hold the needles with your fingers
- Loosen, but do not remove the needle set screws with the small allen screwdriver.
- Lower the needles and remove from the machine.
A. Overedge needleleft
B. Overedge right needle
C. Cover stitch left needle
D. Cover stitch middle needle
E. Cover stitch right needle
A. Overedge needleleft
B. Overedge right needle
C. Cover stitch left needle
D. Cover stitch middle needle
E. Cover stitch right needle
Attention:
After removing the needle which is not currently being used for sewing, remember to retighten the set screw in the needle clamp. Please do not over-tighten the set screw to prevent needle clamp damage.
To Insert Needle (s)
- Hold the needle with the flat surface to the back.
- Insert the needle into the needle socket as far as it will go.
- When inserting a needle, if you first lower it down into the hole in the needle plate it will line up with the needle socket. Then direct it upwards
Note: When inserting needles into the A or B sockets necessary to loosen both A & B Allen screws. After inserting the needles equally tighten both screws.

13. THREADING THE MACHINE
Threading Diagram Sequence: 5-Thread Chain Stitch-3-Thread overlock
A color coded threading diagram is located inside the front cover for quick reference.
Thread the machine in the order 1 to 5 as shown at right.
Note: Threads go through the take-up lever cover for Overlock and Chain stitching as shown.
Tension Color Code: 5-Thread Chain Stitch-3-Thread overlock
- Upper looper thread.... Green
- Lower looper thread...... Blue
- Chain stitch looper thread..... Purple
- Right needle thread.... Yellow
- Chain stitch needle thread.... Red
Threading Diagram Sequence: Triple Cover Stitch
A color coded threading diagram is located inside the front cover for quick reference.
Thread the machine in the order 1 to 4 as shown at right.
Note: Covered Go through the top of take-up lever stitch as shown.
Tension Color Code : Triple Cover Stitch
- Cover stitch looper thread..... Purple
- Right needle thread.... Green
- Middle needle thread..... Yellow
- Left needle thread....Red

To Thread The Machine Correctly

Caution: Be sure to turn off power switch.
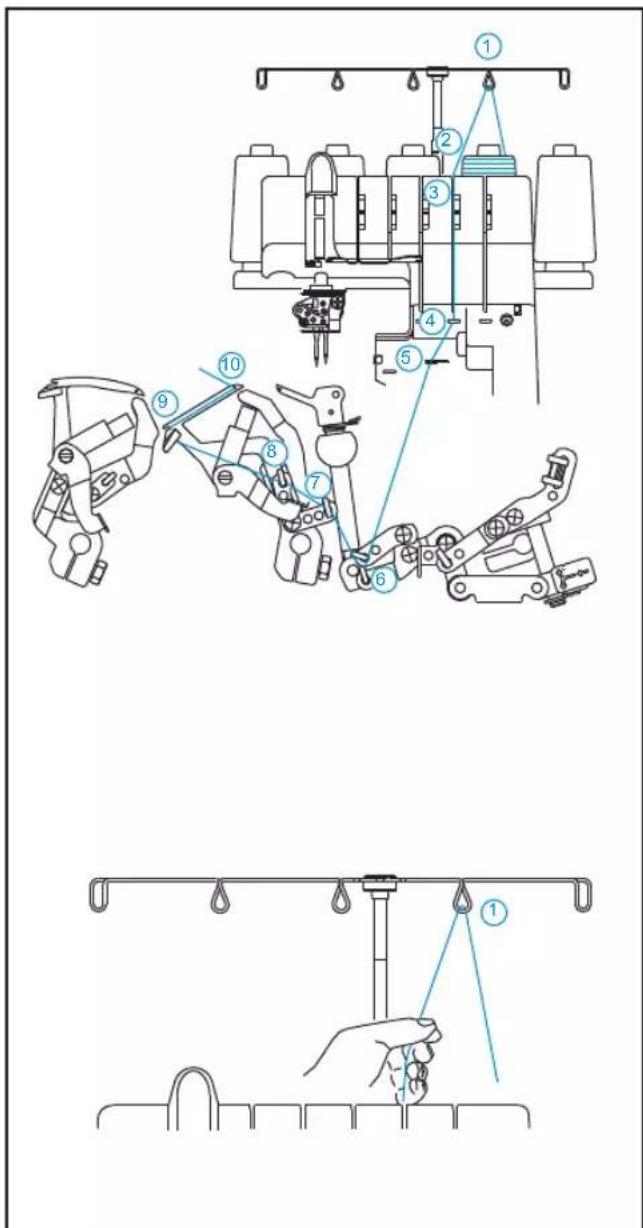
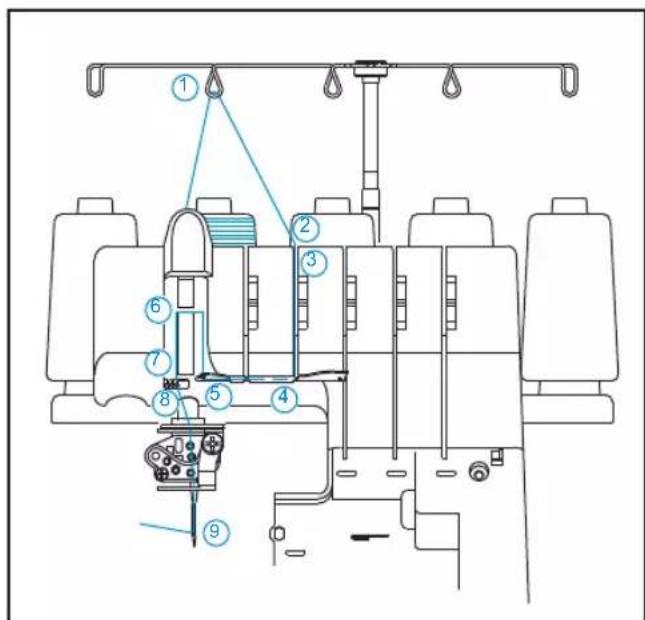
1) Threading the Upper Looper (Green)
Open the front cover and thread the upper looper as indicated in steps 1 through 9.
- Raise the presser foot to release tension discs.
- Thread the upper looper area of the machine following the green color-coded thread guides.
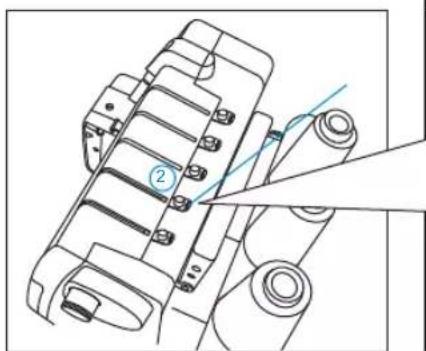
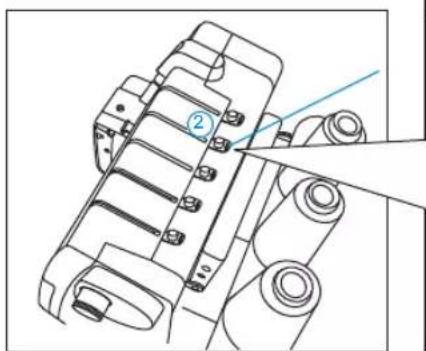
① Pass thread from back to the front through thread guide.
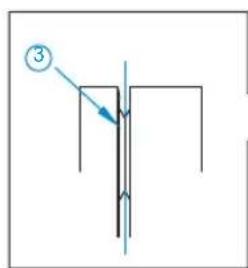
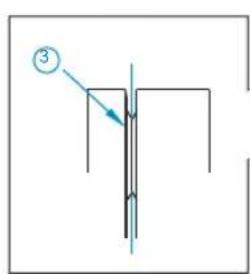
② Thread the top cover thread guide by pulling the thread towards the left until it slips under guide. Then pull thread along the right side of pretension disc as illustrated.

natural_image
Technical line drawing of a mechanical component with no visible text or symbols③ While holding thread with fingers, pass it between the tension discs and pull thread down to make certain it is properly located in between the tension discs.

flowchart
graph TD
    A["1: Washing Machine"] --> B["2: Top Ladder"]
    B --> C["3: Top Ladder"]
    C --> D["4: Top Ladder"]
    D --> E["5: Top Ladder"]
    E --> F["6: Top Ladder"]
    F --> G["7: Top Ladder"]
    G --> H["8: Top Ladder"]
    H --> I["9: Top Ladder"]
    I --> J["10: Top Ladder"]
    J --> K["11: Top Ladder"]
    K --> L["12: Top Ladder"]
    L --> M["13: Top Ladder"]
    M --> N["14: Top Ladder"]
    N --> O["15: Top Ladder"]
    O --> P["16: Top Ladder"]
    P --> Q["17: Top Ladder"]
    Q --> R["18: Top Ladder"]
    R --> S["19: Top Ladder"]
    S --> T["20: Top Ladder"]
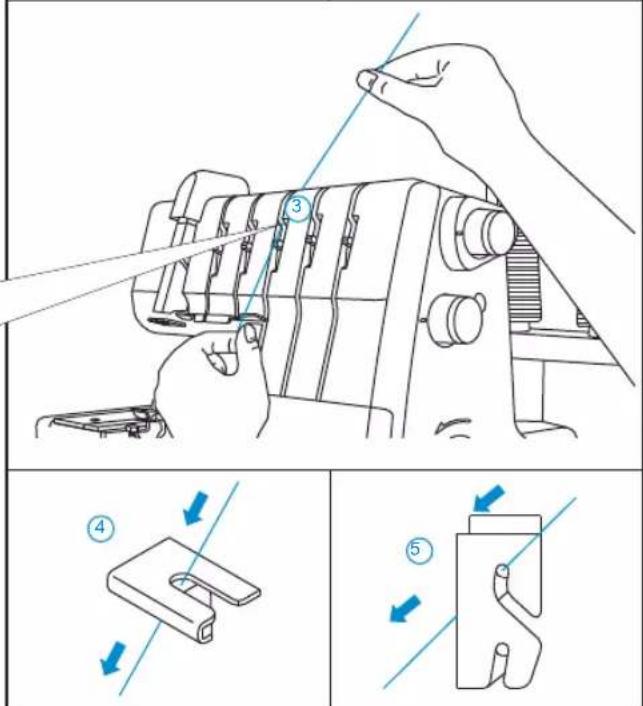
④ Place the thread from right to left into thread guide.
⑤ Place the thread from right to left and position thread behind finger on thread guide.
⑥ Thread the balance of the upper looper area of the machine
⑦ following the green color coded thread guides.
⑨ Thread the hole in the upper looper from front to back. Make sure thread passes behind lower looper. Pull about 10cm (4 inches) of thread through the looper and place to the back of the needle plate.
Note: Use tweezers provided in the accessory case to aid in threading the looper.

2) Threading the Lower Looper (Blue)
Turn the handwheel toward you until the lower looper extends out 5\~10mm from the needle plate edge.
Open the front cover and thread the lower looper as indicated in steps 1 through 10.
- Raise presser foot to release Tension discs.
- Turn the handwheel toward you until the lower looper eye extends out 5-10 mm from the needle plate edge.
- Thread the lower looper area of the machine following the bule color-coded thread guides.
① Pass thread from back to the front through thread guide.
② Thread the top cover thread guide by pulling the thread towards the left until it slips under guide. Then pull thread along the right side of pretension disc as illustrated.
natural_image
Technical line drawing of a mechanical component with no visible text or symbols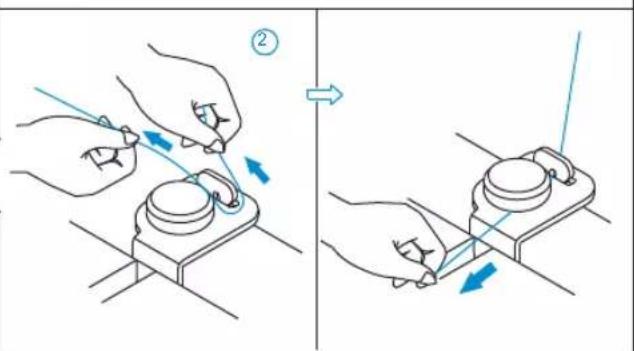
③ While holding thread with finger, pass it between the tension discs and pull thread down to make certain it is properly located in between the tension discs.

Thread the looper area of the machine following the blue color coded thread guides 4\~10.
④ Place the thread from right to left into thread guide.
⑤ Place the thread from right to left into thread guide.
⑥ Thread the balance of the lower looper area of the
⑦ machine following the blue color-coded thread guides,
⑧ placing thread in guides.
⑨ Thread the looper eye (A) from front to back. Pull about 10cm (4 inches) of thread and position into V cutout (B) on threader. Firmly hold thread tail with left hand and pull threader lever (C) up to place thread into correct position (D) for sewing.
Note: Use tweezers provided in the accessory case to aid in threading the looper.
3) Threading the (Purple) and Cover stitch Looper
Open the front cover and thread the chain stitch/cover stitch looper as indicated in steps 1 through 11.
- Raise presser foot to release Tension discs.
- Turn the handwheel toward you until the chain stitch looper eye extends out 5-10 mm from the needle plate edge.
- Thread the chain looper area of the machine following the purple color-coded thread guides.
① Pass thread from back to the front through thread guide.
② Thread the top cover thread guide by pulling the thread towards the left until it slips under guide. Then pull thread along the right side of pretension disc as illustrated.
③ While holding thread with finger, pass it between the tension discs and pull thread down to make certain it is properly located in between the tension discs.


natural_image
Line drawing of hands operating a sewing machine with tools, no text or symbols presentThread the looper area of the machine following the purple color-coded thread guides 4\~11.
④ Place the thread from right to left into thread guide.
⑤ Place the thread from right to left into thread guide.
⑥ Thread the balance of the lower looper area of the machine
⑦ following the purple color-coded thread guides, placing
⑧ thread in guides.
⑩ Thread the looper eye (A) from front to back. Pull about 10cm (4 inches) of thread and position into V cutout (B) on threader. Firmly hold thread tail with left hand and pull threader lever (C) up to place thread into correct position (D) for sewing.
Note: Use the tweezers provided in the accessory case to aid in threading the looper.
4) Threading the (Yellow) Right Needle (B on needle clamp)
Thread the right needle as indicated in steps 1 through 9.
- Raise presser foot to release tension discs.

① Pass thread from back to the front through thread guide.
② Thread the top cover thread guide by pulling the thread towards the left until it slips under guide. Then pull thread along the right side of pretension disc as illustrated.
natural_image
Technical line drawing of a mechanical component with numbered parts (no text or symbols)
flowchart
graph TD
    A["Step 1: Initial setup with hook and drop"] --> B["Step 2: Setup a sewing machine"]
    B --> C["Step 3: Setup a sewing machine with tools"]
    C --> D["Step 4: Setup a sewing machine with tools"]
    D --> E["Step 5: Setup a sewing machine with tools"]
    E --> F["Step 6: Setup a sewing machine with tools"]
    F --> G["Step 7: Setup a sewing machine with tools"]
    G --> H["Step 8: Setup a sewing machine with tools"]
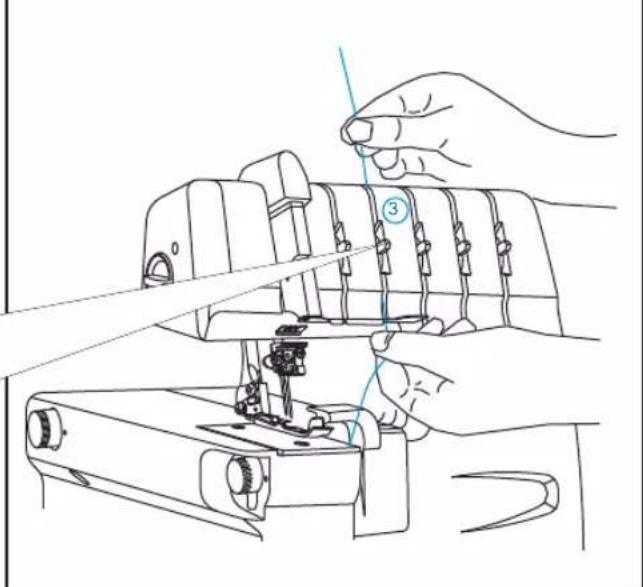
③ While holding thread with finger, pass it between the tension discs and pull thread down to make certain it is properly located in between the tension discs.
natural_image
Line drawing of hands operating a sewing machine with a tool, no text or symbols present④ Slip thread behind metal guide and into rear slot on thread
⑤ guide.
⑥ Pass thread into the slot of take-up lever cover.
⑦ Position thread into the right guide located at base of take-up lever cover.
⑧ Slip thread from left to right into the thread guide located on bottom of the needle clamp. Position the thread into the right section of the guide.
Note: Before threading eye of needle, slip thread behind thread guide located on the bottom of the needle clamp.

⑨ Thread the eye of the right needle from front to back. Draw about 10cm (4 inches) of thread through needle eye toward the rear of machine and place thread to the back, under the presser foot.
Note: Use tweezers provided in the accessory case to aid in threading the looper.
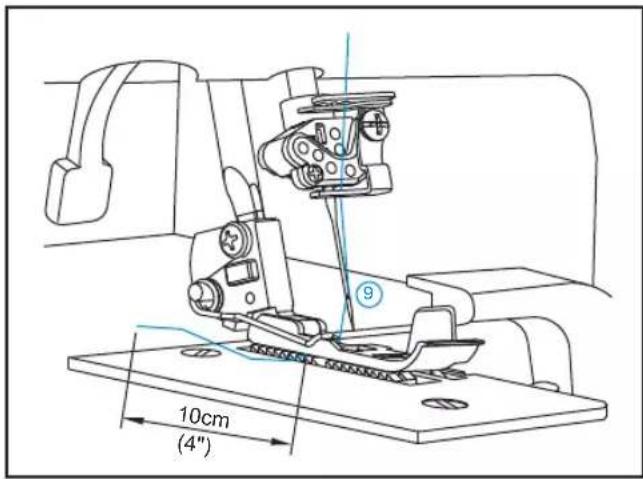
5) Threading the (Red) Stitch Needle (D on needle clamp) CENTER NEEDLE
Thread the center needle as indicated in steps 1 through 9.
-Raise Presser foot to release Tension discs.

① Pass thread from back to the front through thread guide.
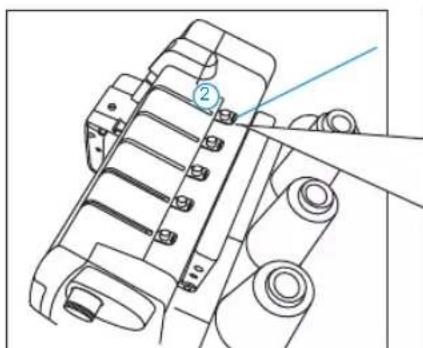
② Thread the top cover thread guide by pulling the thread towards the left until it slips under guide. Then pull thread along the right side of pretension disc as illustrated.
natural_image
Technical line drawing of a mechanical component with no visible text or symbols
③ While holding thread with finger, pass it between the tension discs and pull thread down to make certain it is properly located in between the tension discs.


natural_image
Line drawing of hands operating a sewing machine with a tool, no text or symbols present④ Slip thread behind metal guide and into center slot on thread
⑤ guide.
⑥ Pass thread into the slot of take-up lever cover.
⑦ Position thread into the center slot on the guide located at base of take-up lever cover.
⑧ Slip thread from left to right into the thread guide located on bottom of the needle clamp. Position the thread into the center section of the guide.
Note: For 4 thread overlock left needle: Use needle A.
Before threading eye of needle, slip thread behind thread guide located on the bottom of the needle clamp.
Note: For chain stitch :Use needle D.
Before threading eye of needle, make sure thread is in front of thread guide located on the bottom of the needle clamp.
⑨ Thread the eye of the center needle.
The position of the thread must be behind the thread guide for overlock stitching.
Draw about 10cm (4 inches) of thread through needle eye to hang free.
Place the thread to the back, and slightly to left under the presser foot.
Note: Use of tweezers in the accessory case will make needle threading easy.


6) Threading the Cover Stitch Needles
(1) Threading the Cover Stitch Left Needle (red) (C on needle clamp)
Thread the cover stitch left /chain stitch needle as indicated in steps 1 through 9.
- Raise presser foot to release tension discs.
① Pass thread from back to the front through thread guide.
② Thread the top cover thread guide by pulling the thread towards the left until it slips under guide. Then pull thread along the right side of pretension disc as illustrated.
③ While holding thread with finger, pass it between the tension discs and pull thread down to make certain it is properly located in between the tension discs.

natural_image
Technical line drawing of a mechanical component with no visible text or symbols
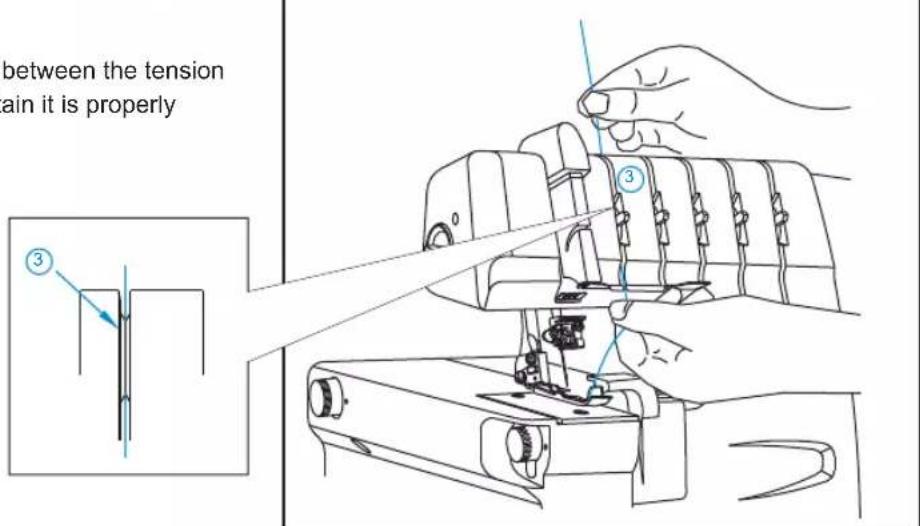
④ Slip thread behind metal guide and into rear slot on thread
⑤ guide.
⑥ Pass thread into the slot of take-up lever cover.
⑦ Position thread in the left guide located at base of take-up lever cover.
⑧ Slip thread from left to right into the thread guide located on bottom of the needle clamp. Position the thread into the left section of the guide.
Note: Slide thread into rear slot on thread guide 5 and slot of take-up lever cover 6. Then slip thread into left slots of thread guides 7 and 8.
Before threading eye of needle, make sure thread is in front of thread guide located on the bottom of the needle clamp, for cover stitch and for chain stitch.
⑨ Thread the eye of the left needle.
Draw about 10cm (4 inches) of thread through needle eye to hang free.
Place the thread to the back, and slightly to left under the presser foot.
Note: Use of tweezers in the accessory case will make needle threading easy.
(2) Threading the Cover Stitch Middle / Chain Stitch Needle (Yellow) (D on needle clamp)(center needle)
Thread the center needle as indicated in steps 1 through 9.
- Raise presser foot to release tension discs.


① Pass thread from back to the front through thread guide 1.
② Thread the top cover thread guide by pulling the thread towards the left until it slips under guide. Then pull thread along the right side of pretension disc as illustrated.
③ While holding thread with finger, pass it between the tension discs and pull thread down to make certain it is properly located in between the tension discs.

flowchart
graph TD
    A["Step 1: Initial Setup"] --> B["Step 2: Cutting Paper"]
    B --> C["Step 3: Cutting Machine"]
    C --> D["Step 4: Sewing"]
    D --> E["Step 5: Assembly"]
    E --> F["Step 6: Final Assembly"]
    F --> G["Step 7: Final Assembly"]
④ Slip thread behind metal guide and into center slot on thread
⑤ guide.
⑥ Pass thread into the slot of take-up lever cover.
⑦ Position thread into center guide located at base of take-up lever cover.
⑧ Slip thread from left to right into the thread guide located on bottom of the needle clamp. Position the thread into the center section of the guide.
Note: Before threading eye of needle, make sure thread is in front of thread guide located on the bottom of the needle clamp for Cover stitch and for Chain stitch.
⑨ Thread the eye of the middle needle.
Draw about 10cm (4 inches) of thread through needle eye to hang free.
Place the thread to the back, and slightly to left under the presser foot.
Note: Use of tweezers in the accessory case will make needle threading easy.
(3) Threading the Cover Stitch Right Needle (Green) (E on needle clamp)
Thread the cover stitch right needle as indicated in steps 1 through 9.
- Raise presser foot to release tension discs.
① Pass thread from back to the front through thread guide.
② Thread the top cover thread guide by pulling the thread towards the left until it slips under guide. Then pull thread along the right side of pretension disc as illustrated.

natural_image
Technical line drawing of a mechanical component with no visible text or symbols


③ While holding thread with finger, pass it between the tension discs and pull thread down to make certain it is properly located in between the tension discs.
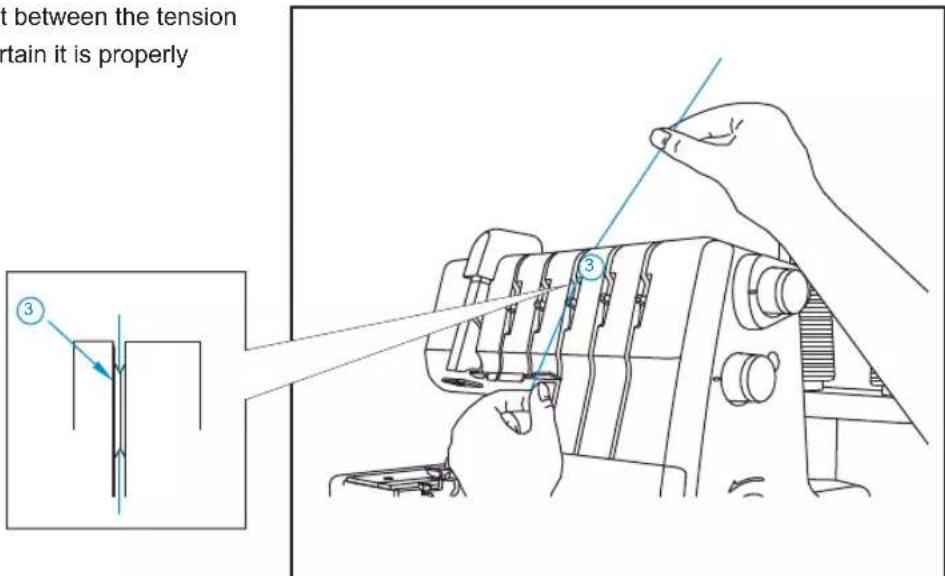
④ Slip thread behind metal guide and into front slot on thread
⑤ guide.
⑥ Pass thread into the slot of take-up lever cover.
⑦ Position thread into right guide located at base of take-up lever cover.
⑧ Slip thread from left to right into the thread guide located on bottom of the needle clamp. Position the thread into the right section of the guide.
Note: Before threading eye of needle, make sure thread is in front of thread guide located on the bottom of the needle clamp for cover stitch.
⑨ Thread the eye of the right needle.
Draw about 10cm (4 inches) of thread through needle eye to hang free.
Place the thread to the back, and slightly to left under the presser foot.
Note: Use of tweezers in the accessory case will make needle threading easy.


14. EASY THREAD CHANGE: TIE ON METHOD
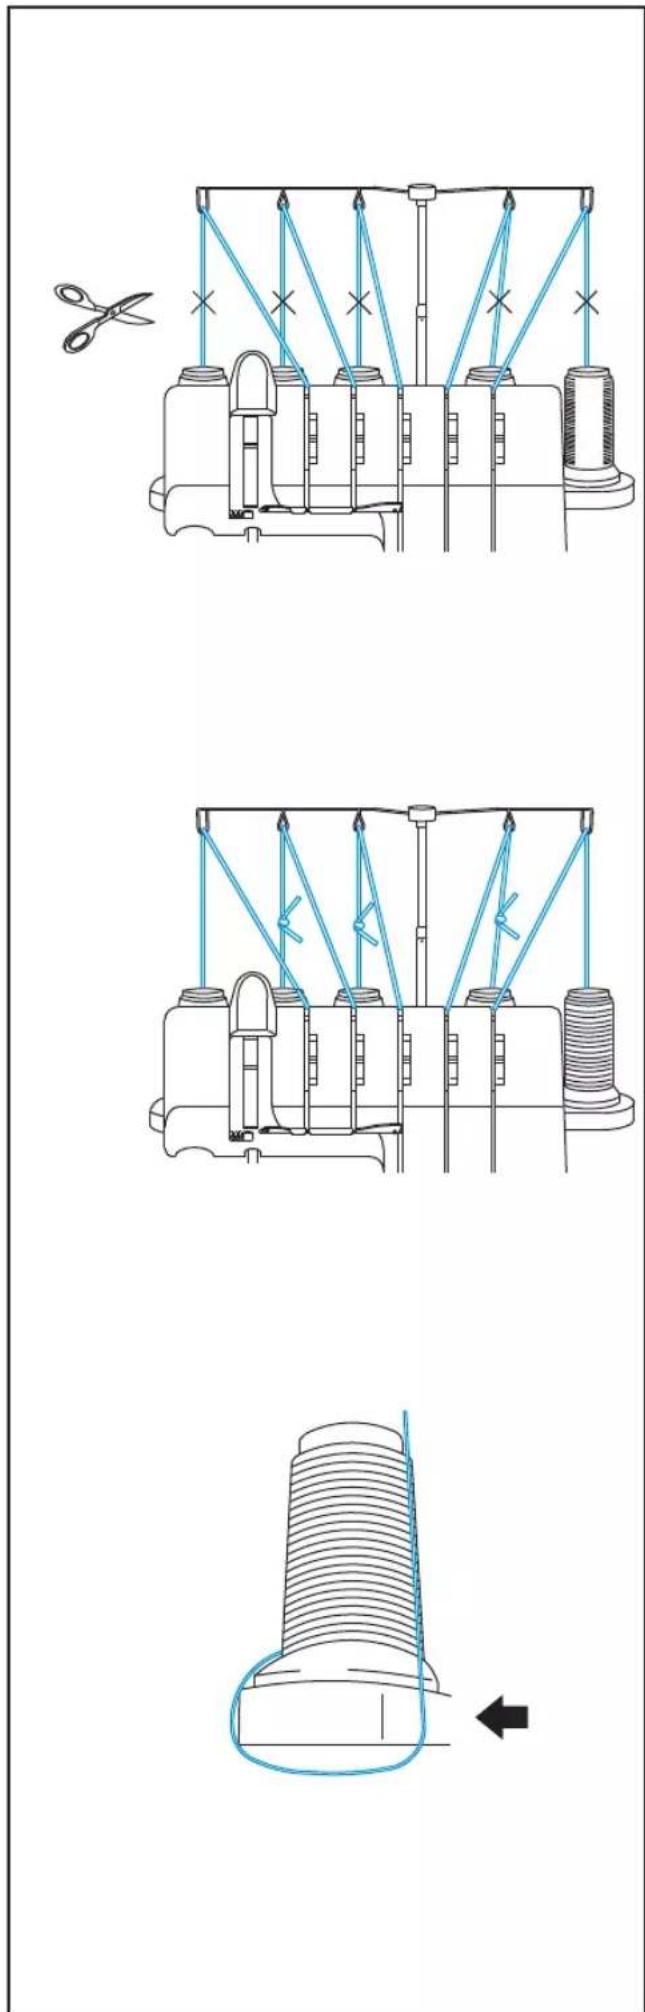
To easily change thread type or color, clip thread near the spool, and remove old spool of thread.
Place new thread on stand.
Tie new thread and old thread ends together with a square knot. Clip thread tails to 2\~3cm (1 inch) length. If clipped too short, threads may come untied.
Firmly pull both threads to test knot security.
-Raise presser foot to release tension discs.
Pull the threads through the machine one at a time.
If threads do not pull easily, check for tangles on thread guides or looping under thread stand.
When pulling thread through the needles, STOP when the knot is in front of the needle.
Cut the thread, and insert, in the eye of the needle.
15. HOW TO ADJUST THE SEAM WIDTH
Overlock seam width can be adjusted from narrow (using right needle) to wide (using left needle) and also with the width adjustment dial.
Needle Position Width
Overedge seam width can be adjusted from narrow (using right needle) to wide (using left needle).
a) When using left needle....6 mm (15/64 inch)
b) When only right needle is used....4 mm (10/64 inch)
c) When using chain stitch needle....8.8 mm (11/32 inch)
Width adjusting dial
As shown on the illustration, turn the dial counter clockwise to increase width of cutting, and clockwise to decrease width of cutting.
Use of width adjustment dial will permit further adjustment within the width range shown below.
a) When using left needle.....5 \~ 7mm (13/64 \~ 17/64 inch)
b) When only right needle is used....3.0 \~ 5.0 mm (1/8 \~ 3/16 inch)
c) When using chain stitch needle....7.8 \~ 9.8 mm (5/16 \~ 3/8 inch)


Left ne dlee

Right ne dlee


Chain stitch
ne dlee
16. HOW TO ADJUST THE STITCH LENGTH
The stitch length dial should be set on the N setting for most sewing conditions.
Adjust the stitch length to N\~ 4 when sewing heavy weight fabrics.
Adjust the stitch length to 2\~N when sewing lightweight fabrics to obtain excellent seams without puckering.
17. HOW TO ADJUST THE PRESSER FOOT PRESSURE
The presser foot pressure of this machine is pre-adjusted at the factory to suit the sewing of medium weight fabrics.
Most of the materials do not require adjustment of presser foot pressure. However, there are some instances where adjustment is necessary, such as when sewing lightweight and heavyweight fabrics.
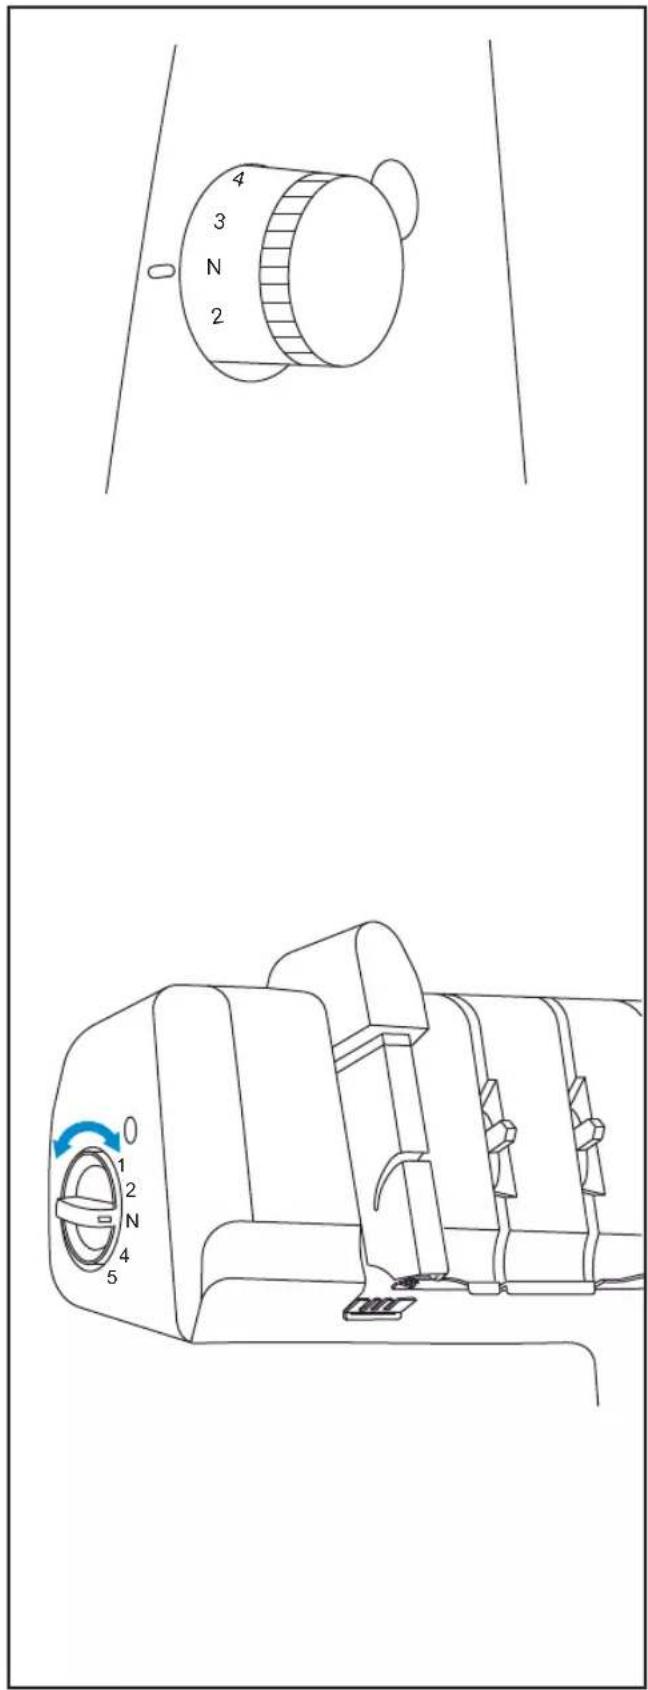
In such case, N for normal, 1 for the less pressure, and 5 for more pressure.
For lightweight fabric...Increase the pressure by turning the dial toward the 5.
For heavyweight fabric...Decrease the pressure by turning the dial toward the 1.
18. DIFFERENTIAL FEED
Differential feed is a system which "stretches" or "gathers" the fabric, when the amount of feed of front feed dogs in relation to the rear feed dogs is changed.
The differential feed ratio ranges from 1:0.6\~1:2.0. Adjustment is made by means of the differential feed adjusting dial pictured at right.
Use of differential feed is very effective in overedging stretch fabrics and fabrics cut on the bias.
Setting "N" is differential feed adjusting dial setting for ratio 1:1.
Gathered Overedge
Gathered overedge is most suited for shirring sleeves, yokes, front and back bodices, skirt hems, etc. in stretch fabrics such as knits and jersey before assembling into garment.
To set the differential feed adjusting dial for gathering
Set differential feed adjusting dial above setting "N". Setting of adjusting dial depends on material being sewn as well as the amount of desired gather. Lightweight fabrics will gather more than heavier fabrics. Therefore set dial to suit the fabric and test sew before sewing your garment.
Note: For normal overedge stitching, set differential feed adjusting dial to "N".

Stretch Overedge
Stretch overedge is ideal for sewing decorative collars, sleeves, skirt hems, etc. on loosely knit and woven fabrics.
To set the differential feed adjusting dial for stretch
Set differential feed adjusting dial below setting "N".
To sew a seam, apply gentle tension to the fabric by holding the seam lightly in front and back of the presser foot.
Note: If amount of "stretch" is not correctly set in relation to the fabric being sewn, the fabric is apt to shift away from the needle resulting in improperly sewn overedge seam. In such case, reset differential feed adjusting dial closer to the center mark, or adjust width dial slightly to a larger number.
*Be sure to reset the differential feed adjusting dial to "N" for normal overedge stitching.

19. PRESSER FOOT MARKINGS
A mark to indicate the needle location is provided on the front of the presser foot on this machine. Use these marks as a guide when sewing.
20. PRESSER FOOT LIFTER
Put the presser foot lifter in the raised position to lower the presser foot for sewing.
Swing the presser foot lifter down to lift the presser foot.
For bulky fabrics, pull forward on the presser foot lifter to allow additional clearance under the foot.
21. CHAINING OFF AND TEST SEWING
Note: The following instructions do not apply to cover stitch. For instructions on cover stitch, see page 48 "How to Sew a Cover Stitch."
When the machine is completely threaded, bring all of the threads across the needle plate and slightly to the left under the presser foot.
Hold the threads and apply a slight tension.
Turn the handwheel toward you 2 or 3 complete turns to start the thread chain.
Lower presser foot.
Continue holding the chain and press on the foot controller until the chain is 5\~7.5 cm (2\~3 inches) in length.
Place fabric under the front of the presser foot and sew a test sample.
Note: Day deflact on the fabric while sewing as this the needle, causing it to break.
At the end of the sample, continue to run the machine with the presser foot down until the chain reaches 15\~20 cm (6\~8 inches) in length.
Note: stircaisg, it is difficult to chain off when fabric lightly backward.
Cut thread.
Note: Any time you have rethreaded the machine off and sew a sample to test tensions and make adjustments as necessary.

22. SELECTION OF STITCHES & AUTO TENSION
This machine is capable of producing various types of stitches according to the combination of Auto Tension Selected, needle positions, threading methods, and the use of convertible right looper/converter.
| Stitch Type Reference ATD : Auto Tension Dial Selected | Page | ||
| 1. Chain StitchATD: D | 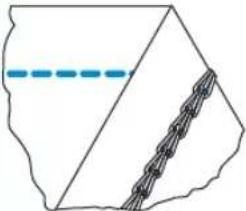 | A 1-needle 2-thread straight stitch is used for construction or decorative stitching.Seams also can be sewn at desired distance from edge of fabric by disengaging the right looper and movable knife. | 39 |
| 2. 2-Thread Wrapped Edge OverlockATD: DNarrowATD: GWide |  | 1-needle 2-thread stitch is used for seaming lightweight or stretch fabrics.It is also ideal for rolled and blind hemming.A 4 mm and 6 mm overlock seam width can be obtained by changing the needle position. | 40 |
| 3. 2-Thread OverlockATD: E | 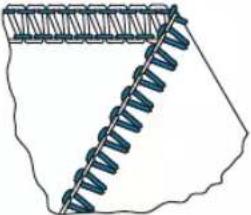 | 1-needle 2-thread stitch is used for overedging common fabrics. It is also ideal for flatlock (butted or lapped) seams and blind hemming. A 4 mm and 6 mm overedge seam width can be obtained by changing the needle position. | 41 |
| 4. 3-Thread OverlockATD: ANarrowATD: BWide | 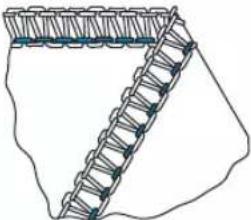 | 1-needle 3-thread stitch is used for overedging and seaming on common fabrics. A mm and 6 mm overlock seam width can be obtained by changing the needle position. | 42 |
| 5. 3-Thread FlatlockATD: F |  | 1-needle 3-thread stitch is used for butted or lapped seams and ornamental stitching with decorative thread. Also, a 4 mm and 6 mm flatlock width can be obtained by changing the needle position. | 43 |
| 6. 3-Thread Mock Safety Stitch OverlockATD: G |  | 2-needle 3-thread stitch that is ideal for lightweight, extremely stretchy fabrics such as tricot and spandex. | 44 |
| 7. 4-Thread Mock Safety Stitch OverlockATD: A | 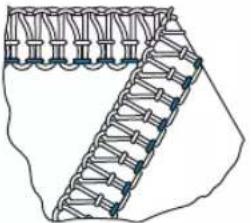 | 2-needle 4-thread stitch that is ideal for medium to heavyweight stretchy fabrics such as double knits and swim wear. | 45 |
| Stitch Type ReferenceATD: Auto Tension Dial Selected | Page | ||
| 8. 4-Thread Chain Stitch-2-Thread OverlockATD: I |  | The 4-thread stitch is a safety stitch made up of combined 2-thread overedge and double chain stitch. | 46 |
| 9. 5-Thread Chain Stitch-3-Thread OverlockATD: ANarrowATD: BWide |  | The 5-thread stitch is a safety stitch made up of combined 3-thread overlock and double chain stitch.A wide seam is formed by using left needle. Overedge and seaming can be done in one operation on non-stretch fabrics. | 47 |
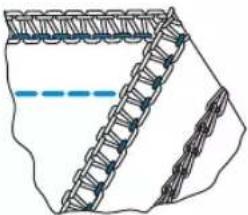 | The 5-thread stitch is a safety stitch made up of combined 3-thread overlock and double chain stitch.A narrow seam is formed by using right needle Overedge and seaming can be dane in one operation on non-stretch fabrics. | 47 | |
| 10. Cover StitchATD: KNarrow (2.8mm)ATD: HWide (5.6mm) |  | 2-needle, 3-thread cover stitch is suitable for stretchy fabrics such as knits, etc.A narrow seam is formed by using left and middle needles. | 50 |
 | 2-needle 3-thread cover stitch is suitable for stretchy fabrics such as knits, etc.A wide seam is formed by using left and right needles. | 50 | |
| 11. Triple Cover Stitch (5.6mm)ATD: J | 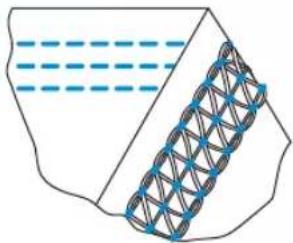 | 3-needle 4-thread cover stitch is suitable for stretchy fabrics such as knits, etc.A triple seam is formed by using left, middle, and right needles. | 51 |
| 12. 3-Thread Rolled Hem (4.0mm)ATD: C |  | 1-needle 3-thread stitch is used for sewing narrow rolled hems. | 54 |
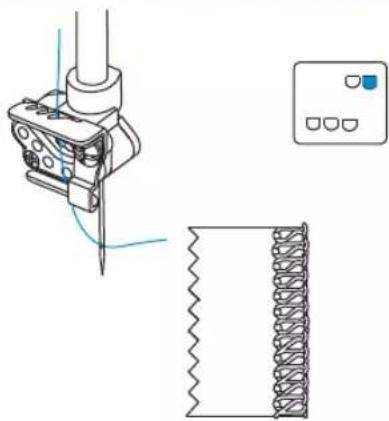
Depending on the needle positions used, this machine can sew 2-thread and 3-thread standard width 4 mm overedge and a 6 mm wide overedge seams.
Also, for overedging heavyweight fabrics, the seam width can be increased still more by turning the overedge seam width adjustment dial. (See page 29)
| Overedge width | 4.0 mm | 6.0 mm |
| Needle used | Overedge right needle | Overedge left needle |
| Needle thread tension dial | Yellow | Red |
 |  |
- HANDY REFERENCE CHART3
| Stitch Type | ATD | SL | DF | L/C | Needle Position | Tension Dial Selected: As select ATD option, the tension dial are set automatically. | Page | ||||||
| Yellow | GreenRed | Purple | |||||||||||
| 1 | Chain Stitch | D | N | N | C |  | ● | ● | 39 | ||||
| 2 | 2-Thread Wrapped Edge Overlock | D | 2 | N | L | 4.0mm narrow |  | ● | converter | ● | 40 | ||
| G | 2 | N | L | 6.0mm wide |  | ● | converter | ● | 40 | ||||
| 3 | 2-Thread Overlock | E | 2 | N | L | 4.0mm narrow |  | ● | converter | ● | 41 | ||
| E | 2 | N | L | 6.0mm wide |  | ● | converter | ● | 41 | ||||
| 4 | 3-Thread Overlock | A | N | N | L | 4.0mm narrow |  | ● | ● | ● | 42 | ||
| B | N | N | L | 6.0mm wide |  | ● | ● | ● | 42 | ||||
| 5 | 3-Thread Flatlock | F | 2 | N | L | 4.0mm narrow |  | ● | ● | ● | 43 | ||
| F | 2 | N | L | 6.0mm wide |  | ● | ● | ● | 43 | ||||
| 6 | 3-Thread Mock Safety Stitch Overlock | G | 2 | N | L |  | ● | ● | converter | ● | 44 | ||
| 7 | 4-Thread Mock Safety Stitch Overlock | A | N | N | L |  | ● | ● | ● | ● | 45 | ||
| 8 | 4-Thread Chain Stitch-2-Thread Overlock | I | N | N | L |  | ● | ● | converter | ● | ● | 46 | |
| 9 | 5-Thread Chain Stitch-3-Thread Overlock | A | N | N | L | narrow |  | ● | ● | ● | ● | ● | 47 |
| B | N | N | L | wide |  | ● | ● | ● | ● | ● | 47 | ||
| 10 | Cover Stitch Narrow/ Wide | K | N | N | C | 2.8mm narrow |  | ● | ● | ● | 50 | ||
| H | N | N | C | 5.6mm wide |  | ● | ● | ● | 50 | ||||
| 11 | Triple Cover Stitch | J | N | N | C | 5.6mm |  | ● | ● | ● | ● | 51 | |
| 12 | Three - Thread Rolled Hem | C | 1 | N | L | 4.0mm |  | ● | ● | ● | 54 | ||
ATD: Auto Tension Dial Selection
DF: Differential Feed
*When option 2, 3, 6, 8 selected, use converter.
*When option 1, 10, and 11 selected, turn upper knife down, move seam width finger knob to setting R, and change front cover attached cover (A) into (B).
*Auto tension settings are based on medium weight fabric and standard # 60 polyester spun thread. It can satisfy most requirements for sewing. If using different thread number or fabric and the result is not you expected, please adjust in small increments.
SL: Stitch Length
L / C: Upper Looper driving clutch position

Caution: Be sure to turn off the power switch.
① Move knife into nonworking position
See page 10 for instructions on placing upper knife in nonworking position.
② To disengage upper looper
Turn handwheel till drive shaft is at its most right position.
Push clutch button to the left and up for cover stitch / chain stitch.
③ To re-engage upper looper
Turn handwheel till drive shaft is at its most right position.
Push clutch button to the left and down for overlock.
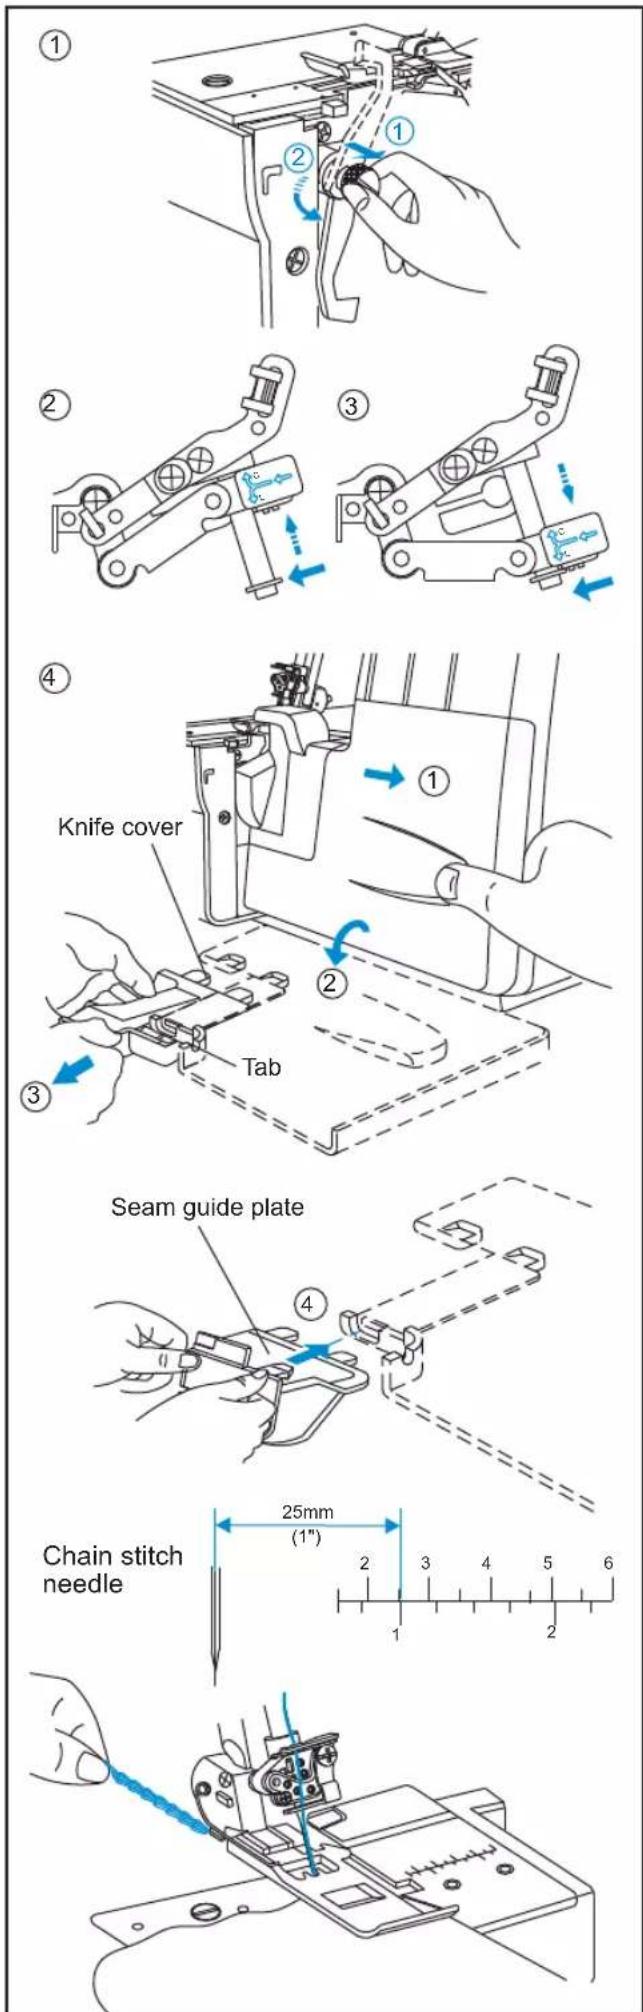
④ To install the seam guide plate
Open front cover
To remove knife cover lift tab and pull toward you.
Place the two tabs of the seam guide plate in the slots on the front cover then snap into place.
The markings on the seam guide plate indicate the distance from the chain stitch needle and the fabric edge. Use this as a reference guide between the needle and edge of fabric.
Start and end of sewing
When starting to sew, pull the thread chain lightly to the rear of machine until the needle penetrates the fabric.
When starting to sew after threading the machine, sew 2 \~ 3 cm on a scrap fabric and chain-off to make a chain.
At end of sewing, pull the fabric lightly to the rear of machine and chain-off.
24. SUGGESTED TENSION SETTING
1) Chain stitch
How to Sew
The chain stitch is sewn with 2 threads, one needle and one looper. Normally, the machine trims the fabric edge while the seam is being sewn. However, a chain stitch seam can be placed at a desired distance from edge of fabric by putting the knife in a nonworking position, disengaging the upper looper and installing the chain stitch seam guide plate
Tension settings may be effected by:
1) Type and thickness of fabric
2) Needle size
3) Size, type and fiber content of thread
Stitch length for chain stitch should be set at over 2mm.
Note: These are suggested tension settings only.
Correct Balance
Set auto tension dial to D shown at right and test sew on a sample of your fabric.
How to Balance
① When the chain stitch needle thread tension is too loose; -Turn the needle thread tension fine tuning lever (yellow) toward the “+”.
-Or, turn the chain stitch looper thread tension fine tuning lever (purple) toward the “-”.
Note: If the tension needs to be increased gently move the tension adjustment lever toward the “+” mark in increments indicated by the smaller white dots on the colored fine tuning label on front cover.
If the tension needs to be decreased gently move the tension adjustment lever toward the “-” mark in increments indicated by the smaller white dots on the colored fine tuning label on front cover.
| NEEDLE POSITION | |||||
| AUTO TENSION DIAL | D | ||||
| SEAM WIDTH FINGER LEVER | R | ||||
| STITCH LENGTH | 2~4 | ||||
| DRIVING CULTCH POSITION | C | ||||
| CONVERTER | N/A | ||||
| Fabric | Tension Dial | ||||
| BlueYellow GreenRed | |||||
| Medium weight | |||||


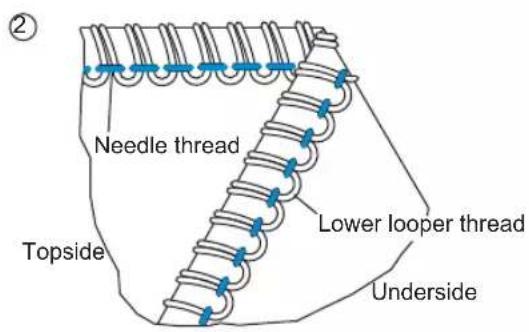
2) 2-Thread Wrapped Edge Overlock
Tension settings may be effected by :
1) Type and thickness of fabric
2) Needle size
3) Size, type and fiber content of thread
Note: These are suggested tension settings only.
Correct Balance
Set auto tension dial to D or G shown at right and test sew on a sample of your fabric.
How to Balance
① When the lower looper thread tension is too tight or needle thread tension is too loose;
-Turn the lower looper thread tension fine tuning lever (Blue) toward the “+”.
-Or, turn the needle thread tension fine tuning lever (Red or Yellow) toward the “-”.
② When the lower looper thread tension is too loose;
-Turn the lower looper thread tension fine tuning lever (Blue) toward the "+"
Note:
If the tension needs to be increased gently move the tension adjustment lever toward the "+" mark in increments indicated by the smaller white dots on the colored fine tuning label on front cover.
If the tension needs to be decreased gently move the tension adjustment lever toward the “-” mark in increments indicated by the smaller white dots on the colored fine tuning label on front cover.
| NEEDLE POSITION | NARROW WIDE | |||||
| AUTO TENSION DIAL | D or G | |||||
| SEAM WIDTH FINGER KNOB | N | |||||
| STITCH LENGTH | 2~4 | |||||
| DRIVING CULTCH POSITION | L | |||||
| CONVERTER | USE | |||||
| NARROW | Fabric | Tension Dial : D | ||||
| BlueYellow Gre | ||||||
| Medium weight | ● | Converter | ● | |||
| WIDE | Fabric | Tension Dial : G | ||||
| BlueYellow Gre | ||||||
| Medium weight | ● | Converter | ● | |||
enRed
enRed
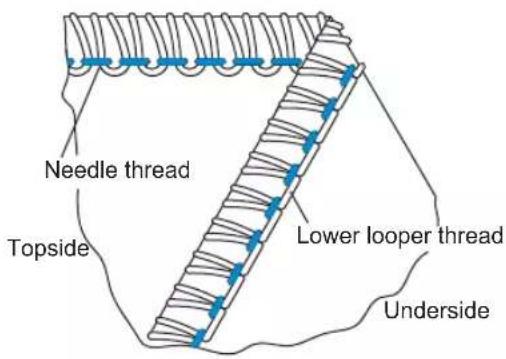

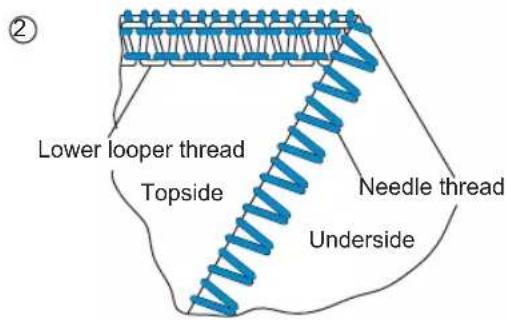
3) 2-Thread Overlock (NARROW-WIDE)
Tension settings may be effected by :
1) Type and thickness of fabric
2) Needle size
3) Size, type and fiber content of thread
See page 11 for instructions on converting upper looper to converter.
Note: These are suggested tension settings only.
Correct Balance
Set auto tension dial to E shown at right and test sew on a sample of your fabric.
How to Balance
① When the upper looper thread lies on the underside of the fabric;
-Turn the upper looper thread tension fine tuning lever (Green) toward the “+”.
- Or, turn the lower looper thread tension fine tuning lever (Blue) toward the “-”.
② When the lower looper thread appears on the top of the fabric;
-Turn the lower looper thread tension fine tuning lever (Blue) toward the "+".
-Or, turn the upper looper thread tension fine tuning lever (Green) toward the “-”.
Note:
If the tension needs to be increased gently move the tension adjustment lever toward the “+” mark in increments indicated by the smaller white dots on the colored fine tuning label on front cover.
If the tension needs to be decreased gently move the tension adjustment lever toward the “-” mark in increments indicated by the smaller white dots on the colored fine tuning label on front cover.
| NEEDLE POSITION | NARROW WIDE | |||||
| AUTO TENSION DIAL | E | |||||
| SEAM WIDTH FINGER KNOB | N | |||||
| STITCH LENGTH | 2~4 | |||||
| DRIVING CULTCH POSITION | L | |||||
| CONVERTER | USE | |||||
| NARROW | Fabric | Tension Dial | ||||
| BlueYellow Gr | ||||||
| Medium weight | ● | Converter | ● | |||
| WIDE | Fabric | Tension Dial | ||||
| BlueYellow Gr | ||||||
| Medium weight | ● | Converter | ● | |||
enRed
enRed


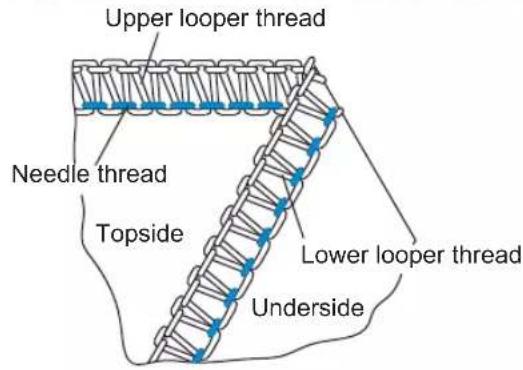
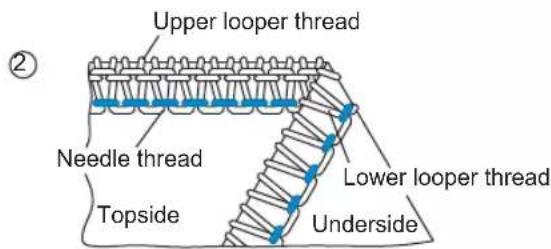
Tension settings may be effected by :
1) Type and thickness of fabric
2) Needle size
3) Size, type and fiber content of thread
Note: These are suggested tension settings only.
Correct Balance
Set auto tension dial to A or B shown at right and test sew on a sample of your fabric.
How to Balance
① When the upper looper thread lies on the underside of the fabric;
-Turn the upper looper thread tension fine tuning lever (Green) toward the “+”.
- Or, turn the lower looper thread tension fine tuning lever (Blue) toward the “-”.
② When the lower looper thread appears on the top of the fabric;
-Turn the lower looper thread tension fine tuning lever (Blue) toward the “+”.
-Or, turn the upper looper thread tension fine tuning lever (Green) toward the “-”.
③ When the needle thread is too loose, turn the needle tension fine tuning lever (Red or Yellow) toward the “+”, or loosen both looper tensions equally toward the “-”.
Note:
If the tension needs to be increased gently move the tension adjustment lever toward the "+" mark in increments indicated by the smaller white dots on the colored fine tuning label on front cover.
If the tension needs to be decreased gently move the tension adjustment lever toward the “-” mark in increments indicated by the smaller white dots on the colored fine tuning label on front cover.
| NEEDLE POSITION | NARROW WIDE | |||||
| AUTO TENSION DIAL | A or B | |||||
| SEAM WIDTH FINGER KNOB | N | |||||
| STITCH LENGTH | N | |||||
| DRIVING CULTCH POSITION | L | |||||
| CONVERTER | N/A | |||||
| NARROW | Fabric | Tension Dial : A | ||||
| BlueYellow GreenRed | ||||||
| Medium weight | ● | ● | ● | |||
| WIDE | Fabric | Tension Dial : B | ||||
| BlueYellow GreenRed | ||||||
| Medium weight | ● | ● | ● | |||

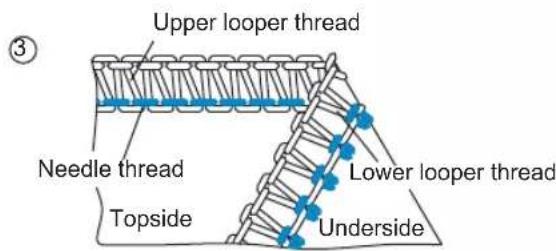
5) 3-Thread Flatlock
Tension settings may be effected by :
1) Type and thickness of fabric
2) Needle size
3) Size, type and fiber content of thread
Note: These are suggested tension settings only.
Correct Balance
Set auto tension dial to F shown at right and test sew on a sample of your fabric.
How to Balance
① When the lower looper thread tension is too loose;
-Turn the lower looper thread tension fine tuning lever (Blue) toward the “+”.
-Or, turn the needle thread tension fine tuning lever (Red or Yellow) toward the “-”.
② When the upper looper thread tension is too loose;
-Turn the upper looper thread tension fine tuning lever (green) toward the “+”.
-Or, turn the needle thread tension fine tuning lever (Red or Yellow) toward the “-”.
③ When the needle thread tension is too loose;
-Turn the needle thread tension fine tuning lever (Red or Yellow) toward the “+”.
-Or, turn the upper looper thread tension fine tuning lever (Green) toward the “-”.
Note:
If the tension needs to be increased gently move the tension adjustment lever toward the "+" mark in increments indicated by the smaller white dots on the colored fine tuning label on front cover.
If the tension needs to be decreased gently move the tension adjustment lever toward the “-” mark in increments indicated by the smaller white dots on the colored fine tuning label on front cover.
| NEEDLE POSITION | NARROW WIDE | |||||
| AUTO TENSION DIAL | F | |||||
| SEAM WIDTH FINGER KNOB | N | |||||
| STITCH LENGTH | 2~4 | |||||
| DRIVING CULTCH POSITION | L | |||||
| CONVERTER | N/A | |||||
| NARROW | Fabric | Tension Dial | ||||
| BlueYellow Gr | ||||||
| Medium weight | ● | ● | ● | |||
| WIDE | Fabric | Tension Dial | ||||
| BlueYellow Gr | ||||||
| Medium weight | ● | ● | ● | |||
enRed


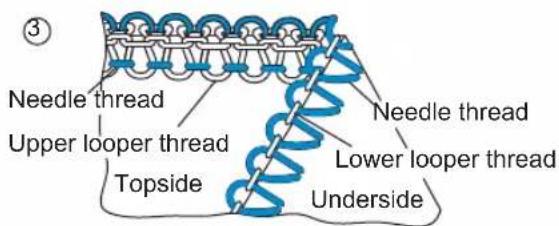
6) 3-Thread Mock Safety Stitch Overlock
Tension settings may be effected by :
1) Type and thickness of fabric
2) Needle size
3) Size, type and fiber content of thread
Note: These are suggested tension settings only.
Correct Balance
Set auto tension dial to G shown at right and test sew on a sample of your fabric.
How to Balance
① When the lower looper thread tension is too loose;
-Turn the lower looper thread tension fine tuning lever (Blue) toward the "+".
② When the left needle thread tension is too loose;
-Turn the left needle thread tension fine tuning lever (Red) toward the “+”.
③ When the right needle thread tension is too loose;
-Turn the needle thread tension fine tuning lever (Yellow) toward the “+”.
Note:
If the tension needs to be increased gently move the tension adjustment lever toward the "+" mark in increments indicated by the smaller white dots on the colored fine tuning label on front cover.
If the tension needs to be decreased gently move the tension adjustment lever toward the “-” mark in increments indicated by the smaller white dots on the colored fine tuning label on front cover.
| NEEDLE POSITION | |||||
| AUTO TENSION DIAL | G | ||||
| SEAM WIDTH FINGER KNOB | N | ||||
| STITCH LENGTH | 2~4 | ||||
| DRIVING CULTCH POSITION | L | ||||
| CONVERTER | USE | ||||
| Fabric | Tension Dial | ||||
| BlueYellow Gre | |||||
| Medium weight | ● | ● | Converter | ● | |
enRed


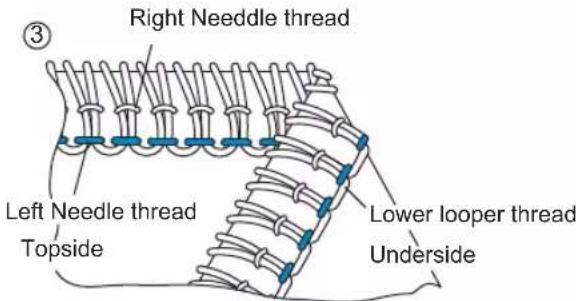
7) 4-Thread Mock Safety Stitch Overlock
Tension settings may be effected by :
1) Type and thickness of fabric
2) Needle size
3) Size, type and fiber content of thread
Note: These are suggested tension settings only.
Correct Balance
Set auto tension dial to A shown at right and test sew on a sample of your fabric.
How to Balance
① When the upper looper thread lies on the underside of the fabric;
-Turn the upper looper thread tension fine tuning lever (Green) toward the "+".
-Or, turn lower looper thread tension fine tuning lever (Blue) toward the “-”.
② When the lower looper thread appears on the top of the fabric;
-Turn the lower looper thread tension fine tuning lever (Blue) toward the “+”.
-Or, turn the upper looper thread tension fine tuning lever (Green) toward the “-”.
③ When the left needle thread tension is too loose;
-Turn the needle thread tension fine tuning lever (Red) toward the “+”.
-Or turn both looper tensions equally toward the “-”.
④ When the right needle thread tension is too loose;
-Turn the right needle thread tension fine tuning lever (Yellow) toward the "+".
Note:
If the tension needs to be increased gently move the tension adjustment lever toward the "+" mark in increments indicated by the smaller white dots on the colored fine tuning label on front cover.
If the tension needs to be decreased gently move the tension adjustment lever toward the “-” mark in increments indicated by the smaller white dots on the colored fine tuning label on front cover.
| NEEDLE POSITION | |||||
| AUTO TENSION DIAL | A | ||||
| SEAM WIDTH FINGER KNOB | N | ||||
| STITCH LENGTH | N | ||||
| DRIVING CULTCH POSITION | L | ||||
| CONVERTER | N/A | ||||
| Fabric | Tension Dial | ||||
| BlueYellow GreenRed | |||||
| Medium weight | ● | ● | ● | ● | |
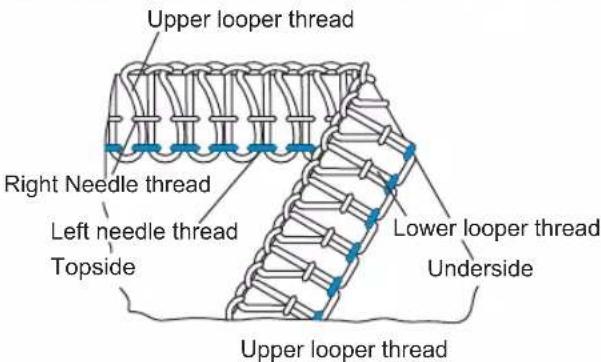
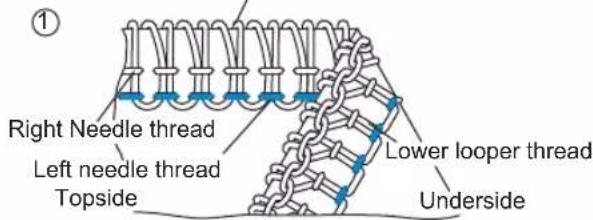

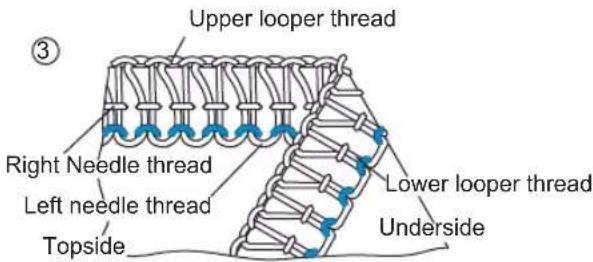

8) 4-Thread Chain Stitch-2-Thread Overlock
Tension settings may be effected by :
1) Type and thickness of fabric
2) Needle size
3) Size, type and fiber content of thread
Note: These are suggested tension settings only.
Correct Balance
Set auto tension dial to I shown at right and test sew on a sample of your fabric.
How to Balance
① When the lower looper thread appears on the top of the fabric;
-Turn the lower looper thread tension fine tuning lever (Blue) toward the “+”.
-Or, turn the upper looper thread tension fine tuning lever (Green) toward the “-”.
② When the right needle thread is too loose;
-Turn the right needle thread tension fine tuning lever (Yellow) toward the "+".
③ When the chain stitch needle thread tension is too loose;
-Turn the chain stitch needle thread tension fine tuning lever (Red) toward the "+".
-Or, turn the chain stitch looper thread tension fine tuning lever (Purple) toward the “-”.
Note:
If the tension needs to be increased gently move the tension adjustment lever toward the "+" mark in increments indicated by the smaller white dots on the colored fine tuning label on front cover.
If the tension needs to be decreased gently move the tension adjustment lever toward the “-” mark in increments indicated by the smaller white dots on the colored fine tuning label on front cover.
| NEEDLE POSITION |  | ||||
| AUTO TENSION DIAL | I | ||||
| SEAM WIDTH FINGER KNOB | N | ||||
| STITCH LENGTH | 2~4 | ||||
| DRIVING CULTCH POSITION | L | ||||
| CONVERTER | USE | ||||
| Fabric | Tension Dial | ||||
| BlueYellow Gre | |||||
| Medium weight | ● | ● | Converter | ● | ● |


9) 5-Thread Chain Stitch 3-Thread Overlock
Tension settings may be effected by :
1) Type and thickness of fabric
2) Needle size
3) Size, type and fiber content of thread
Note: These are suggested tension settings only.
Correct Balance
Set auto tension dial to B shown at right and test sew on a sample of your fabric.
How to Balance
① When the upper looper thread lies on the underside of the fabric;
-Turn the upper looper thread tension fine tuning lever (Green) toward the “+”.
-Or, turn lower looper thread tension fine tuning lever (Blue) toward the “-”.
② When the lower looper thread appears on the top of the fabric;
-Turn the lower looper thread tension fine tuning lever (Blue) toward the "+".
-Or, turn the upper looper thread tension fine tuning lever (Green) toward the “-”.
③ When the left needle thread tension is too loose;
-Turn the left needle thread tension fine tuning lever (Yellow) toward the “+”.
④ When the chain stitch needle thread tension is too loose;
-Turn the chain stitch needle thread tension fine tuning lever (Red) toward the "+".
-Or, turn the chain stitch looper thread tension fine tuning lever (Purple) toward the “-”.
Note:
If the tension needs to be increased gently move the tension adjustment lever toward the "+" mark in increments indicated by the smaller white dots on the colored fine tuning label on front cover.
If the tension needs to be decreased gently move the tension adjustment lever toward the “-” mark in increments indicated by the smaller white dots on the colored fine tuning label on front cover.
| NEEDLE POSITION | NARROW WIDE | ||||
| AUTO TENSION DIAL | A | B | |||
| SEAM WIDTH FINGER KNOB | N | ||||
| STITCH LENGTH | N | ||||
| DRIVING CULTCH POSITION | L | ||||
| CONVERTER | N/A | ||||
| Fabric | Tension Dial | ||||
| BlueYellow Gre | |||||
| Medium weight | ● | ● | ● | ● | ● |
enRed


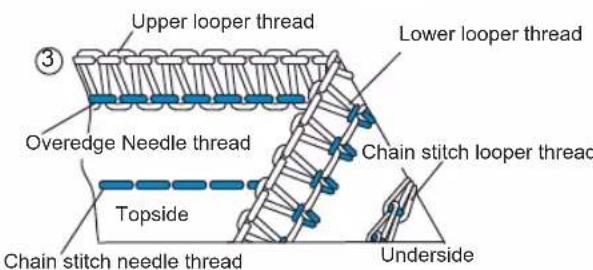

25. HOW TO SEW A COVER STITCH
This machine can produce a 3-thread 5.6 mm wide bottom cover stitch.
The cover stitch can be used for covering, binding or top-stitching necklines and for hemming the bottom, of T-shirts and sweat suits, etc. in addition to flat joining seams (plain seaming).
The cover stitch is most suitable for stretchy fabrics such as knit.
It also can be used in woven fabrics such as denim, but careful attention must be paid to the tension settings or there is the possibility of thread breakage and or skipping.
If you experience skipping or thread breakage sewing denim change needles first and then adjust the tensions little by little (1/4 number at a time).
Machine Set up

Caution: Be sure to turn off the power switch.
Open front cover. (See page 7)
Disengage upper looper. (See page 38)
Place the movable upper knife in the non working position. (See page 10)
Set seam width finger lever on "R" side. (See page 12) Set C/L clutch (see page 38).
Remove overlock right needle (B) and overlock left needle (A).
For Triple 5.6mm cover stitch, install cover stitch right needle (E), cover stitch middle needle (D) and cover stitch left needle (C). (See pages 23 \~ 27)
Install seam guide plate. (See page 38)
The graduations on seam guide plate indicate the distance from cover stitch middle needle. Use it as a guide when positioning fabric edge.
Close looper cover.

Additional Information About Cover Stitch
At start of sewing
① Raise presser foot.
② Place fabric under presser foot behind the needle.
③ Lower presser foot.
④ Note: When you start to sew from the middle of the fabric, place the fabric at the desired of starting point of sewing.
At end of sewing
stop sewing when the fabric is not under the needles
⑤ Raise presser feet.
⑥ Turns the handwheel toward you one circle (counter clockwise), then turns handwheel one circle back. (Clockwise)
⑦ Pull out the fabric lightly to rear of machine and cut the threads to take out the fabric.
⑧ Note:
The instructions given when sewing cover stitches because chaining-off at the end of sewing is not possible.
All chain and cover stitches must be started with fabric under needle.

flowchart
graph TD
    A["Step ①: sewing machine"] --> B["Step ②: presser or printer"]
    B --> C["Step ③: presser or printer"]
    C --> D["Step ④: lathe machine"]
    D --> E["Step ⑤: presser or printer"]
    E --> F["Step ⑥: hand holding fabric cutting"]
    F --> G["Step ⑦: hand holding fabric cutting"]
    G --> H["Step ⑧: fabric cutting is cut"]
10. Cover Stitch (3-Thread) Wide/Narrow
Tension settings may be effected by :
1) Type and thickness of fabric
2) Needle size
3) Size, type and fiber content of thread
Stitch length for cover stitch should be set at over N (2.5mm)
Note: These are suggested tension settings only.
Correct Balance
Set auto tension dial to K or H shown at right and test sew on a sample of your fabric.
How to Balance
① When the cover stitch looper thread is too loose;
-Turn the cover stitch looper thread tension fine tuning lever (Purple) toward the "+".
② When the cover stitch left needle thread tension is too loose;
-Turn the cover stitch left needle thread tension fine tuning lever (Red) toward the "+".
-Or, turn cover stitch looper thread tension fine tuning lever (Purple) toward the “-”.
③ When the cover stitch right needle thread tension is too loose;
-Turn the cover stitch right needle thread tension fine tuning lever (Yellow) or (Red) toward the “+”.
-Or, turn the cover stitch looper thread tension fine tuning lever (Purple) toward the “-”.
④ When the top surface of fabric bulges between needle threads and the seams on the underside of the fabric becomes tight;
-Turn the cover stitch looper thread tension fine tuning lever (Purple) toward the “-”.
Note: If the tension needs to be increased gently move the tension adjustment lever toward the "+" mark in increments indicated by the smaller white dots on the colored fine tuning label on front cover.
If the tension needs to be decreased gently move the tension adjustment lever toward the “-” mark in increments indicated by the smaller white dots on the colored fine tuning label on front cover.
| NEEDLE POSITION | NARROW WIDE | ||||
| AUTO TENSION DIAL | K or H | ||||
| SEAM WIDTH FINGER KNOB | R | ||||
| STITCH LENGTH | N~4 | ||||
| DRIVING CULTCH POSITION | C | ||||
| CONVERTER | N/A | ||||
| NARROW Cover stitch looper Thread | Tension Dial: K | ||||
| BlueYellow Gre | |||||
| Polyester | ● | ● | ● | ||
| Woolly nylon | ● | ● | ● | ||
| WIDE Cover stitch looper Thread | Tension Dial: H | ||||
| BlueYellow Gre | |||||
| Polyester | ● | ● | ● | ||
| Woolly nylon | ● | ● | ● | ||
enRed
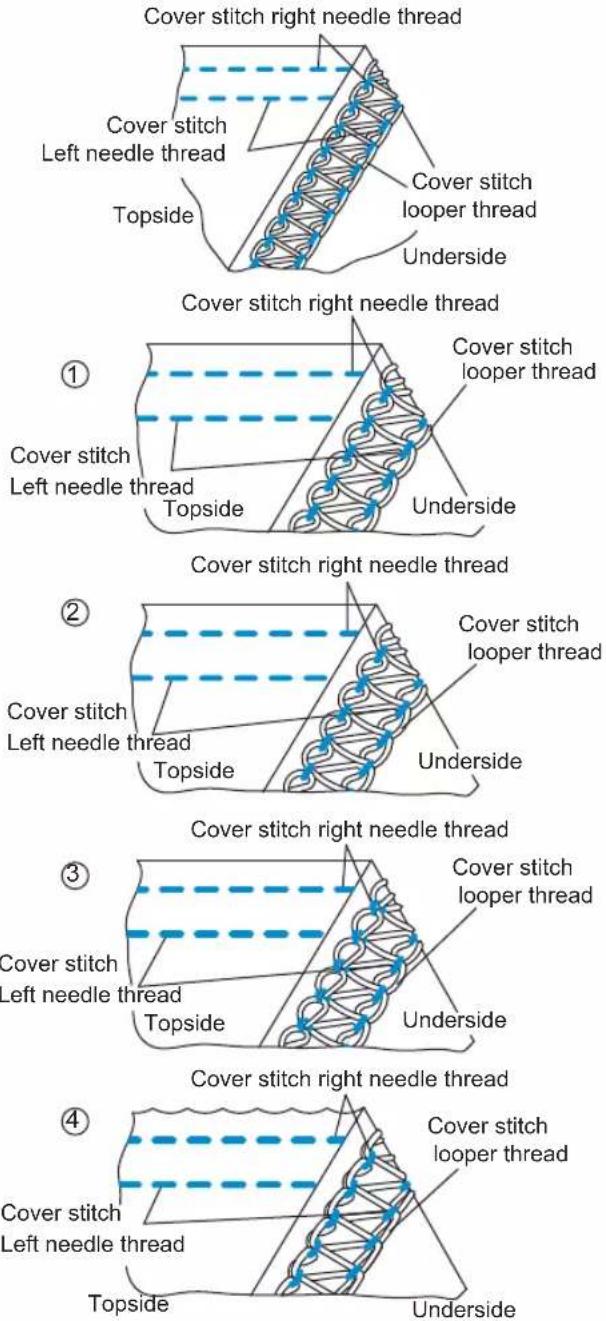
11. Triple Cover Stitch
Tension settings may be effected by :
1) Type and thickness of fabric
2) Needle size
3) Size, type and fiber content of thread
Stitch length for cover stitch should be set at over N (2.5mm)
Note: These are suggested tension settings only.
Correct Balance
Set auto tension dial to J shown at right and test sew on a sample of your fabric.
How to Balance
① When the cover stitch looper thread is too loose;
-Turn the cover stitch looper thread tension fine tuning lever (Purple) toward the “+”.
② When the cover stitch left needle thread tension is too loose;
-Turn the cover stitch left needle thread tension fine tuning lever (Red) toward the “+”.
-Or, turn cover stitch looper thread tension fine tuning lever (Purple) toward the “-”.
③ When the cover stitch middle needle thread tension is too loose;
-Turn the cover stitch middle needle thread tension fine tuning lever (Yellow) toward the “+”.
-Or, turn cover stitch looper thread tension fine tuning lever (Purple) toward the “-”.
④ When the cover stitch right needle thread tension is too loose;
-Turn the cover stitch right needle thread tension fine tuning lever (Green) toward the “+”.
-Or, turn the cover stitch looper thread tension fine tuning lever (Purple) toward the “-”.
⑤ When the top surface of fabric bulges between needle threads and the seams on the underside of the fabric becomes tight; -Turn the cover stitch looper thread tension fine tuning lever (Purple) toward the “-”.
Note: If the tension needs to be increased gently move the tension adjustment lever toward the "+" mark in increments indicated by the smaller white dots on the colored fine tuning label on front cover.
If the tension needs to be decreased gently move the tension adjustment lever toward the “-” mark in increments indicated by the smaller white dots on the colored fine tuning label on front cover.
| NEEDLE POSITION | |||||
| AUTO TENSION DIAL | J | ||||
| SEAM WIDTH FINGER KNOB | R | ||||
| STITCH LENGTH | N~4 | ||||
| DRIVING CULTCH POSITION | C | ||||
| CONVERTER | N/A | ||||
| Cover stitch looper Thread | Tension Dial | ||||
| BlueYellow Gre | |||||
| Polyester | |||||
| Woolly nylon | |||||

① ② ③ ④
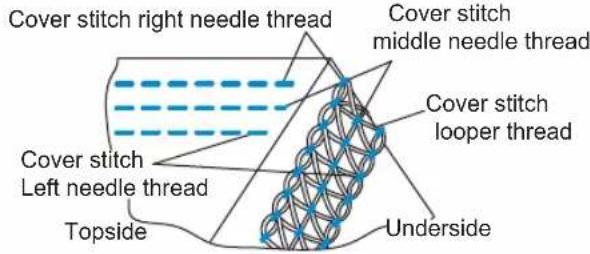
⑤

Securing the seam end
① Since the seams formed by cover stitch unravel when the looper thread is pulled out at the end of sewing, secure the seam end in the following manner.
② When sewing through to the edge of fabric, among the threads coming out of the fabric edge, knot the needle threads (2 or 3 threads) together first, as shown on the right illustration. Then, tie these threads with the looper threads.
③ When sewing is stopped halfway, pull out the needle threads (2 or 3 threads) on the underside of the fabric and knot the threads in the same manner as described above.
④ Cut extra threads.
Note: Normally, the seams at the start of sewing do not unravel, but it is safe to secure the seam end following the same steps as described when sewing through to the edge of fabric.

26. HOW TO SEW A ROLLED HEM
Rolled hemming is done by rolling and overedging the fabric edge.
Light weight fabrics such as lawn, voile, organdy, crepe, etc. perform the best.
Rolled hemming is not suited for heavy or stiff fabrics.
Note: Rolled hemming can only be performed with the right needle.
Machine Set up

Caution: Be sure to turn off power switch.
① Remove the left needle, chain stitch needle and cover stitch needle(s).
② Move the rolled hem lever to setting R.
③ Set the width adjustment dial to N.
④ Set stitch length dial to "1\~2" and a fine seam will be sewn. Thread: A variety of thread combinations can be used for rolled hemming. Thicker threads require a longer stitch length, while thinner threads sew well when using a shorter stitch length.

3-Thread Narrow Hem
Fabric edge will roll within stitching.
Upper and lower looper threads will interlock at the edge of stitching.
Correct Balance
Set auto tension dial to A shown at right and test sew on a sample of your fabric.
Note: If the tension needs to be increased gently move the tension adjustment lever toward the "+" mark in increments indicated by the smaller white dots on the colored fine tuning label on front cover.
If the tension needs to be decreased gently move the tension adjustment lever toward the "-" mark in increments indicated by the smaller white dots on the colored fine tuning label on front cover.
3-Thread Rolled Hem
Fabric edge will roll within the stitching.
The lower looper thread will pull the upper looper thread to under side of your fabric.
Correct Balance
Set auto tension dial to C shown at right and test sew on a sample of your fabric.
Note: Fid a beautiful rolled hem, thread the upper looper nylon and the needle and lower looper with lightweight regular thread.
Note: If the tension needs to be increased gently move the tension adjustment lever toward the "+" mark in increments indicated by the smaller white dots on the colored fine tuning label on front cover.
If the tension needs to be decreased gently move the tension adjustment lever toward the “-” mark in increments indicated by the smaller white dots on the colored fine tuning label on front cover.
| NEEDLE POSITION |  | ||||
| AUTO TENSION DIAL | A | ||||
| SEAM WIDTH FINGER KNOB | R | ||||
| STITCH LENGTH | 1~2 | ||||
| DRIVING CULTCH POSITION | L | ||||
| CONVERTER | N/A | ||||
| Light Weight fabric | Tension Dial | ||||
| BlueYellow Gr | |||||
| Polyester | ● | ● | ● | ||
| Woolly nylon | ● | ● | ● | ||
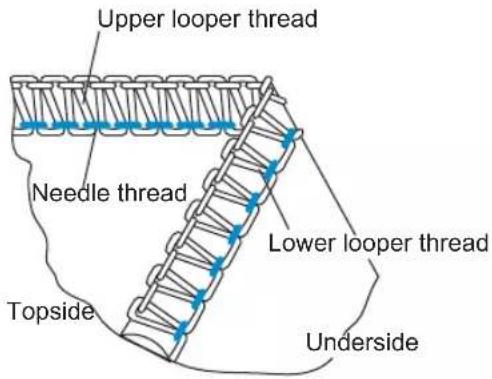
| NEEDLE POSITION |  | ||||
| AUTO TENSION DIAL | C | ||||
| SEAM WIDTH FINGER KNOB | R | ||||
| STITCH LENGTH | 1~2 | ||||
| DRIVING CULTCH POSITION | L | ||||
| CONVERTER | N/A | ||||
| Light Weight fabric | Tension Dial | ||||
| BlueYellow Gre | |||||
| Polyester | ● | ● | ● | ||
| Woolly nylon | ● | ● | ● | ||

Attach 2-Thread converter to upper looper (See page 11)
2-Thread Narrow Hem
Fabric edge will roll within stitching.
Upper and lower looper threads will interlock at the edge of stitching.
Correct Balance
Set auto tension dial to E shown at right and test sew on a sample of your fabric.
Note: With a delightful rolled hem, thread the lower looper nylon and the needle with lightweight regular thread.
Note: If the tension needs to be increased gently move the tension adjustment lever toward the "+" mark in increments indicated by the smaller white dots on the colored fine tuning label on front cover.
If the tension needs to be decreased gently move the tension adjustment lever toward the “-” mark in increments indicated by the smaller white dots on the colored fine tuning label on front cover.
2-Thread Rolled Hem
Fabric edge will roll within the stitching.
The lower looper thread will pull the upper looper thread to under side of your fabric.
Correct Balance
Set auto tension dial to D shown at right and test sew on a sample of your fabric.
Note: With a beautiful rolled hem, thread the lower looper nylon and the needle with lightweight regular thread.
Note: If the tension needs to be increased gently move the tension adjustment lever toward the "+" mark in increments indicated by the smaller white dots on the colored fine tuning label on front cover.
If the tension needs to be decreased gently move the tension adjustment lever toward the “-” mark in increments indicated by the smaller white dots on the colored fine tuning label on front cover.
| NEEDLE POSITION |  | ||||
| AUTO TENSION DIAL | E | ||||
| SEAM WIDTH FINGER KNOB | R | ||||
| STITCH LENGTH | 1~2 | ||||
| DRIVING CULTCH POSITION | L | ||||
| CONVERTER | USE | ||||
| Light Weight fabric | Tension Dial | ||||
| BlueY | yellow Gr | ||||
| Woolly nylon | ● | CONVERTER | ● | ||
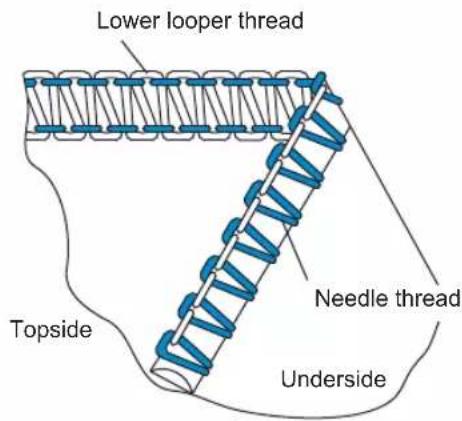
| NEEDLE POSITION |  | ||||
| AUTO TENSION DIAL | D | ||||
| SEAM WIDTH FINGER KNOB | R | ||||
| STITCH LENGTH | 1~2 | ||||
| DRIVING CULTCH POSITION | L | ||||
| CONVERTER | USE | ||||
| Light Weight fabric | Tension Dial | ||||
| BlueYellow Gr | |||||
| Polyester | ● | CONVERTER | ● | ||
| Woolly nylon | ● | CONVERTER | ● | ||
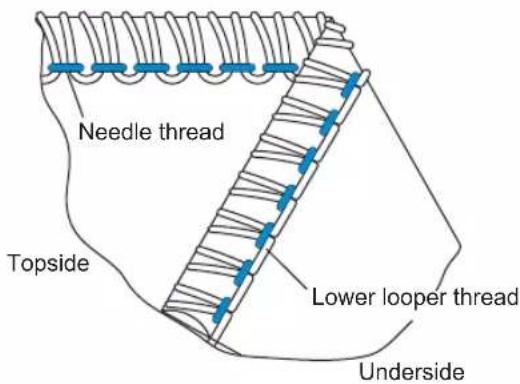
enRed
Additional Information About Rolled Hemming
Hold the thread chain when you begin sewing to keep it from curling into the seam.
Turn the differential feed to 0.8 or 0.6 to eliminate puckering of fine fabrics.
The minimum overedge stitch width that can be obtained for rolled hemming is approximately 1.5 mm (1/16 inch) since the cutting width cannot be set below 3.5 mm (9/64 inch).
To Secure the Rolled Hem Thread Chain
Apply a small drop of liquid seam sealant to the end of the seam. Allow to dry, then cut the chain close to the stitches.
Note: Test the liquid seam sealant for color fastness before use.

natural_image
Technical line drawings of sewing machine stitching process, showing steps from thread to thread connection (no text or symbols)27. STITCH VARIATIONS AND SEWING TECHNIQUES
How to Sew a Flatlock Decorative Seam
A flatlock stitch is achieved by adjusting the tension of the 2-thread or 3-thread overlock stitch, sewing the seam, and then pulling the fabric apart to flatten the seam.
The flatlock stitch can be used as a construction and decorative stitch or for ornamentation only.
Machine Set Up
Use either overedge right needle or left needle.
Begin with the machine threaded and tension balanced for the 2-thread overlock (page 41) or 3-thread flatlock stitch (page 43).
Flatlocking a Seam
Place the fabric wrong sides together to sew a decorative stitch on the right side of the garment.
Sew the seam, trimming the excess fabric.
The needle thread (Red or Yellow) will form a V on the underside of the fabric.
The lower looper thread will pull into a straight line at the fabric edge.
Pull on opposite sides of the seam to pull the stitches flat.

Decorative Flatlocking
① Place the movable upper knife in the nonworking position (page 10). The fabric is not trimmed on this stitch.
② Fold fabric wrong sides together.
Position the fabric so the seam is sewn with part of the stitch extending off the fabric.
③ Pull on opposite sides of the stitch to flatten.
Additional Information About Flatlocking
The tensions must be correctly adjusted for the fabric to pull flat.
When sewing with 3-Thread flatlock. The upper looper thread is the prominent thread in the flatlock stitch. Place a decorative threading the upper looper and inconspicuous threads in the lower looper and needle.
For a ladder stitch, sew seam with right sides together. The needle thread will be the prominent thread that creates the ladder.
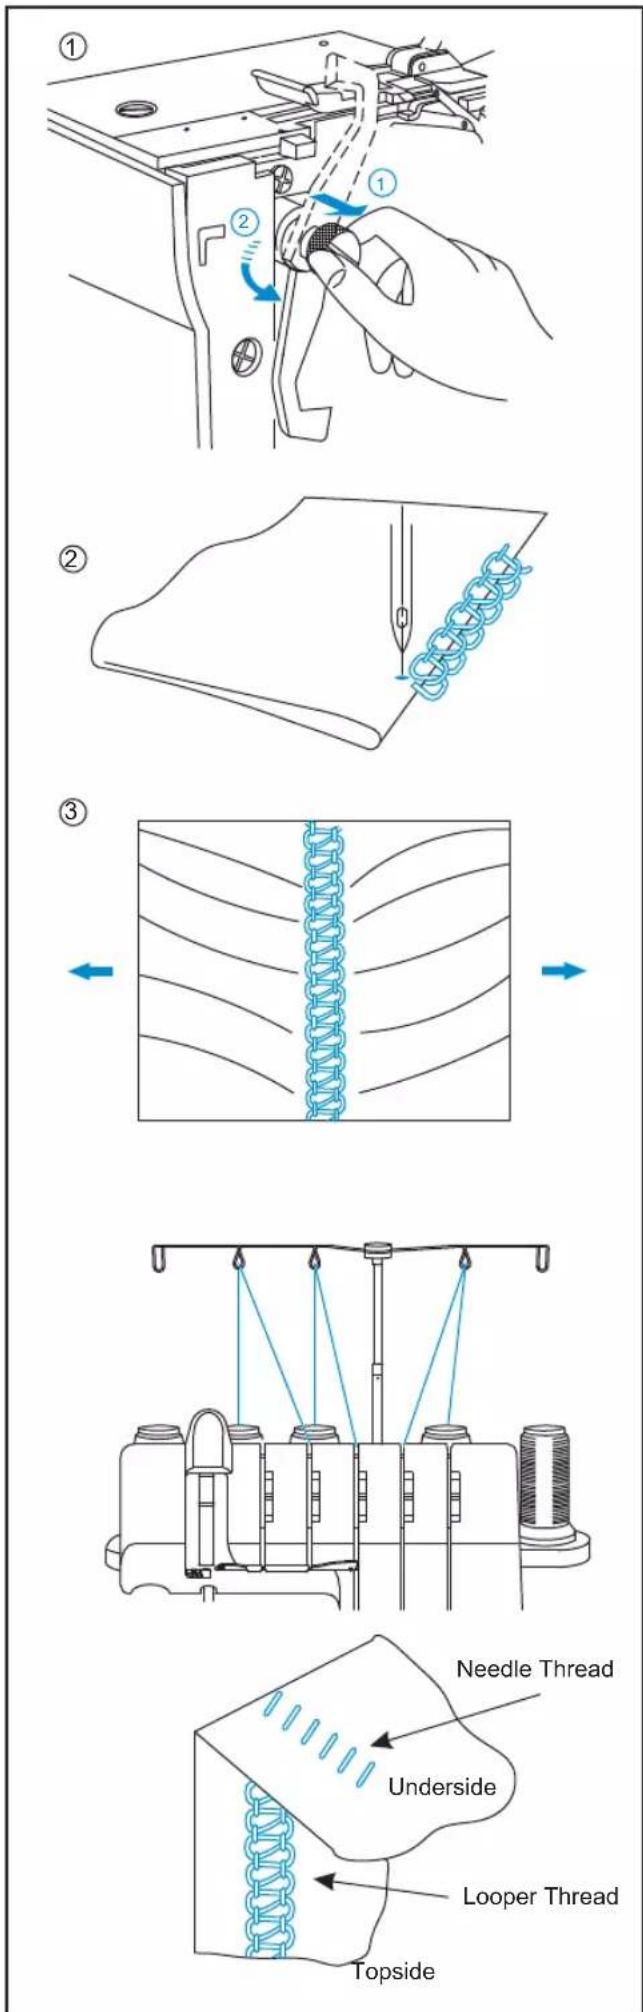
How to Sew an Overlock Blind Hem
The excess fabric is trimmed and the hem is sewn and the raw edges are overlocked in one operation.
The overlock blind hem is best suited for sewing knit wear. It provides a durable finish that is almost invisible.
① Use right needle and adjust machine for a narrow 3-thread overlock stitch. (See page 42)
Note: The three-thread flatlock stitch can also be used. (See page 43)
② Set the stitch length dial at 4.
③ Fold the hem to the wrong side of the fabric, then back to the right side with 6 mm (1/4 inch) beyond the fold.
④ Stitch on the extended hem edge, allowing the machine needle to barely catch the edge of the fold.
Note: An optional blindhem foot is available.(See page 67)
How to Sew Pin Tucks
Sew decorative pin tucks on the fabric before cutting out the garment.
Use right needle and adjust machine for a narrow 3-thread overlock stitch. (See page 42)
Note: The rolled hem can also be used for this technique.
① Place the movable upper knife in the nonworking position. (See page 10)
Mark the fabric with the desired number of pin tucks using a water-soluble fabric marker.

② Fold the fabric with the wrong sides together. Sew with the stitches lying neatly on the edge of the fold.
③ Press the pin tucks in the same direction.
Turning Square Corners
Outside Corner
① Cut out approximately 2cm (51/64 inch) from the corner, in line with the overedge seam edge.
Sew one stitch beyond point (A) and stop.
Raise needle and presser foot.
② Pull the fabric to the rear of the machine just enough to release the thread caught on the finger of the throat plate.
Note: Presser foot has been removed to show detail.
③ Turn the fabric and lower the presser foot so that the knife is positioned in line with the cut edge.
Pull slack threads up, then start to sew.
②

natural_image
Line drawing of a sewing machine needle stitching fabric (no text or symbols)③

natural_image
Abstract geometric pattern with diagonal lines and a curved line (no text or symbols)①
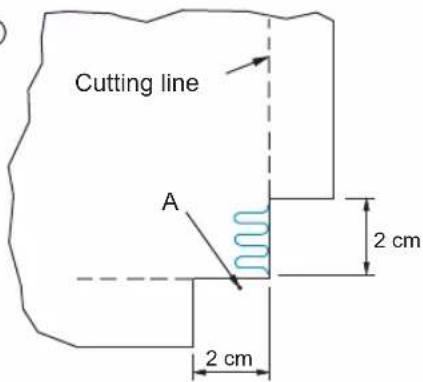
②

③

Inside Corner
① Cut inside corner up to seam line as shown
② Sew along seam line.
Sew up to end of fold. (Leave needle in fabric)
Raise presser foot. (Leave needle in fabric)
Spread fold and re-fold so that seam line is straight.
Lower presser foot.
③ Continue stitching on seam line.
Pin Placement
Insert pins to the left of the presser foot. The pins will be easy to remove and are away from the cutting action of the knives.

Caution: Sewing over pins will damage and /or destroy the cutting edge of the knives.
Securing the Thread Chain
Thread a large eye, hand sewing needle (such as a tapestry needle) with the thread chain.
Insert the needle into the end of the seam to secure thread.
Note: To secure a rolled hem thread chain, see page 56.

How to Reinforce a Seam
Inserting twill tape while overedge sewing will stabilize the seam.
① Insert the tape through the hole in the front of the foot.
② Position the tape under the foot to the back of the machine and sew the garment seam.
③ The tape is attached as the seam is sewn.
Braiding by Chaining off
Place the movable upper knife in nonworking position.
① Insert filler cord such as yarn or twill type through the hole in the front of the foot.
Position the filler cord under the foot and chain off the desired length.
② Chained off braids can be used individually or woven into 3 or 4 ply braids.

28. MACHINE MAINTENANCE
An overlock machine requires more maintenance than a conventional machine for two reasons:
1) A lot of lint is produced due to the cutting action of the knives.
2) An overlock runs at a very high speed and needs to be oiled frequently to lubricate the internal working parts.
Cleaning the Machine

Danger: Before cleaning your machine, disconnect power line plug from the wall receptacle.
Clean the lint from the looper and knife area often with a dry lint brush.
Oiling the Machine

Danger: Before lubricating your machine, disconnect power line plug from the wall receptacle.
The oiling points shown in the diagram, should be oiled periodically.
Note: Use only sewing machine oil. Do not use any other oil or damage could result.

How to Replace the moveable upper Knife

Danger: Before replacing the moveable upper knife, disconnect power line plug from the wall receptacle.
The moveable knife should be changed when it becomes dull.
The moveable knife can be replaced according to the directions provided, however if there are any difficulties experienced, consult your dealer to make the replacement.
Be sure that the power line plug is disconnected from the electric source.
Open the front cover and set the moveable upper knife (a) in the working position.
Loosen the moveable knife set screw (b) and remove the moveable knife (a).
Turn the handwheel to lower the moveable knife holder to its lowest position.
In this position, put a new moveable knife in the groove of the moveable knife holder, making sure that the edge of the moveable knife is approximately 0.5 to 1.0 mm below the surface of the fixed cutting blade (c).
Tighten knife set screw (b).moveable

How to Change Light Bulb

Danger: Always unplug before re-lamping.
Light bulb is available at your local retailer. Take old bulb to the retailer and ask for same bulb.
If voltage indicated on the electrical rating plate of your machine is 120V, ask for light bulb conforming to following specification.
- Bayonet type: 110\~120V, 15W
Glass shape: T-20
Lamp cap: E12
Overall length: 48mm
① Remove light cover screw then while pushing the cover lightly to the rear, swing cover to the left and remove from machine as shown in the illustration. Turn bulb to the left to remove. To replace the bulb, push bulb into the socket and turn to the right.

Caution: Be sure the light bulb has cooled off before changing with a new one.

Warning: Replace the light cover first before connecting the power line plug.
If voltage indicated on the electrical rating plate of your machine is 220-240V, ask for light bulb conforming to following specification.
-Edison type (screw type): 220 \~240V, 15W
Glass shape: T-22
Lamp cap: E14
Overall length: 56mm
Remove light cover screw then while pushing the cover lightly to the rear, swing cover to the left and remove from machine as shown in the illustration. Turn bulb to the left to remove. To replace the bulb, screw bulb into the socket and turn to the right.

29. SNAP ON PRESSER FOOT REMOVAL/REPIACEMENT
The following optional presser feet specially prepared for this machine are available at your local retailer.
Note: Do not use presser feet made for other machines. Use of such presser feet may result in interference with the needle and knife and can be hazardous.
The snap-on type presser foot of this machine permits easy removal and replacement.

Caution: Be sure to disconnect the power line plug or turn off the power switch when changing the presser foot.
Snap-On Type Presser Foot
Removal
Raise presser foot and raise needle bar to its highest position.
Press red colored lever (A) located on back of clamp under the presser foot shank, raise presser bar to its highest position and while holding the presser bar in this position, remove the presser foot.
Replacement
Place presser foot on needle plate under presser foot shank so that hinge pin (C) will fit in slot (B) of the shank. Then lower presser bar with lifter.
If presser foot can not be attached to presser foot shank easily, raise presser bar lifter to its highest position and while holding it in this position, place presser foot under the presser foot shank. Then lower presser bar.
Raise presser bar and make sure the presser foot is properly attached to the presser foot shank.
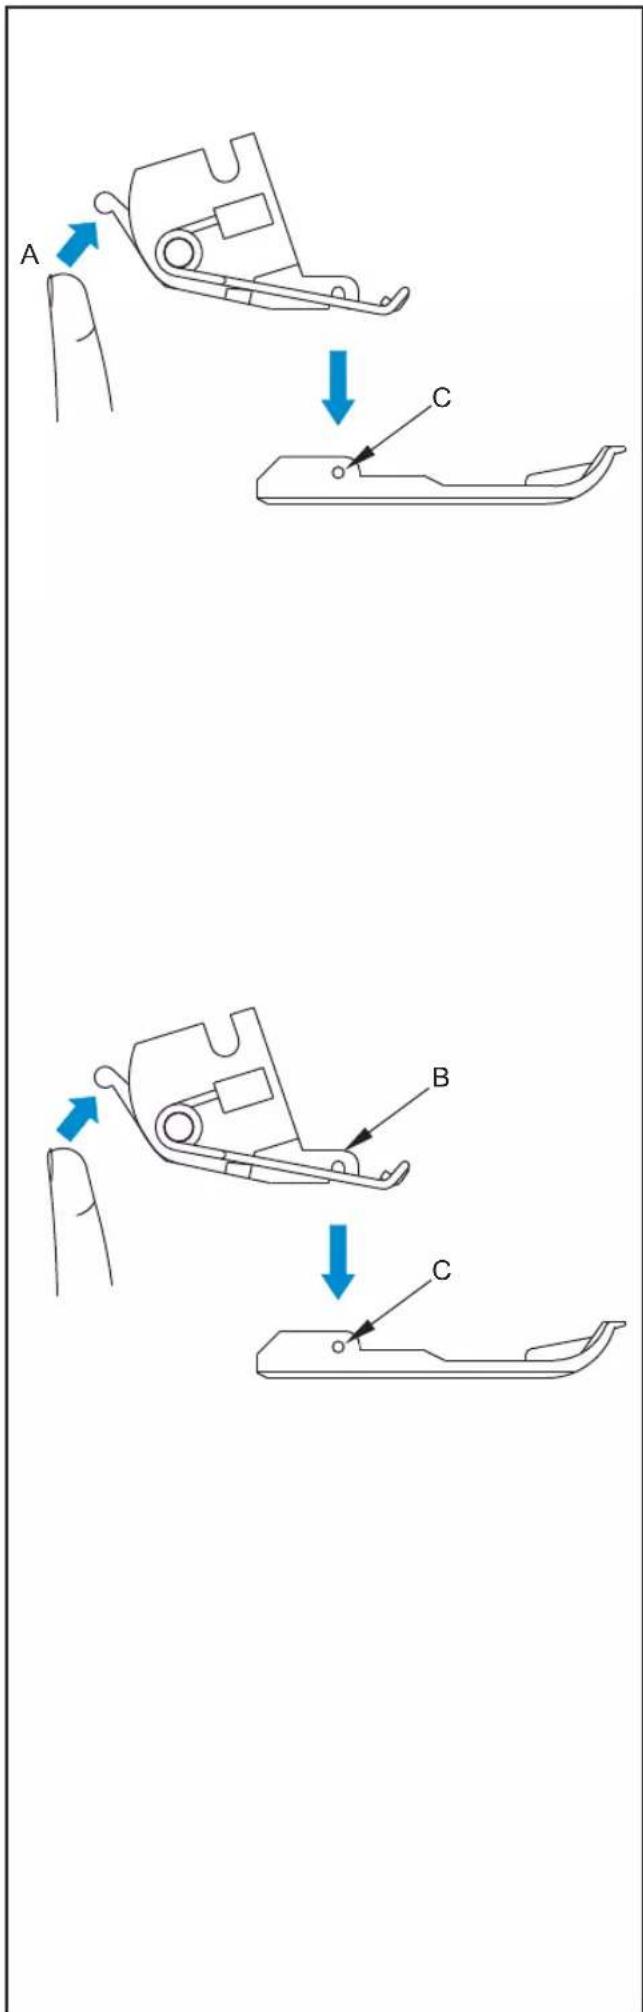
30. OPTIONAL PRESSER FEET
Elastic Foot
This foot is used for attaching elastic tape to the garment while the amount of strech can be adjusted and remain uniform.
Blindhem Foot
This foot is for sewing cuffs on knit fabrics, skirt and trouser seams where seam should not be visible.
Ruffling Foot
This foot is most suited for gathering when sewing tiered skirts, yokes, cuffs and frills on skirts, etc.
This foot is also suited for sewing two fabrics together and gathering the bottom fabric in one operation.
Beading Foot
This foot is used for sewing on beads, etc.
Cording Foot
This sewing foot is suited for serging cording or piping between two layers of fabric for a decorative touch.
Taping Foot
This sewing foot is suited for guiding ribbon and tapes.

natural_image
Technical line drawing of a mechanical clamp or bracket component (no text or symbols)
natural_image
Technical line drawing of a mechanical component with no visible text or symbols
natural_image
Technical line drawing of a mechanical component assembly (no text or symbols)
natural_image
Technical line drawing of a mechanical clamp or bracket component (no text or symbols)
natural_image
Technical line drawing of a mechanical component with no visible text or symbols
natural_image
Technical line drawing of a mechanical component with no visible text or symbols- TROUBLESHOOTING CHART
| Problem | Solution | Page |
| Fabric does not feed well | - Lengthen stitch length. | 29 |
| - Increase presser foot pressure for heavy weight fabric. | 30 | |
| - Decrease presser foot pressure for lightweight fabric. | 30 | |
| Needle breaks | - Insert needle correctly. | 13 |
| - Do not pull fabric while sewing. | 33 | |
| - Tighten needle set screw. | 13 | |
| - Use a larger needle on heavy fabrics. | 13 | |
| Thread breaks | - Check threading. | 14~27 |
| - Check for tangled or caught thread. | 28 | |
| - Insert needle correctly. | 13 | |
| - Insert new needle, current needle may be bent or have a blunt point. | 6 | |
| - Use only high quality thread. | 69 | |
| - Loosen thread tension. | 32~48 | |
| Stitch skip | - Insert new needles, current needles may be bent or have a blunt point. Use only recommended needles HAx1 / ELx705 | 6 |
| - Tighten needle set screw. | 13 | |
| - Insert needles correctly. | 13 | |
| - Change type or size of needles. | 13 | |
| - Check threading. | 14~27 | |
| - Increase presser foot pressure. | 30 | |
| - Use a high quality thread. | 69 | |
| Irregular stitches | - Balance thread tension. | 39~48 |
| - Check for tangled or caught thread. | 28 | |
| - Check threading. | 14~27 | |
| Fabric puckers | - Loosen thread tension. | 39~51 |
| - Check for tangled or caught thread. | 28 | |
| - Use high quality thread. | 69 | |
| - Shorten stitch length. | 29 | |
| - Decrease presser foot pressure for lightweight fabrics. | 30 | |
| Irregular trimming | - Check alignment of knives. | 64 |
| - Replace one or both knives. | 64 | |
| Fabric jams | - Close front cover before sewing. | 7 |
| - Check for tangled or caught thread. | 28 | |
| - Compress thick layers of fabric with conventional machine before sewing with overlock. | ||
| Machine does not operate | - Connect machine to power source. | 7 |
- FABRIC, THREAD AND NEEDLE GUIDE
| Type of Fabric | Type of Thread | NeedleHAx1 / ELx705 |
| WOVEN | ||
| LightweightLawn, Organdy, Voile,Crepe, etc. | Cotton: #100Silk/ Rayon: #100Spun: #80 ~ #90Polyester: #80 ~ #100 | #11/80 |
| Medium WeightMuslin, Seersucker, Satin,Gabardine, Broadcloth, etc | Cotton: #60 ~ #80Silk/ Rayon: #50Spun: #60 ~ #80Polyester: #60 ~ #80 | #14/90, #11/80 |
| Heavy WeightOxford, Denim, Tweed,Serge,Corduroy | Cotton: #40 ~ #60Silk/ Rayon: #40 ~ #60Spun:#60 ~ #80Polyester: #50 ~ #80 | #14/90 |
| KNIT | ||
| TricotJerseyWool (woven, knit) | Spun: #80 ~ #90Polyester: #60 ~ #80 | #11/80 |
| Spun: #60 ~ #80Polyester: #60 ~ #80Cotton: #60 ~ #80 | #14/90, #11/80 | |
| Spun: #60 ~ #80Polyester: #50 ~ #60Woolly nylonWoolly Polyester | #14/90, #11/80 |
- SPECIF CATIONI
| Item | Specification |
| Sewing speed | 1,300 spm maximum |
| Stitch length (feed amount) | 1~4 mm (standard: rolled hemming 1-2, ordinary overedge N=2.5) |
| Differential feed ratio | 1:0.6 ~ 1:2 (with differential feed machine) |
| Overedge stitch width | Rolled hemming 1.5 mm, ordinary overedge 3.0 ~ 9.8 mm (standard 4 mm) |
| Cover stitch needle gauge | Two needles: 2.8 mm (narrow), 5.6 mm (wide)Triple needles: 5.6 mm |
| Needle bar stroke | 27 mm |
| Pressure foot rise | 4.5 mm |
| Needle | HAx1 (130/705H) or ELx705 (#14 or #11) |
| Number of threads | 2~5 |
| Machine dimensions (mm) | |
| Width | 360 |
| Depth | 290 |
| Height | 300 |
| Weight (kg) | 9.0Kgs /19.5Lbs |


- Diana
- A-LINE SERIES Model BL480A
- Instruction and Reference Guide
- PREFACE
- "IMPORTANT SAFETY INSTRUCTIONS"
- DANGER - To reduce the the risk of electric shock:
- WARNING - To reduce the risk of burns, fire, electric shock, or injury to persons.
- "SAVE THESE INSTRUCTIONS"
- TABLE OF CONTENTS
- Page
- PRINCIPAL PARTS
- ACCESSORIES
- Accessories are contained in the accessory case
- Accessories in box with machine
- Optional Accessories
- NEEDLE INFORMATION
- HOW TO OPEN FRONT COVER
- CAUTION
- PRINCIPAL PARTS BEHIND THE FRONT COVER
- CONNECTING MACHINE TO POWER SUPPLY
- POLARIZED PLUG INFORMATION (FOR U.S.A. & CANADA ONLY)
- Warning:
- REMOVAL AND REPLACEMENT OF WASTE TRAY
- Replacement
- Removal
- PREPARATION FOR THREADING
- Setting Up the Thread Antenna
- Thread Net
- Spool Cap
- HOW TO DISENGAGE MOVABLE UPPER KNIFE
- To place movable knife in nonworking position
- To place movable knife in working position
- TO CONVERT UPPER LOOPER TO 2-THREAD CONVERTER
- To Use the 2-Thread converter
- To Disengage 2-Thread converter
- STANDARD OVERLOCK AND ROLLED HEM STITCHING
- To Sew Standard Overlock
- To Sew Rolled Hem
- HOW TO REMOVE AND INSERT NEEDLES
- Needle Position
- To Remove Needle (s)
- Attention:
- To Insert Needle (s)
- THREADING THE MACHINE
- Threading Diagram Sequence: 5-Thread Chain Stitch-3-Thread overlock
- Tension Color Code: 5-Thread Chain Stitch-3-Thread overlock
- Threading Diagram Sequence: Triple Cover Stitch
- Tension Color Code : Triple Cover Stitch
- To Thread The Machine Correctly
- 1) Threading the Upper Looper (Green)
- 2) Threading the Lower Looper (Blue)
- 3) Threading the (Purple) and Cover stitch Looper
- 4) Threading the (Yellow) Right Needle (B on needle clamp)
- 5) Threading the (Red) Stitch Needle (D on needle clamp) CENTER NEEDLE
- Note: For 4 thread overlock left needle: Use needle A.
- Note: For chain stitch :Use needle D.
- 6) Threading the Cover Stitch Needles
- Threading the Cover Stitch Right Needle (Green) (E on needle clamp)
- EASY THREAD CHANGE: TIE ON METHOD
- HOW TO ADJUST THE SEAM WIDTH
- Needle Position Width
- Width adjusting dial
- HOW TO ADJUST THE STITCH LENGTH
- HOW TO ADJUST THE PRESSER FOOT PRESSURE
- DIFFERENTIAL FEED
- Gathered Overedge
- To set the differential feed adjusting dial for gathering
- Stretch Overedge
- To set the differential feed adjusting dial for stretch
- PRESSER FOOT MARKINGS
- PRESSER FOOT LIFTER
- CHAINING OFF AND TEST SEWING
- SELECTION OF STITCHES & AUTO TENSION
- ① Move knife into nonworking position
- ② To disengage upper looper
- ③ To re-engage upper looper
- ④ To install the seam guide plate
- Start and end of sewing
- SUGGESTED TENSION SETTING
- 1) Chain stitch
- How to Sew
- Correct Balance
- How to Balance
- 2) 2-Thread Wrapped Edge Overlock
- Note:
- 3) 2-Thread Overlock (NARROW-WIDE)
- 5) 3-Thread Flatlock
- 6) 3-Thread Mock Safety Stitch Overlock
- 7) 4-Thread Mock Safety Stitch Overlock
- 8) 4-Thread Chain Stitch-2-Thread Overlock
- 9) 5-Thread Chain Stitch 3-Thread Overlock
- HOW TO SEW A COVER STITCH
- Machine Set up
- Additional Information About Cover Stitch
- At start of sewing
- At end of sewing
- stop sewing when the fabric is not under the needles
- Cover Stitch (3-Thread) Wide/Narrow
- Triple Cover Stitch
- Securing the seam end
- HOW TO SEW A ROLLED HEM
- 3-Thread Narrow Hem
- 3-Thread Rolled Hem
- 2-Thread Narrow Hem
- 2-Thread Rolled Hem
- Additional Information About Rolled Hemming
- To Secure the Rolled Hem Thread Chain
- STITCH VARIATIONS AND SEWING TECHNIQUES
- How to Sew a Flatlock Decorative Seam
- Flatlocking a Seam
- Decorative Flatlocking
- Additional Information About Flatlocking
- How to Sew an Overlock Blind Hem
- How to Sew Pin Tucks
- Turning Square Corners
- Outside Corner
- Inside Corner
- Pin Placement
- Securing the Thread Chain
- How to Reinforce a Seam
- Braiding by Chaining off
- MACHINE MAINTENANCE
- Cleaning the Machine
- Oiling the Machine
- How to Replace the moveable upper Knife
- How to Change Light Bulb
- SNAP ON PRESSER FOOT REMOVAL/REPIACEMENT
- Snap-On Type Presser Foot
- OPTIONAL PRESSER FEET
- Elastic Foot
- Blindhem Foot
- Ruffling Foot
- Beading Foot
- Cording Foot
- Taping Foot
Brand : BABY LOCK
Model : Diana
Category : Sewing machine