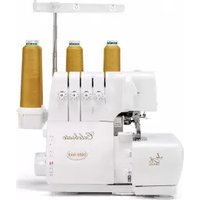
Celebrate - Sewing machine BABY LOCK - Free user manual and instructions
Find the device manual for free Celebrate BABY LOCK in PDF.


| Product Type | Sewing Machine |
| Brand | Baby Lock |
| Model | Celebrate |
| Dimensions (L x W x H) | 41 x 19 x 30 cm (16.1 x 7.5 x 11.8 in) |
| Weight | 8 kg (17.6 lbs) |
| Power Supply | 120 V, 60 Hz (US) or 230 V, 50 Hz (EU), 60 W |
| Stitch Patterns | Built-in stitches including straight, zigzag, blind hem, buttonhole, and decorative stitches |
| Buttonhole Type | Automatic one-step buttonhole |
| Needle Threader | Automatic needle threader |
| Bobbin Winding | Top-loading bobbin with drop-in mechanism |
| Speed Control | Variable speed with foot pedal |
| Presser Foot Pressure | Adjustable |
| Lighting | LED sewing light |
| Free Arm | Yes, for cuffs and sleeves |
| Included Accessories | Presser feet set, bobbins, needles, seam ripper, screwdriver, lint brush, dust cover |
| Maintenance | Clean bobbin case and feed dogs regularly; oil as per manual instructions |
| Safety Features | Automatic needle stop, safety clutch to prevent needle breakage, finger guard |
| Repairability | Common spare parts available; authorized service centers |
| User Manual | 52 pages, available for free download in PDF |
Frequently Asked Questions - Celebrate BABY LOCK
User questions about Celebrate BABY LOCK
0 question about this device. Answer the ones you know or ask your own.
Ask a new question about this device
Download the instructions for your Sewing machine in PDF format for free! Find your manual Celebrate - BABY LOCK and take your electronic device back in hand. On this page are published all the documents necessary for the use of your device. Celebrate by BABY LOCK.
USER MANUAL Celebrate BABY LOCK
Instruction and Reference Guide
Model BLS1
baby lock
FOR THE LOVE OF SEWING
To register your machine warranty and receive Baby Lock product updates and offers, go to babylock.com/profile. If you have questions with registration, visit your Authorized Baby Lock Retailer.
Baby Lock Consumer Helpline: 800-313-4110
www.BabyLock.com
"IMPORTANT SAFETY INSTRUCTIONS"
When using overlock machine, basic safety precautions should always be followed, including the following.
Read all instructions before using this overlock machine.
DANGER-
To reduce the risk of electric shock.
-
The overlock machine should never be left unattended when plugged in. Always unplug this overlock machine from the electrical outlet immediately after using and before cleaning.
-
Always unplug before replacing light bulb. Replace bulb with same type rated 15 watts/110 volts in 110V/120V area. For LED bulbs, replace with rated 2 watts or less.
WARNING-
To reduce the risk of burns, fire, electric shock, or injury to persons.
-
Use this overlock machine only for its intended use as described in this manual. Use only attachments recommended by the manufacturer as contained in this manual.
-
Never operate this overlock machine if it has a damaged cord or plug, if it is not working properly, if it has been dropped or damaged, or dropped into water. Return the overlock machine to the nearest authorized dealer or service center for examination, repair, electrical or mechanical adjustment.
-
Never operate the overlock machine with any air openings blocked. Keep ventilation openings of the overlock machine and foot controller free from the accumulation of lint, dust, and loose cloth.
-
Never drop or insert any object into any opening.
-
Do not use outdoors.
-
Do not operate where aerosol (spray) products are being used or where oxygen is being administered.
-
To disconnect, turn the main switch to the symbol "O" position which represents off, then remove plug from outlet.
-
Do not unplug by pulling on cord. To unplug, grasp the plug, not the cord.
-
Keep fingers away from all moving parts. Special care is required around the overlock machine needle.
-
Always use the proper needle plate. The wrong needle plate can cause the needle to break.
-
Do not use bent needles.
-
Do not pull or push fabric while stitching. It may deflect the needle(s) causing it to break.
-
Switch the overlock machine to the symbol "O" position when making any adjustments in the needle area, such as threading needle, changing needle, threading looper, or changing presser foot, and the like.
-
Always unplug the overlock machine from the electrical outlet when removing covers, lubricating, or when making any of the user servicing adjustments mentioned in the instruction manual.
-
Keep fingers away from moving parts, especially the area near the blades.
-
Please note that on disposal, this product must be safely recycled in accordance with relevant National legislation relating to electrical / electronic products. If in doubt please contact your retailer for guidance.
-
This appliance can be used by children aged from 8 years and above and persons with reduced physical, sensory or mental capabilities or lack of experience and
reduced physical, sensory or mental capabilities or lack of experience and knowledge if they have been given supervision or instruction concerning use of the appliance in a safe way and understand the hazards involved.
-
Children shall not play with the appliance.
-
Cleaning and user maintenance shall not be made by children without supervision.
-
- Moving Parts- To reduce risk of injury, switch off before servicing. CLOSE COVER BEFORE OPERATING MACHINE
-
Do not allow the power cable and controller cable to be scarred, damaged, modified, excessively bent, pulled, twisted, or bundled. If heavy objects are placed on the power cable or it is subjected to heat, it may be damaged, possibly causing fire or electrical shock.
"SAVE THESE INSTRUCTIONS" "This overlock machine is intended for household use."
INFORMATIONS IMPORTANTES DE SÉCURITÉ
"CONSERVEZ CES INSTRUCTIONS"
Congratulations on Choosing Baby Lock Celebrate
You are now entering an exciting new era in sewing. As a Baby Lock Celebrate owner, you are opening the door to more creative sewing adventures and a new ease in serger sewing.
You'll be able to duplicate professional seaming and finishing as seen in even the most expensive ready-to-wear. Because of the serger's high-speed capability - up to 1,500 stitches per minute - and its ability to seam, overcast and trim, all in one operation, you will be completing more projects in less time. Fabrics and handling techniques you previously avoided will no longer pose a challenge--the Baby Lock Celebrate handles all types of fabrics with equal ease. And, because of the way it forms stitches, your serger can accommodate a larger variety of threads than conventional machines, inspiring endless decorative options, too. And those threads will be easier than ever to thread, thanks to the Celebrate's revolutionary new "Instant Jet-Air Threading System"!
Your Baby Lock Celebrate is a high-quality, dependable performance machine. With proper care and maintenance, it will give you many years of sewing pleasure. We suggest you follow your instruction manual as a step-by-step guide to become familiar with serger sewing. Later, as you become more confident, the manual will become a handy reference for expanding your abilities.
Happy Sewing!
Celebrate
Notes:
Table of Contents
OVERVIEW......5
How Your Serger Operates....6
Overview of the Celebrate 6
Accessories 7
Needles 8
Thread 8
Optional Accessories 8
Setting Up Your Celebrate 9
Cutting Blade Locking Dial 10
Presser Foot Pressure Adjustment.... 10
Snap-On Presser Foot 10
Stitch Length / Rolled Hem 11
Stitch Width 11
Differential Feed 12
2-Thread Subsidiary Looper 13
THREADING....14
Threading Preparation 14
Threading Your Celebrate 15
Threading Position for Threading Loopers 15
Lower Looper.... 15
Upper Looper.... 16
Right Needle 17
Left Needle 18
How to use Needle Threader.... 18
Tension Adjustment 19
Serging with Fabric 20
Clearing the Stitch Width Fingers 20
Re-threading Loopers 21
Re-threading Needles 21
4-THREAD OVERLOCK 22
4-Thread Overedging 22
Overlock Seam 22
4-Thread Overlock 23
3-THREAD OVERLOCK 24
3-Thread Overlock 24
ROLLED EDGING 25
Rolled Edging 25
Belt Loops and Button Loops.... 26
Returning to Standard Serging 26
Table of Contents (Cont.)
2-THREAD OVERLOCK 27
2-Thread Overlock 27
Converting from 3-Thread Overlock to 2-Thread Overlock 27
Flatlock Seams 28
Flatlock "Topstitching" 29
Blind Hemming 30
2-Thread Rolled Edge 31
Returning to 3 or 4-Thread Overlock 32
BASIC SERGING TECHNIQUES 33
Securing Ends 33/34
Turning Outside Corners 35
Turning Inside Corners 35
Serging Curves 36
Inserting Tapes 36
Cutting Blade Cover Seam Guide 36
USING SPECIALTY THREADS 37
Using Specialty Threads 37
Threading Lightweight Thread 37
Changing Threads 37
Threading Medium Weight Thread 37
Thread Cradle for Loopers 38
Looper Threading Tool 39
Bypassing the Threading Port 40
Specialty Thread Guide Chart.... 41/42
MAINTENANCE 43
Replacing Needles 43
Replacing Cutting Blades 43
Cleaning....44
Replacing LED Bulb 44
TROUBLESHOOTING 45
Troubleshooting 45/46
Dos and Don'ts 46
TECHNICAL DATA....47
CHART FOR STITCH SELECTION SETTINGS....48
How Your Serger Operates
Sometimes called an overlock machine or overlocker, the serger is different from any conventional sewing machine you have used. Awareness of its simple operation will enable you to become more proficient in its use. Please read all instructions before using your new machine.
Serging is kind of a knitting process that loops two, three or four threads together to create a stitch. Your Baby Lock Celebrate operates with one or two needles and one or two "loopers," each carrying a thread to form the overlock stitch.
When fabric is placed into the machine, it reaches the feed dogs first. The feed dogs move the fabric along as the cutting blades trim the edge, creating a clean edge to be finished. Then the loopers and needle(s) form the stitch on the fabric edge, supported by one or more parallel "stitch fingers" --metal prongs that keep the fabric flat. The threads become "locked" over the fabric and the resulting stitches encase the raw edge with thread to prevent fabric raveling.
After setting up your machine for the first time, take a few moments to learn how it sews. Before your serger is threaded, turn the handwheel - toward you - and watch the movement and operation of the various parts. Don't bother with fabric at first. It doesn't hurt your serger to stitch without fabric under the presser foot.

Overview of the Celebrate
- Presser foot lifter/ thread release lever*
- Thread cutter
- Needle threader lever
- Needle height viewing area
- Needle clamp screw
- Snap-on presser foot
- Needle plate
- Stitch width adjusting dial
- Cutting blade lock switch
- Blade cover
- Stitch length/rolled hem adjusting dial
- Needle drop drawer
- Subsidiary looper
- Front cover
- Machine lock button release lever
-
Machine lock button
-
Looper threading lever
- Differential feed adjusting lever
- Handwheel
- Green marks
- Lower looper threading port
- Power switch
- Looper threader selector
- Accessory compartment & spool stand
- Upper looper threading port
- Lower looper thread tension adjuster
- Upper looper thread tension adjuster
- Carrying handle
- Telescopic thread guide and antenna
- Right needle thread tension adjuster
- Left needle thread tension adjuster
- Needle threader selector
- Presser foot pressure adjusting screw
* Raising the presser foot releases all threads.

Accessories
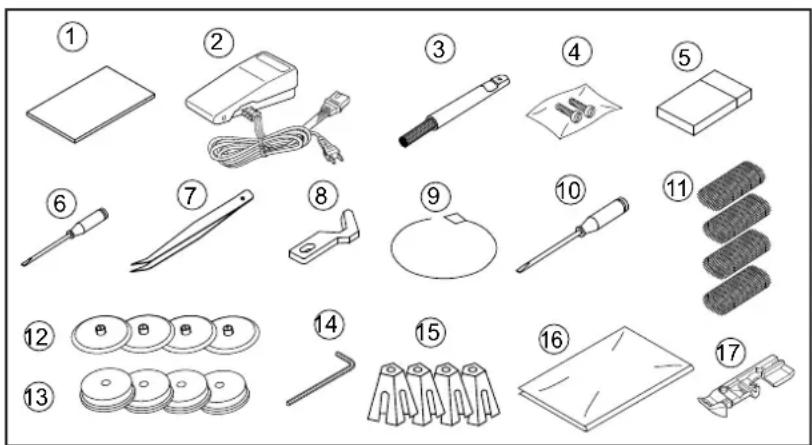
Your Baby Lock Celebrate serger has a built-in accessory compartment. To open, swing the "lid" on the thread spool stand to the right to reveal the tray holding some of the accessories listed below. Others may be found in the machine packing materials.
Accessory Number included Located in
- Instruction manual 1 Packing box
- Foot control 1 Packing box
- Lint brush/needle insert tool 1 Accessory compartment
- Needle clamp screw 2 Accessory compartment
- Package of assorted sized needles 1 Accessory compartment
- Medium screwdriver 1 Accessory compartment
- Tweezers 1 Accessory compartment
- Upper cutting blade for replacement 1 Accessory compartment
-
Looper threading tool 1 Accessory packet
-
Screwdriver 1 Accessory packet
- Thread nets 4 Accessory packet
- Spool caps 4 Accessory packet
- Sponge disks 4 Accessory packet
- Allen wrench 1 Accessory packet
- Cone holders 4 On machine
- Machine cover 1 Accessory packet
- Standard presser foot 1 On machine
"Please visit http://sewathomeclasses.com/serger to watch the complimentary Celebrate - Getting to Know Your Baby Lock Serger Instructional Video."

Needles
Your Baby Lock Celebrate serger is set up with 75/11 machine needles, which are suitable for most medium and lightweight fabrics. For heavyweight fabrics, change to a size 90/14 needle. The needle's semi-ball point design is suitable for knits and wovens. Some manufacturers' needles may produce better quality stitches with your Baby Lock than others. For best results, use Organ or Schmetz brand needles - system HAx1SP/CR, and replace them approximately every third project. (see page 43)
Thread
All types of thread may be used on your Baby Lock, but 100% long-staple polyester thread, crosswound on a cone, consistently provides the best stitch performance. Because the threads must pass through several thread guides at high speeds, they must be of uniform thickness and high strength with a minimum amount of linting.
Good-quality cotton or cotton-covered polyester threads sew well, though they produce more lint, creating the need to clean the machine more frequently. They work well for overedging and seaming, but they may be too weak or too fuzzy for the rolled edge. Poor grades of these threads can result in frequent fraying, breaking and unbalanced stitches.
Threads of other fiber contents and weights may be used, depending on their strength and thickness. Testing will help you determine how easily they can pass through the thread guides, thread slots, needles and loopers. For more information. (see page 41-42)
Important Note: For maximum performance of the Baby Lock Celebrate, it is recommended to use 100% polyester, long-fiber thread. Recommended brands are Maxi-Lock and Metrosene. This thread also performs best when used with various decorative threads for serging specialty techniques.
Optional Accessories
There are optional snap-on specialty feet available for the Celebrate. The optional accessories are available at your Baby Lock retailer.
- Beading Foot B5002-01A-C (BLE-BF)
- Blindhem Foot B5002S02A (BLE-BLHFS)
- Clear Foot B5002K02A (BLE3ATW-CLF)
- Cording / Piping Foot (3mm) B5002-02A-C (BLE-CF3)
• Cording / Piping Foot (5mm) B5002-03A-C (BLE-CF5) - Elastic Applicator Foot B5002S01A (BLE-EF)
- Lace Applicator Foot B5002S05A (BLE-LF)
• Ruffling Foot B5002S03A (BLE-RF) - Flat Sole Foot B5001K02A (BLE3ATW-FSF)
• Teflon Foot B5002T22A (BLE3ATW-TF) - Trim Bin 900N (BLTBIN)
- Size 90 Top Stitch Needle (T-90B)
Setting Up Your Celebrate
After removing the packing materials from the box, gently lift your Baby Lock serger by grasping the handle provided on the top of the machine. Place the machine on a serger sewing table or any level surface that provides ample work area to the left of the machine. Place the foot control in a pedal stay, if desired, and place it under the sewing table. Plug the power cord into the machine first, then into a wall outlet.
The power switch is located toward the back on the right side of the machine. Always make sure the power is OFF when the machine is not in use. (fig. A)
Available foot control for U.S.A and CANADA. : Model YC-482.
This appliance has a polarized plug (one blade wider than the other). To reduce the risk of electric shock, this plug is intended to fit in a polarized outlet only one way. If the plug does not fit fully in the outlet, reverse the plug. If it still does not fit, contact a qualified electrician to install the proper outlet. Do not modify the plug in any way.
The sewing speed of the machine is determined by the amount of pressure applied to the foot control. When not in use, do not place anything on the foot control, or the machine could start inadvertently and the foot control or motor could burn out. (fig. A)
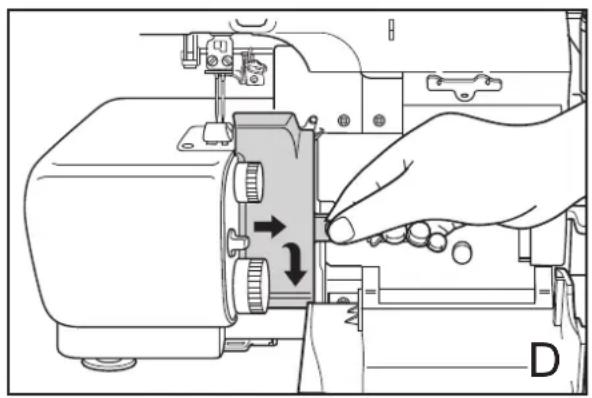
Raise the telescopic thread guide to its highest position of 14". Rotate the shaft to the left and right until each section "clicks" into a locked position. (fig.B) The front cover may be opened simply by placing your fingers behind the tab at the right side and pulling toward you. (fig.C) To open the cutting blade cover, place your thumb against the tab, and slide the cover to the right. A slight pull forward will allow the cover to swing down, providing access to the loopers, blades, and thread guides. (fig.D)


Cutting Blade Locking Dial

When no trimming is desired, as when stitching on a fold, flip the cutting blade lock switch clockwise to the LOCK position. The cutting blade no longer moves up and down, but remains in its lowered position. To re-engage the cutting blade, turn the cutting blade lock switch half of a turn counter-clockwise. The blade will start moving automatically when you start sewing.
Presser Foot Pressure Adjustment

The presser foot pressure has been preset at the factory and rarely needs adjustment. You may find it necessary, however, to decrease the pressure for thick fabrics or increase pressure for thin fabrics to feed more smoothly under the foot. Use a coin to turn the screw on top of the machine.
To increase pressure, turn the pressure adjusting screw clockwise.
To decrease pressure, turn the screw counterclockwise.
Snap-On Presser Foot

Presser Foot Release Button
Seam Line Guides
The Celebrate has the convenience of a snap-on presser foot.
To Release:
- Raise the presser foot lever.
- Lock the cutting blade.
- Raise the needles to the highest position.
- Push the presser foot release lever located at the back of the presser foot holder.
- Carefully turn the presser foot clockwise 90 degrees.
- Slide the presser foot to the rear to remove.
To Replace:
- Raise the presser foot lever.
- Lock the cutting blade.
- Raise the needles to the highest position.
- Slide the foot from the left to right.
- Align the bar of the foot with the groove in the holder.
- Lower the presser foot lever to snap into place.
The presser foot that comes with the Celebrate has a tape sewing slot. Insert the tape or ribbon into the slot in the front of the foot, then under the sole of the foot. (see page 36 for more instruction)
The raised markings on the toe of the foot are seam line guides. They indicate the needle positions to help guide your fabric for accurate seaming.
Stitch Length/Rolled Hem
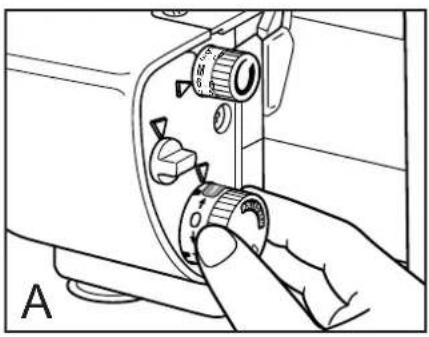

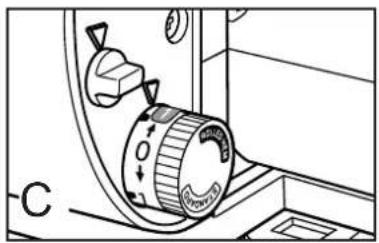
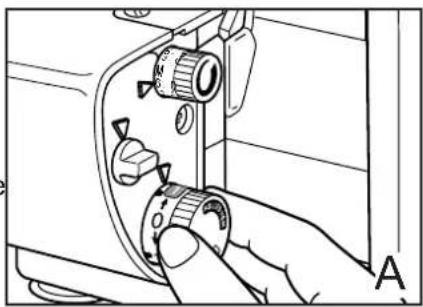
The stitch length / rolled hem adjusting dial is conveniently located just to the left of the front cover, near the base plate. (fig. A) The dial shows two stitch-length ranges, from 0.75, for the shortest stitch, to 4 for the longest. (fig.C) As the dial indicates, one range is for standard sewing and one is for rolled edging or narrow seaming.
Simply turn the dial, aligning the desired setting with the indicator on the machine. A stitch length of 3mm, or about 10 stitches per inch is ideal for seaming and overedging most fabrics. For overedging or seaming very lightweight fabrics, you may prefer a shorter stitch length. When sewing heavier fabrics, you may choose to lengthen the stitch. (fig. B)
Note: 0.75mm is located between the 0 and 1 on both standard and rolled settings.
Stitch Width

The stitch width adjusting dial is located above the stitch length dial. (fig. A) The stitch width dial displays two sets of numbers, indicating two width ranges. The larger size numbers on the dial, 5.5 through 7.5mm, denote the stitch width dial when the left needle is in use. The smaller size numbers, 3.0 through 5.0mm, apply when the right needle is in use. The "M" setting (3.5) is for the rolled edge.
Adjusting the stitch width moves the upper cutting blade. It also moves the stitch fingers further apart or closer together for complete fabric support with any stitch width.
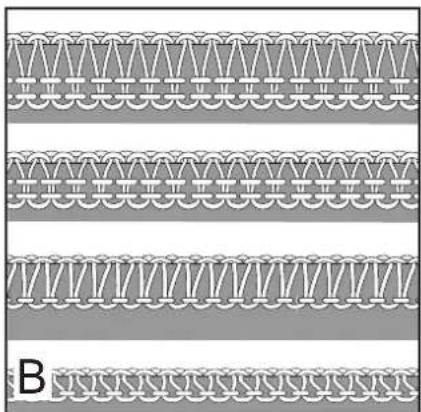
The stitch width is variable by the placement of Right and Left needles and the stitch width dial positions. (Fig. B) Use a wider stitch on loosely woven fabrics. You may prefer a narrower stitch on knitted, tightly woven or sheer fabric.
Differential Feed
Your Baby Lock serger is equipped with differential feed. The sets of feed dogs work independently in order to ensure smooth sewing on all fabrics. (fig. A)
When the differential feed adjusting lever, located at the machine's right, front edge is set on "N" for normal feeding, the feed dogs move the same distance. This is the setting to use for most fabrics and applications. (fig. B)
When the differential feed lever is set above "N", the front feed dog will feed more fabric than the back. This is because the front feed dog moves a greater distance than the back feed dog. As a result, the fabric becomes compressed or eased, as the diagram on the front cover indicates. This action can eliminate wavy seams in stretchy fabrics or those cut on the bias grain.
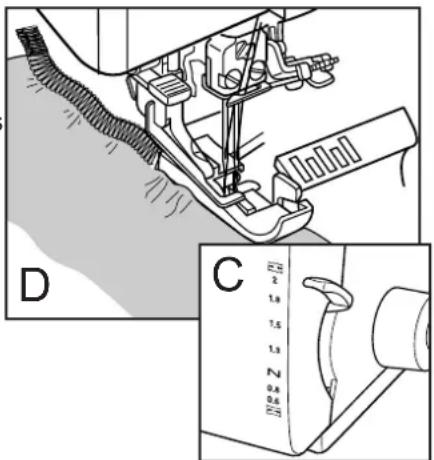
At the maximum setting of 2.0 (fig. C), the differential feed can gather a lightweight fabric to nearly double fullness. (fig. D) The front feed dog is actually feeding in twice as much fabric as the back feed dog is feeding out.
To maximize the gathering effects, use the longest stitch length setting. Fabric weight will affect the gathering. Test stitch for desired results.
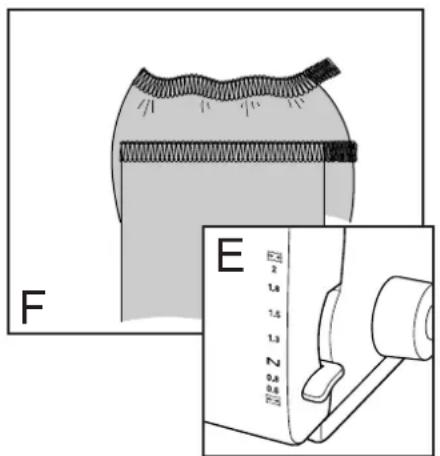
When the differential feed lever is set below "N" (fig. E), the front feed dog moves less distance than the back feed dog. This adjustment stretches the fabric slightly as it is sewn, pulling it taut as it enters the needle. The lower settings prevent puckers on lightweight fabric (fig. F), add more stretch to swim wear and active wear, and can be used to create a lettuce edge. (see page 26).

2-Thread Subsidiary Looper



Either needle thread may be engaged for 2-thread overlock sewing.
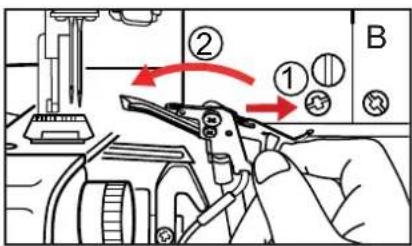
To engage the subsidiary looper
- Open the front cover and the blade cover, cut the upper looper thread just above the threading port. (fig. A) Raise the presser foot and pull out the clipped thread from under the foot.
Remove the upper looper thread from the machine.
- Rotate the handwheel to bring the needle clamp to its highest position.
- Slide the subsidiary looper to the right direction and swing it counterclockwise to the left. (fig. B)
- Make sure the hooked tip of the subsidiary looper enters into the upper looper eye. (fig. C)
- Close the blade cover and the front cover.
To disengage the subsidiary looper
- Open the front cover and the blade cover.
- Rotate the handwheel to bring the needle clamp to its highest position.
- Slide the subsidiary looper to the left direction and swing it clockwise to the right. (fig. D)
- Make sure the subsidiary looper is resting at the right side of the upper looper. (fig. E)
- Close the blade cover and the front cover.
Threading Preparation

When using threads on cones or king spools, place the cone or spool securely over the cone holders furnished on your machine. To avoid bending the thread stand, you may need to place one hand under the stand while positioning the cone. The cone holders prevent the cone or spool from spinning, enabling the thread to feed evenly. (fig. A)
Because threads for the serger feed from the top, standard spool threads can snag on the rough edges of many of these spools. That's why spool caps are furnished with your Celebrate, to provide a smooth surface that enables the thread to reel off freely. With the spool notch side down, insert a spool cap into the top of the spool. (fig. B)
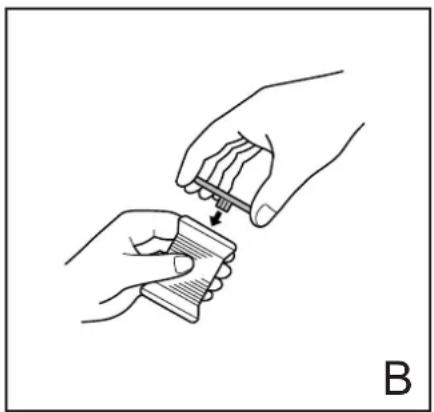
When using standard spool threads on your serger, replace the cone holders with the sponge disks furnished with your machine. These disks hold smaller spools securely and help the thread to reel off properly. With the sponge disk in place, put the capped spool on the spindle. (fig. C)
Thread nets may be placed over threads that tend to slip off the bottom of the spool during sewing. Most threads do not require their use, but nets often are necessary with nylon, rayon or silk threads. (fig. D) Once it's on the spool, fold the net back on itself, if necessary, to enable the thread to feed smoothly without snagging on the net. (fig. E)


Threading Your Celebrate
Your Baby Lock Celebrate is equipped with an exclusive "Instant Jet-Air Threading System" for fast, easy threading of the upper and lower loopers. One push of the "Jet-Air" threading lever will automatically thread the loopers. It is no longer necessary to use tweezers for threading the thread guides.
If a thread breaks or runs out, just re-thread it. There is no need to follow any threading sequence.
Threading Position for Threading Loopers
- Open the front cover.
- Raise the presser foot to release all threads.
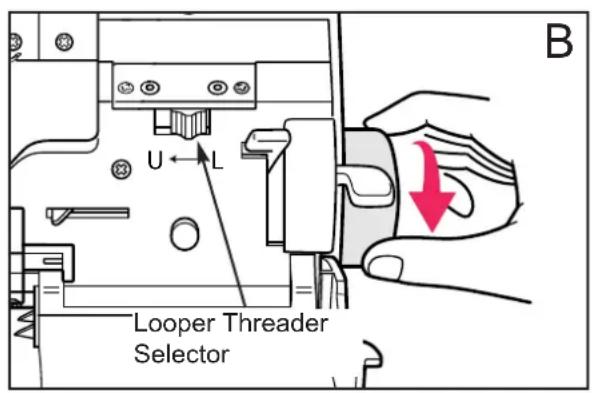
- Depress the machine lock button firmly. (fig. A)
- Rotate the machine handwheel slowly toward you until the looper tubes move to their connecting position. (fig. B)
Note: The Celebrate must be in the locked position when threading the loopers unless otherwise indicated.
Lower Looper
- With the presser foot up and machine lock button in the locked position (fig. B), set the looper threader selector lever to "L" for lower looper threading. (fig. B)
- Place the thread cone or spool on the far right front spool pin on the thread stand (fig.C page 16). Slip the thread into the telescopic antenna thread guide "1" directly above the spool, snap into the thread guide "2" at the top of the machine, then through the slot on the front of the machine. (fig. C page 16)
- Pull 18 inches (45cm) of thread through guide "3". Insert the end of the thread into the threading port "L" about 1 inch (2,5cm). Use tweezers if necessary, to insert the thread end more easily.
- Depress the looper threading lever. (fig. D page 16) If the thread does not go through the lower looper eye with one push, depress the threading lever again until it does. *(see page 16)
- Clip the thread 4 inches (10cm) from the lower looper eye and leave it hanging loose.
- Move the lock button release lever to the right.

Upper Looper
- With the presser foot up and machine lock button in the locked position (see fig. A-B, page 15), set the looper threader selector lever to "U" for upper looper threading. (See fig. B, page 15.)
- Place the thread cone or spool on the second spool pin from the front on the right side of the thread stand. (fig. C) Slip the thread into the telescopic antenna thread guide "A" directly above the spool, snap into the thread guide "B" at the top of the front of the machine, then through the slot on the front cover. (See fig. C, below)
- Pull 18 inches (45cm) of thread through guide "C". Insert the end of the thread into the threading port "U", about 1 inch (2.5cm). Use tweezers, if necessary, to insert the thread end more easily. (See fig. D below)
- Depress the looper threader lever. (fig. D below) If the thread does not go through the upper looper eye with one push, depress the looper threader lever again until it does, and leave thread hanging loose.
- Move the lock button release lever to the right, to unlock the machine.
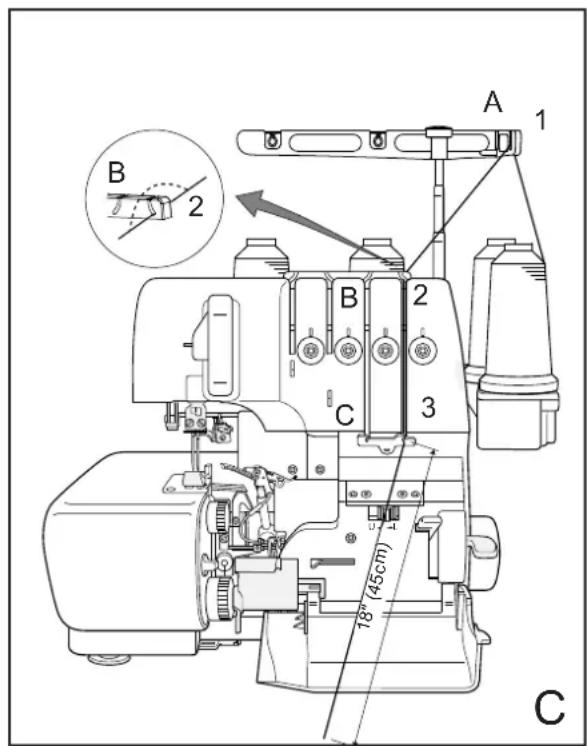

*Be sure at least 1" of thread is inserted into the threading port.
Right Needle
- Turn the handwheel and line up the green marks on the machine and the handwheel. Set the needle threader selector on "R" for right needle. (fig. A page 18)
- Place the thread on the second from left spool pin on the thread stand. (fig. A) Thread needle thread guides 1 and 2, through the groove on the face plate and through guides 3, 4, 5, 6 and 7. Pull a 6-inch (15 cm) length of thread through guide 7.
- Lower the presser foot to engage the tensions.
- Using the Needle Threader, thread the right needle. (illustration below; position 7) (refer to page 18)

Left Needle
- Turn the handwheel to line up the green marks on the machine and handwheel. Set the needle threader selector on "L" for left needle.
- Place the thread on the far-left spool pin on the thread stand. (fig. A page 17) Thread needle thread guides A and B, through the groove on the face plate and through guides C, D, E, and F.
- Lower the presser foot to engage the tensions.
- Using the Needle Threader, thread the left needle. (see page 17; position G) (fig. A-B)
How to Use Needle Threader
- Turn the handwheel to line up the green marks on the machine. (fig. A page 17)
- Set the needle threader selector on "R" (right needle) or "L" (left needle). (fig. A)
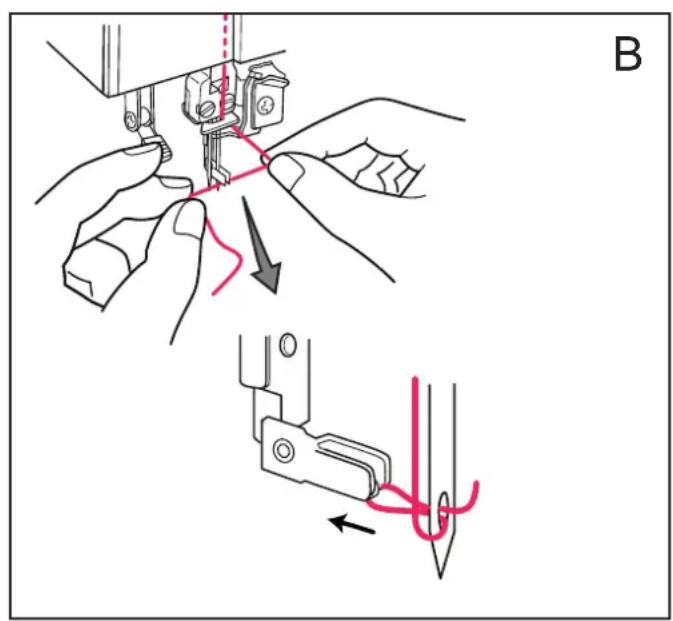
- Press the needle threader lever down (fig. B) so that the hook goes into the eye of the needle.
- Hold the needle thread horizontally with both hands and position the thread into the thread hook guides on top of thread hook. (fig. B)
- Release the needle threader lever, The hook will pull the thread through the eye of the needle as it is released. (fig. B)
- Carefully remove the loop of thread from the needle threader hook and place the thread under the presser foot and to the left.

Tension Adjustment
Your Baby Lock's thread tension is preset at the factory for standard thread and fabric. But the tensions will require adjustment at times, depending on the thread and fabric being used and the stitch to be formed. Refer to the tension chart on the inside back cover. Also, study the diagrams that accompany the explanation of each stitch type. For best results, always sew a test sample before beginning to serge on the actual project.
Serging with Fabric

With the needle and upper looper threads under the foot and to the back, lower the presser foot. While holding the threads in your left hand, press down on the foot controller gently to begin a thread chain before serging fabric. (fig. A)
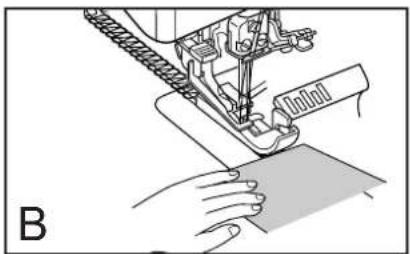
You can leave the presser foot down for most serging applications. Just place the fabric at the toe of the presser foot. As you step on the foot controller, the feed dogs will begin moving the fabric toward the needle. (fig. B) You need to raise and lower the foot only when working with thick, spongy or lofty fabrics, or when precise positioning is required.

Be careful not to push or pull the fabric. The Celebrate will feed it evenly without help. At the end of a seam, just sew off the fabric edge and continue serging to create a 5" - 6" thread chain. Cut the thread chain with the thread cutter on the left side cover. (fig. C)
Clearing the Stitch Width Fingers

As you sew, you will discover that maneuvering the fabric is different from conventional sewing, because the threads form around the stitch width fingers. (fig. A)
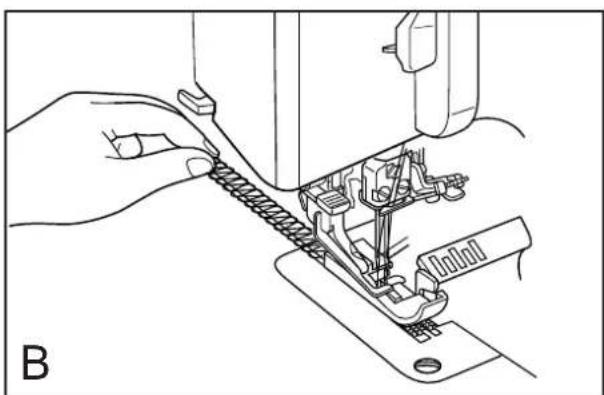
To clear the stitch fingers, simply raise the presser foot, which releases all threads. Raise the needle(s). Then pull the threads gently from behind the foot. (fig. B) The stitches are now released from the fingers. (fig. C)

Re-threading Loopers
If a thread breaks, raise the presser foot and pull the broken thread out from under the foot. Open the front cover, depress the machine lock button, rotate the machine hand wheel slowly toward you until the tubes move to their connecting position, and set the looper threader selector to U or L for the looper being threaded. Re-thread the machine above the threading port, leaving an 18-inch (45cm) thread tail. Thread the looper as usual and move the lock button release lever to the right. Close the front cover and sew a test sample. Refer to page 15-16 for further information.
Note: When re-threading your Baby Lock Celebrate using the "Jet-Air Threading" feature, make sure that the previous thread that was in the looper (tube) is completely removed. This will eliminate any chance of the previous thread obstructing the flow of the air when re-threading the machine.
Re-threading Needles
If a needle thread breaks, raise the presser foot, remove the broken thread and rethread the needle thread guides. Turn the handwheel and line up the green marks on the handwheel and machine. Select the "R" or "L" for the needle being rethreaded. Use the needle threader for exact and easier threading. Refer to pages 17-18 for further information.
4-Thread Overedging
Overedging to finish facings, hems and seams before construction, is one of the most basic uses of a serger, such as making a garment or project with 5/8-inch (16mm) pressed-open seams. (fig. A)
To overedge, place the single layer of fabric in front of the presser foot, aligning the cut edge with upper cutting blade. Begin serging, continuing to guide the fabric along the blade. The edge of the fabric should be trimmed, but not cut away. Then sew the seams on your conventional sewing machine and press them open as usual. (fig. B)
Because notches would be cut away in this process, mark them before serging with "V" snips just inside the seam allowance or with a water-soluble fabric marker. (fig. C)
Note: A 2-thread overlock or 3-thread overlock can also be used with this technique.


Overlock Seaming
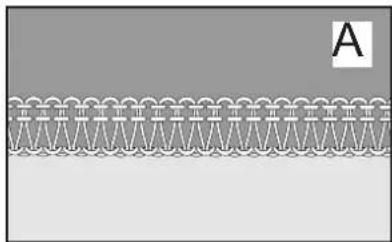
For garments or projects that do not require conventional pressed-open seams, you can stitch and finish the seam in one operation and then press the seams to one side. (fig. A) A 4 or 3-thread seam is strong, yet it provides "give" or flexibility according to the needs of the fabric.
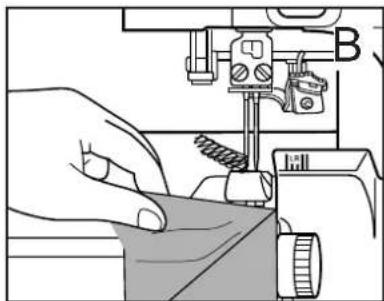
Place two layers of fabric right sides together. Use the marks on your serger's front cover to align the fabric for the desired seam width. Keep your eye on the fabric edge to guide it to the appropriate mark. (fig. B)
Do not watch the needle. If you guide the fabric accurately, the needle will seam in the correct place automatically.
Note: For most seaming, pins are unnecessary because the serger feeds the fabric evenly. If you need pins, place the pins parallel to the seam line outside the seam allowance to avoid damaging the blades.
4-Thread Overlock
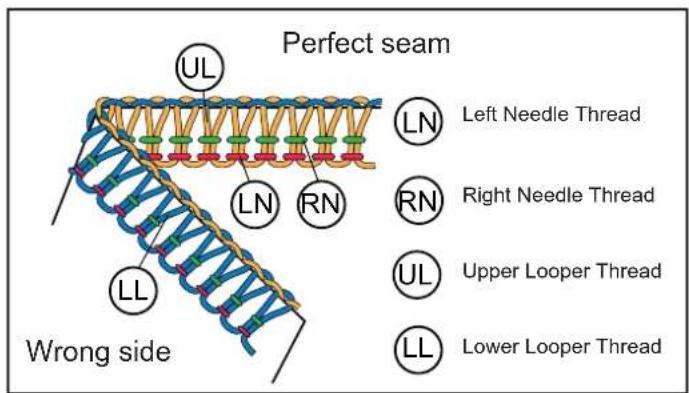
Your Baby Lock Celebrate comes to you set for 4-thread serging, which provides a very durable, yet fully stretchable, seam or edge finish on all kinds of fabrics. With tensions properly set, the upper and lower looper threads lock together evenly over the cut fabric edge(s) to form a flat, non-rolling pattern of overclocking stitches on both sides of the fabric.
The left needle thread interlocks with both looper threads at the stitching line to create the seam. The right needle thread, visible on the top side of the stitch, interlocks with both looper threads to add durability. The upper looper thread, that resembles a zig zag, on the upper side of the fabric, is from the upper looper that moves up above the throat plate and down. The lower looper thread, that resembles a zig zag on the lower side of the fabric, is from the lower looper that only moves lower than the throat plate.
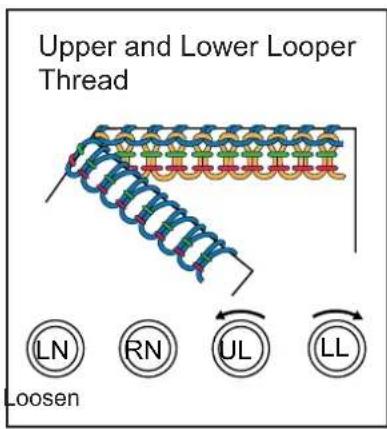
The tension on each thread is controlled by its own tension dial. Turn the dial to a higher number to tighten or increase the tension; turn it to a lower number to loosen or decrease tension. The chart on the inside back cover indicates the suggested number ranges for 4-thread stitching. On this chart, record specific settings for your own machine.
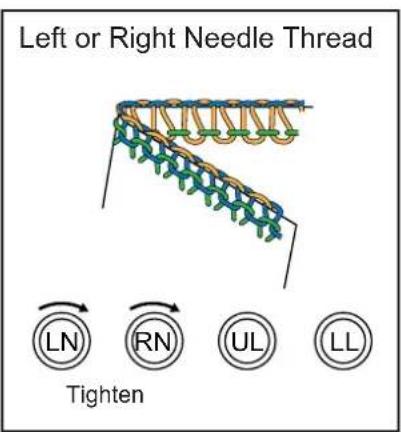
Various threads and individual preferences may require slight adjustment to the needle thread tension as well. Always sew a test sample to determine if the desired result is achieved. Refer to the diagrams for tension guidelines.


3-Thread Overlock
3-thread serging works well - and conserves thread - for edge-finishing most wovens and for seaming knits that don't require the extra durability that a fourth thread provides. It's easy to convert your Celebrate to serge with 3 threads by simply eliminating either needle.
To convert your serger to wide 3-thread stitching (5.5-7.5 mm), snip the right-hand needle thread just above the needle eye. To convert to narrow 3-thread stitching (3.0-5.0mm), snip the left-hand needle thread. (fig. A) Remove the needle not being used completely from the machine.
Re-tighten the needle clamp screw slightly to prevent the screw from vibrating out. (Fig. B)
The tension on each thread is controlled by its own tension dial. Turn the dial to a larger number to tighten or increase tension, to a lower number to loosen or decrease tension. The chart on the inside back cover suggests tension ranges for 3-thread stitching. On this chart, record specific settings for your own machine.
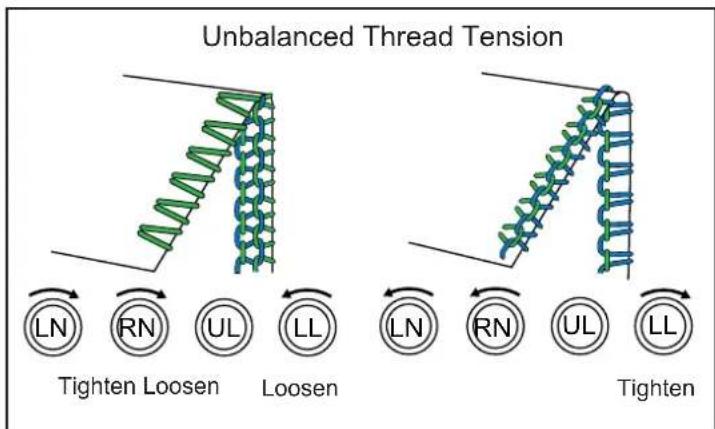
Refer to the diagram to see what a balanced 3-thread stitch should look like. The other diagrams show unbalanced stitches and the tension adjustments necessary to correct them.



Rolled Edging
The rolled edge setting is used to achieve the narrowest stitch possible (1.5mm) on your Baby Lock serger. The stitch is suitable for seaming sheer and lightweight fabrics and for edging and hemming lightweight fabrics.
- Remove the left needle and corresponding thread.
- Clear the stitch fingers.
- Turn the stitch length adjusting dial counter-clockwise into the rolled hem range. Set the desired stitch length within this range. (fig. A)
- Turn the stitch width dial until the "M" lines up with the indicator. (fig. B)
- Increase the lower looper tension. (fig. C)
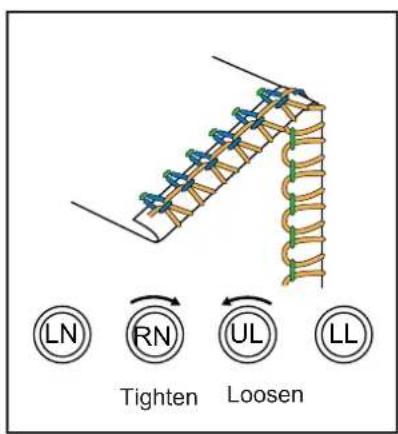
The tension adjustment tightens the lower looper thread, causing the fabric edge to roll around the stitch finger. The upper looper thread then wraps the fabric edge. The lower looper thread will be nearly invisible on the back side of the stitch formation. Sew a test sample first to determine if the fabric edge is sufficiently rolled. If not, increasing lower looper tension and decreasing upper looper tension both may help to create the desired effect.
Record tension settings on the chart on the inside back cover.
Note: If a narrow unrolled edge is desired, follow step 1 through 4 above, leaving tensions set as for standard 3-thread serging with the right needle.


Right Needle Thread

Upper Looper Thread

Lower Looper Thread

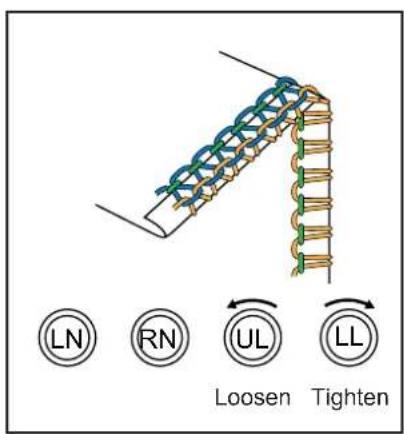
Seaming Sheers
Use the 3-thread rolled hem setting when sewing sheer fabrics that otherwise would require French seams. Set the stitch length at 2.5. Then simply sew the seams, aligning the fabric edges with the serger seam guide, trimming away the excess seam allowance.
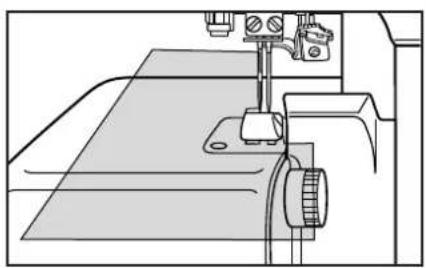

Lettuce Edge
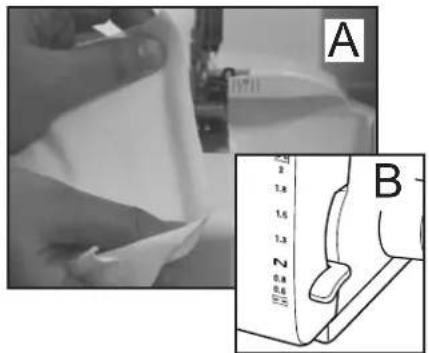

A frilly or "lettuce" edge can be created on most light and medium weight stretch fabrics and on bias edges of soft, woven fabrics. It makes a pretty decorative edging for activewear, lingerie, accessories and children's wear.
Set the machine for the 2-thread or the 3-thread rolled edge. (refer to page 25, 31)
Set differential feed at 0.6. (fig. B) Serge the fabric in the direction of greatest stretch - the crossgrain on knits, bias grain on wovens. For a "leafier" effect, try using a shorter stitch length and gently stretch the fabric (fig. A), as it is being sewn. Sew a test sample. (fig. C)
Belt Loops and Button Loops
Use the rolled edge thread chain, stitched without fabric, to make professional belt loops and button loops. Using a heavy decorative thread in the upper looper forms a stronger loop.

Returning to Standard Serging
Clear the stitch fingers and return the stitch length dial to the standard range. Set stitch width and length at the desired settings. Readjust tensions. Replace the left needle and its corresponding thread, if desired.
2-Thread Overlock
The 2-thread function provides an economical and less bulky means of overedging all fabrics. When joining two fabrics together with 2-threads, the seam it forms is not a standard overlock seam but a flatlock seam. 2-thread rolled edge creates a delicate finish on fine wovens and smooth silkies. When sewn with specialty threads, 2-thread serging makes decorative seams and edges for activewear, children's clothing, ruffles and hemlines.
Converting from 3-Thread to 2-Thread Overlock


Either needle thread may be engaged for 2-thread serging.
-
Open the front cover and the blade cutter, and cut the upper looper thread just above the threading port. (fig.A) Raise the presser foot and pull out the clipped thread from under the foot. Remove the upper looper thread from the machine.
-
Rotate the handwheel to bring the upper looper into position to attach the subsidiary looper.
-
Slide the subsidiary looper to the right and swing it counterclockwise. (fig.B)
-
Close the blade cover and the front cover, decrease the needle tension for 2-thread serging. (see chart on the inside back cover)
The needle and lower looper threads should overcast evenly on the cut edge of the fabric. Sew a test sample. Make adjustments if needed. Refer to diagrams.
*The cutting blade cover has been removed in photos B and C for a clear view. You do not need to remove the cutting blade cover.

Flatlock Seams
Flatlock seams are most suited to fabrics which do not ravel - interlock knits, tricot, sweatshirt fleece and synthetic suede. The serged edges pull open and flatten within the stitch for a non-bulky join. (fig. A) Be sure to sew a test sample first to determine whether the stitch will have the strength to hold the seam without the fabric pulling away.
Sew flatlock seams in the same way as 3-thread seams but then pull the two fabric layers apart until the seam lies flat. Because the threads show on the outside as well as the inside of the garment or project (except fake furs), the flatlock seam is often considered a decorative application. (fig. B)
Before sewing, decide which stitch pattern you want to have on the outside of the garment. For "loops" (lower looper thread) to show, place fabric wrong sides together for sewing the seam. (fig. C)
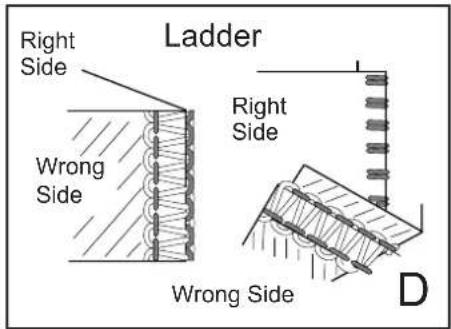
To produce the "ladder" (needle thread) on the outside, place the fabric right sides together. (fig. D)


Flatlock "Topstitching"



The flatlock stitch need not be limited at seamlines. When sewn on a fold, flatlocking can create attractive decorative effects within the body of a garment or project. Either follow placement lines on your pattern or design your own special effects by stitching the fabric before laying out pattern pieces.
- Set the machine for 2-thread flatlock - wide.
- Turn the cutting blade lock switch clockwise to disengage the upper cutting blade.
- Set the stitch length to desired setting.
- Fold the fabric (right side or wrong side out, depending on the loop or ladder stitch you want to show) along stitch placement lines.
- Position the fabric under the presser foot, aligning the fold of the fabric 1/8 inch (3.5mm) to the left of the upper cutting blade. (fig. A)
- Stitch to the desired ending point.
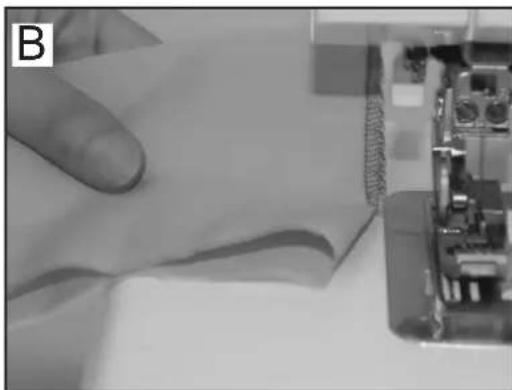
- Clear the stitch fingers and chain off the fabric. (fig B)
- Clip threads, leaving a 3-4 inch (7.5-10cm) chain.
- Gently pull the fabric to flatten the stitches. (fig. C)
- Separate the chain threads and thread them through a needle and pull them to the fabric back side. If necessary, tie a knot to secure the threads. (fig. D)
Note: If the fabric does not pull completely flat under the stitches, guide the fabric fold to the left so that the loops hang slightly off the fold as they are being stitched.
Blind Hemming
You Baby Lock Celebrate can create a sturdy, nearly invisible blindhem.
- Set the machine for 2-Thread Overlock with the right needle threaded. Set the stitch width at 5.0 and the stitch length at 4.0 in the standard range.
- Fold up the hemline and press it in place. Then fold the hem allowance back against the fabric right side to create a fold about 1/4" from the top edge of the hem as shown. (fig. A)
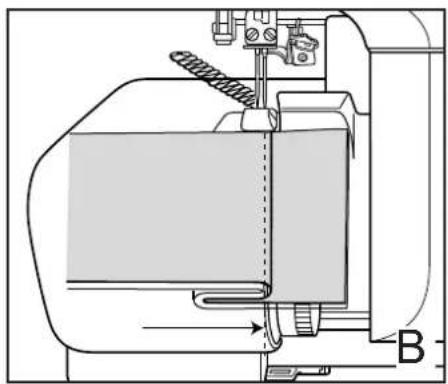
- Align the fold under the presser foot and stitch, allowing the needle to catch only a thread or two of the soft fold: the blade will trim the top edge of the hem and the loopers will overcast the edge for a clean finish. (fig. B)
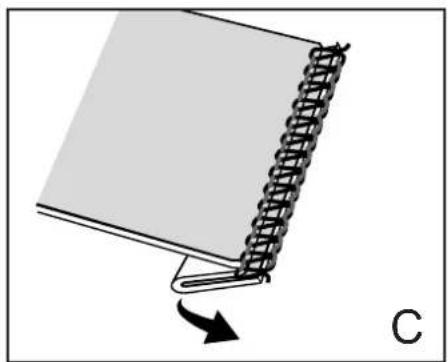
- Open the fold and press flat. (fig. C)
Note: An optional blindhem foot for consistent guiding is available through your Baby Lock retailer. (fig. D)
(See page 8 Optional Accessories listing for part number.)


2-Thread Rolled Edge

The 2-thread version of the rolled edge is often preferred for hemming very soft fabrics which might become too stiff if sewn with three threads.
- Clear the stitch fingers and adjust the stitch width and length as for 3-thread rolled edge.
- Set the machine for 2-thread serging (page 27), using the right-hand needle.
- Adjust tension as shown in the chart on the inside back cover.
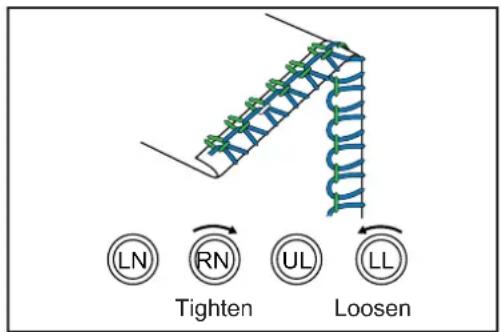
The tension adjustment causes the lower looper thread to roll around the stitch finger, wrapping the fabric edge. Sew a test sample. If the fabric edge is not sufficiently rolled, increase the needle tension and/or decrease the looper tension to help create the desired effect.
Record your tension settings on the chart.

Returning to 3 or 4-Thread Overlock


- Open the front cover and rotate the handwheel counterclockwise to bring the needle clamp to its highest position.
- Slide the subsidiary looper to the left direction and swing it clockwise to the right.
- Engage the machine to the looper threading position. (fig. A-B page 15)
- Rethread the upper looper (page 16). For 4-thread serging, replace the second needle. (page 17-18)
- Move the lock button release lever to the right, to unlock the machine.
- Turn the handwheel and line up the green marks on the machine and the handwheel.
- Rethread the needles. (pages 17-18)
- Close the blade cover and front cover.
- Lower the foot and sew a test stitch.
Securing Ends


The serger stitch will not unravel readily, and in most cases serged seams are secured by an intersecting seam.
If that's not the case, these are several options for securing seam. (fig. A)
- Leave a 3-inch (7.5cm) chain, separate the threads and tie a knot.
- Apply a dot of seam sealant on the thread chain at the fabric edge. Allow to dry and cut off the excess thread chain.
- Leave a 3 to 4-inch (7.5-10cm) thread chain and use a large-eye tapestry needle or double-eye needle to weave the chain back into the stitching.
- Lock the beginning or end of a seam by serging over the previous stitches. (Directions listed below)
To lock the beginning of the seam:
- Manually turn the handwheel toward you taking 2-3 stitches into the fabric. Leave the needle(s) in the lowest position to anchor the fabric.
- Raise the presser foot.
- Smooth out the thread chain with your fingers. (fig. B) Then bring the chain around and under the foot, so that it aligns with the edge of the fabric. (fig. C)
- Lower the foot and continue sewing, catching the thread chain in the stitches for about 1 inch (2.5cm). Let the blades cut off any remaining thread chain. (fig. D-E)
Securing Ends (Cont.)
To lock the end of the seam:
- Take one stitch off the end of the fabric. (fig. F)
- Raise the presser foot and bring the needle(s) to the highest position. Pull back gently on the fabric to clear the stitch fingers.
- Turn the fabric over with the wrong side of the stitch facing up (fig. G), and reposition it under the presser foot with the needle at the seam edge, aligned with the previous needle line. (fig. H)
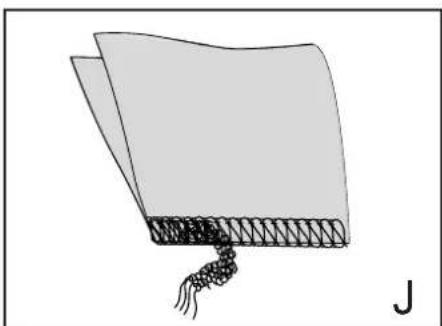
- Lower presser foot and sew 5-6 stitches over the previous stitches, being careful not to cut them. You may want to flip the cutting blade lock switch clockwise to the lock position. Pivot the fabric and chain off. (fig. I-J)


Turning Outside Corners


- Stitch along one edge until you reach the corner. Take one stitch off the edge of the fabric. (fig. A) (As you approach the edge, you may want to stop and manually turn the handwheel towards you.)
- Raise the needle(s) to the highest position.
- Clear the stitch fingers, and rotate the fabric to reposition the needle at the previous row of stitching. (fig. B) Gently pull up on all threads to remove slack and resume stitching. (fig. C)
Note: A loose thread loop at the corner is caused by too much slack in the needle thread when clearing the stitch fingers. Try again, turning corners takes a little practice!
Turning Inside Corners


- Reinforce loosely woven fabrics at the corner with staystitching on the conventional sewing machine. Clip to the corner. (fig. A)
- Align the fabric edge with the blade, and stitch until the blade reaches the corner, not the needles. Don't cut into the corner. (fig. B)
- Lower the needle(s) to anchor the fabric.
- Raise the presser foot and straighten out the fabric, forming a pleat at the corner. (fig. C)
- Be sure the marked stitching line is straight, then continue serging the remaining edge. When done correctly, the pleat will disappear after stitching. (fig. D)


Serging Curves
To serge around inside or outside curves, guide the fabric into the cutting blade, not the needle(s). Remember, cutting takes place before the fabric reaches the needle. Because the long serger presser foot holds the fabric more securely, you may need to raise and lower the presser foot several times to maneuver around very tight curves.
Inserting Tapes
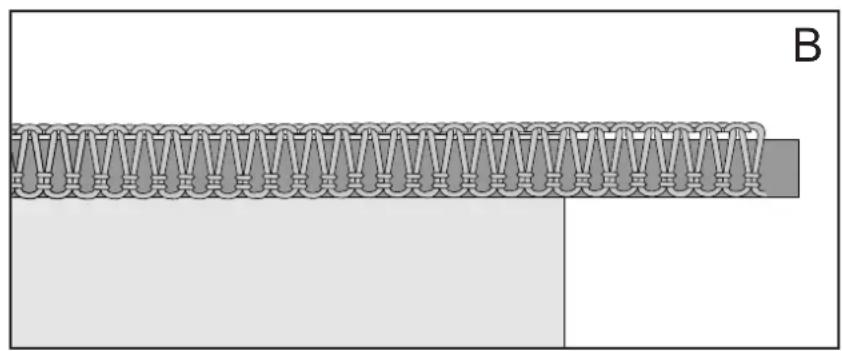
The slot in the standard presser foot is designed to guide stabilizing tape, narrow elastic or decorative ribbon into the stitching. Insert tape or elastic into the slot and under the back of the foot. (fig. A) Adjust the stitch width to match the tape width. Place the fabric under the foot and stitch. (fig. B)

Cutting Blade Cover Seam Guide
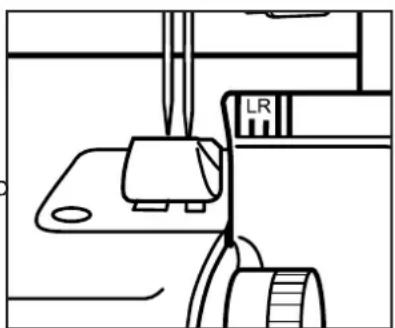
Use the marks on your serger's front cover and set the width dial at "M" to align the fabric for accurate seam allowances. When using the left needle, the second mark "L" from the needle indicates 5/8 inch (16mm) from the cutting edge to the needle. Using the right needle, the third mark "R" from the needle to indicates 5/8 inch (16mm) from the cutting edge to the needle.
Note: Be sure to set the width dial at the "M" setting for accurate seam allowances.
Using Specialty Threads
Beautiful stitches can be formed by serging with specialty threads, cords and ribbons. These heavier or shinier threads can be used to enhance appearance, add strength or elasticity, or create special effects, depending on the thread you choose.
Some specialty threads work well through the needle and loopers. There are some that are too heavy for the needle and should only be used in the loopers.
Use the Specialty Thread Chart on pages 41 and 42 as a guide, keeping in mind that the threads can vary from one manufacturer to another. Take time to test sew for best results.
Threading Lightweight Thread
Specialty thread used in the needle can be threaded in the usual way. The ease with which they can be threaded in the loopers, however, depends on thread thickness.
Changing Threads

- Clip the existing thread at the cone and remove the cone from the spindle. (fig. A)
- Place the new cone on the spindle. With the two threads together, tie an overhand knot, or square knot. (fig. B)
- Raise the presser foot, and pull the old thread from under the foot until the new thread comes through the machine.

Note: When changing a needle thread, pull the thread through until it reaches the needle eye. Then clip off the knot (fig. C) and rethread the needle eye manually or with the needle threader.

Threading Medium Weight Thread
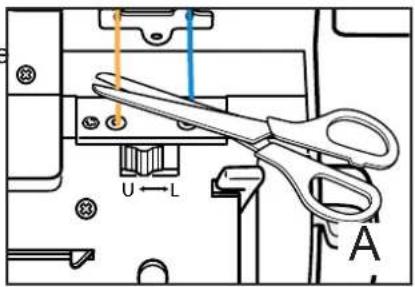
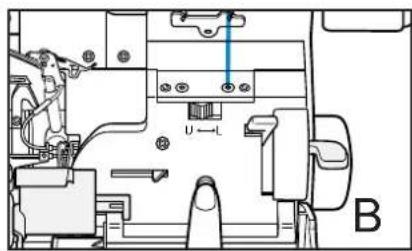
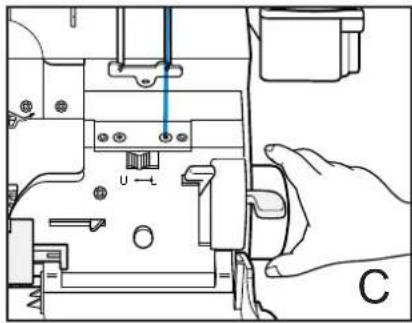
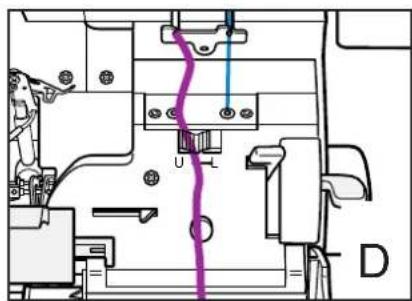
Medium weight threads, including topstitching thread, Decor rayon and stretch nylon thread, are too bulky to form a knot that would fit through the threading port, but they can slip through the hole with the aid of a thread "cradle" made from regular serger thread.
Thread Cradle for Loopers
-
Open the front cover and raise the presser foot.
-
At the threading port, clip the looper thread that is to be replaced. (fig. A) Remove thread from under the foot and the upper thread guides. Replace cone of thread with specialty thread.
-
With machine in locked position (fig. B-C), set the looper threading port to U or L, according to the looper that is being threaded.
-
Thread specialty thread into the upper thread guides, leaving an 18-inch (40cm) tail above the threading port. (fig. D)
-
Cut a 24-inch (55cm) strand of serger thread and fold in half to form a thread cradle. Insert the loose ends of the thread cradle into the port about 1 inch (2.5cm).
-
Holding the cradle loop with left hand, depress the threading lever with your right hand (fig. E) until the thread ends come out the looper eye.
-
Insert the specialty thread tail into the cradle loop (fig. F), pull the serger thread ends until the specialty thread comes through the looper eye. (fig. G) Discard or set aside the thread cradle.
-
Run upper looper thread under the foot and to the left, cut lower looper thread to 4 inch (10cm) and leave it hanging loose.


Looper Threading Tool


- Open the front cover and raise the presser foot.
- At the threading port, cut the looper thread that is to be replaced. Remove thread from under the foot and the upper thread guides. Replace cone of thread with specialty thread.
- With machine in locked position, set the looper threading port to U or L, according to the looper that is being threaded.
- Thread specialty thread into the upper thread guides, leaving an 18-inch (40cm) tail above the threading port.
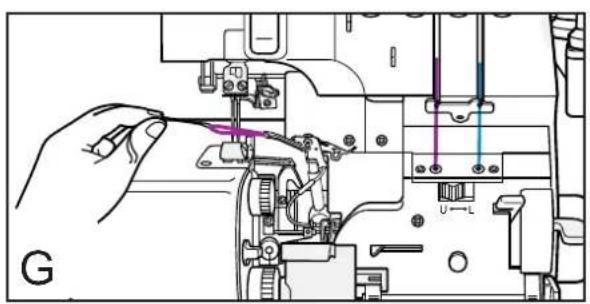
- Place the straight end of the looper threading tool into the threading port. Push the looper threading tool until the end comes out of the looper eye.
- Insert the specialty thread tail into the looper threading tool eye. (fig. A) Pull the straight end of the looper threading tool through the looper eye bringing the specialty thread with it. (fig. B)
Bypassing the Threading Port
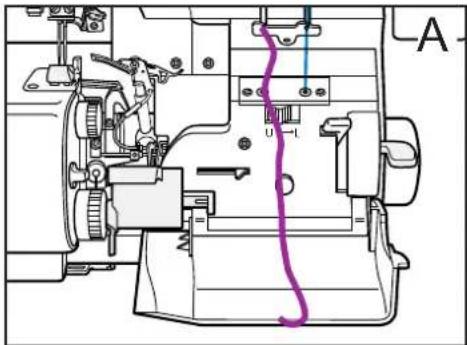
Heavy weight threads can be used through your regular looper thread paths. Specific techniques may require that the thread bypass the thread port for the thread pull to be loosened. Start with the machine threaded with regular serger thread.
- Open front cover and raise the presser foot.
- Just above the threading port, clip the looper thread to be replaced. Pull the thread out of the upper guides and remove the cone.
- Place the specialty thread on the spool pin. Thread it into the upper guides and clip it a couple of inches beyond the base plate. (fig. A)
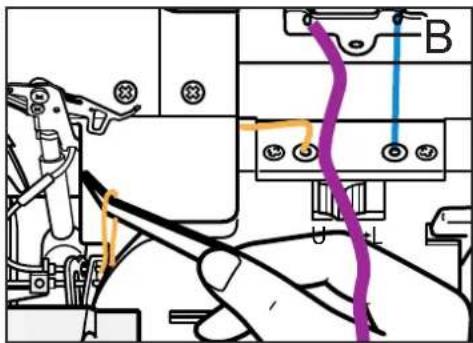
- With machine lock button released, use the tweezers to pull the existing looper thread out of tube extending from the threading mechanism. (fig. B) Leave the thread in the looper arm.
- Tie the specialty thread onto the regular thread with an overhand knot. (fig. C) Pull on the regular thread from the looper eye until the specialty thread comes through the looper eye.
- Place upper looper thread under the foot and to the left. Clip lower looper thread at the base plate.
If the thread is heavy and the overhand knot (step #5) is too large for the looper tube, follow directions #1 thru #6 on page 38 to make a thread cradle. Then:
- Release machine lock button.
- While holding the loose ends of the thread cradle with one hand, use the tweezers to pull the cradle loop out of the tube extending from the threading mechanism with the other hand.
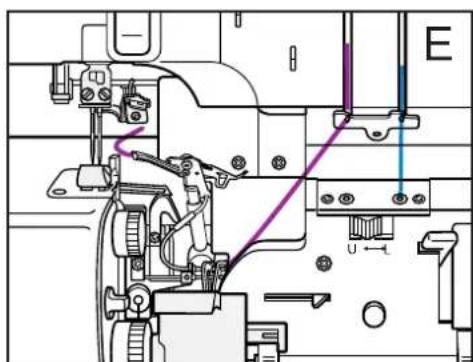
- Insert 2 inch (5cm) of your decorative thread into the cradle loop. Pull on the loose ends of the thread cradle from the looper eye until the specialty thread comes through the looper eye. (fig.D)


Specialty Thread Guide Chart
| Topstitching Buttonhole Twist | Woolly Nylon Thread | Machine Embroidery Metallic Threads | |
| APPLICATION | Edging or flatlock seaming for sportswear and home décor items. | Soft stretchy seams on lingerie, swimwear, active wear, and for rolled edge stitch. | Decorative edges for clothing, gift items, home décor, etc. |
| 4-Thread Seaming | Yes | Yes | Yes For exposed edges only |
| 3-Thread Seaming | Yes | Yes | Yes For exposed edges only |
| 2-Thread Flatlock | Yes | Yes | Yes |
| 4-Thread Edging | Yes | Yes | Yes |
| 3-Thread Edging | Yes | Yes | Yes |
| 2-Thread Edging | Yes | Yes | Yes |
| 3-Thread Rolled Edge | Use in upper looper only | Yes | Use in upper looper only |
| 2-Thread Rolled Edge | Use in lower looper only | Yes | Use in lower looper only |
| COMMENTS | When using decorative thread in the needle use a size 90 Top Stitch needle for best results. | Can be used in the needle. Tensions may require adjustment. | Varies greatly with manufacturer. Avoid thread with coarse metal fibers. Sew test before sewing on project. |
Specialty Thread Guide Chart (Cont.)
| Clear Nylon Monofilament | Machine Embroidery Threads: Rayon and Polyester, 30, 40, 50 weight. Lingerie Thread | Designer 6 Pearl Crown Rayon Candlelight Jeans Stitch Ribbon Thread | |
| APPLICATION | Techniques requiring the thread to be invisible such as blind hemming | Lingerie and lightweight fabrics, edging of fine fabrics, delicate rolled hems. | Decorative edging, flatlocking, rolled hem, etc. |
| 4-Thread Seaming | Yes Yes | Not recommended for seaming | |
| 3-Thread Seaming | Yes | Yes | Not recommended for seaming |
| 2-Thread Flatlock | Use in needle only | Yes | Use in the lower looper |
| 4-Thread Edging | Yes | Yes | Use in the upper and lower loopers. |
| 3-Thread Edging | Yes | Yes | Use in the upper and lower loopers. |
| 2-Thread Edging | Yes | Yes | Use in the lower looper only (Excluding Ribbon Thread) |
| 3-Thread Rolled Edge | Yes, soft, lightweight monofilaments only | Use in the upper looper | Not recommended for seaming |
| 2-Thread Rolled Edge | Yes, soft, lightweight monofilaments only | Use in the lower looper | Not recommended for seaming |
| COMMENTS | Make sure to use a soft pliable monofilament thread Sew at a slower speed. | Use thread nets to prevent the thread from falling off the spool and getting tangled. | Be sure to check the recommendations above for best results. Sew test before applying to the project. |
Replacing Needles


- Raise the needle to the highest position by turning the handwheel toward you.
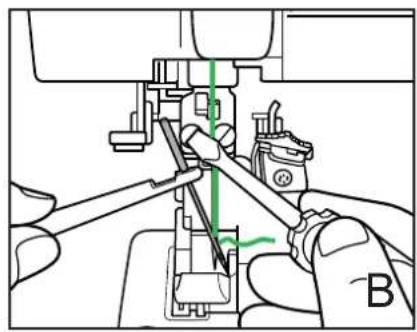
- Using the screwdriver from the accessory pouch, loosen the needle screw for the needle to be changed. "L" screw for the left needle and "R" screw for the right needle as show in illustration A.
Note: To prevent the needle from falling into the needle plate, hold it with the needle insert tool as you loosen the needle screw. (fig. A)
-
Use the needle insert tool or tweezers to insert the new needle with the flat side to the back. Insert the needle as far as it will go. Check the needle viewing window. (fig. A)
-
Tighten the needle screw.
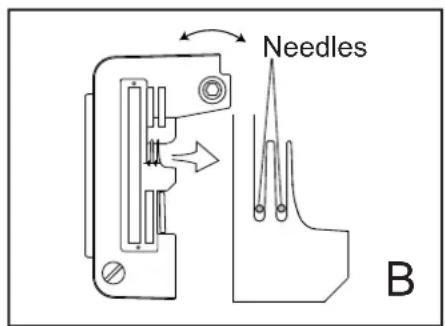
Note: If you do drop a needle down into the machine just pull out the needle-drop drawer at the bottom of the serger. The needle will be on the drawer. (fig. B)
Replacing Cutting Blades
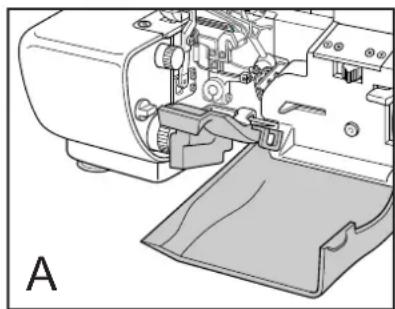
The lower fixed blade is made of a special long-lasting steel and does not require frequent replacement. If necessary, contact your nearest Baby Lock retailer for replacement of this blade.
The upper moving blade is made of a softer steel material and will require replacement. A spare blade is provided with the machine for replacement, if necessary. The spare blade is located in the thread spool stand accessory compartment.
If for some reason your machine does not cut or perform as it should, please take your machine to your nearest Baby Lock retailer. It is possible that the result of poor cutting may indicate other problems.
To replace the upper moving blade, follow below instructions.
- For safety reasons, unplug main power cord.
- Open front cover and cutting blade cover. (fig. A) Remove presser foot.
- Turn handwheel so upper moving blade is in its highest position.
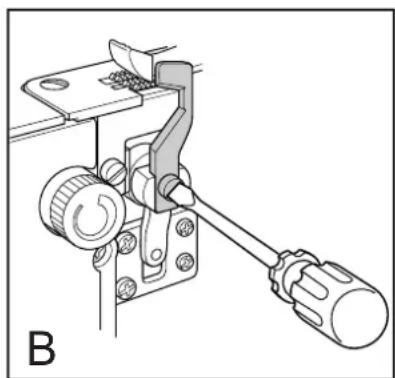
- Remove screw and upper blade. (fig. B)
- Insert new blade into blade slot.
- Insert screw and hold moving blade in its highest position while tightening the screw.
- To finalize position of upper blade, turn handwheel so that the moving blade is in its lowest position. Loosen the screw so that the moving blade can be lowered to 1mm overlap of the top of the fixed blade. (fig. C) Tighten the screw.
- Close cutting blade cover and front cover. Replace the presser foot.
- Rotate the handwheel one turn to ensure smooth operation of the machine.
Cleaning
Your Baby Lock will operate at best performance if it is kept clean at all times. The serger's cutting action creates much more lint than you will find on conventional sewing machines. This lint impedes the machine's efficiency and acts as a sponge to draw oil from it.
Your serger will not need oiling for many years because the major moving parts are made from oil-impregnated metal.
However, we recommend using the cleaning brush often during garment construction in order to keep lint off the blades, the needle bar, the feed dog mechanism and loopers. Remove the blade cover and throat plate periodically to clean more thoroughly.
TO REMOVE NEEDLE PLATE, PROCEED AS FOLLOW:
- For safety reasons, unplug main power cord.
- Raise and remove presser foot.
- Select stitch length dial to rolled hem setting.
- Remove needles from needle clamp.
- Turn your handwheel until the upper looper is in the far right position.
- Remove the needle plate. Remove front screw with screwdriver and back screw with allen wrench. (fig. A)
- With your right hand, first raise the needle plate in front of the blade. Pull slightly to the right, then remove to the left.
- Replace in reverse procedure.
- Finally, position the needle plate so that the needles lower in the center of each hole on the needle plate. (fig. B)

Replacing LED Light Bulb
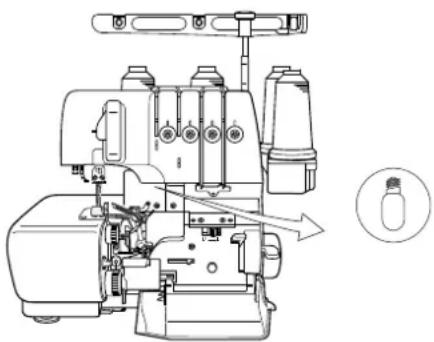
Your Baby Lock Celebrate is equipped with a long-life LED lighting system, which is not necessary to change bulbs.
If the LED unit needs replacement, please contact your authorized Baby Lock retailer.
*Remove LED light bulb and replace LED light bulb with the same type, rated (2 watts or less).
*Remove light bulb and replace bulb with the same type, rated (15 watts/110 volts).
Troubleshooting
Before taking your machine in for service, check the following:
Machine fails to start:
- Are electrical plugs properly connected?
- Is the power switch on?
- Check household circuit breaker or fuse.
- Is the lock button release lever in the unlocked position?
Thread breaks:
- Is the machine threaded correctly? Check each thread guide, all tension discs.
- Is the needle inserted correctly?
- Is the needle bent and worn?
- Is tension adjusted too tightly?
- Is tension adjusted to accommodate thickness of thread being used?
- Are you using good quality thread?
- Is the thread feeding off the cone/spool freely?
- Is the needle size correct for the type of fabric being used?
- Are the needles being used the correct Organ or Schmetz HAx1SP/CR system?
Skipped Stitches:
- Is the needle bent or worn?
- Is the needle inserted correctly?
- Is the serger threaded correctly?
- Is the presser foot pressure right for the fabric?
- Is the correct needle being used for the particular stitch?
- Is the correct needle being used for the type of fabric being sewn?
- Is the fabric being pulled from the rear of the machine while sewing?
Fabric will not feed in machine:
- Is the machine lock button released?
- Is the presser foot down?
- Are the cutting blades sharp?
- Are the cutting blades, presser foot, and feed dogs free of lint?
- Are the cutting blades properly set and is the upper blade against the lower blade?
- Is the presser foot pressure right for the fabric?
- Is the stitch length set properly?
- Is the needle plate secure on the machine?
Stitch is Unbalanced:
- Is the serger threaded correctly?
- Is the needle tension too loose for the fabric being used?
- Are the looper tensions properly adjusted?
- Is the thread well seated in the thread slots?
- Have you changed to specialty threads and not adjusted tension to accommodate a different thread thickness?
Troubleshooting (Cont.)
Needle threading difficulties:
- Is the needle threader selector at the appropriate setting? ("R" for right needle, "L" for left needle.)
- Is the green mark on the handwheel lined up on the machine?
Looper threading difficulties:
- Is the looper threader selector at the appropriate setting? (Left threading port for "U" upper looper, right threading port for "L" lower looper.)
- Is the thread end in the proper threading port?
- Is at least 1 inch (2.5cm) of the thread end in the threading port?
- Is there at least 18 inches (45cm) of loose thread beyond the thread guide above the threading port?
- Is there a kink or twist in the 18 inches (45cm) of thread to restrict the flow into the threading port?
- Is the thread caught to prevent going through the loopers?
Poor Cutting:
- Are the cutting blade(s) dull?
- Have you sewn over a straight pin?
- Is the cutting blade in the locked position?
- Have the cutting blades been improperly replaced?
- Is the fabric being pulled from the rear of the machine while sewing?
Dos and Don'ts
- Always be aware of the needle's up-and-down movement, and do not turn your attention from the machine while it is running.
- When changing the needle, the presser foot or any other parts, always disconnect the machine by turning the power switch to OFF.
- Do not place anything on the foot controller, or the machine will start inadvertently and the controller or motor can burn out.
- When using your serger for the first time, place a fabric scrap under the presser foot and run the machine without thread for a few minutes. Wipe away any oil that appears.
- Do not pull fabric from the rear of the machine. Such action can damage the looper mechanism.
- To prevent possible injury, always avoid body contact with any moving parts and the machine mechanism.
- NEVER sew over pins.
Special Caution: Unplug the power cord from the electrical outlet when the machine is not in use.
Technical Data
Stitch Types:
2 needles, 2 loopers:
4-Thread Overlock
1 needle (left or right), 2 loopers
3-Thread Overlock (wide, narrow, and narrow hem)
3-Thread Flatlock (wide and narrow) right needle only
1 needle (left or right), 1 looper
2-Thread Flatlock (wide and narrow)
2-Thread Blanket Stitch
2-Thread Ladder Stitch
Stitch Width:
Standard 2/3/4 - thread with left needle:
5.5 - 7.5mm
Standard 2/3 - thread with right needle
3-Thread Stitch with right needle
3.0 - 5.0mm
2/3/4 Thread Overlock Stitch: 0.75-4mm
3-Thread Rolled Edge: 0.75-4Rmm
Differential Feed:
Gathering effect: N-2
Stretching effect: N-0.6
Presser Foot:
Snap-on feet
Handwheel:
Rotates forward
Needle System:
Organ or Schmetz HA x 1SP/CR
Sewing Speed:
Up to 1,500 s.p.m
Machine Weight:
7.5 kg
Light System:
1 LED Light Bulb
Chart for Stitch Selection Settings
| Stitch Type | Stitch Length | Stitch Width | Left Needle Tension | Right Needle Tension | Upper Looper Tension | Lower Looper Tension |
| 4-Thread Overlock | 2-3 | 5.5-7.5 | 4 4 4 4 | |||
| 2.5-3.5 | 5.5-7.5 | 3.75 | 3.75 | 4 | 4 | |
| 3-4 | 5.5-7.5 | 3.5 | 3.5 | 4 | 4 | |
| 4-Thread Gathering | 5.5-7.5 | 4 4 4 44 | ||||
| 3-Thread Overlock Wide and Narrow | 2-3 | 3.0 N/A | 4 | 3.5 3.5 | ||
| 2-3 | 7.5 | 4 | N/A | 4 | 4 | |
| 2.5-3.5 | 3.0 | 3.75N/A | 3.53.5 | |||
| 2.5-7.5 | 7.5 | N/A3.75 | 4 | 4 | ||
| 3-Thread Rolled edge | 0.75 | 3.0 N/A | 3.5 | 3 | 7 | |
| 1.5 | 3.0 N/A | 4 | 2.5 6.5 | |||
| 2-Thread Flatlock | 2-3 | 3.5 N/A | 1 | N/A | 5 | |
| 2-3 | 7.5 | 0 | N/A | N/A | 3.5 | |
| 2-Thread Rolled edge | 0.75 | 3.0 N/A | 4.5 | N/A | 3.5 | |
| 1.5 | 3.0 N/A | 4 | N/A | 3.0 | ||
This chart indicates the suggested range of tension numbers for each stitch category. As you determine special settings for your machine, record them on the chart in the blank spases.
BLS1-TA
EI-47-TA
Printed in Japa


- INSTRUCTION AND REFERENCE GUIDE
- IMPORTANT SAFETY INSTRUCTIONS
- DANGER
- WARNING
- INFORMATIONS IMPORTANTES DE SÉCURITÉ
- CONSERVEZ CES INSTRUCTIONS
- CONGRATULATIONS ON CHOOSING BABY LOCK CELEBRATE
- NOTES
- TABLE OF CONTENTS
- OVERVIEW......5
- THREADING....14
- 4-THREAD OVERLOCK 22
- 3-THREAD OVERLOCK 24
- ROLLED EDGING 25
- TABLE OF CONTENTS (CONT.)
- 2-THREAD OVERLOCK 27
- BASIC SERGING TECHNIQUES 33
- USING SPECIALTY THREADS 37
- MAINTENANCE 43
- TROUBLESHOOTING 45
- TECHNICAL DATA....47
- CHART FOR STITCH SELECTION SETTINGS....48
- HOW YOUR SERGER OPERATES
- OVERVIEW OF THE CELEBRATE
- ACCESSORIES
- ACCESSORY NUMBER INCLUDED LOCATED IN
- NEEDLES
- THREAD
- OPTIONAL ACCESSORIES
- SETTING UP YOUR CELEBRATE
- CUTTING BLADE LOCKING DIAL
- PRESSER FOOT PRESSURE ADJUSTMENT
- SNAP-ON PRESSER FOOT
- TO RELEASE
- TO REPLACE
- STITCH LENGTH/ROLLED HEM
- STITCH WIDTH
- DIFFERENTIAL FEED
- 2-THREAD SUBSIDIARY LOOPER
- TO ENGAGE THE SUBSIDIARY LOOPER
- TO DISENGAGE THE SUBSIDIARY LOOPER
- THREADING PREPARATION
- THREADING YOUR CELEBRATE
- THREADING POSITION FOR THREADING LOOPERS
- LOWER LOOPER
- UPPER LOOPER
- RIGHT NEEDLE
- LEFT NEEDLE
- HOW TO USE NEEDLE THREADER
- TENSION ADJUSTMENT
- SERGING WITH FABRIC
- CLEARING THE STITCH WIDTH FINGERS
- RE-THREADING LOOPERS
- RE-THREADING NEEDLES
- 4-THREAD OVEREDGING
- OVERLOCK SEAMING
- 4-THREAD OVERLOCK
- 3-THREAD OVERLOCK
- ROLLED EDGING
- SEAMING SHEERS
- LETTUCE EDGE
- BELT LOOPS AND BUTTON LOOPS
- RETURNING TO STANDARD SERGING
- 2-THREAD OVERLOCK
- CONVERTING FROM 3-THREAD TO 2-THREAD OVERLOCK
- FLATLOCK SEAMS
- FLATLOCK "TOPSTITCHING
- BLIND HEMMING
- 2-THREAD ROLLED EDGE
- RETURNING TO 3 OR 4-THREAD OVERLOCK
- SECURING ENDS
- TO LOCK THE BEGINNING OF THE SEAM
- SECURING ENDS (CONT.)
- TO LOCK THE END OF THE SEAM
- TURNING OUTSIDE CORNERS
- TURNING INSIDE CORNERS
- SERGING CURVES
- INSERTING TAPES
- CUTTING BLADE COVER SEAM GUIDE
- USING SPECIALTY THREADS
- THREADING LIGHTWEIGHT THREAD
- CHANGING THREADS
- THREADING MEDIUM WEIGHT THREAD
- THREAD CRADLE FOR LOOPERS
- LOOPER THREADING TOOL
- BYPASSING THE THREADING PORT
- SPECIALTY THREAD GUIDE CHART
- SPECIALTY THREAD GUIDE CHART (CONT.)
- REPLACING NEEDLES
- REPLACING CUTTING BLADES
- TO REPLACE THE UPPER MOVING BLADE, FOLLOW BELOW INSTRUCTIONS
- CLEANING
- TO REMOVE NEEDLE PLATE, PROCEED AS FOLLOW
- REPLACING LED LIGHT BULB
- TROUBLESHOOTING
- MACHINE FAILS TO START
- THREAD BREAKS
- SKIPPED STITCHES
- FABRIC WILL NOT FEED IN MACHINE
- STITCH IS UNBALANCED
- TROUBLESHOOTING (CONT.)
- NEEDLE THREADING DIFFICULTIES
- LOOPER THREADING DIFFICULTIES
- POOR CUTTING
- DOS AND DON'TS
- TECHNICAL DATA
- STITCH TYPES
- PRESSER FOOT
- HANDWHEEL
- NEEDLE SYSTEM
- SEWING SPEED
- MACHINE WEIGHT
- LIGHT SYSTEM
Brand : BABY LOCK
Model : Celebrate
Category : Sewing machine