KM 42.72 - Coffee machine Petra Electric - Free user manual and instructions
Find the device manual for free KM 42.72 Petra Electric in PDF.


User questions about KM 42.72 Petra Electric
0 question about this device. Answer the ones you know or ask your own.
Ask a new question about this device
Download the instructions for your Coffee machine in PDF format for free! Find your manual KM 42.72 - Petra Electric and take your electronic device back in hand. On this page are published all the documents necessary for the use of your device. KM 42.72 by Petra Electric.
USER MANUAL KM 42.72 Petra Electric
Anti-Chlor-Filter ACF 30
Instructions for use

Contents
Prior to use 16
Technical Data 16
Optional accessories 16
Safety instructions 16
Designation of the displays 17
Startup 17
Preparation 17
Filling level display 17
Exhaust (only required for new appliances) 17
Preparing the coffee #8
Coffee soft pads 18
One cup 78
Two cups 78
Adjusting the coffee quantity 18
Starting the brewing - pre-brewing function 18
Tips for the best possible coffee 18
Preparing hot water 18
Preparing the milk froth 19
Professional milk frothing unit 19
Frothing the milk 19
Care of the professional frothing unit 19
Cleaning after use 19
Cleaning after the final use 20
Recommendations for preparation 20
Cappuccino 20
Latte Macchiato 20
Café Mocha 20
Frothed cocoa 20
Disconnecting 20
Rinse process 20
Decalcification 20
Calcification display 20
Hardness range setting 21
Decalcifier 21
Decalcification program 21
Preparation 21
Segment 1 - Decalcification 22
Segment 2 - Rinsing 22
Cleaning and service 22
Pad cassette 22
Filter insert 22
Professional milk frothing unit 22
Steam opening 22
Troubleshooting 23
Prior to use
We would like to congratulate you to your purchase of automatic coffee pad system. You have obtained a modern appliance, with which you will love to prepare fresh and aromatic coffee.
The automatic coffee pad system may only be used for intended purpose according to these operating instructions. Please read the operating instructions carefully prior to starting the appliance; it provides instructions for its use, cleaning and the care of the appliance. We do not assume any liability for potential damages when disregarding these instructions. Carefully store the operating instructions and pass them to any subsequent user with the appliance. Please also observe warranty statements at the end of the operating instructions.
This appliance is intended for domestic use and similar applications, such as:
- in staff kitchens in shops, offices and other commercial establishments;
- in agricultural establishments;
- by guests in hotels, motels and other accommodation facilities;
- in bed-and-breakfast facilities.
The appliance is not intended for purely commercial use The warning triangle identifies instructions important for safety. Always comply with these, otherwise you may be injured or the appliance could be damaged.
11 The numbers point to the illustrations.
(3) Numbers in parenthesis point to single parts mentioned in the illustrations.
The original packaging is specifically designed to guarantee the secure transport in case services are required. Thereafter, before always keep the packaging at least for the warranty period.
Technical Data
Rated voltage: 220-240 V 50 Hz
Power consumption: 1600 watts
Protection class: I
Optional accessories
Optional accessories are not included in the standard scope of delivery.
You can obtain these accessories from select dealers or you can order them directly from Petra-electric.
Anti-chlorine filter ACF 30
The anti-chlorine fitter ACF 30 provides an authentic coffee flavour. It filters chlorine and other contaminants out of the water.
The efficiency of the filter is reduced the longer it is used. At a daily average consumption of 8 cups of coffee it should be replaced after at least 2 months (approx. 500 cups).
4 Set the time of the next filter replacement on the Replacement indicator (19).
Powder cartridge PK 301
With the powder cartridge PK 30 you can also enjoy your favourite brand of coffee freshly ground and with crema. You do not have to use standard commercial coffee pads.
Safety instructions
Only connect the appliance to a shockproof socket that has been installed according to regulations.
Do not jam the power supply line and protect it from sharp edges, humidity, heat and oil.
Do not connect the appliance if the power supply line is damaged. It must then be immediately replaced by our central customer service or a similarly qualified person. Incorrect repairs may result in considerable hazards for the user.
Do not start the appliance or immediately pull the power supply plug, if it is damaged or leaks or if a defect exists after a fall or such. Have the appliance repaired in these cases.
Do not set the automatic coffee pad system on hot surfaces, such as stovetops or such or near an open gas flame; this could melt the housing. Surfaces sensitive to water are unsuitable as setup surfaces, since these could become damaged by water spray.
This appliance is not intended to be used by persons (including children) with limited physical, sensory or mental capacities or without experience and/or knowledge, unless they are supervised by another person responsible for their safety or received instructions, how to use the appliance.
Please verify that children do not have an opportunity to play with the appliance.
Pull the power supply plug, if the appliance will not be used over an extended period.
A risk of scalding by hot water and steam exists. Please observe the information in these operating instructions when operating this appliance.
Always set the rocking lever (5) after every use.
Frost warning! After the appliance has been bled, i.e. is filled with water, it may only be operated and stored in frost-free rooms. Otherwise, the appliance could be damaged. Frost damages are not
covered by the warranty.
Designation of the displays
| Red | The appliance is rinsing or heating | |
| Red flashing | Fill the water tank! | |
| Green Ready for use | ||
| Green flashing | Bleed new appliance! Rinsing prompt during decalcification. | |
| ① | Yellow Decalcification program | |
| ① | Yellow flashing Decalcify the appliance! | |
| ① | Blue Active steam mode | |
| ① | Blue/yellow flashing | Decalcify the appliance! Steam mode is not possible |
Startup
Set the appliance on a solid surface that is insensitive to water.
The appliance may not be operated in locations that are higher than 1,500m above sea level. You can insert any unneeded length of the power supply line (2) on the bottom (1) of the appliance.
Preparation
Clean the water tank (4), the pad cassette (6), the filter insert (19) and the coffee dispenser (3) with a dish-washing agent prior to the first use.
The water tank (4) is removable. First, tilt backward at the handle and then lift out. It is inserted in reverse order. Set the rocking lever (5) at to remove the pad cassette (6).
The height of the coffee dispenser (3) is adjustable by a thread. You can grab it on the two dispenser nozzles and adjust its height or unscrew it downward. If you turn over the coffee dispenser (3), the filter insert (19) will drop out. It provides the best possible foam. After cleaning, it must be reinserted again so that the recess of the filter insert (19) fits into the counter-piece of the dispenser (3).
7 Set it from below at the thread to assemble the coffee dispenser (3) and screw it to the desired height.
Filling level display
The fresh water supply is monitored continuously by a movable floating module in the water tank (4). The start/stop button 2) flashes red when underrun- ning the required minimum filling quantity. The operation continues as soon as you have replaced the filled water tank (4).
Exhaust (only required for new appliances)
The heating system must be ventilated first at the first startup of the new automatic coffee pad system.
- 4 Fill the water tank (4) through the filler opening in the lid (18) up to the max-mark 5 nd insert it in the appliance.
If you fill it up too much, it will run over when you insert it.
Only fill it with cold fresh water, never use warm water, carbonated water or other liquids, such as milk or similar.
- Place two large cups under the coffee spout (3), insert the empty pad cassette (6) and move the rocking lever (5) up
Note: If the pad cassette (6) is not inserted, the rocking lever (5) cannot be set in the area.
- Switch on the appliance at the on/off button (10). The start/stop button will flash (12) green a short time thereafter.
- Press the start/stop button (12). During start-up, the number of rinsing cycles required is established electronically. If several rinsing cycles are required, the process will be aborted every 45 seconds and the start/stop button (12) will flash green.
- If necessary, empty the cups and press the start/stop button (2) again.
- As soon as the appliance has been sufficiently rinsed, the start/stop button will light up red and the water is heated. Set the rocking lever (5) to The start/stop button 2) will change from red to green after approximately 80 seconds.
- Place one cup respectively under the hot water spout (7) and the frothing nozzle (28) and move the rocking lever (5) to .
- Press both buttons (10 and 12) briefly at the same time. As soon as the right cup is full, push the rocking lever (5) to while the pump is running.
- After the pump switches off automatically, set the rocker lever (5) at
Caution! Scalding risk! Hot steam could escape from the frothing nozzle (28) during heating.
Preparing the coffee
Coffee soft pads
Conventional coffee soft pads with an outer diameter of 7cm can be used (approx. 7g of coffee). Coffee pads with a smaller diameter do not deliver the best coffee. Hard pads, as offered for espresso machines and pads with additives for cappuccino, etc. cannot be used.
Never insert damaged pads, loose coffee powder or instant coffee into the pad cassette; it could plug up. The rocker lever (5) then can no longer be pushed to the right to remove the pad cassette (6). If this should occur, despite observing the information, please proceed as described at the end of this user manual in section "Help in case of malfunctions."
The more careful the pads are inserted, the better the coffee will turn out. It is important to distribute the coffee power evenly in the pad up to the rim so that water cannot flow past the pad. 8 9 ap the pad lightly with your finger tips so that a small indentation develops in the center.
One Cup
Place a cup in the center of the screen (9).
8 Place the pad cassette (6) so that "1" is visible on the handle from above. Insert a coffee pad in the recess as described above.
Two Cups
Place two cups under a dispenser nozzle of the coffee dispenser (3).
9 Place the pad cassette (6) so that "2" is visible on the handle from above. Now there is space for two pads. The first one must be pressed firmly into the recess; the paper edge will point upward. Place the second pad on top as described above.
The paper edge of the top pad must be flat in the recelthe appliance was not used for several days, please and may not project outward and may not be folded inwarproceed as described in section "rinse process".
When inserting the pad cassette (6), please verify that the pad does not shift, otherwise, the seal will not close properly and water will escape at the handle of the pad cassette (6).
Push the rocking lever (5) in area to the left as far as possible. This is important for the best possible coffee quality.
Adjusting the coffee quantity
The quantity of the coffee powder in a pad is optimally adjusted to one cup at 125ml . You can vary the fil
ling quantity per cup according to your personal desires and therefore change the strength of the coffee. Depending, if you prepared one or two cups and if you prefer strong or mild coffee, you adjust the desired coffee quantity on the control knob (11).
Symbol Filling quantity for
| min One | espresso or mocha cup |
| One coffee cup | |
| One large coffee cup | |
| Two coffee cups | |
| max One | jumbo cup |
Starting the brewing - pre-brewing function
In order to start brewing, briefly press the green illuminated start/stop button (2).
Only a small water quantity will be initially supplied for pre-brewing. Brewing will continue only after a brief interval, in which the coffee powder can swell. An especially intensive aroma will be achieved by this method. You can interrupt this at any time by pressing the button again.
Set the rocking lever (5) to before removing the finished coffee.
Remove used pads quickly from the appliance for hygienic reasons.
Tips for the best possible coffee
Stir the coffee prior to consumption; this will provide you with an even coffee strength in the cup.
Carefully close the pad packaging to prevent aroma losses. The best storage location is the refrigerator.
Fill up with fresh water daily. Prior to this, briefly rinse the water tank.
the appliance was not used for several days, please proceed as described in section "rinse process".
ie
Preparing hot water
You may remove water at the best possible temperature from the hot water dispenser (7) when preparing tea or instant beverages.
Place the cup at a height of up to 10cm under the hot water dispenser (7) and move the rocking lever (5) up
After setting the desired water quantity on the control
knob (11), press the green illuminated start/stop button 12.
The hot water quantity may clearly deviate from the usual coffee quantity. Therefore, please verify filling. You can interrupt this at any time by pressing the start/stop button 12) again.
Set the rocking lever (5) to before removing the cup.
Preparing the milk froth
The professional milk frothing unit (24) suction cold milk from a suctioning cup (30) and channels it heated and frothed directly into the cup.
Professional milk frothing unit
Pull the milk frothing unit (24) from the steam outlet (22) downward and dismantle it into single parts. After cleaning in dishwater, reassemble the parts as illustrated in fig. 11:
- Push the tube (25) onto the tube adapter (26).
- Place the frothing nozzle (28) onto the mixer (27).
- Push the tube adapter (26) onto the mixer (27) up to the stop, so that no gap remains visible up to the handle (30).
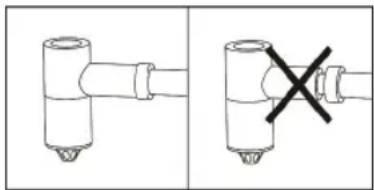
- Place the complete professional milk frothing unit (24) from below onto the steam outlet (22) until it snaps in. You will recognize it easily on the red steam nozzle (23).
Frothing the milk
12 Hang the tube (25) into a milk suctioning cup (31) that is not higher than 14cm . Place it as close as possible to the appliance, so that the tube reaches the bottom of the cup.
Caution - risk of scalding! Hot steam is used for frothing. Only operate the appliance, if the milk frothing unit (24) is properly assembled and a cup is located under the frothing nozzle (28).
Always verify that the milk suctioning cup (31) is sufficiently filled with cold milk. If it empties during frothing, milk and hot steam will splatter from the frothing nozzle (28).
- Place a cup below the frothing nozzle (28) up to a
height of 9 cm.
- Switch on the appliance at the on/off button (10). The rocking lever (5) must be located at
- As soon as the start/stop button (12) is illuminated in green, push the rocking lever (5) to The on/off button 0) is illuminated in blue. Wait until the start/stop button (12) changes from red to green, the appliance is then ready.
Caution - risk of scalding! The remaining water and hot steam from the frothing nozzle (28) could escape during heating. - Set the desired quantity of frothed milk on the control knob (11). The cup symbols will serve you as a guide.
- In order to start, briefly press the green illuminated start/stop button (2). You can interrupt this at any time by pressing the button again.
Please verify that the milk frothing outlet does not stop immediately. It will take some time before the pressure in the steam preparation unit is balanced. Leave the cup there until then. - Set the rocking lever (5) to before removing the cup.
- Let the frothed milk stand for a minute, so that the milk froth can settle.
Care of the professional frothing unit
Please observe the following information for a continuous reliable function of the professional frothing unit (24):
- Clean the professional frothing unit (24) immediately after use, unless you want like to use it again immediately.
- It must be cleaned daily after the last frothing, the milk froth will only succeed easily by this method.
The air duct (29) is located on the hose adapter (26) through which air is added to the milk for frothing. Clean it especially carefully. If making the milk froth is unsuccessful at some point, a contaminated or damaged air duct (29) is the cause without a doubt.
Cleaning after use
- Place the hose (25) into a cup filled with cold water. Place another cup under the frothing nozzle (28).
- Push the rocking lever (5) to and wait until the start/stop button changes from red to green.
- Set the control knob (11) at
- Briefly push the green illuminated start/stop button (12). Push the hose adapter (26) in the mixer (27) back and forth during the filtration process.
- After rinsing, set the rocking lever (5) on the appli
ance to again.
Cleaning after the final use
- Pull the professional frothing unit (24) downward off the steam outlet (22) and dismantle it into single parts.
- All residue can be removed in dishwater by using a soft brush or you can place the parts into the dishwasher. Please be careful that parts are not lost.
- After drying, re-assemble the parts as described above in section "Professional milk frothing unit".
If you follow the aforementioned instructions, you will create a milk froth portion of 1/3.
Recommendations for preparation
Espresso is generally used for many coffee specialties. You can prepare a beverage similar to espresso with your automatic coffee pad system. Select pads of a stronger roasted coffee type. The correct espresso quantity will be obtained at the min control knob setting. You will receive Caffè lungo (extended espresso), if you set the control knob (11) in the center between min and
Cappuccino
Cappuccino consists of one third of espresso, hot milk and milk froth.
First brew the coffee into a preheated cup that holds 150 - 200ml .For this, set the control knob (11) at min. Then feed the frothed milk into the cup at a control knob setting of
Sprinkle some cocoa powder over this, which may also be mixed with some cinnamon during Christmas time.
Latte Macchiato
Latte macchiato is usually served in a glass, where the three layers that should only mix slightly are especially shown at an advantage.
Use a glass that holds 200 - 250ml at a height of 9cm . Add frothed milk into the glass first at a control knob setting Leave the glass for some time or gently bump it to obtain a better separation of the layers. Then add the coffee. For this, set the control knob (11) at min. If the layering is not immediately successful, try to run the coffee over the back of a spoon into the milk froth.
Serve Latte Macchiato sprinkled with chocolate flakes or cocoa powder.
Café Mocha
Cappuccino consists of one third espresso, hot chocolate and frothed milk.
First brew the coffee into a preheated cup that holds 150 - 200ml . Turn the control knob (11) to min.
Then add hot chocolate. Fill with frothed milk at the end at the same control knob setting.
Frothed cocoa
Stir instant cocoa powder into fresh milk directly in the suctioning cup (31). After frothing, you can enjoy a wonderfully light warm cocoa beverage ready to drink.
Disconnecting
The appliance can be switched off at any time by pressing the on/off button (10). If you do not switch it off, it automatically switches off after 60 minutes after the last use. The power consumption is less than 0.5 Watts during off-mode.
Rinse process
Clean the appliance, if it has not been used for several days. The content of the heating system is thereby replaced by tap water.
- Insert the water tank (4) into the appliance after it has been filled up to the max mark 5
- Insert the empty pad cassette (6) and move the rocking lever (5) to
- Place two cups under the coffee spout (3).
- Switch on the appliance on the on/off button ① (10) and then simultaneously press both buttons (10 and 12) briefly.
- After the pump automatically switches off, set the rocking lever (5) to
Decalcification
Calcification display
The appliance must be routinely decalcified as all hot water appliances.
The automatic calcification display determines the time for the required decalcification. Depending on the coffee consumption, you will already be required to perform decalcification after 6 to 10 weeks by the yellow flashing on/off button (B0).
You may continue to brew coffee and prepare hot water. However, milk frothing is no longer possible.
Hardness range setting
The appliance is preset to very hard water (hardness range 4) as a precaution against excessive calcification. Request the hardness range in your residential area from the responsible waterworks or the community administration. If it is lower than 4, you can change the setting. You then must no longer decalcify so frequently.
- Switch the appliance off at the on/off button①(10).
- Press the start/stop button 12) (3 to 4 seconds) until the on/off button 00) flashes yellow. The number of impulses shows the set hardness range.
Flashing signal Hardness range Hardness
| 1 soft 0 - 7° dH |
| 2 medium > 7 - 14° dH |
| 3 hars > 14 - 21° dH |
| 4 very hard > 21° dH |
1^ corresponds with approx. 0.18 mmol/1 Ca- and Mg ions
3. You will change the setting by one step every time you press the start/stop button (12). Range 1 follows hardness range 4 again.
4. In order to assume the new hardness range, press the on/off button 10) again briefly. if this is not done within 10 seconds, the appliance is switched off without changing the setting. You can check the hardness range at any time by repeating step 1 and 2.
Decalcifier
The automatic decalcification program of your automatic coffee pad appliance is optimized to be used for a portion (125 ml) of durgol® swiss espresso® Therefore only use this product in the specified quantity when decalcifying the appliance. A complete decalcification and saving the materials is only guaranteed during the brief decalcification period.
durgol® swiss espresso® was specifically developed for automatic coffee and espresso machines. It is used undiluted, is highly effective and guarantees a reliable decalcification and therefore a long service life of the appliance.
You may obtain it where you bought the appliance; directly from a select dealer or you can order it directly from petra-electric.
Never use vinegar or vinegar concentrate since material of the appliance might be damaged.
Decalcification with citric acid is too slow. That is why a proer decalcification cannot be guaranteed.
A warranty claim does not exist for damages that develop due to the use of an unsuitable decalcifier or non-compliance of the decalcification specifications.
Please be careful when carefully handling the decalcifying agent that damages are not caused on furniture or clothing. Please use a possibly high cup for that reason and place it under the respective spout in order to prevent splatters.
Decalcification program
Your automatic coffee pad system includes an automatic decalcification program that lasts approximately for 25 minutes.
Note: Once the automatic decalcification program is started, it cannot be interrupted.
Preparation
- 13 Unscrew the red steam nozzle (23) from the steam outlet (22). Use the Allen key (32) for this, it is located on the bottom of the drip pan (8).
- necessary, remove the anti-chlorine filter (17, optional accessory) from the water reservoir (4).
- Fill a portion (125 ml) of durgol swiss espresso into the empty water reservoir (4), place the red steam nozzle (23) inside and fill the reservoir with fresh water up to the max. mark. Then insert the reservoir into the appliance.
- Insert the empty pad cartridge (6) and set the rocking lever (5) to
- Place a collecting vessel with at least 1.4 litres capacity (for example a pot) onto the grate under the outlets.
Segment 1 - Decalcification
- Immediately after switching on the appliance press the buttons (10) and (12) simultaneously and keep them pressed until the pump goes into operation. The on/off button 0 lights up yellow continuously as long as the decalcification program is running.
- The start/stop button (2) flashes green after approximately 5 minutes. Push the rocking lever (5) to and press the start/stop button (12).
- The start/stop button (12) flashes green after approximately 10 minutes. Push the rocking lever (5) to and press the start/stop button (12).
- The first segment of the decalcification program is completed after another 5 minutes. The start/stop button (12) flashes red again.
Segment 2 - Rinsing
- Rinse the water reservoir (4), fill it with fresh water up to the max. mark and place it back into the appliance. Place a cup under the outlet (3), push the emptied collecting vessel back onto the grate under the outlets. Push the rocking lever (5) to and press the green-flashing start/stop button (12).
- As soon as the start/stop button 2) starts flashing green again after approximately 80 seconds, place a cup under the hot water outlet (7).Push the rocking lever (5) to and press the start/stop button.
- As soon as the button flashes green again, push the rocking lever (5) to and press the green-flashing start/stop button.
- If the rinse is interrupted by a red flashing light, the tap water must be refilled.
- The decalcification program is completed after a total of 3 rinse cycles and the appliance switches off. Set the rocking lever (5) to
- Prior to this, unscrew the cleaned and decalcified red steam nozzle (23) into the steam outlet (22) up to the stop without tightening it with the Allen wrench (32).
Place the pad cassette (6), coffee dispenser (3) and filter insert (19) into the dishwasher after decalcification.
Cleaning and service
Pull the power supply plug prior to cleaning.
Never immerse the appliance in water.
Wipe the outside of the appliance with only a damp cloth. Do not use any sharp or abrasive cleaning agents, these would damage the finish.
All removable parts can be placed into the dishwasher except the water tank (4) and the tank lid (18).
Pay attention that you do not loose any small parts.
Clean the water tank (4) and the tank lid (18) in dishwater and rinse with clear water.
Pad cassette
Place the pad cassette into the dishwasher with the handle up, so that dishwasher will not remain in the part.
Routinely check that the center opening of the pad cassette (6) is unobstructed. Pulp fibers of paper towels can plug it up during cleaning.
Filter insert
The quality of the crema is already clearly reduced at slight deposits in the filter insert (19). This could already be the case after 100 cups at calcium residue due to very hard water. It must therefore be routinely cleaned. The two filters, which are located on top of each other, may not be pressed together. Remove the coffee oil in dishwater by using a soft brush or place the filter insert into the dishwasher. Remove any calcium deposits by placing it in the decalcification solution and then rinse the filter insert well.
Professional milk frothing unit
The professional frothing unit (24) must be cleaned daily as described in section "Care of the professional frothing unit", in order to guarantee a reliable function.
Steam opening
If you are routinely frothing milk, you must clean the steam nozzle (23) monthly. At some point, you will determine that less steam is available.
13 Unscrew the red steam nozzle (23) from the steam outlet (22). Use the Allen key (32) for this; it is located on the bottom of the drip pan (8). Remove the calcium deposits by placing the nozzle into the decalcifying solution and then rinse it under running water. Manually screw the steam nozzle (23) into the steam outlet (22) up to the stop after cleaning without tightening it with the Allen key (32).
Troubleshooting
The following hints will assist you in eliminating problems. If this is unsuccessful, send the appliance to our customer service for repair. Observe the warranty information.
| Problem Remedy | |
| Flashing red light despite a filled water tank foreign object. | Check, if the floating module is movable in the water tank (4). Remove any objects or decalcify it. |
| Only cold water emerges after venting of cold water. | Repeat the start-up. Ensure that the reservoir is filled with a sufficient amount Do not interrupt the rinsing cycles. |
| The rocking lever is jammed far before the icon ⇒ Tap the pad so th | Check to determine, if the pad is properly located in the pad cassette (6). The lower pad must be pressed tightly into the recess when using 2 pads. at a small recess develops in its center. |
| The coffee intensity is insufficient Please observe | The more careful the pads are inserted, the better the coffee will turn out. the information in section "coffee soft pads". The coffee becomes more intense, if you set a lower coffee quantity on the control knob (11). When using the powder cartridge (optional accessory), press the coffee powder only lightly. |
| Left and right cups fill unevenly been used for some | Lower filling differences cannot be completely prevented. If the appliance has time, it will improve its response. |
| The coffee quantity is reduced | Check if the appliance is located on a horizontal surface. Set the rocking lever (5) in area to the left as far as possible. Routinely check that the center opening of the pad cassette (6) is unobstructed to prevent clogging. The appliance must be decalcified regularly. |
| No coffee emerges and the rocking lever (5) cannot be moved | If the center opening of the pad cassette (6) is clogged, the rocking lever (5) cannot be moved to the right after brewing to remove the pad cassette (6). Pull the power plug and let the appliance cool for an hour. If the blockage is not removed by this action, there is a possibility of emergency opening: You need a paperclip and bend it straight. Please verify that the wire end does not have any burrs, so that the seal in the appliance is not damaged. Caution! Coffee will splatter out of the appliance and could still be hot! Grasp the wire with a paper towel. You will find a small opening on both sides of the housing directly next to the handle of the pad cassette (6). Guide the wire horizontally into the best accessible opening and press it lightly inside. The pressure will suddenly escape after approx. 3 cm and some coffee will escape. The rocking lever (5) can then be moved again. Remove the pad cassette and thoroughly clean it. In the future, check each time prior to brewing if The center opening of the pad cassette (6) is open, The pads are undamaged and |
| \( \Rightarrow \) The powder cartridge (optional accessory) is free of any powder residue. | |
| The quality of thecrema is insufficient for some time. | \( \Rightarrow \) The best crema quality will only develop after the appliance has been in use\( \Rightarrow \)Routinely decalcify and clean the filter insert (19). Observe the information in section "Cleaning and Care".\( \Rightarrow \)The two filters in the filter insert (19) may not be pushed together. However, if this has occurred, it must be replaced. |
| The outlet drips for a long time post-dripping. | \( \Rightarrow \) Always set the rocking lever (5) to \( ○ \) after brewing, this prevents lengthy |
| The appliance switches off during heating above sea level. | \( \Rightarrow \) The appliance may not be operated in locations, which are more than 1,500 m level. |
| Milk is not suctioned due to the lack of steam the process | \( \Rightarrow \) Wait until the start/stop button \( ○ \) (12) is again illuminated in green and attemptcess a second time.\( \Rightarrow \)Clean the steam nozzle (23) as described in section "Cleaning and Care". |
| Milk froth splatters and is very porous visible at the handle. | \( \Rightarrow \) Push the tube adapter (26) up to the stop into the mixer (27) so that no gap is handle. Twisting the tube adapter will not result in any changes. |
| The frothed milk does not have sufficient foam | \( \Rightarrow \) Clean the professional milk frothing unit.\( \Rightarrow \) Remove contaminations on the air duct (29) of the tube adapter (26). Check if its opening is open. A tube adapter (26) with a damaged air duct (29) must be replaced.\( \Rightarrow \)Use cold milk, directly from the refrigerator. |
| Milk froth runs continuously | \( \Rightarrow \) The milk suctioning cup (31) should be at least 14 cm tall, otherwise the suctioning cup (31) could be suctioned empty after frothing (siphon effect). Do not hang the tube (25) directly into a 1 liter Tetra pack. |
| The decalcification program does not start button earlier. | \( \Rightarrow \) It is important that both buttons are pressed simultaneously. If you press one the decalcification program will not start. Try it again and only release the buttons shortly after the pump starts. |
| Water escapes on the handle of the pad cartridge | \( \Rightarrow \) Check if the pad is properly located in the pad cartridge (6). If the paper edge projects over the edge of the depression, the seal will no longer seal during brewing. |
| Water is located under the appliance | \( \Rightarrow \) Empty the drip pan (8) in time.\( \Rightarrow \)Only fill the water tank (4) up to the max mark.\( \Rightarrow \)Never let the appliance stand over an extended period without the water tank (4). |

The appliance complies with the European directives 2006/95/EC, 2004/108/EC and 2005/32/EC.
This product may not be disposed of in regular household waste at the end of its service life, but must be delivered at a collection point for recycling of electrical and electronic appliances.
The materials are reusable according to their iden-shock.
tification. You will be contributing to the safety of our environ- ment when reusing the material or other when using other forms of recycling of used appliances.
Please question the responsible disposal agency at the community administration.
Modifications reserved.
For UK use only
This product is supplied with a 13 A plug conforming to BS 1363 fitted to the mains lead. If the plug is unsuitable for your socket outlets or needs to be replaced, please note the following. If the plug is a non-rewireable one, cut it from the mains lead and immediately dispose of it. Never insert it into a socket outlet as there is a very great risk of an electric shock.
The replacement of the plug at the mains lead has to be done according to the following instructions:
Warning - This appliance must be earthed Important: The wires in this mains lead are colored in accordance with the following code:
green/yellow Earth
blue Neutral
brown Live
As the colors of the wires in the mains lead of this appliance may not correspond with the colored markings identifying the terminals in your plug, proceed as follows:
- the wire which is colored green and yellow must be connected to the terminal which is marked with the letter E or by the earth symbol or colored green or green and yellow,
- the wire which is colored blue must be connected to the terminal which is marked the letter N or colored black,
- the wire which is colored brown must be connected to the terminal which is marked with the letter L or colored red.
If a 13 A (BS 1363) plug is used it must be fitted with a 13 A fuse conforming to BS 1362 and be ASTA approved. If any other type of plug is used, the appliance must be protected by a 10 A fuse either in the plug or adapter or at the distribution board.
If in doubt - consult a qualified electrician.
Never use the plug without closing the fuse cover.
Special decalcifier durgol® swiss espresso®
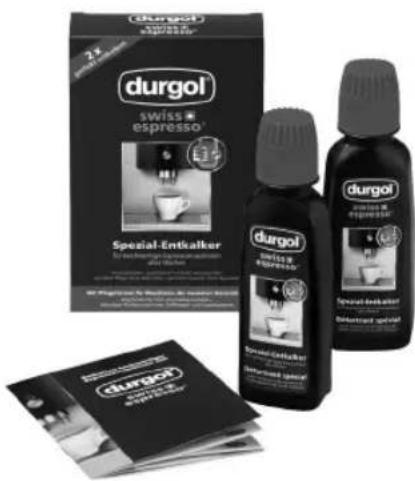
durgol® swiss espresso® is very effective, easy and safe to use and guarantees an effortless and quick decalcification within an additional soaking period. A routine use assures the best quality of your coffee and extends the service life of your automatic coffee pad system due to a special safety formula. durgol® swiss espresso® does not leave any residue. If your machine is rinsed after decalcification, as described in the operating instructions, you will be able to again brew coffee without hesitation.
Please observe the extensive information for the decalcification with durgol® swiss espresso® as well as the warning instructions that may be found in the brochure enclosed with the decalcifier.
You may obtain durgol® swiss espresso® where you bought the appliance; directly from a select dealer or you can order it directly from petra-electric. A package contains two portions of 125 ml each.
A dose is coordinated