USER MANUAL BAR 6 F Caffe Parma DELONGHI
Instructions for use
Mode d'emploi
Bedienungsanleitung
A) If your appliance comes fitted with a plug, it will incorporate a 13 Amp fuse. If it does not fit your socket, the plug should be cut off from the mains lead, and an appropriate plug fitted, as below.
WARNING: Very carefully dispose of the cut off plug after removing the fuse: do not insert in a 13 Amp socket elsewhere in the house as this could cause a shock hazard.
With alternative plugs not incorporating a fuse, the circuit must be protected by a 15 Amp fuse.
WARNING - THIS APPLIANCE MUST BE EARTHED IMPORTANT
The wires in the mains lead are coloured in accordance with the following code:
Green and yellow: Earth
Blue: Neutral
Brown: Live

If the plug is a moulded-on type, the fuse cover must be re-fitted when changing the fuse using a 13 Amp Asta approved fuse to BS 1362. In the event of losing the fuse cover, the plug must NOT be used until a replacement fuse cover can be obtained from your nearest electrical dealer. The colour of the correct replacement fuse cover is that as marked on the base of the plug.
B) If your appliance is not fitted with a plug, please follow the instructions provided below:
As the colours of the wires in the mains lead may not correspond with the coloured markings identifying the terminals in your plug, proceed as follows:
The green and yellow wire must be connected to the terminal in the plug marked with the letter E or the earth symbol coloured green or green and yellow.
The blue wire must be connected to the terminal marked with the letter N or coloured black.
The brown wire must be connected to the terminal marked with the letter L or coloured red.
ENGLISH
Please read this instruction booklet carefully before installing the appliance and keep it handy for future consultation. In so doing you will obtain the best result and maximum safety in its use.
SAFETY INSTRUCTIONS
- Do not immerse the appliance in water.
- Do not operate the appliance without first having water in the tank.
- Do not fill the water tank with milk.
- Be careful not to scald yourself with spouts of water or vapour or by using the appliance incorrectly and do not touch hot parts (water, dispensing area in contact with the filter-holder and filter).
- Do not remove the filter-holder while the appliance is under pressure or dispensing.
-Once the packaging has been removed, check the appliance is in full working order. If in doubt, do not use the appliance and contact qualified service staff.
- Packaging materials (plastic bags, foam polystyrene, etc.) should not be left within reach of children as they could be a potential source of danger.
- This appliance is for domestic use only. Any other use is to be considered improper and therefore dangerous.
- Do not touch the appliance when hands or feet are wet or damp.
- Do not allow children or irresponsible people to operate the appliance.
- Installation must be carried out according to the manufacturer's instructions.
- The appliance's power-cable must not be replaced by the user as special rools are required in order to replace it. In the event of damage to the cable, or if the cable needs replacing, contact only the nearest after-sales assistance centre authorised by the manufacturer.
INSTALLATION
- Position the appliance on a level surface away from faucets and wash basins.
- Make sure the power supply corresponds to that specified on the appliance's data plate. Only connect the appliance to a power socket which has a minimum load of 10A and which is efficiently earthed.
- In the event of the plug on the appliance, have plug replaced with a suitable one, by qualified professional staff.
- The electrical safety of this appliance is only guaranteed when it is properly earthed according to current electrical safety regulations.
- The manufacturer declines all responsibility for any damage resulting from inadequate earthing of the appliance. If in doubt consult a qualified electrician.
- Do not install the appliance in rooms that may reach temperatures of or below to 0^ (as freezing may cause damage).
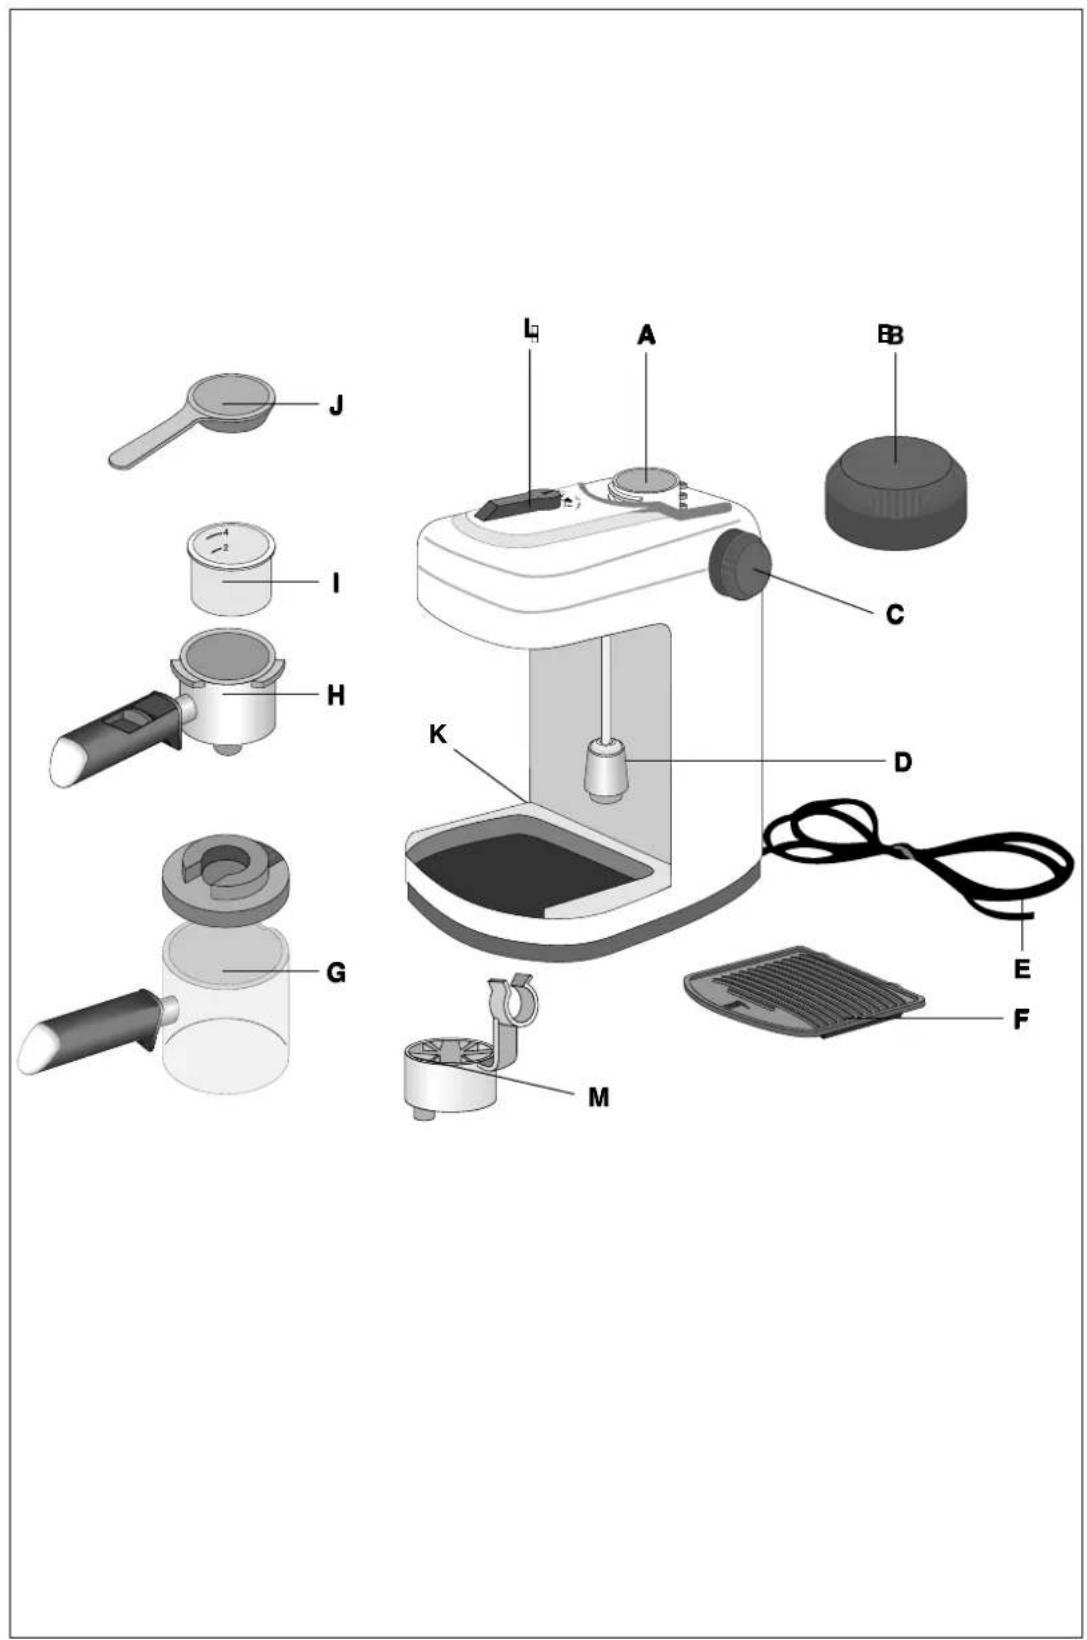
DESCRIPTION OF THE APPLIANCE
These terms are referred to in the following pages:
A. Boiler
B. Boiler cap
C. Steam knob
D. Steam tube with cappuccino nozzle
E. Power cable
F. Drip tray
G. Carafe with lid
H. Filter holder
I.Filter
J. Measuring spoon
K. ON/OFF Switch
L. Coffee selector
M. Cup adaptor
PREPARING ESPRESSO COFFEE
1 Remove the boiler cap by turning it anticlockwise.
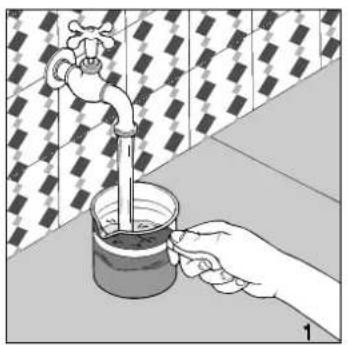
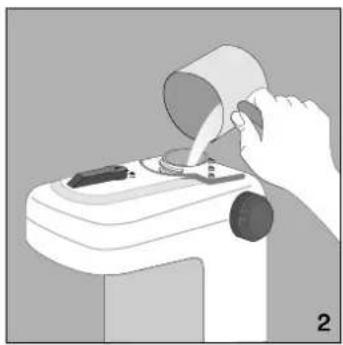
2 Using the carafe supplied (fig. 1) pour water into the boiler (fig. 2) according to the amounts shown in the table at the end of the text. Do not exceed the amounts shown as this could cause the appliance to malfunction. While filling
the water tank make sure the ON/OFF switch is in the OFF position.
3 Carefully close the boiler cap by turning it clockwise.
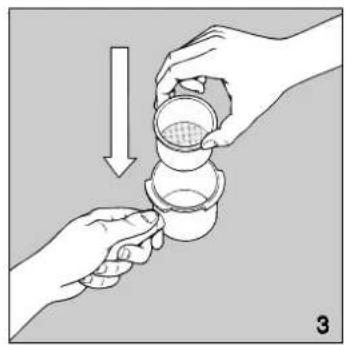
4 Insert the filter into the filter-holder. (fig. 3).
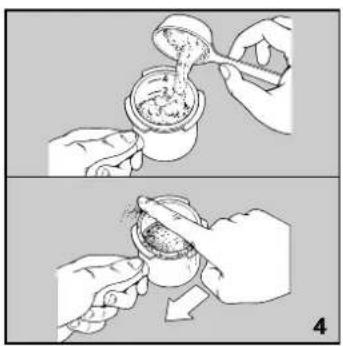
5 P lace the coffee evenly into the filter (fig. 4) according to the amounts shown in the following table. It is important to use medium ground coffee. (Avoid using too finely ground coffee otherwise the filter could become blocked, MOKA coffee is suitable).
6 Remove excess coffee from the filter-rim (fig. 4).
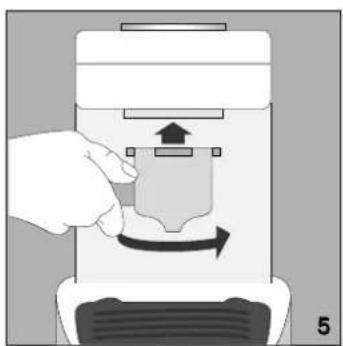
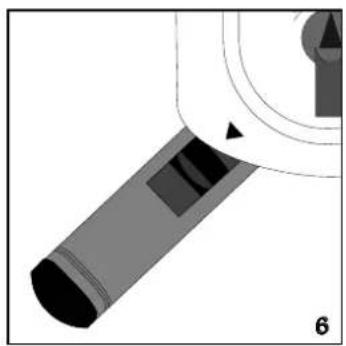
7 To attach the filter holder to the machine place the bowl under the heater-faucet (fig. 5) and line up with the arrow marked on the machine lid (fig. 6). At this point press the filter-holder upwards while at the same time rotating it to the right all the way. It does not matter if the filter-holder's handle is not centrally aligned with the machine. It is important that the bowl be firmly set in its housing.
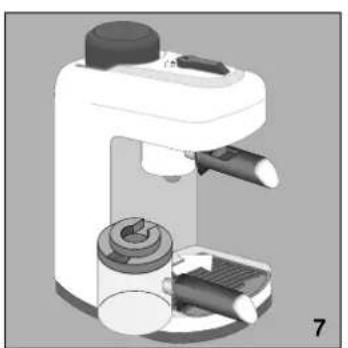
8 The carafe with lid must be positioned under the filter-holder so that the 2 holes under the filter-holder are inside the opening on the carafe's lid (fig. 7). Make sure that the steam knob is turned off.
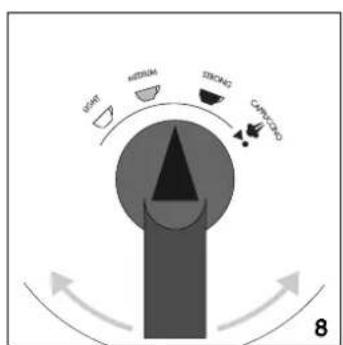
9 S et the coffee selector to the type of coffee required: "LIGHT" for a weak coffee, "MEDIUM" for a normal coffee, "STRONG" for a strong coffee (fig. 8).
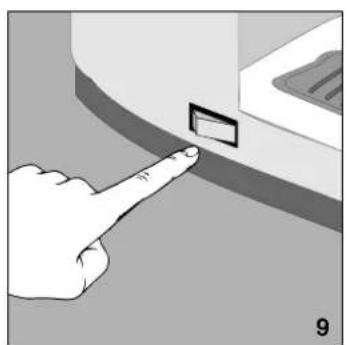
10 Check that the steam knob is turned off firmly and press the ON/OFF switch (fig. 9). The pilot light will come on.
11 About three minutes are required before the coffee begins to be dispensed. Wait until all the water of the boiler has been dispensed. Turn off the power switch after the coffee has been dispensed.
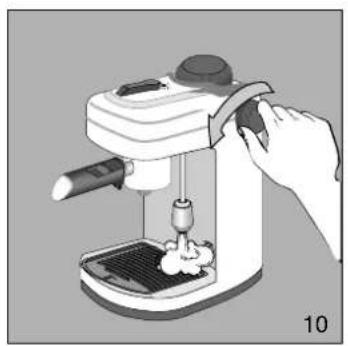
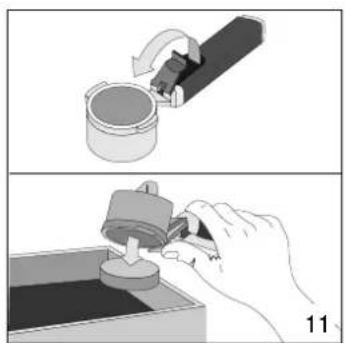
12 Before unscrewing the boiler cap or removing the filter-holder, residual pressure must be released by slowly turning the steam knob (fig. 10) so that the residual steam can escape.
In models with the "safety cap", it is not possible to open the boiler cap when the boiler is hot as the cap turns without unscrewing. If it has to be removed for any reason, it is always necessary to let off steam from the boiler using the steam knob as
described immediately above.
13 To remove coffee grounds from the filter-holder, turn upside down and knock it repeatedly until all grounds have been removed (fig. 11), or rinse the filter holder unit under running water and let drip dry.
NOTE To eliminate the "new" smell, the first time you use the coffee machine, carry out a number of coffee cycles without using coffee.
CUP ADAPTOR ASSEMBLY
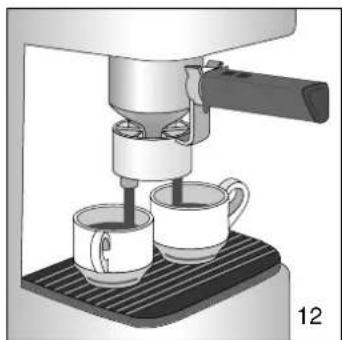
The adaptor (M) must be used every time the coffee is required to be made directly in the cup. For it to be assembled, it only needs to be inserted in the lower part of the filter-holder (fig. 12).
PREPARING CAPPUCCINOS
1 Prepare the coffee as described in points 1 to 10 of the paragraph "PREPARING THE COFFEE", using the amount of water necessary to obtain 2 cappuccinos as shown in the table at the end of the text. Note that more water is needed to make 2 cappuccinos than to make 2 normal coffees as steam is required in order to emulsify the milk. It is advisable to set the coffee selector (L) to "MEDIUM".
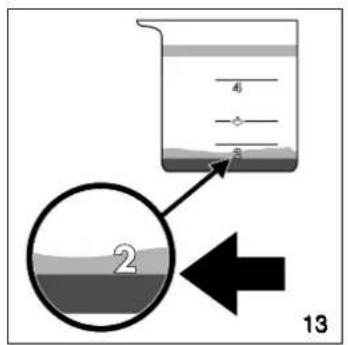
2 Let the coffe drip into the carafe until it reaches number 2 marked on the side as shown in fig. 13, before setting the coffee selector to "4 CAPPUCCINO".
WARNING: the level of the coffee which lies under the cream must reach the bottom of number 2 (see fig. 13). This procedure must be carried out with great care: if the coffee level exceeds number 2 there will not be enough steam left at the end to froth the milk.
3 Pour the coffee into 2 cups.
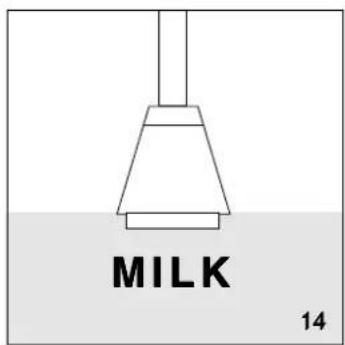
4 Pour approx. 200 grams of milk into the carafe (to make it easier, use the carafe by the measure as shown in the figure at the end of the text). Only fresh milk should be used, not boiled milk and especially not hot milk. Then pour the milk into a carafe. The carafe must be large enough to allow the milk to expand by about 3 times its volume.
5 Place the carafe under the steam nozzle (fig. 14) so as the steam nozzle is just on the surface of the milk and open slowly the steam
valve by turning the steam knob counter clockwise.
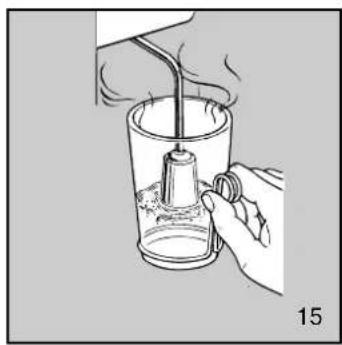
6 Move the carafe up and down under the steam nozzle as in fig. 15 (this will give maximum froth). Froth the milk until the steam in the boiler has been completely used up, then turn the steam knob in a clockwise direction in order to close the steam valve and set the ON/OFF switch to "OFF".
7 Pour gently or preferably spoon the frothy milk onto the coffee, then sprinkle on a little chocolate powder for perfect cappuccino coffee.
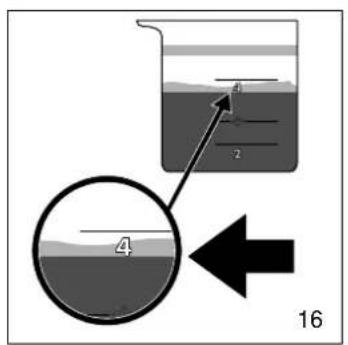
8 In order to make 4 cappuccinos, the previous procedures should be repeated, with care being taken to respect the amounts of water and milk shown in the table at the end of the text. Before setting the selector (L) to "CAPPUCCINO" also let the coffee drip into the jug until it reaches number 4 as shown in figure 16.
Warning: always empty the boiler of any residual water or steam after using the appliance by turning on the steam knob (see fig. 10). This will help avoid malfunctioning when the appliance is next used.
Then, taking care as the steam tube may be hot:
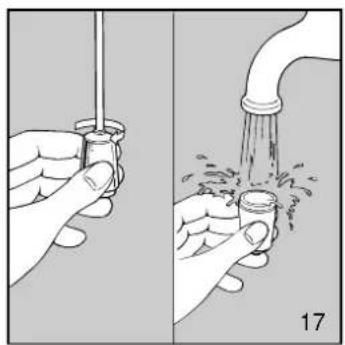
- unscrew the cappuccino nozzle by turning gently to the left (fig. 17) and wash it carefully in hot water.
- clean the steam tube and replace the cappuccino nozzle.
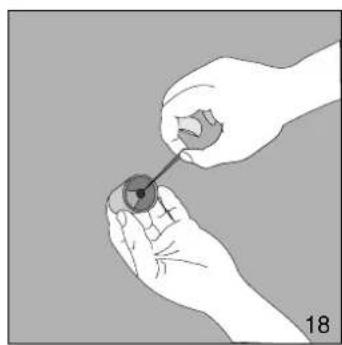
(from time to time, use a pin to clean the holes in the cappuccino nozzle (fig. 18).
HINTS
Making good espresso and cappuccino is not difficult however it does require practice. The following tips will help you get the best results from your machine:
W arm the cups before filling with coffee.
- Use a moka coffee for best results.
- Freshly ground coffee provides the best flavour. To maintain flavour, fresh coffee is best stored in an airtight container in a cool place, even in the fridge.
CLEANING AND MAINTENANCE
- Before carrying out any cleaning or maintenance, switch the machine off, remove the plug from the socket and leave the machine to cool.
- Do not use solvents, detergents or abrasive products to clean the machine. A soft damp cloth is sufficient.
- Clean the filter-holder, filter and drip tray regularly.
- Do not immerse the machine in water - remember that it is an electrical appliance.
- N ever wash components or accessories in a dishwasher.
DESCALING
If you live in a hard-water area, minerals and calcium found in the water will accumulate and affect the operation of the machine.
Approximately every six months (depending on the hardness of the water), your espresso maker should be cleaned with vinegar as follows:
- Before cleaning your espresso maker, turn the switch to OFF and remove the plug from the wall socket.
- Fill the carafe with vinegar and pour into the water tank.
- Replace the tank cap.
- Set the coffee selector to "LIGHT".
- Fit the filter and filter-holder (without any coffee).
- Place the carafe on the drip tray.
- Insert the plug into the wall socket.
- Turn the switch to ON. After a few minutes, the hot vinegar will begin to flow through the filter-holder into the carafe.
- Place the steam tube in a glass or mug. Turn on the steam knob for a few seconds while the vinegar flows through the filter-holder. This will clear any milk residue from the inside of the tube.
10.Close the steam knob (the vinegar will continue to flow into the carafe).
- When no more vinegar flows into the carafe, turn the switch to OFF and allow the machine to cool. Remove the filter-holder, the filter and the carafe and rinse with hot water.
- Repeat the last two steps using cold water in order to remove any residual vinegar. Repeat twice.
| To make | Water quantity in the carafe | Coffee quantity in the filter | Milk quantity in the carafe |
| 2 espressos | | | |
| 2 cappuccinos | Water level must coincide with the "steam" symbol on the carafe | | Use max. 1 carafe filled to the 4 level. |
| 4 espressos | | | |
| 4 cappuccinos | Water level must coincide with the bottom part of metal band | | Use max. 2 carafes filled to the 4 level. |
FRANCAIS
BESCHRIJVING VAN HET APPARAAT