EWS160 - Weather Station HAMA - Free user manual and instructions
Find the device manual for free EWS160 HAMA in PDF.
| Product type | Weather station with wireless outdoor sensor |
| Brand | Hama |
| Model | EWS160 |
| Main unit dimensions | 150 × 85 × 25 mm |
| Thermal sensor dimensions | 65 × 85 × 20 mm |
| Main unit power supply | 2 LR6/AA 1.5 V DC batteries |
| Thermal sensor power supply | 2 LR03/AAA 1.5 V DC batteries |
| Indoor temperature range | 0 °C to +50 °C |
| Outdoor temperature range | -20 °C to +50 °C |
| Transmission range | 30 meters (in open area) |
| Reception frequency | 433 MHz RF |
| Main functions | DCF radio-controlled clock, perpetual calendar until 2069, 12/24h display, alarms (2), snooze function, indoor/outdoor temperature with MAX/MIN memory, low battery indicator, °C/°F selection, wall or table mounting |
| Weekday display | 8 languages: German, English, Russian, Danish, Dutch, Italian, Spanish, French |
| Cleaning and maintenance | Do not use any abrasive or corrosive products. Clean with a soft, dry cloth. |
| Safety | Do not use in a hospital or medical institution. Keep out of reach of children. Do not expose to moisture, excessive heat, or direct sunlight. Outdoor sensor must be protected from rain and sun. |
| Certification | CE (R&TTE Directive 1999/5/EC) |
Frequently Asked Questions - EWS160 HAMA
User questions about EWS160 HAMA
0 question about this device. Answer the ones you know or ask your own.
Ask a new question about this device
Download the instructions for your Weather Station in PDF format for free! Find your manual EWS160 - HAMA and take your electronic device back in hand. On this page are published all the documents necessary for the use of your device. EWS160 by HAMA.
USER MANUAL EWS160 HAMA
D-86651 Monheim/Germany
www.hama.com
Elektronische
Wetterstation
>>EWS-160
Electronic Weather Station
00092657
All listed brands are trademarks of the corresponding companies. Errors and omissions excepted, and subject to technical changes. Our general terms of delivery and payment are applied.
Bedienungsanleitung
Operating instruction
Always read this user's manual before using the device!
Features:
- Radio controlled time with manual setting option
433MHz RF receiving frequency
RF channels with wireless thermo sensor
Transmission range: 30 meters (open area) - Measuring range:
-
Indoort temperature: 0^ +50^ - Outdoor temperature: -20^ +50^
-
Temperature alert function
Max/Min memory for indoor and outdoor temperature - Low-battery indicator for outdoor remote sensor
2 alarms
Perpetual calendar up to year 2069
12/24Hour time display selectable - Wall mount or Table Stand Selectable
Battery: M ain Unit: D C 1.5 V AA size x 2 pcs T hermo Sensor Unit: DC 1.5 V AAA size x 2 pcs
Size: MainUnit Size: 1 50× 85× 25mm
Thermo Sensor Unit: 65 × 85 × 20 ~mm
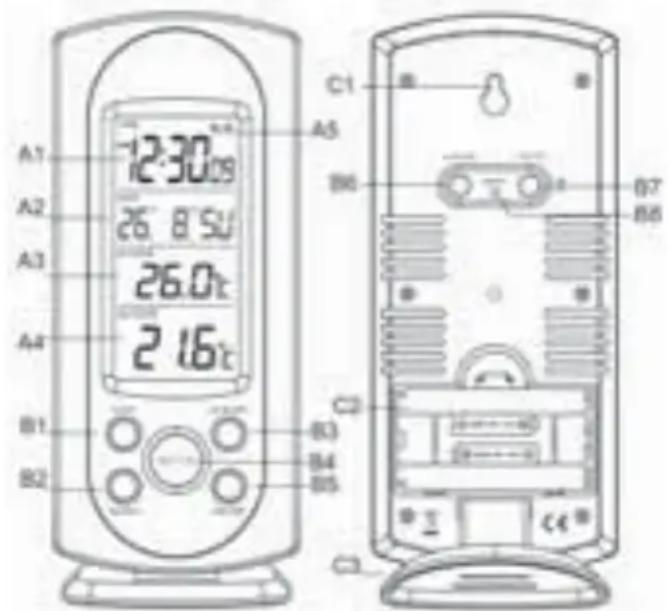
Main Unit Appearance
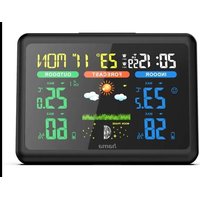
Part A-LCD
A1: Time display
A2: Calendar
A3: Indoor Temperature
A4: Outdoor Temperature
A5: Radio control icon
14 15
Part B- Buttons
B1: "Alert" button B5: "MAX/MIN" button
B2:"SEARCH" button B6: ^+ (12/24)" button
B3:"Snoopze" button B7: - C / ^ / button
B4:“MODE”button B8:"RESET" button
Part C-Structure
C1: Wall Mount Hole
C2: Battery Compartment
C3: Stand
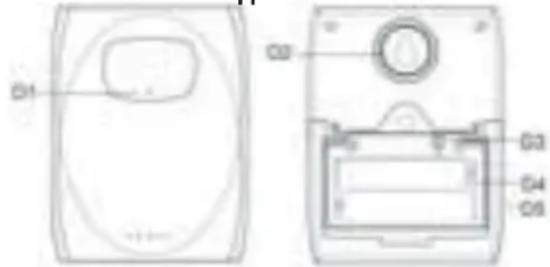
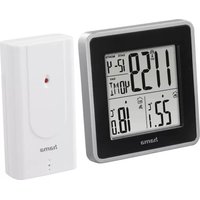
Thermo Sensor Unit Appearance
D1: Transmission Indication LED
D2: Wall Mount Hole
D3: "TX" button
D4: Battery Compartment
D5: Stand
Set Up:
- Insert batteries.
- Use a pin to press the RESET button.
Radio Controlled Clock:
- The clock automatically starts scanning the RF 433MHz signal to register new Thermo Sensor Unit after new batteries is inserted. After registered new channels or press "SEARCH" button to stop scanning, the clock will then scan the DCF frequency signal ("") flashes on the LCD). Buttons will not function while scanning for DCF or Thermo sensor's signal unless they are well received or stopped manually.
The clock automatically scans the time signal at 3.00 a.m. every day to maintain accurate timing. For failed reception, s canning stops (" on the LCD disappear) and repeats again a t 4.00 a.m. 5.00a.m. and 6.00a.m.
The clock manually scans the time signal by holding - / - B8) button for 3 seconds. For failed reception, scanning stops. on the LCD disappear). - Press "HOLD" button to stop scanning when receiving DCF signal.
flashes indicate now is receiving DCF signal.
" " turns on indicate signal received successfully.
" DST" shown on the LCD if it is in Daylight Saving Time Mode.
Manual Time Setting:
- Hold "MODE" button for 3 seconds to enter Clock/Calendar setting Mode when viewing the Time.
- Press "+" or "-" buttons to adjust the setting and press "MODE" button to confirm each setting.
The setting sequence is shown as follow: Hour, Minutes, S econd, Year, Month/Day sequence, Month, Day, Time Zone, D ay-of-week language.
8 languages can be selected in Day-of-week, they are: G erman, English, Russian, Denmark, Dutch, Italian Spanish and French. The languages and their selected abbreviations f or each day of the week are shown in the following table.
| Language | M | onday | Tuesday | Wednesday | Thursday | Friday | Saturday | Sunday |
| German, GE | MO DI MI DO | FR S A S O | ||||||
| English, EN MO TU W E T H FR SA SU | ||||||||
| Russian, RU NH BT C P H I N | CY | BC | ||||||
| Denmark, DA | M A T I O N | TO FR L O | S O | |||||
| Dutch, NE | M A | D I | W O | D O | V R | Z A | Z 0 | |
| Italian, IT | L U | M A | M E | G I | V E | S A | D 0 | |
| Spanish, ES LU | M A M I J U V I | S A D O | ||||||
| French, FR | L U | M A | M E | J E | V E | S A | D I |
- The zone is used for the countries where can receive the DCF signal but the time zone is different from the German time.
- When the country time is faster than the German time for 1 hr, the zone should be set to 1. Then the clock will automatically set 1 hour faster from the signal time received.
- The Time Setting Mode will automatically exit in 15 seconds without any adjustment.
Snoopze Alarm Clock Function:
- Press "MODE" button to select to view:
Time Alarm Time1 ("Shown on the LCD) Alarm Time 2
(“” Shown on the LCD) - When viewing Alarm Time 1 or Alarm Time 2, hold "MODE" button for 3 seconds to enter that Alarm Time setting. Press "+" or "-" buttons to adjust the alarm time.
- When viewing Alarm Time 1 or Alarm Time 2, press "+" button to switch that alarm on or off. If it is on, "●" or "●" shown on the LCD.
- Snooze alarm snoozes for 5 minutes, then it alarms again.
- Press any button to stop the snooze alarm.
Maximum/Minimum Indoor/Outdoor Temperature Recording Function:
- Press "MAX/MIN" button to show the maximum recorded Indoor /Outdoor Temperature.
"Max" is shown on the LCD. - Press "MAX/MIN" button again to show the minimum recorded Indoor/Outdoor Temperature.
" is shown on the LCD.
- Hold "MAX/MIN" button for 3 seconds to clear the recorded m aximum and minimum reading.
Thermometer:
Press "°C / °F" button to select Indoor/Outdoor Temperature in Celsius mode/Fahrenheit mode.
Outdoor Thermo Sensor Unit Registration Procedure:
- The main unit automatically starts receiving transmission from o outdoor thermo sensor unit for outdoor temperature after new b ateries are inserted.
- The thermo sensor will automatically transmit temperature t o the main unit after batteries inserted. Batteries c ompartment of thermo sensor is locating behind the back c over, unscrews to open.
- Press "TX" button on the thermo sensor unit to transmit temperature to the main unit manually. The main unit gives a "beep" sound if it received the temperature.
Display Outdoor Temperature :
Hold "SEARCH" button for 3 seconds to cancel unused channel manually. It will automatically register a new channel a gain if a new channel is received.
- If there is no temperature displayed in existing channel
- "---" is displayed on the LCD), hold "SEARCH" button for 3 seconds to cancel that channel and receive the channel
20 21
a gain, a "Bl" sound can be heard.
- Press "°C /°F" button, on the Thermo Sensor unit, to select T hermo Sensor displayed in Celsius mode or Fahrenheit mode.
Low batteries indicator:
Low battery icon "..." appear at outdoor temperature row in particular channel indicating the external transmitter of the channel in low battery status.
Note:
- Use a pin to press the reset button if the Unit can not work properly.
- Avoid placing the clock near interference sources/metal frames such as computer or TV sets.
- The clock loses its time information when the battery is removed.
- Buttons will not function while scanning for DCF or Thermo sensor's signal unless they are well received or stopped manually.
- All Setting Mode will automatically exit in 15 seconds without any adjustment.
Attention:
- Do not use this product in hospitals or medical institutions.
I t is only emits relatively weak radio signals, these may lead t o malfunction of life-supporting systems. The same may be t he case in other areas.

Mode d'emploi
- The Base station is only suitable for dry indoor areas. Do not expose it to direct sunlight, heavy heat, cold, dampness or wetness.
- The outdoor sensor must not be set up/installed in or under water. Set it up away from direct sunlight and rain.
- The product is not a toy, it contains breakable and s wallowable parts, furthermore it contains batteries. Keep the p roduct out of reach of children.
- Handle the product with care and do not drop it; knocks, blows or even a fall from a low height can damage it
- Never clean the device using abrasive or corrosive materials or products. Abrasive cleaning agents may scratch plastic parts and corrode electronic circuits.
Registration and Safety Certification/General Information
This device bears the CE symbol as specified by the provisions of Directive R & TTE (1999/5/EC).
Hama GmbH & Co. KG hereby declares that this device is in compliance with the basic requirements and other relevant guidelines and regulations of the 1999/5/EC guideline. You will find the declaration of compliance and declaration of conformity in the Internet at http://www.hama.com