HIF1897T - Hi-fi system ROADSTAR - Free user manual and instructions
Find the device manual for free HIF1897T ROADSTAR in PDF.

User questions about HIF1897T ROADSTAR
0 question about this device. Answer the ones you know or ask your own.
Ask a new question about this device
Download the instructions for your Hi-fi system in PDF format for free! Find your manual HIF1897T - ROADSTAR and take your electronic device back in hand. On this page are published all the documents necessary for the use of your device. HIF1897T by ROADSTAR.
USER MANUAL HIF1897T ROADSTAR
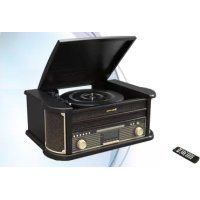
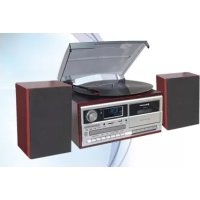
CD/MP3 PLAYER WITH TURNTABLE STEREO AND RADIO.
HIF-1897T
Instruction manual
Bedienungsanleitung
The exclamation point within the triangle is a warning sign alerting the user of important instructions accompanying the product.
The lightening flash with arrowhead symbol within the triangle is a warning sign alerting the user of "dangerous voltage" inside the unit.
To reduce the risk of electric shock, do not remove the cover. No user serviceable parts inside the unit. Refer all servicing to qualified personnel.
230v~
This unit operates on 230V 50Hz . If the unit is not used for a long period of time, remove the plug from the AC mains.

This unit must not be exposed to moisture or rain.

The power switch in this unit is mounted on the secondary circuit and does not disconnect the whole unit from the mains in OFF position.

Ensure all connections are properly made before operating the unit.
This unit should be positioned so that it is properly ventilated. Avoid placing it, for example, close to curtains, on the carpet or in a built-in installation such as a bookcase.
Do not expose this unit to direct sunlight or heat radiating sources.

Correct Disposal of This Product (Waste Electrical & Electronic Equipment)
This marking shown on the product or its literature, indicates that it should not be disposed with other household wastes at the end of its working life. To prevent possible harm to the environment or human health from uncontrolled waste disposal, please separate this from other types of wastes and recycle it responsibly to promote the sustainable reuse of material resources.
Household users should contact either the retailer where they purchased this product, or their local government office, for details of where and how they can take this item for environmentally safe recycling.
Business users should contact their supplier and check the terms and conditions of the purchase contract. This product should not be mixed with other commercial wastes for disposal.
2
EnglishEn
HIF-1897T
WOODEN CD/MP3 PLAYER WITH TURNABLE AND STEREO RADIO
INSTRUCTION MANUAL
Please read this instruction manual carefully and familiarize yourself with your new HiFi system before using it for the first time. Please retain this manual for future reference.
LOCATION OF CONTROLS
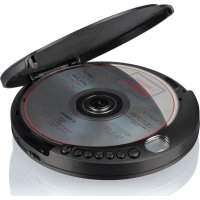
1) DUST COVER
2) CD PLAY/PAUSE BUTTON
3) CD SKIP UP
4) CD DOWN BUTTON
5) PLAY MODE BUTTON
6)FUNCTION BUTTON
7) VOLUME KNOB
8) REMOTE SENSOR
9) RECORD BUTTON
10) CD DOOR
11) CD DOOR OPEN/ CLOSE BUTTON
12) MW BAND BUTTON
13)
14) FM BAND BUTTON
15) POWER ON/ OFF
16) CUE LEVER
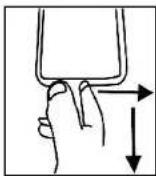
the infra-red transmitter requires 2 pcs CR-2025 size battery for operation.

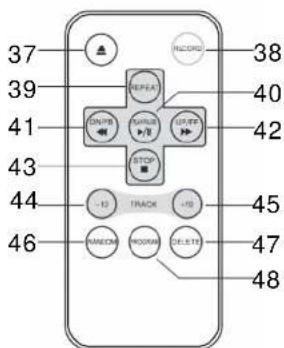
39) REPEAT BUTTON
40) PLAY/PAUSE CD mode, press once to start playback. press again to enter pause mode.
41) skip/search backwardpress once to skip to previous tack.press & hold for search backward.
42) SKIP/SEARCH forward once to skip to next track, press & hold for search forward.
43) STOP in CD mode, press to stop playback or cancel the stored program.
44)+10TrackButton 45)+10TrackButton
46) RANDOM BUTTON in CD mode, press to active random function.
48) PROGRAM in CD mode, press to active programming function.
13/14
EnglishEn
CONNECTING TO POWER
Before switching on make sure that the voltage of your electricity supply is the same as that indicated on the rating plate.
For your own safety read the following instructions carefully before attempting to connect this unit to the mains.
This unit is designed to operate on AC 230V 50Hz current only. Connecting it to other power sources may damage the unit.
CAUTION
To prevent electric shock disconnect from the mains before removing cover. No user serviceable parts inside. Refer servicing to qualified service personnel.
SAFETY PRECAUTION
Do not allow this unit to be exposed to rain or moisture.
Mains Supply: 230V 50Hz - AC only

This symbol means that this unit is double insulated. An earth connection is not required.
POWER SUPPLY
Remove the stereo carefully from the box, retaining the packaging for future use.
AC POWER OPERATION
Connect the plug to a mains power inlet 230V AC 50Hz
MW/FMTUNER
Operation
- Switch ON the Power Switch (15). The red Power Indicator (17) will light up.
- Select the desired frequency band with the Band Selector (14) for FM or (12) for MW band.
Tune to the desired radio station by turning the Tuning control (21).
ANTENNA
- For FM reception there is a built-in FM antenna wire (28) at the rear of the unit. Move the wire around to obtain the best reception.
- For MW reception the signals are picked up through a built-in ferrite antenna. Your may have to orient the unit to obtain the best reception.

5
FM & FM-STEREO RECEPTION
-
Stereo reception is possible when the tuned FM station is broadcasting in stereo.
-
When in FM Stereo mode and the station is broadcasting in Stereo, the STEREO indicator (19) lights up.
TURNTABLE OPERATION
Preparation
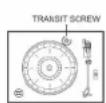
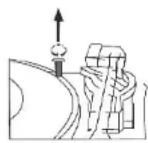
Open the Record Player Cover.
Unscrew the two TRANSIT SCREWS by using a coin.
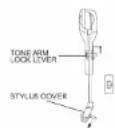
Release the Tonearm Clamp, and remove the stylus protector.
Listening to Records
- Press the PHONO button (31) to select the TURNTABLE function.
- Place a record on the turntable, over the central spindle. Place the EP adapter over the central spindle when playing 17cm EP records.
- Set the Speed Selector (24) to 33/78 or 45 rpm according to the record.
- Release the tonearm clamp, and remove the protective cap from the stylus.
- Lift the Tonearm with the Tonearm Lift Lever.
- Move the tonearm to the beginning of the record, or to the start of a particular track.
- Gently lower the tone arm onto the record with the Tonearm Lift lever to start playing.
- When the record is finished the tonearm will automatically stop. Lift the tonearm from the record and return it to the rest.
- To stop manually, lift the tonearm from the record and return it to the rest.
Notes: Do not stop or turn the platter manually.
Moving or jarring the turntable without securing the Tonearm clamp could result in damage to the Tonearm. Replace the protective cap on the stylus when not in use.

EnglishEn
PLAYING COMPACT DISC
To start
- Press function selector (26) to select "CD" mode.
- Press "OPEN/CLOSE" button (11) to open the cd door (10).
- Place a cd with the printed side facing up inside the tray & then close the co door.
- focus search is performing, the first track will start playback.
- Playback / Pause / Stop
- To interrupt, press the "STOP" button (32) once, the total number of tracks compare on the lcd display (18). press again PLAY/PAUSE to resume normal playback.
- Skip/search mode (skip/search up skip/search down
- During play or pause mode, if "skip up" button (3) is pressed, it will go to next track and display the track no. and then remain the play or pause mode.
- During play or pause mode, if "skip down" button (3) is pressed, it will go back to the beginning of the track, original track no. is display and remain the play or pause mode.
- After step 2, press "skip down" button (3) again will go to the previous track and remain the play or pause mode.
- if press and hold the "skip up/down button" (3) during cd/mp3 playabck, the playing track will go fast forward or backward until the button being released.
- To skip 10 tracks UP or DOWN press the TRACK+10 or TRACK-10 button on Remote Control.


EnglishEn
MP3/WMA TRACK FORMAT REQUIREMENT:
- MP3 bit rate : 32 kbps~256 kbps and wma bit rate : 32 kbps ~ 320 kbps
- The performance of playing MP3 disc is various from the quality of recording disc and the method of recording. Furthermore, the searching lead-time for MP3-CD is longer than normal cd due to difference format.
REPEAT/RANDOM MODE
Press the REPEAT button from Remote Control or PLAY MODE from main unit to activate this function. All the tracks can be played in difference mode as follow:
FOR CD

FOR MP3/WMA DISC

Repeat play
You can listen the desired tracks or folder repeatedly by this function.
- Random play
You can listen all the tracks or folder in a random order by this function
CD DISC PROGRAMMING
Up to 99 tacks can be programmed for MP3 (20 in CD) and play in any order. before use, be sure the system is at stop mode before programming:
- Press CD mode & stop the cd playback.
- Press the "PLAY MODE" button, "P" will appear on LCD display (18). Moreover, it will indicate program no. and digits for track no. to be programmed.
- Select a desired track by pressing SKIP or buttons (3).
- Press the "PLAY MODE" button to store the trace into memory.
- Repeat steps 3 and 4 to enter additional tracks into the memory if necessary.
- When all the desired tracks have been programmed, press cd" PLAY/PAUSE-(2) to play the disc in assigned order.
- To cancel the programmed file, press "STOP" button
VERY IMPORTANT!!
ON/OFF FUNCTION or Automatic power off. Press the POWER button for 1 second to turn the unit on. Press and hold the POWER button for 3 seconds to turn off the device.
When a playback from USB / CD - disk has been completed and no further key is pressed again, the unit will automatically turn off after approximately 15 minutes.
SPECIFICATIONS
Power Supply
AC: 230V~50Hz
RC Battery: CR-2025
Radio Frequency Coverage
FM: 87.5 - 108MHz
MW: 522-1620kHz
Design and specifications are subject to change without notice.
SICHERHEITSHINWEISE

Mode lecture/pause/stop (play / pause / stop)