
CD103 - Hi-fi system TOKAI - Free user manual and instructions
Find the device manual for free CD103 TOKAI in PDF.
| Product type | Micro hi-fi system |
| Brand | Tokai |
| Model | CD103 |
| Dimensions (W × D × H) | 480 × 228 × 229 mm |
| Total weight | 0.95 kg (unit) + 2 × 1.32 kg (speakers) |
| Power supply | AC 100-240 V, 50/60 Hz |
| Power consumption | 18 W |
| Standby consumption | 0.6 W |
| Total audio power | 40 W (2 × 20 W) / 2 × 5 W RMS |
| Headphone impedance | 4-32 Ω |
| FM frequency range | 87.5 - 108 MHz |
| FM station presets | Up to 30 presets |
| CD laser type | 3-beam optical laser (class 1) |
| Compatible CD formats | CD audio, CD-MP3, CD-R, CD-RW |
| USB / SD formats | MP3 (up to 999 files, 99 folders) |
| Bluetooth | A2DP, AVRCP (version 1.2/1.0) |
| Bluetooth range | Approximately 10 m |
| Connectors | USB (compatible), SD/MMC, AUX IN (3.5 mm), headphone (3.5 mm) |
| Main functions | CD player, FM radio, Bluetooth, USB/SD, AUX, programming, repeat, equalizer, alarm/timer |
| Included accessories | Remote control with CR2025 battery, power cord, user manual |
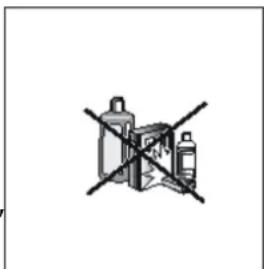
| Care and cleaning | Unplug before cleaning; use a soft dry cloth; no detergents or alcohol |
| Safety | Double insulation (class II), protection against liquids and overheating |
| Repairability | Do not open or repair yourself; hand over to a qualified technician |
Frequently Asked Questions - CD103 TOKAI
User questions about CD103 TOKAI
0 question about this device. Answer the ones you know or ask your own.
Ask a new question about this device
Download the instructions for your Hi-fi system in PDF format for free! Find your manual CD103 - TOKAI and take your electronic device back in hand. On this page are published all the documents necessary for the use of your device. CD103 by TOKAI.
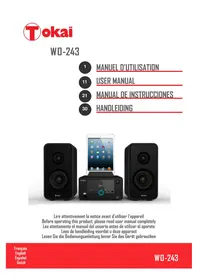
USER MANUAL CD103 TOKAI
CLASS 1 LASER PRODUCT
CLASS 1 LASER APPARAT
LUOKEN 1 LAISERLAITE
KLASSE 1 LASER PRODUKT

ÉTIQUETTE D'AVERTISSEMENT INFORMANT D'UNERADIATION :
Thank you for purchasing the TOKAI CD-103 a Bluetooth Micro system with a digital FM RADIO with auto scanning and until 30 FM resets.
This is your assurance of quality, performance and value. Our engineers have included many useful and convenient features in this product. Please be sure to read this instruction Manual completely to make sure you are getting the maximum benefit from each feature.
This product was manufactured using the highest quality components and standards of workmanship. It was tested by inspectors and found to be in perfect working order before it left our factory. For future reference, record the serial number in the space provided.
Model No: TOKAI CD-103
Serial Number:
EXCLUSIVE IMPORTER
This product was imported by the Company: LEMA S.A.S.
For any questions concerning the conformity of the product, thank you to send your request to:
LEMA S.A.S.
TO PREVENT FIRE OR SHOCK HAZARD DO NOT EXPOSE THIS APPLIANCE TO RAIN OR MOISTURE.

CAUTION
RISK OF ELECTRIC SHOCK DO NOT OPEN

CAUTION: TO REDUCE THE RISK OF ELECTRIC SHOCK, DO NOT REMOVE COVER (OR BACK). NO USER- SERVICEABLE PARTS INSIDE. REFER SERVICING TO QUALIFIED SERVICE PERSONNEL.

LIGHTNING FLASH WITH ARROWHEAD SYMBOL -
Within an equilateral triangle, is intended to alert the user to the presence of uninsulated dangerous voltage within the products enclosure that may be of sufficient magnitude to constitute a risk of electric shock to persons.

EXCLAMATION POINT - within an equilateral triangle is used to indicate that a specific component shall be replaced only by the component specified in that documentation for safety reason.
DRIPPING WARNING
The product shall not be exposed to dripping or splashing and that no objects filled with liquids, such as vases, shall be placed on the product.
VENTILATIONWARNING:
The normal ventilation of the product shall not be impeded for intended use.

WARNING LABEL INFORMING OF RADIATION:
This label is placed inside the unit.
As shown in the illustration. To warn against further measures on the unit. The equipment contains a laser radiating laser rays according to the limit of laser product of class 1.

Class II equipment symbol. This symbol indicates that the power adaptor has a double insulation system.

IMPORTANT! It is recommended not to leave a mobile phone near the unit in order to avoid electromagnetic interference in the speakers.
- READ INSTRUCTIONS --- All the safety and operating instructions should be read before the product is operated, followed and retained for future reference.
- CLEANING --- Unplug this product from the wall outlet before cleaning. Do not use liquid cleaners or aerosol cleaners. Use a damp cloth for cleaning.
- WATER AND MOISTURE --- Do not use this product near water - for example, near a bath tub, wash bowl, kitchen sink, or laundry tub; in a wet basement; or near a swimming pool; and the like.
- ACCESSORIES --- Do not place this
product on an unstable cart, stand, tripod, bracket, or table. The product may fall, causing serious injury to a child or adult and serious damage to the product. Use

only with a bracket, or table recommended by the manufacturer, or sold with the product. Any mounting of the product should follow the manufacturer instructions, and should use a mounting accessory recommended by the manufacturer. A Product and Cart Combination should Be Moved with Care - Quick stops, excessive force and uneven surfaces may cause the product and cart combination to overturn.
- VENTILATION --- Slots and openings in the cabinet are provided for ventilation and to ensure reliable operation of the product and to protect it from overheating, and these openings must not be blocked or covered. The openings should never be blocked by placing the product on a bed, sofa, rug or other similar surface. This product should not be placed in a built-in installation, such as a bookcase or rack, unless proper ventilation is provided or the manufacturer* instructions have been adhered to.
- POWER SOURCES --- This product should be operated only from the type of power source indicated on the marking label. If you are not sure of the type of power supply to your home, consult your product dealer or local power company. For products intended to operate from battery power, or other sources, refer to the operating instructions.
-
POWER-CORD PROTECTION --- Power-supply cords should be routed so that they are not likely to be walked on or pinched by items placed upon or against them, paying particular attention to cords at plugs, convenience receptacles, and the point where exit from the product.
-
NON-USE PERIODS --- The power cord of the product should be unplugged from the outlet when left unused for long periods of time.
-
LIGHTNING --- For added protection for this product during a lightning storm, or when it is left unattended and unused for long periods of time, unplug it from the wall outlet and disconnect the antenna or cable system. This will present damage to the product due to lightening and power-line surges.
-
OVERLOADING --- Do not overload wall outlets, extension cords, or integral convenience receptacles as this can result in a risk of fire or electric shock.
-
OBJECT AND LIQUID ENTRY --- Never push objects of any kind into this product through openings as they may touch dangerous voltage points or short-out parts that could result in a fire or electric shock. Never spill liquid of any kind on the product.
-
SERVICING --- Do not attempt to service this product yourself as opening or removing covers may expose you to dangerous voltage or other hazards. Refer to all servicing to qualified service personnel.
-
DAMAGES REQUIRING SERVICE --- Unplug this product from the wall outlet and refer servicing to qualified service personnel under the following conditions.
a) When the power-supply cord or plug is damaged.
c) If the product has been exposed to rain or water.
b) If liquid has been spilled, or objects have fallen into the product.
d) If the product does not operate normally by following the operating instructions. Adjust only those controls that are covered by the operating instructions as an improving adjustment of other controls may result in damage and will often require extensive work by a qualified technician to restore the product to its normal operation.
e) When the product exhibits a distinct change in performance - this indicates a need for service.
-
REPLACEMENT PARTS --- When replacement parts are required, be sure the service technician has used replacement parts specified by the manufacturer or have the same characteristics as the original part, Unauthorized substitutions may result in fire electric shock and other hazards.
-
HEAT --- the product should be situated away from sources such as radiators, heat registers, stoves or other products that produce heat
If you don't want to disturb other people during your listening, you can plug your earphones/headphone into the PHONE jack. The audio from the speaker will be muted and you can enjoy your listening from your earphones/headphone.
Establish a safe sound level :
Pay attention! Over time your hearing will adapt to continuous loud sounds and will give the impression that the volume has in fact been reduced. What seems normal to you may in fact be harmful. To guard against this before your hearing adapts, set the volume to a low level.
Slowly increase the level until you can hear comfortably and clearly and without distortion. Damage to your hearing is accumulative and is irreversible. Any ringing or discomfort in the ears indicates that the volume is too loud. Once you have established a comfortable listening level, do not increase the sound level.
SAFE SOUND CARE

Notes:
- Reduce volume before plugging the earphones/headphone.
- Speaker of the unit is automatically disconnected while earphone /headphones are connected.
- Adjust the volume to a comfortable listening volume level.
PREPARATION FOR USE
Unpacking and set up
CD-103
Remote Control
User manual
Place the unit on a flat and stable surface so that it cannot be reversed.
- Carefully remove all the components from the carton and remove all packing materials from the unit.
Make sure nothing is accidentally discarded with the packing materials. - Remove any descriptive labels that may be found on either the front or top cabinet of the unit. Do not remove any labels located on either the back or button cabinet of the unit.
- Press the CD door OPEN Button to open the CD compartment door. There is a white card in the CD compartment which is intended to prevent the CD pickup from moving during shipment of the product, Remove this card from the CD compartment before use.
- Save the carton and the packing materials, if possible, in the unlikely event that the unit ever needs to be returned for service. Using the original carton and packing material is the only proper way to protect the unit from shipping damage.
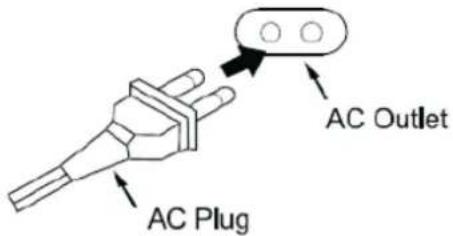
CONNECTING TO AC POWER
- Connect the power cord to the AC mains inlet and the wall outlet. The power supply is now connected and ready for use.
2.To switch off completely, unplug the power cord from the wall outlet.
Unplug the power cord from the wall outlet to protect your set during heavy thunderstorms.
SPEAKER CONNECTIONS
Connect the Left and Right speakers (16) to the left and right speaker wire connectors (18) at the back of the unit, before connecting the unit to AC Power.
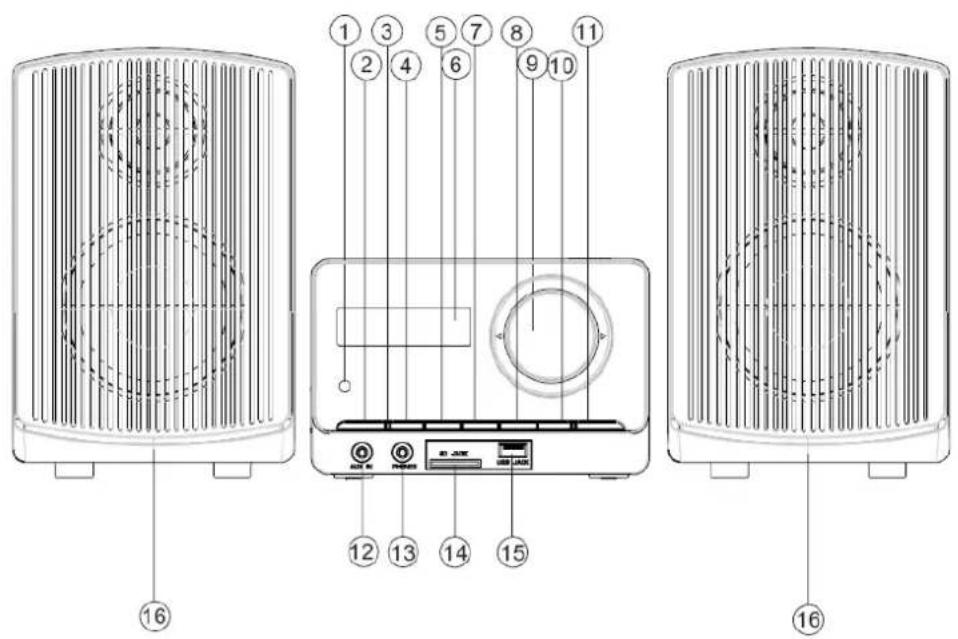
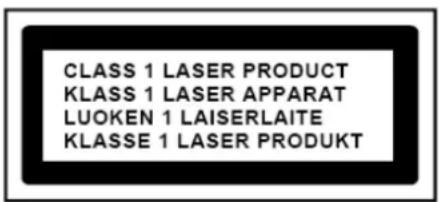
Front View
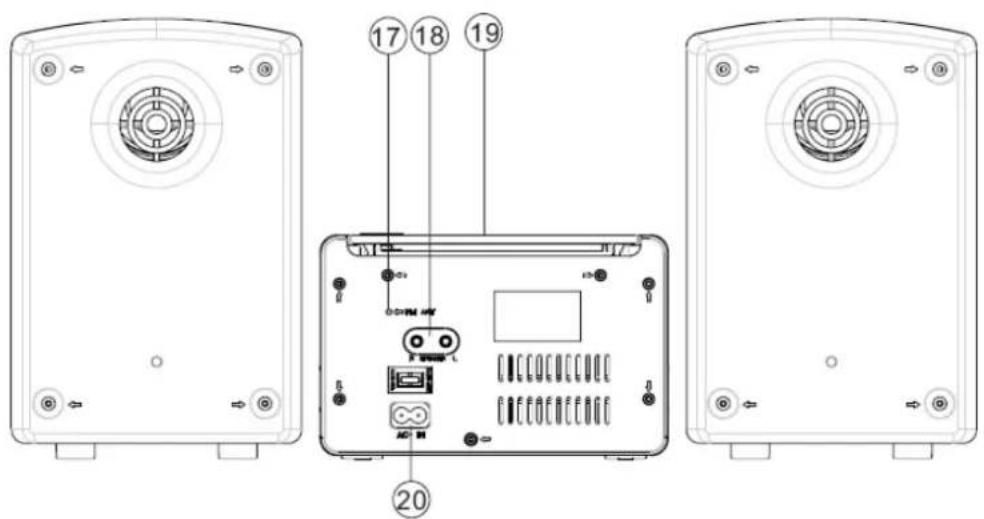
Rear View
- REMOTE SENSOR
- POWER BUTTON
- STANDBY INDICATOR
- PLAY/PAUSE BUTTON
-
STOP/USB/SD BUTTON
-
LCD DISPLAY
-
BACK BUTTON
-
NEXT BUTTON
- VOLUME BUTTON
-
REPEAT/PROG./TIME BUTTON
-
FUNCTION BUTTON
- AUX IN JACK
- PHONE JACK
- SD/MMC SLOT
- USB Compatible PORT
- LEFT & RIGHT SPEAKER BOXES
- FM ANTENNA WIRE
- SPEAKER WIRE CONNECTORS (L/R)
19.CDDOOR - AC SOCKET
1. REMOTE SENSOR
2. POWER BUTTON
-Press POWER button to turn on/off power.
3. STANDBY INDICATOR
4. PLAY/PAUSE BUTTON
- Start or pause MP3/CD/USB/BLUE play.
-In radio mode, press the play/pause button enter the automatic channel scan mode.
5. STOP/USB/SD BUTTON
- Stop CD/MP3/USB/SD playback; erase a CD program.
- Press and hold more than 1.5 sec change USB1.1/SD media.
6. LCD DISPLAY
- Show the FM dial frequency.
- Show the number of tracks.
7. BACK BUTTON
- BACK track selection.
- Press and hold more than 1.5 sec BACK search intra track.
-In the radio mode, press BACK will enter the low end of the manual channel scan mode.
8. NEXT BUTTON
- NEXT track selection.
- Press and hold more than 1.5 sec forward search intratrack.
- In the radio mode, press NEXT will enter the high-end manual channel scan mode.
9. VOLUME KNOB
-Adjust volume level.
- Turn left (or right) & push within 1 sec. and then release can adjust the volume level.
- Turn left (or right) and long push to quickly adjust the volume level.
10. REPEAT/ PROGRAM/ TIME BUTTON
- Repeat a track CD/MP3/USB program.
- Repeat mode: normal->repeat 1->repeat all-> repeat album ->normal.
- for CD/MP3/USB status, when the unit is in the stop mode, short press down this button can enter on programming function for CD/MP3/USB.
- for Radio status, when the unit is in working status, short press down this button can enter on programming function for Radio.
-In the working status, short press this button can on CD/MP3/USB/RADIO for programming.
Remark: the Max Programming track:
for CD song, the Max programming track is 20 tracks for MP3 song, the Max programming track is 99 tracks for Radio station, the Max programming is 30 stations
-In standby mode, to setup the time of the unit.
11. FUNCTION BUTTON
- Select source of sound CD/USB/BLUE/AUX/RADIO.
12. AUX JACK
-The built-in AUX jack.
13. PHONES JACK
-The built-in PHONES jack.
14. SD SOCKET
-The built-in SD MMC jack.
15. USBCompatible SOCKET
-The built-in USB jack.
-to improve FM reception.
18. SPEAKER WIRE CONNECTORS (L/R)
19.CDDOOR
20. AC LINE CORD
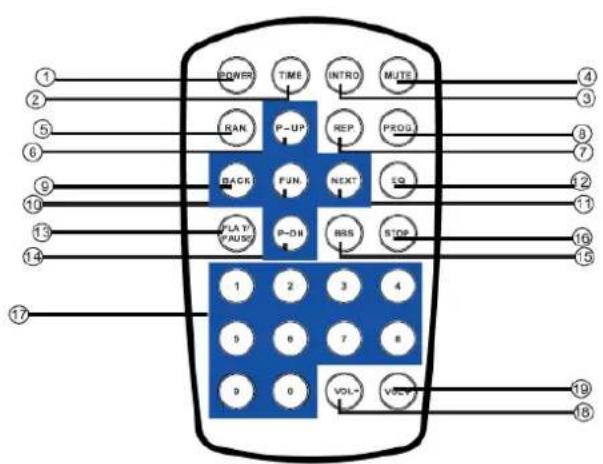
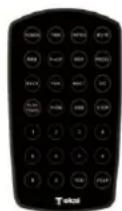
- POWER BUTTON
- TIME BUTTON
- INTRO BUTTON
- MUTE BUTTON
- RANDOM BUTTON
- P-UP BUTTON
- REPEAT BUTTON
8.PROGRAM BUTTON - BACK BUTTON
- FUNCTION BUTTON
- NEXT BUTTON
- EQ BUTTON
- PLAY/PAUSE BUTTON
- P-DOWN BUTTON
- BBS BUTTON
- STOP BUTTON
- NUMBER KEY
- VOL- BUTTON
-
VOL+ BUTTON
-
Please pull out the plastic paper from the battery door before use the remote control.
- When the remote control operation becomes unstable or the distance from which the remote control works is shorter. Replace the batteries with new ones.
- Using the remote control unit
To use the remote unit, point at the REMOTE SENSOR and press the buttons gently and firmly. Remote control operation is possible within approximate 18ft (6m). However, since the remote control range is less when the unit is used at an angle, use directly in front of the REMOTE SENSOR, for maximum distance.
Do not expose the REMOTE SENSOR to strong light(direct sunlight or artificial lighting)and make sure that there are no obstacles between the REMOTE SENSOR and the remote control unit.
USE REMOTE CONTROL OTHER IMPORTANT BUTTON
P-UP / P-DN
- in the radio mode, press these buttons to select desired preset station number.
- in the MP3 mode, press these buttons to select the NEXT/PREV folder/album.
RANDOM BUTTON
-In the player CD/MP3/USB/AUX, press the RANDOM button can be played at random. Press again to cancel.
BBS BUTTON
-In the player CD/MP3/USB/BT/AUX/RADIO, press the BASS button to enhance the heavy bass effect.
Press again to cancel.
EQ BUTTON
-In the CD/MP3/USB/BT/AUX/RADIO mode, press the EQ button to change music style among 5 equalizer levels.
-When playing the music, press this button to select the sound effect: classic-rock-popular-jazz-FLR.
MUTE BUTTON
-In the CD/MP3/USB/BT/AUX/RADIO mode, press the MUTE button to mute the sound.
Press again to restore the sound.
INTRO BUTTON
-In the CD/MP3/USB mode, press the INTRO button to browse 10 seconds of each track of the repertoire, press again to cancel this function.
USE CLOCK
USE CLOCK
To setup the time of the unit
- Connect the AC ON (The following operation must be in standby mode).
- Short press on the TIME button, the time digits will be flashing on the LCD display.
- Press BACK, NEXT buttons to select the time format display by 12h or 24h.
- Press TIME button to confirm.
- Then you can set the hour and the minute with the same method of steps 3-4.
ON/OFF TIMER
After setup the time of unit, long press on the TIME button can setup the unit ON & OFF time, with the same method of steps 3-4.
- Long press on TIME button "ON" will display 2 sec. then the digits of time will flash. Set the hour and minute of the starting time with same method of steps 3-4.
- Press TIME to confirm, then "OFF" will display 2 sec. then the digits of time will flash. Set the hour and minute of the Power OFF Time of the unit with same method of steps 3-4.
- Then the Audio source selection will flash : you can select Radio, CD, USB, SD, or AUX source with BACK / NEXT buttons, press TIME to confirm,
- Then the Volume level selection will flash, select the suitable volume level with BACK/NEXT buttons and press TIME to confirm.
- After the settings are finished, the unit will show on the display the ON programmed time + OFF programmed time + audio source + volume level, then return to normal Clock display.
RADIO OPERATION
RADIO
Radio reception
- Press FUNCTION button select RADIO mode.
- Tune to required station by press BACK or NEXT button.
Manual Tuning: Press BACK or NEXT and then release within 1 sec.
Auto Tuning: Press the play/pause button enter the automatic channel scan mode, and to be automatically set.
To call back the auto preset channels, press Play/Pause button on the unit.
To Preset Channel :(FM 30 Preset memories)
(1) Press BACK or NEXT Select desired station.
(2) Press PROGRAM button once, the MEMORY number indicator begins steady in the display.
(3) Push PRESET- DOWN or PRESET-UP buttons (on the remote control) to select the desired number.
(4) Press PROGRAM button to save that station.
(5) Repeat steps (1) to (4) procedures to preset other stations.
- After end of program. Press Play/Pause button to start play the frequency that you selected or press number key on the remote control.
- Push [VOL-] or [VOL +] to adjust the volume.
- Extend ANTENNA wire to its full length to improve reception of FM broadcasting.
- To turn OFF the radio press FUNCTION button to select another mode or press power button to switch OFF the unit.
- Switch ON again after shut down, the memory frequency still exists.
BLUETOOTH MODE
- The operational range between this unit and a Bluetooth device is approximately 10 meters, different BLUETOOTH devices may be slightly different operation,
- Before you connect a Bluetooth device to this unit, familiarize yourself with the Bluetooth capabilities of the device (IPHONE, IPAD, MOBILE PHONE,etc.) by reading the device instructions.
- Compatibility with all Bluetooth devices is not guaranteed.
- Any obstacle between this unit and a Bluetooth device can reduce the operational range.
- Keep this unit away from any other electronic device that may cause interference.
In order to avoid interferences, please de-activate Wi-Fi on your device (Smartphone, tablet, etc...) when playing music using Bluetooth.
PAIRING YOUR BLUETOOTH DEVICE
Note: Prior to use Bluetooth function, your TOKAI micro system should be paired firstly with your Bluetooth device (refer to Bluetooth operation of your external device).
Press FUNCTION button and select BLUE mode.
Search BLUETOOTH equipment "CD-103" model for connection.
Enable the Bluetooth function of your Bluetooth audio source device to make it discoverable (see your device's operation instructions to add or setup a Bluetooth device).
Select CD-103 on your Bluetooth device to make the pairing.
If required by the External Bluetooth audio source, enter default password "0000".
PLAYBACK
- Press PLAY/PAUSE button to play or pause playback.
- Push [VOL-] or [VOL +] to adjust the volume level.
- Press BACK or NEXT to select tracks.
LISTEN TO MUSIC FROM BLUETOOTH EXTERNAL DEVICE
- If the connected Bluetooth device supports Advanced Audio Distribution Profile (A2DP), you can listen to the music stored on the external device through the TOKAI CD-103. You can control music via the Micro System.
- If the device also supports Audio Video Remote Control Profile (AVRCP), you can use the TOKAI CD-103 remote control to play music and control playback of the music stored on the external device.
USE AUX
The auxiliary input of your Micro system allows you to connect an external source (such as: mp3 player, discman, walkman) and play its content through your TOKAI CD-103.
- Connect your external audio equipment to the AUX IN JACK (12).
- Press FUNCTION to select AUX. The sound source of the Mp3 or discman or walkman will output from the unit.
- Push the volume control to adjust the Volume.
Note: The unit cannot control the player.
PLAYING USB / SD MEMORY CARD
The unit is designed to play MP3 audio files contained in a USB key, if the files are not in MP3 format, the files cannot be read correctly.
-USB/Memory Card audio functions
1) Insert one USB key in the USB compatible port (15) or one SD/MMC memory card in the SD/MMC Slot (14).
→The unit will read the USB and playback automatically if no CD disc loaded.
2) Press FUNCTION button or STOP/USB/SD button to choose the USB or SD state.
3) If playback of USB or SD/MMC cart does not start automatically, press PLAY/PAUSE button to start playback and/or press again to pause the playback.
4) Use the NEXT, BACK buttons for SKIP next/back search.
5) You can program up to 99 Tracks (refer to PROGRAM Play mode under CD/MP3 PLAYER section).
6) Repeat mode: normal->repeat 1->repeat all->repeat album ->normal
(There is no repeat album mode in program PLAY mode)
7) Maximum Folder: the unit can support up to max. 99 Folders (in the USB / SD memory card)
8) Maximum File : the unit can support up to max. 999 Files (in the USB / SD memory card)
-Press and hold the [STOP] key more than 1.5sec at USB mode, system will change to SD mode.
Then"SD" will be displayed. At this moment, system will read the SD memory card.
- If a device is successfully read, then the corresponding device is ready to play a file.
- If a device fails to be read, then "NO" will appear on the Display to indicate that there is no device.
*Notice: If no device is connected or the player fails to read the device when user switch over USB to SD with pressing [STOP] key, then“NO”is display and the system moves into the STOP mode.
Notice:
-
When the unit has not a disc, inserting the USB/SD card will read the USB/SD card automatically, it read the USB first while having a USB.
-
The unit doesn't support the HDD all and the portion USB with Mp3 player.
CD/MP3 PLAYER
CD/MP3 Player
This CD-player can play Audio Discs, MP3 CD-R, CD-RW. Do not try to play CD-ROM, CDi, VCD, DVD or computer CD.
- Press FUNCTION button to CD mode.
- To open the CD door, press CD open/close button on the right side of the CD door.
- Insert a mp3/CD or CD-R, with the printed side facing up and press CD door gently to close.
- Press play/pause on the set to start playback.
- Press the play/pause button again to pause the playback, press once more to resume playback.
- To stop CD playback, press STOP button.
Note: CD/mp3 play will also stop when:
-you open the CD compartment;
-you select radio sound source;
-the CD/mp3 has reached to the end.
Selecting a different track
During playback you can use BACK or NEXT button to select a particular track.
- if you have selected a track number in the stop or pause position, press PLAY/PAUSE to start playback.
- Press NEXT once briefly for the next track, or press repeatedly until the desired track number appears in the LCD display.
- Press BACK once briefly to return to the beginning of a current track.
- Press BACK more than once briefly for selecting a previous track.
Finding a passage within a track
-
Press and hold down BACK or NEXT.
-
the CD is played at high speed.
-
When you recognize the passage you want release BACK or NEXT.
- normal playback will resume.
Different play modes: Repeat
Repeat-play the current track continuously.
Repeat all-plays the entire CD continuously.
Playing tracks in random order after press the RANDOM button, the tracks will be played in random order.
Program- plays your favorite tracks in a programmed playlist.
Notice: When connecting AUX while the CD is playing, the sound of AUX will output .But the CD will not stop working.
Repeat function during CD playback
1>playing tracks in Repeat mode after press REPEAT button one time, the LCD display will show (Repeat the current track):

2>playing tracks in Repeat mode after press REPEAT button 2nd time, the LCD display will show (Repeat ALL tracks of the CD):

3>playing tracks in Repeat mode after press REPEAT button 3rd time, the LCD display will show (Repeat ALBUM in CD MP3 mode):

4>release tracks in playing mode after press REPEAT button 4th time, Repeat indicator goes off, the displaying will be show (Repeat function is cancelled):

Notice:
-If there is no folder in the CD disc, pressing REPEAT a third time, it will go to the step 4 directly.
-If the format of music isn't Mp3, the LCD will not display Mp3.
-If it is playing a USB, the LCD will display USB.
Different play modes: Program
Program- using main unit, program function can be operated when the unit is in stop position.
1>> when the unit is playing a CD DISC:
A>press"program"key of remote control one time in stop position, the LCD display will show:

B>Press BACK or NEXT to select your favorite track No. and then the LCD display of unit will show as following (track number), then press"program"again to confirm the first track memory :

C>Repeat the above operation to program the next favorite tracks until max. 20 tracks, you can rotate BACK or NEXT to select your favorite track.
D>Press PLAY button to play the programmed tracks once finished, the LCD display of unit will show:

E>press STOP button one time to stop the program play, press STOP button one more time to erase all programmed tracks.
2>> when the unit is playing an Mp3 DISC:
A>press"program"key of remote control one time in stop position, the LCD display will show:

B>Press BACK or NEXT to select your favorite track No. and then the LCD display of unit will show as following, then press"program"again to confirm.

C>Repeat the above operation to program the next favorite track until max. 99 tracks in CD MP3 disc, you can rotate BACK or NEXT to select your favorite track.
D>Press PLAY button to play the programmed tracks, the LCD display of unit will show:

E>press STOP button to stop the program play, press STOP button one more time to erase the programmed tracks : Notice:
-the former programmed tracks cannot be deposited by unit automatically;
- the max program function is 99 tracks. If you try to enter more than 99 tracks, program will be full and you cannot continue program function.
-If it is playing a USB, the LCD will display USB.
PROGRAM METHOD
(1)Press the [PROG.] key at STOP mode, system will go to PROGRAM mode.
- The PRG icon and P01 will blink at 2Hz. This prompts the user to enter the first song in the program PLAY list.
(2)The user can select the desire tracks by using [NEXT], [BACK] keys.
Once these keys are pressed, the Display will show the selected track.
(3)After select the desired track, press [PROG.] key again and it will be stored in the memory. In Mp3 mode, Maximum 99 and in CD mode, Maximum 20 tracks can be programmed when repeat steps (2) to (3) procedure.
(4)If press the [STOP] key during the program mode, then the selected TRACKs will be stored in the memory and return to STOP mode (Continuous Play mode)
(5)If press the [PLAY] key during the program mode, it will start the program PLAY mode. Playback will start from P01 Track.
Erasing a program
You can erase the content of the memory by:
-Pressing the STOP button twice, while playing,
- Opening the CD door,
- Selecting another audio source mode.
Precautions & General Maintenance
Place the set on a hard and flat surface so that the system does not tilt.
Do not expose the set, batteries or CDs to humidity, rain, sand or excessive heat caused by heating equipment or direct sunlight.
Do not cover the set. Adequate ventilation with a minimum gap of inches between the ventilation holes and surrounding surfaces is necessary to prevent from heating.
The mechanical parts of the set contain self-lubricating bearings and must not be oiled or lubricated.
*To clean the set, use a soft dry cloth. Do not use any cleaning agents containing alcohol, ammoniac, benzene or abrasives as these may harm the housing.
Care of the cabinet
- To prevent fire or shock hazard, disconnect your unit from the AC power source when cleaning.
- The finish on your unit may be cleaned with a dust cloth and cared for as other furniture. Use caution when cleaning and wiping the plastic parts.
3.Mild soap and a damp cloth may be used on the front panel.
CD player and CD handling
The lens of the CD player should never be touched!
Sudden changes in the surrounding temperature can cause condensation on the lens of your CD player. Playing a CD is then not possible. Do not attempt to clean the lens but leave the set in a warm environment until the moisture
evaporates.
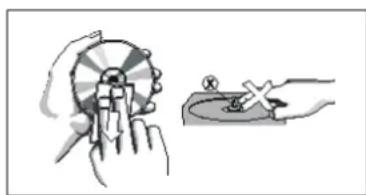
*Always close the CD door to keep the CD compartment dust-free. To clean, dust the compartment with a soft dry cloth.
*To clean the CD, wipe in a straight line from the centre towards the edges using a soft lint-free cloth. Do not use cleaning agents as they may damage the disc.
*Never write on a CD or attach any stickers on it.
If a fault occurs, first check the points listed below before taking the set for repair. Do not open the set as there is a risk of electric shock. If you are unable to remedy a problem by following these hints, consult your dealer or service center.
WARNING: under no circumstances you should try to repair the set yourself, as this will invalidate the warranty.
| PROBLEM | Possible Cause | SOLUTION |
| - No sound - No power | ·Volume not adjusted ·power cord not securely connected ·battery of the Remote Control is dead, or badly inserted | - Adjust the volume, - Connect the AC power cord properly, - Replace the battery, install new battery correctly. |
| Display does not function properly/ NO reaction to operation of any of the controls | ·Electrostatic discharge | - Switch off and unplug the set. Reconnect after a few seconds |
| No disc indication | ·No CD/MP3 inserted, or CD badly loaded. ·CD badly scratched or dirty. ·CD-R is blank or the disc is not finalized. | - Insert a CD, MP3, CD-R, or load CD disc label side facing. - Replace/clean CD, see Maintenance. - Use a finalized CD-R. |
| CD/MP3/USB/SD playback does not work | ·CD/MP3/USB badly scratched / dirty. ·Laser lens steamed up. ·USB or SD device is not installed or installed incorrectly. ·Incompatible USB/SD device used. | - Replace/clean CD/MP3/USB (see maintenance). - Wait until lens has adjusted to room temperature. - Insert USB/SD device into the compatible slot. - Playback using any USB/SD device cannot be guaranteed. Please try another USB/SD device. |
| The CD/MP3 skips tracks | ·CD/MP3 damaged or dirty. ·Program is active. | - Replace or clean CD/MP3. - Quit program mode(s). |
| RADIO Noise or Sound distorted | ·Station is not tuned properly. ·FM wire antenna is not positioned correctly. ·Station is too weak. | - Adjust tuning control, - Extend the FM wire antenna fully. - Try other strong stations. |
| No sound when playing audio via Bluetooth | Your bluetooth device has not been paired properly | Pair your Bluetooth device according to the "Pairing your Bluetooth Device" section. |
| The volume of your Bluetooth device is set at too low. | Increase the volume of your Bluetooth device. | |
| The volume control of your TOKAI micro system is set too low. | Increase the volume of your TOKAI micro system, by pressing VOL+ button. | |
| No sound when playing audio via AUX-IN | Audio cable has not been connected properly. | Check the connection of Audio cable between your Micro system and the external audio device. |
| Audio cable is damaged. | Use another audio cable for connection. |
TECHNICAL SPECIFICATIONS
Model CD-103
Power supply AC 100~240 V, 50/60 Hz
Power consumption 18 W
Standby mode consumption 0.6 W
Output power 40 W (2x20W) = 2x5 W RMS
Operation temperature +5^ - + 35^
Headphone impedance 4~32 Ohms
CD section
Optical pick-up 3-Beam Laser
Frequency response 100Hz - 16KHz
Radio Frequency range FM 87.5 108 MHz
Preset stations up to 30 stations
Connections AUXILARY 3.5MM
USB COMPATIBLE PORT
MMC/SD/SDHC/SDXC memory card reader
EARPHONE 3.5MM
BLUETOOTH A2DP - VERSION 1.2
AVRCP - VERSION 1.0
AC ACCESSORIES AC Power cord
Remote control (including 1 flat CR-2025 battery)
User Manual
Net weight Unit 0,95 Kg / Speakers 2 x 1,32 Kg
Dimensions unit 480 (L) x 228 (W) x 229 (H) mm
IMPORTANT: Due to continual revision and improvement on our products design, specifications are subject to change without further notice.

Warning! This logo set on the product means that the recycling of this apparatus comes within the framework of the Directive 2002/96/CE of January 27, 2003 concerning the Waste of Electrical and Electronic Equipment (WEEE).
This symbol means that used electrical and electronic products should not be mixed with general household waste. There is a separate collection system for these products.
If you want to dispose of this equipment, please do not use the ordinary dust bin!
- The presence of dangerous substances in the electrical and electronic equipments can have potential consequences on the environment and human health in the cycle of reprocessing this product.
- Therefore, at the end of its lifetime, this product shall not be disposed with other non-recycled waste. Used electrical and electronic equipment must be treated separately and in accordance with legislation that requires proper treatment, recovery and recycling of used electrical and electronic equipment.
- Local authorities and resellers have set special procedures for the purpose of collecting and recycling this product (please contact your local authority for further details). You have the obligation to use the selective waste collection systems put in place by your local authority.
- If your used electrical or electronic equipment has batteries or accumulators, please dispose of these separately beforehand according to local requirements.
- By disposing of this product correctly you will help ensure that the waste undergoes the necessary treatment, recovery and recycling and thus prevent potential negative effects on the environment and human health which could otherwise arise due to inappropriate waste handling.

This unit complies with European Council Directive 2006 / 95 CE (Electromagnetic Compatibility & Low Voltage Directives)
We company LEMA SAS hereby states that the unit under reference CD-103, complies with the essential requirements and other relevant provisions of the Council Directive R&TTE 1999/05/CE. The Declaration of Conformity is available on request at the website www.tokai.fr (heading: Contact).
WAARSCHUWINGSLABEL INFORMEREN VAN STRALING -
40 W (2x20W) = 2x5 W RMS
Betriebstemperatur
+5°C - + 35°C
Gesamtimpedanz
4~32 Ohms
CD Bereich
optische Aufnehmer
3-Strahl-Laser
Frequenz Ansprechen
100Hz - 16KHz
FM Frequenzbereich
FM 87.5 ~ 108 MHz

- EXCLUSIVE IMPORTER
- CAUTION
- LIGHTNING FLASH WITH ARROWHEAD SYMBOL -
- DRIPPING WARNING
- VENTILATIONWARNING:
- WARNING LABEL INFORMING OF RADIATION:
- Establish a safe sound level :
- SAFE SOUND CARE
- Notes:
- PREPARATION FOR USE
- Unpacking and set up
- CONNECTING TO AC POWER
- SPEAKER CONNECTIONS
- REMOTE SENSOR
- POWER BUTTON
- STANDBY INDICATOR
- PLAY/PAUSE BUTTON
- STOP/USB/SD BUTTON
- LCD DISPLAY
- BACK BUTTON
- NEXT BUTTON
- VOLUME KNOB
- REPEAT/ PROGRAM/ TIME BUTTON
- FUNCTION BUTTON
- AUX JACK
- PHONES JACK
- SD SOCKET
- USBCompatible SOCKET
- SPEAKER WIRE CONNECTORS (L/R)
- USE REMOTE CONTROL OTHER IMPORTANT BUTTON
- P-UP / P-DN
- RANDOM BUTTON
- BBS BUTTON
- EQ BUTTON
- MUTE BUTTON
- INTRO BUTTON
- USE CLOCK
- ON/OFF TIMER
- RADIO OPERATION
- RADIO
- BLUETOOTH MODE
- PAIRING YOUR BLUETOOTH DEVICE
- PLAYBACK
- LISTEN TO MUSIC FROM BLUETOOTH EXTERNAL DEVICE
- USE AUX
- PLAYING USB / SD MEMORY CARD
- -USB/Memory Card audio functions
- Notice:
- CD/MP3 PLAYER
- Selecting a different track
- Finding a passage within a track
- Different play modes: Repeat
- Repeat function during CD playback
- Different play modes: Program
- 1>> when the unit is playing a CD DISC:
- 2>> when the unit is playing an Mp3 DISC:
- PROGRAM METHOD
- Erasing a program
- Precautions & General Maintenance
- Care of the cabinet
- CD player and CD handling
- TECHNICAL SPECIFICATIONS
- If you want to dispose of this equipment, please do not use the ordinary dust bin!
- WAARSCHUWINGSLABEL INFORMEREN VAN STRALING -
- CD Bereich
Brand : TOKAI
Model : CD103
Category : Hi-fi system