
WO243 - Hi-fi system TOKAI - Free user manual and instructions
Find the device manual for free WO243 TOKAI in PDF.

| Product Type | Hi-fi system with FM radio, Bluetooth, USB, auxiliary input, alarm clock |
| Brand | Tokai |
| Model | WO243 |
| Power Supply | AC/DC power adapter: input 100-240V~ 50Hz, 0.5A; output 5V 1.5A |
| Speaker Power | 20 W |
| FM Radio | Frequencies 87.5 – 108 MHz; manual and automatic search |
| Bluetooth | Version 2.1 with A2DP profile; maximum range 10 meters |
| USB Port | 5V = 500 mA; plays MP3 files |
| Auxiliary Input | 3.5 mm jack socket (AUX IN) |
| Headphone Output | Front 3.5 mm jack socket |
| Alarm Function | 2 independent alarms; buzzer, radio or USB modes |
| Sleep Timer | Auto shut-off from 10 to 90 minutes |
| Display | LCD screen |
| Clock Backup | 2 LR3 (AAA) 1.5 V batteries (not supplied) |
| Supplied Accessories | Power adapter, auxiliary cable, instruction manual |
| Care and Cleaning | Unplug before cleaning; use a damp cloth on the exterior only |
| Safety | Do not expose to rain or moisture; do not open the device; use only the supplied adapter |
| Spare Parts and Repairability | Repairs by qualified technician; use parts specified by the manufacturer |
| General Information | Household use only; CE compliance; manufacturer LEMA SAS, France |
Frequently Asked Questions - WO243 TOKAI
User questions about WO243 TOKAI
0 question about this device. Answer the ones you know or ask your own.
Ask a new question about this device
Download the instructions for your Hi-fi system in PDF format for free! Find your manual WO243 - TOKAI and take your electronic device back in hand. On this page are published all the documents necessary for the use of your device. WO243 by TOKAI.
USER MANUAL WO243 TOKAI
RISQUE D'ÉLECTROCUTION NE PAS OUVRIR

ATTENTION:POUR REDURE LE RISQUE D' ELECTROCUTION,NE PAS RETIRER LE COUVERCLE L'INTERIEUR DE L'APPAREIL NE COMPORTE AUCUNE PIECE UTILE A L'UTILISATEUR CONFIEZ-EN L'ENTRETIEN ADU PERSONNEL QUALIFIE


m = 311
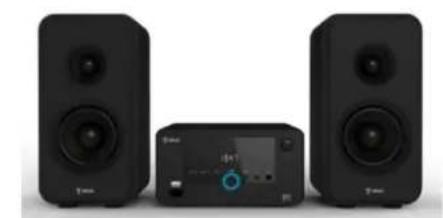
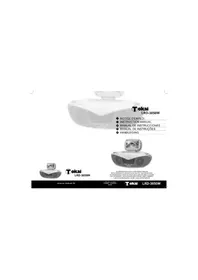
Thank you for purchasing the TOKAI WO-243 a BLUETOOTH MICRO SYSTEM with Digital FM tuner USB compatible & auxiliary input.
This is your assurance of quality, performance and value. Our engineers have included many useful and convenient features in this product. Please be sure to read this instruction Manual completely to make sure you are getting the maximum benefit from each feature.
This product was manufactured using the highest quality components and standards of workmanship. It was tested by inspectors and found to be in perfect working order before it left our factory. For future reference, record the serial number in the space provided.
Model No: TOKAI WO-243
Serial Number:
For any questions concerning the conformity of the product, thank you to send your request to:
LEMA S.A.S.
We company LEMA SAS hereby states that the unit TOKAI WO-243 complies with the essential requirements and other relevant provisions of the Council Directive 1999/EC.
The Declaration of Conformity is available on request at the website www.tokai.fr (heading: Contact).
WARNING
TO PREVENT FIRE OR SHOCK HAZARD DO NOT EXPOSE THIS APPLIANCE TO RAIN OR MOISTURE.

CAUTION
RISK OF ELECTRIC SHOCK DO NOT OPEN

CAUTION: TO REDUCE THE RISK OF ELECTRIC SHOCK, DO NOT REMOVE COVER (OR BACK). NO USER-SERVICEABLE PARTS INSIDE. REFER SERVICING TO QUALIFIED SERVICE PERSONNEL.

LIGHTNING FLASH WITH ARROWHEAD SYMBOL -
Within an equilateral triangle, is intended to alert the user to the presence of uninsulated dangerous voltage within the products enclosure that may be of sufficient magnitude to constitute a risk of electric shock to persons.

EXCLAMATION POINT - within an equilateral triangle is used to indicate that a specific component shall be replaced only by the component specified in that documentation for safety reason.
IMPORTANT!
It is recommended not to leave a mobile phone near the unit in order to avoid electromagnetic interference in the speakers.
- READ INSTRUCTIONS --- All the safety and operating instructions should be read before the product is operated, followed and retained for future reference.
- CLEANING --- Unplug this product from the wall outlet before cleaning. Do not use liquid cleaners or aerosol cleaners. Use a damp cloth for cleaning.
-
WATER AND MOISTURE --- Do not use this product near water - for example, near a bath tub, wash bowl, kitchen sink, or laundry tub; in a wet basement; or near a swimming pool; and the like.
-
ACCESSORIES --- Do not place
this product on an unstable cart, stand, tripod, bracket, or table. The product may fall, causing serious injury to a child or adult and serious damage to the product. Use only with a bracket, or

recommended by the manufacturer, or sold with the product. Any mounting of the product should follow the manufacturer instructions, and should use a mounting accessory recommended by the manufacturer. A Product and Cart Combination should Be Moved with Care - Quick stops, excessive force and uneven surfaces may cause the product and cart combination to overturn.
- VENTILATION --- Slots and openings in the cabinet are provided for ventilation and to ensure reliable operation of the product and to protect it from overheating, and these openings must not be blocked or covered. The openings should never be blocked by placing the product on a bed, sofa, rug or other similar surface. This product should not be placed in a built-in installation, such as a bookcase or rack, unless proper ventilation is provided or the manufacturer* instructions have been adhered to.
- POWER SOURCES --- This product should be operated only from the type of power source indicated on the marking label. If you are not sure of the type of power supply to your home, consult your product dealer or local power company. For products intended to operate from battery power, or other sources, refer to the operating instructions.
- POWER-CORD PROTECTION --- Power-supply cords should be routed so that they are not likely to be walked on or pinched by items placed upon or against them, paying particular attention to cords at plugs, convenience receptacles, and the point where exit from the product.
-
NON-USE PERIODS --- The power cord of the product should be unplugged from the outlet when left unused for long periods of time.
-
LIGHTNING --- For added protection for this product during a lightning storm, or when it is left unattended and unused for long periods of time, unplug it from the wall outlet and disconnect the antenna or cable system. This will present damage to the product due to lightening and power-line surges.
- OVERLOADING --- Do not overload wall outlets, extension cords, or integral convenience receptacles as this can result in a risk of fire or electric shock.
- OBJECT AND LIQUID ENTRY --- Never push objects of any kind into this product through openings as they may touch dangerous voltage points or short-out parts that could result in a fire or electric shock. Never spill liquid of any kind on the product.
- SERVICING --- Do not attempt to service this product yourself as opening or removing covers may expose you to dangerous voltage or other hazards. Refer to all servicing to qualified service personnel.
- DAMAGES REQUIRING SERVICE --- Unplug this product from the wall outlet and refer servicing to qualified service personnel under the following conditions.
a) When the power-supply cord or plug is damaged.
c) If the product has been exposed to rain or water.
b) If liquid has been spilled, or objects have fallen into the product.
d) If the product does not operate normally by following the operating instructions. Adjust only those controls that are covered by the operating instructions as an improving adjustment of other controls may result in damage and will often require extensive work by a qualified technician to restore the product to its normal operation.
e) When the product exhibits a distinct change in performance - this indicates a need for service. - REPLACEMENT PARTS --- When replacement parts are required, be sure the service technician has used replacement parts specified by the manufacturer or have the same characteristics as the original part, Unauthorized substitutions may result in fire electric shock and other hazards.
- HEAT --- the product should be situated away from sources such as radiators, heat registers, stoves or other products that produce heat
- This machine has been designed for domestic use only, any professional usage, inappropriate use, or use that does not comply with the user manual is outside of the manufacturer's responsibility and guarantee.
Unpacking and set up
WO-243
Power adaptor

User manual
- Place your Bluetooth Micro system WO-243 on a flat and stable surface so that it cannot fall over.
- Carefully remove all the components from the carton and remove all packing materials from the components.
- Make sure that each part is in good condition & noting is accidentally discarded with the packing materials.
- Unwind the AC power cord on the back of the main unit and extend it to its full length.
- Carefully read the instructions of this manual, respecting recommendations for use and safety. Keep this document and tell potential users about it.
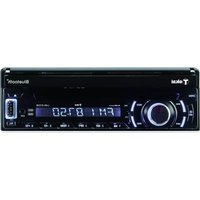
DESCRIPTION OF UNIT AND CONTROLS
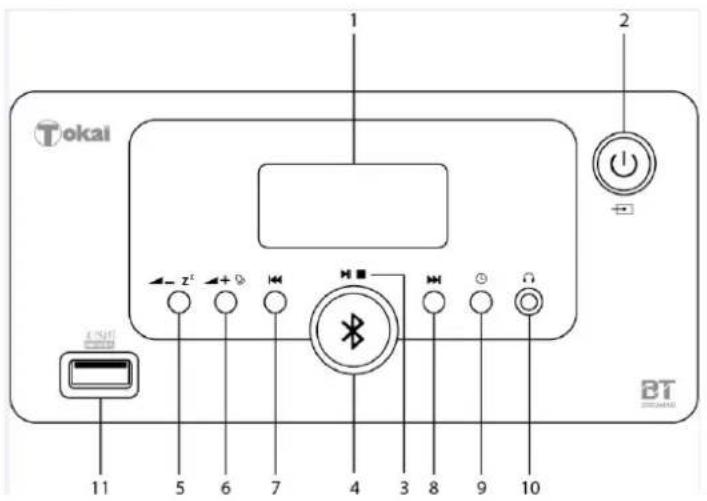
1:LCD screen
2: - Standby / Function button
3:Play/Pause/Stop button
4: -Bluetoothmode
5: -Volume-/Snoopze button
6: +Volume+ / Alarm set button
7: Backward button
8: Forward button
9: - Sleep / Time set button
10: - Earphone jack
11: -USB port
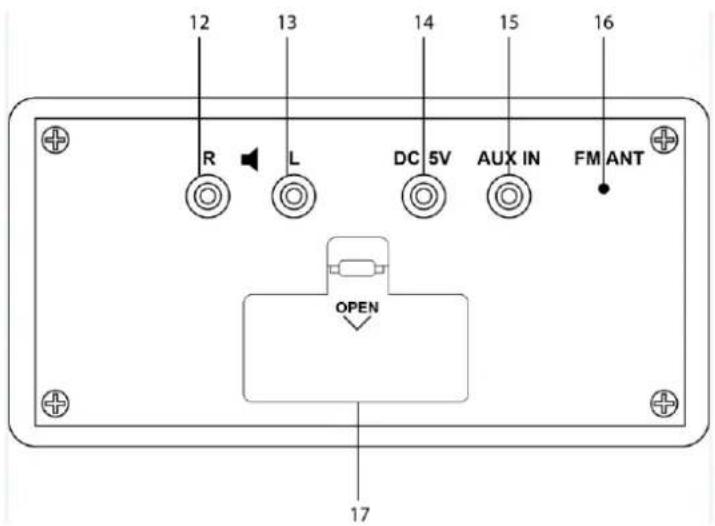
12:R -Speaker jack right side
13: -Speaker jack left side
14:DC5V -AC/DC adaptor jack
15: AUX IN -AUX IN jack
16:FM ANT - Radio antenna
17:Batteries compartment
Installing batteries (backup for the clock in case of a power outage)
- Open the battery compartment on the back of the appliance (17).
- Insert 2 LR3 1.5V batteries, respecting the indicated polarity.
- Close the battery compartment.
INFORMATION ABOUT THE BATTERIES (not supplied)
- The clock must be equipped with the appropriate battery in order to function properly.
- Only the recommended batteries should be used.
- Polarity must be respected when inserting the batteries.
- The batteries should be inserted in such a way as to avoid any short circuit.
- Do not mix used and new batteries.
- Do not mix alkaline, standard (carbon-zinc) and rechargeable (nickel-cadmium) batteries.
- Do not recharge or try to open the batteries. Do not throw the batteries in the fire.
- Replace all batteries at the same time with identical batteries.
- Remove the batteries from the appliance if not used for a long time.
- If the liquid contained in the battery comes in contact with eyes or skin, wash the area immediately and carefully with clear water and consult a doctor.
- Do not expose batteries to excessive heat such as solar radius, fire or similar.
- WARNING: Danger of explosion if the batteries are not placed properly.

In order to respect the environment, do not throw spent batteries out with household waste. Dispose of them at your nearest recycling centre or at a used battery collection point.
Connecting the product
- Install the stand on the top of the sound station.
- Connect the speakers to the sound station by plugging the sockets inside jacks (12) et (13).
- Connect the plug of the mains voltage adaptor into the socket (14). Plug the other end of the mains adaptor into a mains socket.
- Only use the adaptor supplied. If another adapter is used, first make sure that it has identical specifications.
PHONES
The system includes a stereo PHONES jack on the front panel of the main unit. You may connect a set of stereo headphones, not included, to this jack for private listening without others.
The main unit speakers are automatically shut off when headphones are connected to the PHONES jack. If the plug is not fully inserted the sound may be intermittent or you may hear sound one side of the headphones.
IMPORTANT: To prevent hearing damage always set the volume control to a low level before you connect the headphones. Then connect the headphones, put them on, and very gradually increase the volume to a comfortable listening level.
ON/Off /Mode Selection
-
Press the button repeatedly (2) to turn the unit on and select a mode.
-
To switch off, long press the button (2).
NOTE: The last active mode before stopping device is selected by default at startup.
Volume adjustment
Press the buttons ±b - ±b^±b (5) and ±b + ±b (6) to adjust the volume from 0 to 16.
To set the clock time
- In Standby off mode
- Press and hold the SLEEP (9) button, the alarm1 icon and the TIME display will blink.
- Press button to set the hours,
- Press button to set the minutes.
- Then press SLEEP (9) button to confirm.
Clock time check function
If you want to check the clock time during the PLAY mode, press SLEEP the button once.
To set alarm function
In Standby off mode:
- Press and hold the + button, the alarm1 icon and the TIME display will blink.
- Press button to set the hours
- Press button to set the minutes.
- After setting the alarm time as your desired, to press + button again. You can now select whether the alarm should go on to Buzzer, Radio or USB
Wake to buzzer
Press the 14 button until "bb" icon is shown in the display, the buzzer sound will start the set alarm time.
Wake to Radio
Press the 14 button until the frequency is shown in the display. At the set time the alarm will go on at the radio station you last listened to.
Wake to USB
Press the 14 button until the "USB" icon is shown in the display. This feature only works when you have a USB disk inserted in the USB port. This USB will be played at the set alarm time
- Press the + (6) button again to confirm your settings for Alarm 1.
- The alarm icon (Alarm 2) appears and the TIME display is blinking.
- Repeat step 2-6 in order to set Alarm 2.
To select which of the 2 alarms should be active, press the + button repeatedly while the unit is in standby mode (clock display). The display will show consecutively the Alarm 1 icon, the Alarm 2 icon, the both Alarm icons. Press the + button once again to deactivate the alarms (no alarm icon will be displayed).
Shut off alarm
When alarm goes off, press the (2) button to turn off alarm, the alarm will reset for next day
Snoopze function
If you want to snooze a few more minutes press the SNOOZE button z^2 (5) will deactivate the sound for approximately 9 minutes.
Sleep function
- In standby on mode
- Press the button to select the desired source.
- Press and hold the SLEEP (9) button. The "90" will appear on the display.
- Repeatedly press the SLEEP (9) button for desired sleep time between 90, 80, 70, 60, 50, 40, 30, 20, 10 minutes.
- The unit will automatically switch off when the SLEEP time expires.
- To turn sleep mode off, press the SLEEP@9) button until "OFF" is displayed.
RADIO OPERATION
Press the STANDBY button (2) until the frequency shown on the display
For a manual tuning, press the (7) or (8) button to search for desired frequency.
For an automatic tuning, press & hold the (7) or (8) button until the display frequency starts run. When a station of sufficient strength has been found Tuning will stop or you can stop the automatic tuning by pressing backward or forward button.
To turn off the radio, press and hold the STANDBY (2) button.
USB PORT FUNCTION
- Press the (2) STANDBY button until USB icon shown on the display
- Connect USB disk into the USB slot of the system.
- The USB disk will play automatically
- Press the (3) again to stop playing temporarily. Resume normal play by pressing the (3) button again.
- To stop playback, press and hold the (3) button. The total number of tracks will be shown on the display.
- To turn off the unit, Press and hold the (2) button.
AUX INPUT JACK
- Press the STANDBY (2) button until AUX icon shown on the display
- Connect the AUX connect wire from the out jack of your Personal Player such as portable MP3 player to the AUX input jack (15).
Play Start from your Personal Player and adjust the -z^2 (5) / + (6).
This unit can receive audio signal from a BLUETOOTH audio source device. Make sure that your peripheral has A2DP profile for a perfect compatibility.
To prevent interference, we strongly recommend that you switch off WiFi on your peripheral during Bluetooth audio playback.
Connect the BLUETOOTH
- Press the STANDBY button (2) until bL icon shown on the display
- Turn on the Bluetooth feature on your mobile compatible device.
- Search for W0243BT profile.
- Pair and connect to WO243BT.
- you can now start playing your music
- Press the (7) or (8) button to choose the previous or next song.
- When finished listening, press & hold (2) button to turn on the unit
Disconnection to the Bluetooth audio source
Press the STANDBY button to turn off the unit, and to disconnect the Bluetooth device.
NOTE: The device cannot receive music from two Bluetooth audio devices simultaneously. You must disconnect prior Bluetooth function of the paired device, and then make a new Bluetooth device search to be connected.
Confirm W0243BT profile found from the source audio device.
- Connectivity by Bluetooth protocol (2.1 A2DP) - maximal distance: 10 meters
FM radio auto scan: 87, 5 - 108MHz
Alarm function (2 alarms) - AUX IN jack (MP3 player, Smartphone, portable CD player)
- Format audio accepted: MP3
- Earphones jack socket
- Speaker power: 20 W
-
Main unit power supplied: AC adaptor:
-
This unit is designed to operate with AC/DC adaptor
Input: 100-240V~ 50Hz, 0,5A.
Output:5V = = 1,5A
-USB port:5V = 500mA
- Clock power back up supply: 2 × 1.5V LR3 (AAA) batteries (not provided)
- Accessories : AC adaptor, AUX IN cable 3.5mm/3.5mm jack
IMPORTANT:
Due to continual revision and improvement on our products design, specifications are subject to change without further notice.

Warning! This logo set on the product means that the recycling of this apparatus comes within the framework of the Directive 2002/96/CE of January 27, 2003 concerning the Waste of Electrical and Electronic Equipment (WEEE).
This symbol means that used electrical and electronic products should not be mixed with general household waste. There is a separate collection system for these products.
If you want to dispose of this equipment, please do not use the ordinary dust bin!
- The presence of dangerous substances in the electrical and electronic equipments can have potential consequences on the environment and human health in the cycle of reprocessing this product.
- Therefore, at the end of its lifetime, this product shall not be disposed with other non-recycled waste. Used electrical and electronic equipment must be treated separately and in accordance with legislation that requires proper treatment, recovery and recycling of used electrical and electronic equipment.
- Local authorities and resellers have set special procedures for the purpose of collecting and recycling this product (please contact your local authority for further details). You have the obligation to use the selective waste collection systems put in place by your local authority.
- If your used electrical or electronic equipment has batteries or accumulators, please dispose of these separately beforehand according to local requirements.
- By disposing of this product correctly you will help ensure that the waste undergoes the necessary treatment, recovery and recycling and thus prevent potential negative effects on the environment and human health which could otherwise arise due to inappropriate waste handling.

This unit complies with European Council Directive 2006 / 95 CE (Electromagnetic Compatibility & Low Voltage Directives)


- WARNING
- TO PREVENT FIRE OR SHOCK HAZARD DO NOT EXPOSE THIS APPLIANCE TO RAIN OR MOISTURE.
- LIGHTNING FLASH WITH ARROWHEAD SYMBOL -
- IMPORTANT!
- Unpacking and set up
- DESCRIPTION OF UNIT AND CONTROLS
- Installing batteries (backup for the clock in case of a power outage)
- INFORMATION ABOUT THE BATTERIES (not supplied)
- Connecting the product
- PHONES
- ON/Off /Mode Selection
- Volume adjustment
- To set the clock time
- Clock time check function
- To set alarm function
- Wake to buzzer
- Wake to Radio
- Wake to USB
- Shut off alarm
- Snoopze function
- Sleep function
- RADIO OPERATION
- USB PORT FUNCTION
- AUX INPUT JACK
- Connect the BLUETOOTH
- Disconnection to the Bluetooth audio source
- IMPORTANT:
- If you want to dispose of this equipment, please do not use the ordinary dust bin!
Brand : TOKAI
Model : WO243
Category : Hi-fi system