
MHA061 - Hi-fi system Marquant - Free user manual and instructions
Find the device manual for free MHA061 Marquant in PDF.

| Product Type | Hi-fi system with DVD player, FM/AM radio, USB and card reader |
| Power Supply | 100-240 V AC, 50/60 Hz |
| Front Connections | 1 USB port, 1 SD/MMC card reader |
| Rear Connections | SCART output, L/R audio outputs, composite/S-Video video outputs, coaxial and optical outputs, AUX 1 and AUX 2 audio inputs, speaker terminals |
| Antennas | Indoor FM antenna, AM loop antenna |
| Playable Formats | DVD, VCD, CD, MP3, JPEG, files on USB or memory card |
| Radio Functions | FM/AM, automatic and manual tuning, station presets |
| Equalizer | Modes: Normal, Classic, Pop, Jazz, Rock, Vocal |
| Audio Settings | Bass, treble (via TONE button), loudness, mute |
| DVD Player Functions | Play, pause, stop, fast forward/rewind, slow motion, zoom, repeat, A-B repeat, programming, audio/subtitle/angle language change |
| TV Formats | PAL, NTSC, Auto; picture format 4:3 (Pan&Scan, Letterbox) or 16:9 |
| OSD Languages | English, Spanish, French, Italian |
| Remote Control | Infrared, battery included (approx. 1 year life), range 5 m / angle 60° |
| Speakers | Quick-release connectors, cables provided, recommended positioning at 45° |
| Sleep Function | Sleep timer (SLEEP button) |
| Parental Control | Parental control with password (default 0000) and classification limit (8 levels) |
Frequently Asked Questions - MHA061 Marquant
User questions about MHA061 Marquant
0 question about this device. Answer the ones you know or ask your own.
Ask a new question about this device
Download the instructions for your Hi-fi system in PDF format for free! Find your manual MHA061 - Marquant and take your electronic device back in hand. On this page are published all the documents necessary for the use of your device. MHA061 by Marquant.
USER MANUAL MHA061 Marquant
Locations and function of the player 4
Connection 5
Remote Control 9
DVD Operation 12
Radio Operation 22
Troubleshooting 23
Specification 25
Safety Information

natural_image
Pure black horizontal bar with no text, symbols, or markings


The lightning flash with an arrowhead symbol within an equilateral triangle is intended to alert the user of the presence of uninsulated "dangerous voltage" within the product's enclosure that may be of sufficient magnitude to constitute a risk of electric shock to persons.

The exclamation point within an equilateral triangle is intended to alert the user of the presence of important operating and maintenance (servicing) instructions in the literature accompanying the appliance.
THIS DEVICE COMPLIES WITH PART 15 OF THE FCC RULES. OPERATION IS SUBJECT TO THE FOLLOWING TWO CONDITIONS: (1) THIS DEVICE MAY NOT CAUSE HARMFUL INTERFERENCE, AND (2) THIS DEVICE MUST ACCEPT ANY INTERFERENCE RECEIVED. INCLUDING INTERFERENCE THAT MAY CAUSE UNDESIRED.
User Manual
- All the safety and operating instructions should be read before the product is operated.
- Retain Instructions - The safety and operating instructions should be retained for future reference.
- All warnings on the product and in the operating instructions should be adhered to.
- All operating and use instructions should be followed.
Laser
This Digital Video Disc Player employs a Laser System of the class 1.
- Make sure the device is shut down prior to opening player lid.
- Do not open the appliance. Do not attempt to dismantle the appliance.
- In order to avoid any danger: Have service work only carried out by the manufacturer or an authorized service workshop.
- Visible laser radiation when open and interlocks defeated.
- Use of controls or adjustments or performance of procedures other than those specified herein may result in hazardous radiation exposure.
Operation
- Playing of Video DVD or Video CD
- Playing of Audio-CD
- Listen FM/AM Radio
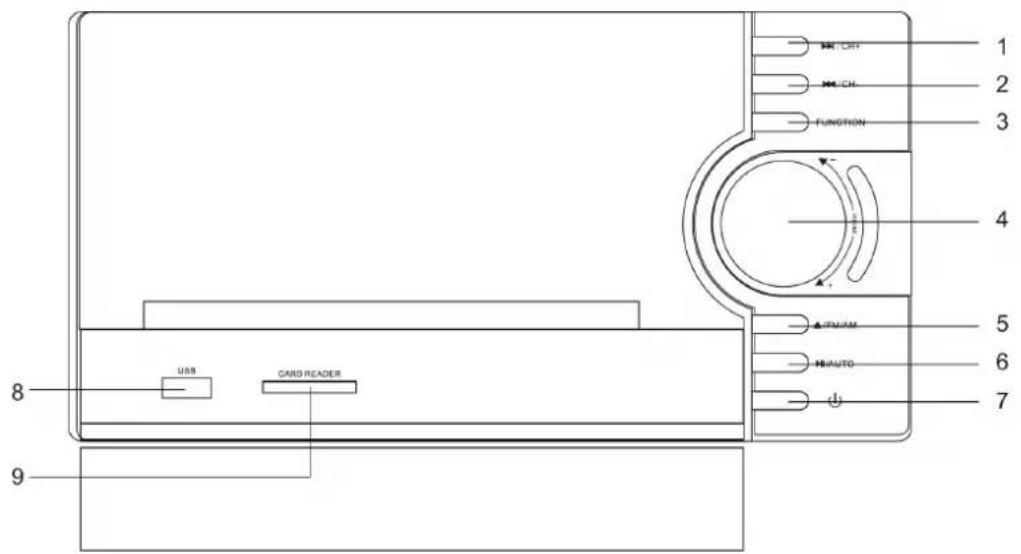
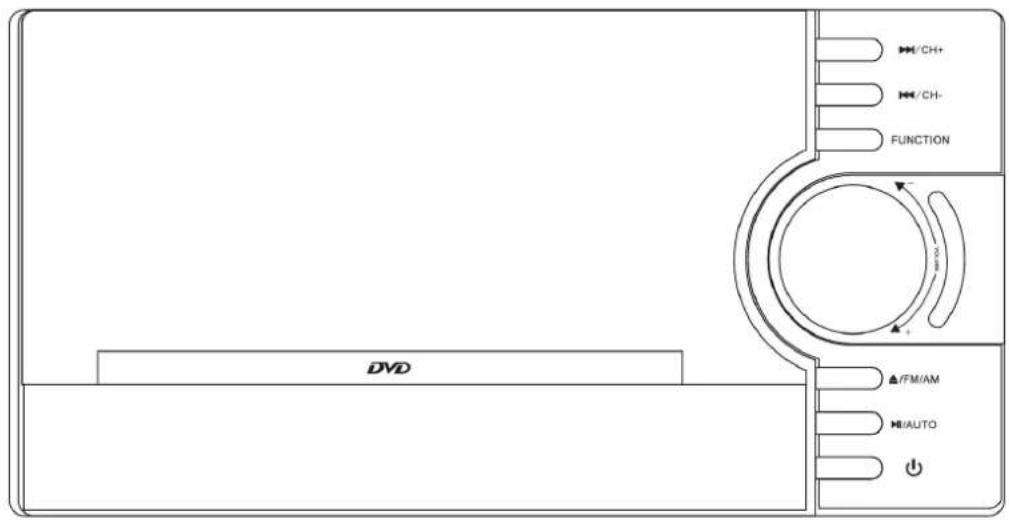
Locations and Function of the Player
Front Panel
-
OH+ button
-
▶//AUTO
-
◀◀/CH- button
-
⏻
-
FUNCTION button
-
USB interface
-
VOLUME knob
-
CARD READER interface
-
▲/FM/AM
Notes:
Open the cover on the bottom of the front panel, you will see the USB and CARD interface.
Use the FUNCTION button to select the proper input signal source. The sequence is DVD —> Radio —>AUX 1 IN—> AUX 2 IN. The DVD operation includes the source for USB and CARD. When in DVD mode, you can press USB/CARD button on the remote control to select USB or CARD signal source.
Before you plug the power cord into the AC outlet, please check to make sure that all of the connections have been properly completed. Plug the power cord carefully into the outlet.
When the unit is initially powered, a brief surge of electricity may cause interference with other electronic equipment on the same circuit. If this occurs, connect the unit to an outlet on different circuit.
Locations and Function of the Player
Playback Content from USB or CARD
This unit has a USB interface, you can insert a USB device or an MP3 Player with USB Interface to play the audio/video files and JPEG files. All the function is the same with the DISC operation.
The unit also has a card reader interface, insert the card into the interface to play the files on the card. The card operation is the same with DISC operation.
When the USB device and the Card are all connected to the unit, you can press the USB/CARD button on the remote control to select USB or CARD mode.
The unit starts to read the table of content (TOC) of the storage and displays the results into the file browser. By using the navigation buttons you can choose the content which you want to playback and start the playback by pressing the ENTER button.
Note:
To avoid damage, do not pull out the USB when you playback the files in the USB. If you want to pull out the USB, please press STOP button first.
Locations and Function of the Player
Rear Panel
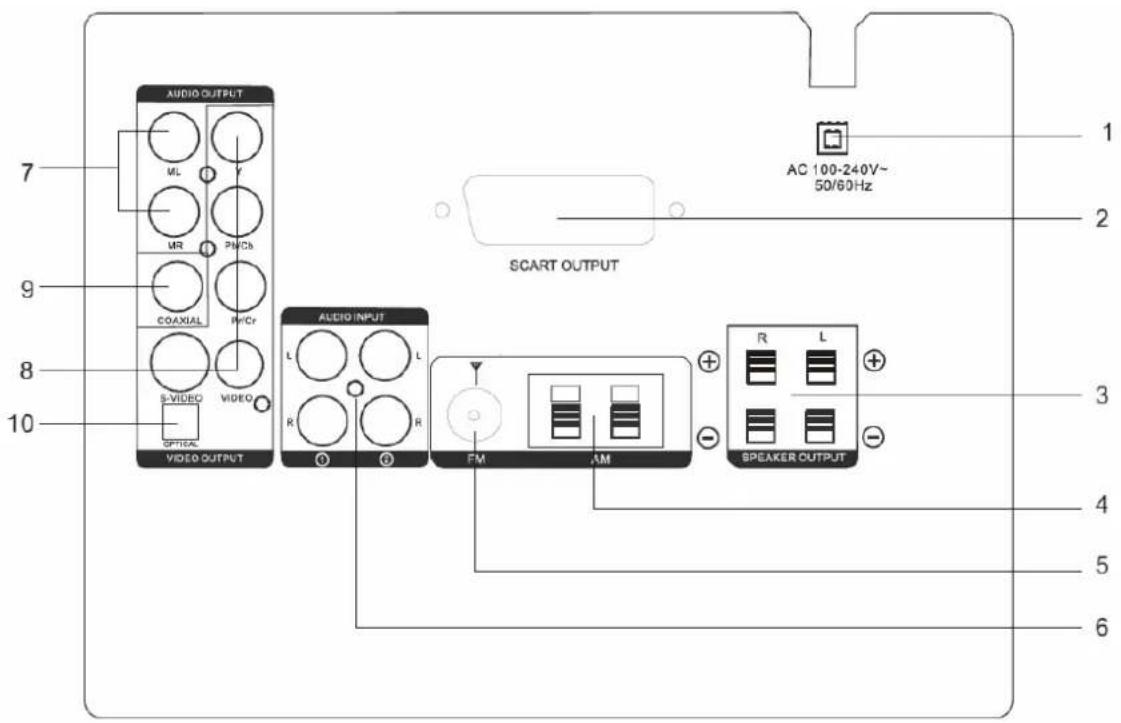
Elements of the rear side
- AC 100-240V 50/60Hz power supply input
- SCART OUTPUT
- SPEAKER OUTPUT
- AM Antenna jack
- FM Antenna jack
- AUDIO INPUT jacks
- AUDIO OUTPUT jacks (including ML, MR)
- VIDEO OUTPUT jacks (including S-VIDEO out jack)
- COAXIAL OUTPUT jack
- OPTICAL OUTPUT jack
Notes:
For FM/AM Radio, please use to connect the provided indoor loop antenna.
Power Cord: Please be sure its prongs are dry before plug-in to an electrical outlet.
Take caution not to overextend the cord or walk on it.
Connection
Connecting to TV/Amplifier
On the rear panel of the unit, there is a SCART OUTPUT interface. Use the SCART cable to connect the main unit to the SCART IN interface of the TV unit.

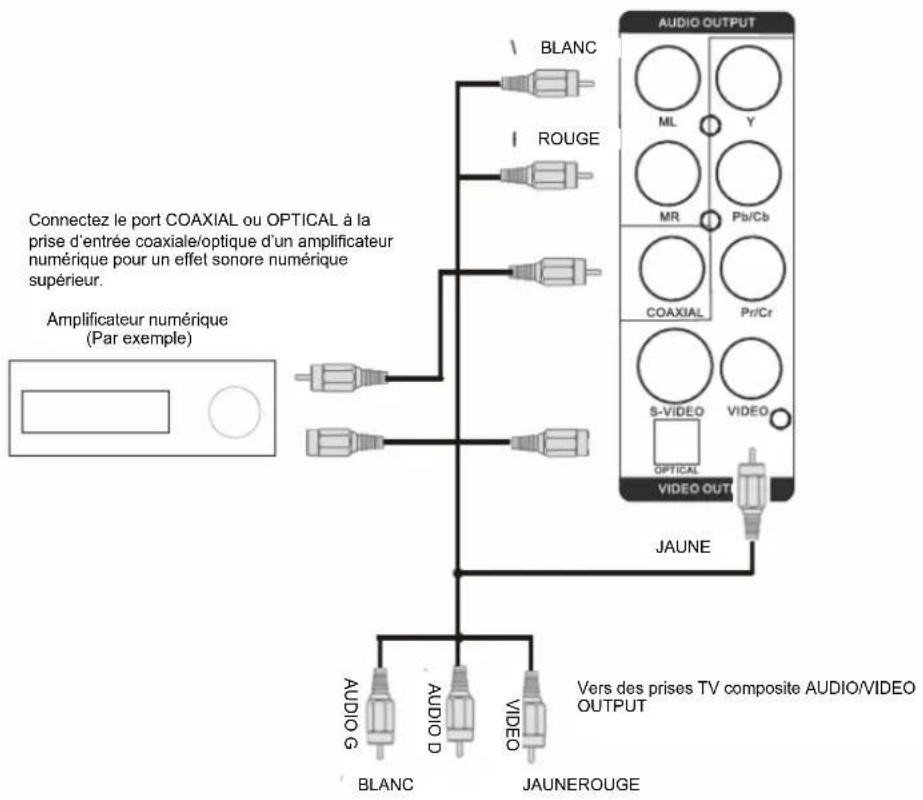
AUDIO/VIDEO OUTPUT CONNECTIONS

flowchart
graph TD
    A["Digital amplifier (for example)"] --> B["Connect the COAXIAL or OPTICAL port to the coaxial/optical input jack of a digital amplifier for superior digital sound effect."]
    B --> C["To TV composite AUDIO/VIDEO OUTPUT jacks"]
    C --> D["WHITE"]
    C --> E["RED"]
    C --> F["VIDEO"]
    C --> G["VIDEO OUT"]
    D --> H["WHITE L"]
    E --> I["AUDIO R"]
    F --> J["VIDEO Y YELLOW"]
    G --> K["VIDEO OUT"]
    style A fill:#f9f,stroke:#333
    style B fill:#ccf,stroke:#333
    style C fill:#cfc,stroke:#333
    style D fill:#fcc,stroke:#333
    style E fill:#cff,stroke:#333
    style F fill:#ffc,stroke:#333
    style G fill:#fcc,stroke:#333
    style H fill:#fff,stroke:#333
    style I fill:#fff,stroke:#333
    style J fill:#fff,stroke:#333
    style K fill:#fff,stroke:#333
Connection
Connecting the Speakers
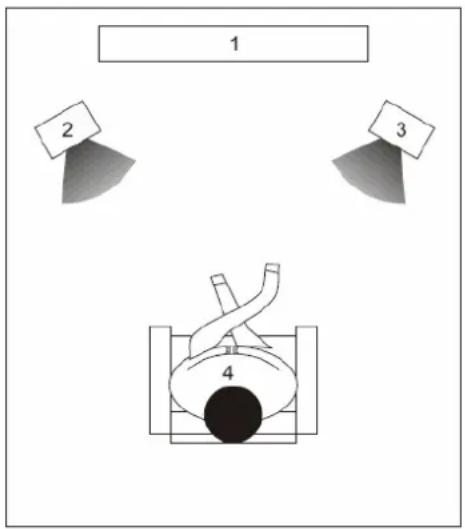
Place the Speakers
For the best result, please arrange the two speakers as shown in the following picture:
Align the speakers vertically at the ear level and at a horizontally angle of 45 degrees to the primary listening area.
- Position of the unit and the TV set.
- Left speaker
- Right speaker
- Position to enjoy sound and video
Connect the Speakers
- Please make sure, that the power is turned off and is not connected to the power outlet.
- Connect the speaker wires to the connectors on the rear side of the unit
- Press down the thumb levers and insert fully each tip of the wire into the connector. Then release the thumb levers to lock the wire in place.
- Please pay attention that the color of the wire correspondent to the color of the thumb levers on the speaker and on the player itself.
Notes:
To prevent damage to circuits, do not short-circuit the positive and negative speaker output jacks.
Make sure the exposed tips of each speaker wire are separated to the distance that they can not touch each other after they are inserted into the connectors.
Do not connect any other speakers or devices that are not included with this system.
Connection
Connecting Antennas
Connect the supplied AM loop antenna and FM antenna to the respective terminals. Adjust the position of the antenna for optimum reception.
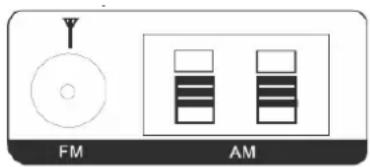
AM indoor loop antenna
Connect the AM Antenna
-
Open cable terminal by pressing back on tab
-
Insert wire end
-
Release tab; make sure wire is in terminal securely.
* Position the antenna as far as possible form a TV, VCR or other radiation source.
FM indoor antenna
* For better FM stereo reception, connect an outdoor FM antenna to the FM antenna terminal.
Basic connection:
Ensure that the power switches of this unit and other equipment to be connected, are turned off before commencing connection
Read attentively the instructions before connecting other equipments
Ensure that you observe the color-coding when connecting audio and video cords
Please connect the unit with TV by only one kind of video output format, and setup a suitable output mode (including signal mode and signal code type), otherwise there will be image distortion.
Remote Control
Insert batteries and Operation radius
Insert the battery into the receptacle and insert the receptacle into the remote.
For the best results, aim the remote towards at the player, screwing window. Stay within 5 metre and angles of 60 degrees or less.
Under normal use the battery will last for one year.
Remove battery during storage or when you are not using the DVD player for a long time.
Notes:
- Weak batteries can leak and several damage by the remote control.
- Leaking out battery acid can damage your health.
- Remove the battery from the battery compartment as soon as it is exhausted or if the remote control is not going to be used for a longer period of time.
- Wipe up leaked out battery acid with a cloth.
- In case of skin contact immediately wash the affected area.
- Seek medical advice if battery acid has been swallowed. In case of contact with your eyes wash out the eyes and seek medical advice.
Remote Control
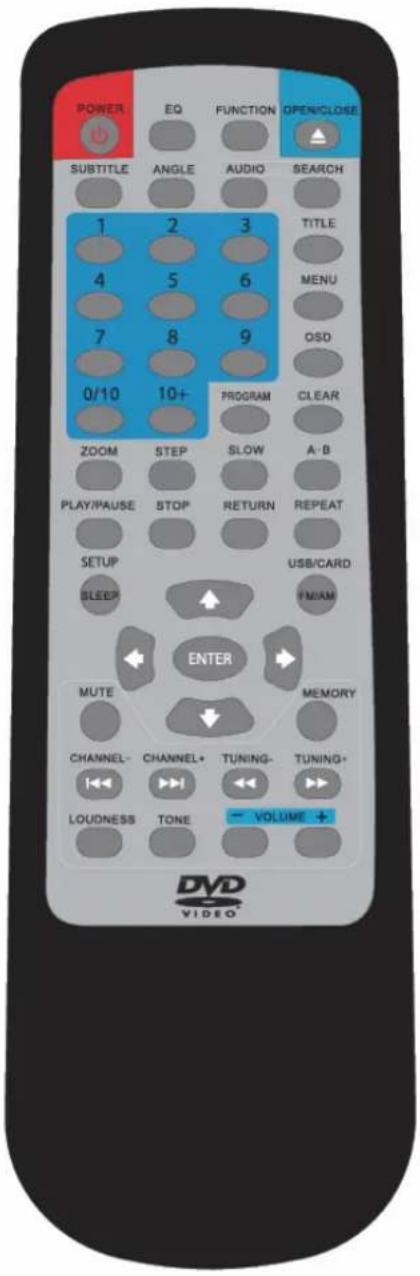
Remote Control
Buttons of the Remote Control:
- POWER button: press to turn on or off the unit.
- EQ button: press to select different audio modes, such as NORMAL, CLASSIC, POP, JAZZ, ROCK and VOCAL.
- FUNCTION button: press to select the different mode, such as DVD, radio, AUX 1 in and AUX 2 in.
- Numeric buttons (0-9, 10+): press to input number to select the track or channel.
- OPEN/CLOSE button: press to open/close the disc tray.
- SUBTITLE button: press to select the subtitle language.
- ANGEL button: press to change the view angle on multi-angle DVD disc
- AUDIO button: press to display the audio information of the DVD/VCD disc.
- SEARCH button: press to search the stations automatically in radio mode.
- TITLE button: press to display the title menu of the DVD disc.
- MENU button: press to display/exit the menu information of the disc.
- OSD button: In media play mode, press to display OSD (the on-screen display) information.
- PROGRAM button: In media play mode, press to enter into program mode to play the track in your desired sequence.
- CLEAR button: clear the program list and the number you input.
- ZOOM button: press to allow the picture to be increased in size
- STEP button: press to enter the step play.
- SLOW button: For some discs, press to start slow forward function.
- A-B button: press to repeat play the part you selected.
- SETUP/SLEEP button: press to enter the DVD setup menu in DVD mode. In other mode, press to enter sleep mode.
- USB/CARD/FM/AM button: in DVD mode, press to select USB or CARD mode. In radio mode, press to select FM band or AM band.
- ← / →, ↑/ ↓ button: In case of menu mode, the buttons served as cursor buttons to select item left/right, up/down.
- ENTER button: press to confirm your selection.
- CHANNEL-/CHANNEL+: press to select the channel down or up in radio mode.
- TUNING-/TUNING+: in media play mode, press shortly to skip to the previous/next track. Press and hold it to activate fast reverse/forward function. In radio mode, press it shortly to search the frequency backward/forward manually. Press and hold it to seek the frequency automatically.
- PLAY/PAUSE button: press to play/pause the playback.
- STOP button: press once to enter pre-stop mode, press twice to enter stop mode.
- RETURN button: press to return to the previous menu.
- REPEAT button: press to switch the repeat modes of the program.
- MUTE button: press to mute/resume the sound.
- MEMORY button: press to store the station into the number button in radio mode.
- LOUDNESS button: press to switch loudness on or off.
- TONE button: press to adjust the value of the BASS and TREBLE.
- VOLUME+/- button: press to adjust the volume level.
DVD Operation
When playing a DVD disc in the DVD player:
1) The disc will be played automatically and stop at menu picture.
Use ← / →, ↑/ ↓ cursor buttons on the remote control to move between the highlight bars in the menu.
2) Press ENTER button on the remote control to confirm the selected item.
3) You can press TITLE button on the remote control to return to the title of the DVD disc.
※ STOP PLAYBACK
Press STOP button on the remote control one time to stop the playback and go back to the DVD LOGO. Then press PLAY/PAUSE on the remote control or press ▶II on the front panel of the player to start play.
During playing, press TUNING+/- on the remote control or ▶▶/I buttons on the front panel during playback will skip to the previous/next track.
Note: For some VCD2.0 discs (PBC-playback control), TUNING+/- or ▶▶/I buttons may be unavailable.
Note you can use the numeric buttons (0-10) and 10+ button on the remote control to select the track directly.
Press ▶II on the unit or PLAY/PAUSE button on the remote control during playback will stop playback temporarily. To return to normal playback, press ▶II or PLAY/PAUSE button.
※ RAPID FORWARD/RAPID REVERSE
Hold press TUNING+/- on the remote control or hold press ▶▶I/I◀ on the unit during playback.
Each time the button is pressed, the speed of rapid forward /reverse changes according to the disc.
Press SLOW on the remote control during play. Each time the button is pressed,
the speed of slow forward (SF) changes according to the disc as follows.
DVD: Normal playback → SF1/2→ SF1/3→ SF1/4→ SF1/5→SF1/6→SF1/7→Normal playback
In slow motion state, click PLAY icon on the screen or press ▶II or PLAY/PAUSE button, normal playback to recover normal playback.
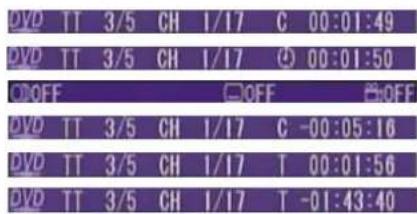
Press the OSD button on the remote control or click OSD icon on the screen during playback to display the console information of the current disc on the screen.
For an example (when playing a DVD disc):
Once you press OSD button on the remote control or click OSD icon on the screen you will see the information as the following order.
DVD Operation
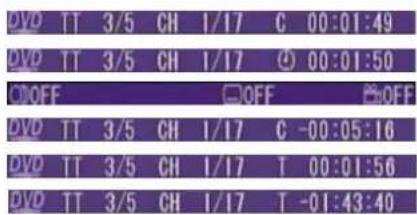
1) Item: TT
Function: Display the current title number and total title number.
2) Item: CH
Function: Display the current chapter number and total chapter number.
3) Item: Ⓑ (This icon only displayed for several seconds, after several seconds it will disappeared.)
Function: Display the played time of the current chapter.
4) C-: Display the remaining time of the current chapter.
5) T: Display the played time of the current title.
6) T-: Display the remaining time of the current title.
7) C: Display the played time of the current chapter.
8) OFF OFF OFF
Display the current disc's language, audio type, subtitle language and play angle.
Note: The displayed information is different according to different type of discs.
Repeat play: when you want to repeat playing the whole disc or a track or a chapter in the disc.
■ Press REPEAT button on the remote control repeatedly to select different repeat modes.
■ For different kinds of discs, pressing REPEAT button has different effects.
For example:
DVD:
REP:[OFF]→ REP:[CHAPTER]→ REP:[TITLE] → REP:[ALL]
Note: REPEAT feature does not support VCD2.0 (with PBC ON).
Paragraph play: When you want to play a paragraph repeatedly, A-B repeat allows a passage to be repeated continuously.
1) Press A-B button first at the start of the required passage: REPEAT A-
2) Press A-B button secondly at the end of the passage: REPEAT A-B
Then the unit will repeat playing the passage you just set from A to B.
3) Pressing A-B button again will exit repeating mode, and "A-B CANCEL" will be displayed on the screen.
※ ZOOM FUNCTION
Allows the picture to be increased in size. Press ZOOM button on the remote control to toggle among 2 scale, 3 scale and 4 scale, 1/2 scale, 1/3 scale, 1/4 scale.
When the scale is 1/4 times, press ZOOM button again to cancel the zoom function.
ZOOM 2 → ZOOM 3 → ZOOM 4 → ZOOM 1/2 → ZOOM 1/3 → ZOOM 1/4 → ZOOM OFF During Zoom mode, press ← / →, ↑/ ↓ buttons on the remote control to move pictures up, down, left or right direction.
DVD Operation
Multi-subtitle Language Function
Press SUBTITLE on the remote control during playback. The corresponding information will be shown on the screen.
Each time the button is pressed, the subtitle language changes in sequential order.
Notes:
- The language number is different according to the disc.
- Some discs only contain one subtitle language.
Multi-audio Language Function
Press AUDIO on the remote control during playback. The corresponding information will be shown on the screen.
Each time the button is pressed, the audio soundtrack language changes on sequential order. Notes:
- The language number is different according to the disc.
- Some discs only contain one soundtrack language.
Multi-angle Function
Press ANGLE button on the remote control during playback. The corresponding information will be shown on the screen.
Each time the button is pressed, the angle changes in sequential order.
Notes:
- The angle number is different according to the disc.
- The function only works for discs having scenes recorded at different angles.
Press AUDIO on the remote control during playback to change the channel.
※ PROGRAM PLAY
In program play mode, you can play the track in your desired sequence.
To program play a disc, please follow the next instructions.
For VCD/CD/MP3:
1) In PBC OFF mode. Press PROG button on the remote control to enter program edit interface.
DVD Operation
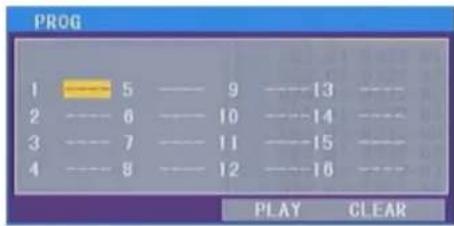
2) Use ← / →, ↑/ ↓ cursor buttons to select the items you want to program. The items you selected will become highlight.
3) Input the sequence number you want to program by numeric buttons (0-9) on the remote control.
4) Use cursor buttons to select PLAY character, then press ENTER button on remote control to confirm. The unit will play the tracks you programmed.
5) If you want to clear the program, use cursor buttons to select CLEAR character and press ENTER will clear the information you have programmed.
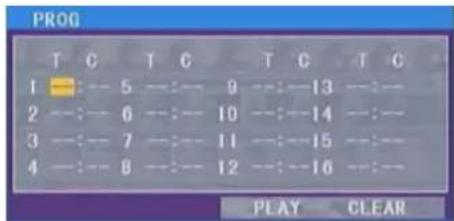
For DVD:
The operation is the same as VCD/CD operation.
Press PROG button on the remote control the following media play window will be shown on the screen:
In DVD mode, when the disc is playing or in stop mode, press SETUP on the remote control to enter setup menu.
When the cursor is on the topside, use / buttons to move between the different pages, such as SYSTEM SETUP, LANGUAGE SETUP, AUDIO SETUP, VIDEO SETUP and DIGITAL SETUP.
* Press ↓ button to move the cursor to the setup page below and then you can use ↑/ ↓ buttons to move between the different setup options.
* Press → button to display the choice list for each setup option and then use ↑/ ↓ buttons and ENTER button to change your selection.
1) SYSTEM SETUP
When you open the setup menu, you will see the system setup page at first, see below:
DVD Operation
TV SYSTEM
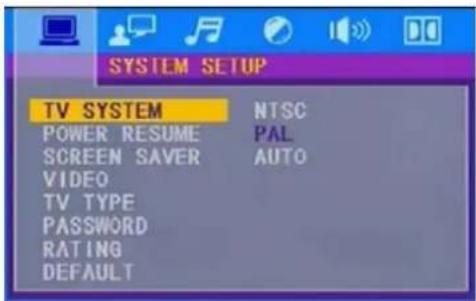
According to the color system of the TV, you can choose the TV system.
* AUTO: Choose this setting if your DVD player is connected to a multi-system TV.
* NTSC: Choose this setting if your DVD player is connected to a NTSC TV.
* PAL: Choose this setting if your DVD player is connected to a PAL TV.
POWER RESUME
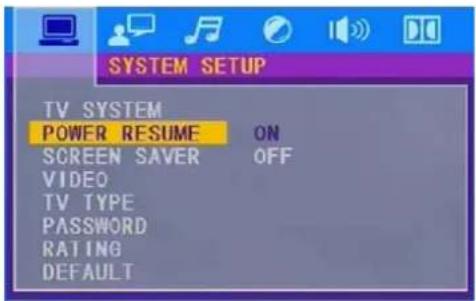
SCREEN SAVER
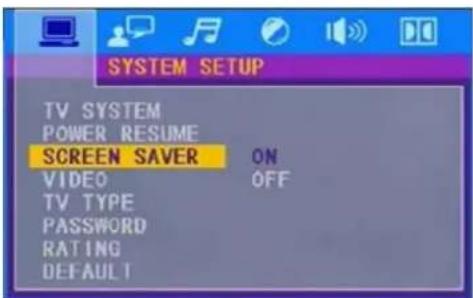
If the screen saver is on, when your DVD player is in Stop, Open or No Disc state, or there is a frame frozen for more than 60sec, the screen saver will be displayed; this feature can protect the screen from damage.
ON: Choose this setting to activate the screen saver.
OFF: Choose this setting to cancel the screen saver.
DVD Operation
VIDEO
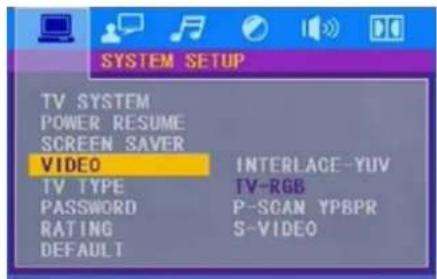
According to the TV type of line out connection, the choices are INTERLACE-YUV, TV-REG, P-SCAN YPBPR and S-VIDEO.
*TV-RGB: Choose this setting if your DVD player is connected to a TV with a scart cable.
*S-VIDEO: Choose this setting if your DVD player is connected to a TV with a S-VIDEO cable or composite video cables.
TV TYPE
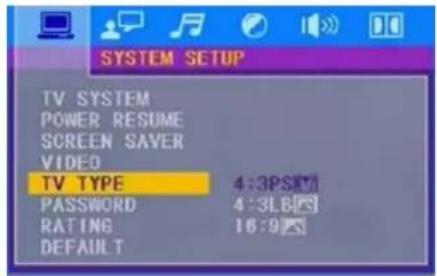
*4:3PS (Pan&Scan): Choose this setting if your DVD player is connected to a normal ratio TV. You can fill the movie to the entire screen of your TV. This might mean that parts of the picture (the left and right edges) won't be seen.
*4:3LB (Letter Box): Choose this setting if your DVD player is connected to a normal ratio TV, connector you will see the movies in their original aspect ratio (height-to-width ratio).you will see the entire frame of the movie, but if will take up a smaller portion of the screen vertically, the movie might appear with black bars at the top and bottom of the screen.
*16:9 (Wide Screen): Choose this setting if your DVD player is connected to a wide screen TV. If you choose this setting and you don't have a wide screen TV, the images on the screen may appear distorted due to vertical compression.
DVD Operation
PASSWORD
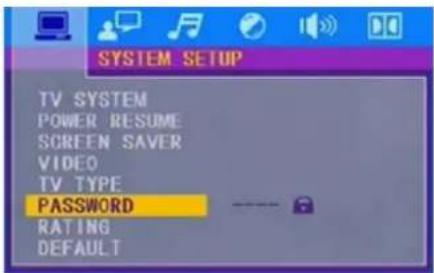
The password option is initialized locked, and you cannot set the ratings limit or change the password in order for the Ratings feature work, the password mode must be turned on. If you want to set the ratings limit, you will need to enter the default password, which is 0000, and then press ENTER to confirm. To change the password, you will be prompted for the old password, then be prompted for a new one, entering a 4 digital number (this is your password).
RATING
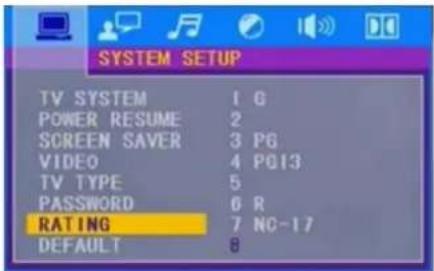
The rating feature is a rating limit system, like movie rating. It works with DVD discs that have been assigned a rating. This helps you control the types of DVDs that your family watches.
There are eight rating options as shown in the figure.
Notes: If the password option is locked, you can not set the ratings limit. The rating limit does not work when the password option unlocked.
RATING
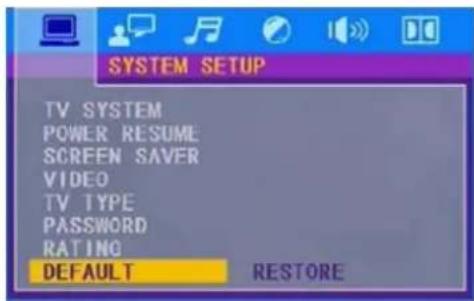
Choose this option to resume all the setup options to default settings.
DVD Operation
2) LANGUAGE SETUP
The language setup page is displayed as below:

*OSD LANGUAGE: you can select the OSD language among: ENGLISH, SPANISH, FRENCH and ITALIAN.
*AUDIO LANG: you can select the AUDIO language among: ENGLISH, FRENCH, GERMAN, ITALIAN, CZECH and SPANISH.
*SUBTITLE LANG: you can select the SUBTITLE language among: ENGLISH, FRENCH, GERMAN, ITALIAN, CZECH and SPANISH.
*MENU LANG: you can select the MENU language among: ENGLISH, FRENCH, GERMAN, ITALIAN, CZECH and SPANISH.
3) AUDIO SETUP
The audio setup page is displayed as below:
AUDIO OUT
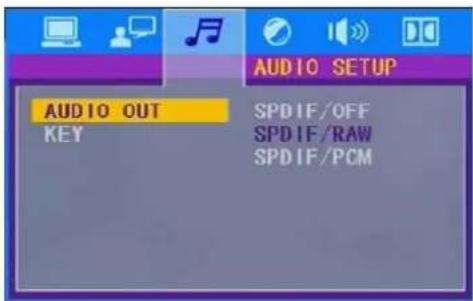
SPDIF/OFF: From the Coaxial Output jack and the Optical Output jack, no signal is output.
SPDIF/RAW: Choose this setting if your DVD player is connected to a power amplifier with a coaxial cable or an optical cable, When playing a disc recorded with Dolby Digital, MPEG audio formats, the corresponding digital signals will be output from the Coaxial Output jack or Optical Output jack, This player's digital output jacks are designed for a connection be a Dolby Digital, or MPEG receiver or decoder.
SPDIF/PCM: Choose this setting if your DVD player is connected to a 2-channel digital stereo amplifier, when playing a disc recorded with Dolby Digital and MPEG audio formats, audio signals will be modulated into a 2-channel PCM signal, and it will be output form the Coaxial Output jack or Optical Output jack.
DVD Operation
KEY
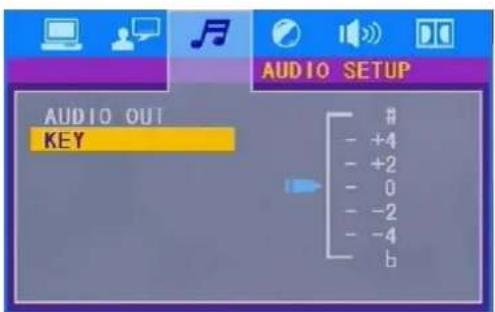
Use the ↑ buttons to adjust the tone among a certain range.
4) VIDEO SETUP
The video setup page is displayed as below:
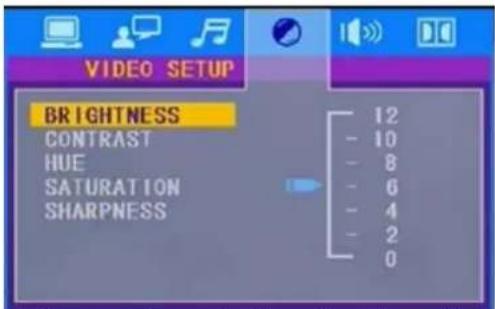
Use the ↑/ ↓ buttons on the remote control to adjust the value of the BRIGHTNESS, CONTRAST, HUE, SATURATION and SHARPNESS among a certain range.
5) SPEAKER SETUP
The speaker setup page is displayed as below:
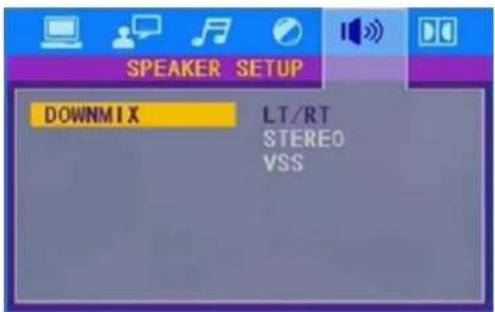
LT/RT: Choose this setting, it will be sound like in a movie theatre if the original movie the disc was recorded from was encoded in the Pro Logic Dolby Digital format.
STEREO: Choose this setting, when 5.1 channel sound playing, two channels of signals will be output from the left and right soundtrack; when 2 channel sound playing, stereo signal will be output.
VSS: Choose this setting, when a disc recorded with 5.1 channel sound format.
DVD Operation
6) DIGITAL SETUP
The digital setup page is displayed as below:
DYNAMIC RANGE

DYNAMIC RANGE: Choose this setting to adjust the line out ratio and get different effect, If adjusting to FULL, the audio signal peak value will be the minimum, while adjusting to OFF, maximum.
DUAL MONO
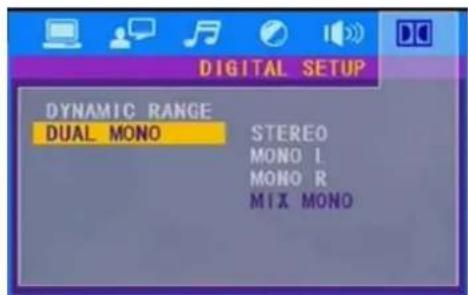
Choose this option to set the L and R mono output mode, there are four modes in this option: STEREO, MONO L, MONO R and MIX MONO, it is mainly used in Karaoke mode.
Radio Operation
With the unit you can listen radio by using the FM/AM Radio Tuner. Please connect the player to a roof antenna or plug the FM antenna into the FM antenna jack or connect the AM loop antenna.
How to change to the Radio mode?
Press the FUNCTION button to select the radio mode. Then use the FM/AM button to switch between FM or AM band.
If you use the first time the Radio, you should start to search the Radio stations.
AUTO SEARCH
Press the SEARCH button on the remote control or AUTO button on the main unit to start the searching automatically.
MANUAL SEARCH
Press the TUNING+/- buttons on the remote control to adjust the frequency step by step manually.
SELECTING CHANNEL
Press the CH+/- buttons on the main unit or CHANNEL+/- buttons on the remote control to select channel up or down.
MEMORY
Press the MEMORY button on the remote control to store channel. If you have searched a Radio station by manual search, you can store it with the optional Memory. Press the numeric buttons to input the channel number, then press MEMORY button to store it.
Troubleshooting
FOR DVD
| Symptom | Correction |
| No power | Check if AC adapter of power is connected securely. Switch the device On by pressing the power button. |
| No sound | Ensure that the equipment is connected properly Ensure that the input settings for the TV and stereo system are proper. Please make sure, that the audio track exists on the disc. Control the volume. |
| No key operation | Turn the unit off and then back to on. Disconnect the unit from power and from battery and connect them again. |
| No playback | Wrong disc, please use only DVD, CD or ISO Data disc The disc may be dirty and require cleaning. Ensure that the disc is installed with the label side up. The disc has too many scratches. Remove the laser pickup protection on the disc tray. The DVD+/-RW should be finalized. Wrong region code by the Video-DVD Cancel the parental lock function or change the parental lock level. Check TV type is correct: PAL/NTSC. Adjust the vertical hold on your TV. |
| No remote control | Are the polarities of the batteries correct? Batteries are depleted. Please uses new one. Point the remote control unit at the Infrared sensor and operate. Remove the obstacles between the remote control and the Inferred sensor. Operate the remote control unit at a distance of not more than 5 meters from the Infrared sensor. |
Troubleshooting
FOR RADIO
No Signal
- Please check if unit is in Radio mode? If not please switch to this mode. Please press the FUNCTION button until RADIO appears on the screen.
- Please make sure, that you receive really analogue Radio signals.
Bad reception quality?
- Please, align your antenna optimally. Use an antenna with active amplifier (house antenna or roof antenna). If you have moved the unit, adjust the antenna again or connect an active antenna.
- Please fine tune the distorted Radio channel.
Specification
General
Power
AC: AC 100-240V 50/60 Hz
Power consumption: ≤50 W
Radio Tuner
Frequency FM 87.5 - 108MHz
AM 522-1620KHz
S/N Ratio > 46 dB
Monophonic > 46 dB
DVD-Player
TV System NTSC/PAL
Resolution Ratio Greater Than 500 lines
Video S/N Ratio 65 dB
Frequency Response 96 kHz /24bit
4 Hz - 44 kHz +/-2 dB
Audio S/N Ratio 95 dB
Degree of Distortion <0.01%
D/A Converter 192 kHz / 24 bit
Video Out 1 V p-p
S-Video Out Y: 1 V p-p (75)
S-Video Out C: 0.3 V p-p (75)
Interface
Video: CVBS (RCA), S-Video, SCART, Y/Pb/Cb/Pr/Cr output
Audio: Stereo (RCA), digital coaxial
RF-Antenna FM/AM Radio
This product's packing materials are recyclable and can be reused. Please dispose of any materials in accordance with your local recycling regulations.
This product consists of materials which can be recycled and reused if disassembled by a specialized company.
Batteries should never be thrown away or incinerated but disposed of in accordance with your local regulations concerning chemical wastes.


MARQUANT®
Gebruiksaanwijzing
REP:[OFF]→ REP:[CHAPTER]→ REP:[TITLE] → REP:[ALL]
flowchart
graph TD
    A["SCART OUTPUT"] --> B["SCART OUT"]
    B --> C["SCART IN"]
    C --> D["Télévision normale"]
CONNEXIONS A LA SORTIE AUDIO/VIDEO
flowchart
graph TD
    A["BRANCH"] --> B["BRANCH BLANC"]
    C["ROUGE"] --> D["ROUGE BLANC"]
    E["JAUNE"] --> F["JAUNE BLANC"]
    G["JAUNEROUGE"] --> H["JAUNEROUGE BLANC"]
    I["BRANCH"] --> J["BRANCH ROUGE"]
    K["BRANCH"] --> L["BRANCH ROUGE"]
    M["BRANCH"] --> N["BRANCH ROUGE"]
    O["BRANCH"] --> P["BRANCH ROUGE"]
    Q["BRANCH"] --> R["BRANCH ROUGE"]
    S["BRANCH"] --> T["BRANCH ROUGE"]
    U["BRANCH"] --> V["BRANCH ROUGE"]
    W["BRANCH"] --> X["BRANCH ROUGE"]
    Y["BRANCH"] --> Z["BRANCH ROUGE"]
    AA["BRANCH"] --> AB["BRANCH ROUGE"]
    AC["BRANCH"] --> AD["BRANCH ROUGE"]
    AE["BRANCH"] --> AF["BRANCH ROUGE"]
    AG["BRANCH"] --> AH["BRANCH ROUGE"]
    AI["BRANCH"] --> AJ["BRANCH ROUGE"]
    AK["BRANCH"] --> AL["BRANCH ROUGE"]
    AM["BRANCH"] --> AN["BRANCH ROUGE"]
    AO["BRANCH"] --> AP["BRANCH ROUGE"]
    AQ["BRANCH"] --> AR["BRANCH ROUGE"]
    AS["BRANCH"] --> AT["BRANCH ROUGE"]
    AU["BRANCH"] --> AV["BRANCH ROUGE"]
    AW["BRANCH"] --> AX["BRANCH ROUGE"]
    AY["BRANCH OUT"] --> AZ["VIDEO OUT"]
    BA["Vers des prises TV composite AUDIO/VIDEO OUTPUT"] --> BB["AUDIO OUTPUT"]
Connexions
REP:[OFF]→ REP:[CHAPTER]→ REP:[TITLE] → REP:[ALL]
Fonction multi-angles


- Safety Information
- User Manual
- Laser
- Operation
- Locations and Function of the Player
- Front Panel
- Notes:
- Playback Content from USB or CARD
- Note:
- Rear Panel
- Elements of the rear side
- Connection
- Connecting to TV/Amplifier
- Connecting the Speakers
- Place the Speakers
- Connect the Speakers
- Connecting Antennas
- AM indoor loop antenna
- Connect the AM Antenna
- FM indoor antenna
- Basic connection:
- Remote Control
- Insert batteries and Operation radius
- Buttons of the Remote Control:
- DVD Operation
- ※ STOP PLAYBACK
- ※ RAPID FORWARD/RAPID REVERSE
- Multi-audio Language Function
- Multi-angle Function
- ※ PROGRAM PLAY
- For VCD/CD/MP3:
- For DVD:
- 1) SYSTEM SETUP
- TV SYSTEM
- POWER RESUME
- SCREEN SAVER
- VIDEO
- TV TYPE
- PASSWORD
- RATING
- 2) LANGUAGE SETUP
- 3) AUDIO SETUP
- AUDIO OUT
- KEY
- 4) VIDEO SETUP
- 5) SPEAKER SETUP
- 6) DIGITAL SETUP
- DYNAMIC RANGE
- DUAL MONO
- Radio Operation
- AUTO SEARCH
- MANUAL SEARCH
- SELECTING CHANNEL
- MEMORY
- Troubleshooting
- FOR RADIO
- No Signal
- Bad reception quality?
- Specification
- General
- Power
- Radio Tuner
- DVD-Player
- Interface
- MARQUANT®
- Gebruiksaanwijzing
- Connexions
- Fonction multi-angles
Brand : Marquant
Model : MHA061
Category : Hi-fi system