
MHA044 - Hi-fi system Marquant - Free user manual and instructions
Find the device manual for free MHA044 Marquant in PDF.
| Product Type | Micro Hi-Fi System |
| Model | MHA044 |
| Brand | Marquant |
| Power Supply | 230 V AC, 50 Hz |
| Radio Bands | AM, FM (stereo) |
| FM Frequency Range | 88 – 108 MHz |
| AM Frequency Range | 540 – 1600 kHz |
| Speakers | 4 ohms, 3-5 W x 2 |
| Output Power | 2 x 2 W RMS (10% THD), 2 x 4 W music |
| Headphone Impedance | 32 ohms |
| Players | CD, MP3, USB, SD/MMC |
| Track Programming | Up to 20 tracks |
| Repeat Modes | Single track, all, random |
| Remote Control | Yes, with AAA batteries (2 x LR03) |
| Remote Control Range | Approximately 6 meters |
| FM Antenna | Extendable wire |
| AM Antenna | Built-in ferrite |
| Maintenance | Clean with a soft, dry cloth |
| Safety | Do not expose to moisture or heat sources |
Frequently Asked Questions - MHA044 Marquant
User questions about MHA044 Marquant
0 question about this device. Answer the ones you know or ask your own.
Ask a new question about this device
Download the instructions for your Hi-fi system in PDF format for free! Find your manual MHA044 - Marquant and take your electronic device back in hand. On this page are published all the documents necessary for the use of your device. MHA044 by Marquant.
USER MANUAL MHA044 Marquant
natural_image
Line drawing of a microwave oven with control panel and remote control (no text or symbols)CARE RELATING TO THE UNIT
SAFETY
Before use, ensure that the unit is suited to the local mains power supply.
Unplug the unit from the mains by pulling on the plug and not on the power cord.
As long as the unit is plugged into a wall power outlet it is connected to the mains power even if it is switched off.
Immediately unplug the unit if any liquid or object enters it. Do not return it to service without an expert examination.
Never open the casing. The laser beam used inside the case may cause harm to eyes. All repairs should be performed by a qualified service technician.
WARNING TO AVOID ANY FIRE OR ELECTRIC SHOCK HAZARD, NEVER EXPOSE THE UNIT TO
RAIN OR DAMP.
WARNING ON LIQUIDS
The unit must never be exposed to dripping water or splashing and no liquid filled object (vase, etc.) should be placed on top of it.
WARNING ON VENTILATION
Using the unit must not interfere with its normal ventilation.
This symbol means that the unit is double insulated. It does not require an earth ground.
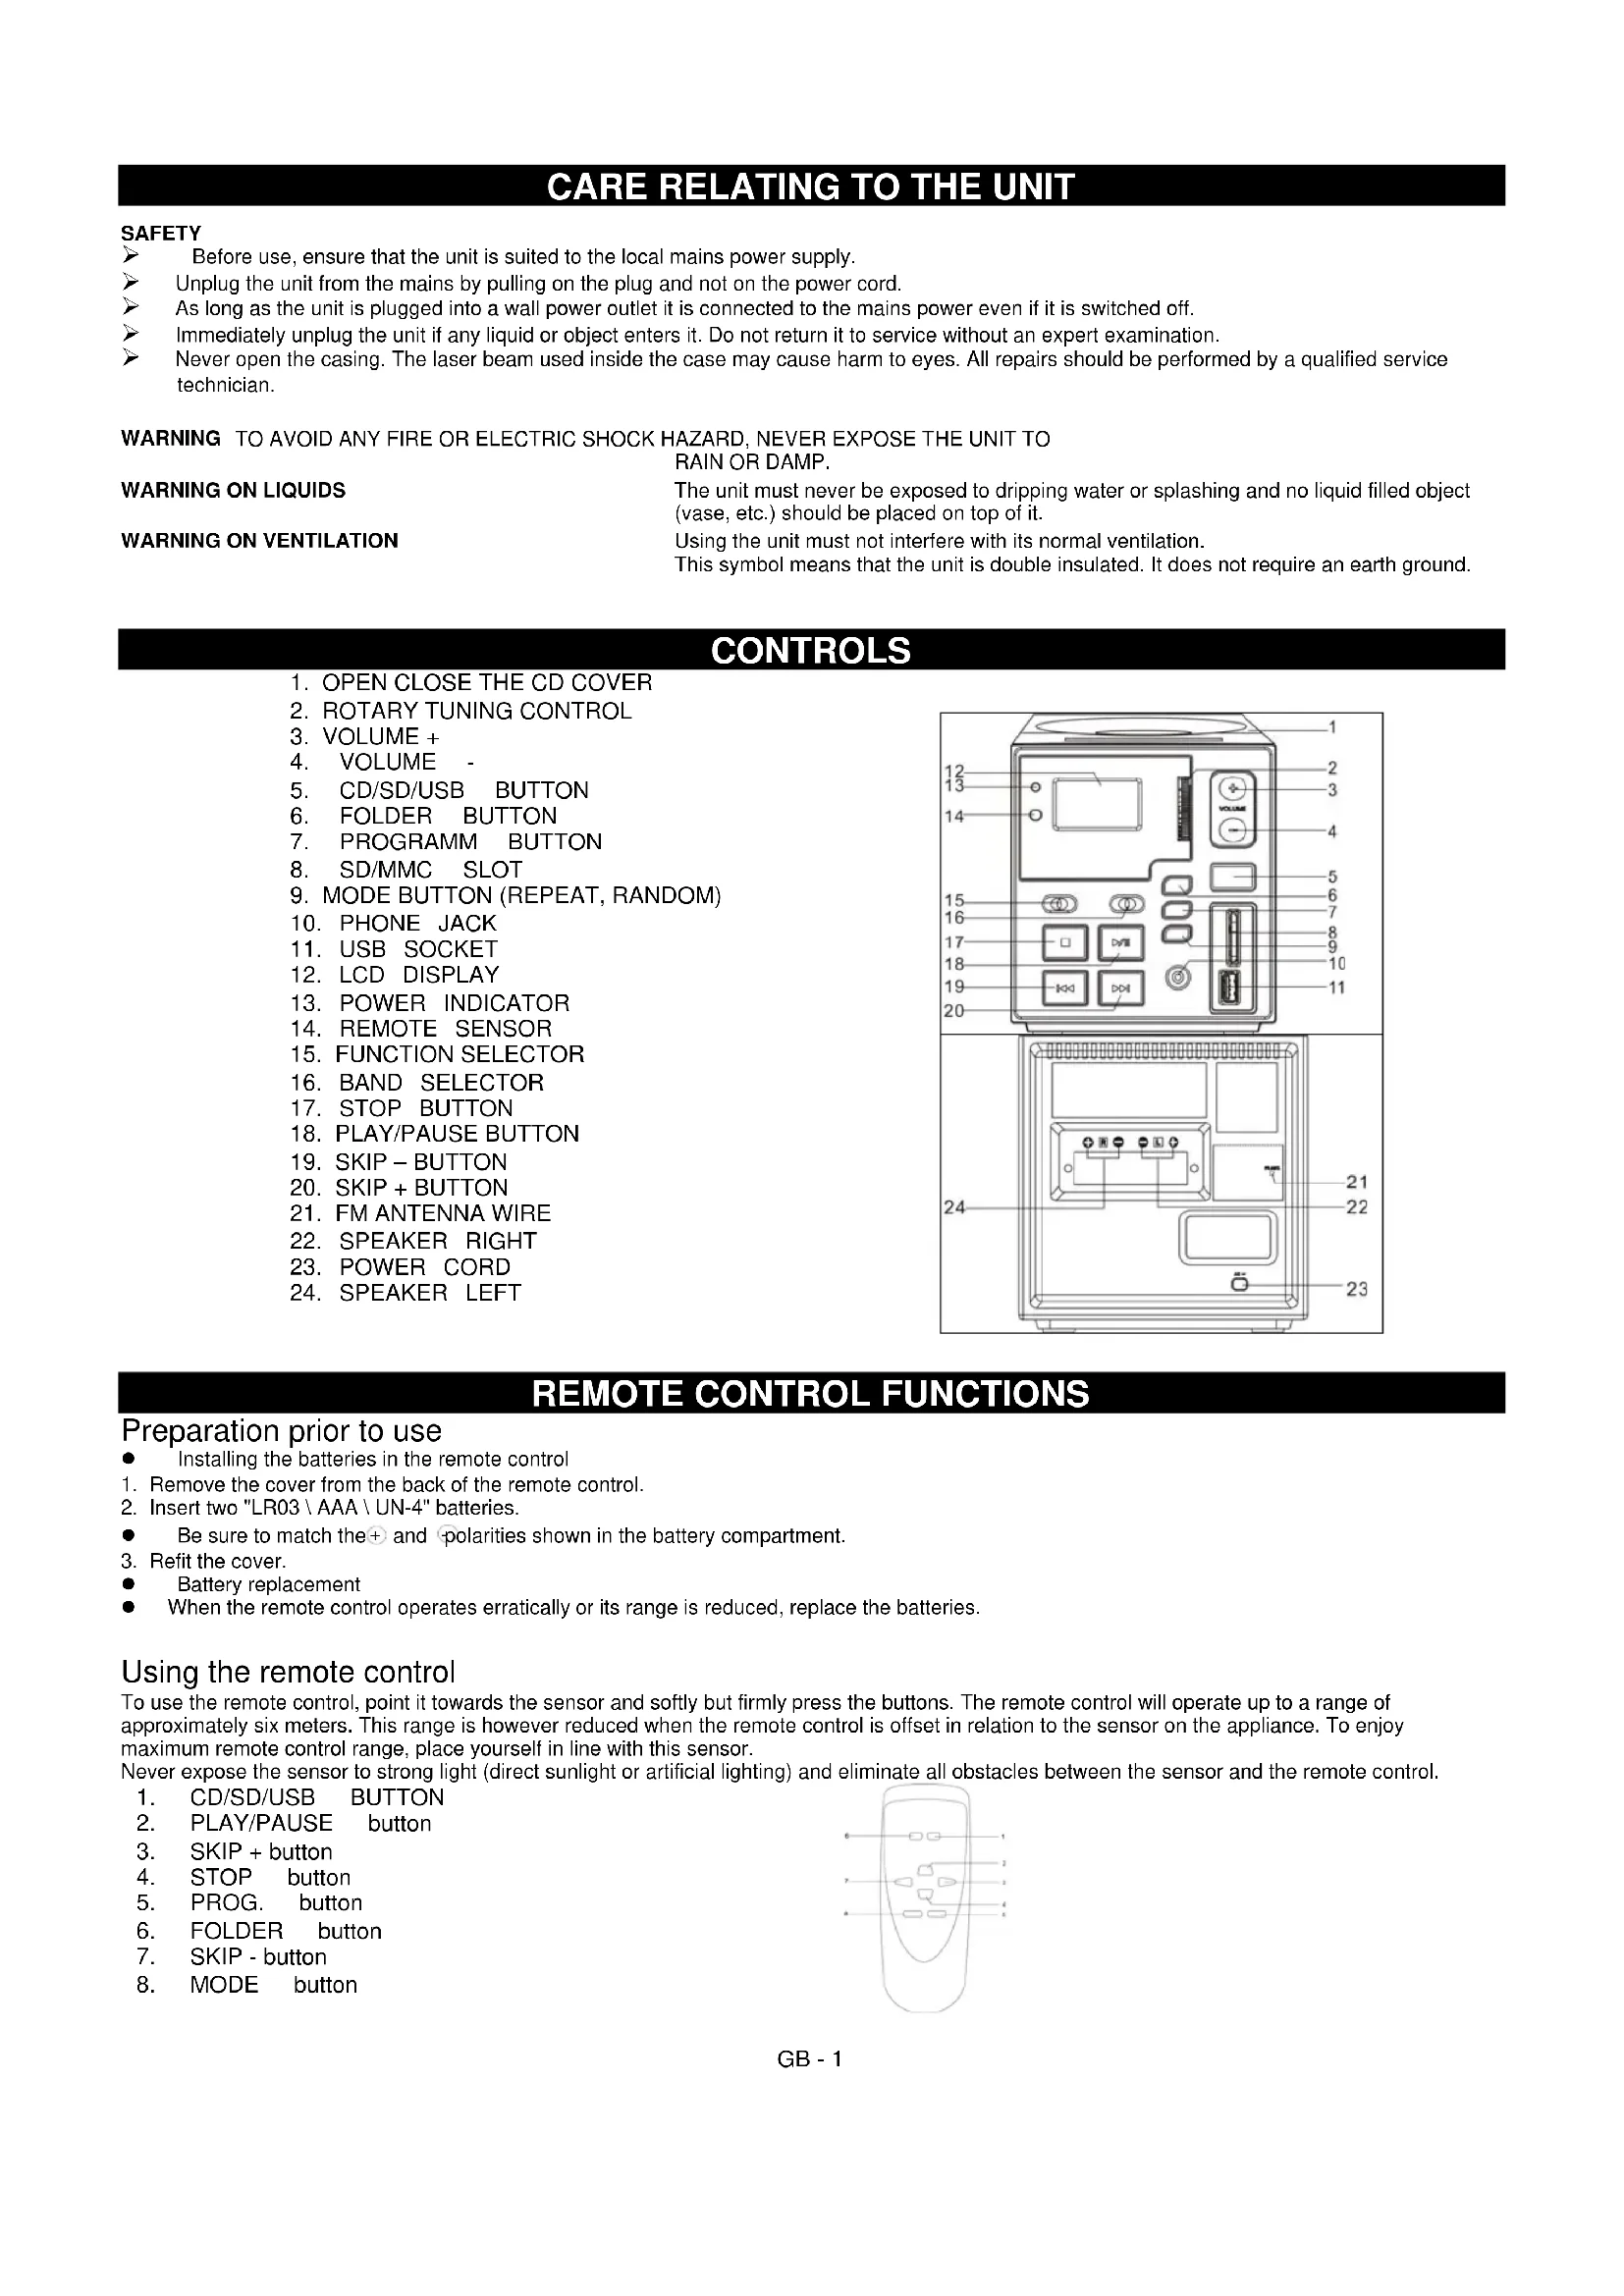
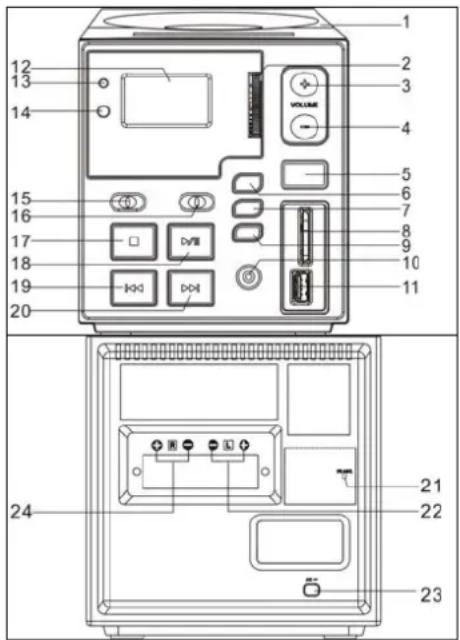
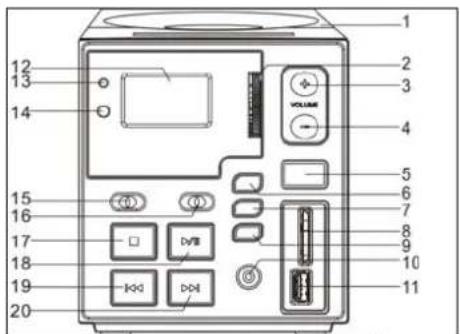
CONTROLS
- OPEN CLOSE THE CD COVER
- ROTARY TUNING CONTROL
- VOLUME +
- VOLUME -
- CD/SD/USB BUTTON
- FOLDER BUTTON
- PROGRAMM BUTTON
- SD/MMC SLOT
- MODE BUTTON (REPEAT, RANDOM)
- PHONE JACK
- USB SOCKET
- LCD DISPLAY
- POWER INDICATOR
- REMOTE SENSOR
- FUNCTION SELECTOR
- BAND SELECTOR
- STOP BUTTON
- PLAY/PAUSE BUTTON
- SKIP-BUTTON
- SKIP + BUTTON
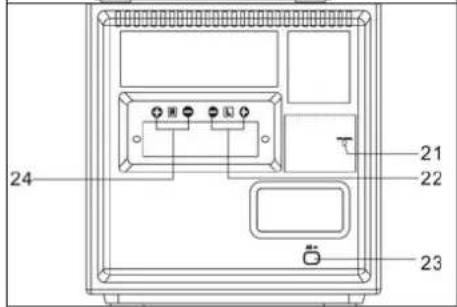
- FM ANTENNA WIRE
- SPEAKER RIGHT
- POWER CORD
- SPEAKER LEFT
REMOTE CONTROL FUNCTIONS
Preparation prior to use
● Installing the batteries in the remote control
1. Remove the cover from the back of the remote control.
2. Insert two "LR03\AAA\UN-4" batteries.
- Be sure to match the + and - polarities shown in the battery compartment.
3. Refit the cover.
● Battery replacement
- When the remote control operates erratically or its range is reduced, replace the batteries.
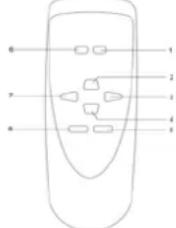
Using the remote control
To use the remote control, point it towards the sensor and softly but firmly press the buttons. The remote control will operate up to a range of approximately six meters. This range is however reduced when the remote control is offset in relation to the sensor on the appliance. To enjoy maximum remote control range, place yourself in line with this sensor.
Never expose the sensor to strong light (direct sunlight or artificial lighting) and eliminate all obstacles between the sensor and the remote control.
- CD/SD/USB BUTTON
- PLAY/PAUSE button
- SKIP + button
- STOP button
- PROG. button
- FOLDER button
- SKIP - button
- MODE button
CONNECTING THE SPEAKERS
Connect the speakers to the red and black terminals on the back of the unit as described here. Connect the R terminals to the right hand speaker and the L terminals to the left hand speaker. Lower the red or black tab, insert the speaker cable, then release the tab to hold the cable in place.
MAINS CONNECTION
Make sure that all of the components and the speakers are connected correctly.
Check that the voltage level required by your equipment matches the local mains supply, namely 230 VAC - 50 Hz.
Plug the unit into the wall outlet.
HEADPHONES
Make sure that your headphones have a 3.5 mm stereo jack and an operating impedance of 8-32 ohms. The speakers are automatically switched off when headphones are connected.
- Select the RADIO mode.
- Choose the radio ware band (AM, FM or FM ST) using the BAND selector.
■ Search for the station of your choice using the Tuning knob. - To switch off the radio, select the CD mode or press the On/Off button.
NOTE: For optimum FM radio reception, extend the FM antenna wire. For AM radio reception, a ferrite antenna built into the unit is used. To improve reception quality, rotate the unit.
When FM stereo signals are too weak or when the background noise level is too great, we recommend selecting the FM (mono) band.
PLAYING A COMPACT DISC
■ Select the CD mode.
- Press the CD player open button, place a disc in the centre of the tray, and label side up, then slowly close the cover.
The display shows the number of tracks.
- Press PLAY once the CD is inserted to start playing the first track.
- To pause play, press the PLAY/PAUSE button. To resume play, press the PLAY/PAUSE button again.
- To stop playing the CD, press the STOP button.
SELECTING A TRACK IN STOP MODE
- Press SKIP/SEARCH Up or Down until the required track number is displayed.
- Press PLAY/PAUSE to start playing the selected track. The LCD display shows the selected track number.
- You can move to the next track by pressing the SKIP Up button. Play moves forward by one track every time the SKIP Up button is pressed.
- When you press the SKIP Down button in Play mode, you go back to the start of the current track. If you press this button more than once, every time you press it, you move back by a track.
SEARCHING FOR A SPECIFIC PASSAGE
During Play, hold the SKIP Up/Down button to fast forward or reverse the track until you reach a specific passage you wish to hear. Playback is speeded up and the volume reduced. Playback returns to normal once the SKIP Up/Down button is released.
PROGRAMMING TRACKS
You can program up to 20 tracks in any order.
■ Select the CD function.
- Press the PROG button.
- Press the SKIP Up/Down button to select the track number you wish to add to your programming.
- Once you have selected the track number of your choice, press the PROG button.
- Repeat steps 2 to 4 to add more tracks.
■ Once all of the tracks you wish to hear have been programmed, press the PLAY/PAUSE button to start playing the programmed selection. Play starts from the beginning of the first track programmed.
The programming stored in memory is cleared when you select the Radio function or when you switch off the unit.
MODE BUTTON (REMOTE CONTROL ONLY)
To repeat one or all tracks, press the MODE button before or during play. Press the MODE button once to repeat only the track currently being played, press this same button twice to repeat the entire CD and three times to select the Random mode. Press this button once again to return to the normal mode.

flowchart
graph LR
    A["REPEAT ONE"] --> B["RANDOM REPEAT OFF"]
    B --> C["-->"]
    C --> D["-->"]
PLAYING AN MP3 CD
- Select the CD/MP3/USB Mode function.
The display shows the total number of tracks. - Press the Play button to start playing the first track.
- To suspend play, press the PLAY/PAUSE button then press this button again to return to the normal play mode.
- To select the Folder, use the remote control. Press the Folder |<< and >>| buttons to select the next or previous folder.
- To stop playing the CD, press the STOP button.
PROGRAMMING TRACKS
- You can program up to 20 tracks in any order.
■ Select the CD/MP3/USB Mode function. - Press the PROG button.
- Press the SKIP Up/Down button or the FOLDER |<< / >>| buttons to select the track or folder number that you wish to add to your programming.
■ Once you have selected the track of your choice, press the PROG button. - Repeat steps 2 to 4 to add more tracks.
- Once all of the tracks you wish to hear have been programmed, press the PLAY/PAUSE button to start playing the programmed selection. Play starts from the beginning of the first track programmed.
The programming stored in memory is cleared when you select the Radio function or when you switch off the unit.
MODE BUTTON (IN USB AND MP3 MODES)
To repeat one or all tracks, press the MODE button before or during play. Press the MODE button once to repeat only the track currently being played, press this same button twice to repeat the entire CD and three times to select the Random mode. Press this button once again to return to the normal mode.

flowchart
graph LR
    A["REPEAT ONE"] --> B["REPEAT ALBUM"]
    B --> C["REPEAT ALL"]
    C --> D["RANDOM"]
    D --> E["REPEAT OFF"]
USB AND SD/MMC SOCKET FUNCTION
■ Select the CD/MP3/USB Mode function.
- Press the CD/USB button to change to the USB or SD/MMC mode.
The display shows the total number of tracks present on the media connected to the USB port or SD/MMC port.
■ Press the Play button to start playing the first track.
- Press the CD/USB button again and change back to CD mode.
SPECIFICATIONS
■ Mains supply: 230V AC - 50Hz
■ Radio bands: AM, FM (stereo)
■ Frequency range: FM 88 – 108MHz
AM 540 – 1600kHz
■ Speakers: 4 ohms 3-5W x 2
■ Output power: 2 x 2W RMS, 10% THD (2 x 4W music)
- Headphone impedance: 32 ohms
BEDIENINGEN
-
OPEN/SLUIT HET CD-KLEPJE
-
ROTERENDE AFSTEMREGELING
-
VOLUME +
-
VOLUME -
-
CD/SD/USB TOETS
-
FOLDER TOETS
-
PROGRAMM TOETS
-
SD/MMC INANG
-
MODE TOETS (HERHAAL, WILLEKEURIG)
-
HOOFDTELEFOONINGANG
-
USB INANG
-
LCD DISPLAY
-
AAN/UIT INDICATOR
-
AFSTANDSSENSOR
-
FUNCTIE KEUZESCHAKELAAR
-
BAND KEUZESCHAKELAAR
-
STOP TOETS
-
PLAY/PAUSE TOETS
-
SKIP - TOETS
-
SKIP + TOETS
-
FM ANTENNEDRAAD
-
LUIDSPREKER RECHTS
-
VOEDINGSKABEL
-
LUIDSPREKER LINKS
FUNCTIES VAN DE AFSTANDSBEDIENING
natural_image
Line drawing of a remote control with labeled buttons (no text or symbols beyond basic labels)DE LUIDSPREKERS AANSLUITEN
flowchart
graph LR
    A["REPEAT ONE REPEAT ALL RANDOM REPEAT OFF"] --> B["→"]
    B --> C["→"]
EEN MP3 CD AFSPELEN
FONCTIONS DE LA TÉLÉCOMMANDE
natural_image
Line drawing of a remote control with four slots and three buttons (no text or symbols)CONNEXION DES HAUT-PARLEURS


- CARE RELATING TO THE UNIT
- SAFETY
- CONTROLS
- REMOTE CONTROL FUNCTIONS
- Preparation prior to use
- Using the remote control
- CONNECTING THE SPEAKERS
- MAINS CONNECTION
- HEADPHONES
- PLAYING A COMPACT DISC
- SELECTING A TRACK IN STOP MODE
- SEARCHING FOR A SPECIFIC PASSAGE
- PROGRAMMING TRACKS
- MODE BUTTON (REMOTE CONTROL ONLY)
- PLAYING AN MP3 CD
- MODE BUTTON (IN USB AND MP3 MODES)
- USB AND SD/MMC SOCKET FUNCTION
- SPECIFICATIONS
- BEDIENINGEN
- FUNCTIES VAN DE AFSTANDSBEDIENING
- DE LUIDSPREKERS AANSLUITEN
- EEN MP3 CD AFSPELEN
- FONCTIONS DE LA TÉLÉCOMMANDE
- CONNEXION DES HAUT-PARLEURS
Brand : Marquant
Model : MHA044
Category : Hi-fi system