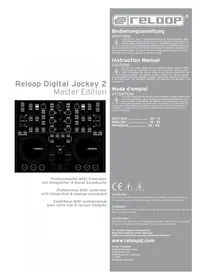
Digital Jockey Controller edition - Mixer Reloop - Free user manual and instructions
Find the device manual for free Digital Jockey Controller edition Reloop in PDF.
| Product Type | Professional MIDI DJ Controller |
| Brand | Reloop |
| Model | Digital Jockey Controller Edition |
| Power Supply | 230 V AC, 50 Hz via external power adapter; also USB powered |
| Connectivity | USB 2.0 (Plug-and-Play, no driver required under Windows XP/Vista/Mac OS X); headphone output (mini-jack); microphone input |
| Jog Wheels | 2 oversized high-resolution jog wheels with Pitch Bend, Scratch, Search and effects modulation functions |
| Crossfader | Adjustable curve (Long/Cut) for smooth or sharp transitions |
| Equalizer | 3-band per channel with Kill function (cut) per band (LED indicator) |
| Pitch fader | Adjustable ranges: ±4%, ±8%, ±16%, ±100% |
| Speed Control | Pitch Bend, Key Lock, Sync |
| Loops | Manual (In/Out) and automatic (Beat Tact, adjustable from 1/8 to 8/1) |
| Samples | 2 banks (Hot Cue/Loop memory) with volume/length encoder |
| Effects | 8 built-in effects (Delay, Skid, Filter, Phase, Flanger, Echo, Trans, Pan) with 2 adjustable parameters per effect |
| Displays | Full view, needle view, info view (BPM, duration, pitch, etc.) |
| Compatible Software | Reloop Attack (included), Traktor 3 LE (included), Traktor 3 Studio (upgrade) |
| Minimum System Requirements | Intel Pentium 4 1 GHz, 512 MB RAM, DirectX or ASIO compatible sound card |
| Maintenance | Clean with a slightly damp cloth; do not use solvents or aerosols; regular check of cables and jog wheels |
| Safety | Do not expose to moisture or extreme temperatures (5°C to 35°C); unplug before cleaning; maintenance by qualified personnel |
| Spare Parts / Repairability | Fuses replaceable with identical model; no internal parts accessible except by authorized technician |
| Warranty | The warranty is void in case of unauthorized modification or improper use |
Frequently Asked Questions - Digital Jockey Controller edition Reloop
User questions about Digital Jockey Controller edition Reloop
0 question about this device. Answer the ones you know or ask your own.
Ask a new question about this device
Download the instructions for your Mixer in PDF format for free! Find your manual Digital Jockey Controller edition - Reloop and take your electronic device back in hand. On this page are published all the documents necessary for the use of your device. Digital Jockey Controller edition by Reloop.
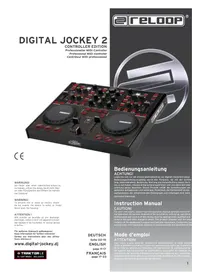
USER MANUAL Digital Jockey Controller edition Reloop
Professional MIDI controller
For your own safety, please read this operation manual carefully before initial operation. All persons involved in the installation, setting-up, operation, maintenance and service of this device must be appropriately qualified and observe this operation manual in detail. This product complies with the requirements of the applicable European and national regulations. Conformity has been proven. The respective statements and documents are deposited at the manufacturer.
C E
WARNING!
To prevent fire or avoid an electric shock do not expose the device to water or fluids! Never open the housing.
ATTENTION!
-LVI-,Delete Playlist"
-LX- "Delete Selected Files"
3.3. Transport Controls
Audio System Settings
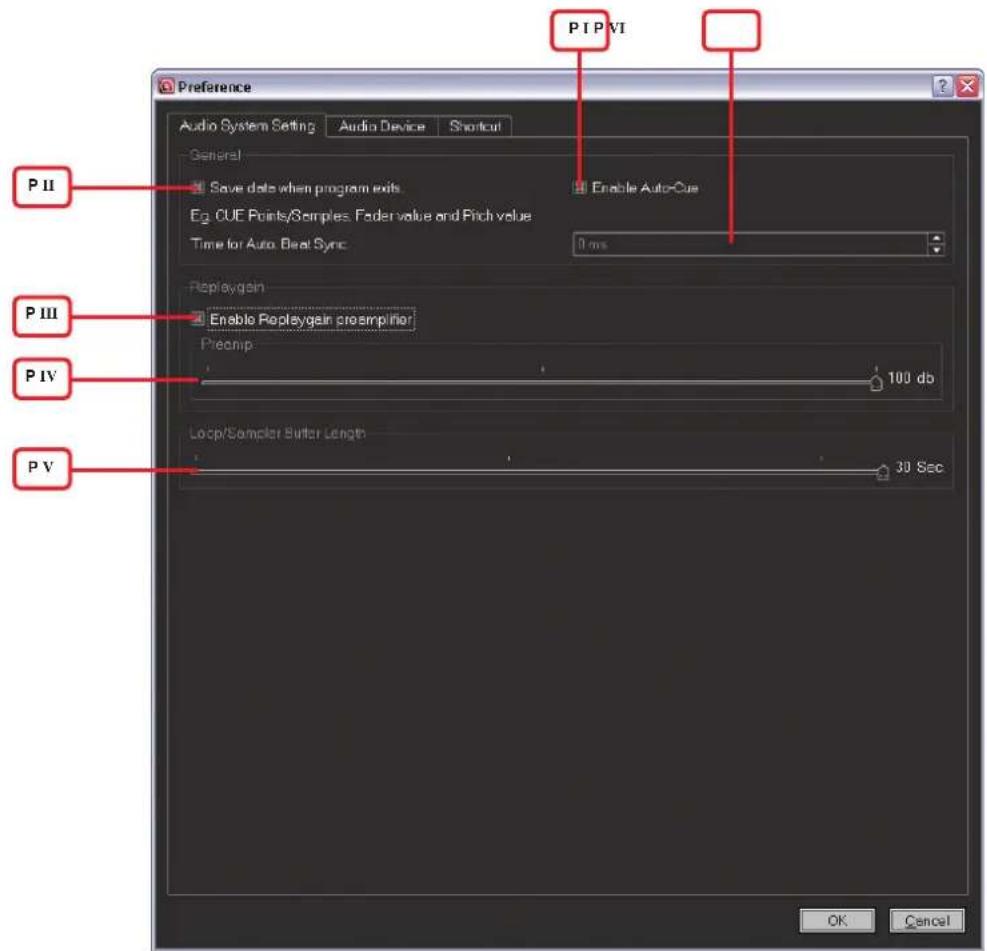
PI: Enable Auto Cue
PV: Loop/Sampler-Buffer Length
PVII: 1st Audio Device
PVIII / PIN / PX: 2nd Audio Device
PXI / PXII: 3rd Audio Device
PXIV / PXV / PXVI: Channel Setting
Congratulations on purchasing your Digital Jockey Controller Edition. Thank you for placing your trust in our disc jockey technology. Before operating this equipment we ask you to carefully study and observe all instructions.
Please remove the Digital Jockey from its packaging. Check before initial operation to make sure that the device has not been visibly damaged during transport. If you detect any damage to the power cable or the casing, do not operate the device. Contact your specialised dealer.
SAFETY INSTRUCTIONS
CAUTION!
Please exercise particular caution when handling 240 V power voltage. This voltage rating may lead to a critical electrical shock! Any damage caused by the non-observance of this operation manual excludes any warranty claims. The manufacturer is not liable for any damage to property or for personal injury caused by improper handling or non-observance of the safety instructions.
- This device left the factory in perfect condition. To maintain this condition and to ensure a risk-free operation the user must observe the safety instructions and warnings contained in this operation manual.
- For reasons of safety and certification (CE) the unauthorised conversion and/or modification of the device is prohibited. Please note that in the event of damage caused by the manual modification to this device any warranty claims are excluded.
- The inside of the device does not contain any parts which require maintenance, with the exception of wear parts that can be exchanged from the outside. Qualified staff must carry out maintenance, otherwise the warranty does not apply!
- The Fuse must exclusively be exchanged against fuses of the same class, with the same trigger features and nominal current rating.
- Ensure that the power will only be supplied after the device has been fully set up. Always plug in the mains plug last. Ensure that the mains switch is in the "OFF" position when connecting the device to power.
- Only use cables that comply with regulations. Observe that all jacks and bushes are tightened and correctly hooked up. Refer to your dealer if you have any questions.
- Ensure that when setting up the product the mains cable is not squashed or damaged by sharp edges.
- Prevent the mains cable from coming into contact with other cables! Exercise great care when handling mains cables and connections. Never touch these parts with wet hands!
- Connect the power cable exclusively to appropriate shock-proof outlets. The only supply point to be used is a supply outlet in accordance with specifications of the public supply network.
- Disconnect the device from the supply outlet when not in use and before cleaning! Be sure to hold the mains plug by the body. Never pull the mains cord!
- Position the device on a horizontal and stable low-flame base.
- Avoid any concussions or violent impact when installing or operating the device.
- When selecting the location of installation make sure that the device is not exposed to excessive heat, humidity, and dust. Be sure that no cables lie around openly. You will endanger your own safety and that of others!
-
Do not rest any containers filled with liquid that could easily spill onto the device or in its immediate vicinity. If, however, fluids should access the inside of the device, immediately disconnect the mains plug. Have the device checked by a qualified service technician before re-use. Damage caused by fluids inside the device is excluded from the warranty.
-
Do not operate the device under extremely hot (in excess of 35^ C) or extremely cold (below 5^ C) conditions. Keep the device away from direct exposure to the sun and heat sources such as radiators, ovens, etc. (even during transport in a closed vehicle). Never cover the cooling fan or vents. Always ensure sufficient ventilation.
- The device must not be operated after being taken from a cold environment into a warm environment. The condensation caused hereby may destroy your device. Do not switch on or operate the device until it has reached ambient temperature!
- Controls and switches should never be treated with spray-on cleaning agents and lubricants. This device should only be cleaned with a damp cloth. Never use solvents or cleaning fluids with a petroleum base for cleaning.
- When relocating, the device should be transported in its original packaging.
- When starting operation, the crossfaders and volume controls of your amplifier must be set to minimum level. Bring the loudspeaker switches into the "OFF" position. Wait between 8 to 10 seconds before increasing the volume to avoid shot noise created by transient effect, which could cause damage to loudspeakers and the diplexer.
Devices supplied by voltage should not be left in the hands of children. Please exercise particular care when in the presence of children. - At commercial facilities the regulations for the prevention of accidents as stipulated by the organization of professional associations must be observed.
- At schools, training facilities, hobby and self-help workshops the operation of the device must be monitored with responsibility by trained staff.
- Keep this operation manual in a safe place for later reference in the event of questions or problems.
APPLICATION IN ACCORDANCE WITH REGULATIONS
- This device is a professional DJ MIDI controller that can control software. The device should be connected via USB cable to a computer.
- This product is authorised for connection to 240 V, 50 Hz AC and is designed exclusively for indoor application.
- If the device is used for any other purposes than those described in the operation manual, damage can be caused to the product, leading to exclusion of warranty rights. Moreover, any other application that does not comply with the specified purpose harbours risks such as short circuit, fire, electrical shock, etc.
- The serial number determined by the manufacturer must never be removed to uphold the warranty rights.
MAINTENANCE
- Check the technical safety of the device regularly for damage to the mains line or the casing, as well as for wearout of wear parts such as rotary and sliding switches.
- If it is to be assumed that a safe operation is no longer feasible then the device must be disconnected and secured against accidental use. Always disconnect the mains plug from the outlet!
- It must be assumed that a safe operation is no longer feasible if the device bears visible defects, if the device no longer functions, following longer storage under unfavourable conditions or after major transport stress.
1. FIRST STEPS:
1.1.Hardware connections
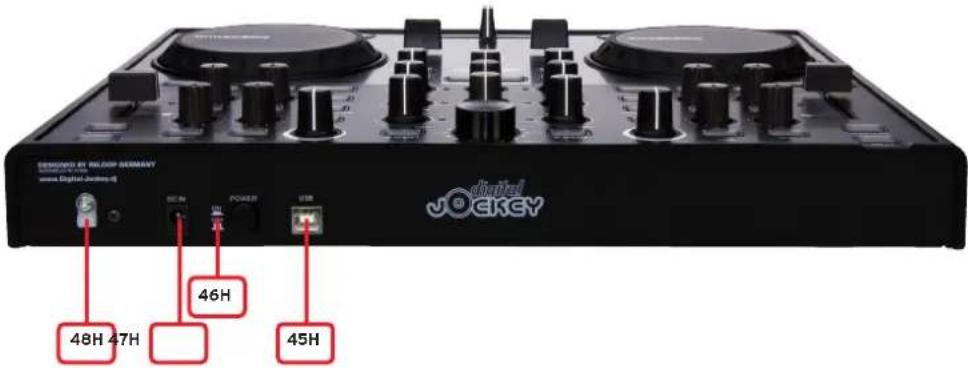
Take the Reloop Digital Jockey out of its packaging and connect the mains adapter to the DC jack on the backside of the device.
Turn on the device via the power button. The Load A and Load B buttons should light up. Please connect the provided USB cord to the controller and a free USB port of your computer.
When connecting the Digital Jockey for the first time the following messages should be displayed on your monitor, as seen under Windows XP:
a) New hardware found - Digital Jockey

b) New hardware found - USB audio device

c) New hardware found - Your new hardware is installed and ready to use.

The controller will automatically be recognised under Windows XP, Vista and Mac OS.X as Plug 'n' Play, without need for special drivers.
Now your hardware is appropriately connected to your computer.
1.2. Reloop Attack software configuration
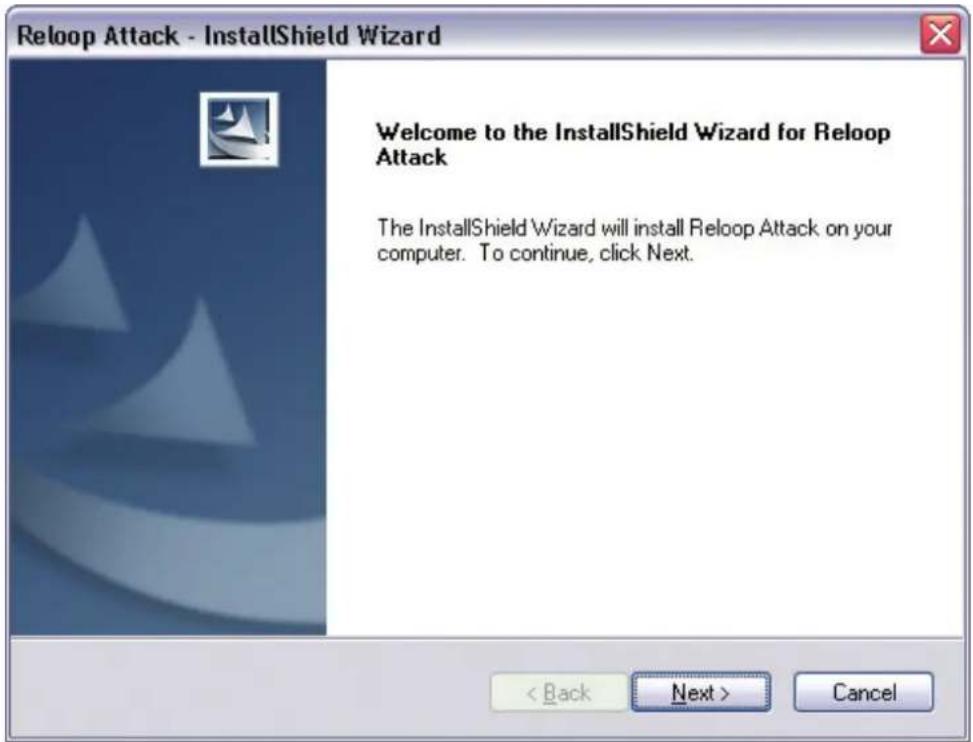
Put the provided installation CD in your CD ROM drive. An installation menu will start automatically.
NOTE!
If your CD ROM's autostart function has been disabled you can manually open the file „Autorun.exe" on the CD.
Click on „Install Reloop Attack" in order to carry out the setup.

a) Installation address of welcome
First you will see the address of welcome. Click „next“.
b) Version selection
Leave the „complete version" as it is and confirm by clicking „next".

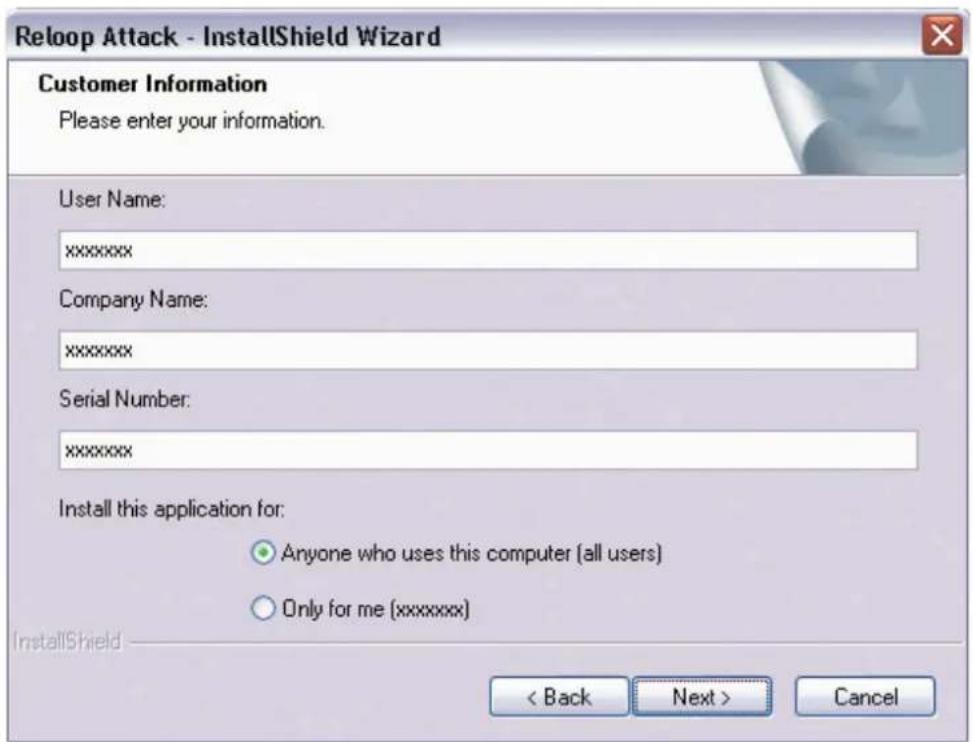
c) Customer information
Enter your data such as name, company and serial number.
NOTE!
Your personal serial number can be found on the backside of the CD cover.
Confirm your entries by clicking „next“.
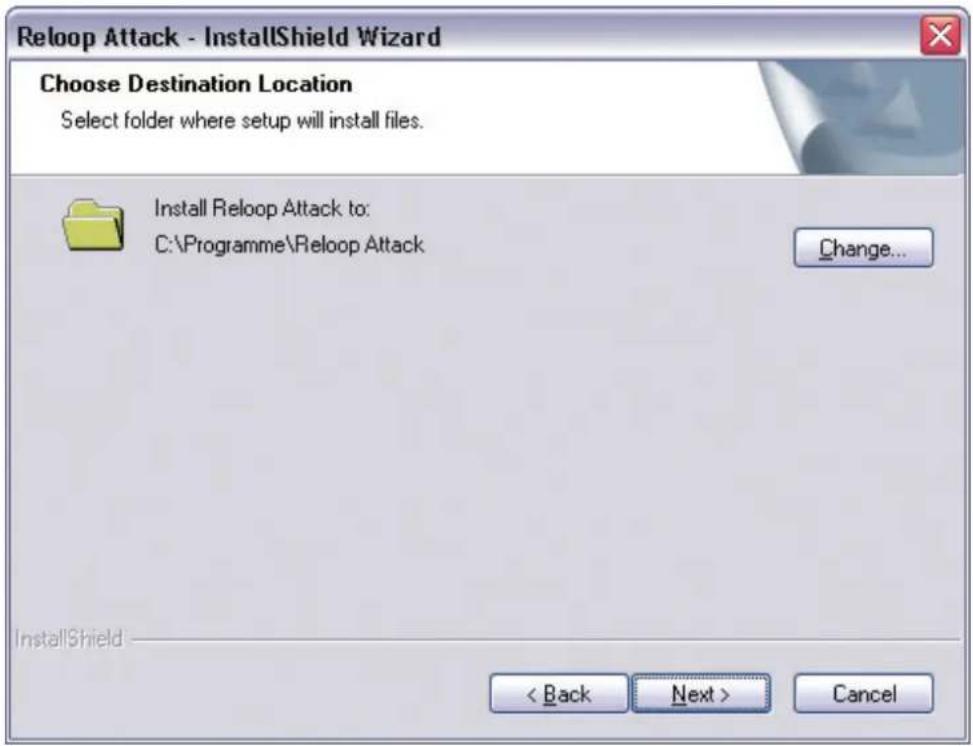
d) Installation path
The installation path is shown here. If required you can change it manually. Confirm the path by clicking „next".
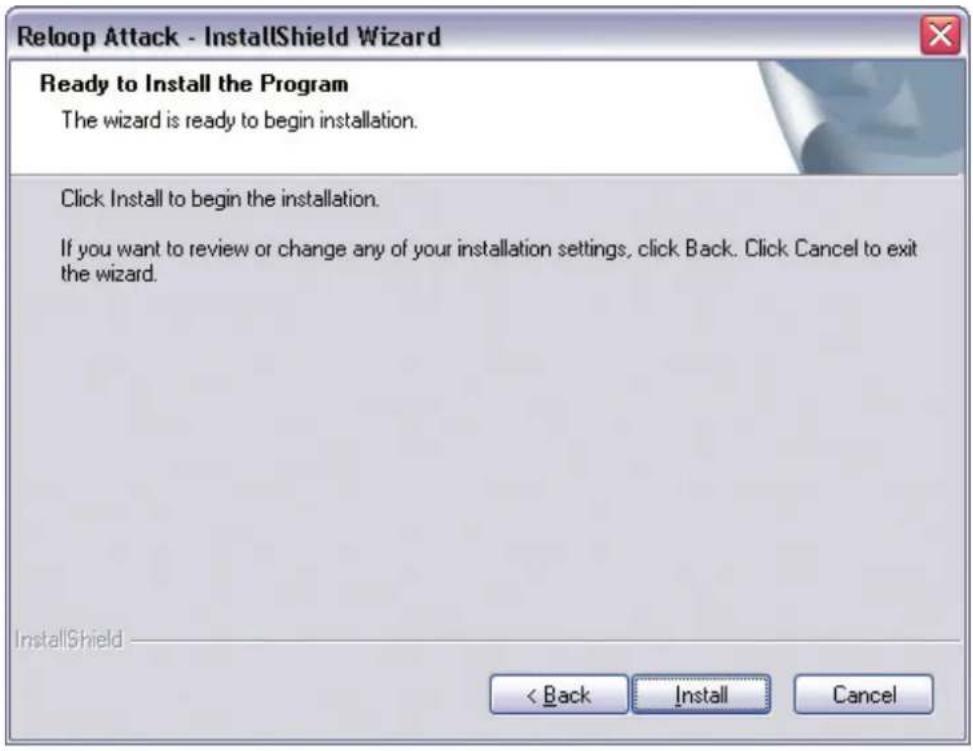
e) Installation confirmation
Confirm the installation by clicking „install".
Now the installation will be carried out, possibly your computer has to be rebooted after installation.
f) Installation completed
Complete the installation by clicking „finish".
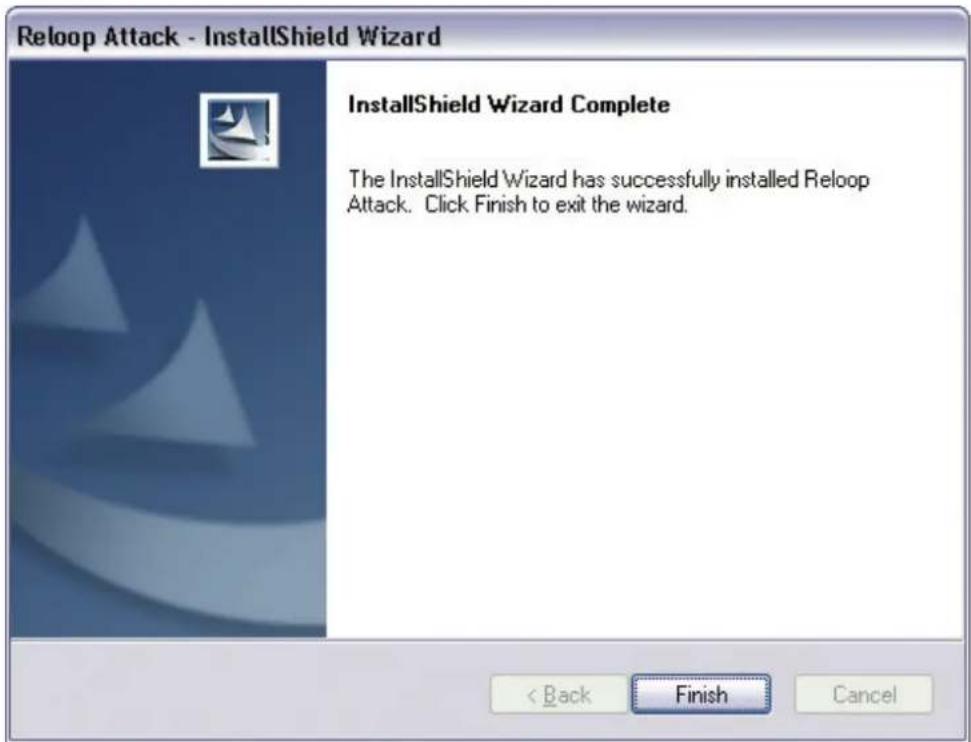
NOTE!
If you are asked to reboot your computer please do so.
Please start the Reloop Attack software by clicking on the icon on your desktop or via the start programm menu in the Reloop Software folder.
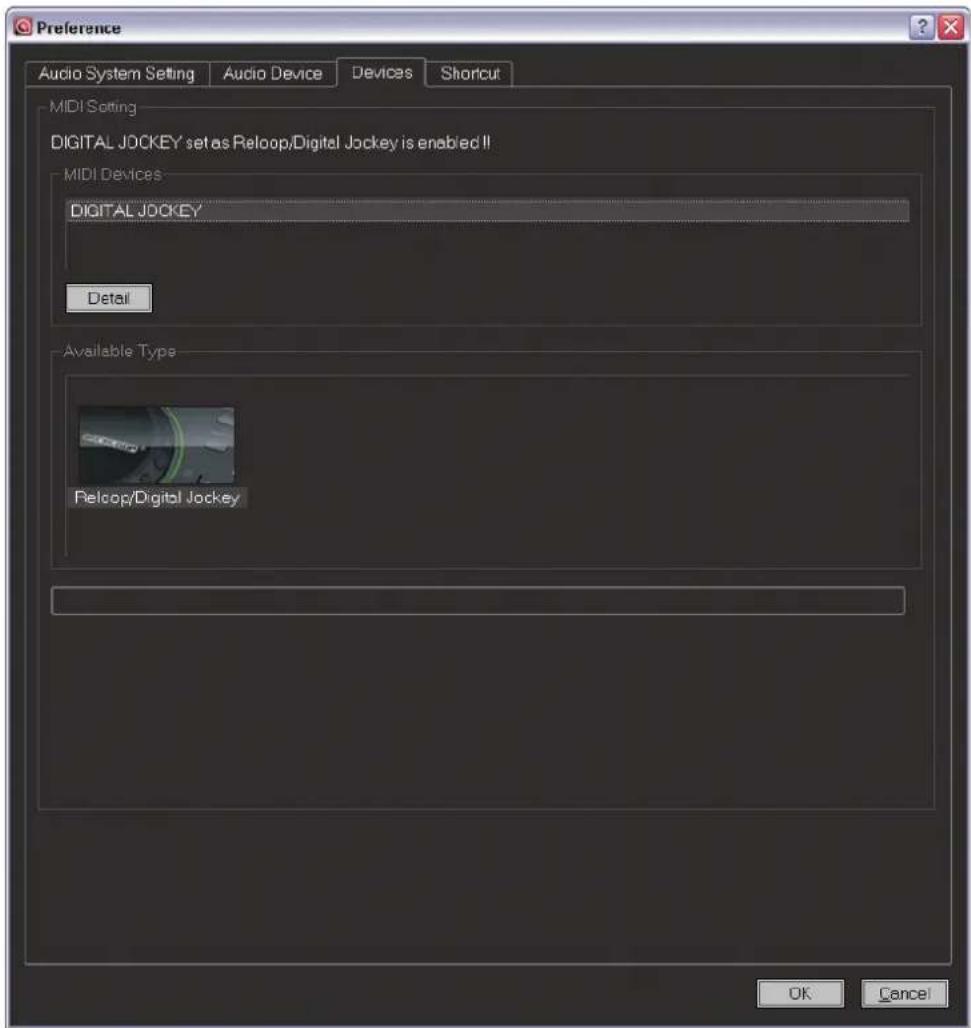
Go to „preferences". The according button can be found on the upper right software window. Open the rider „devices". The Reloop Digital Jockey should be visible there. Click on the Reloop Digital Jockey image in the window „available type". Afterwards click on „Digital Jockey" in the window above „MDI devices". The sentence „Digital Jockey set as Reloop Digital Jockey is enabled" should be displayed. Now your controller is configured for the software.
NOTE!
These settings have to be carried out only once.
Please carry out your individual sound card adjustments under the rider „audio device". Confirm the settings by clicking on „ok". Your controller and your software have been mapped accurately and you can now start mixing.

1.3. Traktor 3 LE software configuration
Carry out the „Autorun.exe" on the provided CD and wait until the installation menu pops up. Click on „Traktor 3 LE" in order to carry out the setup. The Traktor 3 LE setup will start now; please follow the instructions on screen in order to carry out the installation.
NOTE!
Your Traktor 3 LE version is optimally adapted to the Digital Jockey. Make sure that your controller is selected during installation.
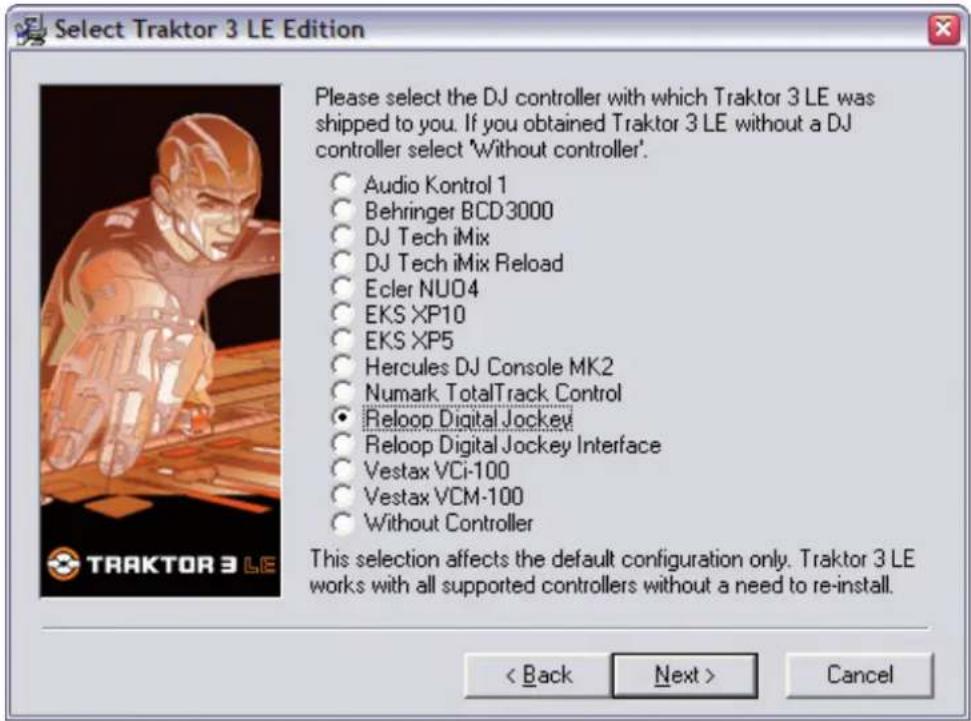
Open Traktor 3 LE after the successful installation. If the Digital Jockey was selected during installation all control elements are optimally mapped so that no further adjustments are necessary.
You will find an overview of the Digital Jockey assignment for Traktor 3 LE and Treaktor 3 Studio (can be upgraded) in the appendix.
Note for Mac Users:
Please execute manually the file "Traktor3LEinstaller.app" on the provided installation disc.
OVERVIEW CONTROLLER AND SOFTWARE
NOTE!
Elements with the same function on the opposite side have only been marked once.
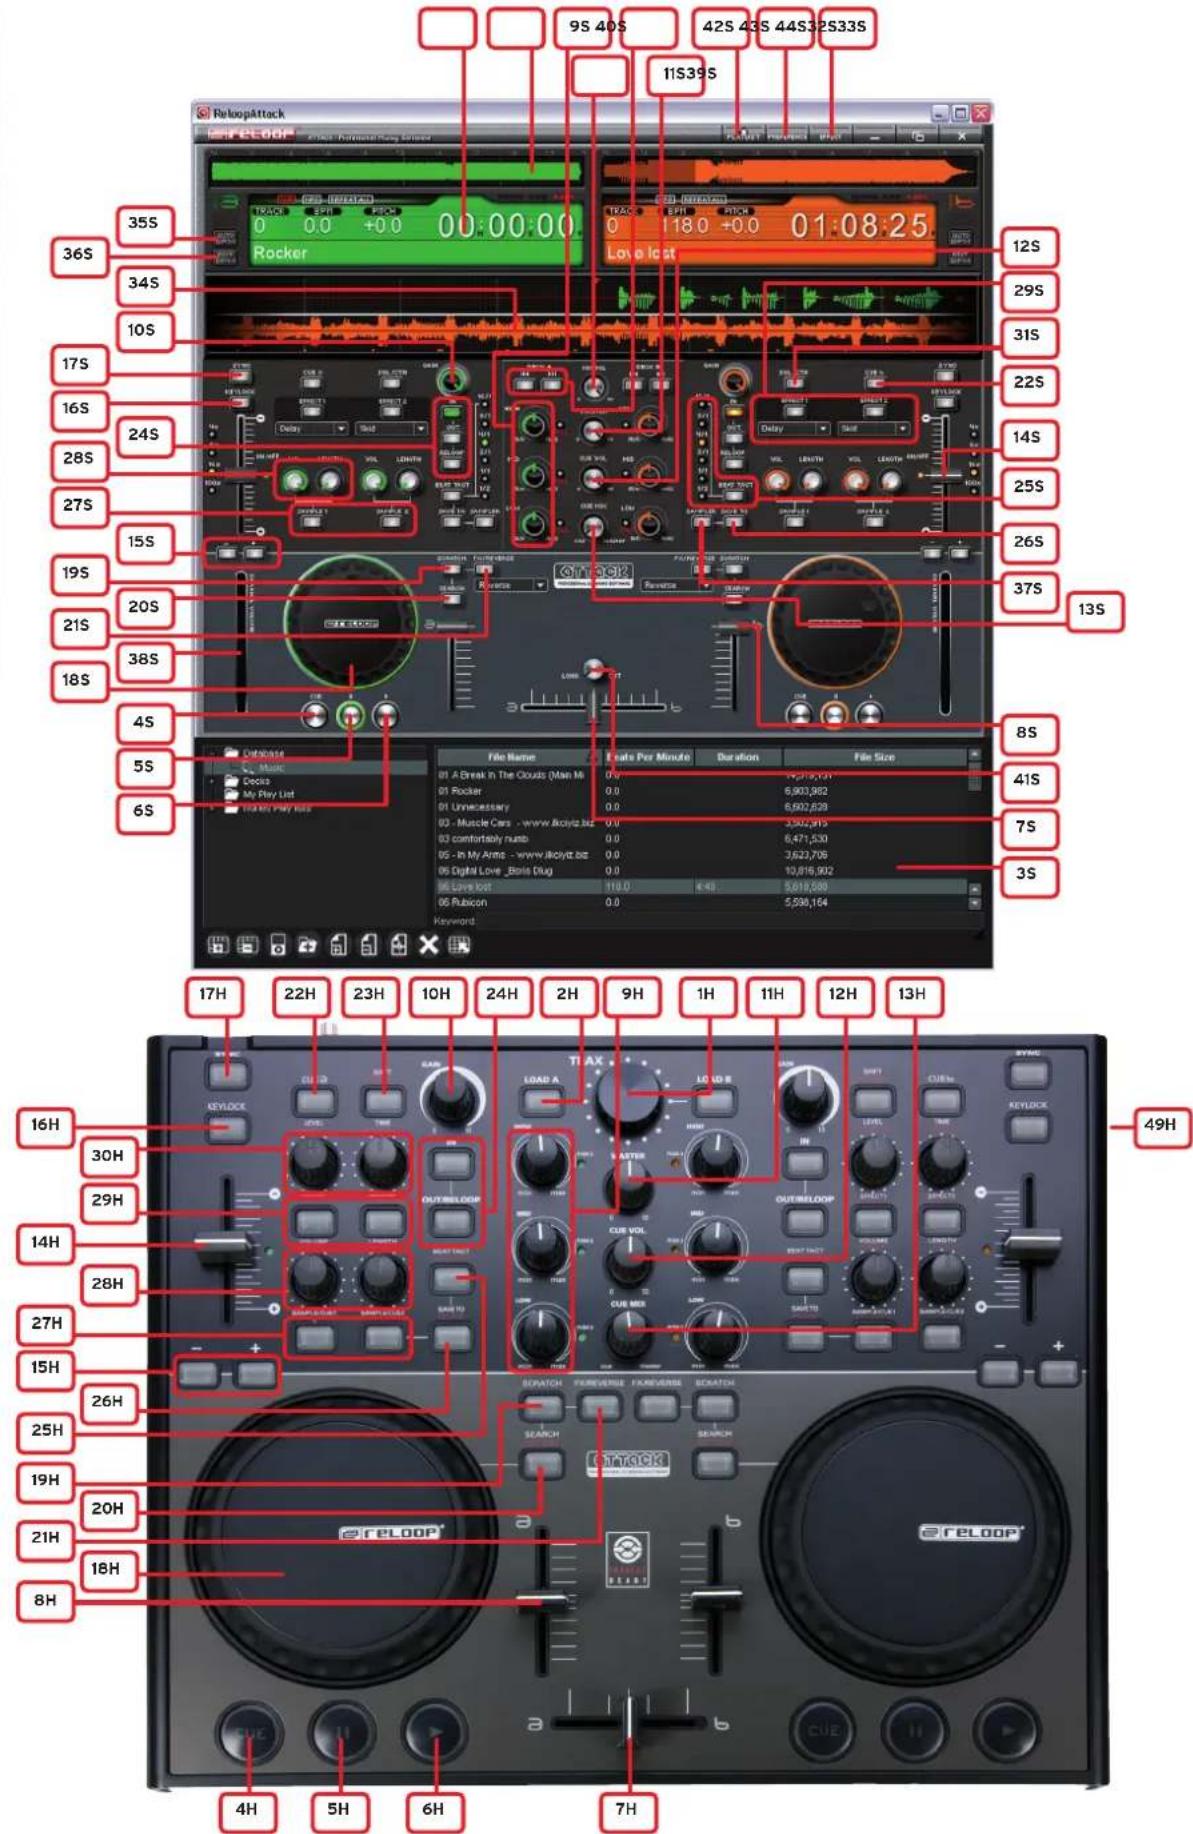
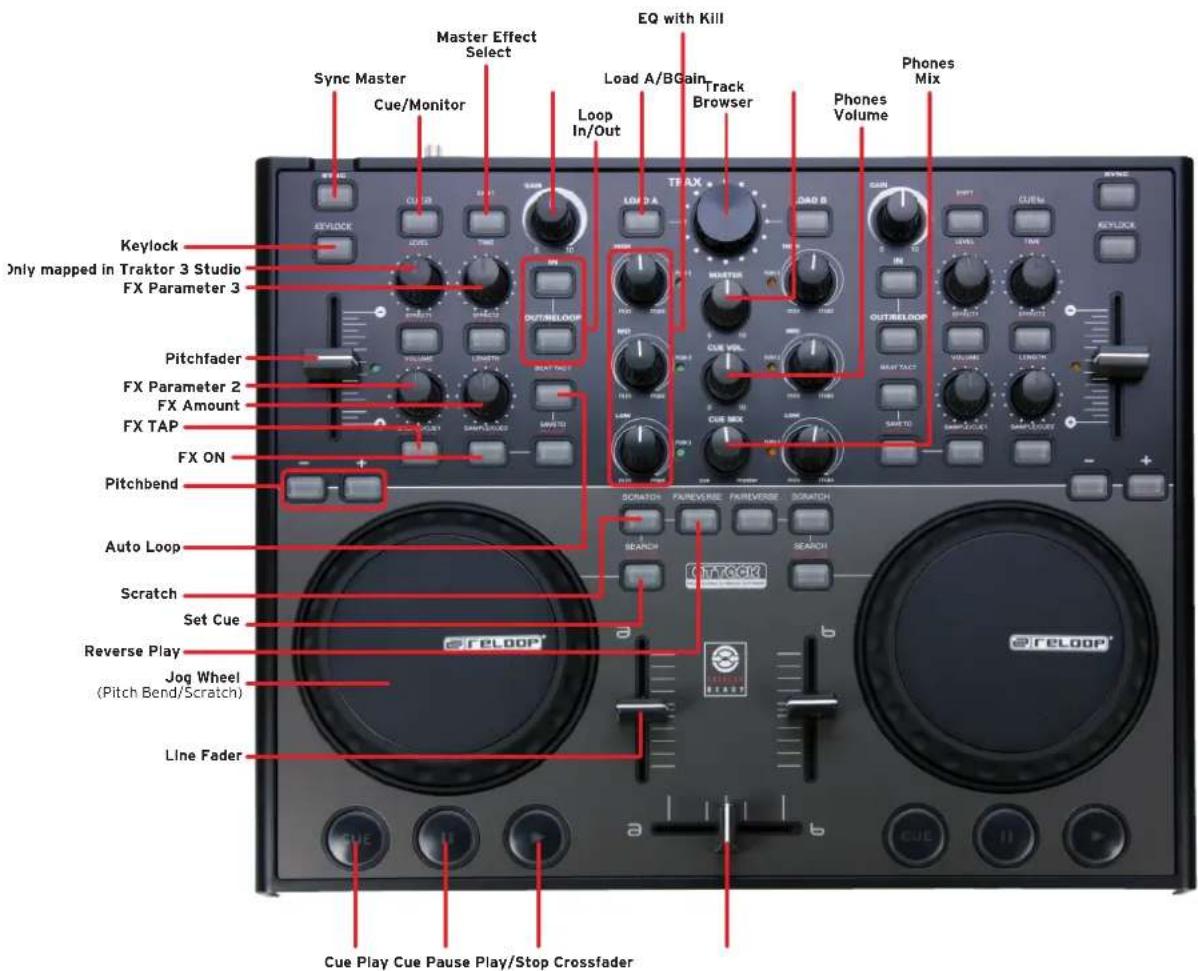
2. DESIGNATIONS
1H: .Trax Encoder
2H:......Load function
3 S: . . . . Library function
4 H / S: ....Cue function
5 H / S: . . . . Pause function
6 H / S: ...Play function
7 H / S: ....Crossfader function
8 H / S: ...Linefader function
9 H / S: ...3-band equalizer
10 H / S: ..Gain function
11 H / S: . . . Master volume function
12 H / S: ...Cue volume function
13 H / S: ...Cue mix function
14 H / S: ...Pitch fader function
15 H / S: ...Pitch bend function
16 H / S: ...Key lock function
17 H / S:...Sync function
18 H / S: ...Jog Wheel function
19 H / S: . . . Scratch function
20 H / S: ...Search function
21 H / S: . . .FX-Reverse function
22 H / S: ...Cue/Monitor function
23 H:......Shift function
24 H / S: ...Loop In/Out Reloop function
25 H / S: . .Beat tact function
26 H / S: ... Save to function
27 H / S: ...Sample banks / Hot cue function
28 H / S: ...Sample encoder function
29 H / S: ...Effect on/off function
30 H: ....Effect encoder
31 S: .......Single/Continue function
32 S:......Complete view function
33 S: .......Info view function
34 S: . . . .Needle view function
35 S: .......Auto BPM function
36 S: . . .Edit BPM function
37 S: .......Sampler function
38 S: .Level display function
39 S: . . . . . Mic volume function
40 S: .Deck function
41 S: .........Crossfader curve function
42 S: .... Maximize/minimize playlist function
43 S: . . . . . . . . . . . . . . . . . . . . . . . . . . . . . . . . . . . . . . . . . . . . . . . . . . . . . . . . . . . . . . . . . . . . . . . . . . . . . . . . . . . . . . . . . . . . . . . . . . . . .
44 S: .. .. .. .. .. .. .. .. .. .. .. .. .. .. .. .. .. .. .. .. .. .. .. .. .. .. .. .. .. .. .. .. .. .. .. .. .. .. .. ... .. .. .. .. .. .. .. .. .. .. ...
45 S: .... ... ... ... ... ... ... ... ... ... ... ... ... ... ... ... ... ... ... ... ... ... ... ... ... ... ... ... ... ... ... ... ... ... ... ... ... ... ...
44 S:......Effect presettings
45 H:....USB connection
46 H: .ON/Off switch
47 H:....Mains connection
48 H: . . . . . Mains cord strain relief
49 H: . . . . . . Kensington lock
3. OPERATION
After having concluded the first steps, the controller being connected and the software being installed properly, you can now operate your controller and software as follows:
3.1.Library
The Attack library is your data base for all of your music. You can search and browse the library for music and information such as BPM values or length of tracks.
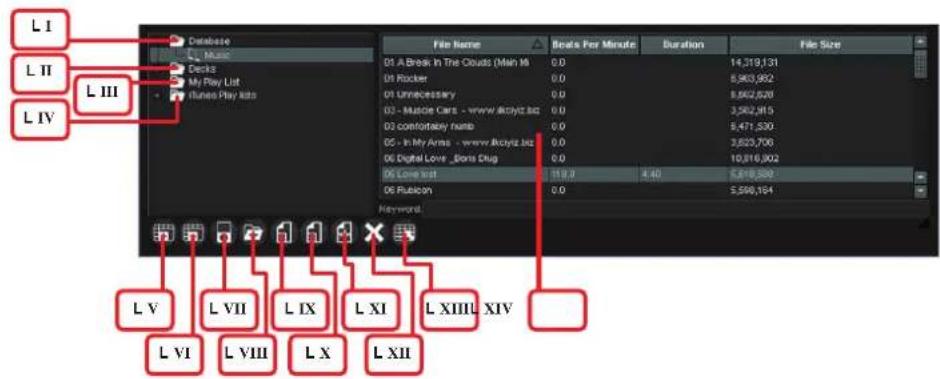
3.1.1. Database -LI
All of your music should be imported to the database. On the one hand you can do this by pressing the shortcut button "Add Directory To Database" -LVIII- in order to import entire folders. Alternatively you can do this in the database window via right mouse click followed by a click on "Add Files" in the now visible submenu in order to import singular files. The drag & drop function for files from the Windows Explorer is also supported.
NOTE!
After the initial installation you will be asked if you would like to add files to the database.
3.1.2.Decks-LII
Under decks you can find separate folders for deck A and deck B. Here you can individually select and load tracks that you would like to play for deck A and deck B. The right mouse click with the submenu function "Add Files" is also supported.
NOTE!
With the button -40 S- you can load the next and previous track respectively within deck A and deck B.
3.1.3. Playlist -LIII-
In the folder "My Playlist" it is possible to create and edit playlists of one's own. This way you can either presort a playlist with certain music styles or prepare a certain set for an evening.
You can create a new playlist by clicking the shortcut "Add New Playlist" -LV-. You can rename a playlist by clicking the right mouse button on the corresponding list. Either import tracks to the playlist via drag and drop from other folders (for example database, decks, Windows Explorer) or via the "Add Files" function (right mouse click or shortcut "Add Files" -LIX-).
3.1.4. iTunes Playlist -LIV
Your iTunes playlists will be displayed here automatically. They can also be adjusted as described above.
NOTE!
With one click you can add your complete iTunes library to the database via the "Import iTunes Library File To Database" function -LVII- (xml format).
3.1.5. Shortcut definitions

-LV- "Add New Playlist"
With this function you can add a playlist.

-LVI- "Delete Playlist"
It is possible to delete a selected playlist via this function.

-LVII- "Import iTunes Library To Database"
Add the iTunes library to the database.

-LVIII- "Add Directory To Database"
You can add whole directories to the database via this function.

-LIX- "Add Files"
Single files can be assigned and added to the corresponding playlist or database via this function. The following formats are supported:
.AC, .CDA, .FLAC, .MP3, .WAV

-LX- "Delete Selected Files"
Via this function it is possible to delete selected files from the playlist and database respectively.

-LXI- "Analyze Selected Files"
Via this function it is possible to automatically analyze selected files in order to have information displayed regarding for example BPM, file size or track length.
NOTE!
This has to be done only once per track. Afterwards the meta information for each track is automatically saved.

-LXII- "Clear List"
With one click you can delete the content of the playlist and database respectively.

-LXIII- "Select All"
Select all tracks of a playlist or database via this function.
-LXIV- "List View"
The content of the database or respective playlist can be seen here. The categories that can be displayed are as follows:
- File name
- Title
- Type
- Artist
- Album
- Beats Per Minute (BPM)
Duration - File Size
NOTE!
Via right mouse click on the list view's category task-bar you can fade in and fade out particular categories.
3.1.6. Waveform Displays
Two detailed waveform displays are at your disposal:
a) Complete View -32 S-:
The Complete View displays the waveform of a whole track. This way it is easy to recognise a track's dynamic like for example intros or breaks. The elapsed part of the current track is displayed in a darker shade in Complete View.
NOTE!
Via direct click in Complete View you can go directly to particular parts within a track.
b) Needle View -34 S-:
The Needle View is a zoomed display of both waveform displays one below the other. There you can recognise single bass kicks or bar points. Furthermore it is possible to see whether two tracks are synchronized or not.
NOTE!
You can adjust the zoom factor by moving the mouse back and forth while clicking and holding the right mouse button when the indicator is in Needle View.
3.1.7. Keyword
In this quick search field you can write single letters or words in order to find the desired tracks more quickly.
3.1.8. Info View -33 S-
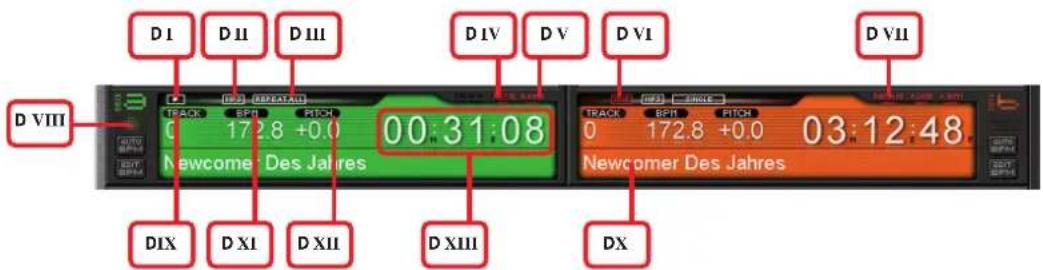
DI: Play display
Displays whether a track is in play mode or not. Additionally the display -DVIII- is illuminated as visual aid.
DII: Format display
Here you can see the current track's format.
DIII:Playback mode
By clicking "SGL/CTN" (single/continue) -31 S- you can change the playback mode. The following types are available:
a) Single: The track will be played and playback stops at the beginning of the next track.
NOTE!
If a track from deck A / deck B is played the following track will be assigned to the other player and both players change to pause mode.
b) Repeat: The track is played and repeated in an endless loop.
c) Repeat All: At the end of the last track from a deck A or deck B playlist the first track of that playlist will be played and the whole playlist will be repeated.
DIV: Auto Cue display
Here you can see if the auto cue function is enabled. It is possible to (de-)activate the auto cue function in the pre-settings menu -43 S-, rider "Audio System Settings", item "Enable Auto Cue".
DV: Auto BPM display
Shows if the automatic BPM analysis is enabled.
DVI: Cue display
This display will flash while setting a cue point and it shines in cue mode.
DVII: Remain display
Shows whether the remain or elapsed time display is enabled.
NOTE!
You can switch between remain/ elapsed mode by clicking the time display -DXIII-.
DVIII: see DI
DIX: Track number display
Shows the track numbers from deck A / deck B playlists -LII-
DX: Title display
Shows current track's name.
DXI:BPM display
Shows the currently set BPM value.
DXII: Pitch display
Shows the currently set pitch value.
DXIII: Time display
Shows the current time, depending on the remain/ elapsed mode. (see DVII).
NOTE!
The time display is shown in minutes, seconds and frames.
3.2. Browsing and loading tracks
Via the large Trax Encoder -1 H- you can browse a database or selected playlist. In order to assign the desired track to a player push the Load A or Load B button -2 H-.
In order to change between files or playlists push and hold the shift button -23 H- and turn the Trax Encoder -1 H-.
Note!
By pushing the Trax Encoder -1 H- or clicking the playlist button -42 S- you can maximize or minimize a playlist.
NOTE!
Via the shift button -23 H- you can call up a second function of a control element. This way the number of MIDI compatible elements is doubled. Watch out for noted regarding a double assignment in order to be able to use all functions of your controller.
3.3. Transport Controls
Below the jog wheel -18 H- you can find three buttons for the play, cue or pause functions of a track.
Via the play button -6 H- you can play the previously selected track. By repeatedly pushing the play button -6 H- again the track will be played in a stutter style from the last set cue point (bop function).
In order to pause a track push the pause button -5 H-
Via the cue button -4 H- you will return to the last set cue point while in play mode. Temporary pushing in pause mode will continue the track from the cue point until the button is being pushed.
3.4.Cue points
There are two possibilities to set a cue point.
a) The first possibility is via frame search. In pause mode navigate via the jog wheel -18 HS- to the desired point and press the play button -6 H / S-. The cue point is now set at the play point.
b) The second possibility is via the loop in function. During playback push the Loop In button -24 H / S- in order to set a cue point.
3.5.Mixer section
Via the crossfader -7 H- you can fade from deck A to deck B and vice versa. The channels' output volume can be adjusted by using the linefaders -8 H / S-. Your software features a 3-band equalizer -9 H / S- which you can operate via the controller. By pushing the equalizer potentiometers -9 H- the kill function of the respective wave band will be activated. The corresponding kill LED shines while the kill function is activated. By pushing the potentiometer again you will deactivate the kill function.
Via the gain knob -10 H / S- you can do a vernier adjustment.
The master volume is adjusted via the master knob -11 H-. Via the cue volume knob -12 H / S- you can adjust the headphones' volume.
Use the cue mix knob -13 H / S- in order to adjust the relation of the master signal and cue channel. This makes sense when trying out a mix via your headphones. The level display -38 S- shows the volume level of a track.
NOTE!
In order to use the cue function properly you require a multi-channel sound card.
If a stereo output has been selected for the headphones in the audio settings it can be enabled for each side via the cue buttons -22 H / S-. This way you can monitor a track while another track is being played via the master output.
NOTE!
Use the cue mix knob -13 H / S- in order to simulate a pre-mix from to cue to master in your headphones.
Via the mic volume knob -39 S- you can adjust the volume of an optionally connected microphone.
Use the long/cut knob -41 S- in order to change the crossfader curve from hard to smooth.
3.6. Speed control
Use the pitch fader -14 H / S- in order to adjust the speed. If you push the fader upwards the speed will decrease. Push the fader downwards and the speed will increase. The currently set pitch value is shown in the info display -DXII-.
The adjusted pitch is shown in the software on the left and right side respectively of the pitch fader. The range can be adjusted to +/-4% , +/-8% , +/-16% , +/-100% . You can change the pitch range by either directly clicking on the software or by using the hot key shift -23 H- plus the pitch bend buttons -15 H- on your controller. The minus button will decrease the range while the plus button increases the range.
Via the pitch bend +/- buttons -15 H- you can cause a temporary increasing or decreasing of the track's speed for as long as you push the respective button. The maximum speed pitch corresponds to the previously set pitch range
This function is especially useful if you want to synchronize two tracks that have the same speed but do not run synchrone.
Via the keylock function -16 H / S- you can freeze the tone pitch. This means that the original tone pitch is kept no matter at what speed the track is being played. This way you can avoid the so called "Mikey Mouse" effect.
Via the sync function -17 H / S- you can automatically synchronize two tracks. The BPM value of the respective sync side is matched to the other player. This useful function facilitates quicker mixing without losing too much time for speed matching. Classic speed matching via pitch is also possible of course.
NOTE!
The sync function is carried out corresponding to analyzed BPM values. But this does not mean that it will work flawlessly for every music style and type of song. Before mixing one should always monitor and adjust the music.
Sometimes the BPM value of a track may not be displayed correctly, for example if the BPM value seems to be way too high or low. This can be the case with break beats or Drum & Bass. In this case you can manually analyze the BPM value. To do so push the Edit BPM button in order to open the manual BPM menu.
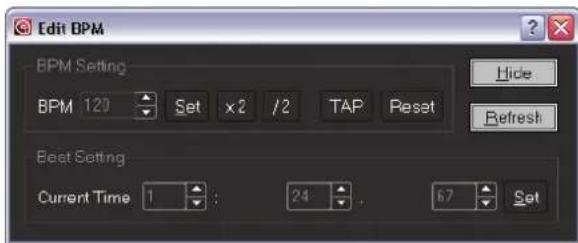
There are to possibilities to manually determine the BPM value.
a) Tap function:
Tap the mouse button on the tap button on screen to the beat of the music in order to manually determine the BPM value.
NOTE!
You can also accomplish this in the information display on the display.
b) BPM set function:
You can also type in the BPM value and confirm it via the set button. Via the buttons "x 2" and "/2" you can double or halve the BPM value with the push of a button.
Click on the "Hide" button in order to exit the BPM menu.
NOTE!
In order to re-enable the auto BPM function push the Auto BPM button -35 S-. On the display -DV- "A.BPM" will be shown in red.
3.7.Jog wheel section -18 H / S
Your Digital Jockey controller disposes of two extra large, high resolution jog wheels -18 H / S- that can accomplish various functions:
a) Frame search function
If the player is in pause/cue mode you can search frame by frame via the jog wheel -18 H / S- in order to set a cue point for example.
b) Pitch bend function
If the player is in play mode you can carry out the pitch bend function via the jog wheels. Similar to a normal turntable you can temporarily increase or decrease the speed by turning the jog wheel clockwise and counter clockwise in order to synchronize two tracks.
NOTE!
Alternatively you can also use the pitch bend buttons -15 H / S-.
c) Scratch function -19 H / S-
Firstly push the scratch button -19 H / S- in order to enable the scratch mode. Now you can scratch via the jog wheels -18 H / S- just like a normal vinyl record.
d) Search function -20 H / S
Firstly push the search button -20 H / S- in order to enable the quick search mode. By turning the jog wheels you can fast forward and rewind within a track.
e) FX/Reverse function -21 H / S
Firstly push the FX/Reverse button -21 H / S- in order to enable this mode. There are three possibilities at your disposal.
- Reverse effect:
If "Reverse" has been selected in the drop down menu you can activate the reverse play mode by by using the FX/Reverse button -21 H / S-.
- Effect 1 function:
If effect 1 has been selected in the drop down menu the effect from the effect section -29 S- will be enabled. By using the jog wheel -18 H / S- you can now modulate an the selected effect's parameter.
NOTE!
By pushing and holding the shift button -23 H- and turning the jog wheel -18 H / S- at the same time you can modulate the second parameter.
- Effect 2 function:
see item b)
Please refer to the next chapter 3.8. "Effect Section" for further details.
3.8. Effect section
Your Reloop Attack software disposes of 8 high-quality effects. It is possible to enable two effects per player.
NOTE!
It is possible to combine two different effects per player.
Via the buttons -29 H / S- you can (de-)activate the respective effect. The selected effect is displayed in the drop down menu below the activating buttons. You can select another effect via the mouse. In order to change with your controller push and hold the shift button -23 H- and push the effect 1 or effect 2 button -29 H-. This way you can change the effects. Two parameters per effect are adjustable. The following effects are at your disposal:
| Effect name: Par | ameter Time: Parameter Ratio: | |
| 1. Delay 0 - 9.999 | delay gap length 0 - 255 delay gain | |
| 2. Skid 100 - 9.999 | stop time 100 - 9.999 start time | |
| 3. Filter 0 - 9.999 | auto scan period 0 - 255 filter frequency | |
| 4. Phase 1 - 9.999 | play rate 0 - 255 sweep depth length | |
| 5. Flanger 1 - 9.999 | 99 waveform cycle 0 - 255 mix depth | |
| 6. Echo 0 - 9.999 | echo gap 0 - 255 echo gain | |
| 7. Trans | 30 - 9.999 trans X parameter | 0 - 255 trans Y parameter |
| 8. Pan | 0 - 9.999 pan cycle | 0 - 255 pan gain |
The effect parameters can be adjusted in the effect preferences. The effect preferences can be opened by clicking -44 S- or via the hot key combination shift -23 H- plus pushing the effect encoder -30 H-. The effect preferences are divided into deck A and deck B.
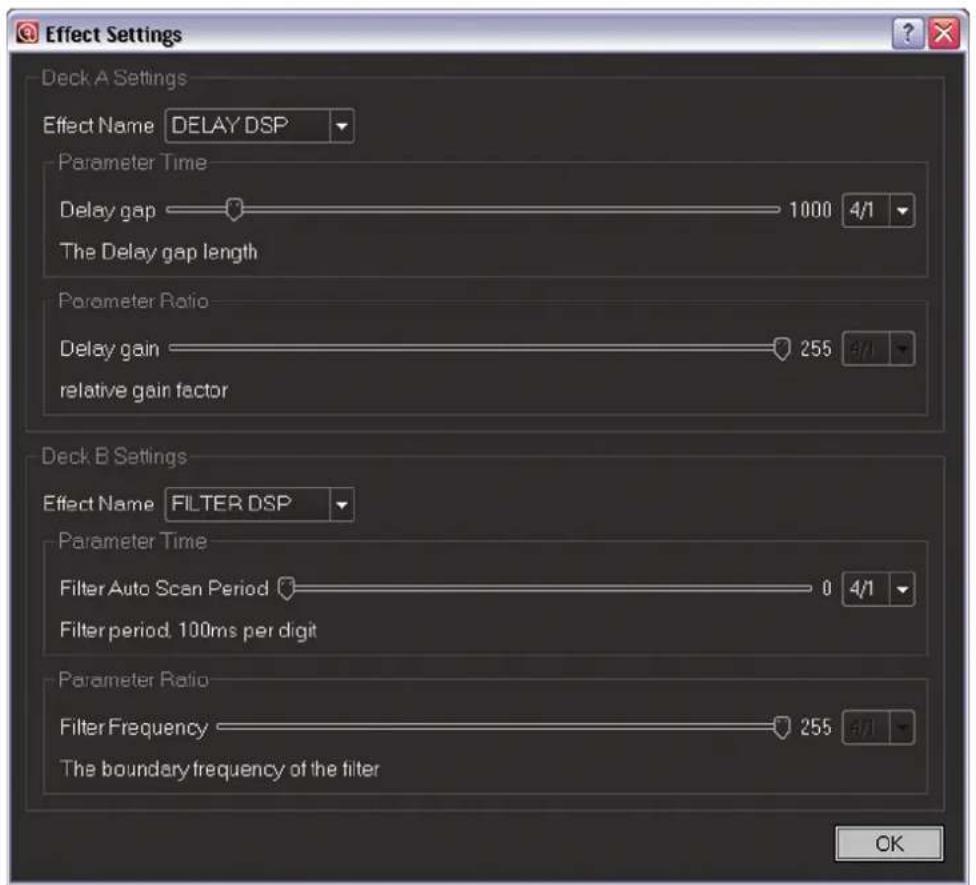
Here the described effect parameters can be adjusted per effect. For a variation via mouse simply move the indicator to the left or right. For a modulation via controller turn the level encoder -30 H- in order to in order to adjust the ratio parameter and turn the time encoder -30 H- in order to adjust the time parameter.
NOTE!
In order to obtain a more effective handling the effect encoder time has been adjusted to a beat raster. Via turning it you can choose bar lengths from 1/4 - 4/1.
Jog wheel effect modulation:
It is also possible to modulate the effect parameters via the jog wheel -18 H. Select the desired effect and switch the FX/Reverse mode -21 S- to effect 1 or effect 2.
NOTE!
In order to change the FX/Reverse mode via controller push and hold the shift button -23 H- and push FX/Reverse -21 H-.
Depending on the selected effect you can now steplessly adjust the ratio parameter via the jog wheel -18 H-. In order to steplessly modulate the time parameter hold shift -23 H- and turn the jog wheel -18 H-.
NOTE!
If the FX/Reverse slot has been adjusted to effect 1 or 2 -21 S- it is possible to (de-)activate the effect via the FX/Reverse button 21 H-.
3.9. Sample, loop & cue point section
3.9.1.Cue points
There are to possibilities to set a cue point:
a) The first one is to push the loop in button -24 H- during playback. This way a cue point is set at the push of a button and it is displayed by a "C" in the needle view.
b) The second possibility is to search a frame via the jog wheel while in pause mode. Go to the desired point, push play -6 H / S- and the cue point is set.
NOTE!
This is also works if scratch mode is enabled.
If you would like to save a cue point push the "save to" button -26 H / S- and a respective sample cue bank -27 H / S-. This way the cue point is saved permanently until you set a new one, thus overwriting the old one.
3.9.2. Loops
Manual loop:
In order to set a loop manually push the loop in button -24 H / S- at the desired point and at the end of the loop push the loop out button -24 H / S-. Now the player switches to the seamless loop function. Exit the loop by pushing the loop out button -24 H / S-.
NOTE!
By pushing the loop out/reloop button -24 H- during playback mode the player will return to the last set loop.
Auto loop:
If the BPM value of a track has been analyzed an automatic beat loop can be set at the push of a button. To do so push the beat tact button -25 H / S- and the player will switch to loop mode. The adjusted bar length is visible next to the beat tact button (± -8/1) . In order to change the bar length either click the bar via mouse in the software or push the beat tact button -25 H- directly on your controller. In order to exit the loop push the loop out button -24H / S-.
NOTE!
In order to adjust the bars beforehand hold the shift button -23 H- and push the beat tact button -25 H-.
3.9.3. Sample function
You can also save a created loop to two sample banks. After having created a loop push the "Save To" button -26 H / S- and select sample bank 1 or 2 -27 H / S-. The loop has now been saved to the respective sample bank.
NOTE!
Depending on whether a cue point or loop has been set the sample bank can be used as hot key or loop memory.
In order to play the sample parallel to the music enable the sampler mode via the sampler button -37 S- or by pushing the sample encoder -28 H-. It is now possible to call up the sample by clicking the respective sample bank -27 H / S-. Via the sample encoders -28 H- it is possible to adjust volume on the left and he sample length on the right side.
NOTE!
This is only available in sampler mode.
Depending on the last played sample bank the volume/length encoders are assigned. In order to stop a sample disable the sampler mode by pushing the sampler encoder -28 H- or the sample button -37 S-.
4. PREFERENCES
Audio System Setting
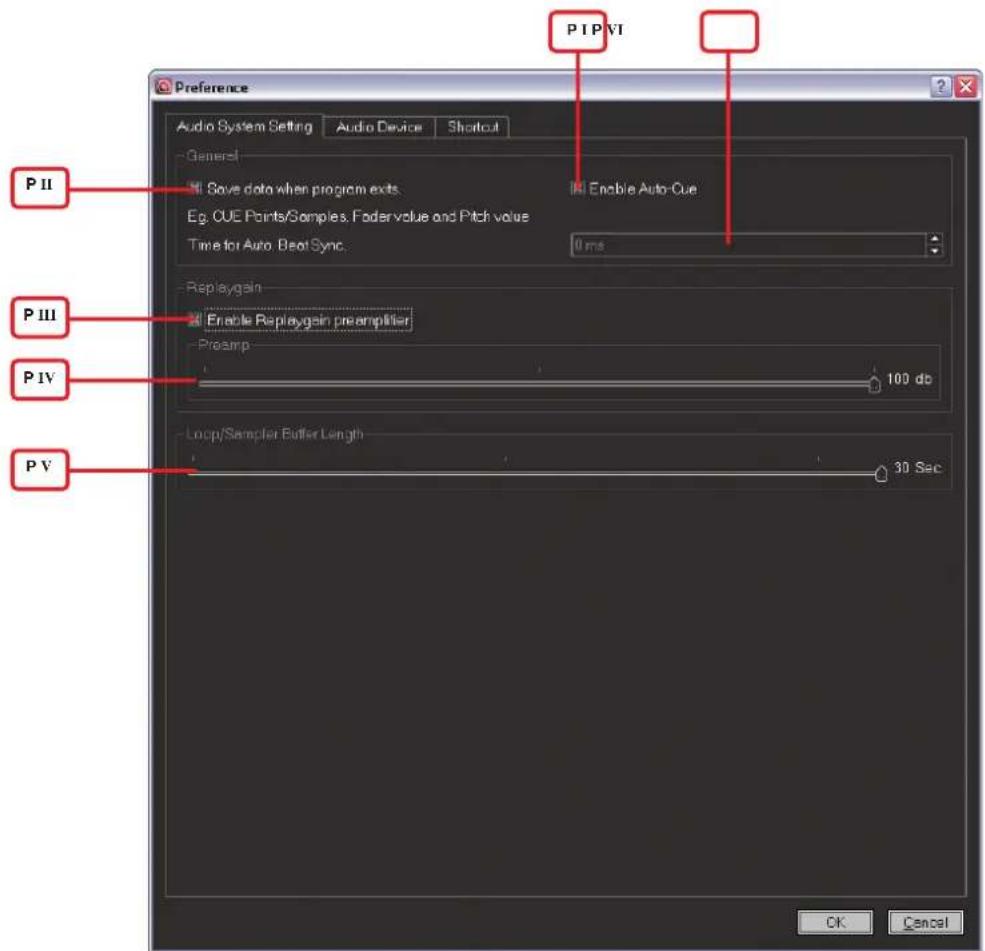
PI: Enable auto cue
If this function is enabled a cue point will be set automatically at the first beat of a track.
PII: Save data when program exits
If this function is enabled your data, such as cue points, samples or fader and pitch values, will be saved when exiting the software.
PIII / PIV: Replay gain
With this knob -PIV- you can adjust the pre-amplification level for example for an optionally connected turntable. The adjustable values go from 80 - 100 dB. Activate this function by check marking the field -PIII-.
NOTE!
If this function is enabled the Attack software will automatically analyze and save the track's gain level when playing it for the first time. This way audio material with differing gain values is automatically matched.
PV: Loop/sampler buffer length
With the knob -PV- you can adjust the sampler buffer length. The value is adjustable from 8 - 30 seconds.
PVI: Auto beat sync
Here the span of time can be adjusted from 0 - 200 msec. If you want the beat to be synchronized. If the value is at "0" the beat will be synchronized without time delay.
Audio Device
If you do not have an ASIO compatible sound card carry out the sound cart routing in the direct sound audio device preferences.
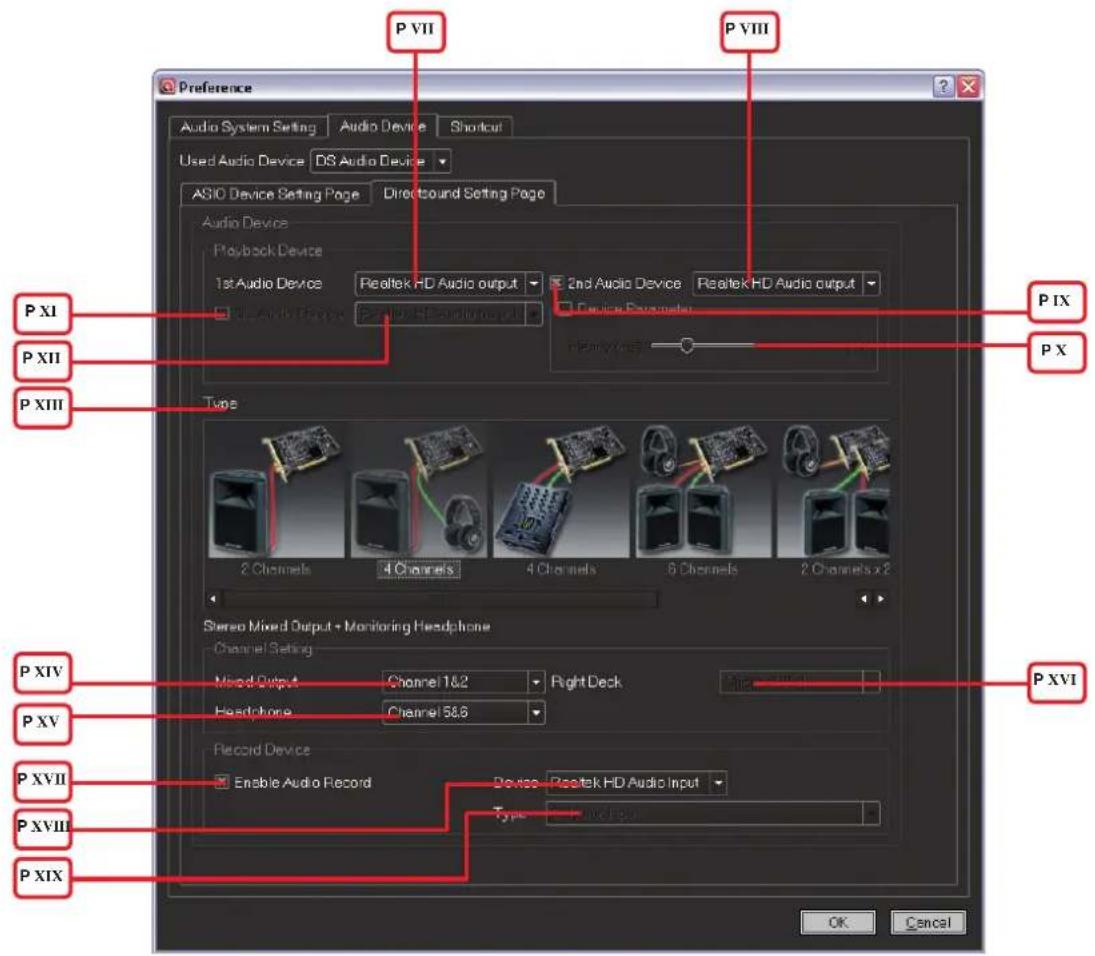
PVII: 1st audio device
In the preferences you can set your respective sound card.
PVIII / PIX / PX: 2nd audio device
If you have a sound card with at least four channels or a second sound card you can select and enable it here. If you wish to adjust the latency for optimization enable the "Device Parameter" -PIX- and adjust the latency via the knob -PX-.
NOTE!
Should you notice any clicking noise or if the music fails completely due to low latency you must increase the latency via the knob -PX-.
PXI / PXII: 3rd audio device
Reloop Attack supports up to three sound cards. Check mark field -PXI- in order to select and enable the third sound card -PXII-.
PXIII: Type
Here you can adjust your preferred and supported sound card routing. Please refer to the following list:
| 2 channels mixed stereo | output (standard) |
| 4 channels 1 x mixed stereo | reo output; 1 x stereo headphones output |
| 4 channels (external) th | type is used for the connection of an external mixer and the internal equalizer and gain will be bypassed. 2 x stereo output |
| 6 channels 2 x mixed stereo | reo output; 1 x stereo headphones output |
| 2 channels x 2 1 x mixed | stereo output and 1 x headphones output on 2 different sound cards |
| 2 x channels x 2 (external) | this type is used for the connection of an external mixer and the internal equalizer and gain will be bypassed. 2 x stereo outputs on two different sound cards |
| 2 channels x 3 2 x mixed | stereo output on 2 sound cards; 1 x stereo headphones output on 3 different sound cards |
PXIV / PXV / PXVI: Channel setting
Under the items -PXIV / PXV / PXVI- the preferences for the respective channels for the mixed output, headphones and if necessary the right deck can be selected.
PXVII / PXVIII / PXIX: Record device
With -PXVII- you can enable the input. In the preferences -PXVIII- select the respective sound card input and under preferences -PXIX- the respective type. Here it is possible to assign a microphone for example.
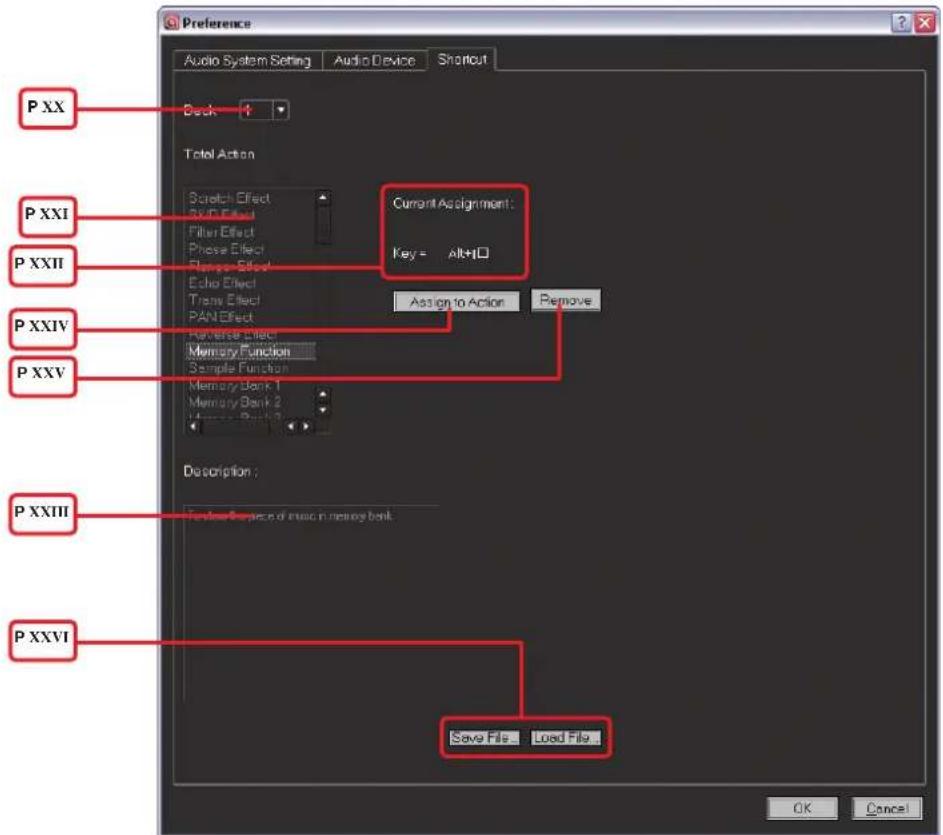
- Keyboard Shortcuts
In the shortcut settings you can assign different functions to a key of your keyboard. Select the desired function from the preferences -PXXI-. The current assignment is shown in field -PXXII-. The function description is shown in field -PXIII-. Select a key that you wish to use for the assignment and click the "Assign To Action" button -PXXIV- in order to assign the function.
NOTE!
If a double assignment or overwriting occurs you will be notified.
In order to remove an assignment use the remove button -PXXV-. In order to save or load an individual assignment list use the button -PXXVI-.
5. SYSTEM REQUIREMENTS
Minimum system requirements:
Intel Pentium 4, 1 GHz processor, Intel Centrino Mobile Technology 1.6 GHz or above
Intel Celeron Processor NOT recommended
- Microsoft Windows XP or Vista
- DirectX9 or above
- Windows Media Player 9 or above
- 512 MB RAM
- 250 MB free hard disc drive (200 MB for cache)
- Microsoft DirectX sound or ASIO compatible sound card
Recommended requirements:
Intel Pentium 4, 2.4 GHz processor, Intel Centrino Mobile Technology 1.6 GHz or above
- Microsoft Windows XP or Vista
- DirectX 9 or above
2GBRAM
- 550 MB free hard disc drive (500 MB for cache)
- Microsoft DirectX or ASIO compatible sound card

TRAKTOR3

TRAKTOR 3 LE MAPPING

TRAKTOR3
TRAKTOR 3 STUDIO MAPPING
All other control elements as for Traktor 3 LE (see above).
MODE D'EMPLOI
FRANÇAIS
-LVI-,Delete Playlist"
-LX- "Delete Selected Files"