Spin!2+ - Mixer Reloop - Free user manual and instructions
Find the device manual for free Spin!2+ Reloop in PDF.

User questions about Spin!2+ Reloop
0 question about this device. Answer the ones you know or ask your own.
Ask a new question about this device
Download the instructions for your Mixer in PDF format for free! Find your manual Spin!2+ - Reloop and take your electronic device back in hand. On this page are published all the documents necessary for the use of your device. Spin!2+ by Reloop.
USER MANUAL Spin!2+ Reloop
For your own safety, please read this operation manual carefully before initial operation! All persons involved in the Installation, setting-up, operation, maintenance and service of this device must be appropriately qualified and observe this operation manual in detail. This product complies with the requirements of the applicable European and national regulations. Conformity has been proven. The respective statements and documents are deposited at the manufacturer.
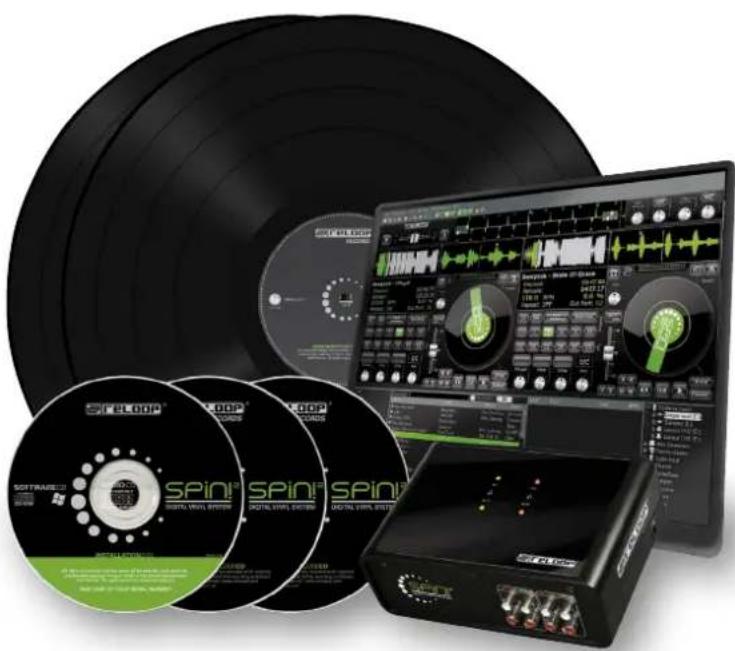
Spin!2+
Digital Vinyl System
Mode d'emploi
ATTENTION!
To prevent fire or avoid an electric shock do not expose the device to water or fluids! Never open the housing!
ATTENTION!
- Shortcut: Master/Rec. Volume
- Title
- Artist
- Album
Genre
BPM
Duration -
Last Played
-
Remix - File Name
Rating File Extension - Comments - Date Created
Year Label - Track - Producer
- File -Key
- Directory - Counter
HINWEIS!
44. Key Mode (Harmonic Mixing)
3.2.7 Automatic Search:
3.3.4 Analyze BPM manually:
3.3.5 Analyze BPM automatically:
3.3.6 Delete tracks permanently:
4. Play List Directory
5. Waveform Directory
3. Calculate BPM on Load
9. End of Track Warning
1. Resolution Selection
4.3 Track Preferences
Track > Track Preferences
4.3.3 Track Settings
- 4 Channel analog input/output with through output.
High level master output. - Phono/Line selector with gain adjust.
- Midi control panel.
- Earphone output with direct switch, split adjust and gain adjust.
- Input/output signal indicate by LED.
- Microphone input with active voltage supply, gain adjust and throughout.
-
USB V1.1 Connect Computer RECORD&PLAY.
-
INPUT/THROUGH OUT SECTION: (LINE IN: -14dBV, LOAD = ? OHM)
CH.BALANCE: Within 0.5 dB
LEVEL DIFFERENCE: Within 0.5 dB
- PLAYBACK SECTION: (Microphone switch off, Windows playing speaker maximum, Phones load= 33 ohm, Line out load= 47K OHM)
FREQUENCY RESPONSE: (Phones out= 0 dBV output; TCD781 Track 1, 4(for line), 6(for phones), 18)
LINE: 17-20K Hz +2 dB
PHONES: 61-20K Hz 3 dB
THD + N: (Phones out = 0dBV OUTPUT, A-Weighted, W/20KHz LPF; TCD781 Track 1)
PHONES: Less than 0.1%
MAXIMUM OUTPUT: (TCD781 Track 1)
LINE: THD<=0.02%,More than +6 dBV (2.0V)
at load = 47K OHM
PHONES: THD<=1%,More than +1.6 dBV (1.2V)
at load = 33 OHM
OUTPUT NOISE: (W/20KHz LPF, A-Weighted,
playback TCD781 track 1 then pause)
PHONES: Less than -70 dBV(Adjust Gain Maximum)
S/N RATIO: (W/20KHz LPF,
Phonestout=OdBV,A-WEIGHTED;TCD781 Track 1)
LINE: More than 85 dB
PHONES: More than 75 dB
CH. SEPARATION: (W/20KHz LPF, A-Weighted; TCD781 Track 32,38)
LINE: More than 85 dB at 1K Hz between L and R.
More than 85 dB at 1K Hz between channels.
PHONES: More than 65 dB at 1K Hz between L and R.
CH. BALANCE: (Phones out = OdBV; TCD781 Track 1)
LINE: Within 1 dB
PHONES: Within 1 dB
FADER MAXIMUM ATTENUATION: (1K Hz Line in= -14 dBV and Phones out = 0 dBV,
A-Weighted W/20K Hz LPF; TCD781 Track 1)
SPLIT FADER
PC to PHONES: Less than -75 dBV
LINE IN to PHONES: Less than -70 dBV
MICROPHONE SECTION: (Microphone switch ON,
FREQUENCY RESPONSE: (Microphone gain maximum)
LINE1OUT: 20-20K Hz +3 dB
THD+N: (A-Weighted, w/ 20k Hz LPF)
LINE1 OUT: Less than 0.2%
MAXIMUM OUTPUT: (THD=1%, Adjust Microphone gain,
A-Weighted, w/ 20k Hz LPF)
LINE1 OUT: More than +5.5dBV (1.9V) at load = 47K OHM
OUTPUT NOISE: (Microphone gain maximum,
disconnect Mic, W/20K Hz LPF, A-Weighted)
LINE1 OUT: Less than -55 dBV
S/N RATIO: (W/20KHz LPF,
MICROPHONE GAIN MAXIMUM, A-Weighted)
LINE1 OUT: More than 60 dB
- RECORDING AND PLAYBACK SECTION: ....... (Windows playing speaker and all
gain control are maximum)
INPUT/OUTPUT IMPEDANCE & SENSITIVITY: . (1KHz recoding MASTER +6 dBV OUTPUT,
S/N RATIO: (1KHz recording,W/20KHz LPF, A-Weighted)
LINE: More than 85 dB
PHONO: More than 85 dB
MIC: More than 60 dB
FUNCTION BALANCE: (Recording 1K Hz and playback to Line out,
W/20K Hz LPF, A-Weighted)
PHONO: + / - 2 dB (Reference to LINE OUT)
PHONES: +/- 2 dB (Reference to DIRECT ON,
playback signal with DIRECT OFF)
MIC: + / - 2 dB (Recording 1K Hz with MIC ON,
playback signal with MIC OFF)
FREQUENCY RESPONSE: (Reference recording 1KHz, load= 47K OHM)
LINE: 20-20K Hz +2/-3 dB
PHONO: 20-20K Hz +2/-3 dB
(RIAA: Input 1K Hz/-50 dBV, 20 Hz/-69.3 dB,
20K Hz/-30.4 dB)
THD + N: (Recording 1KHz and playback to Line out,
A-Weighted, W/20K Hz LPF)
LINE: Less than 0.05%
MIC: Less than 0.15%
DEUTSCH
DEUTSCH
DEUTSCH
DEUTSCH
- Minimum System Requirements .p. 54
- Connection and Software Installation .p. 54
1.1 Connections .p. 54 3.1
1.2 Spin! 2 Softwareinstallation .p.57 3.1.
1.3 ASIO Driver Installation . p. 593.1.2
1.4 Easy Setup . 603.13
1.5 Required Software Settings for Startup .p.63
1.6 Spin! 2+ Interface Controller . 643.2 -
Software General Survey . 64 3.2
2.1 Shortcut: New Spin! Library .p. 65 3.2
2.2 Shortcut: Open Spin! Library . 653.2
2.3 Shortcut: Auto Search . 653.2
2.4 Shortcut: Save Spin! Library .p.65.2.
2.5 Shortcut: Stop Spin! Library .p.65.2
2.6 Shortcut:Play Spin!List .p.652
2.7 Shortcut: Loop Spin! List .p. 652
2.8 Shortcut: shuffle Spin! List 3.2
2.9 Shortcut: Previous.. p.65
2.10 Shortcut: Next . p. 653
2.11 Shortcut: Music Explorer/Audio Input .p.63.3
2.12 Shortcut: Spin! Library .p.653
2.13 Shortcut:Spin!List.. p.65 3.3
2.14 Shortcut: Category View 3.3
2.15 Shortcut:X-Fader Match View .65.3
2.16 Shortcut: Master/Rec. Volume 3.3
2.17 Shortcut: Beat Match View p.65
2.18 Shortcut: Options .p.654
2.19 Free MIDI Learning.. p.65 3.4
2.20 Safe Mode.. 3.4
2.21 Beat Match View . p. 664
2.22 Complete View .p. 664
2.23 Needle View .p.66
2.24 Master 3.5
2.25 Mic Rec. Function .p.675
2.26 Load Track.. 3.5
2.27 Bypass Function.. 3.5
2.28 Label Monitor .p.685
2.29 Gain Knob.. 3.5
2.30 Pitch Mode 3.5
2.31 Pitchfader.. p.69 3.5
2.32 Vinyl timecode Activation . p. 695
2.33 Spin! Mode Button .p.69.5
2.34 Play/Pause Button . p. 85
2.35 Cue Button.. 3.5
2.36 Forward and Reverse Button .p. 705
2.37Skip Buttons .p.35
2.38 Fast Search Buttons .p. 205
2.39 Pitch Bend Buttons .p. 705
2.40 Spin! Library . p. 71
2.41 Flanger Effect .p. 326
2.42 Filter Effect.. 3.6
2.43 Delay Effect.. 3.6
2.44 Key Mode .p.35
2.45 Beat Loop/Auto Loop Function .p. 736
2.46/47 Manual Loop Function .p. 736
2.48 Crossfader . p. 73
2.49 Beat Match Function .p.74
2.50 Cue Points .p.74
2.51 Info View.. p.74
2.52 Category View .p.75
2.53 Music Explorer/Audio Input .p. 75
2.54 Monitor Function . p. 75
66
.71
73
74
74
m = 311 ;
75
75
75 -
Reloop Spin! 2 Menu Navigation.. p.76
Menu Item File . p. 76
Options.. p.76
Learning. p. 76
Quit Spinning. p. 76
Menu Item Spin! Library . p. 76
3.2.1 New .p.76
3.2.2 Open.. .p.76
3.2.3 Save .p.76
3.2.4 Save as.. p. 76
S2.5 Import.. p.76
3.2.6 Export.. p.76
Automatic Search .p.76
2.8 Add Track .p.76
552.9 Select All.. p. 76
3.2.9.1 Delete .p.76
Track Menu. p. 76
55.3.1 Track Preferences .p.76
53.2 Save ID3 TAG Attributes .p.76
3.3.3 Show in Windows Explorer .p.76
3.3.4 Analyze BPM Manually.. p.76
53.3.5 Analyze BPM Automatically .p.76
3.3.6 Delete Tracks Permantly .p.76
Spin! List Menu. p. 77
3.41 Play Spin! List.. p.77
3.4.2 Stop Spin! List .p.77
664.3 Add to Spin! List .p.77
664.4 Safe Mode.. p.77
3.5 Spin! Workspace Menu p. 77
1.675.1 Workspace Arrangeable . p. 77
3.5.2 Tool Tips.. p. 77
3.5.3 Bar .p.77
685.4 Full Screen View .p.77
3.5.5 Menu Bar View .p.77
3.5.6 Shortcut View .p.77
3.5.7 Info View.. p. 77
695.8 Preview .p.77
59.5.9 Spin! Library View .p. 77
695.9.1 Spin! List view .p. 77
3.5.9.2 Category View .p.77
705.9.3 Music Explorer/Audio Input .p. 77
35.9.4 X-Fader Match View .p.77
36.9.5 Master/Rec Volume .p.77
705.9.6 Beat Match View .p. 77
336 Help Menu. p. 77
3.6.1 Easy Setup.. p.77
3.6.2 Manual.. p.77
3.3.3 www.reloop-spin.com .p.77
736.4 Configuration Log .p. 77
736.5 About Spin! 2 . p. 77
- Adjustments .p. 78
4.1 Options .p.78
4.1.1 System .p.78
4.1.2 BPM and Tools .p.79
4.1.3 Audio Devices .p.80
4.1.4 Timecode . p.81
4.1.5 Workspace .p.83
4.1.6 Shortcuts .p.84
4.1.7 MIDI Controller.. p.85
4.2 Auto Search . p. 86
4.3 Track Preferences . p. 87
4.3.1 Information .p.87
4.3.2 File.. p.87
4.3.3 Track Settings .p.88
4.3.4 Volume .p.88
4.3.5Lyrics .p.89
4.3.6 Artwork .p.89
4.3.7 Equalization.. p.90
4.3.8 Cue Points .p.90
4.3.9 Loop .p. 91
4.4 MIDI Learning . p. 91
5. MIDI Mapping.. p. 92
6. FAQ .p.93
6.1 Do I need a special stylus in order to use Spin! 2? .p.93
6.2 Can I buy the timecode records separately? .p. 93
6.3 Why won't my computer recognize the Spin! 2 interface? . p.93
6.4 Why does no timecode signal come from one turntable? p. 93
6.5 Why do I only hear a high-pitched tone? p. 93
6.6 Why is the music playing in reverse? p. 93
6.7 Can I play my records at 45 RPM instead of 33 RPM?
6.8 Why are both tracks being played on the same channel? p. 93
6.9 Why is there no signal? .p. 94
6.9.1 Can I use the interface as sound card? .p. 94
6.9.2 What do I have to observe if I use a Shure M44-7?
6.9.3 Why is the music skipping a beat now and then? .p. 94
6.9.4 Why does the speed / the pitch of my tracks fluctuate? .p. 94
6.9.5 Is there an auto mix / party mix function? .94
6.9.6 How can I optimise the performance of Spin1 2?
6.9.7 What can I do if I hear humming or buzzing when using a laptop? .p. 95
6.9.8 Why is the signal distorted, why is there too much bass, why are the high frequencies missing? p. 95
7. Hot Key Overview .p.95
8. Spin! 2+ Interface Specifications .p.96

OPERATION MANUAL
For your own safety, please read this operation manual carefully before initial operation! All persons involved in the Installation, setting-up, operation, maintenance and service of this device must be appropriately qualified and observe this operation manual in detail. This product complies with the requirements of the applicable European and national regulations. Conformity has been proven. The respective statements and documents are deposited at the manufacturer.
Congratulations on purchasing your Reloop Spin! 2 system. Thank you for placing your trust in our disc jockey technology. Before operating this equipment we ask you to carefully study and observe all instructions. Please remove the Spin! 2 interface from its packaging. Check before initial operation to make sure that the device has not been visibly damaged during transport. If you detect any damage to the power cable or the casing, do not operate the device. Contact your specialised dealer.
SAFETY INSTRUCTIONS
CAUTION!
Please exercise particular caution when handling 240 V power voltage. This voltage rating may lead to a critical electrical shock! Any damage caused by the non-observation of this operation manual excludes any warranty claims. The manufacturer is not liable for any damage to property or for personal injury caused by improper handling or non-observation of the safety instructions.
This device left the factory in perfect condition. To maintain this condition and to ensure a risk-free operation the user must observe the safety instructions and warnings contained in this operation manual.
- For reasons of safety and certification (CE) the unauthorised conversion and/or modification of the device is prohibited. Please note that in the event of damage caused by the manual modification to this device any warranty claims are excluded.
- The inside of the device does not contain any parts which require maintenance, with the exception of wear parts that can be exchanged from the outside. Qualified staff must carry out maintenance, otherwise the warranty does not apply!
- The Fuse must exclusively be exchanged against fuses of the same class, with the same trigger features and nominal current rating.
- Ensure that the power will only be supplied after the device has been fully set up. Always plug in the mains plug last. Ensure that the mains switch is in the "OFF" position when connecting the device to power.
Only use cables that comply with regulations. Observe that all jacks and bushes are tightened and correctly hooked up. Refer to your dealer if you have any questions.
- Ensure that when setting up the product the mains cable is not squashed or damaged by sharp edges.
- Prevent the mains cable from coming into contact with other cables! Exercise great care when handling mains cables and connections. Never touch these parts with wet hands!
- Connect the power cable exclusively to appropriate shock-proof outlets. The only supply point to be used is a supply outlet in accordance with specifications of the public supply network.
- Disconnect the device from the supply outlet when not in use and before cleaning! Be sure to hold the mains plug by the body. Never pull the mains cord!
- Position the device on a horizontal and stable low-flame base.
- Avoid any concussions or violent impact when installing or operating the device.
- When selecting the location of installation make sure that the device is not exposed to excessive heat, humidity, and dust. Be sure that no cables lie around openly. You will endanger your own safety and that of others!
- Do not rest any containers filled with liquid that could easily spill onto the device or in its immediate vicinity. If, however, fluids should access the inside of the device, immediately disconnect the mains plug. Have the device checked by a qualified service technician before re-use. Damage caused by fluids inside the device is excluded from the warranty.
- Do not operate the device under extremely hot (in excess of 35^ ) or extremely cold (below 5^ ) conditions. Keep the device away from direct exposure to the sun and heat sources such as radiators, ovens, etc. (even during transport in a closed vehicle). Never cover the cooling fan or vents. Always ensure sufficient ventilation.
- The device must not be operated after being taken from a cold environment into a warm environment. The condensation caused hereby may destroy your device. Do not switch on or operate the device until it has reached ambient temperature!
Controls and switches should never be treated with spray-on cleaning agents and lubricants. This device should only be cleaned with a damp cloth. Never use solvents or cleaning fluids with a petroleum base for cleaning. - When relocating, the device should be transported in its original packaging.
- When starting operation, the crossfaders and volume controls of your amplifier must be set to minimum level. Bring the loudspeaker switches into the "OFF" position. Wait between 8 to 10 seconds before increasing the volume to avoid shot noise created by transient effect, which could cause damage to loudspeakers and the diplexer.
Devices supplied by voltage should not be left in the hands of children. Please exercise particular care when in the presence of children. - At commercial facilities the regulations for the prevention of accidents as stipulated by the organization of professional associations must be observed.
- At schools, training facilities, hobby and self-help workshops the operation of the device must be monitored with responsibility by trained staff.
- Keep this operation manual in a safe place for later reference in the event of questions or problems.
APPLICATION IN ACCORDANCE WITH REGULATIONS
- This device is a professional digital timecode system that can control software via the included timecode vinyl records and CDs respectively. The device should be connected via USB cable to a computer.
- This product is authorised for connection to 240 V, 50 Hz AC and is designed exclusively for indoor application.
- If the device is used for any other purposes than those described in the operation manual, damage can be caused to the product, leading to exclusion of warranty rights. Moreover, any other application that does not comply with the specified purpose harbours risks such as short circuit, fire, electrical shock, etc.
- The serial number determined by the manufacturer must never be removed to uphold the warranty rights.
MAINTENANCE
- Check the technical safety of the device regularly for damage to the mains line or the casing, as well as for wearout of wear parts such as rotary and sliding switches.
- If it is to be assumed that a safe operation is no longer feasible then the device must be disconnected and secured against accidental use. Always disconnect the mains plug from the outlet!
- It must be assumed that a safe operation is no longer feasible if the device bears visible defects, if the device no longer functions, following longer storage under unfavourable conditions or after major transport stress.
- This manual, video tutorials, tips and tricks and additional downloads can be found on:
www.reloop-spin.com
MINIMUM SYSTEM REQUIREMENTS:
PC:
- Current processor (Pentium III, 1 GHz recommended)
- Windows XP (SP2 or higher), Vista (SP1 or higher) operating system
Free USB-Port
-1GB RAM - Sufficient free hard disk space for music files
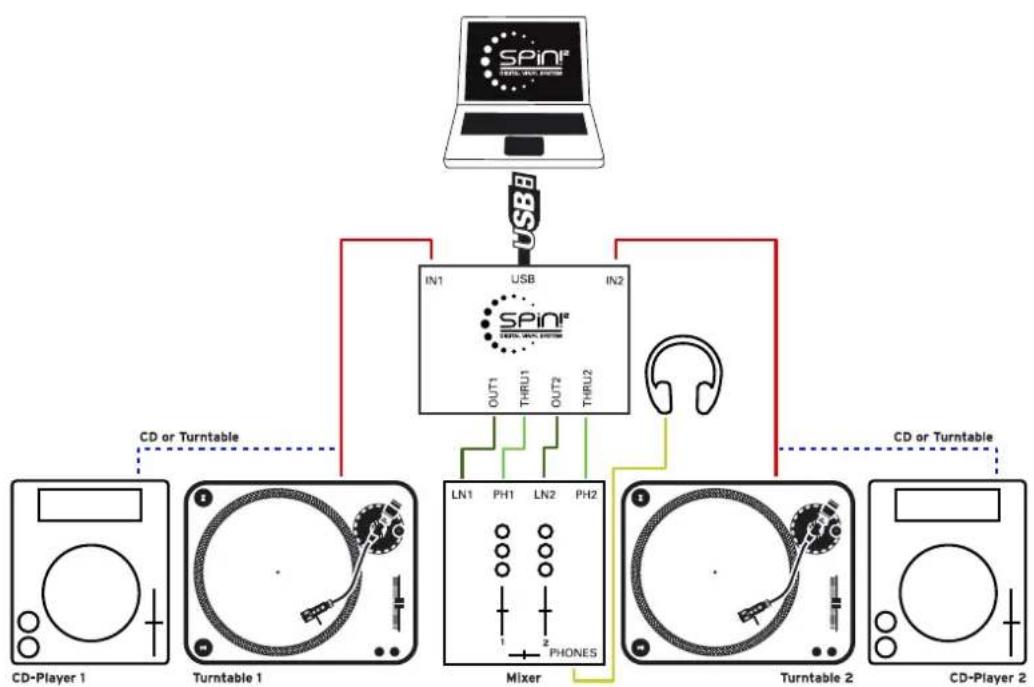
1. CONNECTION AND SOFTWARE INSTALLATION
1.1 Connections
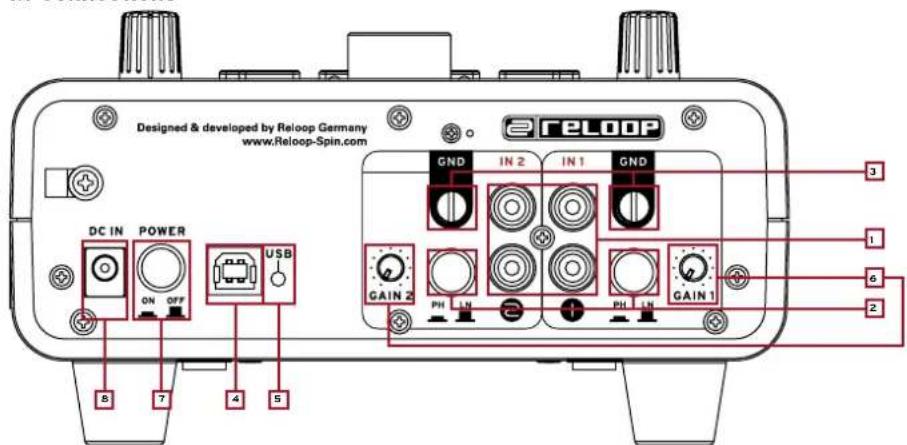
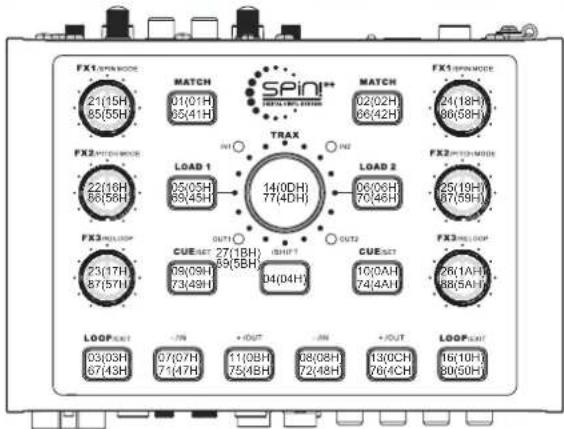
DESIGNATIONS
Rear Side:
- Phono/Line Audio Inputs
- Phono/Line Switch
- GND Grounding Screws
- USB Port
- USB Status LED
- Input Gain Knob
- ON/OFF Button
- Mains Input
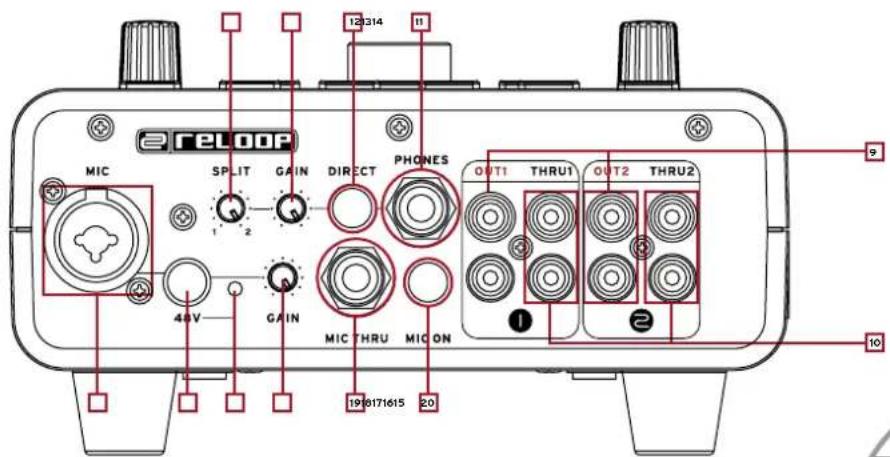
Front Slide:
- Line Audio Outputs
- Through Outputs
- 6.3 mm Headphones Input
- Direct Button
- Headphones Gain Knob
- Headphones Split Knob
- Microphone Input
- 48 V Phantom Power Button
- 48 V Phantom Power Status LED
- Microphone Gain Knob
- 6.3 mm Mic Through Inputs
- Mic On Button
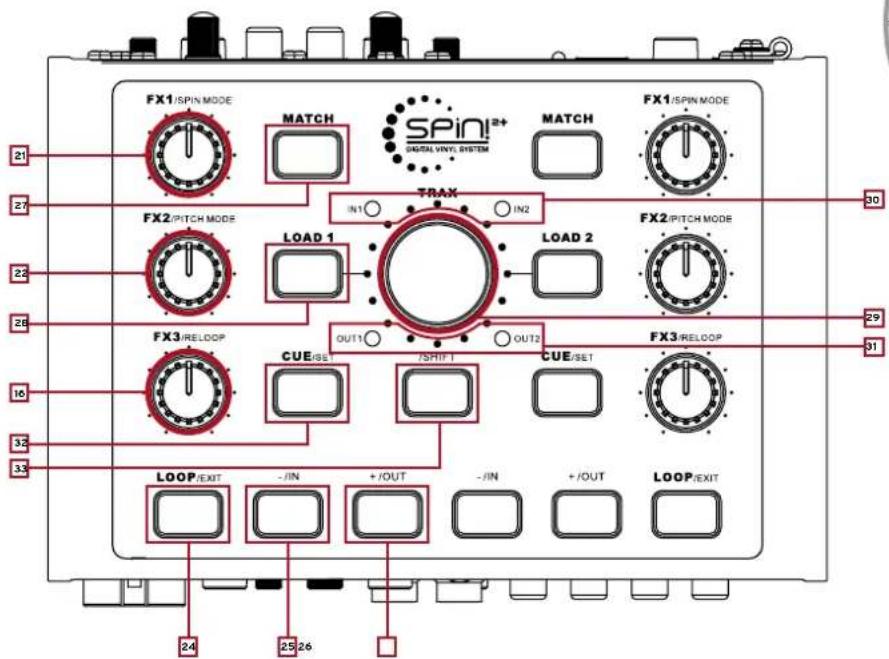
Surface:
- FX1 / Spin Mode Knob
- FX2 / Pitch Mode Knob
- FX3 / Reloop Knob
- Loop/Exit Button
25.-/Loop In Button - +/ Loop Out Button
- Match Button
28.Load1/2Buttons - Trax Encoder
- Signal Input LEDs
- Signal Output LEDs
- Cue / Set Button
- Shift Button
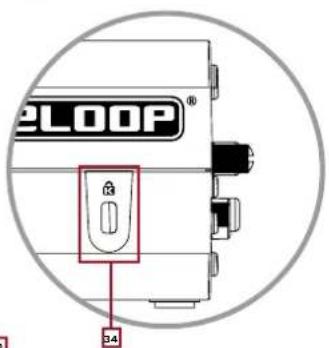
Lateral View:
- Kensington Safety Slot
a) Connect your turntable's or CD player's outputs to the corresponding inputs (1 or 2) of the Reloop Spin! 2+ Interface -1-. If required connect your turntables to the GND grounding screw -3-. Depending on the connected player de-/activate the phono pre-amp -2-. Adjust the signal input volume with the Input Gain Knob -6-. This adjustmetn can vary depending on the connected medium.
b) Connect the line outputs -9- of the Spin! 2 Interface with the line inputs of your mixer. In order to loop through a conventional vinyl signal connect the Through Outputs -10- with the phono inputs of your mixer. This way it is possible to switch between the timecode and analogue vinyl signal by simply using the phono/line switches.
NOTE!
The Signal Input LEDs 1, 2 -30- light up when there is an incoming signal. The Signal Output LEDs -31- light up when there is an outgoing signal.
c) You can connect a microphone to the Microphone Input -15-. If you use a studio condenser microphone you can activate the rquired phantom power by pushing the 48 V Phantom Power Button 16-. The 48 V phantom power status LED -17- lights up when this function has been activated. With the Mic On button -20- you can turn the microphone on and off respectively.
NOTE!
The microphone input is coupled with the stereo RCA input 1. If turned on input 1 will be blocked.
With the Microphone Gain Knob -18- you can adjust the volume. Connect a 6.3 mm jack cord to the Mic Through Input -19- and the microphone input of your mixer in order to loop through the microphone signal directly. This way you can on the one hand record the microphone signal via the software and on the other hand you can directly tap the microphone signal at your mixer.
d) You can connect your headphones to the Headphones Input -11-. Adjust the volume via the Headphones Gain Knob -13-. Via the Headphones Split Knob -14- you can either monitor output 1 (left position), output 2 (right position) or both outputs (middle position). With activated Direct function -12- the inputs can directly be monitored without any latency.
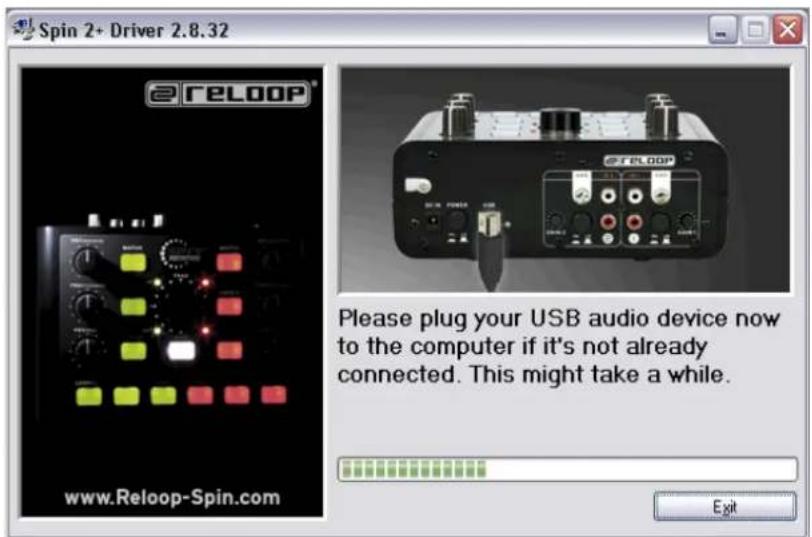
e) Connect the enclosed USB cord to the USB Port -4- of your Spin! 2 Interface and a free USB port of your computer. Connect the mains input -8- to the mains cord and a power outlet. Turn on the interface by pushing the ON/OFF button -7-. You can connect a safety cord to the Kensington Safety Slot -34-.
Now the following messages should appear on your monitor (example for XP):
New hardware found - Reloop Spin! 2 Interface

New hardware found - USB audio device

New hardware found - Your new hardware is installed and ready to use.

The basic installation of your Spin! 2+ Interface under Windows XP & Vista is carried out as Plug, N' Play without the need for special drivers.
CONNECTIONS
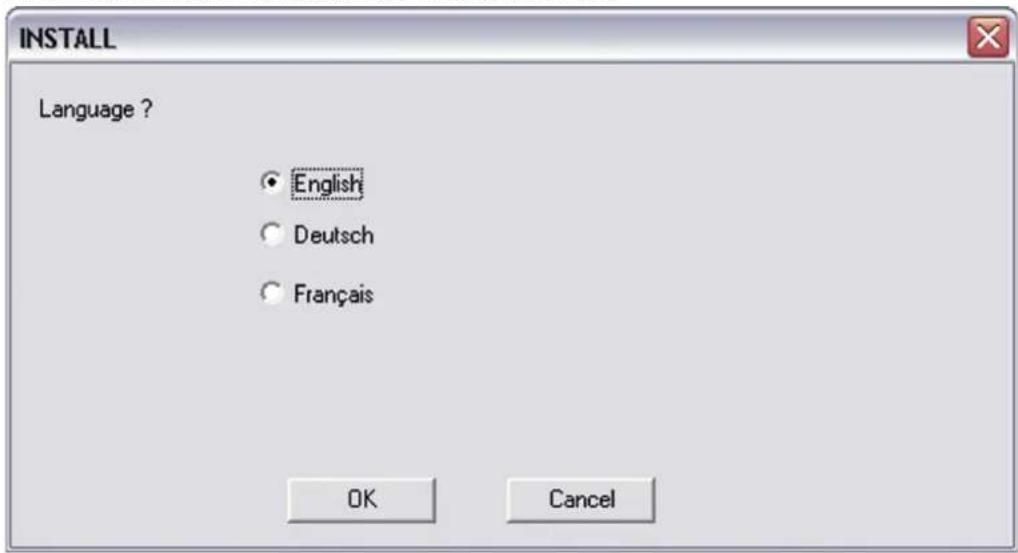
1.2 SPIN! 2 SOFTWARE INSTALLATION
After having carried out the hardware setup you can now continue with the software and ASIO driver installation. To do so please insert the Spin! 2 installation CD in the CD ROM drive of your computer. If the setup does not start automatically please carry out the file
,Install_reloop.exe" manually.
Choose the installation language and confirm with ,OK".
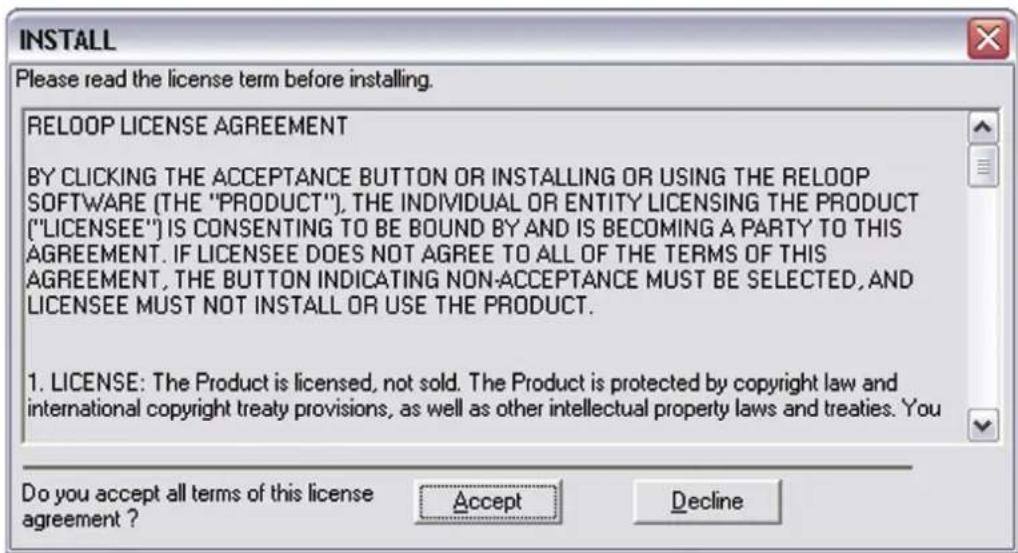
Read and accept the licensing agreement.
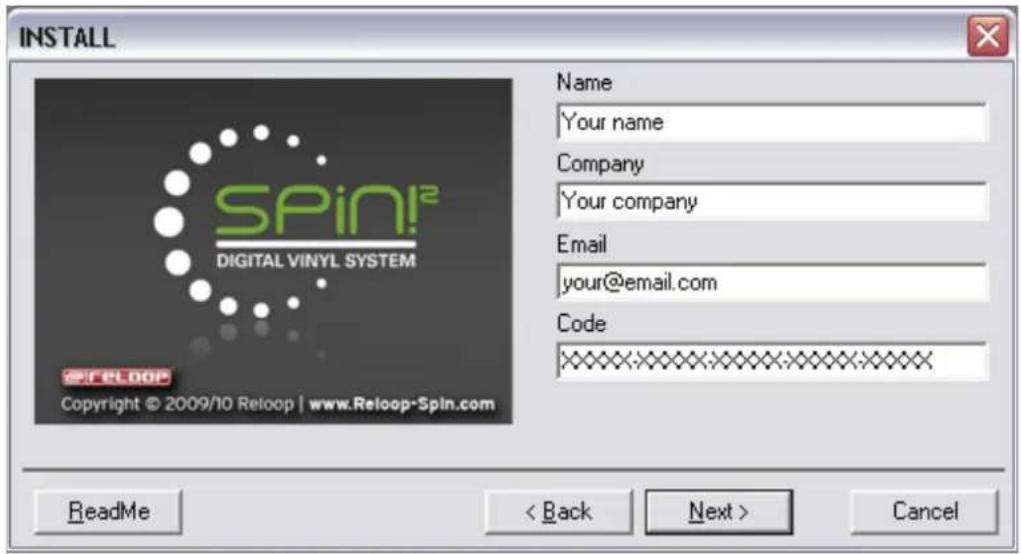
Now you have to enter your name, company if desired, e-mail address (required) and the serial number. You can find the serial number on the back side of the Spin! 2 installation CD-cover. Confirm the entries with „Next".
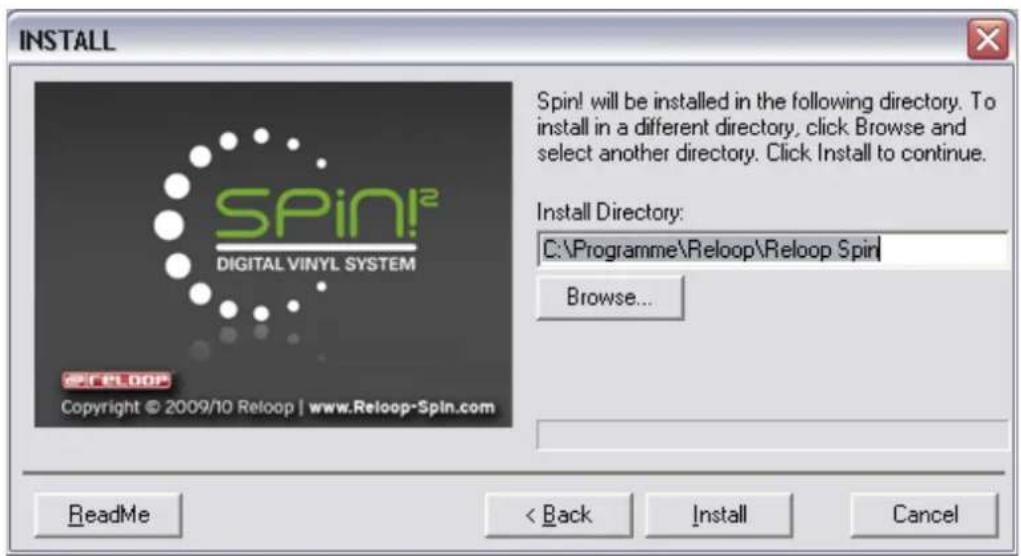
Now choose the installation directory where you would like to install your Spin! 2 software or use the standard directory (recommended). Please confirm with „Next".
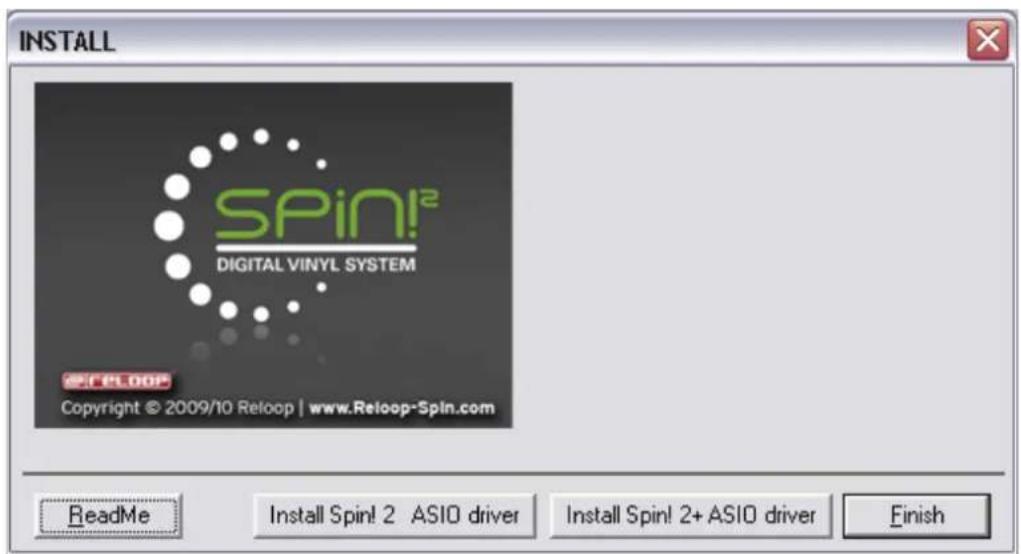
After a successful installation you should now install the ASIO driver for your Spin! 2+ Interface. To do so click on „Install Spin! 2 ASIO driver" and „Install Spin! 2+ ASIO driver" respectively (depending on the purchased interface version).
1.3 ASIO DRIVER INSTALLATION
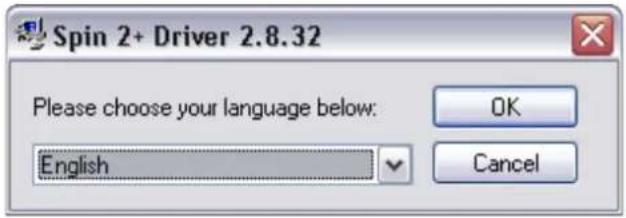
After the ASIO setup menu appears, first choose your language.
As second step click on "Install driver".
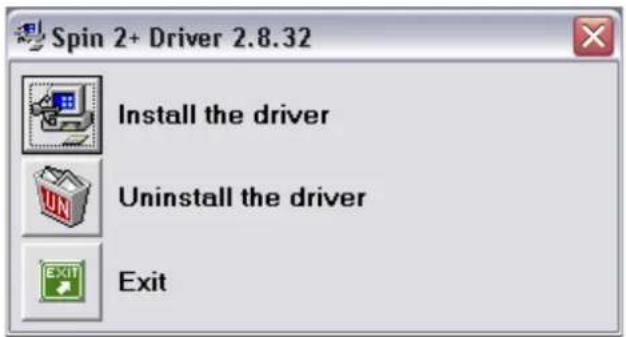
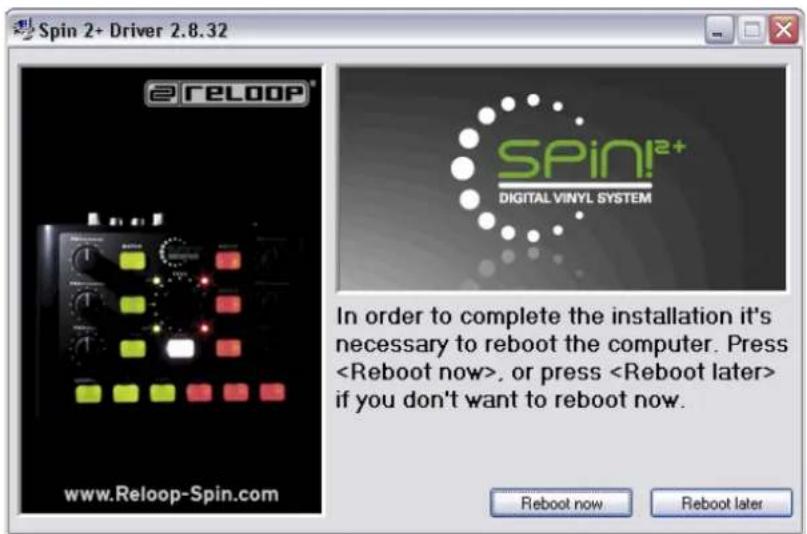
If your Spin! 2+ Interface has not been connected yet you will be asked to do so now, as displayed below. Now the ASIO drivers are being installed.
You may be asked to disconnect the USB cord from the interface and then to re-plug it. In order to finalize the ASIO installation you should reboot your computer.
On the CD you can also find ASIO drivers for 64 bit systems which you can execute manually if desired.
Log regularly onto www.reloop-spin.com for all the latest updates.
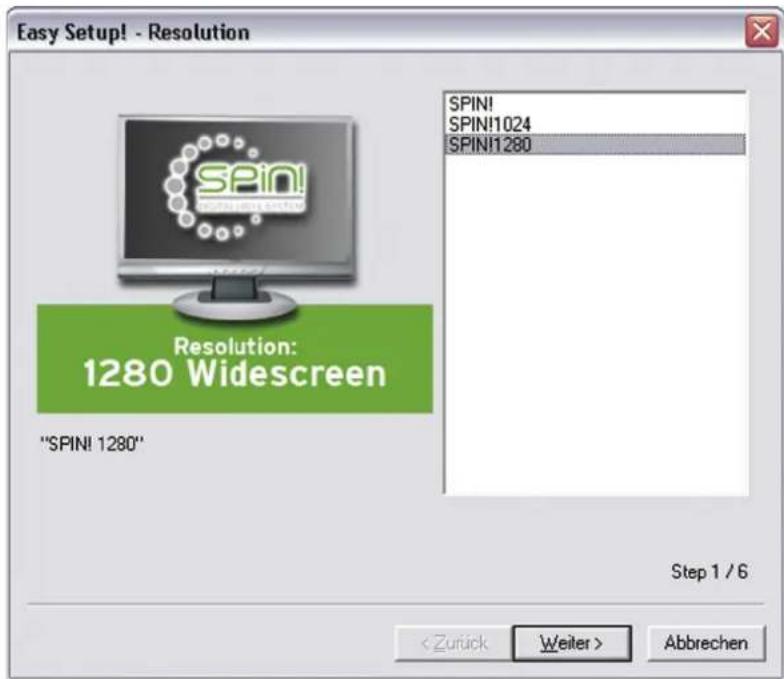
1.4 EASY SETUP
When starting Reloop Spin! 2 for the first time the easy setup will start automatically.
NOTE!
You can also carry out the setup manually under the menu item > Help > Easy Setup!
1. Resolution
In this first step please choose the screen resolution.
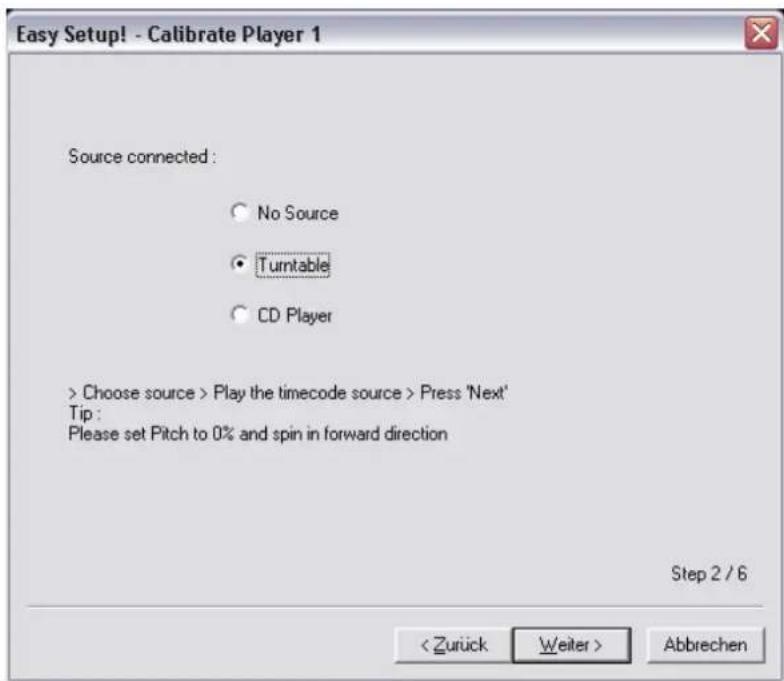
2. Calibration Input 1
Now you have to carry out the calibration. Choose the according playback device. Switch to play mode and click „Next".

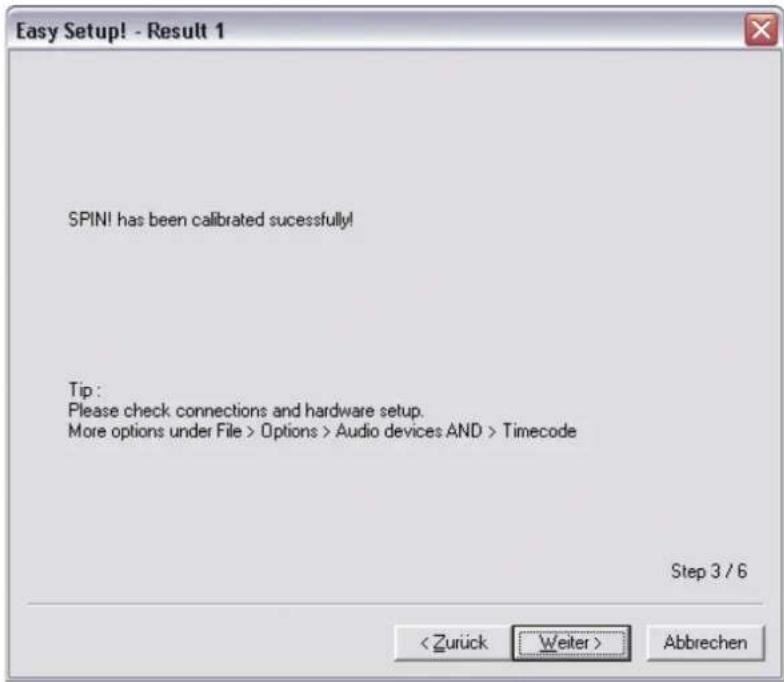
3. Calibration Result for Channel 1
After a successful calibration the message „Spin! has been calibrated successfully" should appear.
NOTE!
If the message „Spin! has not been installed properly" should appear please check your connections or change your turntables' needles.
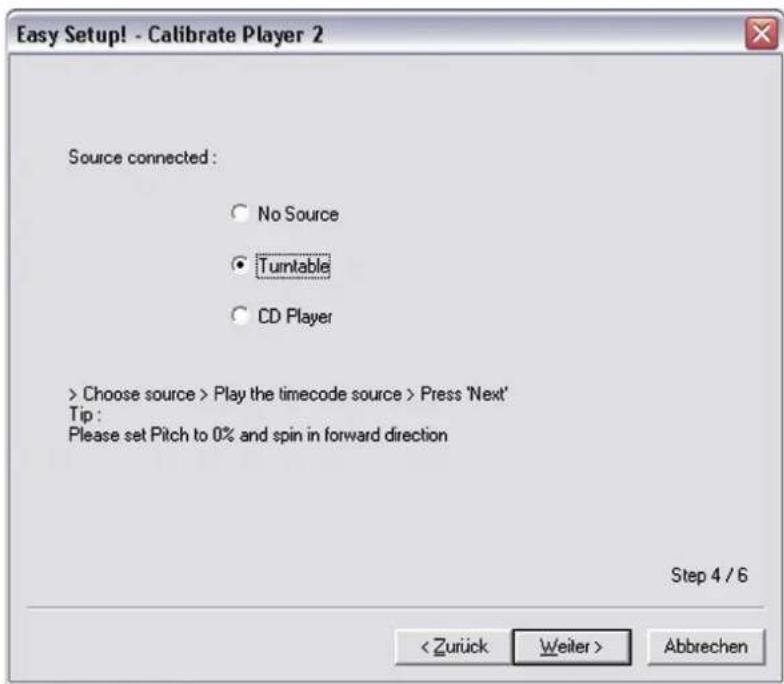
4. Calibration Input 2
Please choose the same adjustmetns for your second playback device.
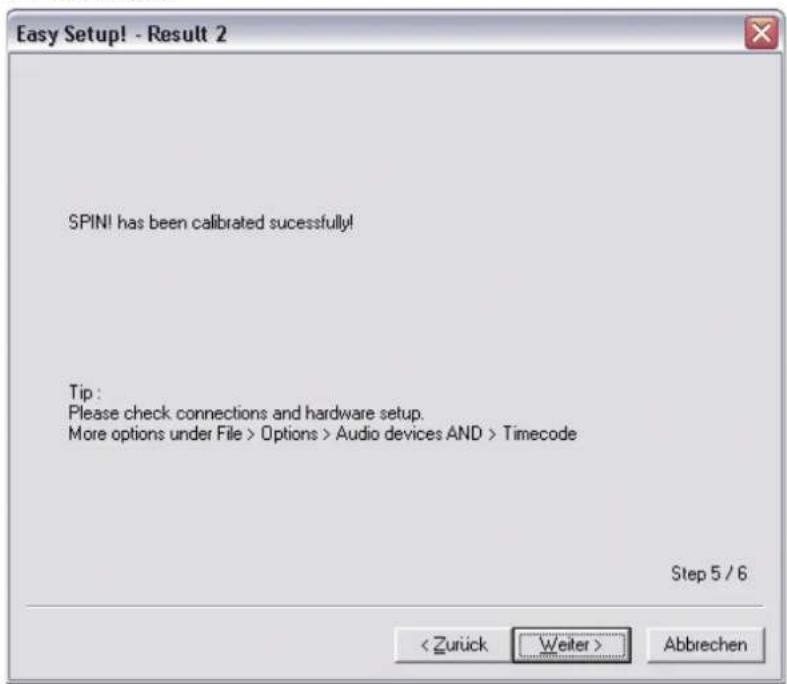
5. Calibration Result Input 2
A successful calibration result should appear here as well.
NOTE!
The calibration is only necessary when using turntables. When connecting CD players this step will be left out.
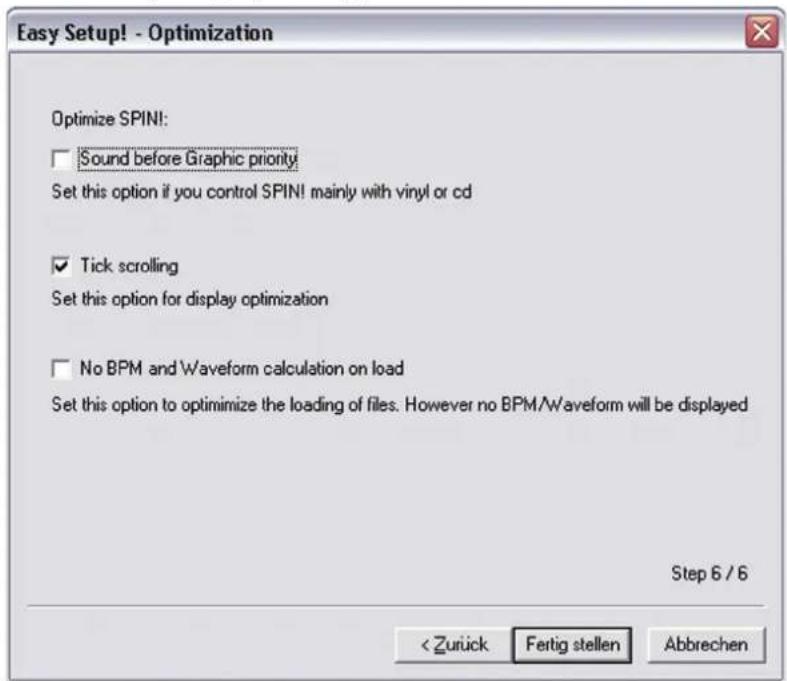
- If the setup has been successful your entries will be confirmed. Close the easy setup by clicking "Finish".
NOTE!
In order to optimise Spin! 2 there are three possibilities in the last installation step.

1. Sound Before Graphic Priority
If this function is activated the sound performance will be assigned before graphics. This is an advantage when using older or inefficient computers (when experiencing dropouts for example).
2. Tick Scrolling
The waveform remains still. The line (corresponds to the needle's position) moves.
3. BPM and Waveform
If this option is activated Spin! 2 determines the BPM and waveforms when loading a track. (default and recommended)
1.5 REQUIRED SOFTWARE SETTINGS FOR STARTUP
Following, the first necessary steps in order to be able to directly work with the Spin! 2 software will be explained.
NOTE!
The complete manual can be found following the menu > Help > Manual.
a) Importing Music
First import all your music to the Spin! Library. To do so go to the menu item > Spin! Library > Auto Search.
It is possible to either search for single folders or directories automatically for music. Confirm your choice with „OK".
b) Loading Tracks
After having imported all your music you can load single tracks into player 1 and 2. There are three possibilities to do so:
- Via mouse
Use the drag & drop function in order to load a track to a player.
- Via Trax Select
On the Spin! 2 timecode record's B-side the last groove has been conceived for s e a r c h i n g tracks. Drop the needle on this groove in order to browse the Spin! library. Stop the record at the desired track and put the needle back to the beginning of the record in order to load the desired track.
- Via Keyboard
Browse the Spin! library with the up/down cursors to the desired track and push enter in order to load this track. The active player can be selected via the TAB key.
c) Activating the Timecode Mode
Activate the Timecode Mode via the „Vinyl" button, right below the label monitor.
- Via Trax Wheel
Navigate through the Spin! Library by turning the Trax Wheel and load the desired track via the load buttons.
Now you can start mixing.

1.6 INTERFACE CONTROLLER
With your Spin! 2+ Interface it is possible to directly control the most important software functions without having to use the mouse. The control elements will be explained in detail below.
a) Track Browsing & Beat Match
By turning the Trax Encoder -29- you can navigate through the Spin! Library. By pushing the Load Buttons -28- you can load a track to the corresponding player. If desired you can synchronise a track with the opposing one at the push of a button by using the Match Buttons -27-.
b) Cue & Loop Section
By pushing the Shift Button -33- and the Cue / Set Button -32- you can set a cue point. In order to call up the last set cue point push the Cue / Set Button -32-.
Push the Loop button -24- in order to set an automatic beat loop. Via the +/- buttons -25/26- you can adjust the bar length. By pushing the Loop Button -24- again you leave the beat loop. In order to set a manual looppush the Shift Button -33- and the In Button -25- for the Loop In Point and Shift -33- and the Out Button -26- for the Loop Out Point. You can leave the manual loop by pushing the Shift Button -33- and the Exit Button -24-.
c) Effect & Mode Section
Via the effect knobs FX 1-3 -21, 22, 23- you can adjust the three master effects. In order to change the Spin! Mode hold the Shift Button -33- and turn the Spin! Mode Knob -21-. You can change the Pitch Mode by holding Shift -33- and turning the Pitch Mode Knob -22-.
Activate the Reloop Function by holding the Shift Button -33- and turning the Reloop Knob -23-.
NOTE!
Visit www.reloop-spin.com regularly for video tutorials and updates.
2. SOFTWARE GENERAL SURVEY

- Shortcut: New Spin! Library
Here you can create a new, empty library that can be filled with audio files as required.

- Shortcut: Open Spin! Library
Opens an existing library.

- Shortcut: Auto Search
In order to import a bulk of audio files you can comfortably browse your hard disk or, if required, single directories via this function.

- Shortcut: Save Spin! Library
Saves your library.

- Shortcut: Stop Spin! List
Stops the playback of a Spin! List.

- Shortcut: Play Spin! List
Starts the playback of a Spin! List.

- Shortcut: Loop Spin! List
The Spin! List will be repeated in an endless loop.

- Shortcut: Shuffle Spin! List
A random playback of the Spin! List will be started.

- Shortcut: Previous
Load the previous track from the Spin! List to your player.

- Shortcut: Next
Load the next track from the Spin! List to your player.

- Shortcut Music Explorer / Audio Input
Fades the Music Explorer / Audio Input view in and out.

- Shortcut: Spin! Library
Fades the Spin! Library in and out.

- Shortcut: Spin! List
Fades the Spin! List in and out.

- Shortcut Category View
Fades the Category View in and out.

- Shortcut X-Fader Match View
Fades the X-Fader Match View in and out.

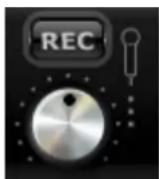
- Shortcut: Master/Rec. Volume
Fades the Master/Rec. Volume View in and out.

- Shortcut: Beat Match View
Fades the Beat Match View in and out.

- Shortcut: Options
In this option menu you can carry out a variety of adjustments. Further information regarding this matter can be found in the chapter 4.1 in this manual.

- Free MIDI Learning
Activates the MIDI learning mode. Please refer to chapter 4.4 for further information.

- Safe Mode
If the Safe Mode is active it is not possible to load a track to the currently active player. This prevents unwanted loading of new music when using a player.
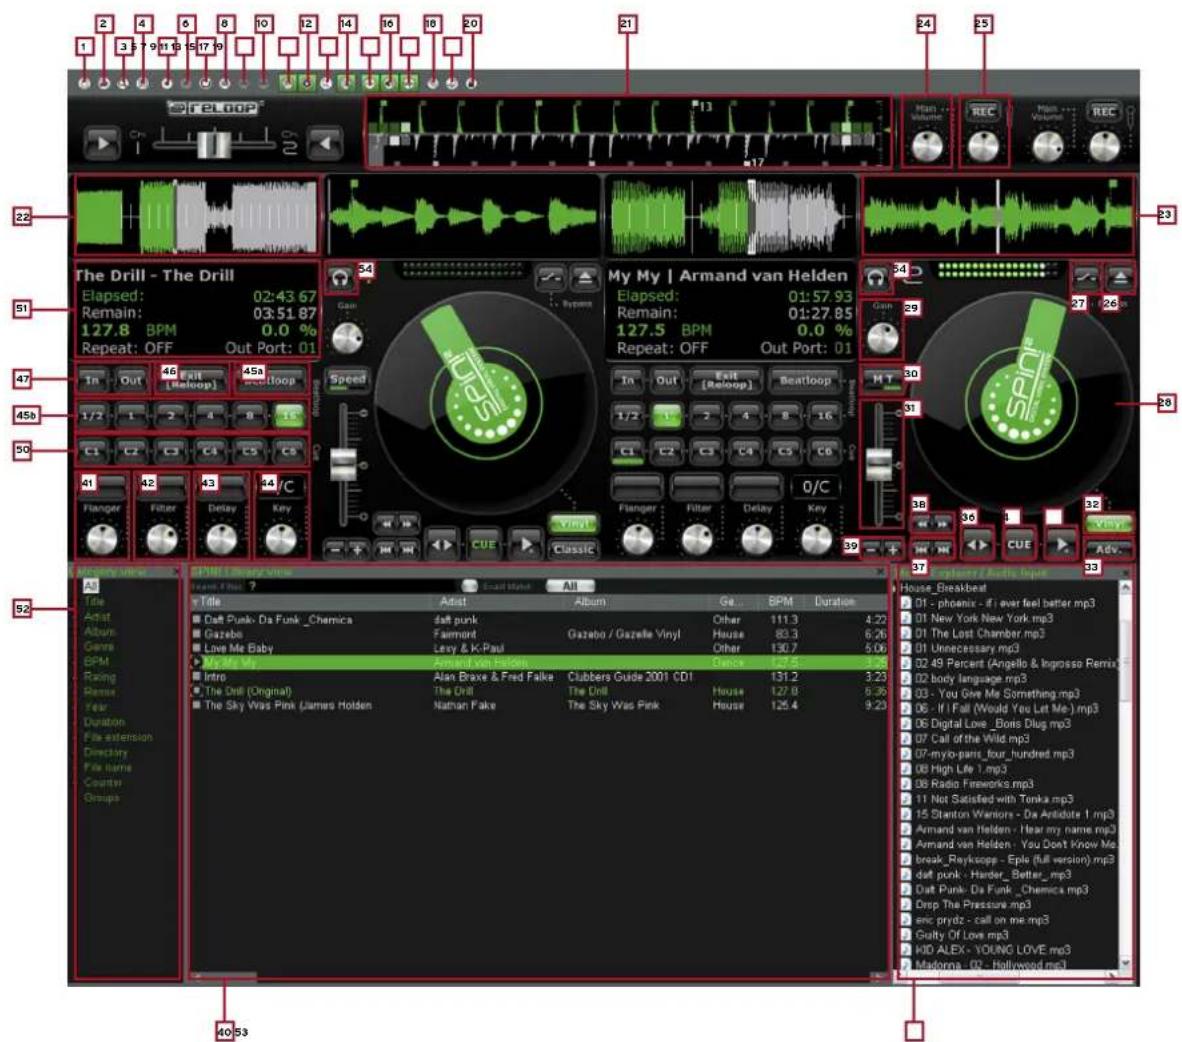
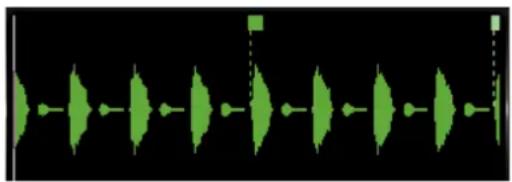
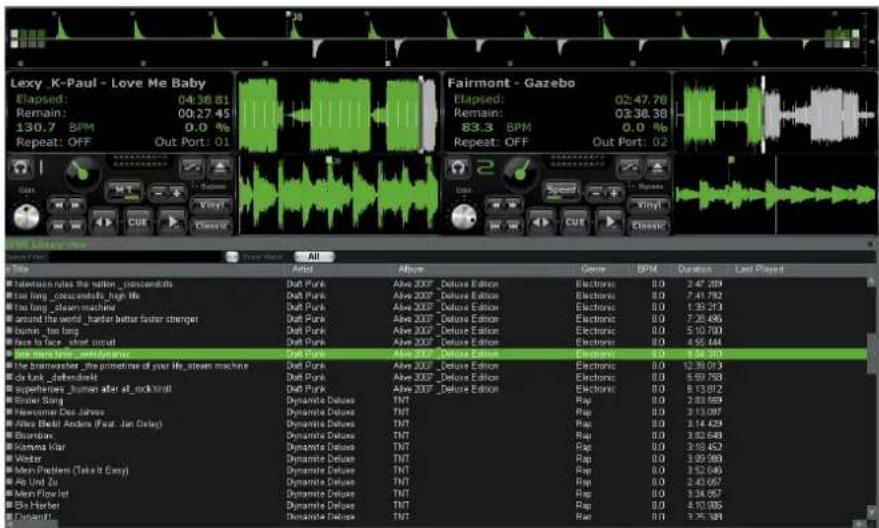
21. Beat Match View
The Beat Match View shows you the peaks of both tracks - the two displays are arranged vis-à-vis. It is possible to quickly recognize whether bass drums and snares are running simultaneously. This way, if the two tracks have been matched regarding the pitch, it is possible to easily and quickly synchronise two tracks. The left player 1 is displayed green and the right player 2 is displayed grey.
By activating the Bar function (menu item 3.5 Spin! Workspace, subitem 3.5.3 Bar) the advanced Beat Match View will be displayed.

a) Peaks
Display of the wave peaks.
b) 4/4 Bar Counter
The four small boxes indicate the 4/4 bar. With each bar a further box will light up. With this help you can bring in the track according to the first of four beats.
c) Beat Bars
Display the single beat bars synchronically to the peak display.

NOTE!
If the Beat Bars are not correctly in line with the peak you can adjust this in the Needle View. To do so hold the displayed bar in Needle View with the mouse and drag it accordingly to the left or right.
d) 16 Bar Counter
This numeric display counts each 16 bars. If for example a 7 is displayed, 7 bars of the track have been played. As usually every 16 bars there is a change of the suspense curve (breaks, effects, etc.) you can use this help as mix staring point.
e) Zoom Adjustment
Here you can adjust the zoom factor of the Beat Match View.
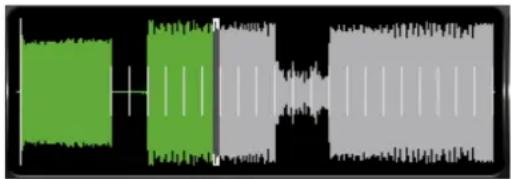
22.Complete View
In the Complete View you can see the complete waveform of a track. The dramatic arch of a track can be recognized well and at the blink of an eye you can also see where the intros and breaks are. The elapsed part of a track is displayed green and the remaining part of a track is displayed grey.
23. Needle View
The zoom range can be adjusted from 2 - 16 beats. To do so click the right mouse button in needle view and select the according value from the submenu. Furthermore you can choose whether the left, right, stereo or both channels mixed should be shown in the waveform. Select the according option with a right mouse click in Needle View.
There are two types for the Needle View display:
Waveform Scrolling
The waveform moves. A vertical line in the middle represents the needle.
- Tick Scrolling
The waveform remains still. The line (corresponds to the needle's position) moves.
NOTE!
This option is system-resource saving.
Select the corresponding option with a right mouse click in Needle View.
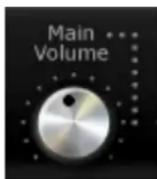
24. Master
Adjust the master volume for player 1 and player 2 respectively.
25. Mic Rec. Function
Due to the integrated Mic Rec. Function (Mic Spin!) you can record a sample via microphone that can later be used for scratching for example.
Follow these steps:
Sample recording
- Under Audio Input (Music Explorer) assign the input "O: Reloop Spin! 2- Interface 1" via drag & drop to one of the players
- Adjust the volume level via the mic volume knob
- Push the Rec button
- A save dialogue will appear; enter name and position where the sample should be stored
- After pushing "save" the recording will start; stop the recording by pushing the Rec. button once more
Mic Spin! function (playing and scratching a sample)
- Via drag & drop assign a desired track from the Spin! Library or the recorded sample to a player in order to manipulate it via record.
NOTE!
The mic input is coupled to the input 1. As soon as you connect the microphone the phono/line input 1 is deactivated. If you would like to record a mic smaple during a mixing session make sure that player 2 is currently playing. After recording disconnect the microphone in order to be able to control player 1 via records.
26.Load Track
With this function it is possible to load single files to the player.

27. Bypass Function
If the Bypass Function has been activated the input signal of the Spin! 2+ Interface will be directly routed through the software. Deactivate the bypass function for timecode use.

28.Label Monitor
The Label Monitor is a kind of virtual record that moves along according to the timecode record. Each movement that is made with the record will be carried out synchronously to the Label Monitor. The Label Monitor is a helpful marker for beat juggling.
29. Gain Knob
The Gain Knob is, similar to a mixer, the final amplification of a channel. Tracks of a different recording volume level can be adjusted to one another without increasing the master volume.
NOTE!
Under > File > Options > Rider „BPM and Tools!" > item "Auto BPM" you can activate the auto gain function. This way the gain values of the tracks will be adjusted automatically without any further need for manual adjustment.

30. Pitch Mode
You have the possibility to select two different Pitch Modes via the pitchfader -31-. You can change the mode by clicking the -30- button.
a) Speed Mode
If Speed Mode has been selected you can adjust the pitch like with a normal turntable. Within the adjusted pitch range the current value is also shown in the Info View -51-, position -7-.

b) Master Tempo Mode (MT)
If the Master Tempo mode has been activated it is possible to change the pitch via the pitch fader -31- ranging from - / + 6% without influencing the tone pitch. This means that the tone pitch remains the same when changing the pitch.

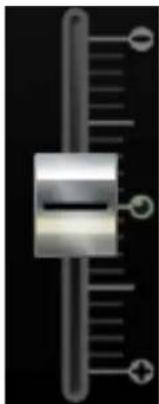
31. Pitchfader
The pitch fader represents a conventional pitchfader of a turntable or CD player. When in Timecode Vinyl mode -32- the fader moves synchronously to the adjustments made with the turntable. This depends on the adjusted pitch mode (see point 30). In deactivated Timecode Mode the pitchfader can also be moved via the mouse.
32. Vinyl Timecode Activation
Via this button you can activate the Timecode Mode, which means that an operation via timecode records and CDs becomes possible. If this button is deactivated it is only possible to control the software via the mouse.

33. Spin! Mode Button
By using this button you can choose between the playback modes Spin! Mode, Classic Spin!, Advanced Spin! and Battle Spin!.
a) Classic Spin!
The audio files will be played from beginning to end, just like a normal record (needle drop). Classic mixing and scratching are possible but without the loop, cue points and effects options.

b) Advanced Spin!
In this mode needle drop is also possible. But it is commensurate to the vinyl record's length. So if you would like to jump to the middle of a song, you have to place the needle in the middle of the record. Classic mixing and scratching are possible; loops, cue points and effects are available.

c) Battle Spin!
No needle drop is available here. This means that the track will always continue no matter where the needle is placed on the record. This mode is appropriate for scratching even if the needle should skip. Battle mixing is possible; loops, cue points and effects are available.

34. Play/Pause Button
By pushing this button you will start the previously selected track. This function is only available in PC control mode.

35. Cue Button
By using this button you will change to Cue Mode. There are two possibilities in order to set a cue point.

a) Cue Pause
In playback mode push the Play/Pause Button -34- in order to change to pause mode. Now push the cue button in order to set a cue point.
b) Loop In
During playback or in pause mode you can push the Loop In button in order to set a cue point.
36.Forward and Reverse Button
Via this button you can determine the playback direction of the track (forward or reverse). In Timecode Mode this button shows the direction the records moving in.

37. Skip Buttons
Push these buttons in order to load the previous or next track from your Spin! Library.

38. Fast Search Buttons
Via these buttons it is possible to fast search within a track. In Timecode Mode this function is deactivated.

39. Pitch-Bend Buttons
Activate the pitch vernier adjustment via the Pitch Bend Button. By pushing and holding these buttons you can temporarily increase or decrease the pitch. Release the button and the player will return to the pitch that has previously been set via the pitch fader.

40. Spin! Library
In this browser you will find all necessary information regarding the tracks of your Spin! Library. In order to directly select a track from the library click on the corresponding track and move it via drag & drop to the desired player. Alternatively you can also choose the track select function via the timecode record (see chapter 1.5, item b).
Via the hot key "V" you can activate the Spin! Library in order to navigate the library via the up/ down cursor buttons. By pushing enter you can assign the track to the active player. Via the TAB button you can select between player 1 and player 2.
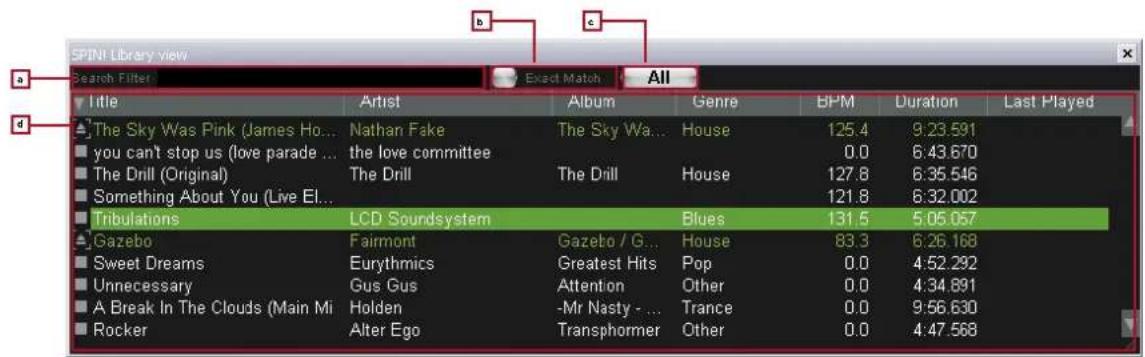
a) Search Filter
In this field it is possible to search for a track by entering some letters. The more precise the input the more precise the result will be.
b) Exact Match
If this option is activated only exact results corresponding to the entry will be shown.
c) Selection Filter
Here you can define selection filters that should be searched for.
- All
Via this filter all categories will be observed while searching.
File
If this filter is active only file names will be considered while searching.
Title
If this filter is active only title names will be considered while searching.
- Artist
If this filter is active only artist names will be considered while searching.
- Album
If this filter is active only album names will be considered while searching.
Genre
If this filter is active only genres will be considered while searching.
- Remix
If this filter is active only remix names will be considered while searching.
Year
If this filter is active only years will be considered while searching.
BPM
If this filter is active only BPM values will be considered while searching.
- Directory
If this filter is active only directory names will be considered while searching.
d) Categories
In this view all information regarding a track, like title, name or BPM is displayed. You can define the categories on your own by clicking the right mouse button in the category bar (columns properties).
- Title
- Artist
- Album
Genre
BPM
Duration -
Last Played
-
Remix
Rating - Comments
Year
Track - File
-
Directory
-
File Name
- File Extension
- Date Created
Label - Producer
Key
Counter
NOTE!
You can edit every bit of information regarding the track on your own by double clicking the mouse in the corresponding category field. If you wish to save these attributes (ID3 TAG) permanently for a track, go to the menu and click on the corresponding track
Track > Save ID3 TAG attributes.
Via a right mouse click in the Spin! Library you can access a submenu that includes the following options:
Add Track
With this function you can add single tracks to your library.
Select All
All tracks of the current Spin! Library will be marked.
Auto Search
In order to import a bulk of audio files you can comfortably browse your hard disk or if required single directories via this function.
Delete
Delete all marked tracks from the Spin! Library.
Track Preferences
You can carry out track-specific adjustments here.
Add to Spin! List
The marked tracks will be added to the Spin! List.
Show In Windows Explorer
Finds and shows the marked track in Windows Explorer.
Group
Via this function you can assign or delete marked tracks of a previously created group/playlist. For further information please alo see item -52-.
Analyse BPM Manually
Via this tool you can manually determine the BPM value. This can be achieved by either clicking on the space button with the mouse or by pushing the space bar. The longer you push the according button to the beat the more precise the calculated value will be.
List View
All categories of a track are displayed in this view. The categories can be defined via the Column Properties function (see below)
Analyse BPM Automatically
Via this function the BPM value will be calculated automatically although beats cannot be recognized by the software if the beat does not stand out enough from the rest of the track in order to be identified as rhythm element. 4/4 beats are ideal for the Reloop Spin! 2 software.
Column Properties
As already explained, here you can fade in and out single categories.
41. Flanger Effect
First push the effect activation button above the flanger turning knob. Now the flanger effect is activated. By turning the flanger turning knob you can adjust the flanger effect's intensity. Push the effect activation button again in order to deactivate the effect.
42.Filter Effect
First push the effect activation button above the filter turning knob. Now the filter effect is activated. By turning the filter turning knob you can adjust the filter effect's intensity. Push the effect activation button again in order to deactivate the effect.
43. Delay Effect
First push the effect activation button above the delay turning knob. Now the delay effect is activated. By turning the delay turning knob you can adjust the delay effect's intensity. Push the effect activation button again in order to deactivate the effect.
44. Key Mode (Harmonic Mixing)
With the Key Function it is possible to adjust the tone pitch independently from the tempo. The single tone is displayed in the field above as notes. This way you can harmonically mix tracks with a differing tone pitch.
45. Beat Loop/Auto Loop Function
Your Reloop Spin! 2 software disposes of an intelligent beat loop function. With this tool it is possible to create beat-matching loops with the push of a button, depending on the selected bar. This way it is not necessary to set the in and out points manually.
Select the desired bar via the beat loop bar buttons (1/2 - 16 bars). Activate the beat loop via the beat loop button (when in beat loop mode this will flash). Deactivate the beat loop via the play/pause button -34-.
Operation via Keyboard:
- When in playback mode push "F4" (player 1) or "F12" (player 2) in order to activate the beat loop mode
- Via the keys "F5"/"F6" (player 1) and "F7"/"F8" (player 2) you can prolong or shorten the loop respectively
- Push the space bar in order to quit the auto loop (select the active player via the TAB button)
46./47. Manual Loop Function
- In order to set a loop manually push the Loop In button at the desired starting point and the Loop Out button at the desired ending point.
- By pushing this button again you will quit the loop
- By pushing the Reloop Button you will return to the last set loop
| Funktion Player 1 Player 2 |
| Loop In F1 F8 |
| Loop Out F2 F10 |
| Exit [Reloop] F3 F11 |

48. Crossfader
The Crossfader is just intended for the PC control mode. When in regular Timecode Mode (external mixer) you will not need the crossfader. Via the fader you can crossfade from channel 1 to 2 and vice versa.
NOTE!
When in Timecode Mode the crossfader should be in the middle position.
49. Beat Match Function
The Beat Match Function is a handy helping tool in order to match the pitch of two different tracks with the push of a button. You can either match the right player with the left player or you can match the left player with the right player.
| Beatmatch Schnelltaste |
| Player 1 Y |
| Player 2 X |

50. Cue Points
It is possible to set up to 6 cue points per track. They will be permanently saved automatically until they are replaced by new ones.
- In order to set a cue point via mouse push the right mouse button at the desired time.
- In order to call up a cue point a click of the left mouse button suffices.
- If a cue point has been saved you will see a thick green mark on the corresponding cue button.
- Set the cue point for player 1 via the numbers 1 - 5 (only 5 cue points per player) and for player two via the numbers 6 - 0.
If you push the according number again the cue point will be called up (hot cue).
51. Info View

a) Title
The title of the current track is displayed here. With a click of the right mouse button you can select whether only the title, only the artist or both should be displayed.
b) Elapsed
The elapsed time of the current track is shown here (minutes/seconds/frames).
c) Remain
The remaining time of the current track is displayed here (minutes/seconds/frames).
d) BPM
The current BPM value is shown here.
e) Repeat function
Here you can (de)activate the track repeat function. If the repeat function is activated the loaded title will automatically be repeated.
f) Out port
Here you can see which output signal of the interface is assigned to the player. If set up correctly "01" should be displayed on the left player and "02" on the right player. You can change the port by clicking on it.
g) Pitch
Here the current pitch value is displayed.
52. Category View
The category view is a kind of fast search filter for the Spin! Library. You can choose whether the Spin! Library view should be displayed alphabetically, sorted according to years or BPM values for example. Under the point "groups" you can carry out playlists or sortings. In order to create a new group push the right mouse button in category view on the "Add Group" item. Now you will be asked to enter a name - confirm by pushing the enter button.
53. Music Explorer/Audio Input
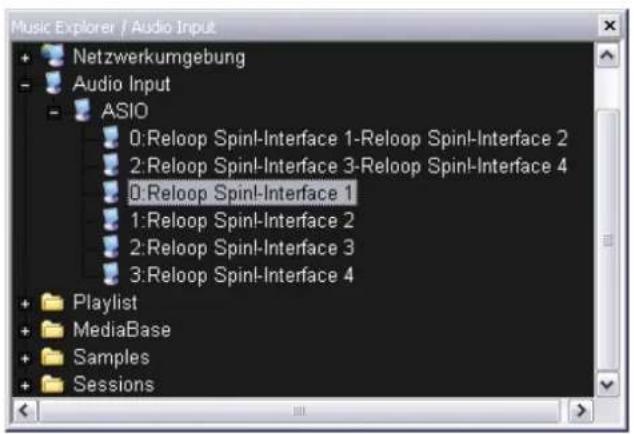
The music explorer is a file browser in tree view just as you know it from the Windows explorer. Here you can search for files in your work centre or your network environment. Furthermo here you can also find the Spin! 2+ Interface under the item "Audio Input". Each input is listed there. Via drag & drop it is possible to drag single inputs onto the player for an easy assignment.
54. Monitor Function
Via the Software Monitor function you can monitor a track. This function is unnecessary when using an external mixer as you would monitor a track via the mixer's cue function.

3. RELOOP SPIN! 2 MENU NAVIGATION
In this chapter all menu items will be described step by step.
3.1 MENU ITEM FILE
3.1.1 Options
In this option menu you can carry out a variety of adjustments. Further information regarding this matter can be found in the chapter 4.1 in this manual.
3.1.2 Learning
With the „Enable" button you activate the MIDI Learning Function. Please also refer to chapter 4.4.
3.1.3 Qilt Spinning
Here you can quit the Reloop Spin! 2 software.
3.2 MENU ITEM SPIN! LIBRARY
With the Reloop Spin! Library you can manage your audio files. If desired it is possible to create and store various libraries. You can import music to the Spin! Library in order to obtain a central collecting station of your files. It is possible to edit and export new libraries and you can also import libraries (for example iTunes playlists).
3.2.1 New
Here you can create a new, empty library that can be filled with audio files as required.
3.2.2 Open
Opens an existing library.
3.2.3 Save
Saves your library.
3.2.4 Save as...
Saves your library under a different name without deleting the previous one.
3.2.5 Import
Imports files [iTunes (.xml) / m3u Files (.m3u)]
3.2.6 Export
Exports files [m3u Files (*.m3u)]
3.2.7 Automatic Search
In order to import a bulk of audio files you can comfortably browse your hard disk or if required single directories via this function.
3.2.8 Add Track
With this function you can add single tracks to your library.
3.2.9 Select All
With this function you can select all tracks from a library.
3.2.9.1 Delete
With this function it is possible to delete files from your current library without deleting them from your hard disc.
3.3 TRACK MENU
3.3.1 Track Preferences
You can carry out track-specific adjustments here.
3.3.2 Save ID3 TAG Attributes
If you want to change ID3 TAG attributes you can save these.
3.3.3 Show in Windows Explorer
With this function it is possible to display the marked track in Windows Explorer.
3.3.4 Analyze BPM Manually
Via this tool you can manually determine the BPM value. This can be achieved by either clicking on the space button with the mouse or by pushing the space bar. The longer you push the according button to the beat the more precise the calculated value will be.
3.3.5 Analyze BPM Automatically
Via this function the BPM value will be calculated automatically although beats cannot be recognized by the software if the beat does not stand out enough from the rest of the track in order to be identified as rhythm element. 4/4 beats are ideal for the Reloop Spin! 2 software.
NOTE!
Several tracks can be analysed automatically. If a track is loaded to a player for the first time the BPM value will automatically be determined and saved permanently.
3.3.6 Delete Tracks Permanently.
Via this function it is possible to delete tracks permanently.
ATTENTION!

In this case the track will be deleted permanently from your hard disc and not only from the library.
3.4 SPIN! LIST MENU
The Spin! List is a kind of "party" playlist. The featured tracks will be played and crossed over alternately from player 1 and player 2. This function is ideal if you want to operate the software in stand-alone mode without a DJ.
3.4.1 Play Spin!List
Starts the playback of a Spin! List.
3.4.2 Stop Spin! List
Stops the playback of a Spin! List.
3.4.3 Add to Spin! List
Adds the currently selected track to the Spin! List.
NOTE!
You can also add tracks to the Spin! List via drag & drop.
3.4.4 Safe Mode
If the safe mode is active it is not possible to load a track to the currently active player. This prevents unwanted loading of new music when using a player.
3.5 SPIN! 2 WORKSPACE MENU
In this menu you can fade in and out single elements in order to individually arrange the view.
3.5.1 Workspace Arrangeable
If this is activated it is possible to rearrange and close single window elements.
3.5.2 Tool Tips
Activates the Tool Tips function. By activating it an information window will appear when moving the mouse cursor over single elements.
3.5.3 Bar
Activates the extended Beat Bar function in Beat Match View.
3.5.4 Full Screen View
Activates the full screen view. Alternatively this can be carried out via the key combination ALT+S.
3.5.5 Menu Bar View
Fades the menu bar in and out.
3.5.6 Shortcut View
Fades the shortcut view in and out.
3.5.7 Info View
Fades the info view in and out.
3.5.8 Preview
Fades the preview bar in and out.
3.5.9 Spin! Library View
Fades the Spin! Library in and out.
3.5.9.1 Spin! List View
Fades the Spin! List in and out.
3.5.9.2 Category View
Fades the category view in and out.
3.5.9.3 Music Explorer/Audio Input
Fades the music explorer / audio input view in and out.
3.5.9.4 X-fader Match View
Fades the X-fader match view in and out.
3.5.9.5 Master/Rec Volume
Fades the master/rec volume view in and out.
3.5.9.6 Beat Match View
Fades the Beat Match view in and out.
3.6 HELP MENU
3.6.1 Easy Setup
Via this you can call up the easy setup.
3.6.2 Manual
Via this you can call up the manual as PDF file.
3.6.3 www.reloop-spin.com
Via this you can visit the web site reloop-spin. com. Visit this site frequently in order to obtain current downloads or information.
3.6.4 Configuration Log
Via this a current system-configuration overview will be created as text file. This could be required when trying to solve possible problems.
3.6.5 About Spin!
Here the current Spin! version is displayed.
4. ADJUSTMENTS
4.1 Options
You can reach the options menu under > File > Options.
4.1.1 System
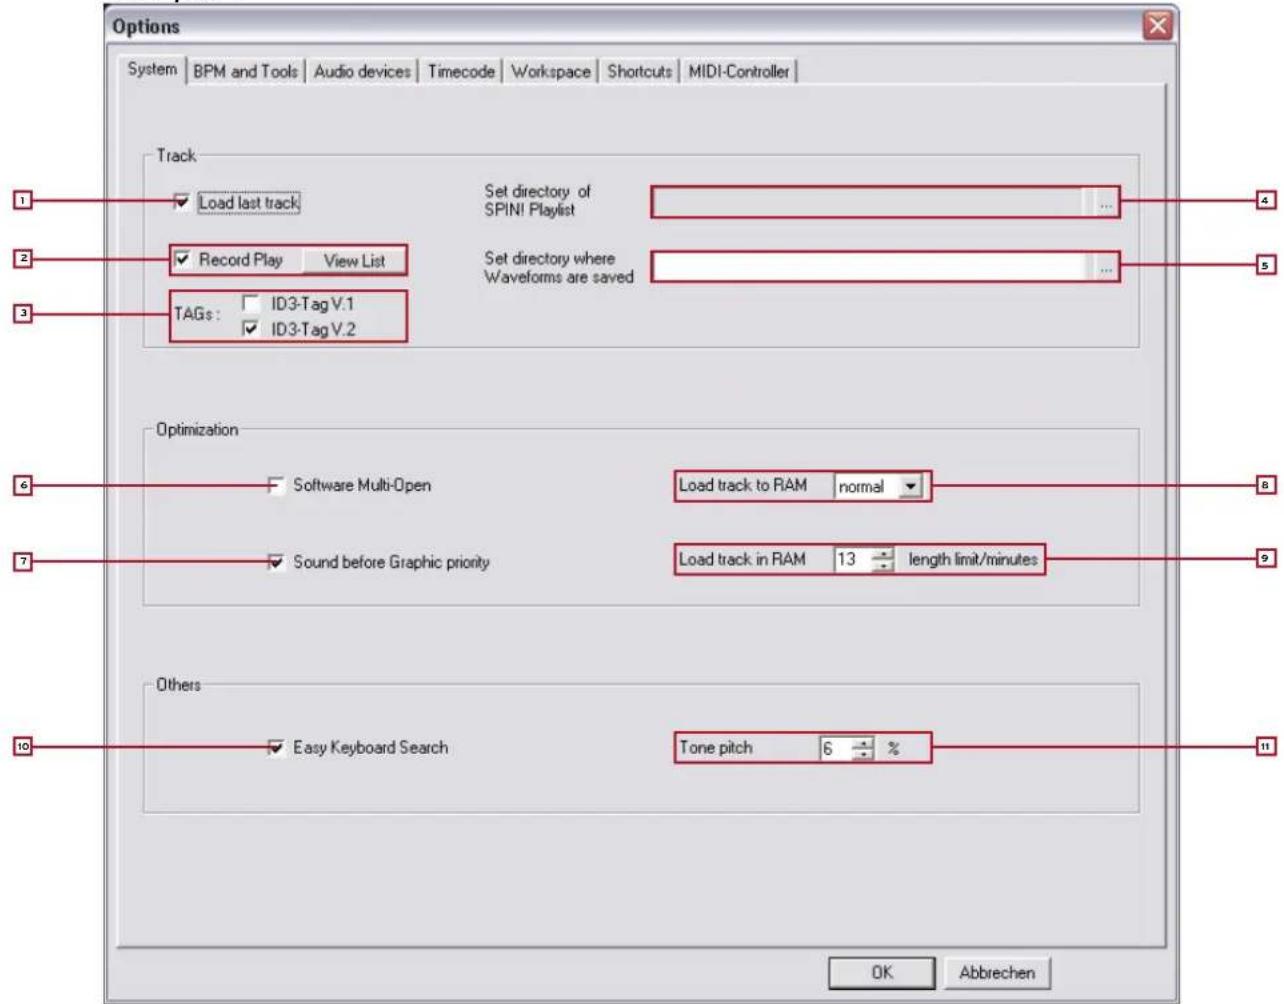
1. Load Last Track
If this option is activated the last played track and Spin! Library will be loaded when starting the software.
2. Record Play
If this function is activated all played tracks will be saved in a list with date and time. By pushing the "View List" button you can call up this list.
3. TAGs
Here you can select which ID3 TAG version should be displayed. Only one option should be selected here.
4. Play List Directory
Here you can determine the path where the Spin! List should be saved/loaded.
5. Waveform Directory
Here you can determine the path where the waveform peaks should be saved.
6. Software Multi Open
If this function is activated Reloop Spin! can be opened several times at once (not recommended/depends on ASIO).
7. Sound Before Graphic Priority
If this function is activated the sound performance will be assigned before graphics. This is an advantage when using older or inefficient computers (when experiencing dropouts for example).
8. Load Track to RAM
Here you can determine how fast the track should be loaded to RAM (slow/normal/fast).
9. Load Track in RAM/min.
Here you can determine the maximum track length in minutes that should be loaded to RAM.
10. Easy Keyboard Search
If this function is activated you can browse tracks in the Spin! 2 library and music explorer by simply typing in a letter.
11. Tone itch
Here you can adjust the percentage that the tone pitch should be played in (also see chapter 2, item 30).
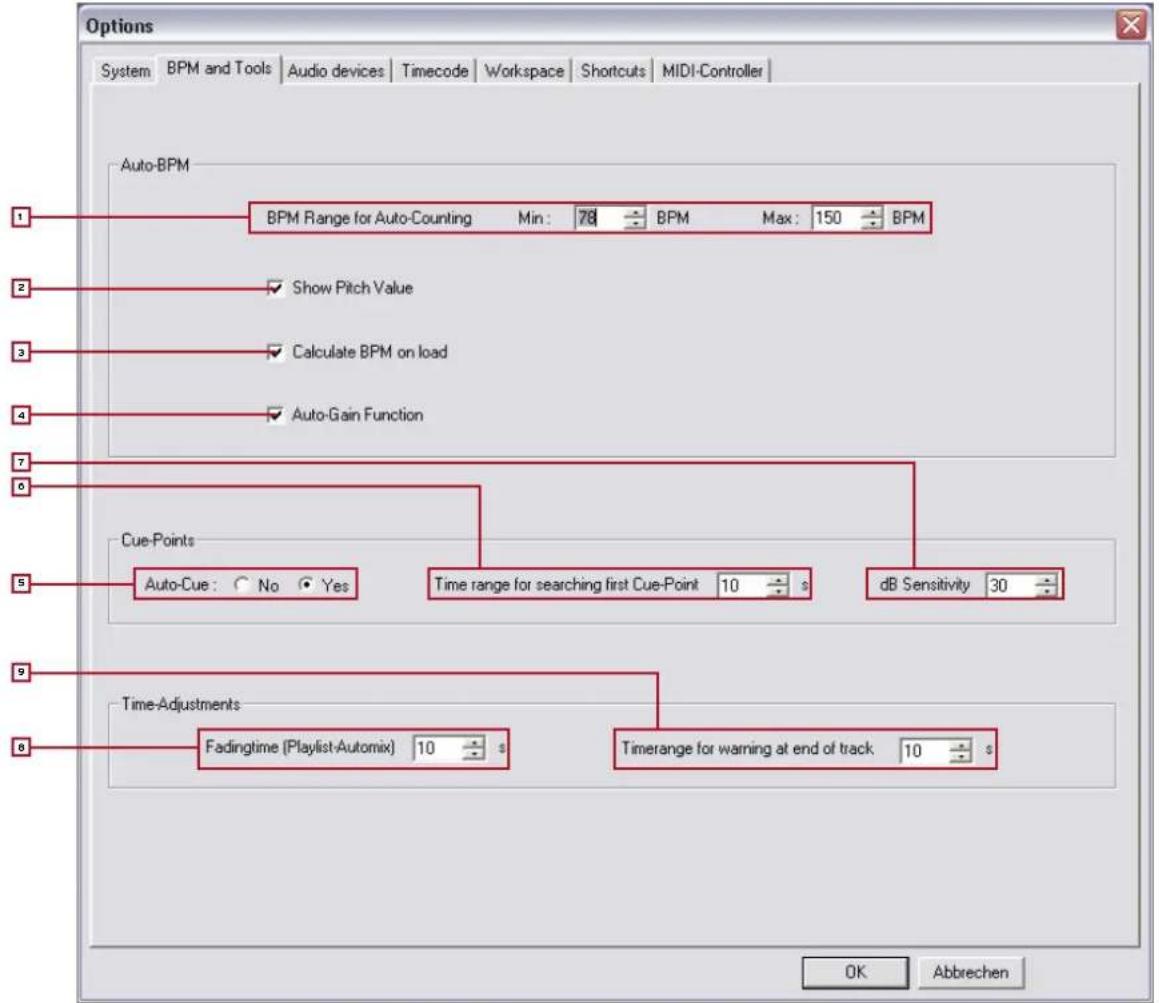
4.1.2 BPM and Tools
1. BPM Range
Here you can adjust the BPM range that the software should use to calculate. The smaller the difference the faster and more precisely Spin! can calculate. By default the range is 78 - 150 BPM.
Recommended settings:
All-Round 78-150 BPM
Hip Hop 80-120 BPM
House/Techno 110-150 BPM
2. Show Pitch Value
Activates the pitch display (default setting and recommended).
3. Calculate BPM on Load
If this option is activated Spin! determines the BPM and waveforms when loading a track (default and recommended).
4. Auto Gain
If this function is activated the gain values of tracks with a different volume level will be matched. This way a manual matching via the Gain Knob -29- is no longer necessary.
5. Auto Cue
Via this you can turn the auto cue function on/off.
6. First Cue Point Search
Via this you can determine the time frame in seconds for the first cue point search.
7. dB Sensitivity
Here you can adjust the sensitivity in decibel and corresponding threshold level that should be used for setting a cue point.
8. Fading Time
Here you can adjust the crossfading time for the auto mix function of the Spin! List.
9. End of Track Warning
Here you can adjust the optical end of track warning-time in seconds.
4.1.3 Audio Devices
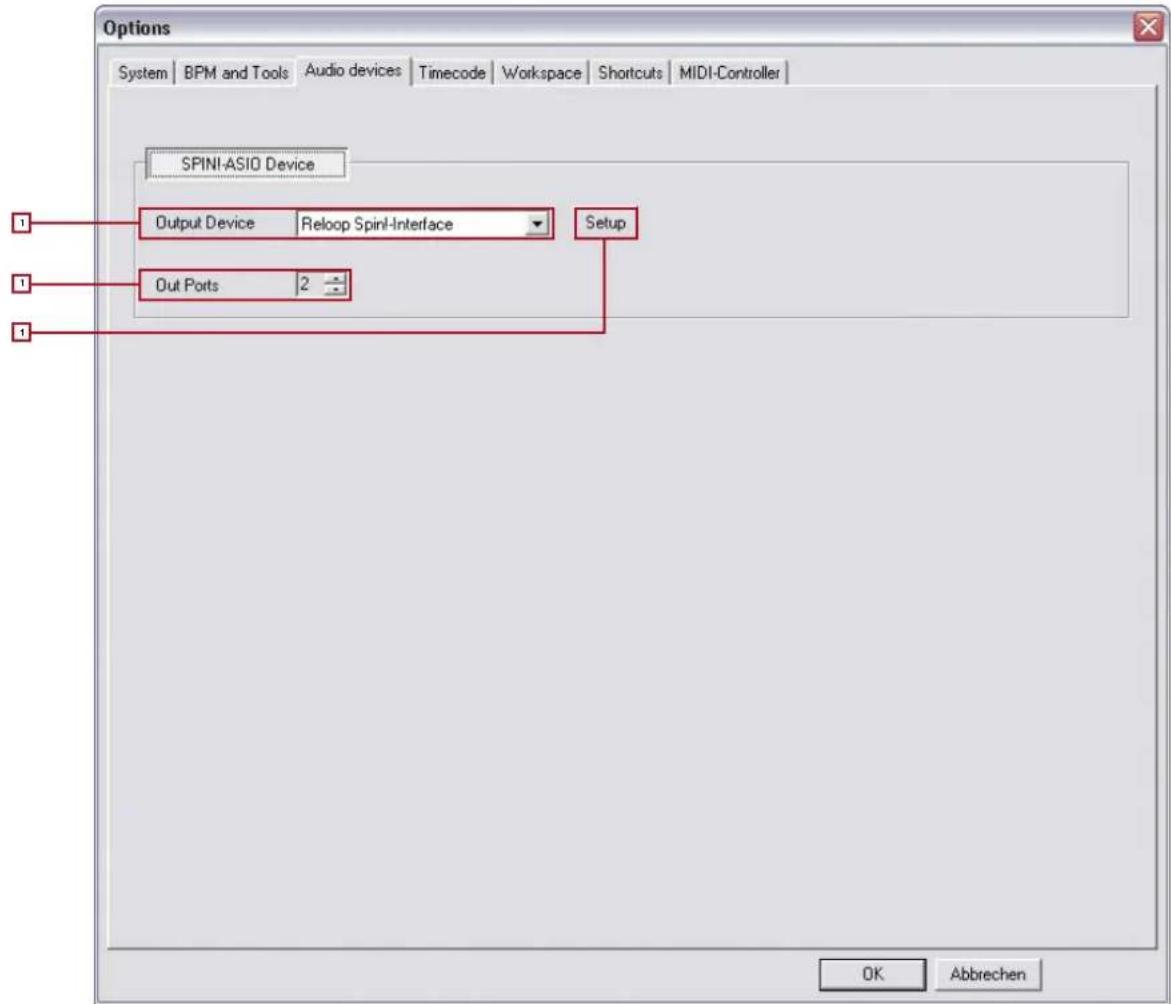
1. Output Device
Here you select the Reloop Spin! 2+ Interface and it should be displayed here.
2.Out Ports
Here you can determine the number of outputs. A "2" should be entered here.
3. Setup
Here you can adjust the single outputs for the left and right side. Furthermore you can adjust the buffer size via the button "Control Panel" in the ASIO setup.
NOTE!
All audio device settings have been automatically adjusted in the easy setup; this way you do not have to carry out any changes here.

4.1.4 Timecode
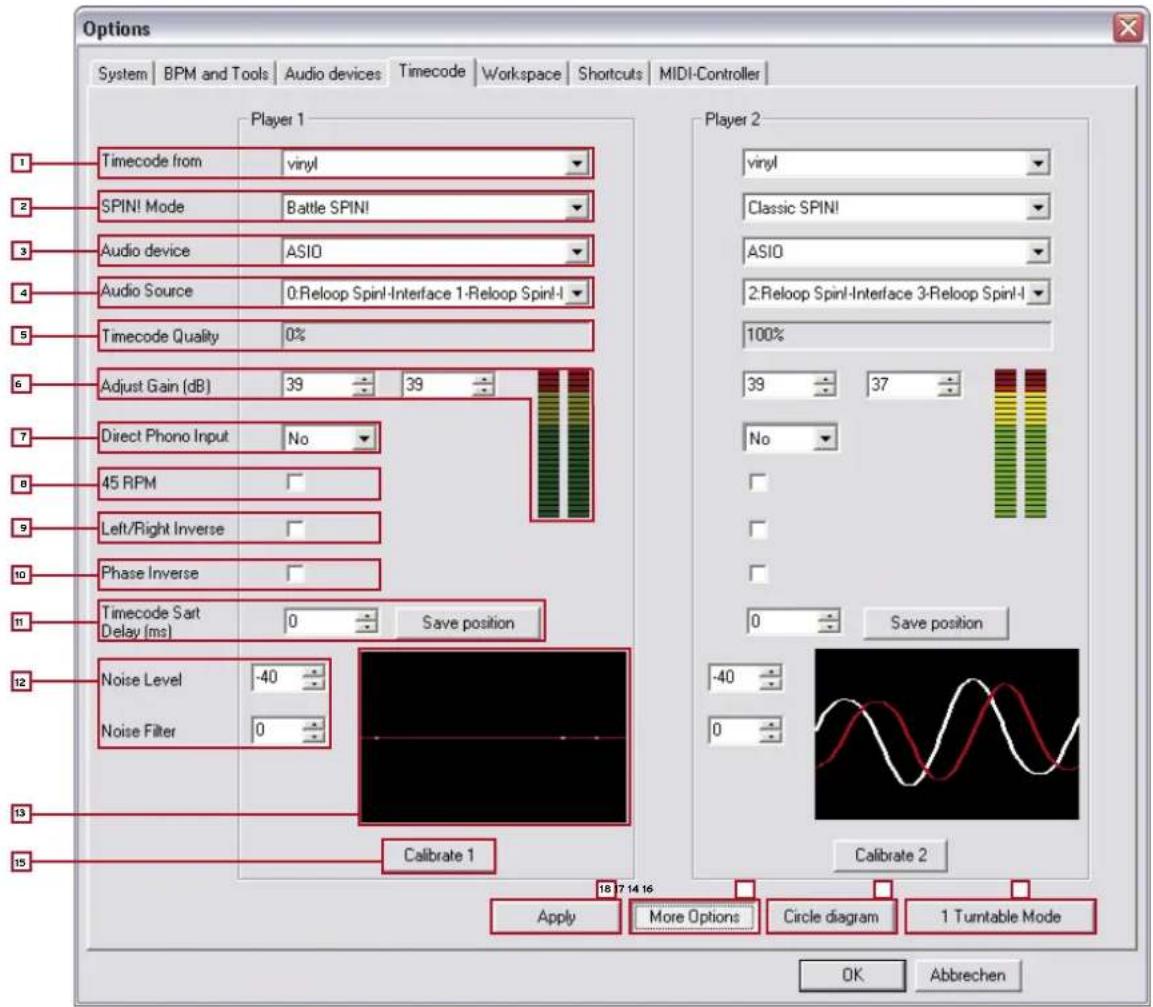
In this detailed timecode menu several adjustments for player 1 and player 2 can be carried out although they are not necessary if the easy setup was successful. You should carry out advanced settings for optimization and solving problems only.
1. Timecode from
Here you can set the timecode source, vinyl or CD.
2. Spin! Mode
Here you can select the Spin! mode (see chapter 2, item -33-).
3. Audio Device
Here the ASIO driver should be selected.
4. Audio Source
Here you can assign the corresponding connections of your Spin! 2 interface.
The default settings are:
Player 1: O: Reloop Spin!-Interface 1 - Reloop Spin!-Interface 2
Player 2: 2: Reloop Spin! -Interface 3 -Reloop Spin! -Interface 4
5. Timecode Quality
Here the timecode's signal quality is displayed in percentages. Fluctuations or a percentage that is too low could be caused by dirty or worn out needles. Ideally the value should be between 90 - 100%.
6. Adjust Gain
Here the decibel value of the input signal for the left and right side can be adjusted. The virutal LED chain serves as modulation display. This value should only be changed manually when trying to solve a problem. In the easy setup the ideal gain value will be configured automatically for you.
7. Direct Phono Input
Here you can define whether a turntable has been directly connected to the computer. When using the Spin! 2+ interface (line output) a "No" must be displayed here.
8.45 RPM
Here you can determine whether the timecode records should be played at 45 RPM (Rounds Per Minute). Default setting and usual is 33 RPM.
9. Left/Right Inverse
When using certain needles or when having calibrating problems it could be that the left and right side have been mixed up. For the software sector this can be re-adjusted via this option.
10. Phase Inversion
Some cartridges such as the Shure M44-7 need a phase inversion. Activate it here.
11. Timecode Start Delay
Here you can determine the starting point of your timecode record. As usually the first third of the record is likely to be worn out first it is possible to offset the starting point to a desired position. To do so place the needle on the desired starting point and push "Save Position". The value is displayed in milliseconds.
12. Noise Level/Noise Filter
These two values are only intended for optimisation and for solving problems. Due to easy setup these values have already been configured.
- Noise Filter:
When experiencing grounding problems or something similar you can increase the noise filter to 150 for example in order to improve the input signal. The louder the noise the higher the frequency should be raised.
ATTENTION!
The timecode's precision could decrease if the noise filter is set too high.
- Noise Level:
Here you can adjust the noise level in decibel. For a better sensitivity the value should be increased. Default setting is 40 dB.
13. Calibration Display
Here the timecode signal is displayed optically. Ideally the signal should look like a sinus curve. If the signal is distorted (square wave) you should check your needles or adjust the settings as described above.
14. Circle Diagram
Alternatively the calibration display can be shown as a circle diagram. To do so activate this button.
15. Calibrate Button
Push this button in order to calibrate the respective player automatically with the pre-set options.
16.1 Turntable Mode
If you wish to use only one turntable you should activate this mode in order to control both players. Make sure that the same interface input is selected under "Audio Source" (see item 4).
TIP!
You can choose between the players via the TAB button.
17. More Options
Activate this button in order to fade in the advanced options (noise level / noise filter and 1 turntable mode)
18. Apply
Push this button in order to apply the adjustments. Then push "OK" in order to quit the menu.
4.1.5 Workspace
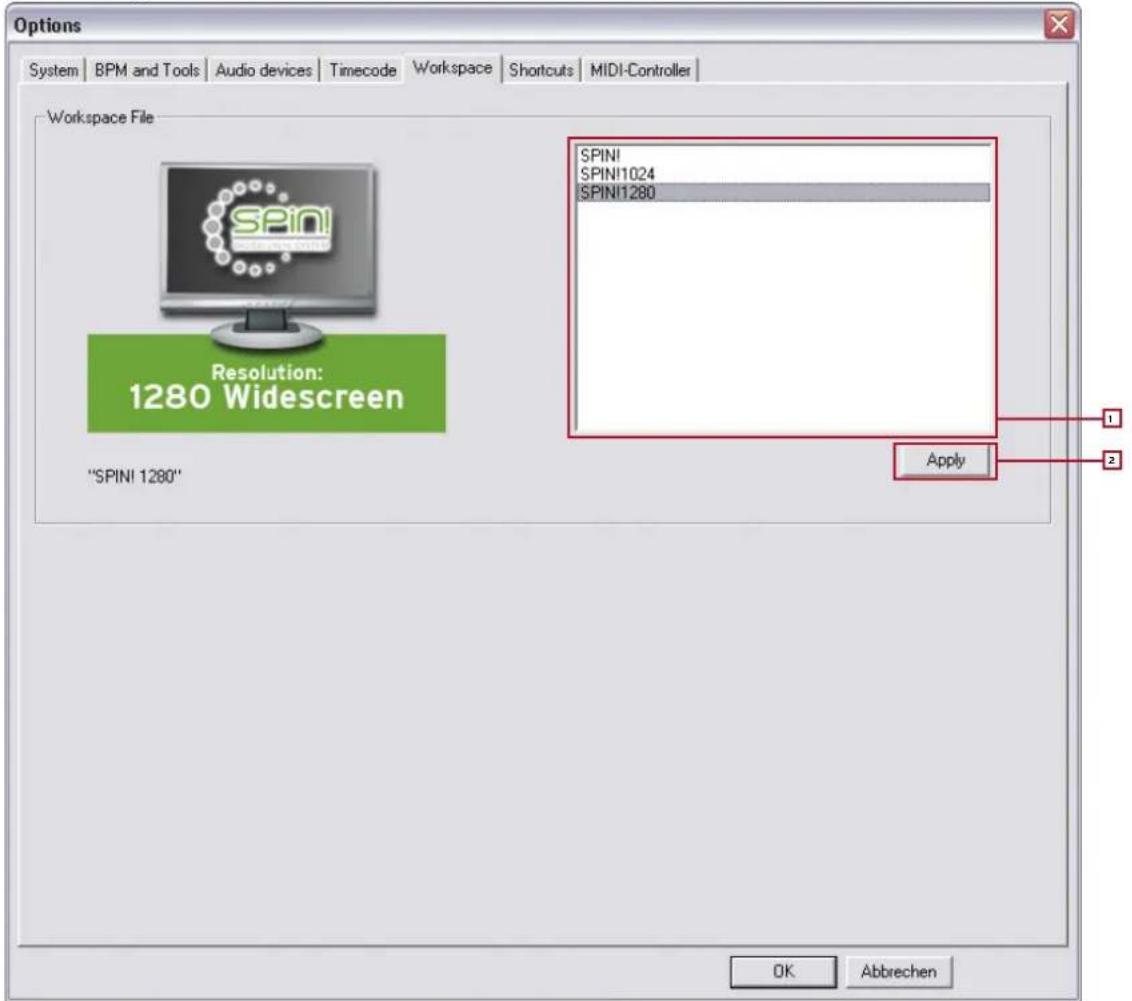
1. Resolution Selection
The available resolutions are listed here. Select the according resolution for your monitor.
2. Apply
Adopt the settings via the Apply Button.

NOTE!
Performance Skin
When in Resolution Selection you can also choose a compact Performance Skin according to your resolution. In this simplified display only the basic elements are displayed that are needed for classic mixing. Cue-Points, Effects, Beat Match or large Label Monitors are not available. A further advantage of this display is the maximised Library section that is especially tailored to laptop computers that dispose of a smaller resolution.
4.1.6 Shortcuts
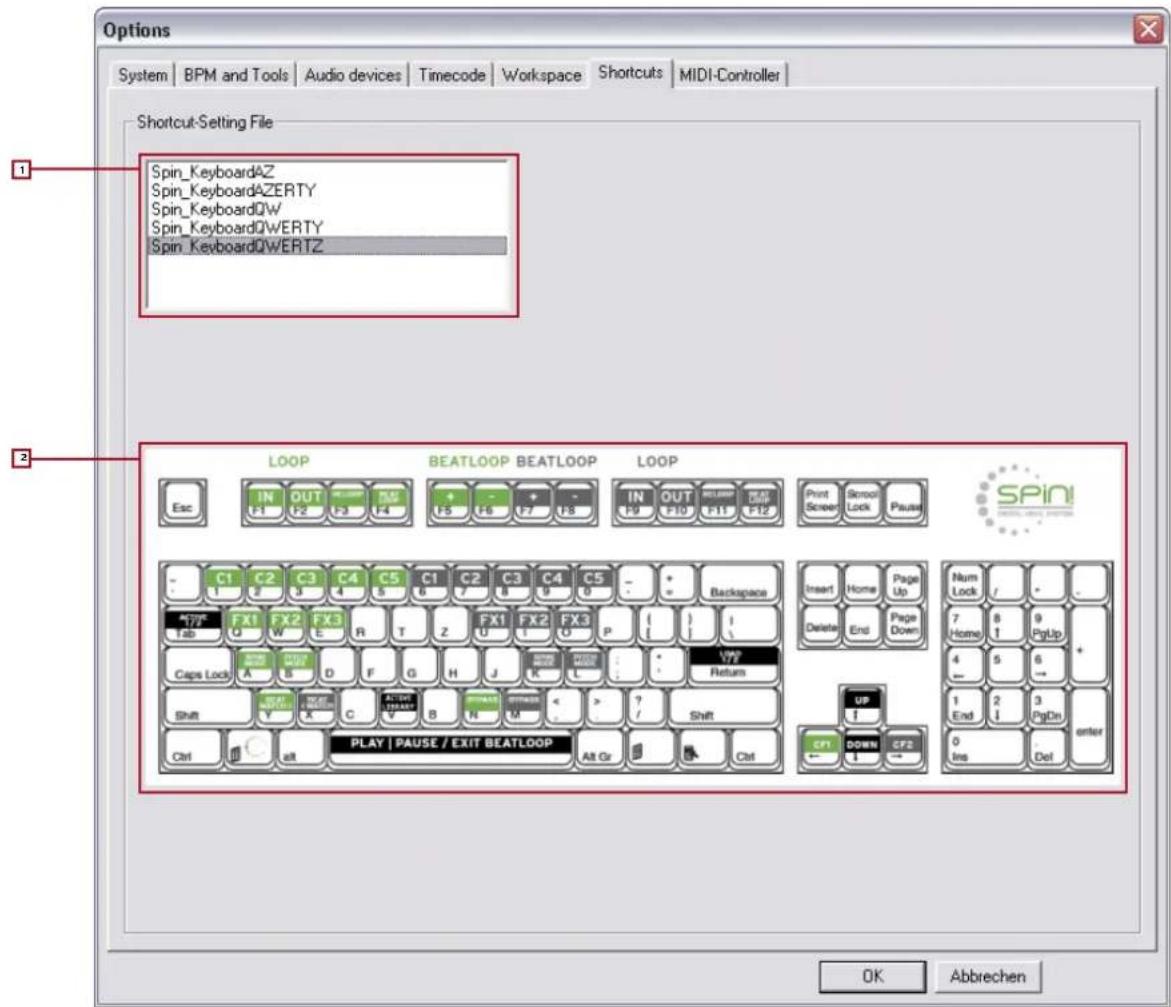
1. Shortcut Setting File
Here you can select the hot key layout for your keyboard.
The following options are at your disposal:
- Spin_keyboardQWERTZ
(Germany, Austria, Switzerland, Hungary)
- Spin_keyboardQWERTY
(America, England, Netherlands, Italy, Scandinavia, Poland, Spain, Portugal)
- Spin_keyboardAZERTY
(France, Belgium)
2. Layout Preview
Here the keyboard layout is displayed in a preview.

4.1.7 MIDI Controller
1. Activate MIDI
Via this you can activate the MIDI operation for Spin!
2. MIDI Device
Here you can find a list of compatible MIDI controllers, for example Reloop Digital Jockey (www. digital-jockey.dj).
3. MIDI Setup File
The pre-configured MIDI configuration files are listed here.
4. Omni Mode
If this option is activated Spin! will receive on all channels.
Note!
Please check regularly for Spin! updates under www.reloop-spin.com in order to download new MIDI mappings for example.
4.2 Auto Search
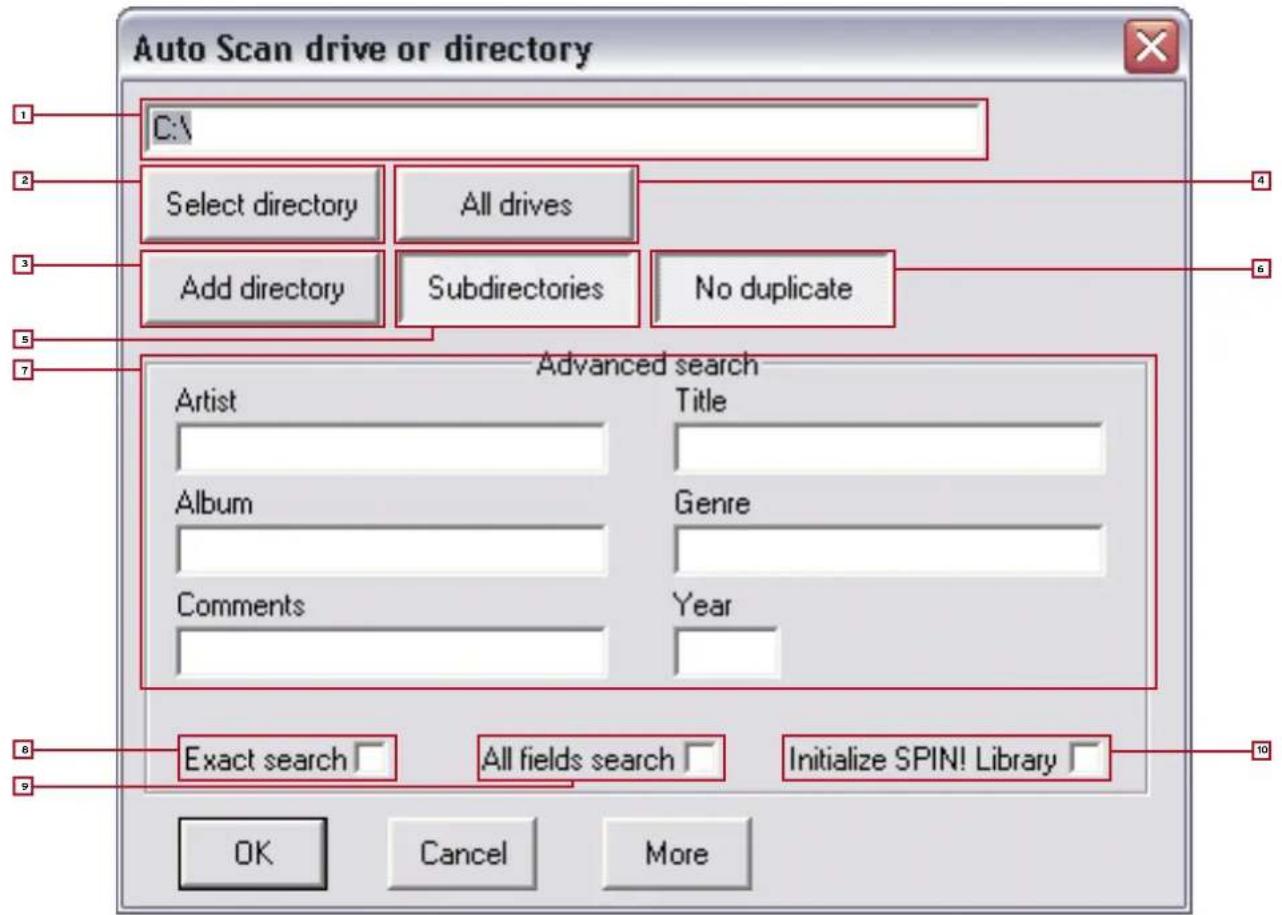
Via the Auto Search Function you can easily locate music files on your hard disk and add them to your Spin! Library.
1. Path
The currently selected path is shown here.
2. Select Directory
Via this function you can select single folders.
3.Add Directory
If this option is activated a directory will be added.
4. All Drives
Select this option in order to select all drives from your work space and search for tracks.
5. Subdirectories
If this option has been selected subdirectories will also be considered when searching.
6. No Duplicate
If this option is activated the already added tracks will not be added again to the Spin! Library when searching in the same directory for a second time.
7. Advanced Search
Categories such as artist, title or genre can be filtered here while searching.
8. Exact Search
If this option is activated only exact matches will be added.
9. All Fields Search
If this option is activated all category fields will be searched.
10. Initialize Spin! Library
If this option is activated the Spin! Library will be initialized.
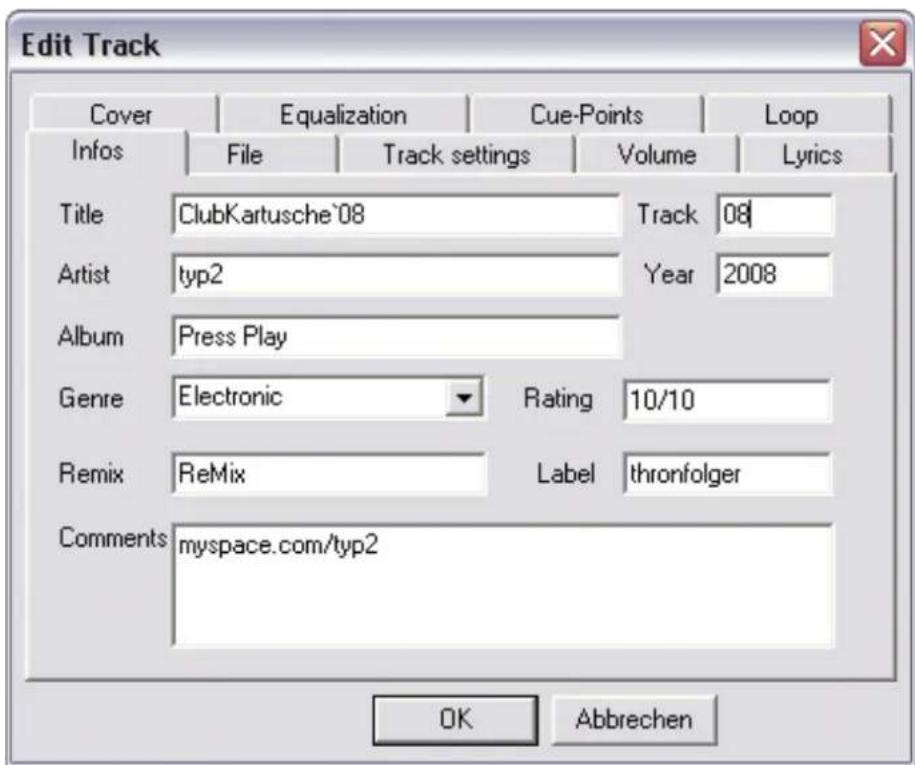
4.3 Track Preferences
In the track preferences you can activate these settings and data of a track. You can reach the track preferences under the menu item:
Track > Track Preferences
or by clicking the right mouse button on the track in the Spin! Library.
4.3.1 Information
Here you can see and edit various information like title, artist or label for example. Additionally it is possible to save comments to a track.
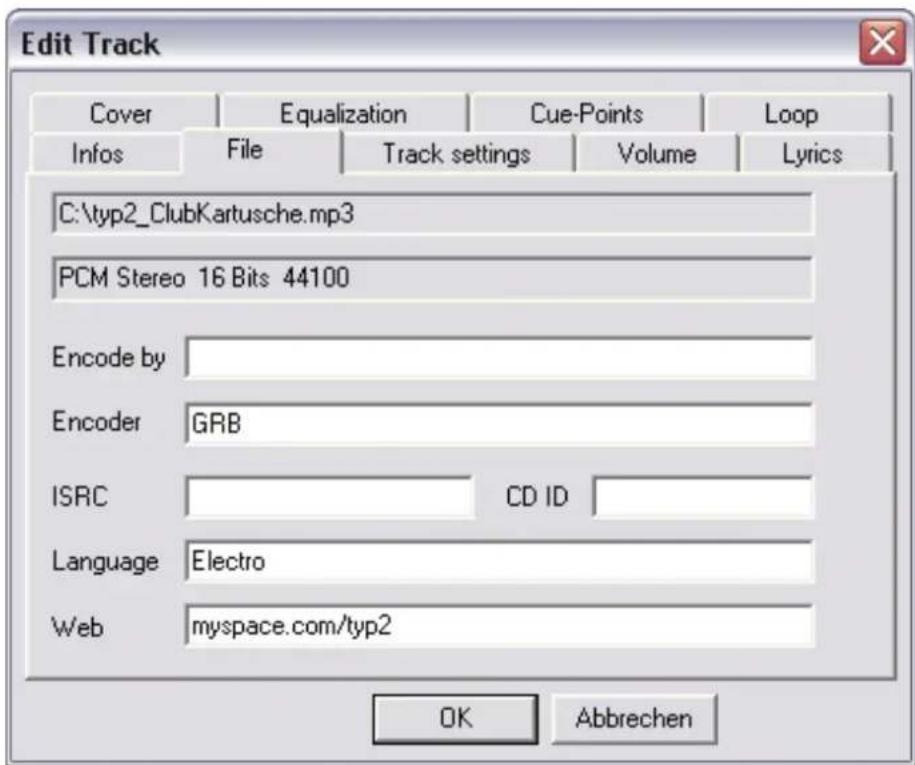
4.3.2 File
Here you can see information regarding saving location and audio quality.
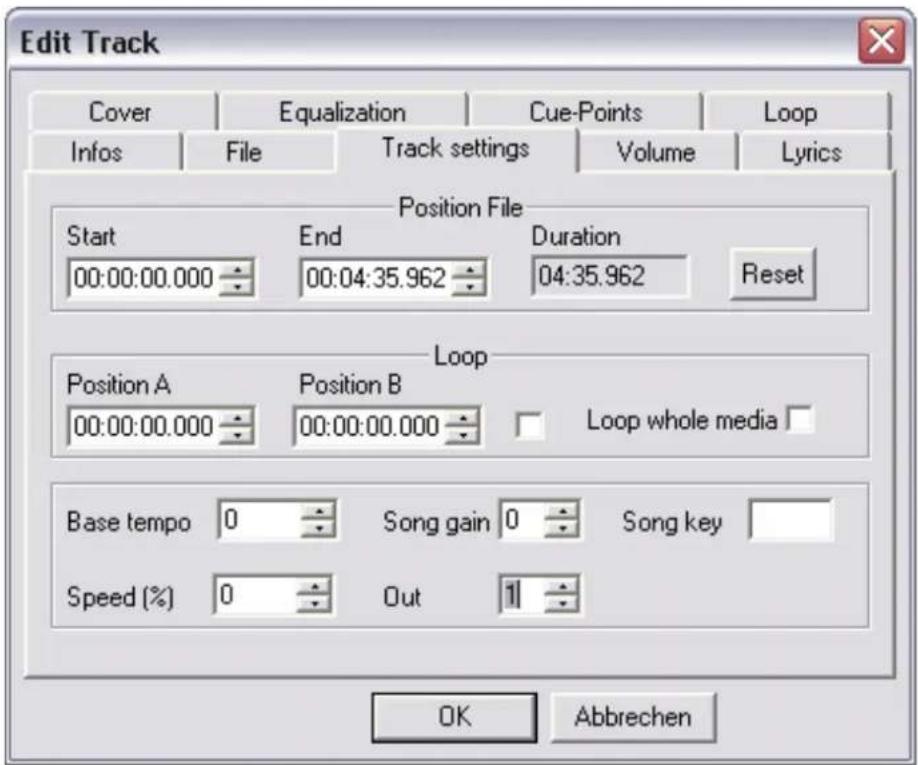
4.3.3 Track Settings
Here you can see and edit settings such as starting and ending points, loops or tempo.
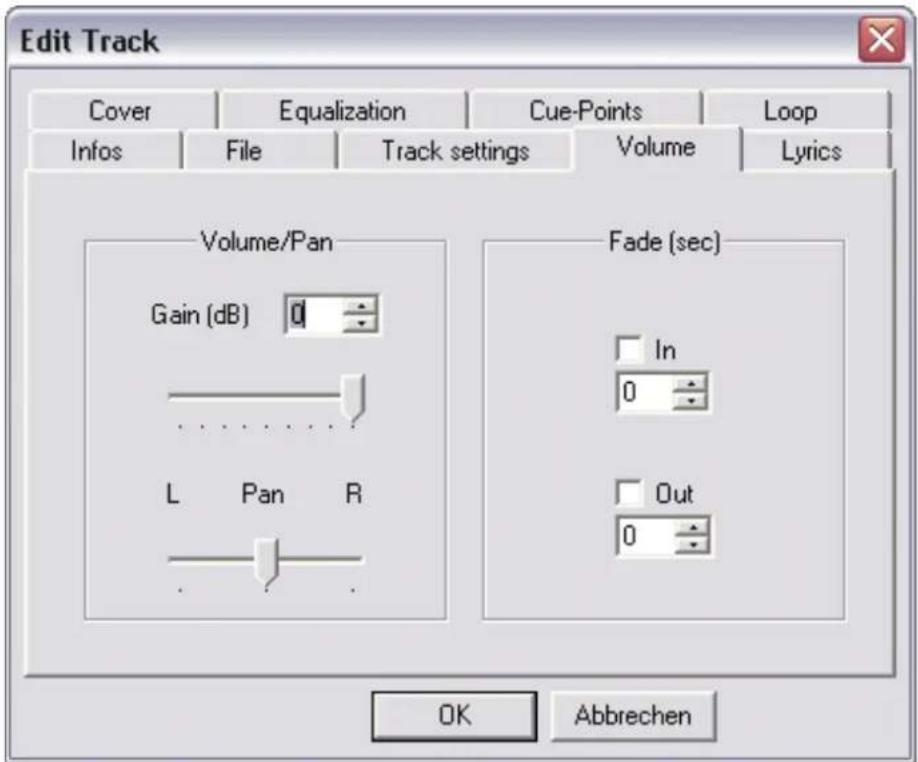
4.3.4 Volume
If desired you can preset gain, pan or fade in/out for a track.
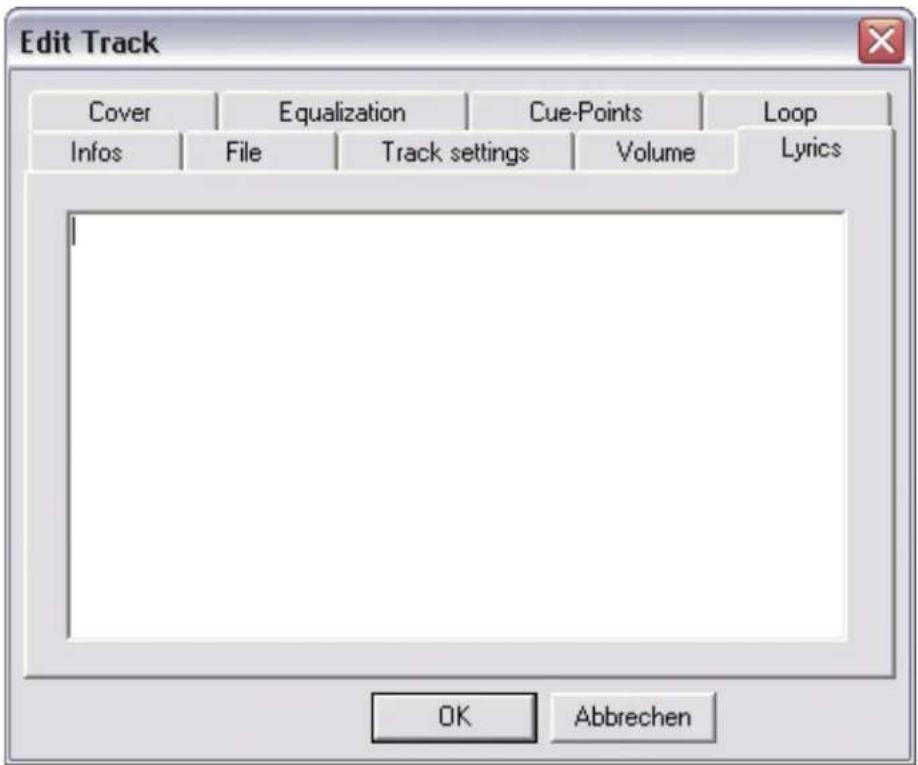
4.3.5Lyrics
If desired you can enter and view song lyrics here.
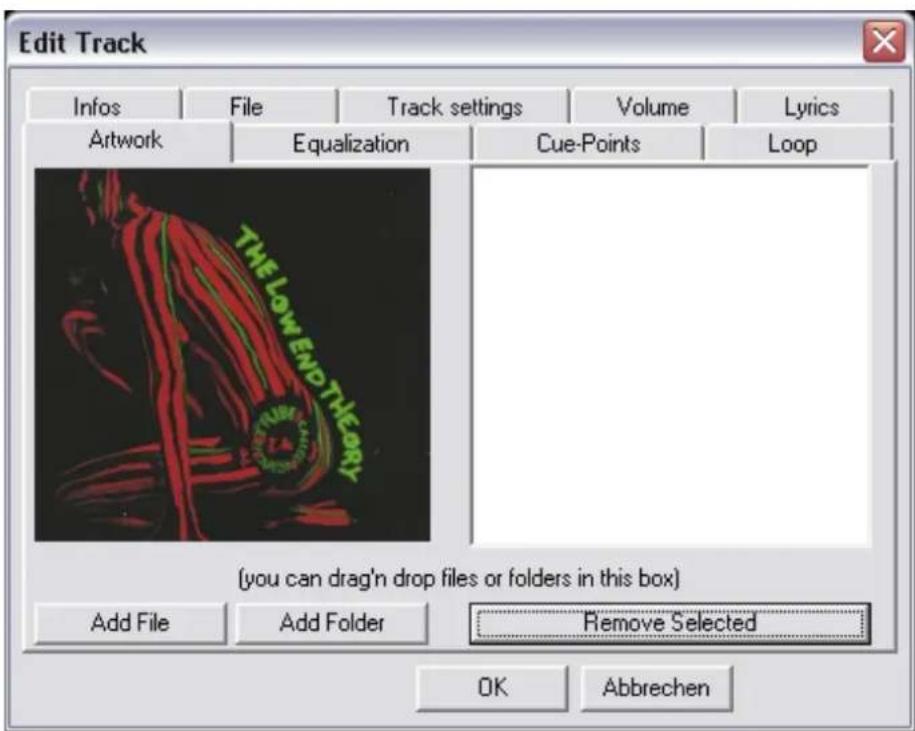
4.3.6 Artwork
Here you can upload and see cover artwork for a track.
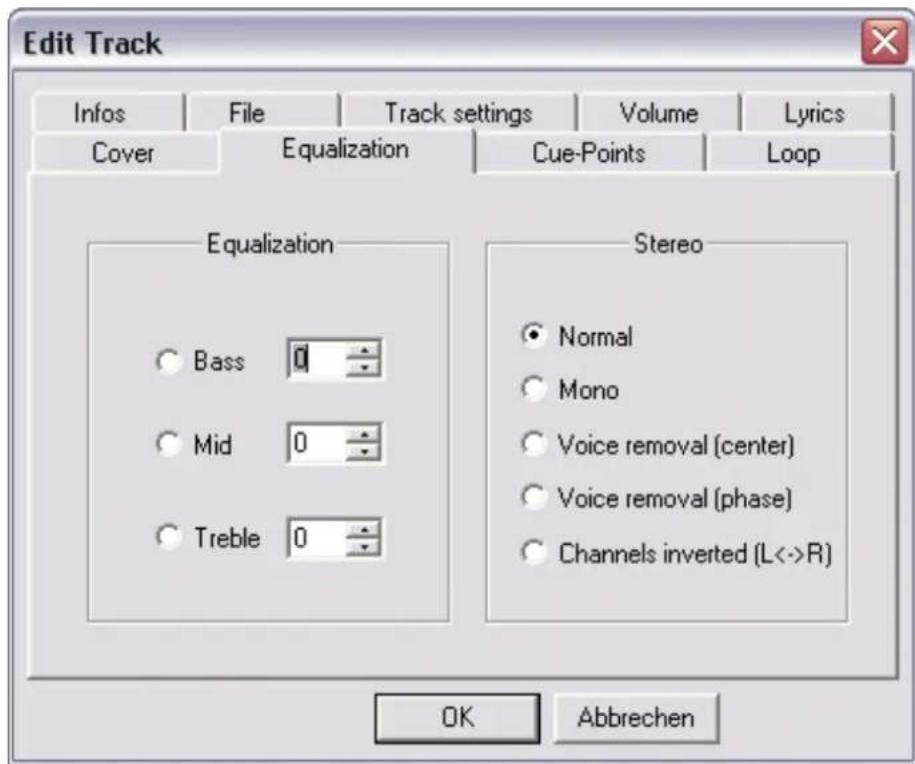
4.3.7 Equalization
Here you can adjust the EQ settings.
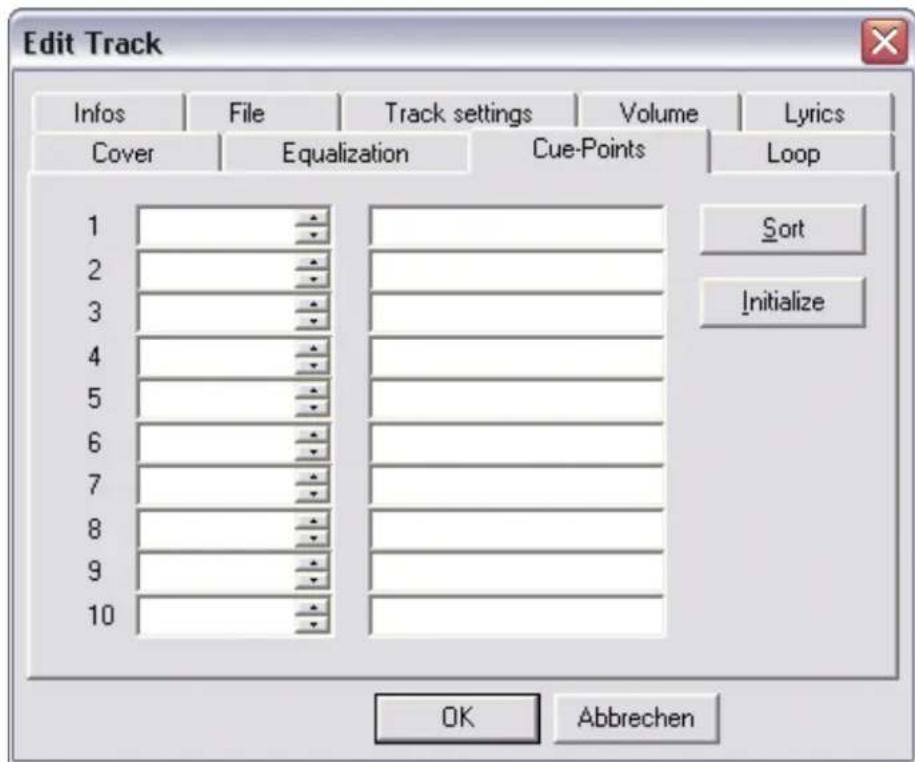
4.3.8 Cue Points
Here you can pre-define up to 10 cue points if required.
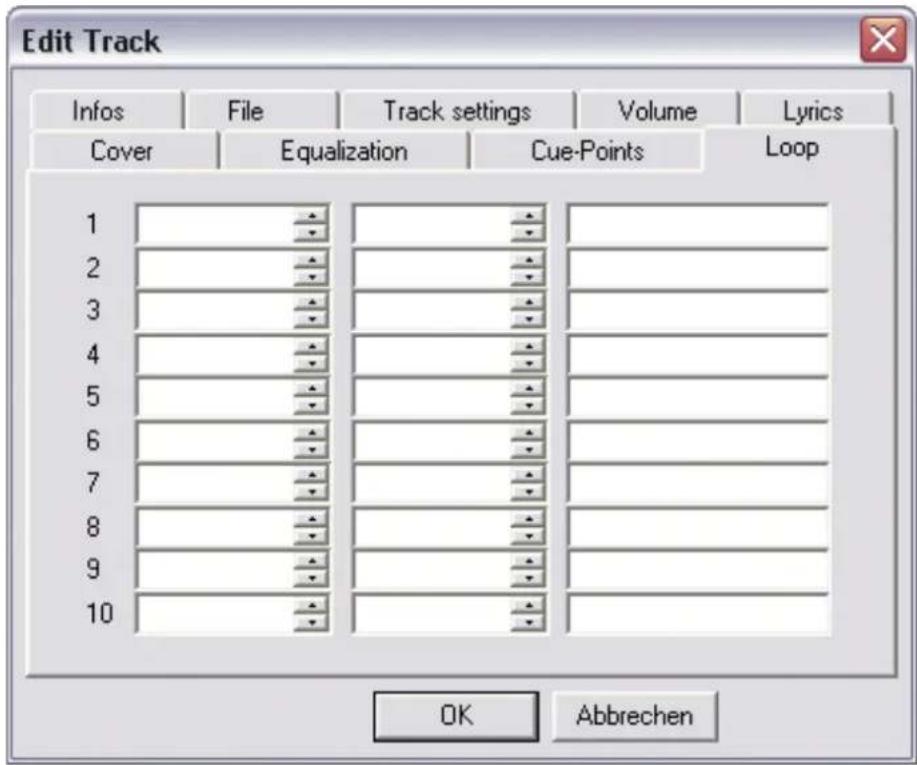
4.3.9 Loop
Here you can pre-define up to 10 loops if required.
4.4 MIDI Learning
With the Free MIDI Learning Function you can assign MIDI commands to single software elements. To do so activate the Free MIDI Learning Function by clicking the button in Shortcut View or under File>Learning>Enable. Now choose an element by moving the mouse cursor over an element and wait shortly. The corresponding element will be marked. Confirm the desired MIDI hardware controller in order to assign it to the element. This way you can control the Spin! 2 software via MIDI keyboards or DJ controllers.
Deactivate the button again in order to quit the MIDI Learning mode. It is possible to create, select and edit MIDI presets in the MIDI control mode (> File > Options > MIDI Controller).
5. MIDI MAPPING
| I/O | FUNCTION | CHANNEL+ MIDI CODE | MIDI CODE | FUNCTION CODE | ACTION |
| O | MATCHA | 09 | 90 | 01H | 7FH:ON/00H:OFF |
| O | MATCHB | 09 | 90 | 02H | 7FH:ON/00H:OFF |
| O | LOOP/EXITA | 09 | 90 | 03H | 7FH:ON/00H:OFF |
| O | ☆SHIFT | 09 | 90 | 04H | 7FH:ON/00H:OFF |
| O | LOAD1 | 09 | 90 | 05H | 7FH:ON/00H:OFF |
| O | LOAD2 | 09 | 90 | 06H | 7FH:ON/00H:OFF |
| O | - / IN A | 09 | 90 | 07H | 7FH:ON/00H:OFF |
| O | - / IN B | 09 | 90 | 08H | 7FH:ON/00H:OFF |
| O | CUE / SET A | 09 | 90 | 09H | 7FH:ON/00H:OFF |
| O | CUE / SET B | 09 | 90 | 0AH | 7FH:ON/00H:OFF |
| O | + / OUT A | 09 | 90 | 0BH | 7FH:ON/00H:OFF |
| O | + / OUT B | 09 | 90 | 0CH | 7FH:ON/00H:OFF |
| O | LOOP/EXIT B | 09 | 90 | 10H | 7FH:ON/00H:OFF |
| O | TRAX(ENCODE SW) | 09 | 90 | 0DH | 7FH:ON/00H:OFF |
| O | TRAX (ENCODE) | 09 | 90 | 1BH | 7FH:TURN RIGHT 00H:TURN LEFT |
| O | SHIFT & MATCHA | 09 | 90 | 41H | 7FH:ON/00H:OFF |
| O | SHIFT & MATCHB | 09 | 90 | 42H | 7FH:ON/00H:OFF |
| O | SHIFT & LOOP/EXITA | 09 | 90 | 43H | 7FH:ON/00H:OFF |
| O | SHIFT & LOAD1 | 09 | 90 | 45H | 7FH:ON/00H:OFF |
| O | SHIFT & LOAD2 | 09 | 90 | 46H | 7FH:ON/00H:OFF |
| O | SHIFT & - / IN A | 09 | 90 | 47H | 7FH:ON/00H:OFF |
| O | SHIFT & - / IN B | 09 | 90 | 48H | 7FH:ON/00H:OFF |
| O | SHIFT & CUE/SET A | 09 | 90 | 49H | 7FH:ON/00H:OFF |
| O | SHIFT & CUE/SET B | 09 | 90 | 4AH | 7FH:ON/00H:OFF |
| O | SHIFT & + / OUT A | 09 | 90 | 4BH | 7FH:ON/00H:OFF |
| O | SHIFT & + / OUT B | 09 | 90 | 4CH | 7FH:ON/00H:OFF |
| O | SHIFT & LOOP/ EXIT B | 09 | 90 | 50H | 7FH:ON/00H:OFF |
| O | SHIFT & TRAX (ENCODE SW) | 09 | 90 | 4DH | 7FH:ON/00H:OFF |
| O | SHIFT & TRAX (ENCODE) | 09 | 90 | 5BH | 7FH:TURN RIGHT 00H: TURN LEFT |
| O | FX1/ CLASSIC(VR) A | OB | B0 | 15H | 00~7F |
| O | FX2/ CLASSIC(VR) A | OB | B0 | 16H | 00~7F |
| O | FX3/ CLASSIC(VR) A | OB | B0 | 17H | 00~7F |
| O | FX1/ CLASSIC(VR) B | OB | B0 | 18H | 00~7F |
| O | FX2/ CLASSIC(VR) B | OB | B0 | 19H | 00~7F |
| O | FX3/ CLASSIC(VR) B | OB | B0 | 1AH | 00~7F |
| O | SHIFT & FX1/ CLASSIC(VR) A | OB | B0 | 55H | 00~7F |
| O | FX2/ CLASSIC(VR) A | OB | B0 | 56H | 00~7F |
| O | SHIFT & FX3/ CLASSIC(VR) A | OB | B0 | 57H | 00~7F |
| O | SHIFT & FX1/ CLASSIC(VR) B | OB | B0 | 58H | 00~7F |
| O | SHIFT & FX2/ CLASSIC(VR) B | OB | B0 | 59H | 00~7F |
| O | SHIFT & FX3/ CLASSIC(VR) B | OB | B0 | 5AH | 00~7F |
| I | MATCHA (LED) | 09 | 90 | 01H | 7FH:ON/00H: OFF |
| I | MATCHB (LED) | 09 | 90 | 02H | 7FH:ON/00H: OFF |
| I | LOOP/EXIT (LED) | 09 | 90 | 03H | 7FH:ON/00H: OFF |
| I | SHIFT(LED) | 09 | 90 | 04H | 7FH:ON/00H: OFF |
| I | LOAD1 (LED) | 09 | 90 | 05H | 7FH:ON/00H: OFF |
| I | LOAD2 (LED) | 09 | 90 | 06H | 7FH:ON/00H: OFF |
| I | - / IN A (LED) | 09 | 90 | 07H | 7FH:ON/00H: OFF |
| I | - / IN B (LED) | 09 | 90 | 08H | 7FH:ON/00H: OFF |
| I | CUE / SET A (LED) | 09 | 90 | 09H | 7FH:ON/00H: OFF |
| I | CUE / SET B (LED) | 09 | 90 | 0AH | 7FH:ON/00H: OFF |
| I | + /OUT A (LED) | 09 | 90 | 0BH | 7FH:ON/00H: OFF |
| I | + / OUT B (LED) | 09 | 90 | 0CH | 7FH:ON/00H: OFF |
| I | IN1 (LED) | 09 | 90 | 11H | 7FH:ON/00H: OFF |
| I | IN2 (LED) | 09 | 90 | 12H | 7FH:ON/00H: OFF |
| I | OUT1 (LED) | 09 | 90 | 13H | 7FH:ON/00H: OFF |
| I | OUT2 (LED) | 09 | 90 | 14H | 7FH:ON/00H: OFF |
6. FAQ
6.1 Do I need a special stylus in order to use Spin! 2?
No. Spin! 2 will work with every needle. Still, some things should be considered to guarantee a smooth performance:
Your needle should neither be worn out nor be dirty/dusty. If you use a headshell-mounted system please be sure that it is aligned properly. Also its output voltage should be as high as possible to ensure a „clean“ timecode stream. This is why we bundled the Ortofon Digitrack System with Spin! 2: due to its „Concorde“-design you dont have to make any adjustments and its very high output (8mV) makes sure that the timecode stream is always nice and clean.
Generally speaking every turntable is Spin! 2 compatible. The better the turntable (e.g. Reloop RP-6000 MK6) the better the results (scratch characteristics, speed droop).
6.2 Can I buy the timecode vinyl records separately?
Yes, of course. Timecode vinyl records wear out quicker than normal vinyl because you don't change them after every song. Besides the normal wear and tear your records get while being used, oil or grease will degrade the quality of your timecode vinyl. Because of that your dealer has spare records. They come in black, white and atomic green.
6.3 Why won't my computer recognize the Spin! Interface?
There may be several reasons. We would recommend to unplug all your USB devices to eliminate conflicts with USB soundcards for example.
Also we advise you not to use a hub to connect Spin! 2 to your computer. If possible, always make a direct connection.
6.4 Why is there no timecode signal from one turntable? One turntable can play MP3 files, only the second one does not work as Spin! says that it cannot find a timecode signal?
Go to „Options/Timecode" and check if any waveforms are displayed. If there is only one waveform displayed then there is a faulty connection between your needle and the interface. In order for Spin! 2 to work it needs to read TWO waveforms. Just to clarify: that means TWO waveforms PER PLAYER, shown in red and white. First, swap your needles. If the problem migrates along with your needle to the second turntable then your needle is either dirty/ broken or the contacts are dirty. Use a q-tip and some cleaning alcohol to clean both the contacts on the cartridge and in the tonearm. Please do NOT spray contact spray or anything else into the tonearm! You can check whether you get a stereo signal out of your turntable by playing a normal record and using the panorama knob on your mixer. If both needles work on one of the turntables but not on the second turntable then you probably have a bad RCA cord. Please replace it. If the audio cords are permanently attached to your turntable then contact your specialized dealer / technician and ask for help.
6.5 Why do I only hear a high-pitched tone?
You're listening to the timecode stream because you activated „Vinyl Bypass“, located right above the Label Monitor. In your case, you're playing the timecode vinyl. Deactivate „Vinyl Bypass“ and the control vinyl will play your digital music.
6.6 Why is the music playing in reverse?
Your turntable is playing normally yet your music is playing backwards? Your turntable may be hooked up incorrectly. Your cables are mixed up- the left and right channels of your turntable are reversed. Simply swap them and everything should be back to normal. If for some reason you can't swap the cables then go to „File-> Options-> Timecode" and check the box next to „Left/Right Inverse". Basically this has the same effect as swapping your cables would have, however, it is always a better to have your equipment connected correctly.
6.7 Can I play my records at 45 RPM instead of 33 RPM?
Yes. Go to „File -> Options -> Timecode" and check the box next to „45 RPM". Now re-calibrate Spin! 2 (make sure that the turntable's pitch fader is set to „0").
6.8 Why are both tracks being played on the same channel?
Both players are routed to the same OUT PORT. In the Info Screen, click on the number after "Out Port" to change the routing. Typically you will want to route the left channel to Port 1 and the right one to Port 2.
6.9 Why is there no signal?
There are several possibilities, please check the following:
- Is your mixer/amp turned on? Are gain, line and master controls turned up?
- Did you choose the correct input on your mixer (phono instead of line)?
- Is vinyl control activated? (Button „Vinyl" below the Label monitor has to be green)
- Is Spin! 2 correctly configured?
- Have all the cords been plugged correctly?
- Does Spin! 2 recognize the timecode?
- Is a microphone plugged in? Unplug the mic, it blocks Input 1.
- Is the correct Out Port set? Left Player: Out Port 1, right player: Out Port 2.
6.9.1 Can I use the Interface as a sound card?
You can use the Spin! 2 interface as a mobile USB sound card with two stereo inputs and two stereo outputs. Also it features a microphone input with adjustable gain. If you use the mic input it will work instead of stereo input 1.
6.9.2 What do I have to observe if I use a Shure M44-7?
This cartridge will need a phase inversion. Go to „File -> Options -> Timecode" and tick the box next to „Phase Inverse".
6.9.3 Why is the music skipping a beat now and then?
The cause may be a hard disc that is too slow. One solution is to set the setting "Load Tracks to RAM" to "rapid" under "options>system". Furthermore it is recommended to defragment the hard disc where the tracks are stored in order to optimize the reading abilities.
6.9.4 Why does the speed / the pitch of my tracks fluctuate?
There are several reasons for this:
Spin! 2 is not calibrated
- the needle is dirty/dusty
- there is too much weight on the needle
the needle is worn out
- the timecode vinyl is worn out (scratches, cue burn) or dirty
6.9.5 Is there an auto mix/party mix function?
Yes. Add some tracks to the Spin! 2 list (NOT the Spin! 2 library) and select „play Spin! 2 list" by right-clicking into the list. The tracks will be played alternately between both players.
6.9.6 How can I optimize the performance of Spin! 2?
A computer with decent performance and stability is important in order to have Spin! 2 running reliably. Here are some tricks:
- Open the settings for your system performance in your control panel under „System>Advanced". Here select the setting „adjust for ideal setting".
- Deactivate any LAN / WLAN and network devices.
- Deactivate virus scanners and power management software.
- In Windows, go to „System Properties ->Advanced ->Performance Options" and tick „Background services" in your Windows settings
- Defragment your hard disc
- Don't have other programs running in parallel with Spin! 2.
- In Spin! 2, go to „File -> Options" and tick „Sound before graphic priority"
6.9.7 What can I do if I hear humming or buzzing when using a laptop?
Try to disconnect the mains adapter from your laptop. If the humming is no longer audible this is a grounding problem. You can try to solve the problem via the following procedures:
- Try to use a mains adapter without grounding.
- Try to connect all your devices to only one circuit.
- Try to place the mains and RCA cords separately.
- Check if your turntable is grounded correctly.
Try to connect an anti-buzzing filter.
6.9.8 Why is the signal distorted, why is there too much bass, why are the high frequencies missing?
Please check if Spin! 2.2 Interface's outputs are connected to the line inputs of your mixer (not to phono input).
7. HOT KEY OVERVIEW
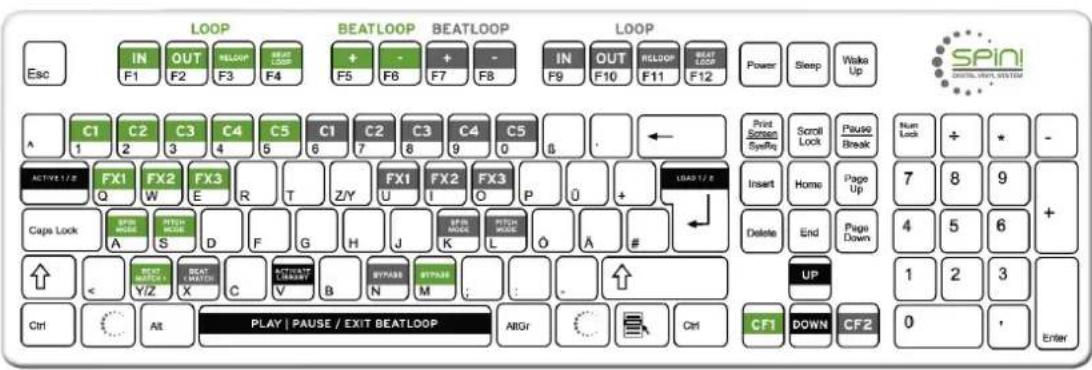
1. GENERAL SECTION
MODEL: SPINU2A
POWER SOURCE: USB5V, 500mA
DIMENSION: 180(W) x 137(D) x100.2(H) mm
WEIGHT: 0.78 kg
2 FEATURES:
- 4 Channel analog input/output with through output.
High level master output. - Phono/Line selector with gain adjust.
- Midi control panel.
- Earphone output with direct switch, split adjust and gain adjust.
- Input/output signal indicate by LED.
- Microphone input with active voltage supply, gain adjust and throughout.
-
USB V1.1 Connect Computer RECORD&PLAY.
-
INPUT/THROUGH OUT SECTION: (LINE IN: -14dBV, LOAD = ? OHM)
CH.BALANCE: Within 0.5 dB
LEVEL DIFFERENCE: Within 0.5 dB
- PLAYBACK SECTION: (Microphone switch off, Windows playing speaker maximum, Phones load= 33 ohm, Line out load= 47K OHM)
FREQUENCY RESPONSE: (Phones out = 0 dBV output; TCD781 Track 1, 4(for line), 6(for phones), 18)
LINE: 17-20K Hz +2 dB
PHONES: 61-20K Hz 3 dB
THD + N: (Phones out = 0dBV OUTPUT, A-Weighted, W/20KHz LPF; TCD781 Track 1)
PHONES: Less than 0.1%
MAXIMUM OUTPUT: (TCD781 Track 1)
LINE: THD<=0.02%,More than +6 dBV (2.0V)
at load = 47K OHM
PHONES: THD<=1%,More than +1.6 dBV (1.2V) at load = 33 OHM
OUTPUT NOISE: (W/20KHz LPF, A-Weighted, playback TCD781 track 1 then pause)
PHONES: Less than -70 dBV(Adjust Gain Maximum)
S/N RATIO: (W/20KHz LPF, Phones out=OdBV,A-WEIGHTED; TCD781 Track 1)
LINE: More than 85 dB
PHONES: More than 75 dB
CH. SEPARATION: (W/20KHz LPF, A-Weighted; TCD781 Track 32,38)
LINE: More than 85 dB at 1K Hz between L and R. More than 85 dB at 1K Hz between channels
PHONES: More than 65 dB at 1K Hz between L and R.
CH. BALANCE: (Phones out = OdBV; TCD781 Track 1)
LINE: Within 1 dB
PHONES: Within 1 dB
FADER MAXIMUM ATTENUATION: (1K Hz Line in= -14 dBV and Phones out = 0 dBV, A-Weighted W/20K Hz LPF; TCD781 Track 1)
SPLIT FADER
PC to PHONES: Less than -75 dBV
LINE IN to PHONES: Less than -70 dBV
MICROPHONE SECTION: (Microphone switch ON,
FREQUENCY RESPONSE: (Microphone gain maximum)
LINE1 OUT: 20-20K Hz +3 dB
THD+N: (A-Weighted, w/ 20k Hz LPF)
LINE1 OUT: Less than 0.2%
MAXIMUM OUTPUT: (THD=1%, Adjust Microphone gain,
A-Weighted, w/ 20k Hz LPF)
LINE1 OUT: More than +5.5 dBV (1.9V) at load = 47K OHM
OUTPUT NOISE: (Microphone gain maximum,
disconnect Mic, W/20K Hz LPF, A-Weighted)
LINE1 OUT: Less than -55 dBV
S/N RATIO: (W/20KHz LPF,
MICROPHONE GAIN MAXIMUM, A-Weighted)
LINE1 OUT: More than 60 dB
- RECORDING AND PLAYBACK SECTION: ....... (Windows playing speaker and all
gain control are maximum)
INPUT/OUTPUT IMPEDANCE & SENSITIVITY: . (1KHz recoding MASTER +6 dBV OUTPUT,
load = 47K OHM
LINE IN: 10-50K OHM / -14 dBV (200mV) +2 dB
PHONO: 47K OHM / -54 dBV (2mV) 2 dB
MIC: 2.2K OHM / -50 dBV (3.16mV) +2 dB
S/N RATIO: (1KHz recording,W/20KHz LPF, A-Weighted)
LINE: More than 85 dB
PHONO: More than 85 dB
MIC: More than 60 dB
FUNCTION BALANCE: (Recording 1K Hz and playback to Line out,
W/20K Hz LPF, A-Weighted)
PHONO: +/2 dB (Reference to LINE OUT)
PHONES: +/- 2 dB (Reference to DIRECT ON,
playback signal with DIRECT OFF)
MIC: +/2 dB (Recording 1K Hz with MIC ON,
playback signal with MIC OFF)
FREQUENCY RESPONSE: (Reference recording 1KHz, load= 47K OHM)
LINE: 20-20K Hz +2/-3 dB
PHONO: 20-20K Hz +2/-3 dB
(RIAA: Input 1K Hz/-50 dBV, 20 Hz/-69.3 dB)
20K Hz/-30.4 dB)
THD + N: (Recording 1KHz and playback to Line out,
A-Weighted, W/20K Hz LPF)
LINE: Less than 0.05%
MIC: Less than 0.15%
Configuration Minimum . 102 3. Guidance des Menu Reloop Spin! . 124
1. Branchements & Installation du Logiciel .p. 102 3.1 Rubrique File.. p.124
1.1 Branchements .p. 103 3.1.1 Options.. p. 124
1.2 Installation u logiciel Spin! 2 . p. 1053.1.2 Learning.. p. 124
1.3 ASIO Pilote Installation .p. 107 3.1.3 Quit Spinning.. p. 124
1.4 Easy Setup .p. 108
1.5 Paramétres d'Installation du Logiciel . 111 3.2 Menu Item Spin! Library.. p. 124
1.6 Interface de Controlle .p. 1123.21 New .p. 124
3.2.2 Open.. p.124
2. Vue d'Ensemble du Logiciel .p. 1123.2.3 Save.. p. 124
2.1 Shortcut: New Spin! Library .p. 113 3.2.4 Save as.. p. 124
2.2 Shortcut: Open Spin! Library .1133.2.5 Import.. p. 124
2.3 Shortcut: Auto Search .p. 1133.2.6 Export.. p. 124
2.4 Shortcut: Save Spin! Library .p. 1133.2.7 Automatic Search .p. 124
2.5 Shortcut: Stop Spin! Library .1133.2.8 Add Track .p.124
2.6 Shortcut: Play Spin! List .p. 1133.2.9 Select All .p. 124
2.7 Shortcut: Loop Spin! List .p. 1B2.9.1 Delete .p. 124
2.8 Shortcut: shuffle Spin! List . p. 113
2.9 Shortcut: Previous . p. 33 Track Menu.. p. 124
2.10 Shortcut: Next .p. 1B3.1 Track Preferences.. p. 124
2.11 Shortcut: Music Explorer/Audio Input.. 3.3.2 Save ID3 TAG Attributes .p.124
2.12 Shortcut: Spin! Library.. 3.3.3 Show In Windows Explorer.. p. 124
2.13 Shortcut: Spin! List.. 3.3.4 Analyze BPM Manually..
2.14 Shortcut: Category View 3.3.5 Analyze BPM Automatically .p. 124
2.15 Shortcut: X-Fader Match View 3.3.6 Delete Tracks Permanently .p. 124
2.16 Shortcut: Master/Rec. Volume. p. 113
2.17 Shortcut: Beat Match View.. p. 113 3.4 Menu Spin! List.. .p. 125
2.18 Shortcut: Options.. p. 113 3.4.1 Play Spin! List .p. 125
2.19 Free MIDI Learning.. 3.4.2 Stop Spin! List. p. 125
2.20 Safe Mode.. 3.4.3 Add to Spin! List .p.125
2.21 Beat Match View.. 3.4.4 Safe Mode .125
2.22 Complete View .p.114
2.23 Needle View .p. 1345 Spin! Workspace Menu .p. 125
2.24 Master.. 3.5.1 Workspace Arrangeable .p.125
2.25 Mic Rec. Function.. 3.5.2 Tool Tips .p.125
2.26 Load Track.. 3.5.3 Bar .p.12
2.27 Bypass Function .p.1855.4 Full Screen View .p.125
2.28 Label Monitor .p. 1365.5 Menu Bar View .p. 125
2.29 Gain Knob.. 3.5.6 Shortcut View .p.125
2.30 Pitch Mode.. 3.5.7 Info View .125
2.31 Pitchfader.. 3.5.8 Preview .p.125
2.32 Vinyl timecode Activation .p. 113.5.9 Spin! Library View .p. 125
2.33 Spin! Mode Button .p.1875.9.1 Spin! List view .p.125
2.34 Play/Pause Button . p. 85.9.2 Category View . p. 125
2.35 Cue Button.. 3.5,9.3 Music Explorer/Audio Input .p.125
2.36 Forward and Reverse Button.. 3.5.9.4 X-Fader Match View .p.125
2.37Skip Buttons .p.185.9.5 Master/Rec Volume .p.125
2.38 Fast Search Buttons .p. 135.9.6 Beat Match View .p. 125
2.39 Pitch Bend Buttons .p.118
2.40 Spin! Library .p. 1396 Help Menu .p. 125
2.41 Flanger Effect .p. 1206.1 Easy Setup.. p. 125
2.42 Filter Effect .p. 1306.2 Manual .p. 125
2.43 Delay Effect.. 3.6.3 www.reloop-spin.com.. p.125
2.44 Key Mode .p. 26.4 Configuration Log .p. 125
2.45 Beat Loop/Auto Loop Function.. 3.6.5 About Spin1 2 . p. 125
2.46/47 Manual Loop Function .p.121
2.48 Crossfader . p. 121
2.49 Beat Match Function.. p.122
2.50 Cue Points .p.122
2.51 Info View.. p. 122
2.52 Category View .p.123
2.53 Music Explorer/Audio Input.. p. 123
2.54 Monitor Function .p.123
- Resolution/Resolution
- Shortcut: Master/Rec. Volume
- Title
- Artist
- Album
Genre
BPM
Duration -
Last Played
-
Remix
Rating - Comments
Year
Track - File
-
Directory
-
File Name
- File Extension
- Date Created
Label - Producer
Key
Counter
NOTE!
3.3.6 Delete tracks permanently :
4. Play List Directory
5. Waveform Directory
All-Round 78-150 BPM
Hip Hop 80-120 BPM
House/Techno 110-150 BPM
2. Show Pitch Value
3. Calculate BPM on Load
9. End of Track Warning
1. Resolution Selection
4.3 Track Preferences
Track > Track Preferences
4.3.3 Track Settings
- 4 Channel analog input/output with through output.
High level master output. - Phono/Line selector with gain adjust.
- Midi control panel.
- Earphone output with direct switch, split adjust and gain adjust.
- Input/output signal indicate by LED.
- Microphone input with active voltage supply, gain adjust and throughout.
- USB V1.1 Connect Computer RECORD&PLAY.
3. INPUT/THROUGH OUT SECTION: (LINE IN: -14dBV, LOAD = ? OHM)
CH.BALANCE: Within 0.5 dB
LEVEL DIFFERENCE: Within 0.5 dB
4. PLAYBACK SECTION: (Microphone switch off, Windows playing speaker maximum, Phones load= 33 ohm, Line out load= 47K OHM)
FREQUENCY RESPONSE: (Phones out= 0 dBV output; TCD781 Track 1, 4(for line), 6(for phones), 18)
LINE: 17-20K Hz +2 dB
PHONES: 61-20K Hz 3 dB
THD + N: (Phones out = 0dBV OUTPUT, A-Weighted, W/20KHz LPF; TCD781 Track 1)
PHONES: Less than 0.1%
MAXIMUM OUTPUT: (TCD781 Track 1)
LINE: THD<=0.02%,More than +6 dBV (2.0V) at load = 47K OHM
PHONES: THD<=1%,More than +1.6 dBV (1.2V) at load = 33 OHM
OUTPUT NOISE: (W/20KHz LPF, A-Weighted, playback TCD781 track 1 then pause)
PHONES: Less than -70 dBV(Adjust Gain Maximum)
S/N RATIO: (W/20KHz LPF, Phones out=OdBV,A-WEIGHTED; TCD781 Track 1)
LINE: More than 85 dB
PHONES: More than 75 dB
CH. SEPARATION: (W/20KHz LPF, A-Weighted; TCD781 Track 32,38)
LINE: More than 85 dB at 1K Hz between L and R. More than 85 dB at 1K Hz between channels
PHONES: ...More than 65 dB at 1K Hz between L and R.
CH. BALANCE: (Phones out = 0dBV; TCD781 Track 1)
LINE: Within 1 dB
PHONES: Within 1 dB
FADER MAXIMUM ATTENUATION: (1K Hz Line in= -14 dBV and Phones out = 0 dBV, A-Weighted W/20K Hz LPF; TCD781 Track 1)
SPLIT FADER
PC to PHONES: Less than -75 dBV
LINE IN to PHONES: Less than -70 dBV
MICROPHONE SECTION: (Microphone switch ON, 1KHz -50 dBV input,48 V OFF)
FREQUENCY RESPONSE: (Microphone gain maximum)
LINE1 OUT: 20-20K Hz +3 dB
THD+N: (A-Weighted, w/ 20k Hz LPF)
LINE1 OUT: Less than 0.2%
MAXIMUM OUTPUT: (THD=1%, Adjust Microphone gain, A-Weighted, w/ 20k Hz LPF)
LINE1 OUT: More than +5.5dBV (1.9V) at load = 47K OHM
OUTPUT NOISE: (Microphone gain maximum, disconnect Mic, W/20K Hz LPF, A-Weighted)
LINE1 OUT: Less than -55 dBV
S/N RATIO: (W/20KHz LPF,
MICROPHONE GAIN MAXIMUM, A-Weighted)
LINE1 OUT: More than 60 dB
- RECORDING AND PLAYBACK SECTION: ....... (Windows playing speaker and all gain control are maximum)
INPUT/OUTPUT IMPEDANCE & SENSITIVITY: . (1KHz recoding MASTER +6 dBV OUTPUT, load = 47K OHM)
LINE IN: 10-50K OHM / -14 dBV (200mV) ÷ 2 dB
PHONO: 47K OHM / -54 dBV (2mV) +2 dB
MIC: 2.2K OHM / -50 dBV (3.16mV) +2 dB
S/N RATIO: (1KHz recording,W/20KHz LPF, A-Weighted)
LINE: More than 85 dB
PHONO: More than 85 dB
MIC: More than 60 dB
FUNCTION BALANCE: (Recording 1K Hz and playback to Line out, W/20K Hz LPF, A-Weighted)
PHONO: + / - 2 dB (Reference to LINE OUT)
PHONES: +/- 2 dB (Reference to DIRECT ON, playback signal with DIRECT OFF)
MIC: + / - 2 dB (Recording 1K Hz with MIC ON, playback signal with MIC OFF)
FREQUENCY RESPONSE: (Reference recording 1KHz, load= 47K OHM)
LINE: 20-20K Hz +2/-3 dB
PHONO: 20-20K Hz +2/-3 dB (RIAA: Input 1K Hz/-50 dBV, 20 Hz/-69.3 dB, 20K Hz/-30.4 dB)
THD + N: (Recording 1KHz and playback to Line out, A-Weighted, W/20K Hz LPF)
LINE: Less than 0.05%
MIC: Less than 0.15%