
WS 5140 - Washing machine MIELE - Free user manual and instructions
Find the device manual for free WS 5140 MIELE in PDF.

| Product type | Super-spin washing machine |
| Brand | Miele |
| Model | WS 5140 |
| Maximum capacity (dry laundry) | 14 kg (programs A, E, F, G) |
| Wash programs | White/Colors, Non-iron, Delicate/Synthetic, Wool, Mini program, Rinse and spin, Spin only, Drain only |
| Available temperatures | From 20 °C to 95 °C depending on program |
| Power supply | 3 AC 220-230 V 50 Hz / 3N AC 380-400 V 50 Hz |
| Heating power | 15 kW (switchable to 10 kW) |
| Required water pressure | 1 to 10 bar |
| Noise level (wash) | 69.3 dB(A) |
| Noise level (spin) | 73.5 dB(A) |
| Special functions | Pre-wash, starching, no spin, delayed start (up to 9h30), emergency stop, reprogramming |
| Safety | Door lock, handle safety, emergency stop, leak protection |
| Maintenance | Filter cleaning (gas models), detergent drawer cleaning, water inlet hose check |
| Connections | Cold and/or hot water (max 70 °C), drain, gas or steam option depending on version |
Frequently Asked Questions - WS 5140 MIELE
User questions about WS 5140 MIELE
0 question about this device. Answer the ones you know or ask your own.
Ask a new question about this device
Download the instructions for your Washing machine in PDF format for free! Find your manual WS 5140 - MIELE and take your electronic device back in hand. On this page are published all the documents necessary for the use of your device. WS 5140 by MIELE.
USER MANUAL WS 5140 MIELE
Operating Instructions
Washer Extractor
Mode d'emploi
natural_image
Exterior view of a stainless steel washing machine (no visible text or symbols)WS 5080 / WS 5100 / WS 5140
natural_image
Symbol of a trash bin with crossed lines indicating no waste or discharge (no text or labels)natural_image
Line drawing of a mechanical device with an arrow indicating motion, no text or symbols presentHinweise:
natural_image
Simple line drawing of a rectangular device with a flame symbol inside, no text or labels present.flowchart
graph TD
    A["Start"] --> B{Decision}
    B -->|Yes| C["Circle with 'X'"]
    B -->|No| D["Square with 'O'"]
    C --> E["Waveform"]
    D --> F["Circle with 'O'"]
    E --> G["Arrow to Key"]
    F --> G
    G --> H["End"]
natural_image
Diagram showing a mechanical assembly with bolts and a downward arrow indicating motion (no text or symbols)natural_image
Technical line drawing of a mechanical clamp or bracket assembly (no text or symbols)natural_image
Pure mechanical diagram showing a lever mechanism with no text or symbolsnatural_image
Diagram of a hand holding a mechanical device with an upward arrow, surrounded by furniture and window panels (no text or symbols)natural_image
Technical line drawing of a mechanical component with a central bore and fluid pouring (no text or symbols)natural_image
Technical line drawing of a mechanical bearing assembly (no text or symbols)"A" (2 Stück),

natural_image
Technical line drawing of an internal combustion engine unit with labeled components (no text or symbols present)"B" (2 Stück)
Warning and safety instructions 34
Caring for the environment 38
Description of the machine 39
- Description of the control panel 41
- Fault indicator lights 41
Operation 43
- Loading the machine 43
- Programme and temperature selection 43
- Adding detergent 43
- Detergent dispensing 44
- Fault message "ignition fault" and "blocked filter" 44
- Opening the door and removing laundry 45
Notes 45
- Bleaching agents 45
- With pre-wash 45
- No spin (Rinse hold) 45
- Spin times 45
- Short programme 46
- Starching 46
- Skip programme stage 46
- Programme cancellation during peak load cut-out 46
- Power cut during a wash programme / Manually emptying the suds container and unlocking the drum door . . . . . . . . . . . . . . . . . . . . . . . . 47
- Programme cancellation 47
- Delay start 48
- Re-programming a wash programme 50
- Additional programmes 52
- Possible reasons for increased levels of foaming 52
Cleaning and care 54
Symbols on the data plate 56
For the installer/electrician
Removing the transit fitting 57
Screw feet 57
Plumbing 58
Water inlet/drainage 58
Electrical connection 59
Electric heating 59
Gas connection 60
Steam connection 60
Guarantee 61
The washer-extractor must be installed by an approved service technician or authorized Service Dealer.
Explanation of the Warning and Safety symbols on the machine

It is essential to read these operating instructions.
Please refer to specific instructions, e.g. Installation instructions

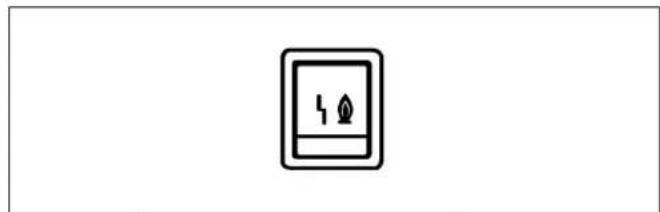
Caution, hot surfaces.

Caution, voltage up to 1000 volts.

Earthing
To avoid the risk of accidents or damage to the machine read the operating instructions through before using it for the first time.
Appropriate use of the machine
This washer extractor is only intended for items of laundry which have not been impregnated with dangerous or inflammable substances.
Only machine wash articles which possess a care label announcing they are suitable for machine washing.
It is the operator's responsibility to ensure that the standard of disinfection in thermal as well as chemo thermal procedures is maintained (in accordance with § 18 IFSG) by carrying out suitable validation tests. These procedures should be checked on a regular basis, either thermo-electrically using loggers, or bacteriologically with bio indicators. The operator must pay particular attention to maintaining the correct parameters in the procedure, including temperature and with chemo thermal programmes the chemical concentration used.
Disinfection programmes must not be interrupted, as this can have a limiting effect on the disinfection result.
On no account must solvents of the kind used for dry cleaning be used in this machine. There may be the danger of fire or explosion.
Never use or store petrol or petroleum based substances or any easily inflammable substances near the machine. Do not use the machine lid as a resting place.
Danger of fire or explosion.
When used in a commercial environment ensure that all operators are trained to use the machine correctly. If the machine is used in a publicly accessible room, please ensure that operators are able to use it safely.
Technical and electrical safety
The electrical safety of this appliance can only be guaranteed when continuity is complete between the appliance and an effective earthing system which complies with local and national regulations. It is most important that this basic safety requirement is regularly tested by a qualified electrician. The manufacturer cannot be held liable for the consequences of an inadequate earthing system.
Do not damage, remove or bypass the safety features and controls on the machine.
Where there is any damage to the machine or to the cable insulation the machine must not be used until it has been repaired.
Any removable outer panels must be in place, and all moving or electrical parts shielded before the machine is operated.
The machine is only completely isolated from the electricity supply either when switched off at the wall isolator, or the mains fuse is withdrawn from the socket.
- Repairs to machines operating with electricity, gas or steam should only be undertaken by a suitably qualified service engineer to ensure safety. Unauthorised repairs could be dangerous.
Never attempt to force the machine door open. To ensure the correct functioning of the door lock safety mechanism the handle is fitted with a break line.
- Faulty components should only be exchanged for Miele original spare parts. Only when these parts are fitted can the safety standards of the machine be guaranteed.
The very best materials are used in the manufacture of this machine, and every care is taken in its manufacture. However, with time, deterioration of parts can occur, especially with rubber components such as hoses. This should be borne in mind if operating the machine without supervision. Check the inlet hoses regularly for signs of deterioration and replace in good time, to avoid leaks and subsequent damage.
Safety precautions to take if you smell gas - applies only to gas-heated washer extractors.
N.B.: Natural gas usually has no smell of its own. In the U.K. a smell is added by British Gas for safety reasons.
■ If you smell gas you must act immediately.
■ Extinguish any flames.
■ Do not create any electrical sparks: e.g. do not insert or withdraw any electrical plugs or operate electrical switches such as lights and door bells.
■ Do not enter a room holding a torch or candle etc. if there is a smell of gas in the room.
■ Do not light cigarette lighter or matches.
■ Do not smoke.
■ Open all windows and doors.
■ Close any shut-off valves at the gas connection or mains supply immediately.
■ Shut off the gas-valve next to the machine.
■ If all gas valves are closed but there is still the smell of gas in the room you should call your local gas supplier immediately.
Important
Before signing off any commissioning, maintenance, conversion or repair work as finished, all gas pipework from the manual isolating valve to the burner nozzles must be checked for soundness. Pay special attention to the test points on the multifunction control, the connection pressure monitor and the burner setting pressure. The tests must be carried out with the burner switched on and switched off.
Use of the machine
This washer extractor is not intended for use by persons (including children) with reduced physical, sensory or mental capabilities, or lack of experience or knowledge, unless they have been given supervision or instruction concerning its use by a person responsible for their safety.
Never allow children to play in, on or near the washer extractor, or to operate it themselves. Please supervise its use by the elderly or infirm.
Remember that the door porthole glass can become hot during the operation of the machine. Do not let children touch it.
When washing with high temperatures hot steam will come out of the Air gap at the side of the machine.
Always close the door after use. This way you will avoid the danger of:
- children climbing onto or into the dryer or hiding things in it.
- pets or other small animals climbing into it.
Always make sure the drum is stationary before reaching in to remove washing. Reaching into a moving drum is extremely dangerous.
Water used for washing and rinsing must not be used as drinking water. It must be discharged into a proper sewerage system.
The machine should only be operated unsupervised when there is a floor drain (gully) in the direct vicinity of the machine.
Disinfecting and cleaning agents often have compounds containing chlorides in them. If these agents dry on to stainless steel surfaces, the residual chlorides will attack the steel and can cause rusting. To protect your machine from rust damage, we recommend only using chloride free disinfecting and cleaning agents for washing and disinfecting programmes and for cleaning stainless steel surfaces of the machine itself. If you are not sure about a particular agent, contact the manufacturer of that agent for advice. If you accidentally spill an agent containing chlorides on the machine it should be rinsed off with water and dried using a soft cloth.
- Proprietary dyes, dye removers and de-scaling agents may only be used in this machine if the manufacturer expressly states that they are suitable for use in a washing machine. There may be the danger of fire or explosion.
Always follow the instructions of the chemical manufacturer when using cleaning agents and special application chemicals. Only use such chemicals for the purpose and in the situation specified by the manufacturer in order to avoid the danger of adverse chemical reactions and material damage. If in doubt check the suitability of the product for use in this machine with the manufacturer before using it.
Where a chemical cleaning agent is recommended on technical application grounds, this does not imply that the manufacturer of the machine takes responsibility for the effect of the chemical on the material of the items being cleaned or on the machine. Please be aware that changes in formulation, storage conditions etc., which may not be publicised by the chemical producer, can have a negative effect on the cleaning result.
Laundry that was soiled with biological oils or fat should be washed using a suitable detergent and/or wash programme. It must also be inspected after washing. If oils or fat are not sufficiently removed they could cause the laundry to self ignite during the drying process.
On no account use high pressure cleaners or hose down the machine.
Use of accessories
- Accessory parts may only be fitted when expressly approved by Miele. If other parts are used, guarantee, performance and product liability claims may be invalidated.
Chlorine and component damage
Notes on using chlorine bleach and perchlorethylene
- Frequent use of chlorine increases the risk of component damage.
The use of agents containing chlorine, such as sodium hypochlorite and chlorine bleach in powder form, can damage the protective surface of stainless steel and cause corrosion. Factors affecting this are chlorine concentration levels, contact time and temperature. It is therefore advisable to avoid the use of such agents. Oxygen based bleaching agents should be used instead.
If, however, chlorine based bleaching agents have to be used for particular types of soiling, then anti-chlorine measures must also be carried out. If this is not done irreparable damage can occur to components in the machine and to laundry.
Anti-chlorine treatment
Anti-chlorine treatment has to be carried out immediately after chlorine bleach has been used. Hydrogen peroxide and oxygen based cleaning and bleaching agents must only be used in programmes specified for their use. Any wash performance problems should be discussed with the manufacturer of the cleaning / bleaching product in the first instance.
With thiosulfate, especially when used with hard water, gypsum can form, which can lead to incrustations on laundry or deposits in the machine.
The exact quantity of additives and the treatment temperatures required must be set and tested on site in accordance with the dosage recommendations of the detergent and additive manufacturers. The laundry must also be tested to make sure it contains no active chlorine residues after processing.
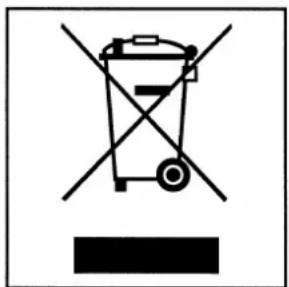
Disposal of old machines or appliances
When disposing of an old washer extractor first make it unusable. Disconnect from all services, cut off the cable and the plug from the cable. Make the door lock inoperative, so that children cannot accidentally shut themselves in. Make appropriate arrangements for the safe disposal of the appliance.
All personnel working with this machine must be fully trained in all aspects of its use and safety.
Keep these instructions in a safe place.
Disposal of the packing material
The transport and protective packing has been selected from materials which are environmentally friendly for disposal and can normally be recycled. Packaging e.g. cling film, polystyrene and plastic wrappings must be kept out of the reach of babies and young children. Danger of suffocation. Rather than just throwing these materials away, please ensure that they are recycled.
Disposal of your old machine
natural_image
Symbol of a trash bin with no text or labels, featuring crossed and unshaded cross brackets (no readable text)Electrical and electronic machines often contain materials which, if handled or disposed of incorrectly, could be potentially hazardous to human health and to the environment. They are, however, essential for the correct functioning of your machine. Please do not therefore dispose of it with your household waste.
Please dispose of it at your local community waste collection/recycling centre, and ensure that it presents no danger to children while being stored for disposal.
It should be unplugged or disconnected from the mains electricity supply by a competent person. See the "Warning and Safety" section of this booklet for further details.
Control panel

1 "Reset" button 4 Programme sequence indicator lights (only on washer-extractors with gas heating) 5 Progra
5 Programme and temperature selector switch
2 Pushbutton switches 6 Emergency cut-off switch
3 Temperature and remaining time display and selector button
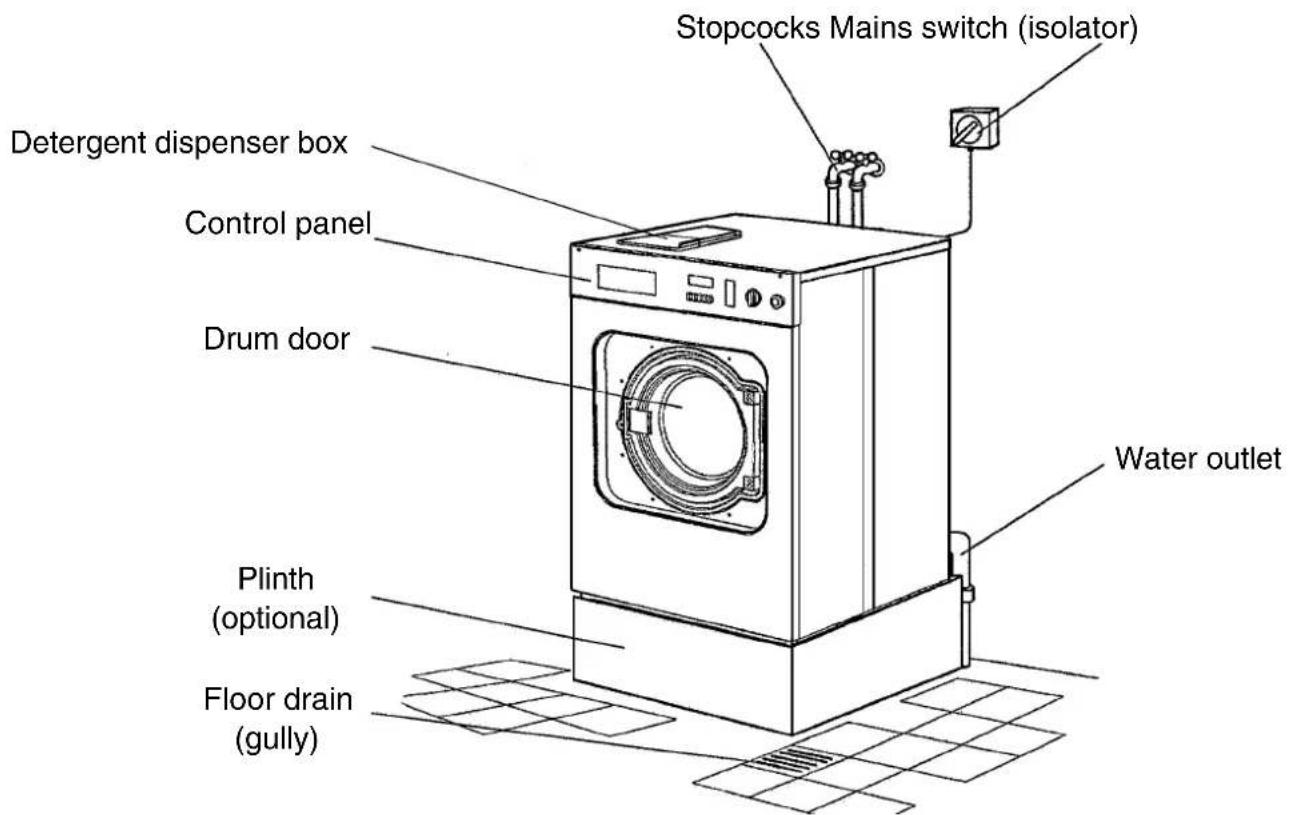
WS 5080/5100/5140
This machine is constructed in accordance with IEC 60204-1:2005.
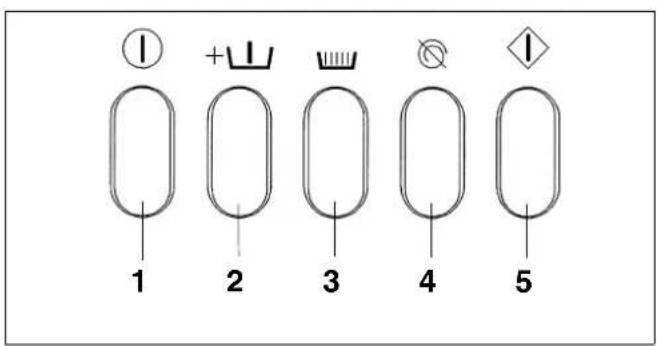
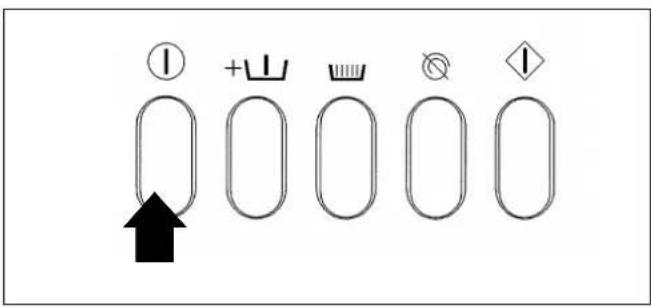
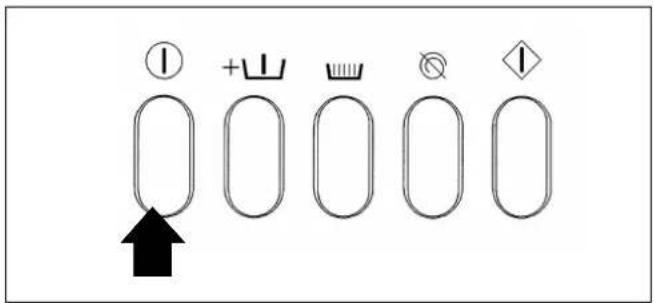
1 = "On/Off" button
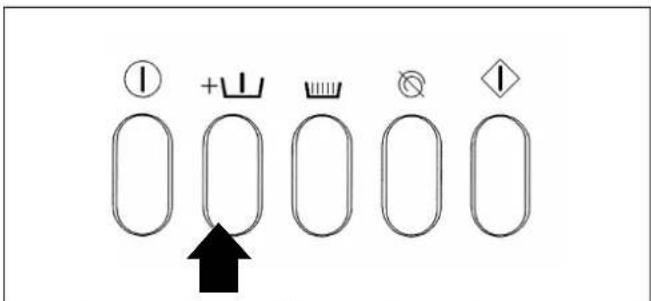
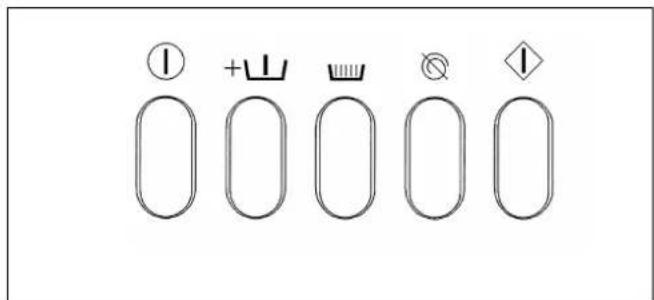
2 = "With pre-wash" button
For heavily soiled washing
- only use with programmes A, B and
© if required.
3 = "Starch" button
Press this button to select the starch function. It can only be used with pro-
grammes A and E.
4 = "No spin" button (Rinse hold)
Press this button if the washing is not to be spun (after the final rinse).
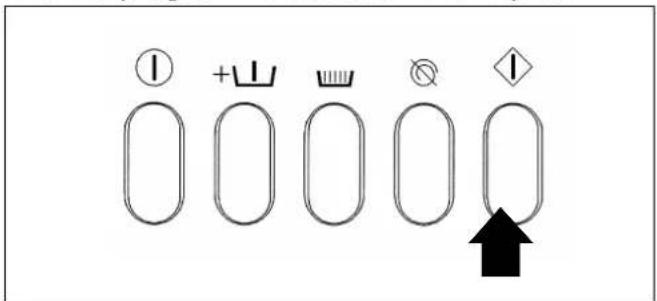
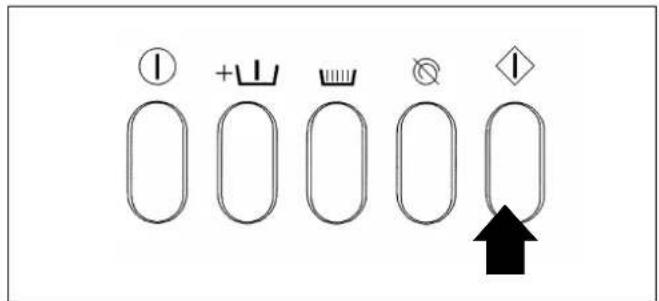
5 = "Start" button
Press this button to start the programme.
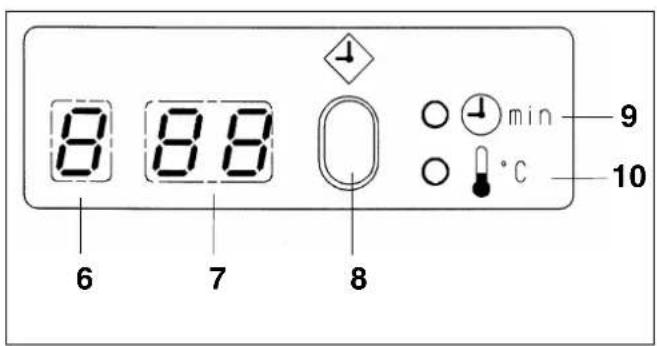
6 = Display "Time hours"
7 = Display "Time minutes"
This displays the remaining length of the selected programme or how much time is left before a programme starts if "Delay start" was selected.
or "Temperature in °C"
Temperatures above 20^ C are displayed in 5^ C steps.
8 = "Delay start"
This is used to delay the start time of a programme by up to 9 hours and 30 minutes. See page 48 for a detailed explanation.
9 = "Time" indicator light
Indicates a time in display 6 and 7.
10 = "Temperature °C" indicator light
Indicates a temperature in ^ C in display 7.
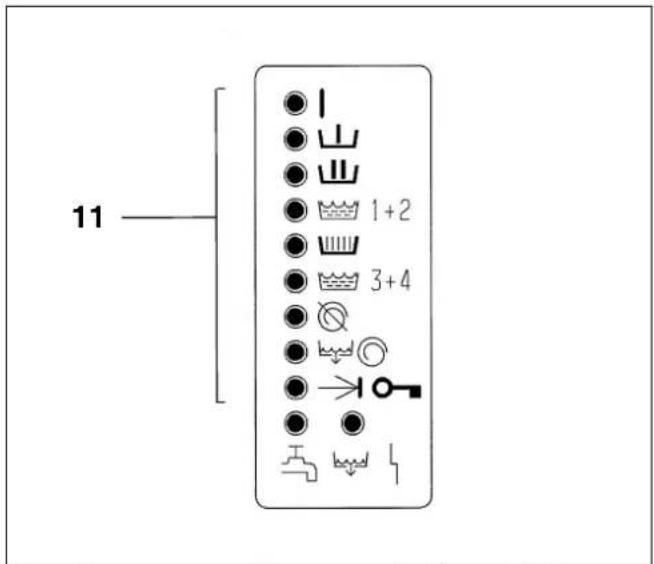
11 = Programme sequence indicator lights
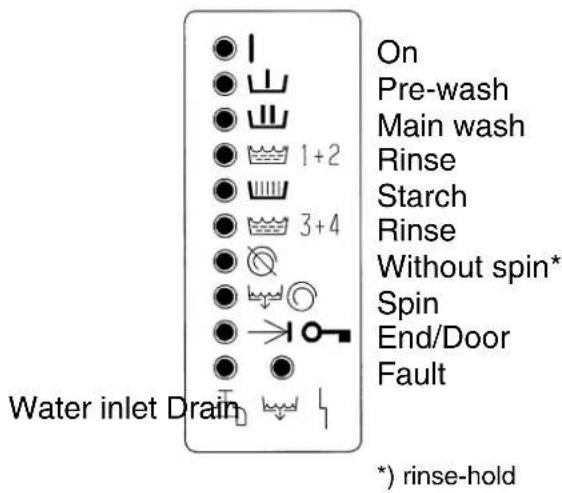
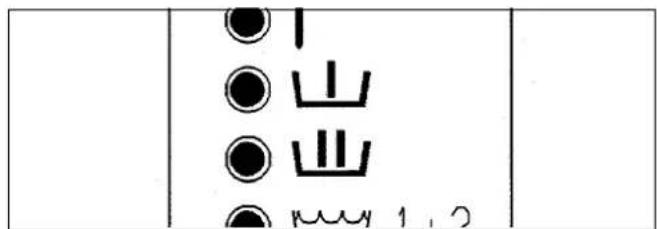
Fault indicator lights
A fault or malfunction is indicated by a flashing indicator light.
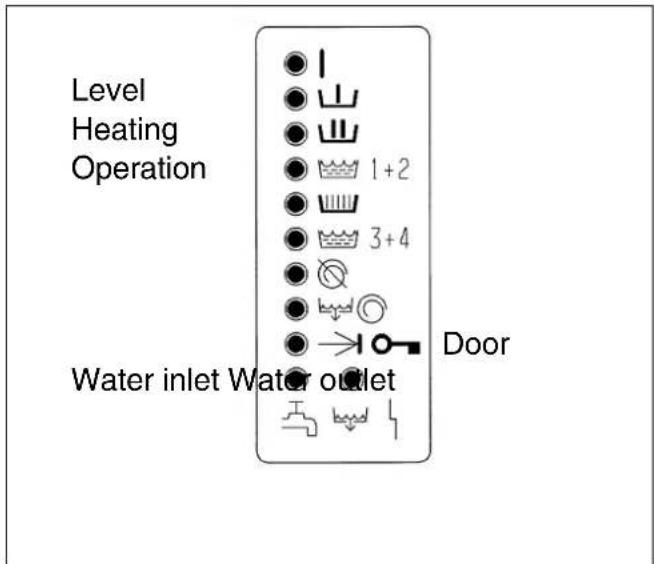
Explanation:
"Level"
Fault in the water level system (water level) "Heating"
Fault in the heating up system
"Operation"
Operation fault
"Door"
Fault in the locking mechanism. Open the door manually (see "Power cut during a wash process").
If one of the fault indicator lights listed above flashes an approved Service Engineer must be called to remedy the fault.
"Water inlet"
Indicates an insufficient/inadequate water supply eg. stopcocks turned off, or water inlet filters blocked.
"Drain"
The drain outlet from the machine is blocked or the drain valve is defective.**
After rectifying the fault or error the wash programme will need to be started from the beginning again.
**) a defective drain valve should only be repaired by an approved Service Engineer.
Only refers to WS 5100 and WS 5140 with gas heating
Fault message "Heating"
The "Heating" indicator light flashes if there is an interruption to the on-site gas supply to the machine, for example if the gas stop valve is not open. If any other lights blink at the same time, this is of no further significance.
Turn on the gas stop valve. Restart the machine by first releasing the On-Off button and then pushing it in again, and pressing the "Start" button.
If the "Heating" indicator light still flashes after this, call your Service engineer to remedy the fault.
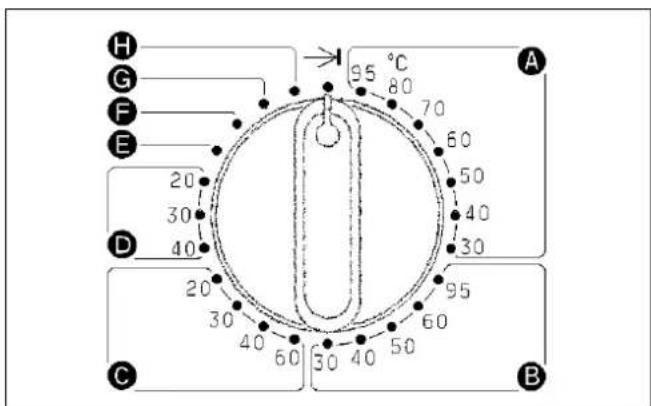
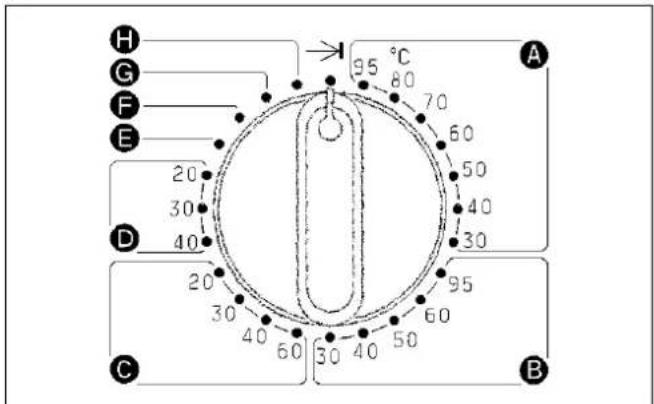
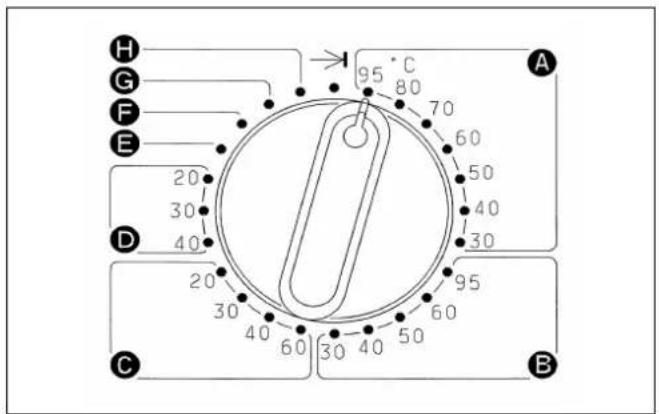
12 = Programme and temperature selector switch
The programme selector switch is used to select the required wash programme.
A Cottons
B Minimum iron
C Delicates/synthetics
D Woollens
E Short programme
F Separate rinse and spin*
G Separate spin*
H Separate drain*
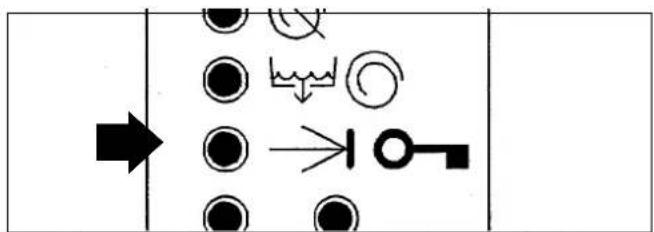
→ End
13 = "Reset" button
(only on WS 5100 / WS 5140 with gas heating)
After an ignition fault wait for at least 1 minute before operating this button.
14 = Emergency cut-off switch
To be operated only in an emergency. After removing the cause of danger this switch can be re-set by turning the knurled disc in a clockwise direction.
After re-setting, the display for "Time" or "Temperature" will flash. The "Start" button needs to be pressed again to continue the interrupted programme.
*) Please note
Switch settings F, G and H
These settings have also been described elsewhere as:
F - Extra rinse and spin
G - Extra spin
H - Extra drain
The respective functions are the same.
Commissioning
The washer-extractor must be installed by an approved Customer Service Engineer or authorized Dealer.
■ Open the stopcocks (on site)
■ Switch on at the mains (on site)
■ Empty all pockets
Foreign objects, (eg nails, coins, paper clips etc) can cause damage to textiles and components in the machine.
- Load the drum
Laundry - Weight of load (Dry laundry)
| WS 5080 WS 5100 WS 5140 |
| Programmes A, E, F, Gmax. 8 kg max. 10 kg max. 14 kg |
| Programme Bmax. 2,5 kg max. 3,5 kg max. 5 kg |
| Programmes C, Dmax. 1,5 kg max. 2 kg max. 3 kg |
- Press the "On/Off" button in - The "On" indicator light illuminates and the "Time" indicator light flashes.
■ Select the required programme and temperature (eg. programme A Cottons 95°C).
■ Select pre-wash if more intensive treatment is required. This can only be selected with programmes A, B or C. Press the "Pre-wash" button.
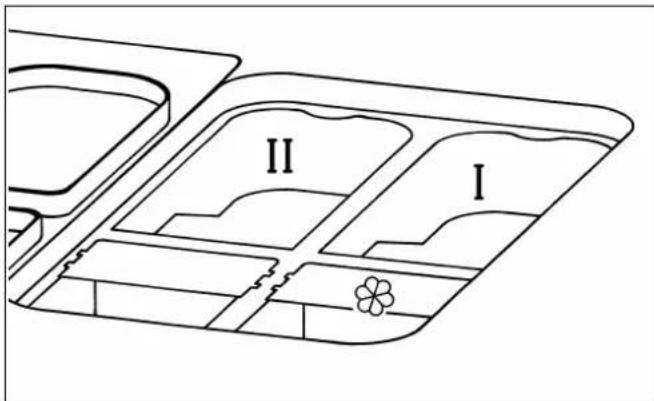
■ Add detergent for the main wash into compartment II and, if required into compartment I for the pre-wash. Fabric conditioner is put into compartment ⚙️ and liquid bleach is put into the compartment without a symbol.
Detergent dispensing
Avoid dispensing more than the required amount as this can cause excessive foaming.
Use only low lather detergents.
Important: With gas heated machines use only high quality detergents to avoid the heater pipe furring up quickly.
Amount dispensed:
Follow the detergent manufacturer's instructions.
natural_image
Line drawing of a mechanical device with a black arrow indicating rotation or movement (no text or symbols)Notes:
Do not fill fabric conditioner or bleaching agent higher than the level mark in the dispenser.
For bleaching at least 4 rinse cycles must be programmed (see "Re-programming" and the "Programme changes" chart).
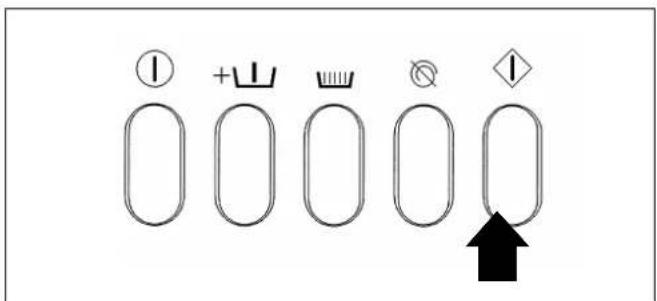
■ Press the "Start" button in. The "Time" display will go out and the "Temperature" display will illuminate.
- the wash programme then progresses.
If the "Without Spin" (Rinse hold) button was pressed the programme will be interrupted after the last rinse. The "Rinse hold" indicator light will illuminate.
- Washing remains suspended in water. If washing is to be spun:
Press the "Without spin (Rinse hold)" button again. The water in the drum will drain followed by a final spin.
Otherwise:
- - If the programme is to finish without spinning turn the programme selector
switch to position Ⓗ(Separate drain).
Only refers to WS 5100 and WS 5140 with gas heating

■ Fault message "ignition fault"
If the symbol "1" appears in the time (hrs) display this indicates an ignition fault.
natural_image
Simple line drawing of a rectangular box with a leaf symbol inside, no text or numbers present.Wait for at least 1 minute before operating the "Reset" button to repeat the ignition process.
If this measure is not successful call your Service engineer to remedy the fault.
■ Fault message "blocked filter"
A continuous humming tone during a wash programme indicates that the fluff filter needs to be cleaned.
flowchart
graph TD
    A["Start"] --> B{Decision}
    B -->|Yes| C["Process"]
    B -->|No| D["End"]
■ To open the drum door at the end of the programme:
When the "End" indicator light illuminates pull the handle to open the door.
Note:
If the drum door does not open, press against the door handle and then pull on it again.
- Never use force to open the door.
■ Remove the laundry.
Make sure the drum is empty, otherwise when the machine is next used items could shrink, or cause other laundry to discolour.
At the end of the day's washing:
■ Switch the electricity mains supply off at the on-site wall switch (isolator).
■ Turn off the water stopcock (on site).
Notes
Bleaching agents
Only use bleaching agents on textiles with the symbol △ on the wash care label.
Liquid bleaching agents must only be added to the compartment without a symbol. The agent will then be dispensed automatically during the 2nd rinse (cold bleaching).
Liquid bleaching agents should only be used with coloureds if the textile manufacturer's wash care label states that the textile is colour fast and suitable for bleaching.
With pre-wash
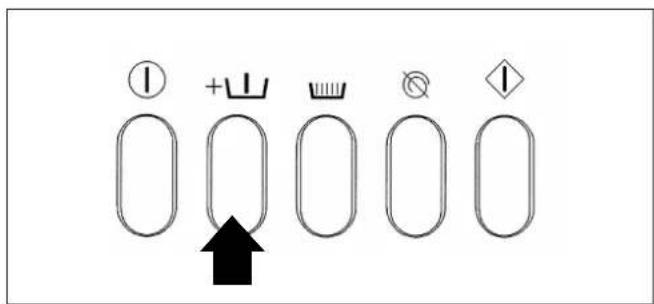
A pre-wash can be selected for heavily soiled laundry.
This button is only effective with Cottons, Minimum iron and Delicates/synthethics programmes.
The "With pre-wash" button does not operate after a programme has commenced.
Without spin
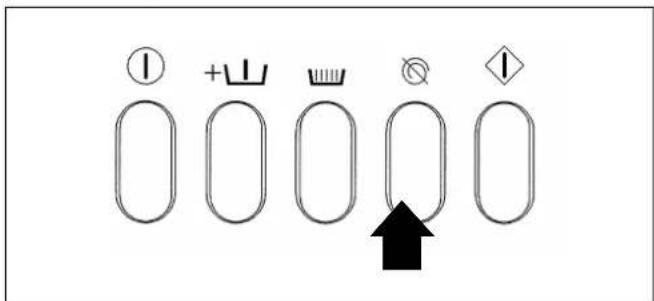
Without spin can be selected with all programmes.
After selecting the programme press in the "without spin" button.
At the “without spin” stage in the programme the without spin indicator light in the sequence will come on as a reminder that the programme needs to be continued. It can be continued in either of two ways.
Either press and release the “without spin” button, and the programme will continue by draining and spinning.
Or, if the programme is to finish without spinning turn the programme selector switch to (H) (Separate drain). The drain valve is opened for 1 minute, without needing to press the "Start" button.
Spin times
After the last rinse, and if the "without spin" button has not been activated
Programme:
A = 7 minutes
B, C and D = 1 minute
E and F = 7 minutes
If the load is unevenly balanced in the drum the spin will be interrupted. Run-up to spin resumes automatically once the imbalance has been redressed.
Note: The "Separate spin" setting can be used for textiles that have been handwashed and can be spun.
Short programme
This programme is intended for dealing with lightly soiled laundry only. Reduce the amount of detergent according to the load reduction. The programme consists of a main wash (wash temperature 40^ C - this can be reprogrammed to 50^ C or 60^ C), 2 rinses and a final spin.
Starching
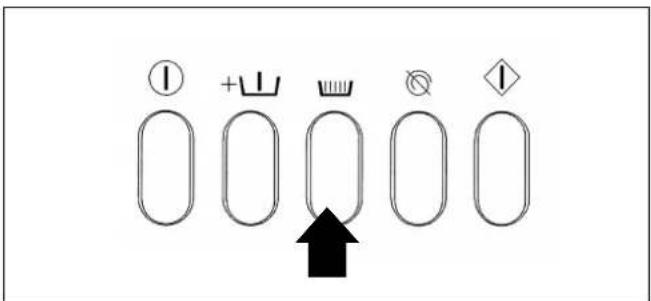
Starching can take place in the Cottons programmes and in the Short programme.
After selecting the programme press in the "Starch" button.
When the programme gets to the "Starch" position it pauses, the "Starch" indicator light will illuminate.
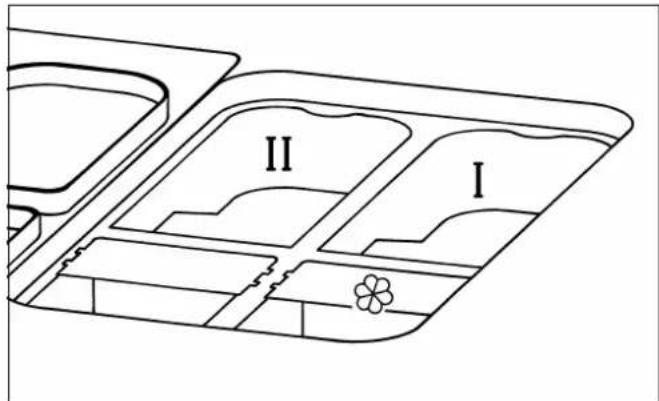
Press and release the "Starch" button to continue the programme adding starch to water as it flows into compartment (I) according to manufacturer's instructions.
Skip a programme stage
If a programme stage is to be skipped turn the programme selector switch to the "End →l" position. The programme sequence lights flash down through the stages. Reselect the programme when the appropriate stage is lit up. The programme then continues.
Programme cancellation during peak load cut-out
If the heater elements are shut down for longer than 45 minutes the programme is cancelled. A programme cancellation is indicated by the display of the error message "Heating" (the "Main wash" indicator light flashes).
Press and release the "On-Off" button (the "Main wash" indicator light will go out). Press the "Start" button to re-start the programme.
Power cut during a wash programme / Manually emptying the suds container and unlocking the drum door
During a short power cut:
The programme remains in the position it has reached.
When the power is resumed the "Time" or "Temperature" display will flash to indicate that the programme has been interrupted.
Press the "Start" button to continue the programme.
During an extended power cut:
Switch the mains supply off at the mains switch (isolator).
Turn the programme selector switch to "End". To remove the laundry the drain valve will need to be manually opened and the drum door released manually. Close the stopcocks.

natural_image
Diagram showing a mechanical assembly with a downward arrow and bolt holes, no text or symbols presentOpen the drain valve by opening the venting screw, but do not unscrew completely,
(spanner size 17 mm) and draining off the suds. Take care, some water will seep out of the screw opening (approx. 100 ml). This should be caught in a suitable container.
Tighten up the venting screw again and check that there is no leak.
Open the drum door and remove the laundry.
Note:
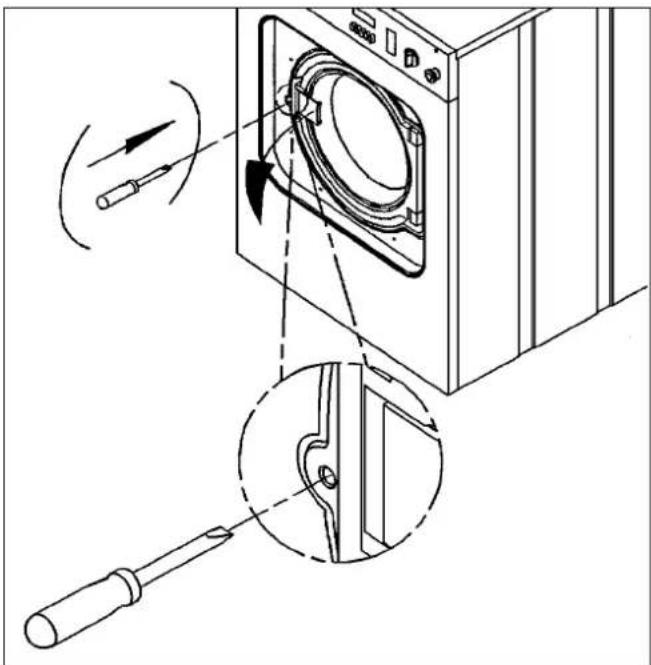
-
First insert the screwdriver into the opening (see illustration) push in and hold firm.
-
Press on the door handle with the right hand and then pull the door handle to open the door.
- Never use force to open the door.
Programme cancellation
If a programme is to be cancelled turn the programme selector switch to "End" and press the "Start" button.
Delay Start
After closing the drum door and pressing in the "On/Off" button the "Time" indicator light flashes to indicate that the Delay Start Option can be selected.
The “Delay Start” button can be used before or after selecting a programme to delay the start of a programme by up to 9 hours and 30 minutes. It works in 30 minute steps. If the button is pressed in when 9 hours 30 mins. shows in the display, the display will clear. Press the button once more and 30 minutes will appear.
Delay Start is confirmed by pressing the "Start" button. The display then shows how much time is left before the programme will start.
It is possible to cancel the Delay Start option before the "Start" button has been pressed in by releasing the "On/Off" button and pressing it in again.
If "Start" has already been pressed it is only possible to cancel the programme selected and the Delay Start option by turning the Programme Selector Switch to "End" and releasing the "Start" button.
Once the Delay Start period selected has elapsed the programme will commence automatically. The indicator light "Time" goes out. The display "Time min" / "Temperature °C" shows the water temperature until the drain valve is opened at the end of the main wash and then shows the time left until the end of a programme.
To change an individual wash programme by re-programming
Individual wash programmes can be tailored to suit different requirements.
Example of re-programming
Important
The machine must be switched off and the drum door closed.
All other buttons must be in the "Off" position, ie. released, not pressed in.
The programme selector switch must be at the "End" position.
Press in the "On/Off" button.
- The "On" indicator light illuminates and the "Time" indicator light will flash.
Press the "With pre-wash" button in and out twice within a period of 4 seconds.
A few seconds later:
The letter "P" will illuminate in the "Time h" display field.
- The programme sequence indicator lights "Pre-wash" and "Main wash" will flash.
- Re-programming can now be carried out. See example on next page.
Example:
Changing the temperature holding time in the pre-wash from 4 minutes to 2, 8 or 20 minutes


4 Minutes 2 Minutes


8 Minutes 20 Minutes
To select 8 minutes holding time:
Release the "On/Off" button.
- The change to the temperature holding time in the pre-wash is stored. Programming is complete.
Make a note of the programme change in the list on the next page.
Set the programme selector switch to A/95°C.

Set the programme selector switch to the "End" position.
Keep pressing the "Start" button until
For further programme change possibilities see next page.
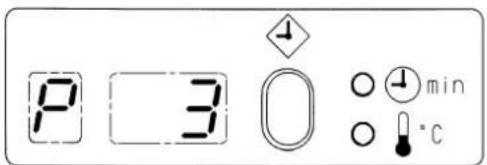
"P3" shows in the display.
| Programme changes | Position of pro-gramme selector switch | Options* Standard | Comments Enter | programme changes here | ||||||
| 1 | * | 2 | 3 | 4 | ||||||
| Pre-wash | Temperature holding time in the pre-wash | CottonsA | Cottons 95 C | 4 Mins | 2 Mins 8 | Mins 20 Mins | ||||
| Temperature holding time in the extra pre-wash | Cottons 80 C | 4 Mins 6 | Mins 10 Mins | |||||||
| Pre-wash temperature Cottons | 70 C 40 C cold | 50 C 60 C | ||||||||
| Temperature in the extra pre-wash | Cottons 60 C | 40 C cold | 50 C 60 C | |||||||
| Pre-wash level | Cottons 50 C | I^2) | II I III | Only for Cottons and Minimum iron | ||||||
| Extra pre-wash level | Cottons 40 C | I | I | I^2) | I III | Only for Cottons and Minimum iron | ||||
| Interim rinse after the last extra pre-wash | Cottons 30 C | yes | no | Only for Cottons >60 C | ||||||
| Main wash | Temperature holding time in the main wash | B | Min. Iron 95 C | 6 Mins | 4 Mins 12 | Mins 20 Mins | Only for Cottons, Minimum iron & Delicates/synthetics | |||
| Main wash level ^3) | Min. Iron 60 C | I^2) | II I III | Only for Cottons, Short and Minimum iron | ||||||
| Top-up rinse (suds cooling) | Min. Iron 50 C | yes | no | Only for Cottons >60 C | ||||||
| Cool down (timed suds cooling) | Min. Iron 40 C | yes | no | |||||||
| Rinses | Rinse time | Min. Iron 30 C | 3 Mins | 3.5 Mins | 4 Mins | 4.5 Mins | Only for rinses 2 - 5 | |||
| Number of rinses ^4) | C | Delicates 60 C | 3 | 4 | 5 | 2 | Only for Cottons, Minimum iron, Delicates & Woollens | |||
| Level of rinses 1 - 5 ^4) | Delicates 40 C | II | III I | Only for Cottons, Short & Minimum iron | ||||||
| 1 minute wash with drain | Delicates 30 C | no | yes | Only for rinses 2 - 5 | ||||||
| Special functions | Final rinse with hot water | Delicates 20 C | no | yes | Hot water inlet I, Hot water inlet II and Cold water inlet III | |||||
| Timed water intake | D | Woollens 40 C | 0 | 30 secs | 45 secs | 90 secs | Only for first water intake ^1) | |||
| Temperature holding time in short programme | Woollens 30 C | 6 Mins | 4 Mins 2 Mins 1 Mins | |||||||
| Temperature in short programme | Woollens 20 C | 40 C | cold 50 C | 60 C | ||||||
| No. of rinses in short programme | E | 2 | 3 | 4 | 5 | |||||
| Final spin time ^4) | F | 7 Mins | 5 Mins 3 Mins 11 Mins | Only for Cottons and Short programme | ||||||
| Final spin time | G | 7 Mins | 5 Mins 3 Mins 14 Mins | Only for separate spin | ||||||
| Final spin time | H | 7 Mins | 5 Mins 3 Mins 1 Mins | Only for separate rinse and spin | ||||||
1) Timed water intake is only ever done for the initial intake of water. Level I in the pre-wash, extra pre-wash and main wash must also be programmed. Timed water intake is limited to Level III.
2) Special water intake in the pre-wash or main wash (only 1 water intake). No wash rhythm up to Level I. Gentle action between Level I and II. Normal action above Level II. Water is topped up only when Level I is switched back to Level I.
3) This function is only done without a pre-wash. The main wash is always limited to Level I if there is a pre-wash.
4) A change to the standard option, especially when it is intended to change the standard options of the three functions marked 4) at the same time, must only ever be carried out in consultation with the Service Engineer.
Additional programmes
The following programme changes may only be carried out by an authorized service engineer
Programme "Sluice" (For Great Britain)
[2 pre-rinses, pre-wash, main wash, 3 rinses, final spin]
Programme "Thermal disinfection without pre-wash"
[final rinse at 70°C]
Programme "Chemo-thermal disinfection without pre-wash"
[main wash 60°C (+2,-1°C),
10 minutes holding time and final rinse at 70°C]
Programme "Incontinent laundry"
[3 pre-rinses, pre-wash, rinse, main wash, 3/4/5 rinses, final spin]
Programme "Thermal disinfection with pre-wash"
[pre-wash at 95°C (+2, -1°C),
10 minutes holding time]
Programme "Sanfor test wash
[main wash,
holding time 40 minutes, 2 rinses:
1st rinse at 60^ C, 6 minutes holding time
2nd rinse at 60^ C, 9 minutes holding time, final spin]
Possible reasons for increased levels of foaming:
- detergent type
■ Only use detergent formulated for use in commercial washer extractors. Domestic laundry detergent is not suitable.
- overdosing of detergent
- Dispense detergent following the detergent manufacturer's instructions on the packaging and in accordance with local water hardness levels*.
– detergent creates too much foam
■ Use a lower foaming detergent or contact your detergent application specialist.
- very soft water
In areas with hardness level 1 dispense less detergent in accordance with the detergent manufacturer's instructions.
- soiling level of the laundry
■ For lightly soiled laundry dispense less detergent in accordance with the detergent manufacturer's instructions.
– residues, e.g. detergent are left on laundry
■ Run an additional pre-wash without detergent and without selecting a temperature. Laundry which has been soaked before washing must be thoroughly rinsed before running a wash programme.
- small loads
■ Reduce the amount of detergent dispensed according to the size of the load.
– Gas heated machines
With gas heated machines the circulating suds are pumped over the heater element.
This additional movement of the suds can produce extra foam.
■ Follow the dispensing instructions given above.
■ Use a low lather detergent.
■ Depending on the type of detergent used up to 30% less may be dispensed (not with disinfection programmes).
Water hardness levels
| Hardness range | Water quality | Hardness level in mmol/l | German hardness level °d |
| I soft 0 – 1.3 0 - 7 | |||
| II medium 1.3 – 2.5 7 - 14 | |||
| III hard 2.5 – 3.8 14 - 21 | |||
| IV very hard over 3.8 over 21 | |||
*) If you do not know the hardness level of the water in your area you should contact your local water authority for information.
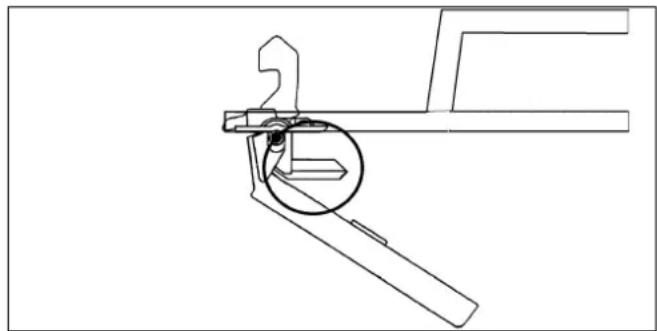
The door will not open
Press against the door, switch the machine off and then on again and then try and open the door again.
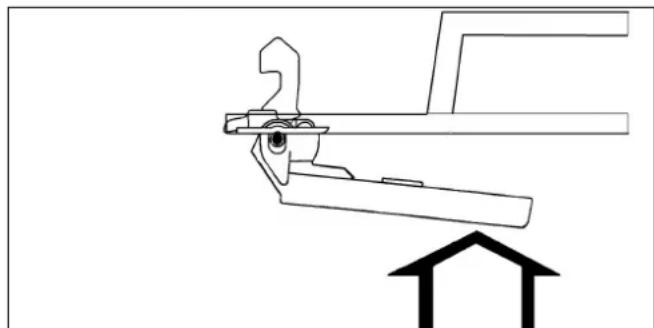
If you still cannot open the door:
natural_image
Technical line drawing of a mechanical clamp or bracket assembly (no text or symbols)The door handle safety mechanism has disengaged itself.
The door handle cannot be opened or closed.
The safety mechanism is designed to protect the handle and the lock from damage, for instance, if too much force is being used in an attempt to open the door.
natural_image
Pure mechanical diagram showing a lever and bracket assembly without any text, numbers, or symbolsPress firmly against the door handle until you clearly hear the safety mechanism engage.
- You will now be able to open and close the door again.
Cleaning and care of the machine should be carried out, wherever possible, immediately after use.
On no account use high pressure cleaners or hose down the machine.
Build-up of rust
The drum and suds container are manufactured from rust-free stainless steel. It is, however, possible that water with a high iron content or foreign bodies in the wash, (e.g. paper clips or metal buttons), may lead to the formation of superficial rust spots in the drum and/or suds container, especially if the machine is not used for a long time. Stainless steel components should be cleaned regularly with a proprietary cleaning agent for stainless steel. This must be done if rust appears! Door seals should also be regularly checked to make sure that nothing has got trapped in them. Clean them regularly.
After use the detergent box should be cleaned with warm water to remove any detergent residues.
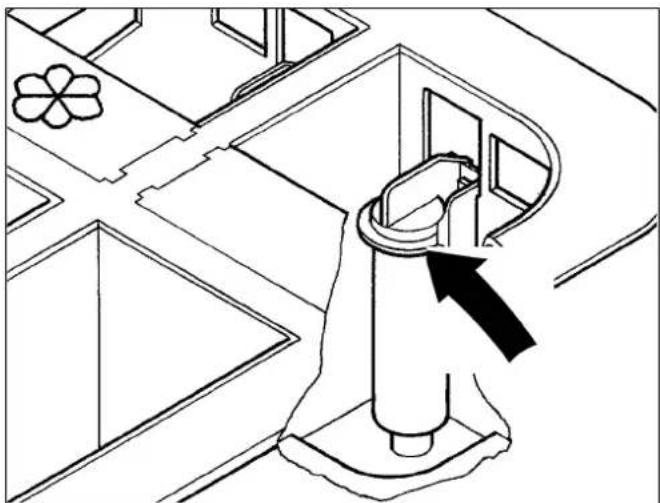
The siphon tubes in the dispenser compartments should also be cleaned.
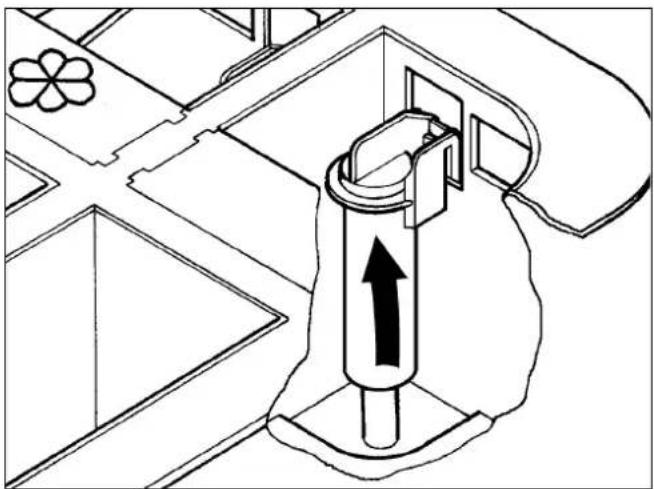
natural_image
Diagram of a hand holding a cylindrical device with an upward arrow, surrounded by geometric furniture and decorative elements (no text or symbols)Pull the siphon tubes upwards to remove for cleaning in warm water. Replace in the reverse order (the siphon tubes must be hooked in correctly).
To clean the fluff filter
- This only applies to WS 5100 and WS 5140 with gas heating.-
The fluff filter should be checked regularly for build-up of fluff and cleaned when necessary. Carry out this check only after a programme has finished and the suds container has been emptied.
- A blocked filter is indicated by a continuous humming tone during a programme.-
Clean the filter as follows:
-
Turn the programme selector to "Separate Drain".
-
Once the suds container is empty turn the programme selector to "End".
Place a two litre capacity dish under the fluff filter.
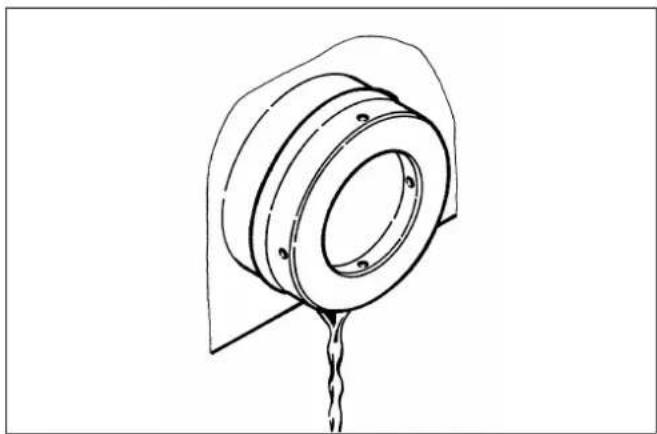
natural_image
Technical line drawing of a mechanical component with a central bore and fluid pouring (no text or symbols)Turn the lid anti-clockwise to open - a half turn to a complete turn.
The water in the drain filter will drain out.
Take care, the water may be very hot.
Empty the dish and repeat as many times as is necessary.
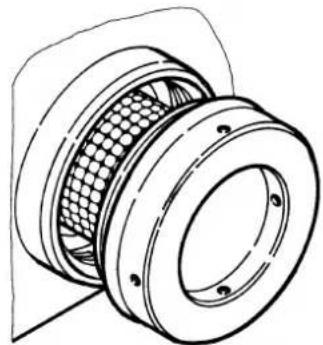
natural_image
Technical line drawing of a mechanical component with mesh pattern and mounting holes (no text or symbols)Once the flow of suds stops, completely remove the filter lid together with the filter.
Clean the filter and the inside of the filter housing, taking care in case there are any sharp objects.
Put the filter back in place and secure by turning the lid in a clockwise direction.
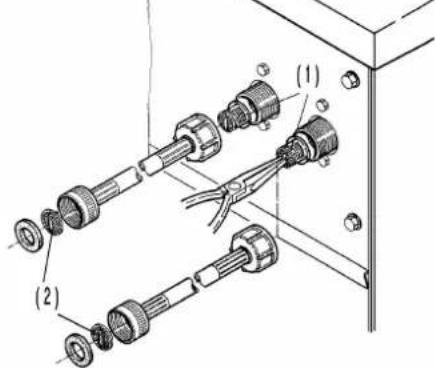
The filters (1) and (2) should be checked from time to time and cleaned if necessary.
The housing, plastic parts, such as buttons, knobs etc. and the facia panel should only be cleaned with appropriate mild cleaners or with a damp cloth and wiped dry. Any scouring agents will scratch the surface.
To clean casing parts made of stainless steel, use an appropriate stainless steel cleaner. Any scouring agents will scratch the surface.
Avoid contact of stainless steel surfaces with liquid cleaning and disinfecting agents which contain chlorine or sodium hypochlorite.
These agents can have a corrosive effect on stainless steel. Aggressive vapours containing chlorine bleach can also be corrosive.
Do not store open containers of these agents near the machine.
After use do not shut the machine door, but leave it slightly ajar, to allow the machine to dry out.
If the machine is not going to be used for a longer period of time (4 weeks or more) the drum should be rotated several times after the last use. The drum should be rotated every 4 weeks to prevent damage to the bearings.
Should a fault occur please contact your nearest Customer Service Dept.
When contacting the Customer Service Department please give both the model and the serial number (SN) of the machine.
These can be found on the data plate:
with the door open, or at the rear of the machine towards the top.
Only use genuine spare parts, when ordering spare parts the Spare Parts Dept will also need to know the model and the serial number (SN) and Part No. (M.-Nr.).
Guide to the data plate
Model Model type
SN Serial number
IBN Commissioning date
| Model | SSSS | IBN | |||||||||
| SN: | |||||||||||
| Art.-Nr. | |||||||||||
| Mat.-Nr. | -UT- | = | Total | Total | |||||||
| Og | Og | ||||||||||
| Og | Og | ||||||||||
| Og | Og | ||||||||||
| Og | Og | ||||||||||
| - | = | ||||||||||
| H | |||||||||||
| D= | |||||||||||
| ∅←→ | Qn(Hi) | ||||||||||
| ○ | |||||||||||
| Vol./G | IP X4 CE X250000000000000000000000000000000000000000000000000000000000000000000000000000000000000000000000000000 CE CE CE CE CE CE CE CE CE CE CE CE CE CE CE CE CE CE CE CE CE CE CE CE CE CE CE CE CE CE CE CE CE CE CE CE CE CE CE CE CE CE CE CE CE CE CE CE CE CE C E | ||||||||||
1 Machine type
2 Serial number
3 Article number
4 Material number
5 Voltage/Frequency
6 Control fuse
7 Drive motor
8 Drum data
9 Drum diameter/Drum depth
10 Spin speed
11 Drum volume/Laundry dry weight
12 Kinetic energy
13 Run-up time
14 Braking time
15 Heating
16 Indentification/Year of manufacture
17 Commissioning date
18 Electric heating
19 Fuse rating (on-site)
20 Indirect steam heating
21 Direct steam heating
22 Gas heating
23 Area for test certification labels
Noise emission
registered on the "A" scale.
During wash During spin
WS 5080 65.6 dB 80.7 dB
WS 5100 63.0 dB 77.7 dB
WS 5140 69.3 dB 73.5 dB
Measured in Germany in accordance with EN ISO 9614-2
This machine should not be used for articles which have been treated with dangerous or inflammable substances.
To avoid the possibility of frost damage on no account install the machine in a room which is exposed to frost.
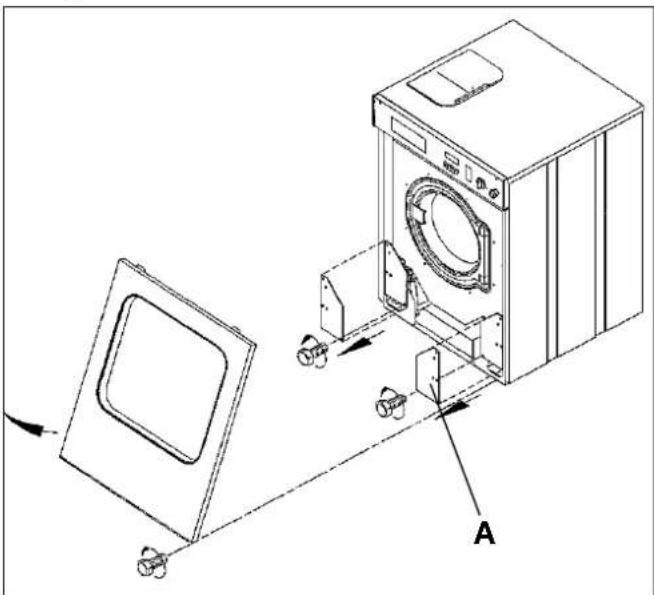
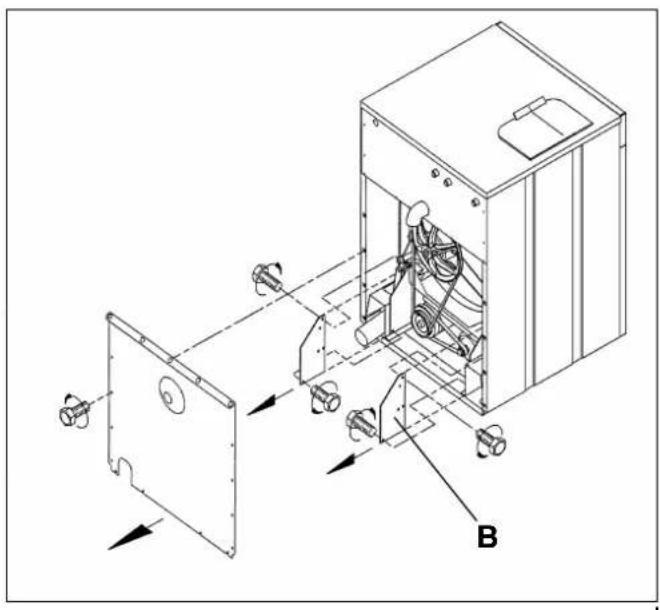
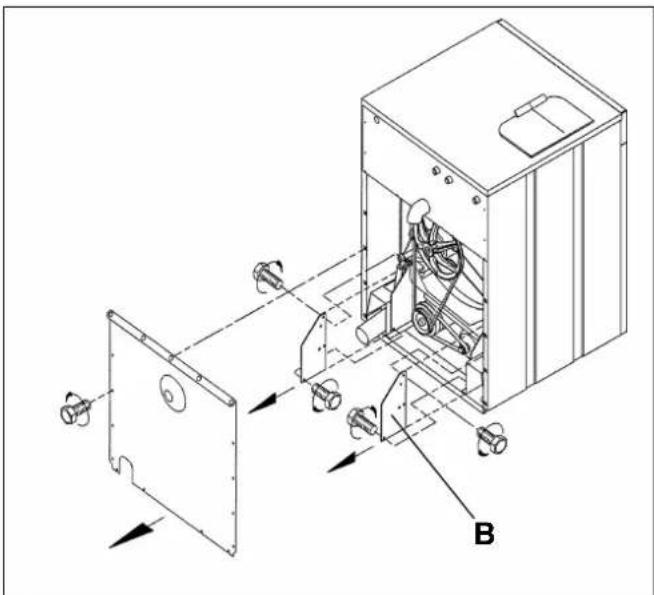
When the machine has been installed in its final position, only then remove the red transit fittings marked "A" and "B".
natural_image
Technical line drawing of a washing machine with mounting bracket and component assembly (no text or symbols)"A" (2 pieces)

natural_image
Technical line drawing of a mechanical device with labeled components (no text or symbols present)“B” (2 pieces)
To remove them detach the front and the rear panel.
The screw feet may be adjusted to compensate for any unevenness in the floor surface. The base frame should not be resting on the floor. If installed on a plinth the machine must be secured to the plinth and the plinth bolted to the floor (see enclosed installation diagram). Bolts are provided with the machine. Electric heated washer extractors installed without plinth, with their feet directly on the floor do not need to be secured.
Do not install the machine on carpeted flooring if the carpet pile blocks the ventilation gap at the base of the machine.
Plumbing
Cold water Hot water Cold water
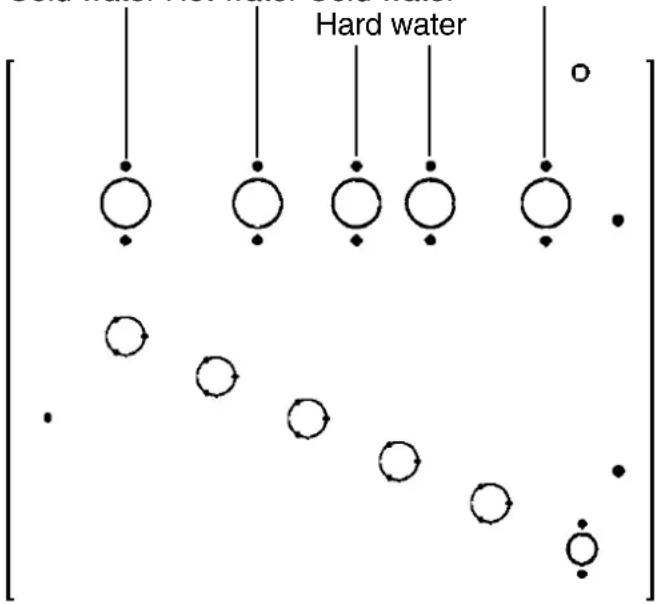
Connection must be made to the water supply via a stopcock which conforms to current local and national regulations. This work must be carried out by an authorised person.
Water Supply (Water Fittings) Regulations 1999 and Water Byelaws 2000, Scotland
The Type A air gap fitted to the machine provides Category 5 protection thereby enabling connection to mains water. The air gap is located upstream of the detergent box and to provide protection against the possibility of backflow of cleaning agents the machine is supplied with 3 double check valves which should be connected to the inlet hoses.
See the installation diagram for instructions on connection to the water supply and for drainage.
The inlet pressure hoses supplied with the machine must be used for connection to the water supply.
To ensure the hot water inlet hose (marked 90^ C) lasts for many years it is advised not to use it on a hot water connection supplying water hotter than 70^ C.
If replacing inlet hoses only use a hose able to withstand a burst pressure of at least 70 bar, and a water temperature of at least 90°C.
This also applies to all connection parts. Use spare parts recommended by the manufacturer.
A water pressure flow rate of at least 1 bar, static water pressure max. 10 bar is essential to ensure smooth operation of this machine.
Water taken into the machine must not exceed a temperature of 70^ C.
Connection to cold water only
-See enclosed Installation Diagram.-
Electrical connection
All electrical work must be carried out by a suitably competent person in compliance with national and local regulations.
The electrical safety of this machine is in accordance with IEC 335-1, IEC 335-2-4, IEC 335-2-7.
The machine must only be connected to the voltage and frequency shown on the data plate.
The machine is supplied as standard for connection to a 415 V 3 phase + N electricity supply, rated load and fusing as shown on the data plate.
Connection should be made via a suitable isolator, with an on-off switch which is easily accessible for servicing.
WARNING
THIS APPLIANCE MUST BE EARTHED.
Connection should be made via a suitable isolator which complies with local and national safety regulations and which is easily accessible for disconnecting the machine from the electricity supply. Provision must be made on site to switch off all poles. Switches with a minimum all-pole contact gap greater than 3 mm are suitable for isolating the machine.
These include circuit breakers, fuses and relays (IEC/EN 60947).
The isolator switch should be easily accessible for servicing work.
If the machine is disconnected from the electricity supply ensure adequate measures are taken to ensure that the machine cannot be reconnected to the electricity supply until all work has been carried out.
Warning
Make sure that the drum turns in the correct direction when spinning - viewed from the front this is anti-clockwise. 2 phases need to be changed if it turns the wrong way.
The motors are fitted with overload protection switches.
The electrical heating is set ex-works at:
- 9 kW (WS 5080)
- 9 kW (WS 5100)
- 15 kW (WS 5140)
The machine can be converted to:
- 6 kW (WS 5080)
- 6 kW (WS 5100)
- 10 kW (WS 5140)
by disconnecting one heater.
This should only be done by an authorized Service Engineer.
When the machine is commissioned the heater rating and fuse rating should be permanently marked on the data plate with the following symbol ☒.
In countries other than G.B. check with your local agent for conversion possibilities.
The minimum suds level required for activating the heating given in mm column of water is 30 mm.
Gas connection
The gas connection may only be carried out by a suitably qualified (e.g. Corgi registered) engineer, in accordance with local and national safety regulations. The enclosed installation diagram and the installation instructions for gas must be followed to ensure correct gas connection.
The gas group to which the machines have been set at the factory is given on the Gas Data sticker affixed to the rear of the machine.
When converting to another gas group, or to liquid gas, a conversion kit is required, available from the Spare Parts department, (give the model and serial number of the machine as well as the gas type, group and connection pressure in the country of installation when ordering). The installation instructions for gas heated machines must be followed. Conversion may only be carried out by suitable competent persons.
All removable outer housing parts must be re-fitted after the gas connection has been made.
Do not attempt to undertake any repairs to gas heated machines yourself. Repairs must only be carried out by suitably competent persons to ensure safety, e.g. gas engineers must be registered. Please consult the Miele Customer Service department or an authorized Service dealer.
Steam connection
Steam connection must only be undertaken by an authorized installer.
For steam connection it is essential to follow the Installation Plan and instructions provided.
When connection to steam has been completed, ensure that all removable outer housing parts have been put back in place.
Please contact your Miele Sales Office for details concerning guarantee terms and conditions.
See the back cover for contact details.
Attention, surfaces chaudes.

natural_image
Symbol of a trash bin with no text or numbers, crossed by two diagonal lines and a solid black rectangle below (no text or labels)natural_image
Simple line drawing of concentric circles with a vertical line and the number 5 below (no text or symbols on the circles)3 = Touche "Amidonnage"
natural_image
Architectural line drawing of a mechanical assembly with a black arrow indicating direction (no text or symbols)Remarques :
natural_image
Diagram showing a mechanical setup with a tool and a downward arrow, no text or symbols presentnatural_image
Technical line drawing of a mechanical clamp or bracket assembly (no text or symbols)natural_image
Technical line drawing of a mechanical clamp or bracket assembly with an upward arrow indicating motion (no text or symbols)natural_image
Diagram of a hand holding a device with an upward arrow, surrounded by geometric shapes and a flower symbol (no text or labels)natural_image
Technical line drawing of a mechanical component with a central bore and fluid pouring (no text or symbols)natural_image
Technical line drawing of a mechanical component with meshed center and flanged base (no text or symbols)natural_image
Technical line drawing of a washing machine with mounting bracket and side panel (no text or symbols)"A" (2 pièces)
natural_image
Technical line drawing of a mechanical device with labeled components and directional arrows (no text or symbols beyond label)B" (2 pièces)
natural_image
Symbol of a trash bin with crossed lines indicating no waste or discharge (no text or labels)natural_image
Line drawing of a mechanical device with an arrow indicating direction, no text or symbols presentIndicazioni:
flowchart
graph TD
    A["Circle"] --> B["Arrow"]
    C["Circle"] --> D["Arrow"]
    E["Circle"] --> F["Arrow"]
    G["Circle"] --> H["Arrow"]
    I["Circle"] --> J["Arrow"]
■ Aprire lo sportello al termine del programma.
natural_image
Diagram showing a mechanical setup with a downward arrow and cylindrical components, no text or symbols presentnatural_image
Technical line drawing of a mechanical clamp or bracket assembly (no text or symbols)natural_image
Pure mechanical diagram showing a lever mechanism with no text or symbolsnatural_image
Diagram of a hand holding a mechanical device with an upward arrow, surrounded by geometric shapes (no text or symbols)natural_image
Technical line drawing of a mechanical component with a central bore and a trailing rod (no text or symbols)natural_image
Technical line drawing of a mechanical bearing assembly (no text or symbols)natural_image
Technical line drawing of a washing machine with component layout and mounting bracket (no text or symbols)"A" (2 pezzi),
natural_image
Technical line drawing of a mechanical device with labeled components (no text or symbols present)"B" (2 pezzi)
Fairacres, Marcham Road, Abingdon, Oxon, OX14 1TW
- Hinweise:
- For the installer/electrician
- Explanation of the Warning and Safety symbols on the machine
- Appropriate use of the machine
- Danger of fire or explosion.
- Technical and electrical safety
- Important
- Use of the machine
- Use of accessories
- Chlorine and component damage
- Notes on using chlorine bleach and perchlorethylene
- Anti-chlorine treatment
- Disposal of old machines or appliances
- Disposal of the packing material
- Disposal of your old machine
- Fault indicator lights
- Commissioning
- At the end of the day's washing:
- Notes
- Bleaching agents
- Spin times
- Short programme
- Starching
- Skip a programme stage
- Programme cancellation during peak load cut-out
- Power cut during a wash programme / Manually emptying the suds container and unlocking the drum door
- Delay Start
- To change an individual wash programme by re-programming
- Example of re-programming
- ①
- Example:
- Possible reasons for increased levels of foaming:
- - detergent type
- - overdosing of detergent
- – detergent creates too much foam
- - very soft water
- - soiling level of the laundry
- – residues, e.g. detergent are left on laundry
- - small loads
- – Gas heated machines
- The door will not open
- Build-up of rust
- Plumbing
- Water Supply (Water Fittings) Regulations 1999 and Water Byelaws 2000, Scotland
- Electrical connection
- WARNING
- Gas connection
- Steam connection
- Indicazioni:
Brand : MIELE
Model : WS 5140
Category : Washing machine