P992 - Monitor DELL - Free user manual and instructions
Find the device manual for free P992 DELL in PDF.



| Product Type | CRT Monitor 19 inches (visible) |
| Brand | DELL |
| Model | P992 |
| Screen Size | 19 inches (48 cm) diagonal |
| Maximum Resolution | 1600 x 1200 pixels at 75 Hz |
| Mask Pitch | 0.24 mm (aperture grille) |
| Dimensions (H x W x D) | 471 mm x 451 mm x 461 mm |
| Weight (monitor only) | 25.5 kg |
| Power Supply | 100-240 V AC, 50/60 Hz, 2.0 A (120 V) / 1.0 A (220 V) |
| Power Consumption | Operating: typ. 120 W; standby mode: < 5 W |
| Operating Temperature | 0 °C to 40 °C |
| Connectivity | 1 x VGA input (HD15) |
| Main Features | OSD adjustments (brightness, contrast, position, size, geometry, color temperature, language), power saving mode (VESA DPMS), automatic signal detection |
| Controls | Menu buttons, brightness/contrast adjustments, power with LED indicator (green = on, amber = standby) |
| Included Accessories | Power cable, CD-ROM containing user guide and drivers |
| Care and Cleaning | Unplug before cleaning; use a damp (non-abrasive) cloth; do not use liquid or spray products |
| Safety | Automatic voltage selector; do not open the casing (risk of electric shock); do not block ventilation openings; avoid moisture and dust |
| Spare Parts and Repairability | Parts not available separately; servicing reserved for qualified technician |
| OS Compatibility | Windows 98, ME, 2000, XP (drivers included) |
| Standards | VESA DPMS, plug-and-play DDC |
Frequently Asked Questions - P992 DELL
User questions about P992 DELL
0 question about this device. Answer the ones you know or ask your own.
Ask a new question about this device
Download the instructions for your Monitor in PDF format for free! Find your manual P992 - DELL and take your electronic device back in hand. On this page are published all the documents necessary for the use of your device. P992 by DELL.
USER MANUAL P992 DELL
DellTM P992 Color Monitor Quick Setup Guide
Observe the following safety guidelines when connecting and using your monitor:
- Be sure that your monitor is electrically rated to operate with the AC power available in your location.
- Locate your monitor near an easily accessible electrical outlet.
- Place the monitor on a solid surface and treat it carefully. The screen can be damaged if dropped, sharply hit, or touched with a sharp or abrasive implement.
- Put your monitor in a location with low humidity and a minimum of dust.
- Never use your monitor if the power cable has been damaged. Do not allow anything to rest on the power cable, and keep the cable away from where people could trip over it.
- Never insert anything metallic into the monitor openings. Doing so may create the danger of electric shock.
To avoid electric shock, never touch the inside of the monitor. Only a qualified technician should open the monitor's case. - Be sure to hold the plug, not the cable, when disconnecting the monitor from an electrical outlet
- Openings in the monitor cabinet are provided for ventilation. To prevent overheating, these openings should not be blocked or covered. Also, avoid using the monitor on a bed, sofa, rug, or other soft surface. Doing so may block the ventilation openings in the bottom of the cabinet. If you put the monitor in a bookcase or some other enclosed space, be sure to provide adequate ventilation.
- Do not expose the monitor to rain or use it near water. If the monitor accidentally gets wet, unplug it and contact an authorized dealer immediately. You can clean the exterior of the monitor with a damp cloth when necessary, but be sure to unplug the monitor first.
If your monitor does not operate normally-in particular, if there are any unusual sounds or smells coming from it-unplug the monitor immediately and contact an authorized dealer or service center.
Quick Specifications
AC input voltage/frequency 100 - 240 V - 50 - 60 Hz
Current 2.0 A (RMS) at 120 VAC and 1.0 A (RMS) at 220 VAC
Operating Temperature 0^ to 40^ (32^ to 104^)
Dimensions
471 mm × 451 mm × 461 mm (height × width × depth)
(18.54 × 17.76 × 18.15 inches)
Weight (monitor only) 25.5 kg (56 lbs 1 oz)
Other accessory items in the package CD-ROM User's Guide, AC Cord

Connecting Your Monitor to a Computer
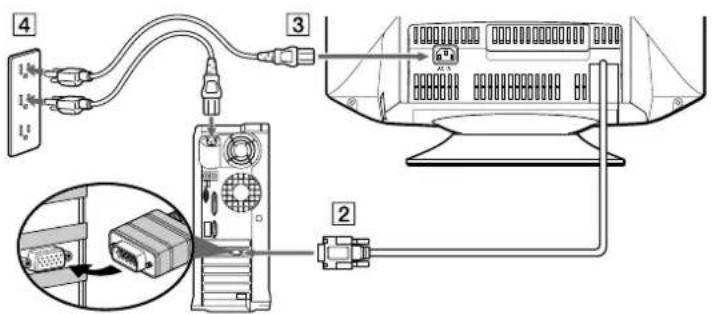
1Turn off your computer and unplug its power cable.
Connect the HD15 video signal cable to the video output of your computer.
3Connect the power cable for your monitor to the power port on the back of the monitor.
4Plug the power cable of your computer and your monitor into a nearby outlet.
5 Turn on your monitor and computer. If the monitor does not display an image, refer to the troubleshooting section of this guide.

These buttons are used to make adjustments to the monitor in the desired menu items.
2 These buttons display the BRIGHT / CONTRAST (O) menu. These buttons are also used to navigate the menu.
This button is used to display the main menu on your screen. This button is also used to select the menu items and to activate the adjustment.
This button switches the power on and off. The LED indicator lights up in green when the monitor is turned on, and lights up in amber when the monitor is in power saving mode. If the monitor is in the power save mode and the power is turned off with the power switch, it may take up to 10 seconds for the LED to go black.

Driver Installation
Use the monitor CD to install the appropriate monitor driver for your operating system.
The following OS messages might be slightly different from the actual message that appears on your PC, but the meaning is the same.
Microsoft Windows XP Operating System
To manually install or update the driver, perform the following steps:
- Insert the monitor CD into the CD-ROM drive.
- Click Start Control Panel Appearance & Themes and then click the Display icon.
- In the Display Properties window, click the Settings tab and then click Advanced.
- Click the Monitor tab, and then click Properties Driver tab Update Driver.
- When the Hardware Update Wizard dialog box appears, choose "Install the software automatically," and click Next> and the Finish to complete the installation.
- Close the Display Properties window.
Microsoft Windows Millennium Operating System
To manually install or update the driver, perform the following steps:
- Click Start->Settings->Control Panel and then double-click Display.
- In the Display Properties window, click the Settings tab, and then click Advanced.
- Click the Monitor tab, and then click Change-> Specify the location of the driver->Next.
- When the Update Device Driver Wizard dialog box appears, select "Display a list of all the drivers in a specific location, so you can select the driver you want," and click Next>.
- Insert the monitor CD into the CD-ROM drive, then click Have Disk...
- Type d: \ (change the drive letter to match your CD-ROM drive if it is not drive D) in the Copy manufacturer's files from: box, then click OK.
- Click Next>, Next>, and then Finish to complete the installation.
- Close the Display Properties window.
Microsoft® Windows® 2000 Operating System
To manually install or update the driver, perform the following steps:
- Click Start->Settings->Control Panel and then double-click Display.
- In the Display Properties window, click the Settings tab, and then click Advanced.
- Click the Monitor tab, and then click Properties Driver Update Driver.
- When the Update Device Driver Wizard dialog box appears, choose "Search for a suitable driver for my device," and click Next>
- Insert the monitor CD into the CD-ROM drive, type d: \ (change the drive letter to match your CD-ROM drive if it is not drive D) in the Copy manufacturer's files from: box, and click Next> and then Finish to complete the installation.
- Close the Display Properties window.
Microsoft® Windows® 98 Operating System
Windows 98 automatically detects the new monitor and displays the Add New Hardware Wizard dialog box if the monitor driver is not already installed.
- Insert the monitor CD into the CD-ROM drive, and click Next> twice when the Add New Hardware Wizard dialog box appears.
- Click the CD-ROM drive box to install the drivers from the CD and then click Next>
- Confirm that the driver was found on the CD, and click Next> twice to install the driver.
- Click Finish to exit the Add New Hardware Wizard dialog box.
To manually install or update the driver, perform the following steps:
- Click Start->Settings->Control Panel and then double-click Display.
- In the Display Properties window, click the Settings tab, and then click Advanced.
- Click the Monitor tab, and then click Change.
- When the Update Device Driver Wizard dialog box appears, follow the steps in the previous paragraph.
Setting Display Resolution
For optimal monitor performance while using Microsoft® Windows® XP, Windows® 2000, Windows® 98 or Windows NT®, set the display resolution to 1024 × 768 as follows:
- Click Start--> Settings--> Control Panel.
- Double-click the Display icon in the Control Panel window, and the click the Settings tab.
- In the Desktop area, move the slider to 1024 × 768 pixels. Then click OK.


Accessing the User's Guide Online or via CD
To view the latest monitor User's Guide, access the SUPPORT section of the Dell Web site (http://support.dell.com).
If you do not have Internet access, you can access the guide on the monitor CD:
- Insert the monitor CD into your CD-ROM drive.
A start-up document should launch automatically; however, if the start-up document does not launch automatically, click Start Run, type D: monitor.htm, and click OK. (Substitute the correct CD-ROM drive letter if it is not the D drive.) - Click the appropriate icon to open the User's Guide in the desired language.
NOTE: All applicable warranty and regulatory information regarding your monitor is contained in the User's Guide on your CD.
Troubleshooting Tips
Monitor Has No Power
If the monitor's power indicator is off and no image appears on the display, perform the following checks:
- Ensure that the power cable is fully inserted in the monitor's power port and the electrical outlet.
- Test the electrical outlet by plugging in a working electrical device such as a lamp.
- Ensure that the power button has been depressed, and wait for the power indicator to light.
- Try another power cable on the monitor. Use the computer's power cable and turn on the monitor with the signal cable disconnected. If the monitor is working correctly, a self-test pattern appears.
No Image Is Displayed on the Monitor
If the monitor power indicator is on but no image appears on the display, perform the following checks:
- Ensure that the video connector is seated properly. Tighten the connector screws securely with your fingers.
- Ensure that the computer is on.
- Increase brightness and contrast controls.
- Turn off the monitor and unplug the signal cable. Check the cable connector for bent or broken pins.
- With the signal cable still disconnected, turn on the monitor. If the monitor is working correctly, a self-test pattern appears.
- Perform a monitor reset or recall.
IMPORTANT!
Before contacting Dell for technical assistance, refer to the Troubleshooting section in the User's Guide on your monitor CD. This section contains detailed information for resolving most monitor problems.
Information in this document is subject to change without notice.
© 2001 Dell Computer Corporation all rights reserved.
Reproduction in any manner whatsoever without the written permission of Dell Computer Corporation is strictly forbidden.
Trademarks used in this text: Dell and the DELL logo are trademarks of Dell Computer Corporation; Microsoft and Windows are registered trademarks of Microsoft Corporation.
Other trademarks and trade names may be used in this document to refer to either the entities claiming the marks and names or their products. Dell Computer Corporation disclaims any proprietary interest in trademarks and trade names other than its own.
September 2001
nnn nnn nn nnn nnn nnn nnn nnn nnn nnn nnn nnn nnn nnn nnn nnn nnn nnn nnn nnn nnn nnn nnn nnn nnn nnn nnn nnn nnn nnn nnn nnn nnn nnn nnn nnn nnn nnn nnn nnn nnn nnn nnn nnn nnn nnn nnn nnn nnn nnn nnn
n
nynnnnnnnnnn nnnn nn nnnn nn nnnn nn nnnn nn nnnn nn nnnn nn nnnn nn nnnn nn nnnn nn nnnn nn nnnn nn nnnn nn nnnn nn nnnn nn nnnn nn nnnn nn nnnn nn nnnn nn nnnn nn nnnn nn nnnn nn nnnn nn nnnn nn nnnn nn nnnn nn nnnn
<an by np nio nn no annn no CD-ROM -p no 2
ninnnnn7nyn<anwni,CD-n by nnnn nnnnn 3
n nnnnnn nn nnnnnnnn nn nnnn 4
n nn nnnnnnnnnnnnnnnnnnnnnnnnnnnnnnnnnnnnnnnnnnnnnnnnnnnnnnnnnnnnnnnnnnnnnnnnnnnnnnnnnnnnnnnnn
xyn by nyn npn nnpn nnnn 1
nnn by np nnnn nn no nnaa 2
.3
nni n np091 ninn 9 by y9,nyin nn nn nnn n.4
n nn nnn
Windows NT® Windows Microsoft Windows XP, Windows 2000, Windows 98
:nnn nn 1024 x 768 y nnnn npnn
nnpn<--nnn<-nnn ywn 1
nntan 100 by np nni npnnn nn no y np 2
1024x768-ponnnn nn n 3
:CD-wnw77 IN IINn JINnwnwn77tnwn
(http://support.dell.com) Dell wenn nn nn nnnn nn,wnnnn nn nn nn
n nn nnnnnnnnnnnnnnnnnnnnnnnnnnnnnnnnnnnnnnnnnnnnnnnnnnnnnnnnnnnnnnnnnnnnnnnnnnnnnnnnnnnnnnnnnnnnn
CD-ROM -n 1234567890123456789012345678901234567890123456789012345678901234567890123456789012345678901234567890123456789
D:/monitor.htm nn nnon nonon
(D pni nnnn nn nann CD-ROM -pni nnnn nn nnn)
nennnnnnnnnnnnnnnnnnnnnnnnnnnnnnnnnnnnnnnnnnnnnnnnnnnnnnnnnnnnnnnnnnnnnnnnnnnnnnnnnnnnnnnnnnnnnnnnnnnnnnnnnnnnnnnnnnnnnnnn
CD-1 1nnn nn nnnnnnnnnnnnnnnnnnnnnnnnnnnnnnnnnnnnnnnnnnnnnnnnnnnnnnnnnnnnnnnnnnnnnnnnnnnnnnnnn


0000000000000000000000000000000
nnnnnn nnnnnnnnnnnnnnnnnnnnnnnnnnnnnnnnnnnnnnnnnnnnnnnnnnnnnnnnnnnnnnnnnnnnnnnnn
n nn nnnnnnnnnnnnnnnnnnnnnnnnnnnnnnnnnnnnnnn
nynnynnnnnn
nnnnnnnnnnnnnnnnnnnnnnn
·n nnnnnnnnnnnnn
xyn by nannn
0000000000000000000000000000000
.
·
.
.111111111111111
·nny nnnnnnn
-
#
ytnnnt ytnnn nynnnn nnennn nnnnn Dell ay
xyn by nniy hnh ny an nnnn nn nnnn nn
nntnn nnnnnnnnnnnnn
©2001 Dell Computer Corporation, nnnn nn
Dell Computer Corporation
nn nn nn nn nn DELL nn Dell: n oopn nnon
Microsoft Corporation Windows-1 Microsoft Dell Computer Corporation
Dell Computer nany any in nin yoh nyuon nn onnnn nn noon nno
Corporation
2001 200

Printed in U.K.
OTneuTaHO BBeIMKo6pTuHm
www.lws:inaojnq
091n
Dell
- Quick Specifications
- Connecting Your Monitor to a Computer
- Driver Installation
- Microsoft Windows XP Operating System
- Microsoft Windows Millennium Operating System
- Microsoft® Windows® 2000 Operating System
- Microsoft® Windows® 98 Operating System
- Setting Display Resolution
- Accessing the User's Guide Online or via CD
- Troubleshooting Tips
- Monitor Has No Power
- No Image Is Displayed on the Monitor
- IMPORTANT!
- Before contacting Dell for technical assistance, refer to the Troubleshooting section in the User's Guide on your monitor CD. This section contains detailed information for resolving most monitor problems.
- n nn nnn
- :CD-wnw77 IN IINn JINnwnwn77tnwn
- xyn by nannn
- #
Brand : DELL
Model : P992
Category : Monitor