BSD3023 - Car stereo Renkforce - Free user manual and instructions
Find the device manual for free BSD3023 Renkforce in PDF.

| Product type | Car radio with FM/AM receiver, USB/SD player, Bluetooth hands-free kit |
| Brand | Renkforce |
| Model | BSD3023 |
| Dimensions (W x H x D) | 182 x 53 x 115 mm (1 DIN) |
| Weight | 600 g |
| Power supply | 12 V DC, max. consumption 15 A, fuse 15 A |
| Output power | 4 x 40 W max. |
| Speaker impedance | 4 to 8 ohms |
| Frequency ranges (Europe) | FM 87.5-108 MHz / AM 522-1620 kHz |
| Frequency ranges (USA) | FM 87.5-107.9 MHz / AM 530-1710 kHz |
| Station memory | 24 (18 FM + 6 AM) |
| Radio functions | RDS (AF, TA, PTY), PLL tuning, auto/manual search |
| Data media | USB (max. 32 GB, 500 mA), SD/MMC/SDHC (max. 16 GB) |
| Audio formats | MP3 |
| Bluetooth | Hands-free kit and A2DP audio streaming, pairing with password 0000 |
| Display | Alphanumeric DOT-Matrix LCD |
| Auxiliary input | AUX IN (3.5 mm jack) |
| Preamp outputs | LINE outputs (RCA) for external amplifier |
| Remote control | Infrared, steering wheel mount, CR2025 battery |
| Equalizer | Presets: Flat, Classics, Pop, Rock, DSP Off |
| Safety | Protection fuse, secure mounting, observe polarity |
| Maintenance | Clean exterior with soft dry cloth, replace fuse by technician |
| Repairability | Repairs only by qualified technician; do not open the case |
| Warranty | Legal/manufacturer warranty, void if instructions not followed |
Frequently Asked Questions - BSD3023 Renkforce
User questions about BSD3023 Renkforce
0 question about this device. Answer the ones you know or ask your own.
Ask a new question about this device
Download the instructions for your Car stereo in PDF format for free! Find your manual BSD3023 - Renkforce and take your electronic device back in hand. On this page are published all the documents necessary for the use of your device. BSD3023 by Renkforce.
USER MANUAL BSD3023 Renkforce
Copyright 2011 by Conrad Electronic SE

Legal notice
These uplaing instructions are a publication by Corrad Electronic S, KlaeCorrad.1, D22240 Hichna (www corrad.com). All rights including translation reserved. Reproduction by any method e.g.pharmacy, micftling, or the capture in radiochondrocytes and other media. This is an open access article distributed under the Creative Commons Attribution License.
These operating insidues represent the technical status at the time of printing Changes in technology and equipment reserved.
Copyright 2011 by Conrad Electronic SE

Information legales
Copyright 2011 by Conrad Electronic SE.

Colofon
Deze gubriaansooring is a pubizicatio of vma Cntrceoroe S, Kaus-Contrd. Str 1, D-0224 Hsraa/ww conrod am) Alre chriti, verting enbtae, boercudien. Ruprulacies ve wksk daen ck, jisbeendoc boxopie. microfivrtif de registirati in elestrorica gegenewarkeungssappanauo, versien de schlifelki htmming der de atgeper. Kadrick, ock van uttelskils, VEDOC.
Programm Identification (PI)
- Stationstaten 1-6 (18)
NEWS, AFFAIRS, INFO, SPORT, EDUCATE, DRAMA, CULTURE, SCIENCE, VARIOED, POP M, ROCK M, EASY M, LIGHT M, CLASSICS, OTHER M, WEATHER, FINANCE, CHILDREN, SOCIAL, RELIGION, PHONE IN, TRAVEL, LEISURE, JAZZ M, COUNTRY, NATION M, OLDIES, FOLK M, DOCUMENT, TEST, ALARM
Mechanical Installation 53
Installation in the Radio Slot 54
Removal 55
Hands-Free Microphone 55
Remote Control 56
Electrical Connection 58
Aerial Connection 59
LINE Output Connection 59
AUX IN Connection 59
Hands-Free Microphone Connection 59
Speaker and Power Supply Connection 60
Insertion/Replacement of the Remote Control Battery 62
Operation 63
General Operation 63
Menu Settings 66
Radio Operation 67
USB/Memory Card Operation 74
Remote Control Functions 77
Bluetooth® Operation 78
Maintenance 84
Fuse replacement 84
Cleaning 85
Handling 85
Troubleshooting 86
Technical Data 88
Disposal 89
Compliance Statement 89
Introduction
Dear Customer,
Thank you for purchasing this product.
This product complies with the national and European legal requirements. We kindly request the user to follow the operating instructions, to preserve this condition and to ensure safe operation!
These operating instructions relate to this product. They contain important information concerning commissioning and handling. Please bear this in mind when passing on the product to a third party. Keep these operating instructions for future reference!
All company names and product names are trademarks of the respective owner. All rights reserved.

Fon. +49 9604 / 40 88 80
Fax +49 9604/40 88 48
e-mail: tkb@conrad.de
Mon to Thurs 8.00am to 4.30pm
Fri 8.00am to 2.00pm
Intended Use
The Renkforce BSD-3023 SD tuner is used to receive radio stations in vehicles, play back audio files from suitable storage media and amplify the audio signals gained this way. It also serves as hands-free system for Bluetooth®-capable mobile phones.
The device must be connected to speakers for playback.
The product is only approved for connection to a 12 V direct current vehicle power supply with the negative vehicle battery pole to the car body. The device must only be installed and taken into operation in vehicles with this vehicle voltage type.
The installation type must be selected by the user to ensure that the device is protected from moisture and wetness.
Any use other than that described above will damage this product and involves dangers like short circuit, fire, etc.
The entire product must not be modified or converted, and the casing must not be opened.

Always observe the safety information in these operating instructions!
Symbols

The symbol with the exclamation mark indicates that the user must read these operating instructions before using the product and observe them during operation.

The "hand" icon stands for special advice and operating notes.

The guarantee/warranty will expire if damage is incurred resulting from non-compliance with these operating instructions. We do not assume liability for any consequential damage!
Nor do we assume any liability for damage to property or personal injury caused by improper use or failure to observe the safety information. The warranty/guarantee will expire in such cases!

- Unauthorized conversion and/or modification of the product are not permissible for safety reasons.
- The only voltage source permissible is the 12V direct current vehicle power supply (negative battery pole to the vehicle body). Never connect the device to any other voltage supply.
- Ensure proper commissioning of the device. Observe the operating instructions for it.
- This product is not a toy and not suitable for children. Children cannot judge the dangers involved when handling electrical devices.
- Do not expose the device to any high temperatures, dripping or splashing water, strong vibrations or heavy mechanical stress.
- Never operate the device unattended.
- Do not leave packing material unattended. It may become a dangerous toy for children.
- Also observe the safety and operating instructions of any other devices that are connected to the device.
- If you are not sure about the correct connection or if any questions arise which are not covered by the operating instructions, do not hesitate to contact our technical support or another specialist.
Operating Elements

Operating Instructions
English
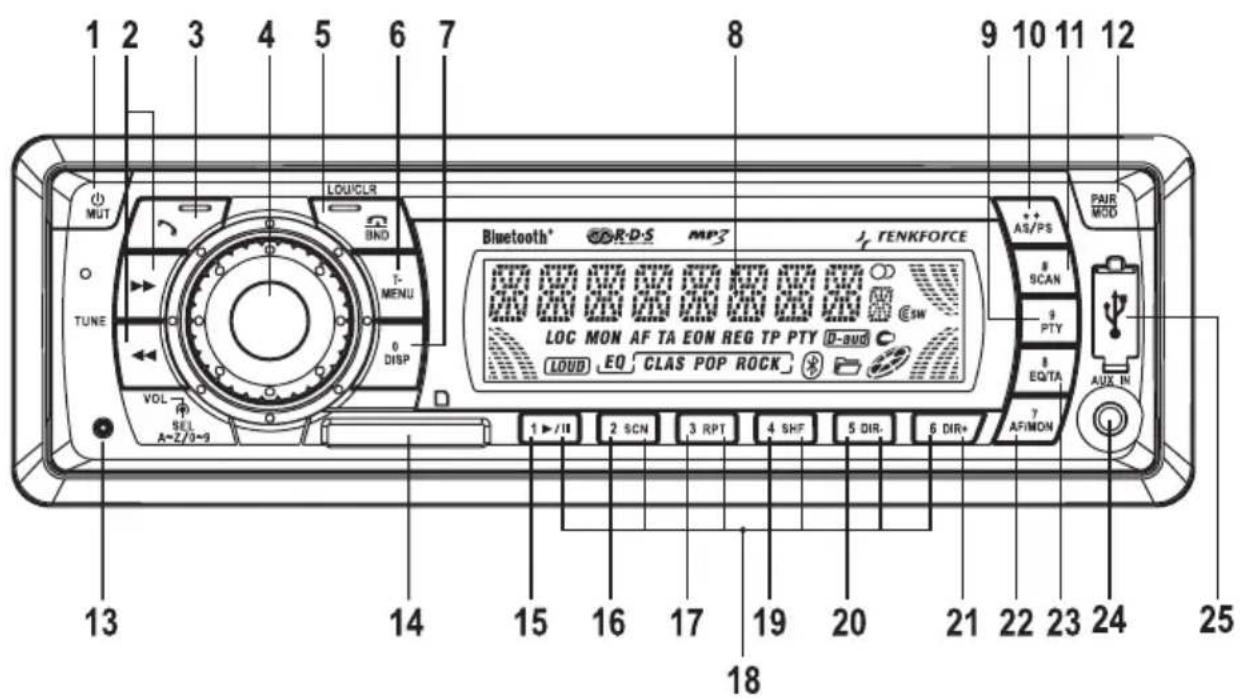
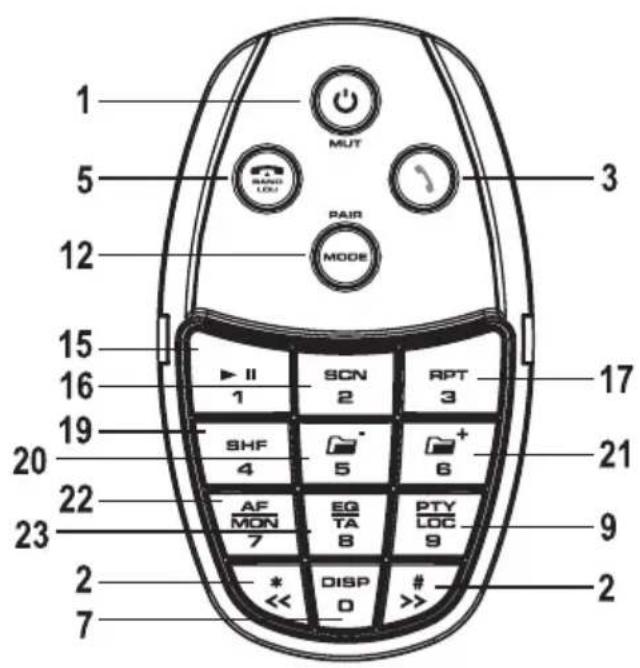
Operating Elements
(1) Button / MUT
(2) Buttons and
(3)Button
(4) Rotary control VOLUME
(5)Button/BND/LOU/CLR
(6) Button T-MENU
(7) Button 0 / DISP
(8) LC display
(9) Button 9 / PTY
(10) Button * + AS / PS
(11)Button#/SCAN
(12) Button PAIR / MOD
(13) Button RESET
(14) Memory card reader
(15)Button
(16) Button SCAN
(17) Button RPT
(18) Station buttons 1-6
(19)ButtonSHF
(20) Button DIR
(21) Button DIR+
(22) Button 7 / AF / MON
(23)Button8/EQ/TA
(24) AUX IN connection
(25) USB interface
(26) Button VOL ▲
(27) Button VOL
Product Description
This device is equipped with the following features:
AM/FM radio part
- USB interface
- MMC/SD card reader
- Bluetooth® hands-free device
- Music playback via Bluetooth® interface (A2DP)
- IR remote control with steering wheel holder
High output performance (4 x 40W max.)
- Pre-amplifier for connection of an output amplifier
- Front AUX IN for connection of external audio sources
- Electronic volume, depth, height, fader and balance control
- Digital signal processor for sound characteristics adjustment to different musical styles
- Loudness circuit
FM-tuner with RDS function
- Precise electronic stations tuning by PLL tuner
- 24 programmable station slots (18 x FM, 6 x AM)
- Manual/automatic station search in either search direction
Automatic station storage/programme storage search
- Alphanumeric DOT matrix display
- ID3 tag display for MP3 playback
Time settings via RDS system
- ISO connection terminal
Mechanical Installation
In most cars, the manufacturer intended an installation slot for the car radio. The installation place was selected according to safety aspects. Therefore, it is suggested that the car radio be installed in this intended slot.
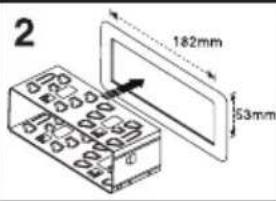
The device requires a DIN installation slot with the dimensions 182 × 53 ~mm . This installation size is standardised and usually complied with by all car manufacturers.
If no installation slot is intended, learn about the correct car radio installation site from your car dealer.

Select your installation site carefully to prevent the device from impairing normal driving activity of the driver.
Only use the included assembly material to guarantee for secure installation.
Changes to the vehicle that are required by the SD tuner or other components always have to be performed so that there will not be any impairment of road safety or constructive car stability. In many cars, the operational license will already expire from sawing out of a sheet metal part.
Since the device generates heat in operation, the installation site must be resistant to heat.
Before applying any attachment bores, ensure that no electrical cables, brake lines, the fuel tank, etc. are damaged by it.
When using the tools for installation of your car HiFi components, observe the safety tool manufacturer's notes.
When installing your HiFi system, observe the danger of accidents that devices torn loose may cause in case of accidents. Therefore, attach every part securely at a site where it cannot become any danger for the passengers.

Before device installation, verify the depth of the intended installation space.
Mechanical Installation
Installation in the Radio Slot
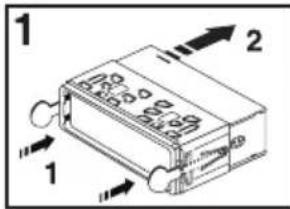
- Unlock the installation frame with the two unlocking keys (figure1, item1).
- Remove the installation frame backwards from the device (figure1, item2).
- Push the installation frame into the vehicle's installation cut-out (figure2).
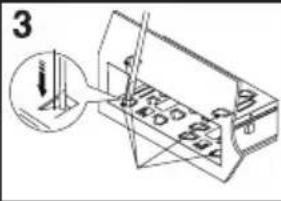
- Bend over some of the holding tabs at installation frame until the frame is securely fastened in the installation slot (figure3).
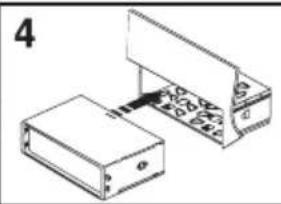
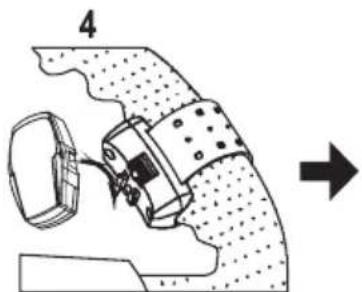
- After producing all electrical connections (see "Electrical Connection"), push the device into the installation frame until it latches securely (figure4).

Keep the two unlocking keys carefully. You will need them to remove the device again later.
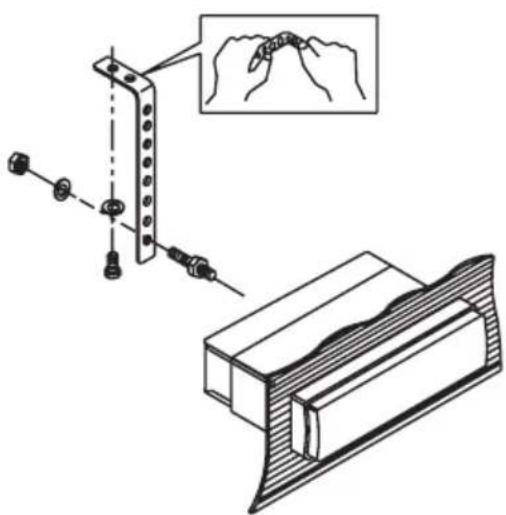
- Additionally secure the device against vibration with the screw cone at the rear of the device.
- Such safety device is already intended in most vehicles. If it isn't in your vehicle, please attach the device with the included perforated metal sheet.
Proceed as displayed in the following figure for attachment:
Mechanical Installation
Removal
- Insert the two unlocking keys in the lateral slots between the device and installation frame until the device is unlocked.
- If required, loosen the attachment screw at the rear of the device.
- Carefully remove the car radio from the installation frame using the unlocking keys.
- Loosen all electrical connections on the rear of the device and the aerial plug.

Hands-Free Microphone
The microphone for the hands-free device can be attached to the sun-blind, the steering column cover or any other suitable place in the vehicle interior.

The microphone and connection line must never be located in the air-bag trigger range.
- Attach the hands-free microphone to a suitable place with a clamp or the included hook-and-loop tape.
- Place the connection line to the radio installation slot.
Mechanical Installation
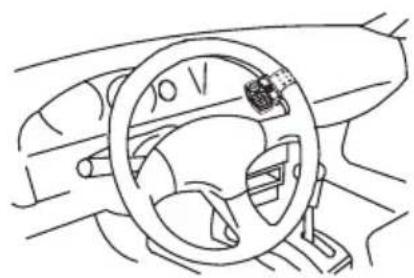
Remote Control
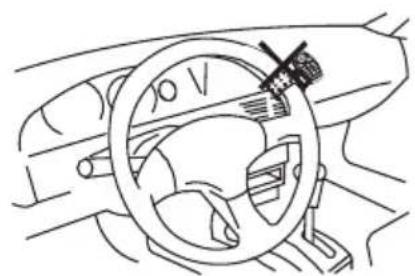
The remote control can be attached right at the steering wheel rim with the included steering wheel holder. The IR reception eye is located at the front shield of the SD tuner.
Steering wheel assembly:
- Align the steering wheel straight.
- Open the two screws (E) of the steering wheel holder.
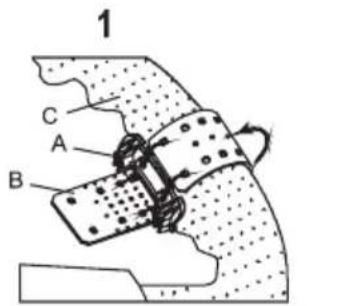
- Place the inner part (A) of the steering wheel holder to the steering wheel inside (C).
- Tighten the rubber band (B) around the steering wheel rim and hook it into the latching tabs under tension (figure 1).
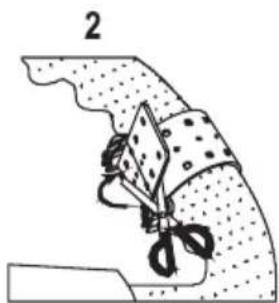
- Cut off any protruding rubber band (figure 2).
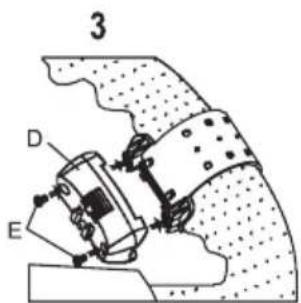
- Attach the outer part (D) of the steering wheel holder again with the two screws (E) (figure 3).
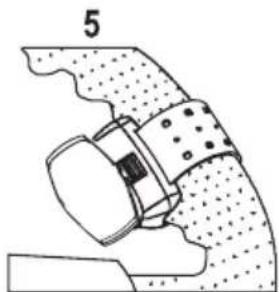
- Push the remote control onto the steering wheel holder (figure 4 and figure 5).
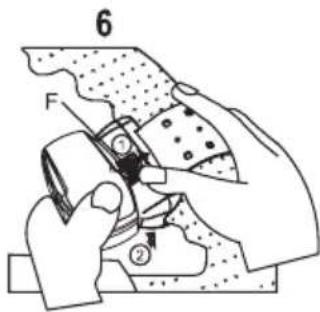
To remove the remote control, operate the safety lever (F) and pull the remote control from the holder (figure 6).
Mechanical Installation

The remote control must not be placed in the air-bag trigger range.
The remote control must be installed to the steering wheel in a way that will not impair the driver in steering and operation of the vehicle.
Tighten the holder's rubber band well to ensure that the remote control cannot come loose during the drive.
The remote control must be attached to the steering wheel inside to prevent steering impairment.

The best installation site for the remote control depends on the SD tuner installation site. Check for proper function before final assembly. The IR transmitter is at the rear of the remote control.
X
ok

The electrical connection should only be performed by a specialist.
To prevent short circuits and the resulting damage to the device, the minus pole (earth) of the vehicle battery must be disconnected during connection.
Only connect the battery's minus pole again after connecting the device completely and verifying the connection.
To inspect the vehicle voltage line voltage, only use a voltmeter or diode test lamp because normal test lamps take up too high currents and, thus, may damage the vehicle electronics.
When placing the lines, observe that they are not crushed or scrape over sharp edges. Use rubber sleeves in the penetration points.
Connection to the speakers must be two-wire each. Insulate any open connection points.
Only use speakers with sufficient load capacity (see "Technical Data").
Observe that all speakers have the correct polarity - that is, that plus and minus marks match.
The speaker connection cables are usually encoded. Some speaker manufacturers mark the (+) -line with an additional colour strip, while others use a grooved line for the (+) -pole, but a smooth one for the (-) -pole.
The device was developed for operation with speaker impedances of at least 4 Ohm. Never connect speakers with a lower impedance.

In most vehicles, the lines for electrical connection and connection of the speakers are already placed up to the intended installation slot.
If this is not the case, ensure that the subsequently installed lines are secured by the respective intended vehicle fuses (see vehicle operating manual).
Aerial Connection
- Connect your vehicle's aerial plug to the aerial socket at the rear of the device (socket next to the cinch connections).
- If your vehicle is equipped with a different aerial plug, use a matching adapter as available in specialist trade.
LINE Output Connection
The SD tuner has LINE outputs for the connection of an output amplifier.

Only use suitably shielded cinch cables for connection to the cinch sockets. Interferences may occur from using any other cables.
Keep the connection line length as short as possible.
Do not place the lines close to any other cables. This prevents any interfering effect on the lines.
To avoid distortions or mismatches that may damage the device, the cinch connections must only be connected to devices with matching cinch connections.
- Connect the cinch sockets at the rear of the device to the output amplifier inputs.

The red socket is the connection for the right channel
The white socket is the connection for the left channel
AUX IN Connection
The connection AUX IN (24) can be used to connect an external audio device (e.g. portable MP3 player); its signal will be played back via the vehicle speaker.
- Connect the AIX IN (24) connection to the external device's audio output.
Hands-Free Microphone Connection
- Connect the hands-free microphone to the coupling of the back connection lines at the rear of the device.
Electrical Connection
Speaker and Power Supply Connection
Vehicles equipped with an ISO system plug can be connected right to the ISO connection terminal at same plug assignment (please verify first!). If the plug assignment deviates, use a vehicle-specific adapter available in trade for connection.
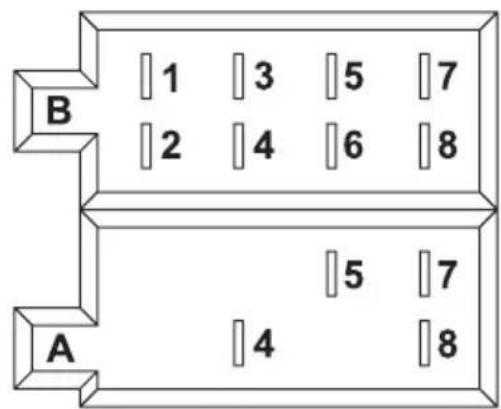
For the contact assignment of the SD tuner ISO connection socket, see the following figure.
You can learn about the respective assignment of your car system plug from your car dealer.
System plug B (speaker connection)
(1) Speaker right, rear (+)
(2) Speaker right, rear (-)
(3) Speaker right, front (+)
(4) Speaker right, front (-)
(5) Speaker left, front (+)
(6) Speaker left, front (-)
(7) Speaker left, rear (+)
(8) Speaker left, rear (-)
System plug A (power supply)
(1) Not assigned
(2) Not assigned
(3) Not assigned
(4) Continuous current +12V
(5) Aerial control output
(6) Not assigned
(7) Ignition +12V
(8) Ground
Electrical Connection
- The continuous current connection +12V (4) must be connected to a line that supplies 12V continually even with the ignition switched off (terminal 30 of the vehicle power supply). This connection is used to store the user settings, time, etc.
- The aerial output (5) delivery a voltage of +12V with the device switched on. This line can be used for power supply to an electrical aerial, as well as as switch-on voltage for a car amplifier.
- The continuous current connection +12V (7) must be connected to a line that supplies +12V continually even with the ignition switched off (terminal 15 of the vehicle power supply).

Do not connect this terminal to continuous current, or the vehicle battery will go flat if the vehicle is parked for an extended period of time.
- The connection earth (8) is connected to the vehicle body.

The more and more frequently used adhesive technique or painted metal parts will decrease electric conductivity. Therefore, not every metal part is suitable as an earthing point.
Electrical Connection
Insertion/Replacement of the Remote Control Battery

Observe correct polarity when inserting battery.
Do not let batteries lying around openly; there is a danger that they are swallowed by children or pets. If swallowed, see a doctor immediately.
Leaking or damaged batteries may cause caustic burns when touching skin. Therefore, use suitable protective gloves in this case.
Ensure that the battery is not short-circuited or thrown into fire. It also must not be recharged. There is a danger of explosion.
Remove the battery if you do not use it for an extended period of time.
- Take the remote control from the steering wheel holder as described above.
- Slide open the battery compartment lid at the rear of the remote control and remove it.
- Put in a new 3V lithium button cell CR2025 in the correct polarity. The positive pole of the battery must point upwards for this.
- Close the battery compartment again. The latching tab must latch audibly.
- Attach the remote control in the steering wheel holder again as described above.

- If the remote control no longer works properly, the battery is discharged and must be replaced with a new battery of the same type.
The battery is changed as described above. - Replace the discharged battery with a new battery of the same type.

Only take the device into operation after familiarising yourself with its functions and these operating instructions.
Check again that all connections are correct. After verification, attach the vehicle battery minus pole again.
General Operation
- Button / MUT (1)
Briefly press the button to switch on the device.

Any other button can be pressed for switching it on as well.
Keep this button pressed with the device switched on to switch it off again.
Briefly press this button with the device switched on to mute playback.

Use this function if you want to briefly interrupt the current playback, e.g. to ask passengers for the way.
To deactivate muting again, press the button again or turn the rotary control VOLUME (4).
- Button PAIR / MOD (12)
This button selects the different audio sources.
Every push of a button switches to the next source:
TUNER > USB PLAY > SD PLAY > BT AUDIO > AUX

If one of the sources is not active, i.e. if no medium is inserted or no Bluetooth® device is connected, the source is skipped at selection.
- Rotary control VOLUME (4)
In normal operation, the rotary control VOLUME controls the volume.
Press the rotary control VOLUME once or several times to change the parameters BAS (bass control), TRB (treble control), BAL (balance control) and FAD (fader control) by turning the rotary control VOLUME.

Operation
- LC display (8)
The LC display (8) shows all information depending on the audio source just played back (radio part, SD player, etc.).
- Button 0 / DISP (7)
This button displays different information on the LC display (8).
Press the button again to switch on the display.
If you do not continue pressing the button, the display will quickly return to the original information.
At RDS station reception:
Radio operation: Station name > Time > Transmission frequency > Programme type
SD/USB operation: Track display > Time > ID3 information > Station name > Transmission frequency > Programme type
At non-RDS station reception:
Radio operation: Transmission frequency > time > PTY NONE
SD/USB operation: Track display > Time > ID3 information > Transmission frequency > PTY NONE
- Button / BND / LOU / CLR (5)
This button switches on or off the loudness function.
Press and hold the button to switch the loudness function on or off.
LOUD ON: The loudness switch is activated.
LOUD OFF: The loudness switch is deactivated. The sound is not influenced.

The human ear is less able to take up low and high sounds at low volumes. Lifting these frequency ranges at low volumes (loudness correction) counters this effect and makes the music sound more natural.
Operation
- Button 8 / EQ / TA (23)
Briefly press the button to call the different equalizer pre-settings.
FLAT Equalizer on, linear frequency response
CLASSICS Pre-settings for classical music
POP M Pre-settings for pop music
ROCK M Pre-settings for rock music
DSP OFF Equalizer switched off
- Button RESET (13)
This button resets all settings to the factory pre-set values.
Press this button in the following cases:
- after completion of the installation and connection work
- if the device no longer reacts to button operations
- if the display shows any undefined characters
Menu Settings
- Rotary control VOLUME (4)
To select the menu settings, first keep the rotary control VOLUME pressed (>2 seconds) and then again briefly until the desired function appears in the display.
The options for the respective setting are selected by turning the rotary control VOLUME.
BEEP ON/OFF
BEEP ON: Every operation of a button is confirmed with a signal sound.
BEEP OFF: Button configuration is deactivated.
P-VOL
Set the device switch-on volume here by turning the rotary control VOLUME.
AREA EUR/USA
AREA EUR: Radio frequency band settings for Europe
FM 87.5-108MHz / 50kHz steps
MF 522-1620kHz / 9kHz steps
AREA USA: Radio frequency band settings for the U.S.
FM 87.5-107.9MHz / 200kHz steps
MF 530-1710kHz / 10kHz steps
HOUR 12/24H
12H: Time is displayed in the 12h format.
24H: Time is displayed in the 24h format.
PCLK ON/OFF
PCLK ON: The time is displayed when the device is switched off.
PCLK OFF: The time is not displayed when the device is switched off.
Operation
Radio Operation
RDS as reception concept
The abbreviation RDS stands for radio data system. i.e. inaudible encoded additional information is emitted as well by the VHF RDS station.
The BSD-3023 is an SD tuner that is able to evaluate this encoded data that is emitted by nearly every station.
The following essential additional information is transmitted:
-Programme identification (PI)
- Traffic programme ID (TP)
- Traffic announcement (TA)
-Programme service name (PS)
- Alternative frequencies (AF)
-Programme type (PTY)
- EON information (EON)
- Time (CT)
Programme identification (PI)
This data helps with clear identification of a station. It enables the radio to differentiate between areas where the same programme is emitted. The car radio thus only switches to stronger stations when reception weakens if this station emits the same programme identification.
Traffic programme ID (TP)
This signal tells the receiver that a station with traffic programme information is received.
Traffic announcement ID (TA)
This signal enables the station to recognise a traffic announcement and also interrupt current playback from another source.
Operation
Programme service name (PS)
This information indicates to the receiver which station is currently being received. It is indicated right in the car radio display (e.g. BAYERN 3).
Alternative frequencies (AF)
A list of alternative frequencies that emit the same programme is included. If the received station is too weak, the receiver recognises that it has to find a station with better reception via the AF signal.
Programme type (PTY)
This code submits to the receiver information on the type of programme emitted (e.g. sports, classical music, news, etc.). The listener can thus find just the programme he is looking for.
A national disaster alarm can also be distributed this way. Not all stations offer PTY service yet, however.
EON information (EON)
Many station labels with different programmes only have a single programme with traffic information. If EON information is included in the transmission, the device equipped this way switches to the traditional programme station when there are any traffic announcements, even if another programme of the same station chain is listened to.
If you are listening to, e.g., Bayern 4 (no traffic programme), the device will switch to Bayern 3 (with traffic programme) for the duration of the traffic programme announcement when the TA button is active.
Time (CT)
Many stations send the current time in the RDS data. If the device receives this signal, it automatically sets the integrated clock.
The RDS system therefore offers the advantage that it switches to a similar station with better reception automatically when the transmission range is left. However, it will only switch if a better station with the same programme is available.
Short signal weaknesses due to bad reception cannot be eliminated by the RDS system either, because it would lead to continuous switching back and forth of the car radio. This would be seen as much more unpleasant by the listener than brief reception interferences.
Another benefit of the RDS system is that the station name is displayed. The station name of an RDS station is displayed on the car radio display.
Operation
Function of the individual buttons
- Button / BND / LOU / CLR (5)
This button selects the radio part frequency range.
3 VHF ranges and one MF range are available:
$$ F 1 > F 2 > F 3 > M W $$

Each of the four frequency ranges can store 6 stations on the station buttons 1-6 (18).
- Buttons and (2)
These buttons change the receiver frequency to adjust the station in radio operation.
Pressing the button briefly starts automatic station search (display SEARCH).
The search will stop only when the next station with good reception is reached.
If a button is kept pressed for an extended period of time, manual station search is activated.
MANUAL appears in the display.
In this mode, the frequency is adjusted until the corresponding button is released again. Pressing the button briefly changes the frequency step by step.

If the buttons are not pressed for an extended period of time, the device switches back to automatic station search. AUTO appears in the display briefly.
- Station buttons 1-6 (18)
Briefly pressing these buttons enables direct search for a previously stored station.
To store the station just listened to, just keep the corresponding button pressed for more than 1 second.

Each of the three VHF ranges (F1-3) and the MF reception range has six station buttons. A total of 24 station buttons can be assigned.
Operation
- Button * + AS / PS (10)
If this button is kept pressed briefly, the stations saved on the station storage buttons 1-6 (18) are played for a few seconds each.
Press the button again to stop this search.
If the button is kept pressed, all stations with good reception will be stored automatically to station storage buttons 1-6 (18).
After this process, the saved stations are played for a few seconds as described above.
- Button 7 / AF / MON (22)
Briefly press button 7 / AF / MON (22) once > AF is switched on
Press the button again > AF is switched off
The button 7 / AF / MON (22) calls automatic station tracking.
The display indicates AF.
If a weak or no RDS station is received, the display flashes.
If the station is received well, the icon is lit continually.
Only the AF function enables the device to switch to a better station if the reception area is left.
Mono/Stereo toggling:
Press and hold the button 7 / AF / MON (22) to switch radio reception to mono or stereo.
Keeping it pressed again selects the respective other reception type.
Operation
- Button 8 / EQ / TA (23)
Keep button 8 / EQ / TA (23) pressed > TA is switched on
Keep the button pressed again > TA is switched off
If a traffic programme station is received, the display indicates TP = Traffic Programme.
If the TA function is active, TA is also displayed.
If another source is played back (e.g. SD playback), the programme is muted for the duration of the traffic programme announcement.
If a current radio programme is running at a very low volume, the traffic programme announcement will automatically switch to a higher level that can be understood well.
After the end of the announcement, the radio returns to the previously set volume.
- Button 9 / PTY (9)
This button switches on the PTY function. You can see this by the PTY display.
After the PTY button is pressed, the display indicates the selected programme type.
Use the rotary control VOLUME (4) to set the desired programme type and press one of the buttons or (2) to start station search.
Now a station of this programme type is searched for.
The following programme types are available:
NEWS, AFFAIRS, INFO, SPORT, EDUCATE, DRAMA, CULTURE, SCIENCE, VARIOED, POP M, ROCK M, EASY M, LIGHT M, CLASSICS, OTHER M, WEATHER, FINANCE, CHILDREN, SOCIAL, RELIGION, PHONE IN, TRAVEL, LEISURE, JAZZ M, COUNTRY, NATION M, OLDIES, FOLK M, DOCUMENT, TEST, ALARM
Operation
- Setting the RDS Parameters
To set the RDS parameters, first keep the button 9 / PTY (9) pressed (>2 seconds) and then press it again briefly until the desired function appears in the display.
The options for the respective setting are selected by turning the rotary control VOLUME (4).
The following settings are possible:
TA SEEK/ALARM
TA SEEK: When losing the traffic programme information, the device will automatically find a new station with traffic programme ID.
TA ALARM: The device emits a warning sound if the traffic programme ID is no longer received.
PI SOUND/MUTE
Device reaction if you reach an area where 2 different stations with different programme identification (PI) are transmitting the same AF (alternative frequency):
PI SOUND: The radio switches to the new station for a few seconds and then back again.
PI MUTE: The new station is muted.
RETUNE L/S
RETUNE L: If no traffic programme ID is received anymore, automatic search starts after 90 seconds.
RETUNE S: If no traffic programme ID is received anymore, automatic search starts after 30 seconds.
MASK DPI/ALL
Device reaction at station search:
MASK DPI: Alternative frequencies with different programme information (PI) are not considered.
MASK ALL: Alternative frequencies with different programme information (PI) and alternative frequencies with a high signal strength but without RDS information are not considered.
Operation
EON TA LO/DX
Device reaction when switching to EON traffic announcements:
EON TA LO: The device only switches to EON traffic announcements if the EON station signal strength is good and no interference is expected.
EON TA DX: The device always switches to EON traffic announcements without considering signal strength.
TA VOL
The preselected volume is selected for traffic programme announcements with the TA function activated if the volume set is lower.
Set the desired announcement volume by turning the rotary control VOLUME (4).
REG ON/OFF
REG ON: The device only switches to another frequency with the precisely same programme if reception grows weaker.
REG OFF: The device will also switch to a different station with the same regional ID if reception grows weaker.
USB/Memory Card Operation
The device is equipped with a USB interface and memory card reader for SD/MMC cards.
MP3 files stored on these media can be played back.

Do not connect any MP3 player to the USB interface if it is battery-operated.
The USB interface power supply may charge the inserted batteries and cause heating and explosion of the batteries.

USB media and USB hard discs of up to 32 GB and a power intake of no more than 500mA can be connected to the USB interface.
Only USB storage media can be operated via the USB interface. MP3 players with USB connection will usually switch to PC mode when connected here. Music files cannot be played in this mode. However, you can always connect an MP3 player's audio output to the AUX IN (24) connection.
SD/MMC cards and SDHC cards at up to 16 GB are supported.
The media must be FAT 16 or FAT 32 formatted.
Due to the great diversity of devices with USB and SD/MMC card interfaces and their sometimes very manufacturer-specific functions, it cannot be ensured that all media will be recognised and all operation options are present in connection with this device.
If the storage medium is not recognised, remove it again and re-connect it.
- Connect your USB storage medium to USB interface (25).
- If you are using a memory card, connect it to the memory card reader (14).
- The device automatically switches to the corresponding input and commences playback.
- The medium last inserted is selected automatically.
- Buttons and (2)
These buttons are used to select the individual tracks or to find a certain section within a track.

The arrows on the buttons indicate the search direction (forwards or backwards).
Press the buttons briefly to jump to the next or the previous track.
Keep the buttons pressed to search for a certain section within a track. Playback is then performed at an accelerated speed.
- Buttons DIR - (20) and DIR + (21)
These buttons are used to select the directory on the storage medium.
DIR- (20) selects the previous directory.
DIR+ (21) selects the next directory.

If there is no directory structure on the storage medium, these buttons will have no function.
- Button II (15)
Press this button to briefly interrupt playback.
Press the button again to resume playback where it was previously interrupted.
- Button SCN (16)
Press this button to play about 10 seconds of each track.
Press and hold this button to play about 10 seconds of each track of the current directory.
To switch off this function again, press the button SCN (16) again.
Playback is then performed at normal speed again.
- Button RPT (17)
Press this button to keep repeating the current track.
Press and hold this button to keep repeating the tracks of the current directory.
To switch off this function again, press the button RPT (17) again.
Operation
- Button SHF (19)
Press this button to play all tracks in a random order.
Press and hold this button to play all tracks of the current directory in a random order.
To switch off this function again, press the button SHF (19) again.
Playback is then performed in the normal order again.
- USB/Memory card search functions
Search for track numbers
- Press the button * + AS / PS (10) once to activate track number search.
- Select the desired track number with the rotary control VOLUME (4).
- Press the rotary control VOLUME (4).
- The desired track is played back automatically.
Search for track names
- Press the button * + AS / PS (10) twice to activate track name search.
- The first letter of the track display flashes.
- Select the desired letter with the rotary control VOLUME (4).
- Press the rotary control VOLUME (4). The second letter flashes.
- Select any other letters this way.
- Press the button /BND / LOU / CLR (5).
- All tracks and directories that start with the selected letter/s are displayed.
- Select the desired track or directory with the rotary control VOLUME (4).
- If the selected name is a directory name, the display will indicate ('').
- In this case, use the buttons or (2) to select the track within this directory.
- Press the button /BND / LOU / CLR (5).
- The desired track is played back automatically.
Operation
Search via the directory structure
- Press the button * + AS / PS (10) three times to activate directory structure search.
- The first directory structure is displayed.
- Select the desired directory with the rotary control VOLUME (4).
- Press the button BND / LOU / CLR (5). The directory is selected and the name of the first track or next subdirectory is displayed.
- Select the desired track or sub-directory with the rotary control VOLUME (4).
- Continue as described until the desired track is displayed.
- Press the button /BND / LOU / CLR (5).
- The desired track is played back automatically.
Search within the currently selected directory
- Press the button * + AS / PS (10) four times to activate search within the current directory.
- The current track's name is displayed.
- Select the desired track or ('-) for selecting the desired directory with the rotary control VOLUME (4).
- Proceed as already described in "Search via the directory structure".
Remote Control Functions
Almost all the SD tuner functions can also be controlled via the included steering wheel remote control. The Bluetooth® hands-free system can also be operated with it comfortably and safely via the steering wheel.
The buttons with the same designations as on the device have the same functions as well.
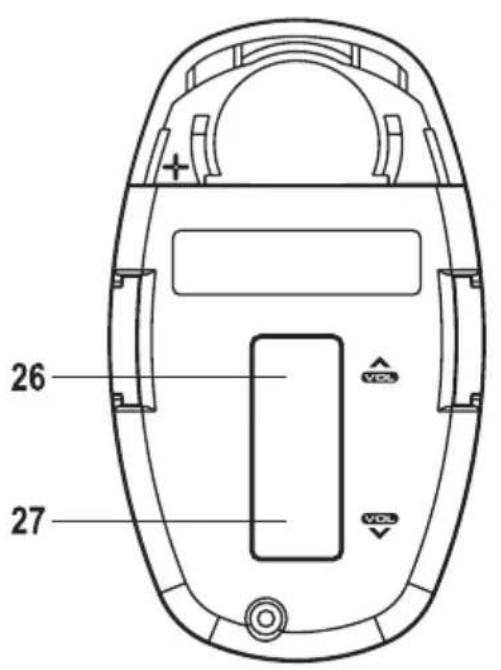
The function for the rotary control VOLUME (4), however, is distributed between two separate operating elements:
- The buttons VOL (26) and VOL (27) at the rear of the remote control assume the function of turning the rotary control VOLUME (4).
- The button / BND / LOU / CLR (5) assumes the function of pressing the rotary control VOLUME (4).
Bluetooth® Operation

To enable best phone reception and keep the electromagnetic radiation in the vehicle as low as possible, an outside aerial should always be used for mobile phone operation.
For the mobile phone to automatically take incoming calls, automatic call answering must be activated at the SD tuner (see hands-free system menu) as well as in the mobile phone (see corresponding instructions). This is a prerequisite for legal operation of hands-free systems while driving in many countries.
In Bluetooth® operation, the SD tuner can be used as a hands-free system for mobile phones and/or as a playback device for Bluetooth®A2DP audio streaming. However, before transmission between your mobile phone or Bluetooth® device and the SD tuner is possible, both devices must be coupled. This process is called "Pairing".
Pairing
- Switch on your Bluetooth® device and activate pairing mode here (for this, see the instructions for the respective device). The device then searches for Bluetooth® devices in the reception range.
- Keep the button PAIR / MOD (12) pressed until the display indicates PAIRING.
- If the SD tuner was found, your Bluetooth® device will indicate CarBT.
- Enter password 0000 to couple the two devices.
After successful pairing, the display indicates the Bluetooth® icon. - If pairing was not successful, try repeating the process. The CarBT device in your mobile phone may have to be deleted (see mobile phone instructions).
- Only the rotary control VOLUME (4) and the button / MUT(1) will work during pairing. All other buttons are locked during pairing.
- To interrupt pairing prematurely, keep the button PAIR / MOD (12) pressed. The display indicates PAIR END.

Only one Bluetooth® device can be coupled with the SD tuner. If there is already an active Bluetooth® coupling, this connection must be interrupted first.
Switching off the SD tuner or Bluetooth® device that is part of the active coupling or removing it from the range will interrupt the connection. When switching it on again or if the Bluetooth® device is back in range of the SD tuner, the connection is automatically re-established. The SD tuner display indicates the Bluetooth® icon again.
The function may have to be activated in the Bluetooth® device to enable this automatic connection (please see the instructions of your Bluetooth® device for this).
Hands-free system menu
- Press the button T-MENU (6) with the Bluetooth® connection active.
- The hands-free system menu is displayed.
- Press the button T-MENU (6) or the buttons or (2) repeatedly to select the different menu items:
PRE NUM: List of stored phone numbers (max. 10)
RECEIVED: List of last 10 received calls
DIALED: List of last 10 dialled calls
MISSED: List of last 10 missed calls
AUTO ANS (MANU ANS): Switches between automatic and manual answering of calls
TALK XX: Conversation volume setting
Operation
PRE NUM
Storing phone numbers in the number storage:
- Select PRE NUM.
- Turn the rotary control VOLUME (4) to select the desired memory slot (0-9).
- Press the rotary control VOLUME (4).
The display indicates DIAL - Enter the desired phone number with the number buttons (0-9).
- Press the rotary control VOLUME (4) to store the phone number.

Briefly press the button BND / LOU / CLR (5) while entering phone numbers to delete the last number entered.
Keep the button a / BND / LOU / CLR (5) pressed while entering phone numbers to delete the whole phone number.
If a phone number is stored to a memory slot that already had a phone number stored, the old number will be deleted.
Dialling from the phone number storage:
- Select PRE NUM.
- Turn the rotary control VOLUME (4) to select the desired memory slot (0-9).
- Press the button (3).
The connection is being established.
Quick dial:
- Press the button (3)
- Press and hold the number button (0-9) for which the desired phone number is stored.
The connection is being established.
RECEIVED
- Select RECEIVED.
- Turn the rotary control VOLUME (4) to display the numbers of the received calls.
- Press the button (3) to call the displayed number.
- The connection is being established.
Operation
DIALED
- Select DIALED.
- Turn the rotary control VOLUME (4) to display the numbers of the 10 last dialled calls.
- Press the button (3) to call the displayed number.
- The connection is being established.
MISSED
- Select MISSED.
- Turn the rotary control VOLUME (4) to display the number of received missed calls.
- Press the button (3) to call the displayed number.
- The connection is being established.
AUTO ANS (MANU ANS)
- Select AUTO ANS or MANU ANS.
- Select the desired option with the rotary control VOLUME (4).
AUTO ANS: Automatic answering
MANU ANS: Manual answering

If manual answering was selected, an incoming call can be answered with the button (3) or rejected with the button BND / LOU / CLR (5).
TALK XX
- Select TALK XX.
- Select the desired call volume with the rotary control VOLUME (4).
Calling by entering a phone number manually
- Press the button (3) to enter phone mode.
- Enter the desired phone number with the number buttons (0-9).
- The dialled number appears in the display.
- Press the button (3) again to call it.

Briefly press the button BND / LOU / CLR (5) while entering phone numbers to delete the last number entered.
Keep the button BND / LOU / CLR (5) pressed while entering phone numbers to delete the whole phone number.
Redialling
- Press the button (3) twice to activate redialling.
- The display indicates LAST NUM.
- Press the button (3) again to call the last number dialled.
Answering an incoming phone call
- On this, please read the item AUTO ANS (MANU ANS) in "Hands-free system menu".
Holding a call
- Press the button (3) during an active phone call to interrupt the call.
- Press the button (3) again to resume the call.

This function is not supported by every mobile phone.
Ending a phone call
- Press the button / BND / LOU / CLR (5) to end a phone call.
Operation
Call pick-up
- Hold down the button T-MENU (6) during a call to transfer the call to the mobile phone or hands-free device.
Caller number display
- In case of an incoming phone call, the caller's number is displayed.

If the caller suppresses caller ID or the mobile phone network does not support this feature, the caller number cannot be displayed.
Audio-Streaming
Audio-streaming means transmission of audio files (music) to the SD tuner via Bluetooth®.
If you have an A2DP-capable Bluetooth®-device, you can connect it to the SD tuner as described above for pairing and establish an audio transmission.
- Ensure that both devices are connected by pairing.
- Start playback/audio transmission at your Bluetooth® device (see corresponding operating instructions).
- Keep the button PAIR / MOD (12) pressed until the display indicates BT AUDIO.
- Audio transmission is now active.
- You can remote-control your Bluetooth®-device's playback with the buttons and (2) and button (15) now as usual.
Maintenance
Regularly verify technical safety of the SD-tuner, e.g. for damage to the connection cables and casing.
If you have reason to believe that the product can no longer be operated safely, disconnect it immediately and make sure it is not unintentionally operated. Disconnect the vehicle power supply!
It can be assumed that safe operation is no longer possible if:
- the device is visibly damaged
- the device no longer works or
- after heavy mechanical stress
Before cleaning or servicing the SD tuner, always observe the following safety information:

Live components may be exposed if covers are opened or components are removed.
The device must be disconnected from all power sources before any servicing or repair work is carried out.
Capacitors inside the device may still carry voltage even though they have been disconnected from all power sources.
Only qualified experts familiar with the hazards involved and the relevant regulations must perform repairs.
Fuse replacement
If the fuse must be replaced, observe that only fuses of the indicated type and rated current (see "Technical Data") must be used.

Never repair fuses or bridge the fuse holder.
- After disconnection from the power supply (disconnect ISO connection plug!) carefully remove the fuse from the fuse holder next to the ISO connection.
- Replace it with a fuse of the same type.
- After this, you can reconnect the SD tuner to the vehicle power supply and take it into operation.
- If the fuse triggers again, take the device to a specialist workshop for repair.
Maintenance
Cleaning
Clean the exterior of the device with a soft, dry cloth or brush only.
Never use any aggressive cleaning agents or chemical solutions that may damage the surface of the casing.
Handling
- If the volume inside the car is too high, acoustic warning sounds can no longer be heard. This will endanger you and other traffic participants. Therefore, ensure adjusted volume.
- Carelessness on the road may lead to serious accidents. The HiFi system must only be operated when the traffic situation permits and you will not be distracted from traffic by system operation.
- Do not listen to excessively loud music over an extended period of time. This may damage your hearing.
In purchasing the BSD-3023 SD-Tuner, you have acquired a reliable product designed to the state of the art and operationally safe.
Nevertheless, problems or errors may occur.
Therefore, we would like to describe how to eliminate possible errors here:

Always observe the safety information!
No playback, display and lighting not lit:
- Car fuse is defective. Find the corresponding fuse in your vehicle's operating instructions and check it.
Device fuse is defective. Remove device and check fuse. - Plus line/earth line has come loose. Remove device and check line connections.
Playback only via one speaker:
Balance control misadjusted. Adjust balance control as described.
- Speaker connection has come loose. Remove device and/or speaker and check connections.
Playback only via the front or rear speakers:
- Fader control misadjusted. Adjust fader control.
- Speaker connection has come loose. Remove device and/or speaker and check line connections.
Hardly any stations can be received in radio operation:
Aerial not fully extended. Extend aerial fully.
- Aerial connection has come loose from the device. Remove device and check connection.
- Aerial is defective. Check connection, earthing and aerial.
Interference in Radio and USB/memory card operation:
Interferences enter the device through the pulse line. Install additional noise suppression throttle in the pulse line.
- Use additional noise suppression plugs, distributor rotors, etc. in your vehicle if required.
- Bad earth connection. Check earth connection, use different earthing point if required.
Troubleshooting
Only noise is emitted when the station buttons are pressed:
- No station programmed. Programme station as described.
The device no longer reacts to button commands or displays chaotic characters:
- Reset your device with the button RESET (13).
Bluetooth® audio transmission does not work:
- The connected device does not support Bluetooth®A2DP audio transmission.
- The device is not connected to the SD tuner. Perform pairing.
The transmission quality in hands-free operation is bad:
- The distance between microphone and vehicle speakers is too low.
- The microphone is in the air flow of sliding roof, open window, ventilation, etc.
- The distance between speaker and microphone is too large.

Repairs other than those described above must only be carried out by an authorised specialist.
Technical Data
General Information
Operating voltage 12 V/DC
Power consumption 15 A max. / 6.5 mA standby
Fuse ... Car flat fuse 15 A
Battery remote control 3V-Lithium button cell CR2025
Output performance 4 x 40 W (max.)
Speaker impedance. 4-8 Ohm
Interfaces. Bluetooth, USB and SD/MMC-Card
Phone number storage 10
Installation slot 1 DIN (182 x 53 mm)
Installation depth 115 mm
Weight 600g
Tuner
Reception range (Europe) FM 87.5 - 108.0 MHz/AM 522 - 1,620 kHz
Reception range (U.S.) FM 87.5 - 107.9 MHz/AM 530 - 1,710 kHz
Frequency step (Europe) FM 50 kHz/AM 9 kHz
Reception step (U.S.) FM 100 kHz/AM 10 kHz
Sensitivity FM 10 dbμ/AM 32 dBμ
Interim frequency FM 10.7 MHz/AM 450 kHz
Stereo separation FM. >25 dB
USB/Memory Card Operation
Frequency response 20-20,000 Hz
Signal-to-noise ratio >60 dB
Channel separation. >50 dB
Playable file formats MP3
Playable media .SD/MMC, SDHC max. 16 GB / USB max. 32 GB
Power load capacity USB output max. 500 mA
Disposal
Dispos of the product according to the applicable statutory provisions at the end of its service life.
Disposal of used batteries/rechargeable batteries

You as end user are required by law (battery ordinance) to return all used batteries and rechargeable batteries; disposal in the household waste is forbidden.
Batteries/rechargeable batteries are marked with the adjacent symbol that indicates the prohibition of disposal via household waste. The designations for the relevant heavy metals are: Cd = cadmium, Hg = mercury, Pb = lead. You can return your flat batteries/rechargeable batteries at the collection points of your municipality or anywhere where batteries/rechargeable batteries are sold.
Compliance Statement
The manufacturer hereby declares that this product complies with the basic requirements and other relevant provisions of directive 1999/5/EC.

The declaration of conformity for this product is available at www.conrad.com.
Table des matieres
Page
Introduction 91
Chere cliente, cher client,
Alternative frequencies (AF)
NEWS, AFFAIRS, INFO, SPORT, EDUCATE, DRAMA, CULTURE, SCIENCE, VARIED, POP M, ROCK M, EASY M, LIGHT M, CLASSICS, OTHER M, WEATHER, FINANCE, CHILDREN, SOCIAL, RELIGION, PHONE IN, TRAVEL, LEISURE, JAZZ M, COUNTRY, NATION M, OLDIES, FOLK M, DOCUMENT, TEST, ALARM