
TechniVision 26 HD - TV TECHNISAT - Free user manual and instructions
Find the device manual for free TechniVision 26 HD TECHNISAT in PDF.
| Product type | HD LED TV |
| Brand | TechniSat |
| Model | TechniVision 26 HD |
| Screen size | 26 inches (diagonal) |
| Resolution | HD (1366 x 768 pixels) |
| Reception | DVB-S, DVB-C, DVB-T, analog (CT) |
| Connections | HDMI (x2), VGA, SCART (EuroAV), S-Video, component input, USB, digital audio output S/P-DIF, 3.5 mm headphone output, audio input VGA/DVI |
| Antenna | LNB input (satellite), antenna input (DTT/cable) |
| Common Interface | Yes (CI/CI+) |
| Power supply | 230 V ~ 50 Hz |
| Main features | Satellite, cable, DTT and analog reception; DVR recording via USB; electronic program guide (EPG); teletext; parental control; Timeshift; sleep timer; multiple picture formats; subtitles; Dolby Digital |
| Care and cleaning | Clean with a soft, dry cloth. Do not use abrasive products or solvents. |
| Safety | Disconnect before cleaning. Do not expose to moisture. Use a mains socket with earth. |
| Spare parts | Remote control, batteries, power cable. For other parts, contact TechniSat customer service. |
| Repairability | Refer to the manual for procedures. For any repair, contact an authorized service center. |
| General information | Manual available in several languages. CE mark. Manufacturer: TechniSat, Germany. |
Frequently Asked Questions - TechniVision 26 HD TECHNISAT
User questions about TechniVision 26 HD TECHNISAT
0 question about this device. Answer the ones you know or ask your own.
Ask a new question about this device
Download the instructions for your TV in PDF format for free! Find your manual TechniVision 26 HD - TECHNISAT and take your electronic device back in hand. On this page are published all the documents necessary for the use of your device. TechniVision 26 HD by TECHNISAT.
USER MANUAL TechniVision 26 HD TECHNISAT
TechniVision 22/26/32 HD
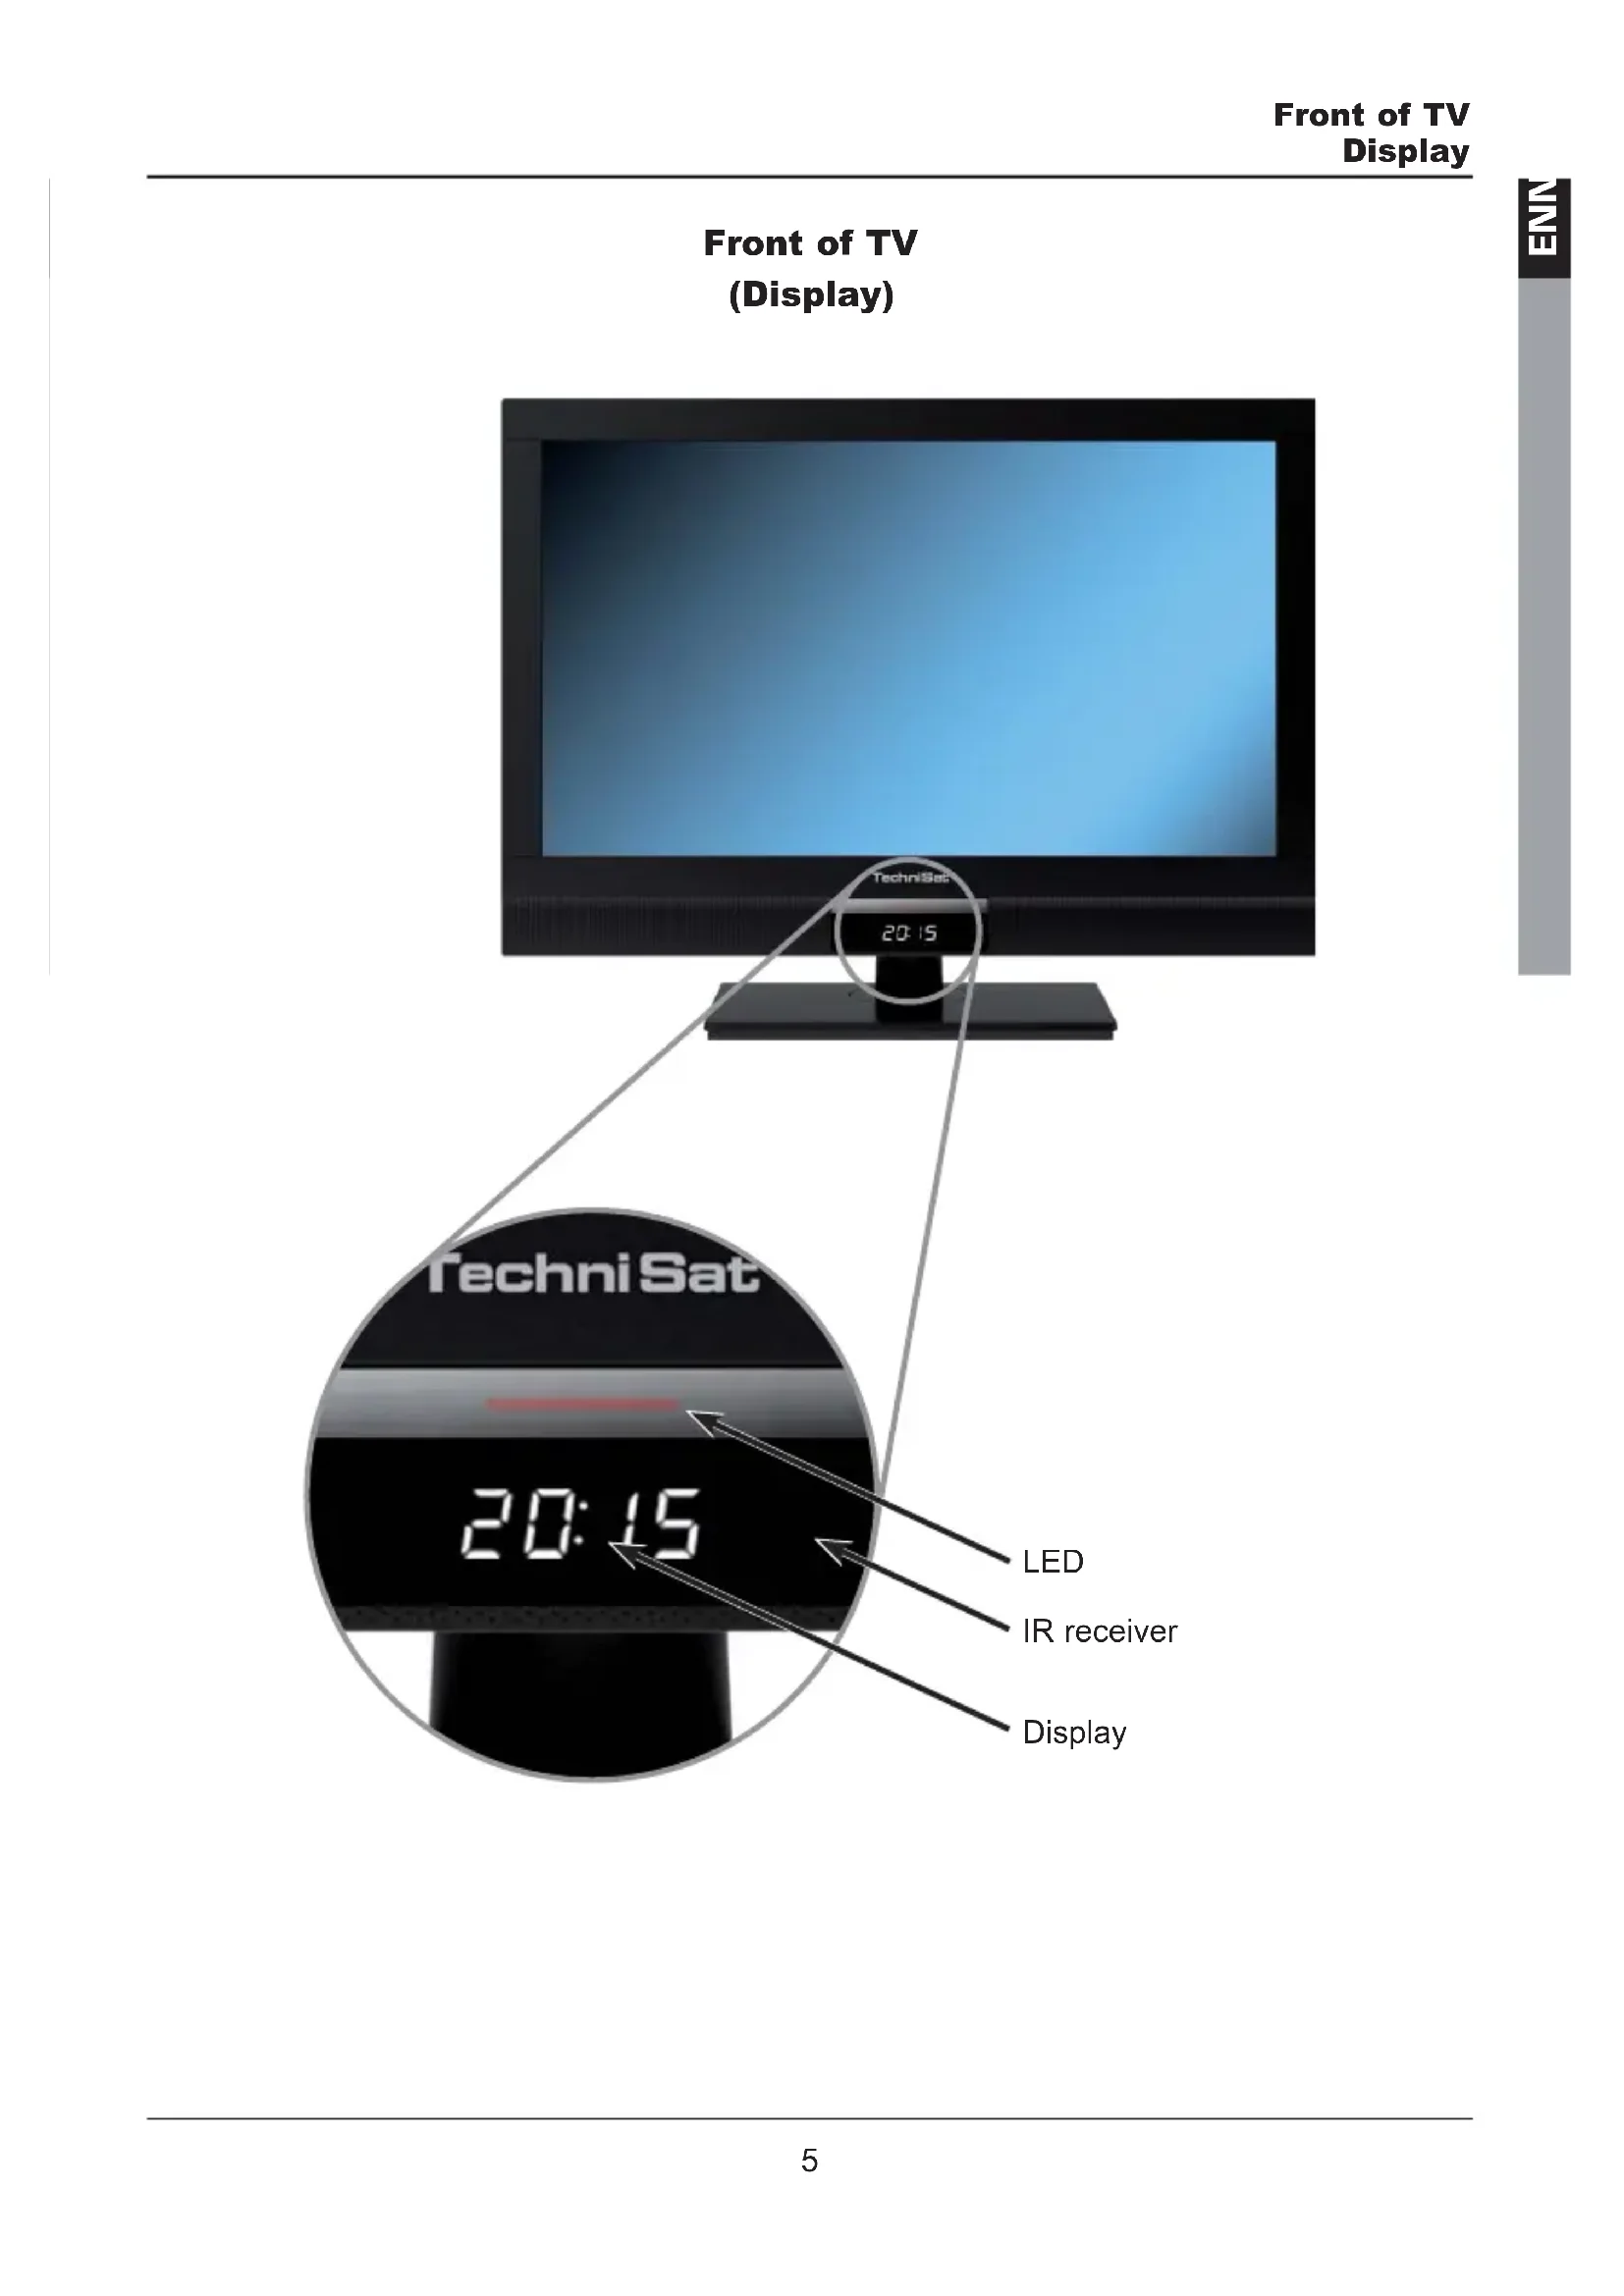
natural_image
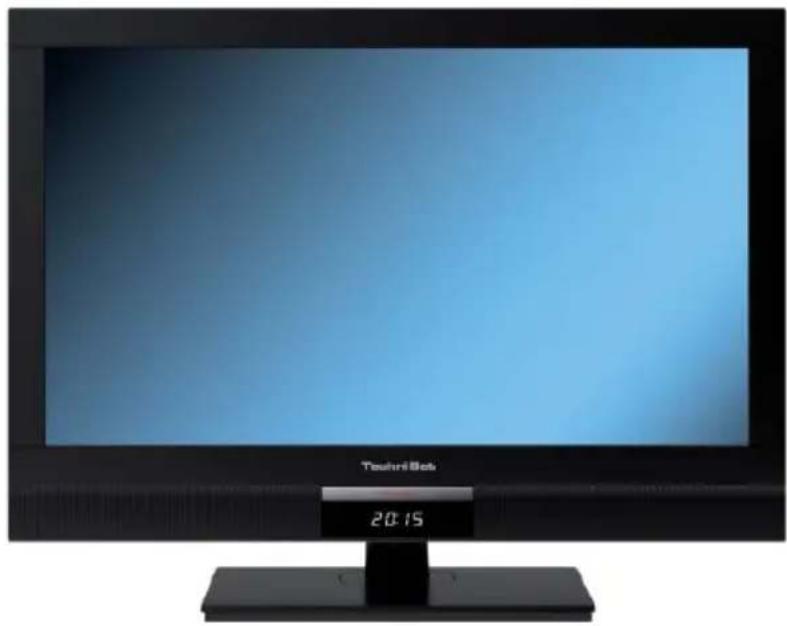
Front view of a TechniSat monitor displaying a blue gradient screen and a digital clock showing 20:15 (no readable text beyond branding)1 Illustrations
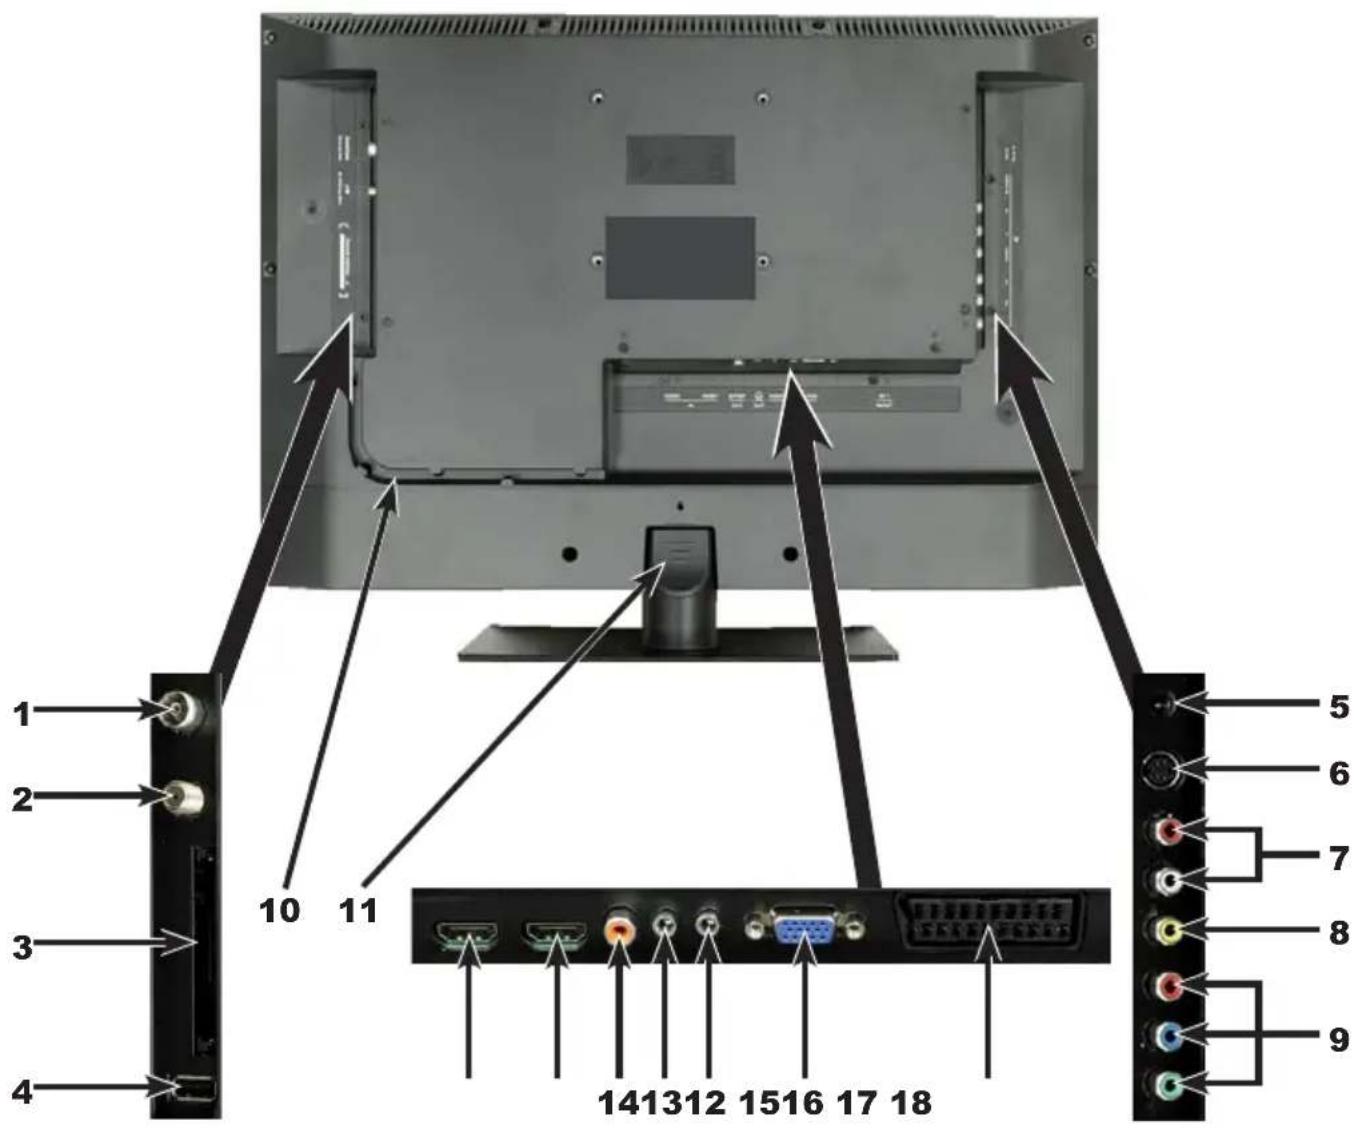
Rear of TV
TechniVision 22 HD
(connections, attachment, cover)

1 Antenna input (DVB-C, DVB-T, analogue)
2 LNB Input (DVB-S)
3 Common Interface
4 USB port
5 DC socket
6 S-Video input
7 Audio input (R, L) (S-Video, Video and component input)
8 Video input
9 Component input
10 Cable guide
11 Stand attachment cover
12 HDMI input 2
13 HDMI input 1
14 Audio output digital (S/P DIF electrical)
15 Headphone output (3.5mm jack plug)
16 Audio input (VGA/DVI) (3.5mm jack plug)
17 VGA connection
18 Scart socket (EuroAV)
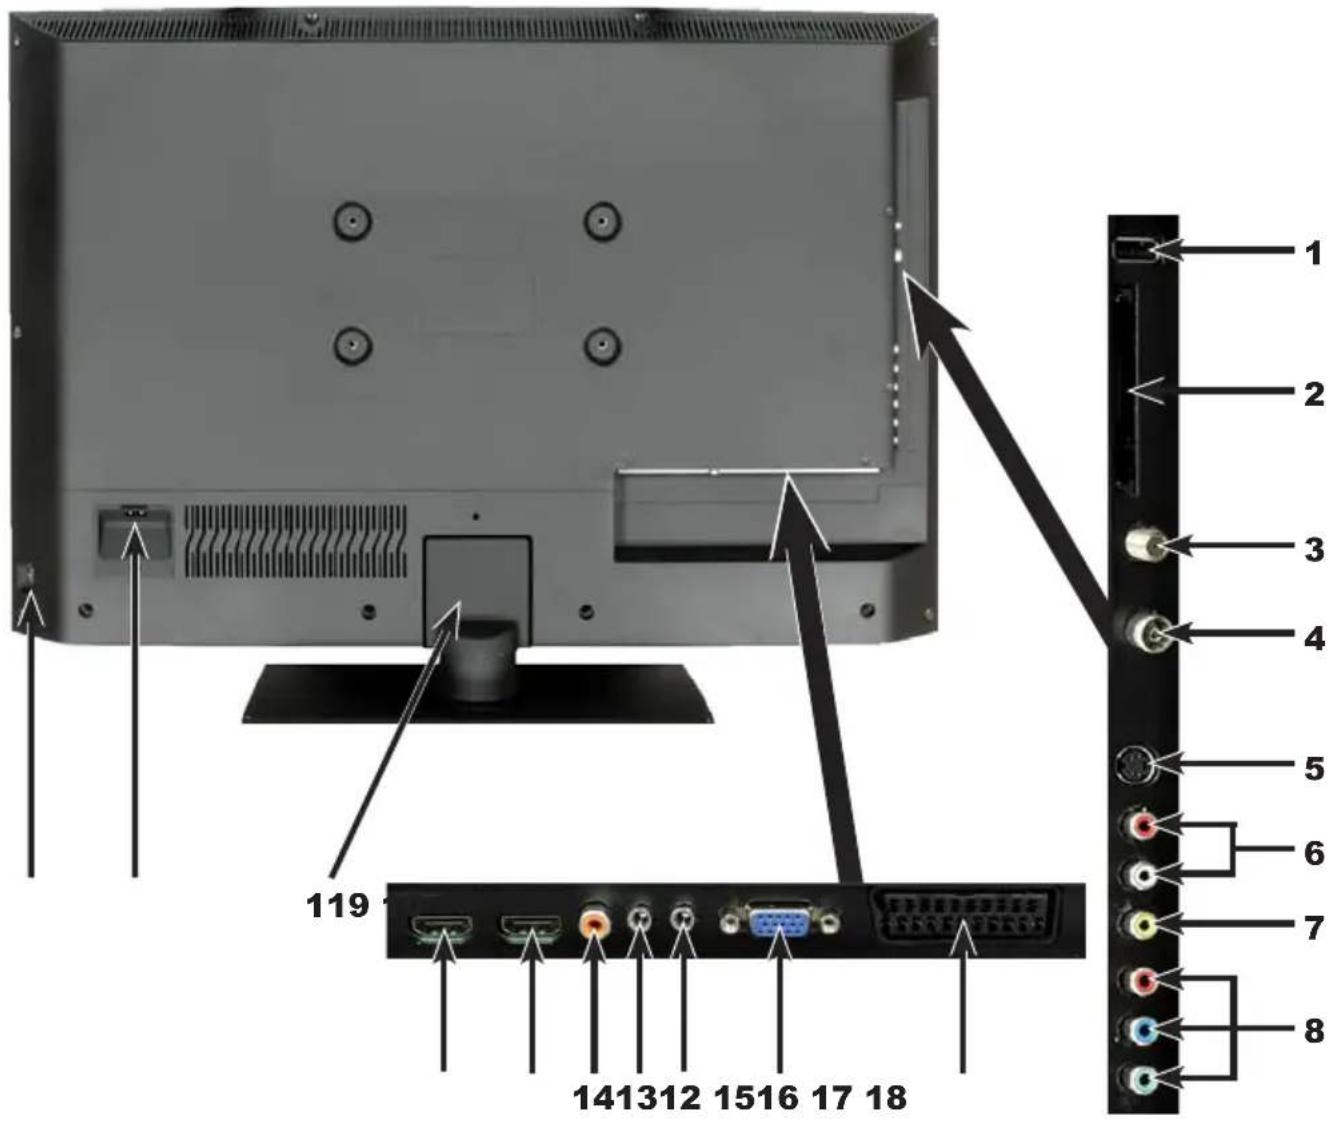
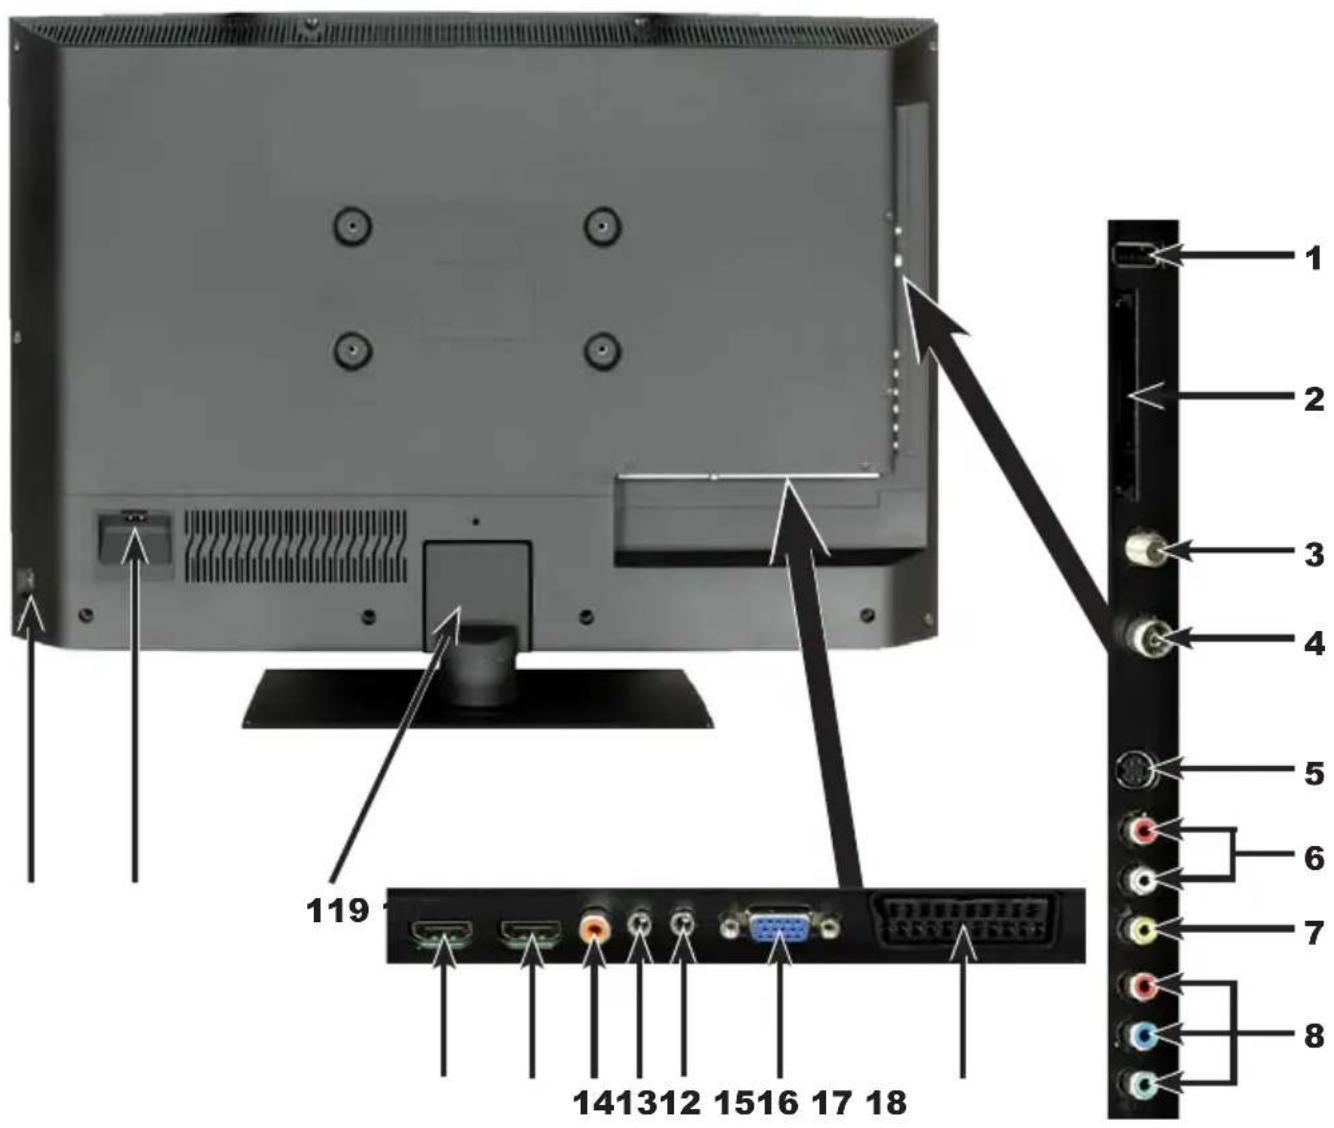
Rear of TV
TechniVision 26/32 HD
(connections, cover)

1 USB port
2 Common Interface
3 LNB Input (DVB-S)
4 Antenna input (DVB-C, DVB-T, analogue)
5 S-Video input
6 Audio input (R, L) (S-Video, Video and component input)
7 Video input
8 Component input
9 Mains power switch
10 Mains power connection
11 Stand attachment cover
12 HDMI input 2
13 HDMI input 1
14 Audio output digital (S/P DIF electrical)
15 Headphone output (3.5mm jack plug)
16 Audio input (VGA/DVI) (3.5mm jack plug)
17 VGA connection
18 Scart socket (EuroAV)
Front of TV
(Display)

2 Please read this first
Dear customer,
This quick start manual simply describes the most important connection options and the basic operating steps required for you to quickly get started operating the TechniVision 22, TechniVision 26 or TechniVision 32.
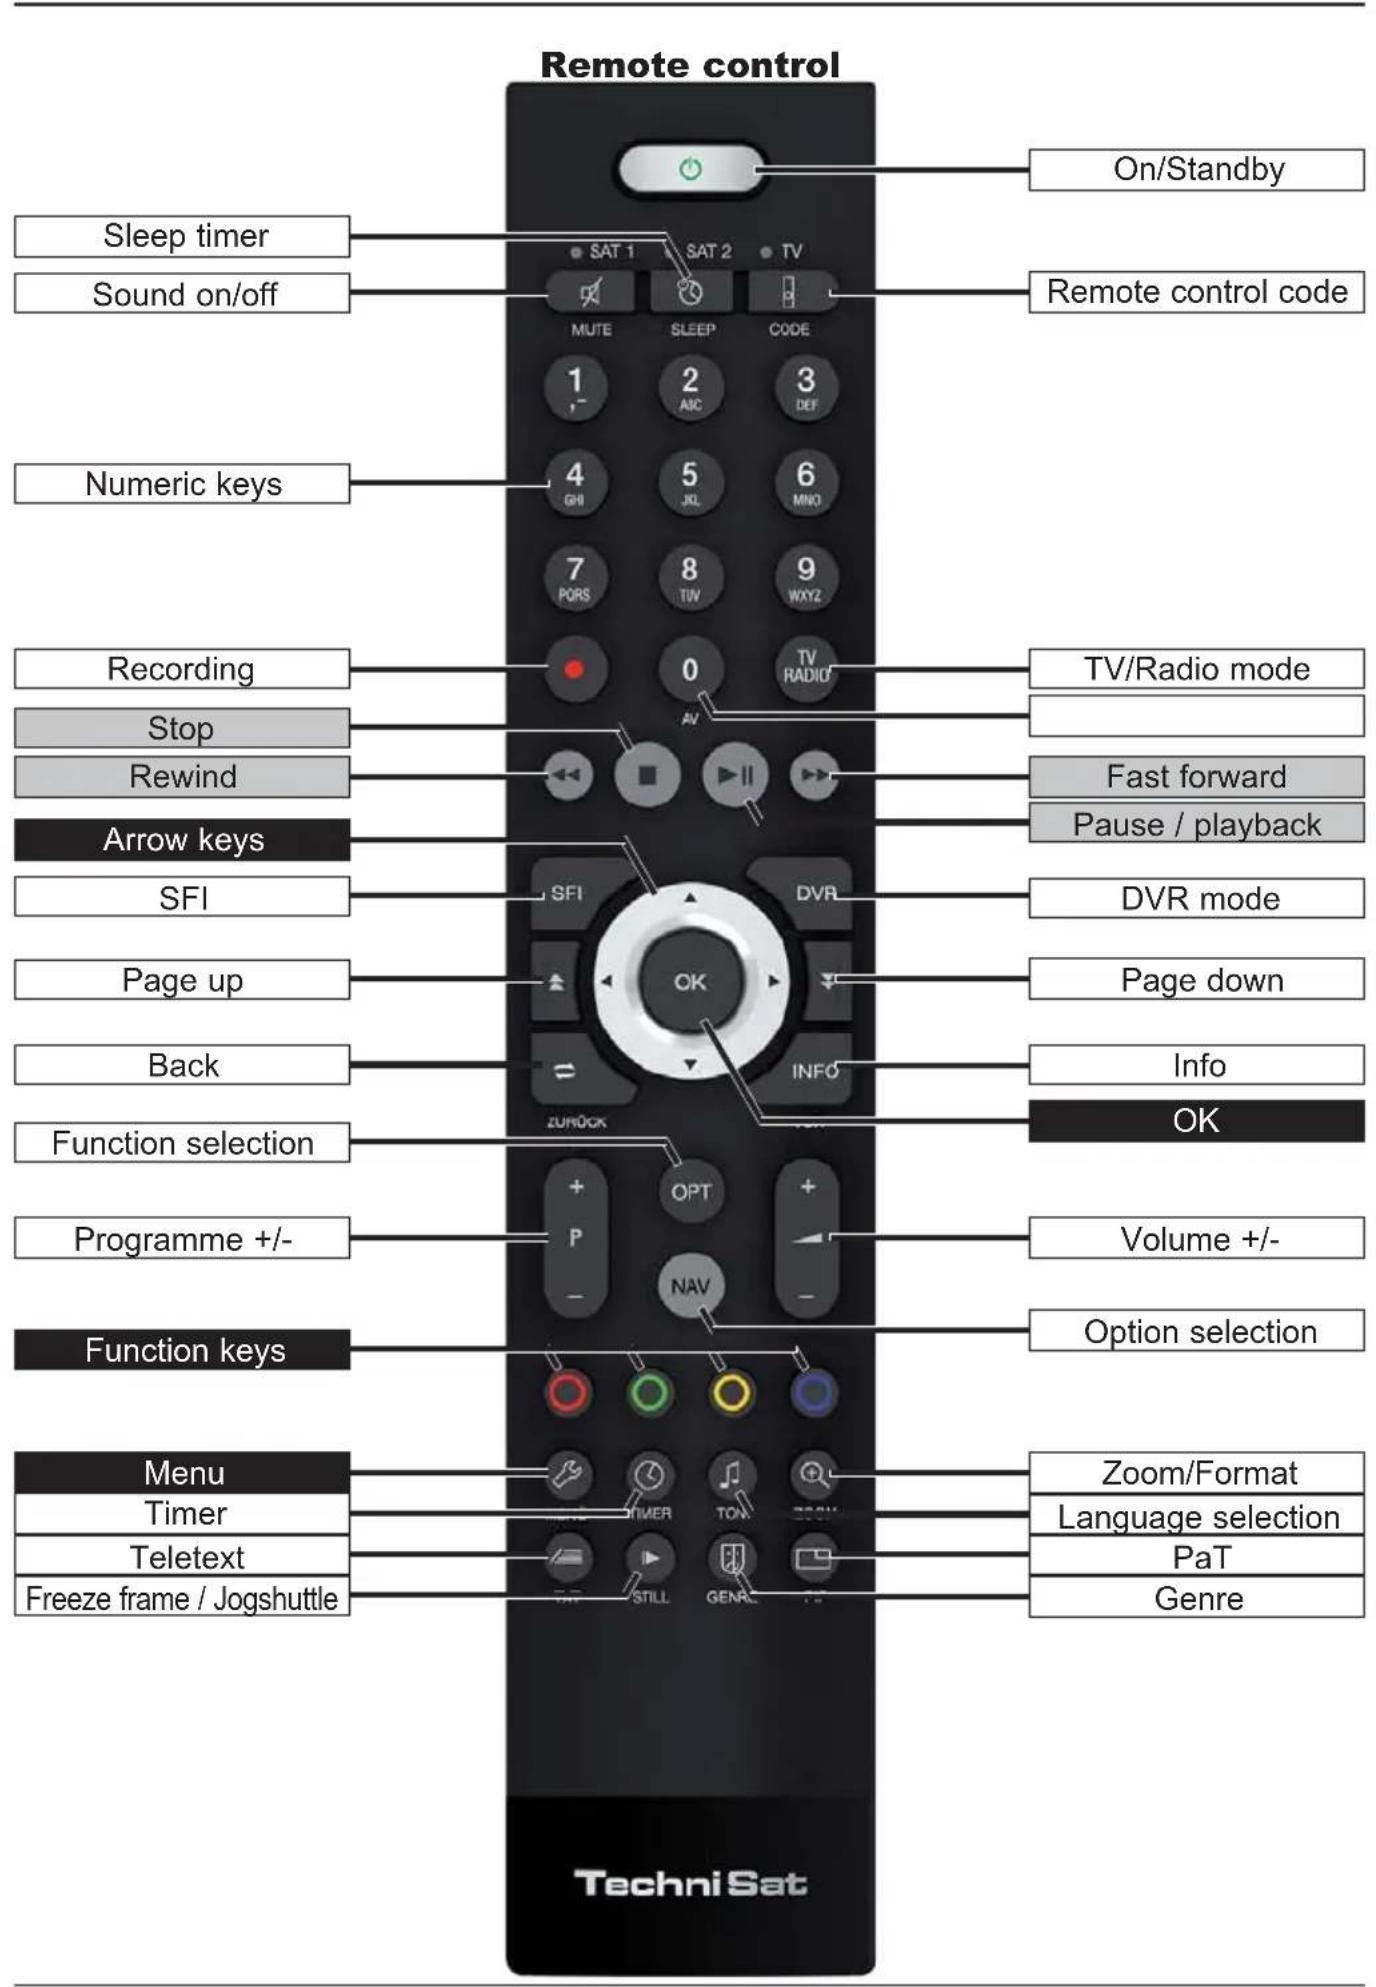
3 Remote control
3.1 Changing the battery
Open the cover on the battery compartment at the rear of the remote control by pushing it in the direction of the arrow and then lifting it off.
Insert the supplied batteries, ensuring that the poles are the right way around (indicator visible in battery compartment).
Close the battery compartment again.
3.2 Remote control code
By switching over the remote control option it is possible to use this remote control to operate a TechniSat television and two TechniSat receivers using the same coding.
Hold down the remote control code button to switch over the remote control option and press the OK button as often as necessary until the LED for the desired remote control option (TV, SAT1 or SAT2) flashes briefly.
The currently set remote control code will be displayed, as the appropriate LED flashes, while pressing a button.
4 Connecting
a Connecting the satellite antenna using the LNB input.
b Connecting the cable connection (digital and/or analogue) or the DVB-T antenna to the antenna input on the television.
c Connecting the television to a BluRay/DVD player using an HDMI cable or a cinch components cable with the cable adapter.
d Connecting the digital audio output to Hi-Fi stereo equipment or surround sound equipment.
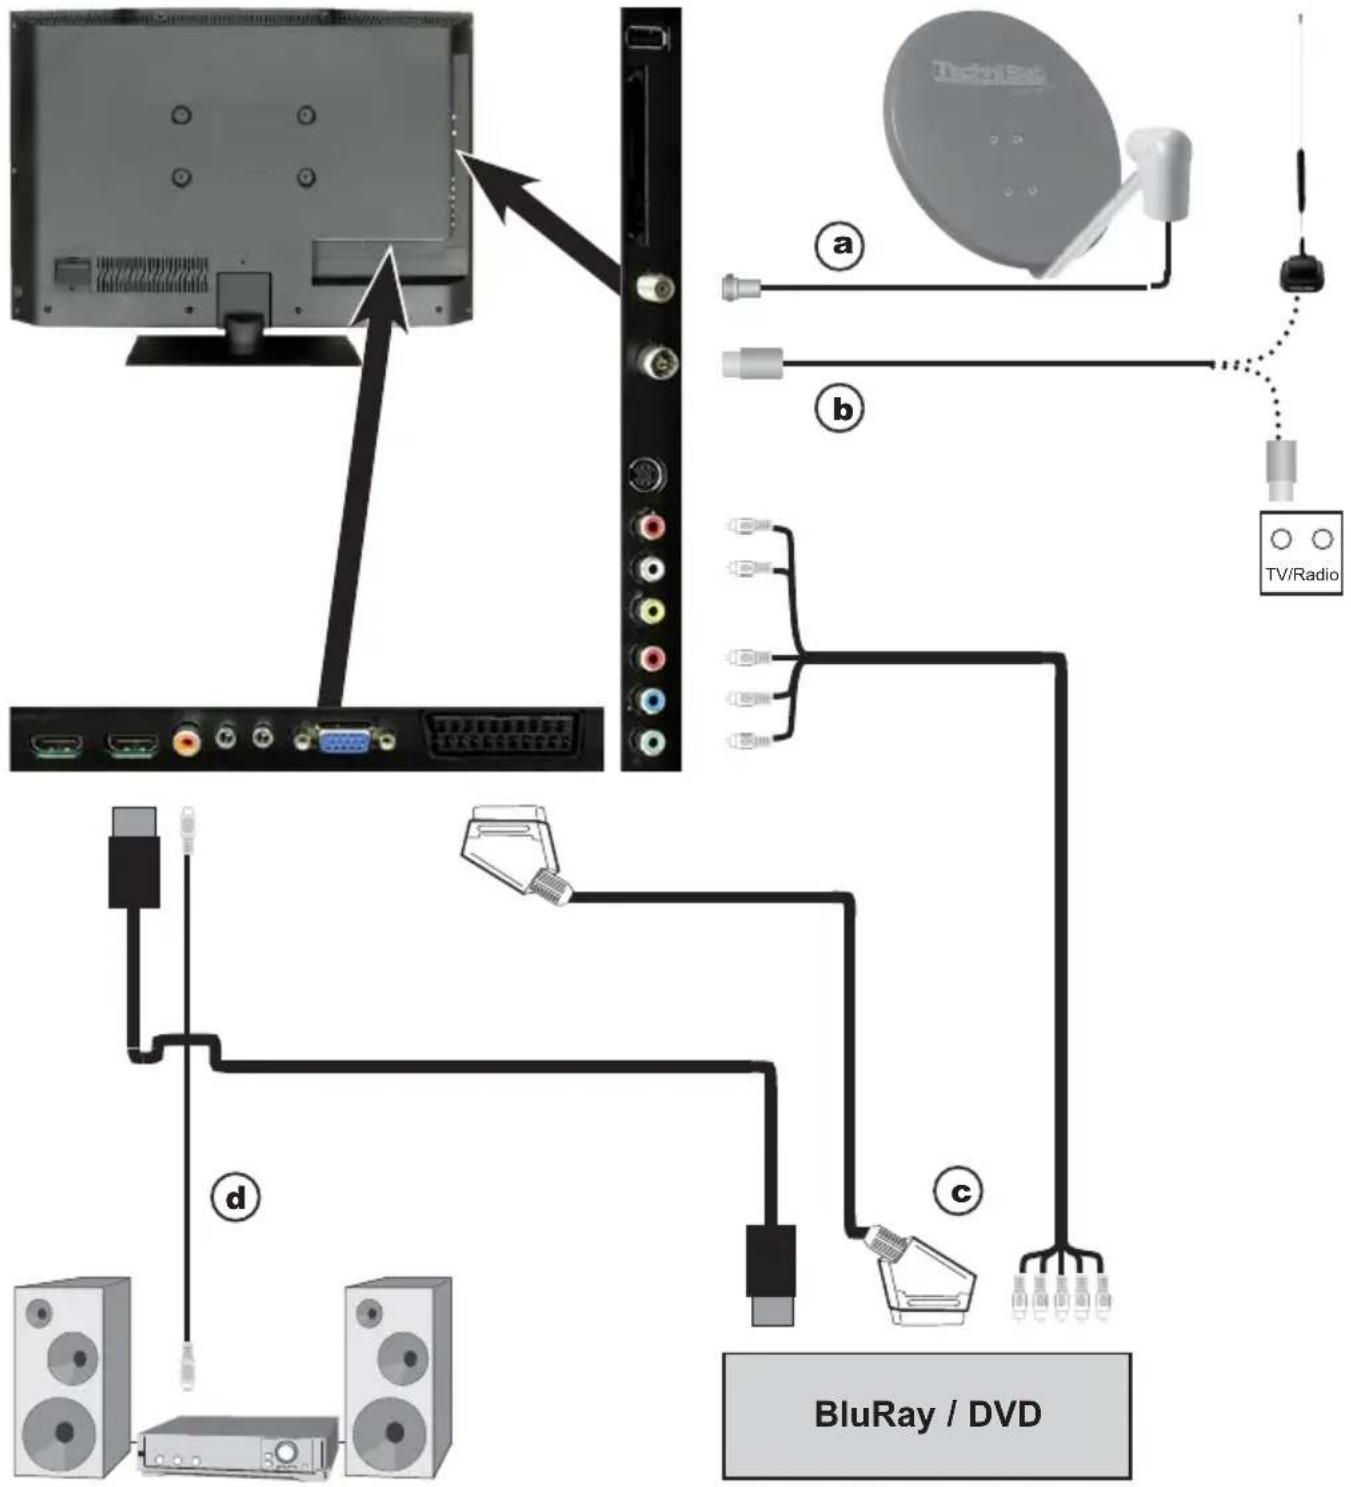
The following references a b c refer to the example connection on page 7.
4.1 Satellite antenna
a Connect LNB input 1 on the TV to your external unit using a suitable coaxial cable.
4.2 Antenna/cable connection (analogue and digital)
b Connect the antenna input for the LCD TV to either a terrestrial antenna or to the connection socket for the cable or antenna connection.
Use the TechniSat DVB C/T Switch (Part No. 0000/3263) for simultaneous reception of DBV-T signals and DVB-C plus analogue cable channels. This switch automatically switches between DVB-T reception and reception of DVB-C and analogue cable channels, thus preventing potentially conflicting frequency influences.
4.3 BluRay/DVD player
c Connect your BluRay/DVD player using an HDMI connection cable with an HDMI connection.
4.4 Surround sound/Hi-Fi amplifier
You can connect the LCD TV to a surround sound or Hi-Fi amplifier to obtain the best possible sound quality.
d If your amplifier has an appropriate electrical input (S/P-DIF), connect the Audio output digital electrical to the input on your amplifier.
Depending on the broadcaster concerned, the stereo signal (PCM) and, where broadcast, Dolby Digital signal (AC3) are available.
4.5 Mains power connection
TechniVision 22 HD
The TV should only be connected to the mains power supply using the adapter after cable connections to the associated components have been fully set up. This will avoid damage to the TV or other components.
Connect the mains adapter pin connector to the DC socket (see page 2 #5).
Then attach the mains cable to the adapter and connect it using a 230 V / 50 Hz plug.
TechniVision 26 / 32 HD
The TV should only be connected to the mains power supply using the adapter after cable connections to the associated components have been fully set up. This will avoid damage to the TV or other components.
To do this, attach the mains cable to the mains power connection (see page 3 #10) and connect it using a 230 V / 50 Hz plug.
5 Basic operation
Dear Customer,
the following section starts by covering basic operation as well as recurring operating steps for the TV. This should make it easier to read the instruction manual, since it avoids repeated description of identical steps at each individual stage.
The so-called "On Screen Display" is used on your television. This simplifies operation of the television since the buttons on the remote control can take on different functions, which makes it possible to reduce the number of buttons.
In this On Screen Display (OSD for short) the selected functions or settings are highlighted. Furthermore, you will see a line at the lower edge of the screen in which the various buttons on the remote control are shown with their current functions.
In this instruction manual the terms shown in the OSD as well as the buttons to be pressed are highlighted from the rest of the text by the display format used.
⚠ Warning - indicates an important note which you absolutely should observe in order to avoid problems with the television, loss of data or unwanted operation.
Tip - indicates a note about the function described as well as other functions associated with it and any others to be observed with reference to the respective place in the instruction manual.
5.1 Switching the television on/off
When the TV is on standby, you can switch it on by pressing the On/Standby button.
When operating normally you can switch the TV to standby mode by pressing the On/Standby button.
When switching the TV on/off, also observe point 7.1 and points 7.1.1 - 7.1.4 as well as the instructions given under these points.
5.2 Calling up the main menu and navigating through the menus /functions
The following example will illustrate how you reach the main menu and call up a submenu. The objective of the example is to call up the Picture settings menu.
Press the Menu button. The main menu appears on the screen.

Select the Settings menu item by moving the highlight over this item using the arrow keys.
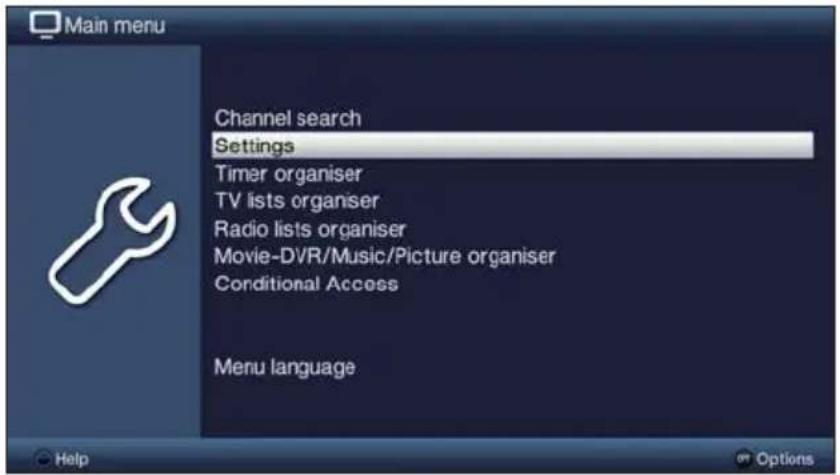
Press the OK button to open the Settings menu.
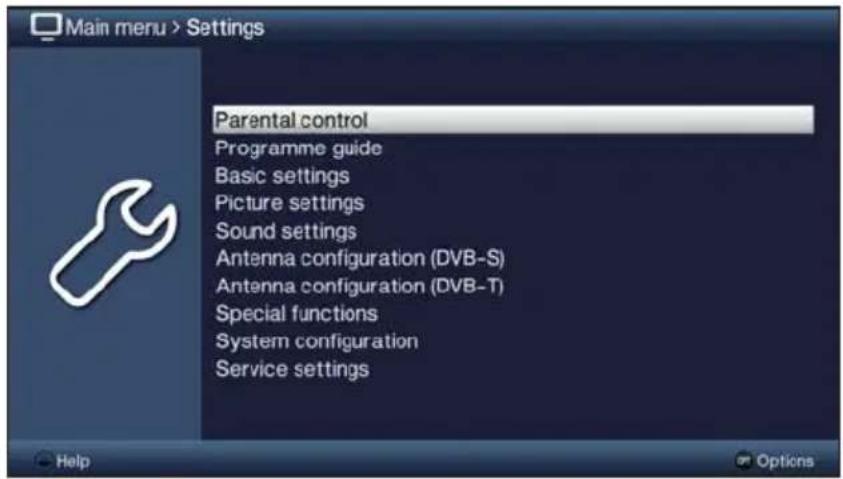
Use the up/down arrow keys to highlight the Picture settings item.
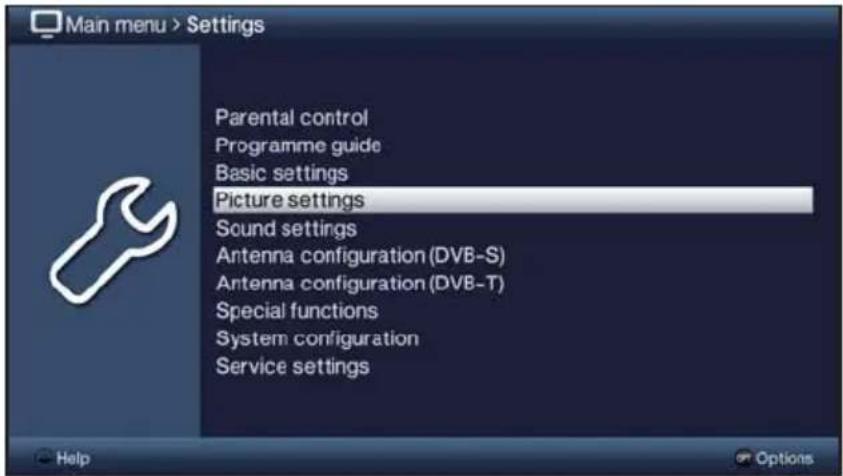
The Picture settings menu is opened by subsequently pressing the OK button.

You can also highlight the individual menu points in the same way as you highlight an item on a submenu to open it and alter the respective settings.
The menu items in some menus have to be highlighted by moving sideways. This is done by pressing the right/left arrow keys.
By pressing the up/down arrow keys it is possible to move the highlight from line to line and to move upwards and downwards page by page using the page up/down buttons.
You will see the so-called menu path in the uppermost line of the menu. This shows you the menu you are currently in and the path you took to reach this menu. In the example shown this is Main menu > Settings > Picture settings. The menu path is also shown throughout the instruction manual and shows you how you can reach the respective menu with the settings described.
If the blue function key with Help is displayed in the bottom line on the screen, a Help page can be displayed by pressing this button and hidden by pressing it again.
5.3 Accepting settings / Exiting menus and functions
In some menus and functions the changes made must be accepted manually in order to save them permanently. If this does not happen, the values that existed before leaving the menu or the function will be reset automatically.
If an Accept field or the green function key with Accept is displayed in the bottom line of the screen, you can see that the changes made must be saved manually to be accepted.
By highlighting Accept using the right/left arrow keys and confirming with the OK button or by pressing on the green function key (Accept), the changes are saved and you return to the next menu level up.
Alternatively:
Press the Back button.
A request appears asking whether the changes you made should be applied.

Use the right /left arrow keys to highlight Yes or No and confirm with the OK button.
According to your selection the changes are now saved or rejected and you return to the next menu level up.
Alternatively:
Press the Menu button to leave the menu directly.
The settings that need to be saved manually will be reset in this case.
If the green function key with Accept is not displayed in the bottom line of the screen, the changes are saved automatically when leaving the menu.
5.4 Changing a setting
You can create settings using the arrow selection method, the selection list, by entering numbers and by using the virtual keyboard. The television dictates the method that can be used to alter a marked setting. You can see this from the following displayed symbols:
- Arrow selection method (Point 5.4.1) Arrows are shown on the left or right edge of the marking.
Selection list (Point 5.4.2) The symbol is shown on the right edge of the marking.
- m Entering numbers (Point 5.4.3)
- 📁 Virtual keyboard (Point 5.4.4) The symbol is shown on the right edge of the highlight.
5.4.1 Arrow selection method
If « is shown on the left and » on the right next to the set value, you can alter this using the left/right arrow keys.
5.4.2 Selection list
If ⏻ is shown on the right next to the set value, the value is changed using the selection list.
Press the OK button to open the selection list.

Highlight the setting you want using the up/down arrow keys.

By pressing the up/down arrow keys it is possible to move the highlight from line to line and to move upwards and downwards page by page using the page up/down buttons.
Confirm by pressing on the OK button. The selection list is closed again and the selected setting is shown in the menu.
5.4.3 Entering numbers
Enter the new setting you want using the numeric keypad key if a question mark or a number value or is shown inside the highlight.
Note the number of digits used in the entry as there must always be the same number used. This means that if a five-digit value is required, for example "10600", but you only wish to set a four-digit value, for example "9750", then you must enter a "0" at the beginning for every unused location. Therefore, in this example, it would be necessary to enter "09750".
5.4.4 Virtual keyboard
If ℚis shown on the right next to the set value, the value is amended using the virtual keyboard. You have three different keyboard options when using this data entry method. You can switch the keyboard layout between the so-called QWERTY keyboard and the alphabetic keyboard; an SMS keyboard can also be used at any time.
The functionality of the QWERTY keyboard is identical to that of the alphabetic keyboard. They only differ in the arrangement of the various letters, numbers, characters and symbols.
Press the OK button to open the virtual keyboard.
The keyboard now appears in the alphabetic format.

You can switch to the QWERTY keyboard and back to the alphabetic keyboard by pressing the Option button.
![News 1 2 3 4 5 6 7 8 9 0 - + q w e r i y u i o p [ ] a s d f g h i k l . # \ z x c v b n m . /](/content/2026/02/378710/images/71ff9b198be0110355c4f7a43fdbd5c4b57e1e7f909e1e93506917ccdb383109.jpg)
You can now enter the term you want as follows.
Arrow keys: Moves the highlight on the keys of the virtual keyboard.
OK:
The highlighted character is added to the end of the term, (the highlighted function is executed.
/ Yellow function key: The keyboard switches between upper case/lower case.
/ Red function key: Pressing/holding down deletes the character in front of the orange highlight/the whole entry.
/ Green function key: The entered term is accepted.
/ Blue function key: The keyboard switches over to the alternative characters.
<|> Moves the orange highlight within the term.
The SMS keyboard is operated using the numeric keypad key on both the alphabetic and the QWERTY keyboard and can be used at any time. Therefore the coloured buttons incorporate the functions described above.
Press one of the numeric pad keys 0 - 9 and select the various letters, numbers, characters and symbols.
The first letter of the respective row of characters is highlighted after first pressing a numeric keypad key.
The highlight then moves one field to the right for every additional press of the same numeric keypad key.
Press as often as necessary to reach the desired character. This will be added to the entered term after a short delay.
The various numeric pad keys are assigned the following displayed letters, numbers, characters and symbols.
0:
1: - 1 + = # & '
2: abc 2 a a a a a c
3: d e f 3 d e d
4: a hi 4 q i i T
5:
6:
7: p q r s 7 b 5 s 6 l
8:
9: w x v z 3 2 2 y 2
Once you have reached the field you want with the highlight, you can then begin selecting the next character immediately since, in this case, the character is directly added to the term.
If you wish to continue directly selecting a character from the same numeric keypad key, you can add the previously highlighted character to the term by pressing the right arrow key.
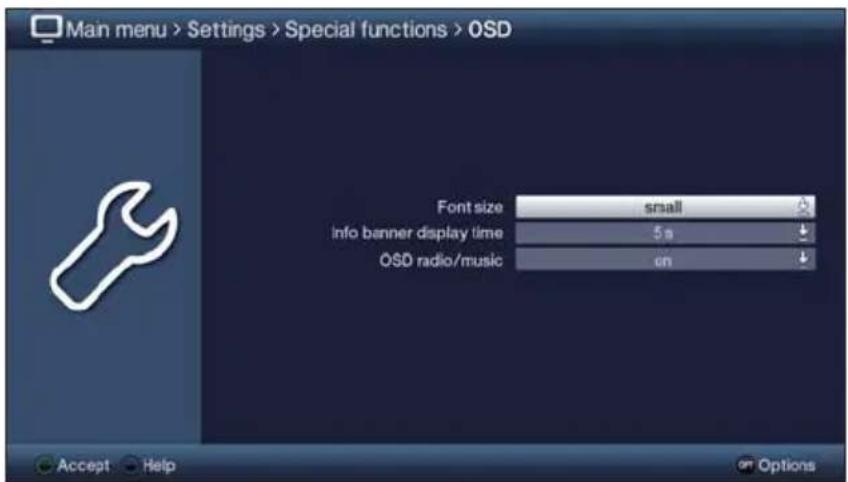
5.5 Option selection
You have the option in some menus and operating modes (e.g. TV mode, music/images playback etc.) to call up additional functions and options using option selection.
Pressing the Option button opens the option selection in the lower right-hand corner of the screen.
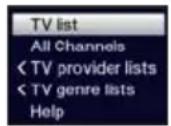
In this example we can see the option selection for the channel list.
Every additional press of the Option button moves the highlight down one line each time.
i Some options are selected directly in this window. Other options for a number of subordinate selection options are located in the option groups. Highlighting one of these option groups automatically opens another window on the left.
You can use the up/down arrow keys within the option group to highlight one of the options listed in there.
By pressing the up/down arrow keys it is possible to move the highlight from line to line and to move upwards and downwards page by page using the page up/down buttons.
The highlighted option is selected by pressing the OK button and you exit the option selection area.
If you do not want to select an option or wish to leave the option selection area without making any changes, simply press the Option button until it is hidden.
6 Initial installation
On initial installation of the TV, the installation wizard starts AutoInstall automatically. Using the installation wizard is the simplest way for you to create the most important settings for your TV.
The initial installation process shown here serves merely as an example. The exact process for the initial installation will depend on the settings you select. Therefore please follow all instructions displayed on screen carefully.
Menu language
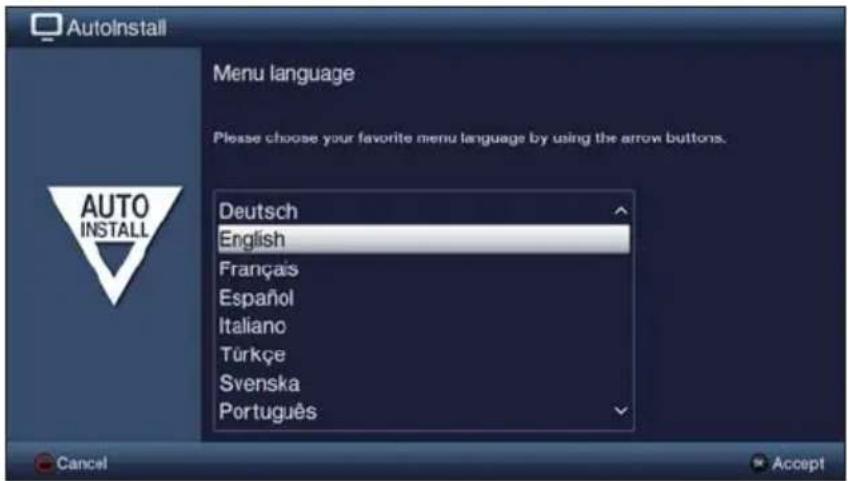
Use the up/down arrow keys to highlight the menu language you want and confirm by pressing the OK button.
i The preferred audio language will be set automatically according to this selection.
Country selection
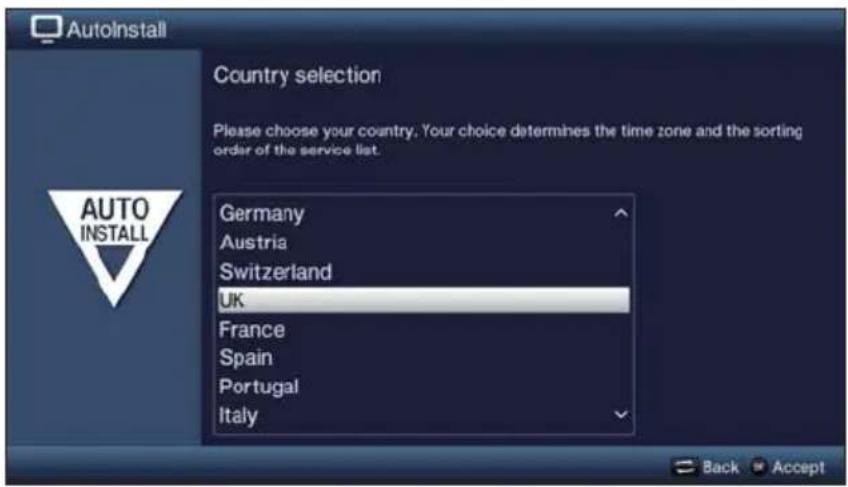
Using the up/down arrow keys select the country in which the television will be operated and confirm by pressing the OK button.
i Automatic setting of the local time as well as changing to summer/winter time will take place based on your selection.
Channels will also be automatically sorted in the installation wizard according to this setting as well following a channel search.
Display mode
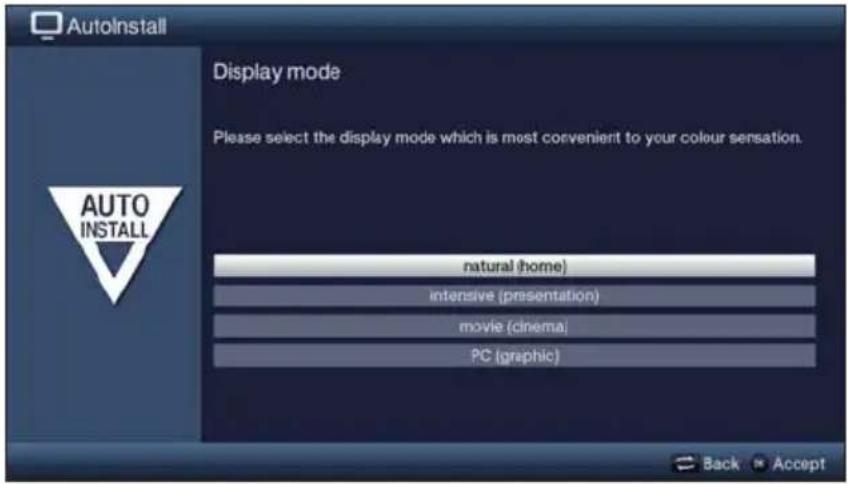
Use the up/down arrow keys to select your preferred display mode and confirm by pressing the OK button.
The values preset by the selected displayed mode can be adjusted as you want after AutoInstall, in the main menu under Settings > Picture settings.
When selecting the intensive display mode, note the message(s) that appear and confirm by pressing the OK button.
Selecting reception signals
Use the up/down arrow keys to select the available reception signals.
DVB-S for digital satellite channels
DVB-C for digital cable channels
DVB-T for digital terrestrial channels;
Analogue CT for analogue terrestrial and cable channels.
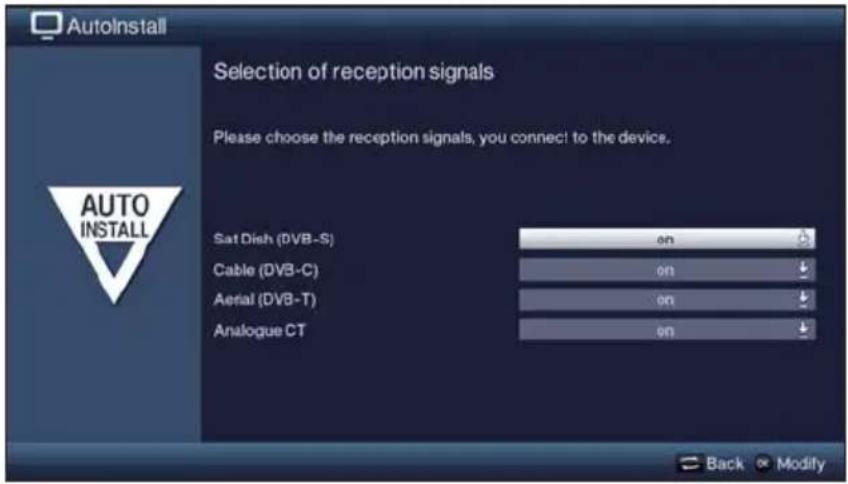
Use the right/left arrow keys to indicate whether you wish to use the highlighted reception signal (On) or not (Off).
Confirm by pressing the OK button.
Antenna configuration (DVB-S)
In this step of the installation you can adjust your TV setup to the configuration of your satellite antenna.
If the DVB-S source has been deactivated, this page of the installation wizard does not appear; you are taken directly to the "Antenna configuration (DVB-T)" page instead.
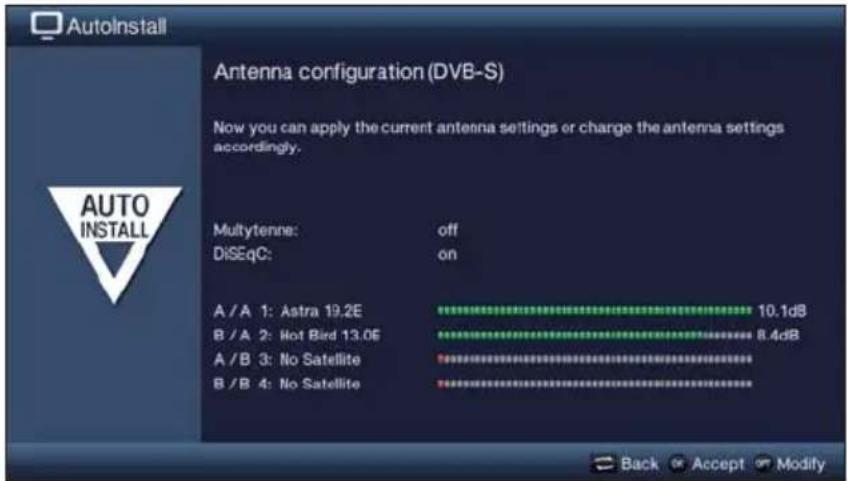
Press the OK button to accept the default antenna setting and continue with the "Antenna settings (DVB-T)" section.
If the configuration of your reception equipment does not match the default setting, you can open the antenna configuration by pressing the Option button and adjust the setting on your reception equipment.
Antenna configuration (DVB-T)
A channel spectrum with the signal levels of the various channels is displayed in this step, in order to align the DVB-T antenna for the best reception.
The "channel search / ISIPRO" appears immediately if DVB-T has been deactivated.
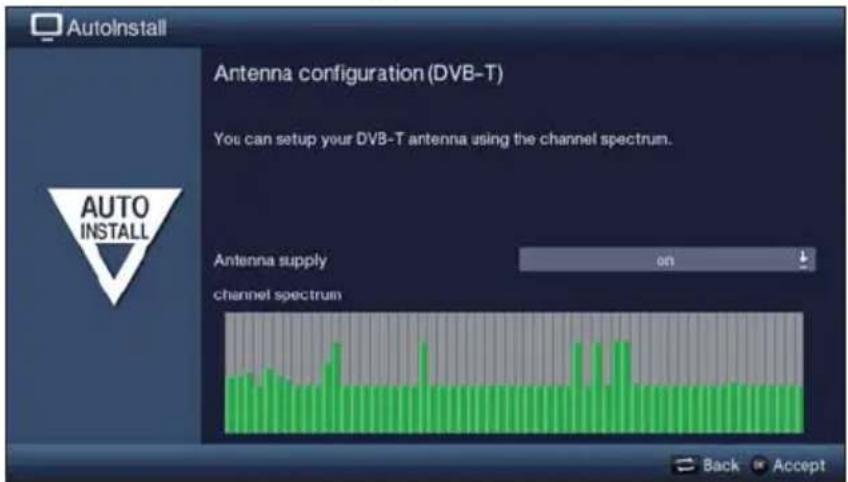
Use the right/left arrow keys to switch the voltage supply on or off.
Press the OK button to accept the setting and access the next stage of the installation wizard.
Channel search / ISIPRO - DVB-S only
You have various options for searching for new channels or updating the channel list. You can use the ISIPRO service list function to download a new satellite channel list for your TV from the satellite or run a channel search.
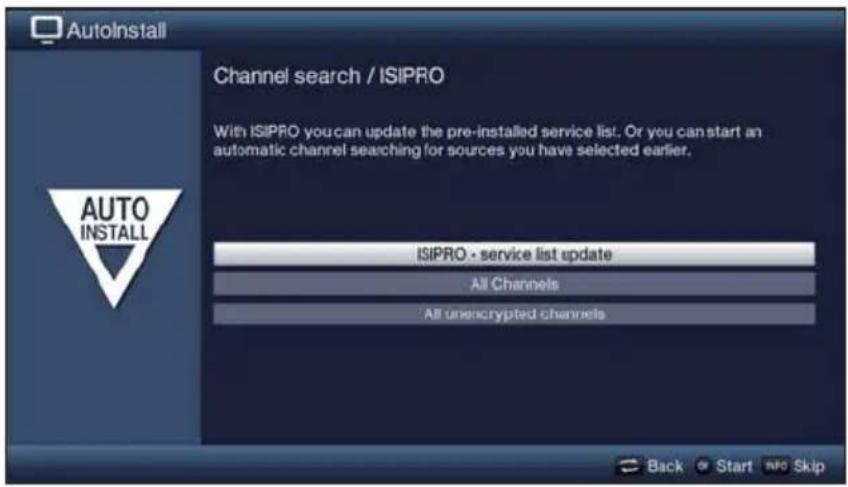
To download the available current channel list, use the up/down arrow keys to highlight the ISIPRO - service list update line and start the process by pressing the OK button.
If instead of updating the channel list you want to run a channel search via satellite, or the DVB-S reception signal has not been configured, use the up/down arrow keys to highlight the All channels or All unencrypted channels field, then start the channel search process by pressing the OK button.
If you do not want to start either the service list update or a channel search, you can skip this step by pressing the Info button.
The ISIPRO - service list update item can only be selected if you have activated the DVB-S source in "Selecting the reception signals". After the service list update, an automatic channel search on all other configured reception sources is then carried out via "All Channels".
When using All channels, free-to-receive and encrypted channels are searched for; when using All unencrypted channels only free-to-receive channels are searched for.
During the channel search the reception areas you have selected area automatically scanned for channels. This procedure may take several minutes. Please note all messages displayed on screen.
If you skip the channel search/service list update, the factory channel list is loaded, as long as DVB-S has been configured in "Selecting the reception signals". In this event no channels for other sources are available. However, you can run a channel search at any time in the main menu under Channel search.
Regional programmes
Some broadcasters transmit channels with varying regional content. On this page you can define your preferences for these regional channels.
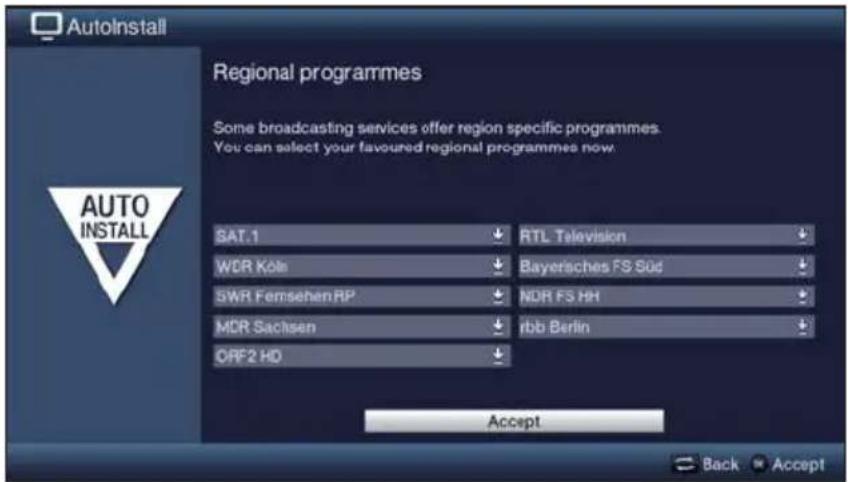
Using the arrow keys highlight the channel provider for the preferred regional programme you wish to set up and select this using the selection list.
If you subsequently select another regional programme for a programme provider as per point 7.2.4, this will be saved in the same way for this programme provider.
Software update
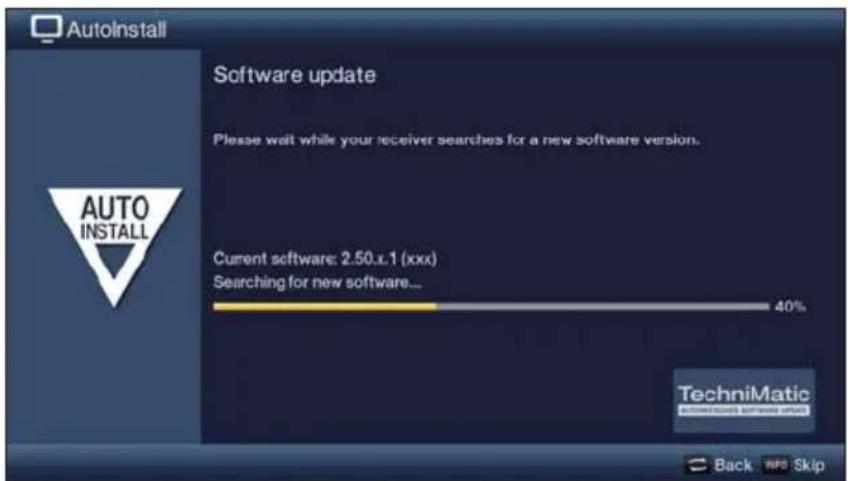
If you do not want to wait for a search for new software or a software download, you can, if necessary, skip this step by pressing the Info button.
If there is no new TV software available, you can press the OK button to go to the next step in the installation wizard.
If, on the other, new TV software is found, the automatic software update can be started by pressing the OK button.
Loading SFI data
Your TV has the SFI (SiehFernInfo) electronic programme guide. To enable the data for the electronic programme guide to be displayed, it must first be downloaded.
To do this, your TV automatically starts downloading the SFI data as soon as any software updating has been completed. This process can take up to 30 minutes.
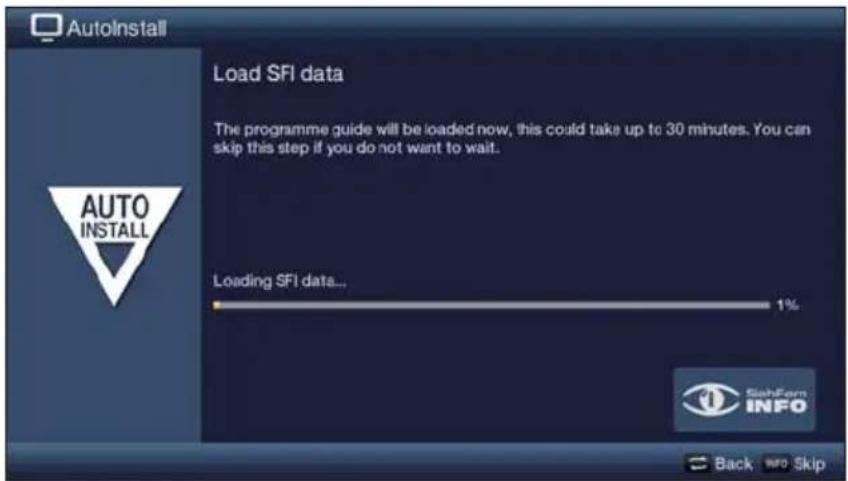
If you do not want to wait for the SFI data to be downloaded, you can skip this process by pressing the Info button.
If the SFI update has been skipped, your TV will download the SFI data automatically at the set time, as long as the function remains activated and the TV is also in standby mode at that moment. Additionally you can run the update manually at any time, in the main menu under Settings > Programme guide.
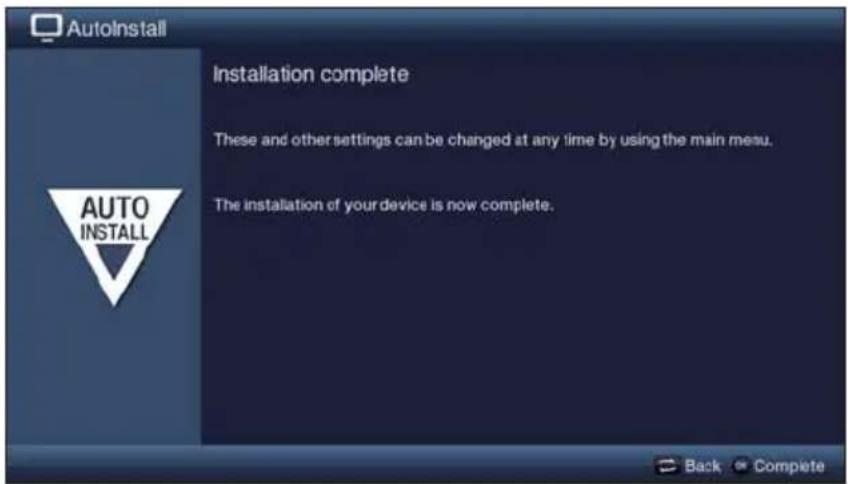
Exiting the installation wizard
Confirm the final message from the installation assistant by pressing the OK button.
7 Operating the unit
7.1 Switching the TV on and off
7.1.1 Switching on using the mains power switch on the TV (only with the TechniVision 26/32 HD)
Switch the TV on by pressing in the mains power switch (see page 3 #9).
The TV now performs an initialisation and cannot be operated during this time. This process takes several seconds to complete.
7.1.2 Switching on from standby mode
Switch the TV on by pressing the On/Standby button or the Channel +/- keys or a numeric key between 0 and 9 on the remote control.
The operating mode is displayed by the green LED, where this is activated in the main menu under Settings > Basic settings.
If the user-dependent parental control (TechniFamily) is activated, the user selection now appears as per point 7.1.3 in the quick start manual.
7.1.3 Switching off to standby mode
Switch the TV off by pressing the On/Standby button.
When switching off the TV, please note that a check takes place as to whether a new operating software version or channel list is available. This process takes several seconds to complete. The LCD panel is already switched off during the test.
The device switches completely into standby mode after completion of the test. The TV is now in standby mode and can be completely switched off using the mains power switch. The LED lights up red in standby mode or the time appears in the display, where this is activated in the main menu under Settings > Basic settings.
7.1.4 Switching off using the mains power switch on the TV (only with the TechniVision 26/32 HD)
The television is switched off completely by pressing the mains power switch.
If this is the case, neither automatic software and SFI data updates nor recording or alarms will function.
The TV notes the last 'On' or 'Off' switching status entered using the remote control. If the TV was switched off at the mains power switch during operation, it is switched straight back to standby mode by pressing the mains power switch.
⚠️ If a power failure took place during operation, you should switch off the television using the mains power switch so that it is not switched on again unintentionally as soon as the power is available again.
7.2 Selecting a channel
7.2.1 Using the channel up/down buttons
You can switch between channels one at a time using the Channel +/- buttons on the remote control or on the TV.
7.2.2 Using the numeric pad keys
Use the numeric keypad keys to enter the number of the channel you want.
For example:
1 for channel slot 1
1, then 4 for channel slot 14
2, then 3, then 4 for channel slot 234
1, then 2, then 4, then 5 for channel slot 1245
When entering channel numbers with several digits, you have approx. three seconds after pressing a key to complete the entry.
If you wish to enter a one, two or three-digit number, you can accelerate the switching process by holding down the last digit for longer, or by pressing the OK button.
7.2.3 Using the channel list
Press the OK button.
The TV channel list appears in television mode and the radio channel list in radio mode. The channel currently selected is highlighted.
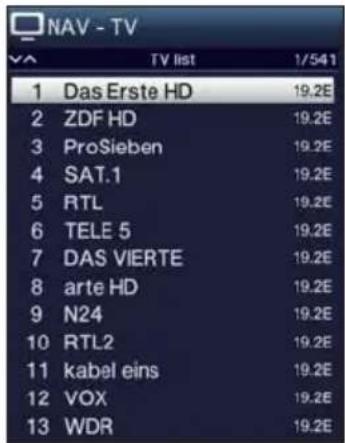
You can view additional data about the current programme by pressing the INFO button.
7.2.3.1 Selecting the channel
You can now highlight the channel you want using the up/down arrow keys, the page up/down keys and the numeric keypad keys.
Exit the Navigator by the pressing the OK button; the highlighted channel is displayed on the screen.
7.2.3.2 Selecting a list
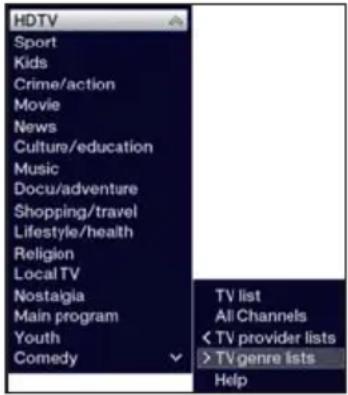
To make it easier for you to find channels, your receiver provides various channel lists. You can select your favourites lists or display the channels sorted alphabetically from the list of all channels, the TV provider lists or according to genre.
Press the OK button to open the active channel list.
You can now use the option selection to select the channel list you want (favourites lists, the list of all channels, TV provider lists and genre lists).
Highlight the channel you want to watch as described under point 7.2.3.1 in the quick start manual and confirm by pressing the OK button.
7.2.4 Selecting a regional programme
During the initial installation you selected your preferred regional programmes. If you now pick one of these regional programmes, a note appears stating that further regional programmes are available for selection.

Using the option selection you can select between the various regional programmes under the Region item.
The selected regional programme is now stored as a preferred regional programme from this programme provider.
7.2.5 Switching between TV/radio
You can use the TV/Radio button to switch between TV and radio mode.
i The TV switches to the last radio channel listened to.
Alternatively you can also switch between TV and radio operation as described under point 7.3 in the quick start manual.
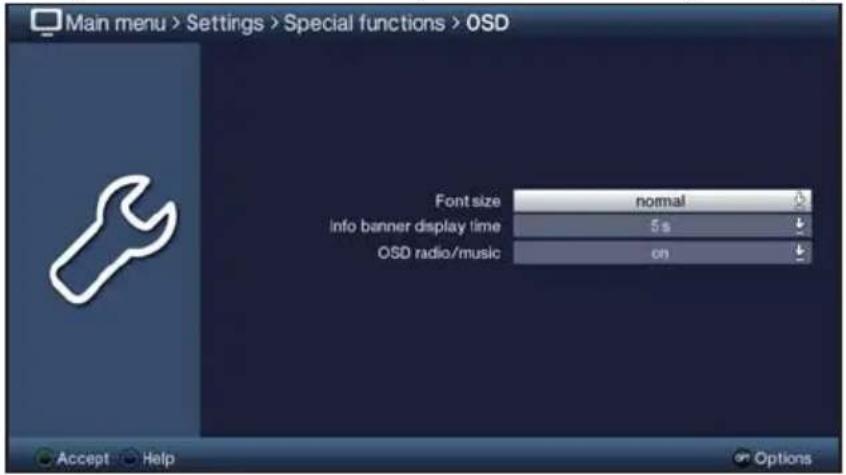
To do this also note the setting for OSD Radio/Music in the main menu under Settings > Special Functions > OSD.
7.3 AV source
Press the AV button to open the AV sources selection window to select a device connected to the HDMI inputs (HDMI 1/2), component input (YPbPr), Scart socket (EuroAV), VGA port (VGA), video port (Video) or S-Video port (S-Video).
Select the source you want using the up/down arrow keys and confirm by pressing the OK button to switch over to the selected input.
To do this also note points 7.2.1 and 7.2.3 in the quick start manual.
7.4 Channel/source information
7.4.1 Infobox
An Infobox appears on the screen for the set period every time you change channels.

The channel slot and name as well as the source of the channel selected, the channel list in which the channel is located and the title of the current programme with the start/end time and the progress bar, as well as further channel information (e.g. Text for teletext, 16:br 16:9 transmissions, or subtitles, encrypted channels or for Dolby Digital broadcasts) are shown in this Info box.
The progress bars are coloured yellow according to the amount of transmission time already expired for the current programme. If the beginning of the progress bar is coloured red the transmission started too early and if the end of the progress bar is coloured red the current programme has overrun.
i The current time is shown in the upper right-hand corner of the screen.
7.4.2 Displaying the clock and channel information
This function allows you to see channel information about the channel being watched.
Pressing the Info button allows the information mentioned in point 7.4.1 of the quick start manual to be displayed again for the set period.
7.5 Receiving encrypted channels
Insert a Cl-/Cl+- module with the upper side pointing to the rear in the slot.
Insert the smartcard into the CI / CI+ module card slot.
7.5.1 Smartcard PIN code
With encrypted channels, programmes that are not suitable for children can be pre-blocked by means of a parental control code/symbol. To unblock the specific programme it is necessary to enter the Smartcard PIN code stored on the Smartcard.
To release the programme use the numeric keypad keys to enter the 4-digit Smartcard PIN code.
7.6 Volume control
After switching on the television sound is produced according to the power-on volume set using the sound settings menu.
To adjust the volume of your TV, press Volume + to increase the volume, and Volume - to decrease it.
7.6.1 Using mute
To switch the sound off (mute), press the Sound on/off button - press the key again to switch the sound back on.
7.6.2 Headphone volume
While the sound is muted it is possible to operate the Volume + and Volume - rocker keys to adjust the headphones volume.
7.7 Selecting a different language / sound option
For some channels you have the option of selecting a different sound option (Dolby Digital, Stereo or Audio Channel 1 or Audio Channel 2) or another language.
Using option selection you can select the language/sound option you want via the Audio option.
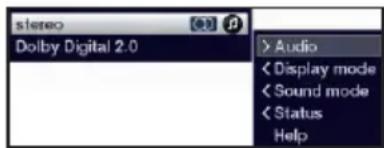
If A is displayed in the highlight, you can press the Audio channel button to switch between Stereo (CD), Audio channel 1 and Audio channel 2 playback.
7.8 Display mode
You can use the display mode selection option to switch between the preset display modes during actual operation: natural (home use), intensive (for presentations), film (cinema) and PC (graphics), as well as the fully customisable user-defined display mode.
You can select the display mode you want using option selection under the Display mode menu item.
7.9 Subtitles
When switching to a programme being broadcast with subtitles, the subtitles symbol appears in the Info box.
Using the option selection, under the Subtitles menu item, you can select subtitles when you want to display them.
7.10 Teletext
Your TV can display teletext information on channels that broadcast teletext data. This is displayed by the symbol in the Info box.
7.10.1 Switching teletext on/off
Press the Teletext button to switch on teletext for the currently selected channel along with its overview page.
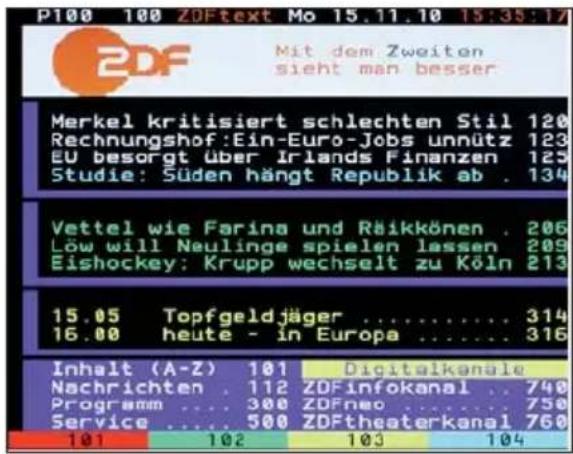
You can exit teletext by pressing the Teletext button again.
7.10.2 Page selection
Use the numeric keypad keys 0 to 9 to enter the 3-digit page number of the teletext page you want.
Press the red, green, yellow or blue function keys to call up the teletext page displayed in it.
7.11 Format switchover / Zoom
By pressing the Zoom/Format key you can switch between the various predefined formats (original, optimum, optimum 16:9, full zoom and stretch).
i The display format selected is displayed at the lower edge of the screen.

To hide the format switching screen, press the Back button.
7.12 Freeze frame
The television picture is displayed as freeze frame by pressing the Freeze frame button.
Freeze frame is ended by pressing this button again; normal playback appears on the television screen again.
The sound will continue to be reproduced normally during freeze frame.
7.13 Sleep timer
You can set the switch-off time of your TV using the sleep timer.
You can set the sleep timer by pressing the Sleep timer button multiple times (15 minutes to 2 hours), or switch it off.
i You will see a display on the screen depending on the setting.

7.14 Function Selection
You can open the Navigation menu (NAV menu) to select the function you want by pressing the function selection button.
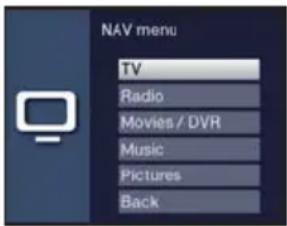
TV TV mode: Internal receiver and external connections.
Radio Radio mode: Internal receiver and external connections.
Movies/DVR Movies/DVR Navigator: Access MPEG2 titles, VOB, TS or TS4 files stored on a device connected to the USB port.
Music Music navigator: Access MP3 titles stored on an attached USB device and available radio DVR recordings.
Pictures Pictures navigator: Access JPG files stored on an attached USB device.
When doing this please also note points 7.16 and 10.8 in the instruction manual.
7.15 SFI programme information guide
Your TV has "SiehFern Info" electronic programme information. You can use this to display programme information for a single or a number of digital channels on the screen and to obtain a very quick overview of the current programmes, or programmes being broadcast that day, or on the following days.
Press the SFI button to call up the electronic programme guide.
The electronic programme guide is displayed, using the selected start category. The Overview start category is selected in the factory settings.
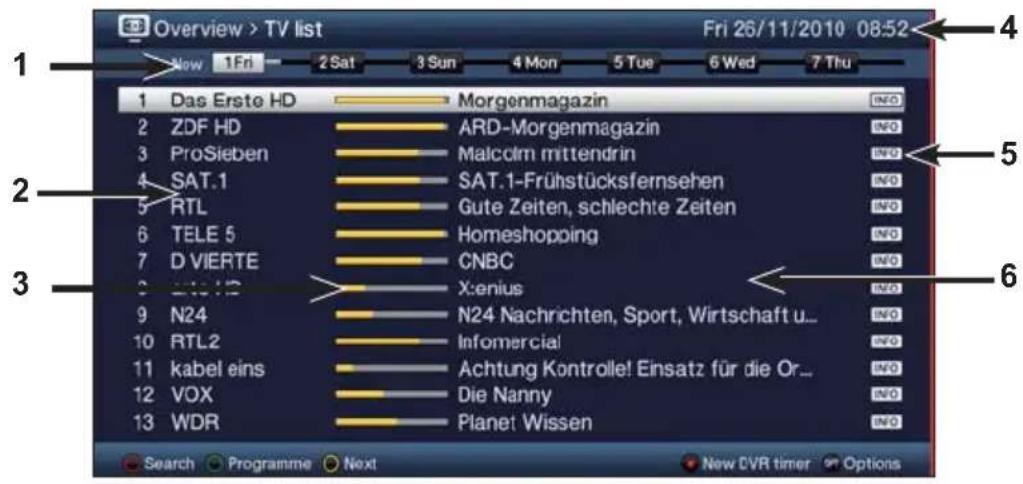
1 Viewing time > indicates when programmes are to be shown. Time line > a graphical display of the viewing time in the form of progress bars.
2 Channel name with the corresponding channel slot within the active favourites list.
3 Progress bars or the start/stop time of the programme being shown.
4 The current date and the time.
5 Shows that there is further information available about the broadcast.
6 Programmes on the channel being shown.
You can access the various SFI views and functions using the option selection as well as via the assigned function key located at the lower edge of the screen.
You can switch the display time back and forth or move the highlight using the right/left arrow keys, the up/down arrow keys and the page up/down buttons.
You can exit the electronic programme guide again by pressing the SFI button.
8 Operating the DVR
The DVR function (DVR=Digital Video Recorder) means you no longer have to use an external recorder (e.g. video or DVD recorder) to record programmes, as you can use this function to record them to an attached USB storage device.
The recording capacity thus depends on the volume of data in the broadcast material and the size of the attached storage medium.
i DVR recordings of channels from DVB-S, DVB-C and DVB-T sources can be made.
To do this be absolutely sure to observe the notes and settings under point 8 in the quick start manual.
8.1 DVR recording
The following recording modes are available for DVR recording:
1. Instant recording
Select this type of recording to immediately record the programme currently being broadcast at the push of a button.
2. Timer-controlled recording
This function is used to ensure that your television is switched on and off again for the selected broadcast to make a recording, for example when you are out. You can do this by programming the timer either manually or automatically, using the SFI.
3. Timeshift recording
Timeshift recording enables time-shifted TV viewing. You can start to play back a programme while it is still recording (= time-shifting).
8.1.1 Instant recording
Switch on the channel/source you want to record and press the Record button to record the current programme.
The programme will continue to be played on the screen while the recording is running.
Press the Pause / Playback button to play back the current programme from a particular point.
To continue playing back the programme from this point, press the Pause / Playback button again.
8.1.2 TimeShift recording
If you are watching a programme and are interrupted, for example, by a telephone call, you can press the Pause / playback button to pause the programme and to start recording it at the same time.
To continue playing back the programme from this point, press the Pause / Playback button again.
You are now watching the programme with a time delay to the live broadcast (Timeshift), while the programme continues to be recorded in the background.
8.1.3 Ending manual recording
Pressing the Stop button causes an enquiry to appear as to whether the recording should be saved or discarded.
Select Save to save the recording, or Discard not to save the recording, or Back to continue with the recording.
8.1.4 Ending recording automatically
Pressing the record button causes a window to open containing all available functions.
You can, for example, select +1 hour for which the TV should continue to record the channel and then automatically stop recording.
8.1.5 Timer recordings
You can use the DVR timer to automatically record programmes to an attached USB storage device when you are out, for example. To do this, timers can be programmed in the main menu under Timer organiser.
8.2 DVR playback
You can access your DVR recordings using the DVR Navigator.
8.2.1 Calling up the DVR Navigator / Starting DVR playback
Depending on whether you are in TV or radio mode, a list appears with all the TV or radio recordings present on an attached USB storage medium.
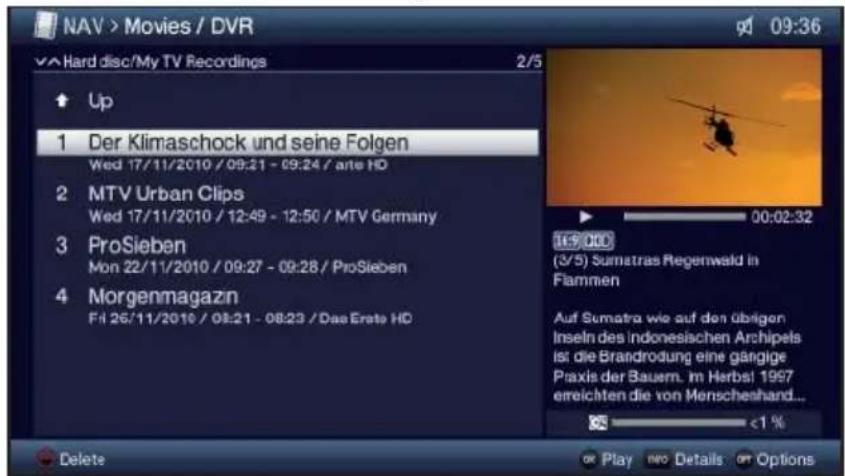
You can access the DVR Navigator by either pressing the DVR mode key or selecting the Movies / DVR menu item in the function selection and then selecting the My Recordings folder.
Highlight the recording you want and confirm with OK to begin playback.
The broadcast information can be displayed and hidden by repeatedly pressing the Info button.
8.2.2 Pause/freeze frame
To pause playback of a recording (Freeze frame), press the Pause / Play button during playback.
Press this button again to resume playback.
8.2.3 Fast forward/rewind
Your DVR has fast forward/rewind functions so you can get to a specific place in a recording.
Press the Fast forward or rewind button during playback. ▶▶ or ◀◀ appears in the previously mentioned small Infobox. The recording is played back at 4x speed in the selected direction.
If you press the Fast forward or Fast rewind button again, the speed will increase to 16x and the message “▶▶▶” or “◀◀◀” appears.
If you press the Fast forward or Fast rewind button again, the speed will increase to 64x and the message “▶▶▶▶” or “◀◀◀◀” appears.
Pressing the Fast forward or Fast rewind button again causes you to jump forwards or backwards in 10 minute increments.
When you get to the place you want in the recording, you can return to normal playing mode by pressing the Play / Pause button.
8.2.4 Jogshuttle function
To quickly and accurately navigate to a position in the recording, your receiver also has a 'jog shuttle' function. This is used as follows:
During playback press the Jogshuttle button (freeze frame) to access jogshuttle mode.
Playback of the recording is halted (freeze frame) and “▶II” is displayed in the Infobox.
8.2.5 Skipping to tags
During playback you have the option of navigating directly to locations in the recording where you have set tags.
Using the option selection under the Tag menu item, select the tag to skip to the location you want in the recording.
8.2.6 Ending playback
Press the Stop button to end playback.
Playback will end and your TV will return to TV mode. In doing so the television "notices" the place in the recording where playback ended. If you start playing this recording back again, it will automatically resume at the point where you previously left off.
Your receiver bears the CE symbol and complies with all requisite EU standards.
Subject to change for amendments and printing errors Version 01/11
Duplication and reproduction only with the publisher's approval
TechniVision 22 HD, TechniVision 26 HD, TechniVision 32 HD and TechniSat are registered trademarks of
(0.14 Euro/min. on a German landline, up
0.42 Euro/min. for a mobile phone.)
After 7pm and at weekends and on public holidays
0900-3 TECHNISAT (+49 900-3 832464728)
(0.62 Euro/min.)
TechniSat
TechniVision 22/26/32 HD

natural_image
Front view of a black electronic TV with a digital display showing 20:15, no visible text or symbols on the screen or podium.1 Illustrations
(raccordements, fixation, cache)
(raccordements, cache)
TechniVision 22/26/32 HD

natural_image
Front view of a black electronic TV with a digital display showing 20:15, no visible text or symbols on the screen or podium.1 Figuras
TechniVision 26/32 HD
(conexiones, tapa)
natural_image
Back view of a computer monitor showing external port and cable connector (no text or symbols visible)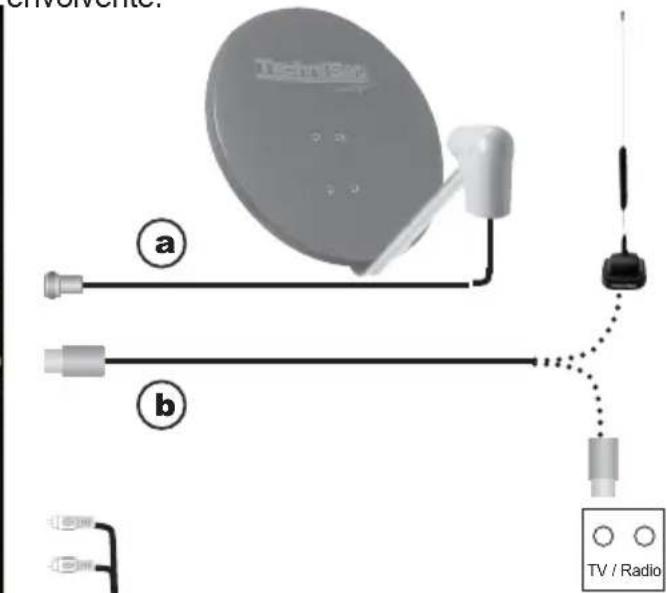

TechniVision 22/26/32 HD

natural_image
Front view of a black electronic TV with a digital display showing '20:15' and 'Touchris Bits' logo (no readable text beyond branding)1 Immagini
TechniVision 22/26/32 HD

natural_image
Front view of a black electronic TV with a digital display showing 20:15, no visible text or symbols on the screen or podium.1 Afbeeldingen
TechniVision 22/26/32 HD
natural_image
Front view of a black electronic TV with a digital display showing 20:15, no visible text or symbols on the screen or podium.1 Ilustracje
TechniVision 22/26/32 HD

natural_image
Black electronic TV with a digital display showing 20:15, no visible text or symbols on the screen or podium.1 Obrázky
4.4 Zesilovač HiFi/Surround
TechniVision 22/26/32 HD

natural_image
Black electronic TV with a digital display showing 20:15, no visible text or symbols on the screen or podium.1 ábrák
Your receiver bears the CE symbol and complies with all requisite EU standards.
Subject to change for amendments and printing errors Version 01/11
Duplication and reproduction only with the publisher's approval
TechniVision 22 HD, TechniVision 26 HD, TechniVision 32 HD
and TechniSat are registered trademarks of
(0.14 Euro/min. on a German landline, up
0.42 Euro/min. for a mobile phone.)
After 7pm and at weekends and on public holidays
0900-3 TECHNISAT (+49 900-3 832464728)
(0.62 Euro/min.)


- TechniVision 22/26/32 HD
- Illustrations
- Rear of TV
- TechniVision 22 HD
- (connections, attachment, cover)
- TechniVision 26/32 HD
- (connections, cover)
- Please read this first
- Dear customer,
- Remote control
- Changing the battery
- Remote control code
- Connecting
- Satellite antenna
- Antenna/cable connection (analogue and digital)
- BluRay/DVD player
- Surround sound/Hi-Fi amplifier
- Mains power connection
- TechniVision 26 / 32 HD
- Basic operation
- Switching the television on/off
- Calling up the main menu and navigating through the menus /functions
- Accepting settings / Exiting menus and functions
- Changing a setting
- Arrow selection method
- Selection list
- Entering numbers
- Virtual keyboard
- Option selection
- Initial installation
- Display mode
- Selecting reception signals
- Antenna configuration (DVB-S)
- Antenna configuration (DVB-T)
- Channel search / ISIPRO - DVB-S only
- Regional programmes
- Software update
- Loading SFI data
- Exiting the installation wizard
- Operating the unit
- Switching the TV on and off
- Switching on using the mains power switch on the TV (only with the TechniVision 26/32 HD)
- Switching on from standby mode
- Switching off to standby mode
- Switching off using the mains power switch on the TV (only with the TechniVision 26/32 HD)
- Selecting a channel
- Using the channel up/down buttons
- Using the numeric pad keys
- Using the channel list
- Selecting the channel
- Selecting a list
- Selecting a regional programme
- Switching between TV/radio
- AV source
- Channel/source information
- Infobox
- Displaying the clock and channel information
- Receiving encrypted channels
- Smartcard PIN code
- Volume control
- Using mute
- Headphone volume
- Selecting a different language / sound option
- Display mode
- Subtitles
- Teletext
- Switching teletext on/off
- Page selection
- Format switchover / Zoom
- Freeze frame
- Sleep timer
- Function Selection
- SFI programme information guide
- Operating the DVR
- DVR recording
- Instant recording
- Timer-controlled recording
- Timeshift recording
- Instant recording
- TimeShift recording
- Ending manual recording
- Ending recording automatically
- Timer recordings
- DVR playback
- Calling up the DVR Navigator / Starting DVR playback
- Pause/freeze frame
- Fast forward/rewind
- Jogshuttle function
- Skipping to tags
- Ending playback
- TechniSat
- (raccordements, fixation, cache)
- (raccordements, cache)
- Figuras
- (conexiones, tapa)
- Immagini
- Afbeeldingen
- Ilustracje
- Obrázky
- Zesilovač HiFi/Surround
- ábrák
Brand : TECHNISAT
Model : TechniVision 26 HD
Category : TV