
DVDLV57 - DVD player PANASONIC - Free user manual and instructions
Find the device manual for free DVDLV57 PANASONIC in PDF.
| Product Type | Portable DVD player with LCD screen |
| Brand | Panasonic |
| Model | DVD-LV57 |
| Dimensions (W x D x H) | 154 x 148 x 43 mm |
| Weight | 499 g |
| Power Supply (AC) | AC adapter 100-240 V, 50/60 Hz |
| Battery Power | Rechargeable lithium-ion battery pack (CGR-H601) |
| Battery Life | Approx. 5 hours (screen open, brightness -5) |
| Screen | 5-inch (12.7 cm) TFT color LCD screen |
| Compatible Discs | DVD-Video (region 1 or ALL), CD Audio, CD Video, CD-R/RW (MP3, CD-DA, Video CD) |
| Video Formats | NTSC |
| Video Outputs | Mini composite video jack, mini S-Video jack |
| Audio Outputs | Mini stereo jack, optical digital audio output |
| Special Features | Programmed playback, random, resume, markers, virtual surround sound (V.S.S.), parental control |
| Remote Control | Infrared remote control with CR2025 button cell |
| Child Lock | HOLD switch |
| Maintenance and Cleaning | Soft dry cloth; lens cleaner recommended (SZZP1038C) |
| Safety | Class 1 laser; avoid exposure to moisture and shocks |
| Spare Parts | Battery CGR-H601, CR2025 battery, AC adapter N0JZEH000001, remote control N2QAHC000007 |
| General Information | Manufactured under license from Dolby Laboratories; Macrovision anti-piracy technology |
Frequently Asked Questions - DVDLV57 PANASONIC
User questions about DVDLV57 PANASONIC
0 question about this device. Answer the ones you know or ask your own.
Ask a new question about this device
Download the instructions for your DVD player in PDF format for free! Find your manual DVDLV57 - PANASONIC and take your electronic device back in hand. On this page are published all the documents necessary for the use of your device. DVDLV57 by PANASONIC.
USER MANUAL DVDLV57 PANASONIC
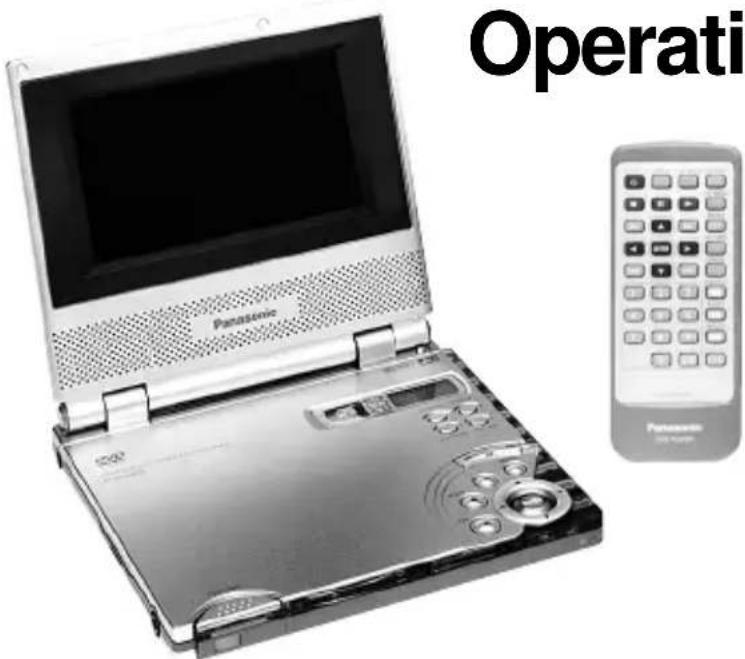
Operating Instructions
Model No. DVD-LV57
PalmTheater

PRINTED WITH SOYINK
This manual was printed with soy based ink.


■Region number supported by this unit
Region numbers are allocated to DVD players and software according to where they are sold.
- You can play DVDs marked with labels containing "1" or "ALL".
Read the disc's instructions carefully.
Example:


Dear customer
Thank you for purchasing this product.
For optimum performance and safety, please read these instructions carefully.
Before connecting, operating or adjusting this product, please read these instructions completely. Please keep this manual for future reference.
For U.S.A. Only
The servicenter list and warranty can be found on pages 45 and 46.
WARNING:
TO REDUCE THE RISK OF FIRE, ELECTRIC SHOCK OR PRODUCT DAMAGE, DO NOT EXPOSE THIS APPARATUS TO RAIN, MOISTURE, DRIPPING OR SPLASHING AND THAT NO OBJECTS FILLED WITH LIQUIDS, SUCH AS VASES, SHALL BE PLACED ON THE APPARATUS.
CAUTION!
THIS PRODUCT UTILizes A LASER. USE OF CONTROLS OR ADJUSTMENTS OR PERFORMANCE OF PROCEDURES OTHER THAN THOSE SPECIFIED HEREIN MAY RESULT IN HAZARDOUS RADIATION EXPOSURE. DO NOT OPEN COVERS AND DO NOT REPAIR YOURSELF. REFER SERVICING TO QUALIFIED PERSONNEL.
CAUTION:
Use only Panasonic car adaptor DY-DC95.
The following mark and symbols are located on the bottom of the unit.

CAUTION
RISK OF ELECTRIC SHOCK DO NOT OPEN

CAUTION: TO REDUCE THE RISK OF ELECTRIC SHOCK, DO NOT REMOVE SCREWS. NO USER-SERVICEABLE PARTS INSIDE. REFER SERVICING TO QUALIFIED SERVICE PERSONNEL.

The lightning flash with arrowhead symbol, within an equilateral triangle, is intended to alert the user to the presence of uninsulated "dangerous voltage" within the product's enclosure that may be of sufficient magnitude to constitute a risk of electric shock to persons.

The exclamation point within an equilateral triangle is intended to alert the user to the presence of important operating and maintenance (servicing) instructions in the literature accompanying the appliance.
CAUTION VISIBLE AND INVISIBLE LASER ATTENTION RADIATION WHEN OPEN. DO NOT STARE INTO BEAM.
-RAYONNEMENT LASER VISIBLE ET INVISIBLE EN CAS D'OUVERTURE. NE PAS REGARDER DANS LE FAISCEAU.
(Bottom of product)
THE FOLLOWING APPLIES ONLY IN THE U.S.A. CAUTION:
This equipment has been tested and found to comply with the limits for a Class B digital device, pursuant to Part 15 of the FCC Rules. These limits are designed to provide reasonable protection against harmful interference in a residential installation. This equipment generates, uses and can radiate radio frequency energy and, if not installed and used in accordance with the instructions, may cause harmful interference to radio communications. However, there is no guarantee that interference will not occur in a particular installation. If this equipment does cause harmful interference to radio or television reception, which can be determined by turning the equipment off and on, the user is encouraged to try to correct the interference by one or more of the following measures:
- Reorient or relocate the receiving antenna.
- Increase the separation between the equipment and receiver.
- Connect the equipment into an outlet on a circuit different from that to which the receiver is connected.
- Consult the dealer or an experienced radio/TV technician for help.
Any unauthorized changes or modifications to this equipment would void the user's authority to operate this device. This device complies with Part 15 of the FCC Rules. Operation is subject to the following two conditions: (1) This device may not cause harmful interference, and (2) this device must accept any interference received, including interference that may cause undesired operation.
Open this page while reading the instructions so you can see where the controls are.
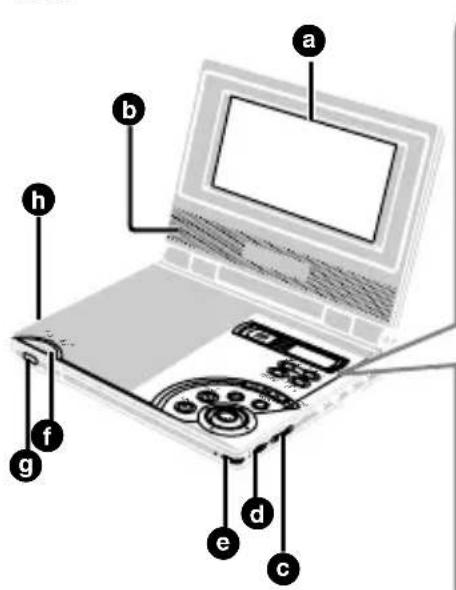
Main Unit
5-inch wide screen LCD
Stereo speakers
Volume [VOL] dial
[HOLD] switch Standby [] indicator
Disc lid [PUSH OPEN] button
Remote control signal sensor
Headphone [O] jack
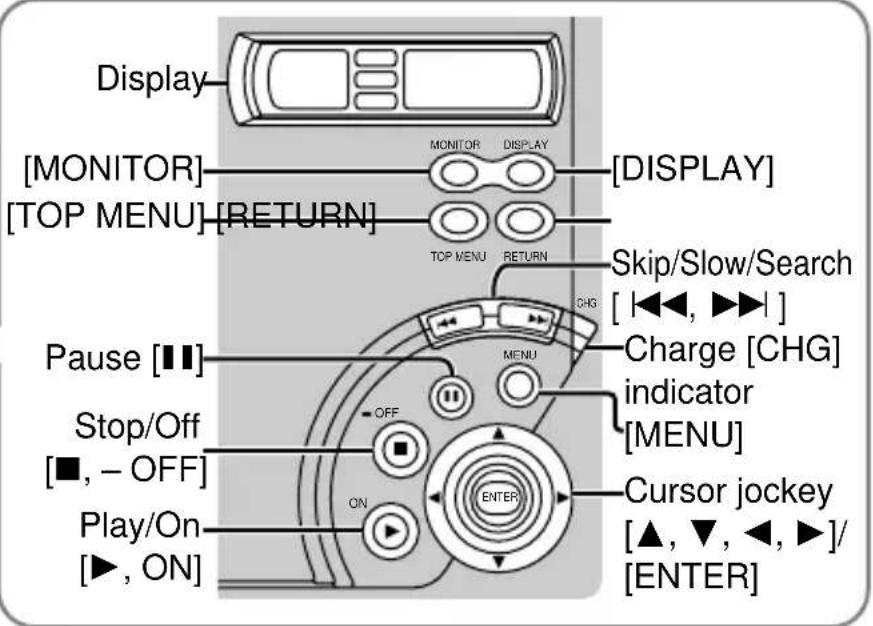
Remote Control
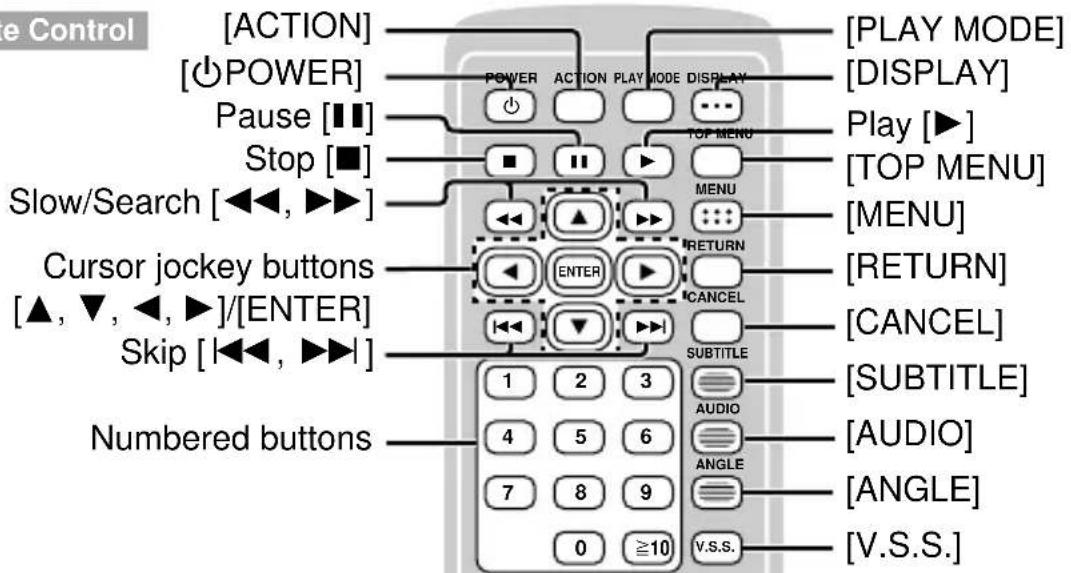
Using the cursor
On the main unit: Slide the cursor jockey in the direction you want to move the cursor.
[▲] up, [▼] down, [←] left, [▶] right.
On the remote control: Press the cursor jockey button corresponding to the direction you want to move the cursor.
[▲] up, [▼] down, [←] left, [▶] right.
Accessories

Please check and identify the supplied accessories.
(For U.S.A.)
To order accessories contact
1-800-332-5368 or web site
(http://www.panasonic.com).
(For Canada)
To order accessories, call the dealer from whom you have made your purchase.
Remote control. 1
(N2QAHC000007)
Button-type battery. 1
for remote control
(for replacement, see below)
Audio/video cable. 1
(RJL3X001X15)
□AC adaptor. 1
(NoJZEH000001)
□Battery pack. 1
(for replacement, see below)
Optional accessories:
Button-type battery (CR2025)
Car adaptor (DY-DC95)
Mini optical digital audio cable
(RP-CA2120)
Battery pack (CGR-H601)
Available only in U.S.A.
Carrying case (DY-CC20)
Headphones (RP-HC100 or RP-HC70)
Use numbers indicated in parentheses when asking for replacement parts.
Note
The included AC adaptor is for use with this unit only. Do not use it with other equipment.
Table of contents
Getting Started
IMPORTANT SAFETY INSTRUCTIONS 6
Listening caution. 7
Disc information 8
Disc handling precautions 9
Basic Operations
Basic play. 14
-Resume function. 15
- Skipping chapters and tracks 16
Advanced Operations
Changing the play sequence 18
Program play. 18
- Random play. 18
Changing soundtracks, subtitle languages and angles 19
For Your Reference
Changing initial settings. 27
Common procedures. 27
- Summary of initial settings 28
- Entering a password 31
Digital output 32
Connecting other equipment 33
Enjoying more powerful sound . . . 34
-Enjoying surround sound with 3 or more speakers 34
Preparing the remote control . 10
Power supply 10
Using the AC adaptor 10
Using the battery pack 11
Enjoying a larger screen. 12
- Connecting to a television. 12
-
Selecting TV screen type 13
-
Fast forward and rewind—SEARCH 16
- Slow-motion 16
-
Frame-by-frame viewing 16
-
Starting play from a selected title or track 17
- Returning to a menu 17
Enjoying Virtual Surround Sound (V.S.S.) 20
Changing the monitor settings . . . 20
- Changing the size of the picture . . . 21
Adjusting the brightness 21 - Adjusting color intensity 21
Using On-Screen Menu Icons. 22
Common procedures. 22
-Icons for disc information 23
-Icons for unit information. 24
Shuttle screen 26
- Listening through 2 speakers . . . . . . 35
Recording to MDs and cassettes. . . 36
Using an optional car adaptor . 36
Using headphones 37
Watching video from a video camera 37
Glossary 38
Troubleshooting Guide. 39
Maintenance. 42
Specifications 43
Product Service 44
Servicenter List (ONLY FOR U.S.A.) 45
Limited Warranty (ONLY FOR U.S.A.) 46
Open the facing page when using the operating instructions.

IMPORTANT SAFETY INSTRUCTIONS
Read these operating instructions carefully before using the unit. Follow the safety instructions on the unit and the applicable safety instructions listed below. Keep these operating instructions handy for future reference.
1) Read these instructions.
2) Keep these instructions.
3) Heed all warnings.
4) Follow all instructions.
5) Do not use this apparatus near water.
6) Clean only with dry cloth.
7) Do not block any ventilation openings. Install in accordance with the manufacturer's instructions.
8) Do not install near any heat sources such as radiators, heat registers, stoves, or other apparatus (including amplifiers) that produce heat.
9) Do not defeat the safety purpose of the polarized or grounding-type plug. A polarized plug has two blades with one wider than the other. A grounding-type plug has two blades and a third grounding prong. The wide blade or the third prong are provided for your safety. If the provided plug does not fit into your outlet, consult an electrician for replacement of the obsolete outlet.
10) Protect the power cord from being walked on or pinched particularly at plugs, convenience receptacles, and the point where they exit from the apparatus.
11) Only use attachments/accessories specified by the manufacturer.
12) Use only with the cart, stand, tripod, bracket, or table specified by the manufacturer, or sold with the apparatus. When used, use caution when in cart/apparatus combination injury from tip-over.
13) Unplug this apparatus during lightning storms or when unused for long periods of time.
14) Refer all servicing to qualified service personnel. Servicing is required when the apparatus has been damaged in any way, such as power-supply cord or plug is damaged, liquid has been spilled or objects have fallen into the apparatus, the apparatus has been exposed to rain or moisture, does not operate normally, or has been dropped.
Do not rest the unit on your lap for a long time while using it. The unit can become hot and cause burns.
To prevent damage
Avoid the following;
- Spraying flammable insecticides near the unit.
- Pressing the LCD.
- Touching the lens and other parts of the laser pickup.
Do not use the unit in the following places;
- Where the temperature is below 5^ ( 41^ ) or above 35^ ( 95^ ). (Operating the unit beyond this range can cause the protection circuitry to function and render the unit inoperable.)
Sandy places such as beaches. - On top of cushions, sofas, or hot equipment such as amplifiers.
Batteries
1. Battery pack
(Lithium ion battery pack)
- Use this unit to recharge the battery pack.
- Do not use the battery pack with equipment other than the specified player.
- Do not use the player outside if it is snowing or raining. (The battery pack is not waterproof.)
- Do not get dirt, sand, liquids, or other foreign matter on the terminals.
- Do not touch the plug terminals (+ and -) with metal objects.
- Do not disassemble, remodel, heat or throw into fire.
2. Button-type battery (Lithium battery)
- Insert with poles aligned.
- Do not touch the terminals (+ and -) with metal objects.
- Do not disassemble, remodel, heat or throw into fire.
- Keep out of reach of children.
If any electrolyte should come into contact with your hands or clothes, wash it off thoroughly with water.
If any electrolyte should come into contact with your eyes, never rub the eyes.
Rinse eyes thoroughly with water, and then consult a doctor.
3. Disposing of the batteries
Check and follow your local regulations before disposal.
CAUTION:
The batteries used in this device may present a risk of fire or chemical burn if mistreated. Do not disassemble or incinerate the batteries. Do not heat the batteries above the following temperatures.
Button-type battery .. 100^ (212°F)
Battery pack. 60°C (140°F)
Do not recharge the button-type battery. Replace only with Panasonic part number indicated below;
Button-type battery (Lithium battery) (for remote control) . . . . . . CR2025
Battery pack (Lithium ion battery pack) .......CGR-H601
Use of other batteries may present a risk of fire or explosion.
Listening caution


Do not play your headphones or earphones at a high volume. Hearing experts advise against continuous extended play. If you experience a ringing in your ears, reduce volume or discontinue use.
Do not use while operating a motorized vehicle. It may create a traffic hazard and is illegal in many areas.
You should use extreme caution or temporarily discontinue use in potentially hazardous situations.
Even if your headphones or earphones are the open-air type designed to let you hear outside sounds, don't turn up the volume so high that you can't hear what's around you.
Sound can be deceiving. Over time your hearing "comfort level" adapts to higher volumes of sound. So what sounds "normal" can actually be loud and harmful to your hearing.
Guard against this by setting your equipment at a safe level BEFORE your hearing adapts.
To establish a safe level:
- Start your volume control at a low setting.
- Slowly increase the sound until you can hear it comfortably and clearly, and without distortion.
Once you have established a comfortable sound level:
- Set the dial and leave it there.
A lithium ion/polymer battery that is recyclable powers the product you
have purchased. Please call 1-800-8-BATTERY for information on how to recycle this battery.

Disc information
Discs that can be played
| Disc type | Logo | Region number | Video system | Indication used in instructions |
| DVD-Video | DVDVIDEODVDVIDEO | 124 | NTSC | DVD |
| Video CD | COMPACTDISCDIGITAL VIDEO | — | NTSC | VCD |
| Audio CD | COMPACTDISC DIGITAL AUDIO | — | — | CD |
Discs that cannot be played
DVD-Audio, PAL discs, DVD-ROM, DVD-R/DVD-ram, CD-ROM, VSD, CDV, CD-G, +RW, DVD-RW, CVD, SVCD, SACD, Divx Video Discs, and Photo CD.
DVDs that can be played

This unit has a Dolby Digital decoder so you can play DVDs with this mark.

This unit does not have a DTS decoder. Connect this unit to equipment that has a DTS decoder to enjoy DVDs with this mark.
■Region Management Information (DVD-Video only)
This unit responds to the Region Management Information recorded on DVD-Video. This unit's region number is "1". You cannot play the disc if the region number on the DVD-Video does not correspond to the region number on the unit. You can play discs with labels containing the region number "1" and "ALL". Read the disc's instructions carefully.
■Playing DVDs and Video CDs
The producer of the material can control how these discs are played. This means that you may not be able to control play of a disc with some operations described in these operating instructions. Read the disc's instructions carefully.
Before enjoying DVD/Video CD/CD
The On-Screen menu language of your player has been factory preset to English.
You can change the menu language to French or Spanish (→ page 29, Display—Menu Language).
In these instructions, it is assumed that English has been selected as the menu language.
Concerning discs
Do not use irregularly shaped discs, such as heart-shaped.
(These discs can damage the unit.)
■How to hold a disc
Do not touch the recorded shiny surface.
If the surface is dirty
Wipe it with a damp cloth and then wipe dry. Wipe from the center toward the circumference.
If the disc is brought from a cold to a warm environment, moisture may form on the disc
Wipe with a soft, dry, lint-free cloth before using the disc.
■Handling precautions
-
Do not write on the label side with a ballpoint pen or other writing instrument.
-
Do not use record cleaning sprays, benzine, thinner, static electricity prevention liquids or any other solvent.
- Do not attach labels or stickers to discs.
- Do not use discs with exposed adhesive from tape or left over peeled off stickers.
- Do not use scratch-proof protectors or covers.
- Do not use discs printed with label printers available on the market.
■Do not place or store discs in the following places - Locations exposed to direct sunlight
- Humid or dusty locations
- Locations directly exposed to a heat vent or heating appliance
MP3 playback
You can use this unit to play MP3 format audio recorded for personal use with a computer etc. onto CD-R or CD-RW. Play may not be possible in some cases due to the condition of recording. Discs recorded using MP3 differ to CDs in the following ways.
- Structure of the disc (example)
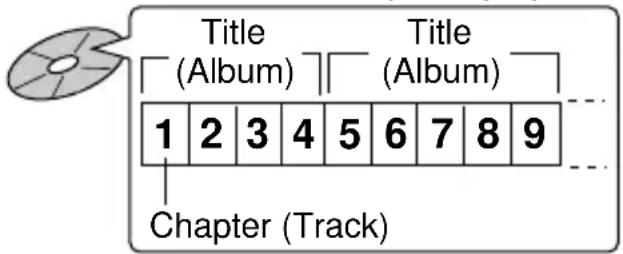
Starting play from a selected chapter
Press the numbered buttons and press [ENTER].
Example:
Chapter 23: [2] [3] [ENTER]
(Pressing ≥ 10 is unnecessary.)
Repeat play
You can use chapter repeat or title repeat.
- Program play, random play
You cannot use program play or random play.
- On Screen Menu Icons for disc information during play
Total number of chapters
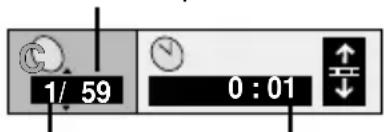
Current chapter Elapsed play time (display only, cannot be changed)
Note
-Not compatible with multi-session recordings
If you record MP3 onto CD-R/CD-RW over a number of sessions, this unit can play only the recordings made in the first session.
-
Recordings will not necessarily be played in the order you recorded them. The recordings will be reordered according to their titles: numbers in numerical order first, upper case in alphabetical order next, and lower case in alphabetical order last.
-
If you play an MP3 track that includes still picture data, it will take some time before the music starts playing and the elapsed time will not be displayed during this time. Even after the track starts, the correct play time will not be displayed.
Preparing the remote control
Insert the battery
(Lithium battery)
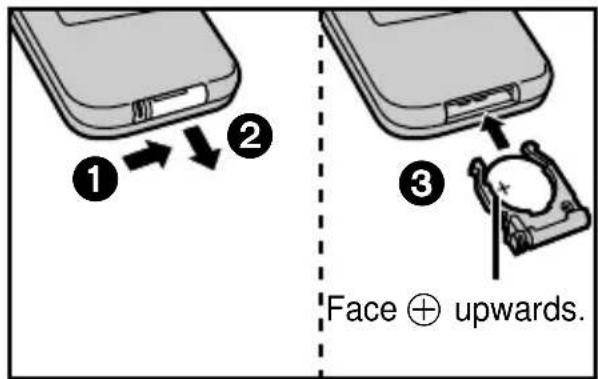
Replacing the button-type battery
The battery normally lasts for about a year. Replace if the remote control fails to operate the unit when used within the operation range.
Note
Refer to "IMPORTANT SAFETY INSTRUCTIONS" on pages 6 and 7.
Operation range
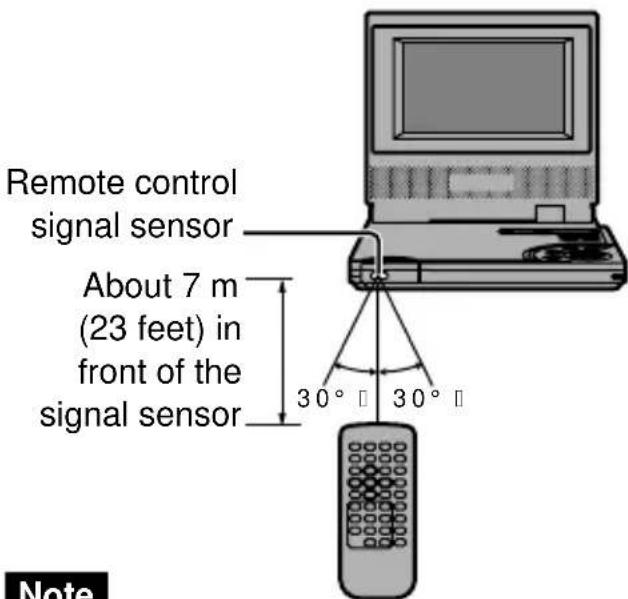
Note
- Do not expose the remote control signal sensor to bright light.
- Do not place obstacles between the remote control signal sensor and the remote control.
- Do not use another unit's remote control at the same time.
Power supply
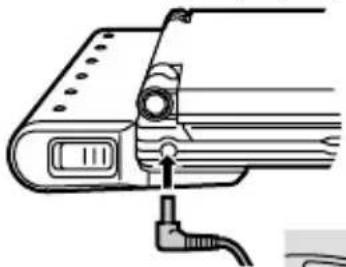
Using the AC adaptor
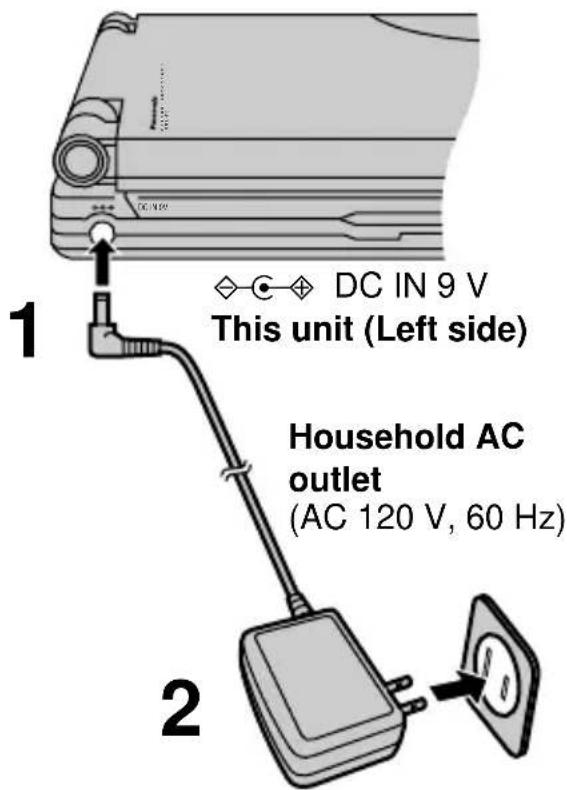
The [O] indicator lights.
Front of this unit
Note
Refer to "IMPORTANT SAFETY INSTRUCTIONS" on page 6.
The unit is in the standby condition (the [O] indicator lights) when the AC adaptor is connected. The primary circuit is always "live" as long as the AC adaptor is connected to an electrical outlet.
■When the unit is not going to be used for a long time
The unit consumes 2 W when in standby mode.
To conserve power, disconnect the AC adaptor from the AC outlet.
Using the battery pack (Lithium ion battery pack)
- Charge the battery pack before using it for the first time.
- For replacement, see page 4 "Optional accessories".
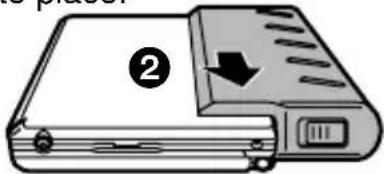
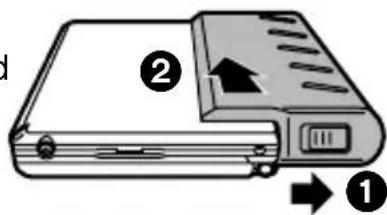
1 Attach the battery pack.
Insert the guides on the battery pack into the holes on the base and the rear of the unit.
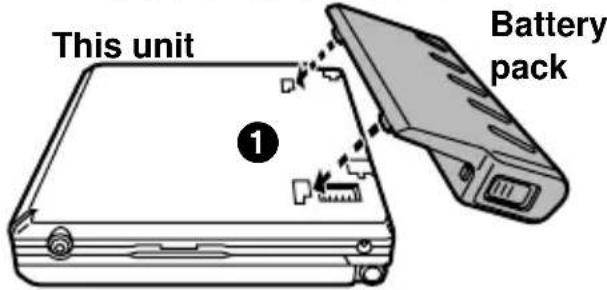
2Slide the pack so it clicks and locks into place.
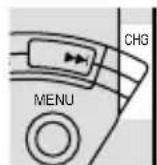
2 Recharge the battery pack.
Connect to the household AC outlet while the battery pack is attached ( page 10).
The [CHG] indicator lights. (The [0] indicator goes out.)
Note
- The battery pack can only be recharged when the unit is off.
Refer to "IMPORTANT SAFETY INSTRUCTIONS" on pages 6 and 7.
Recharging is complete when [CHG] goes out
Disconnect the AC adaptor.
Recharging and play times
| Recharging [at 20 °C (68 °F)] | Play time | |
| Approx. 5 hours | LCD on | LCD off |
| Approx. 5 hours※ | Approx. 6 hours | |
*When brightness is set to “-5” (→ page 21). When brightness is set to “0”, approx. 4 hours.
- Times shown above depend on operating conditions.
The charge is shown on the unit's display during charging. Use this indicator as a guide.
Flashes Flashes Low Charging
complete
■Confirm the battery charge on the unit's display
→ → → → Flashes
Full Low Recharge
■If play time dramatically reduces after recharging
The battery pack has reached the end of its service life (it can be recharged about 300 times).
If the unit is not to be used for a long time
- Detach the battery pack. (Even if the unit is off, it still uses some power. This can lead to over discharging of the battery and malfunction.)
- Recharge the battery pack when you are ready to use it again.
To detach
1 Slide and hold the latch in position.
Connecting to a television
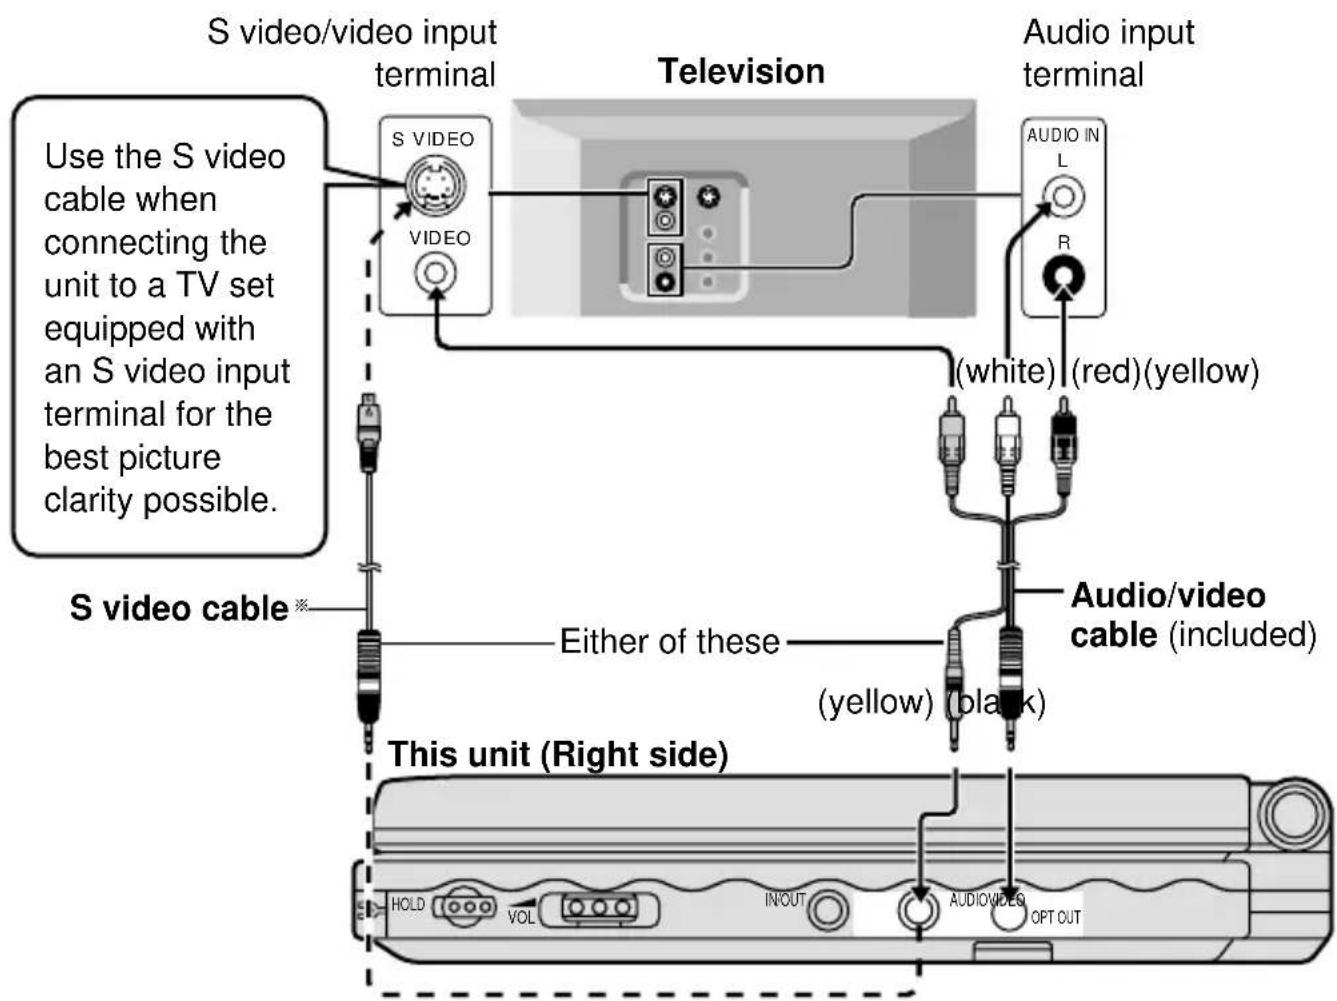
^ 串 S video cable is not included Available from Panasonic dealers. Part number: RFX4139
Note
- The unit's speakers do not have magnetic shielding. Do not place the unit near televisions, personal computers or other devices early influenced by magnetism.
- Volume may be lower when playing DVDs than when playing other discs or during TV broadcasts. If you turn the volume up, reduce it again so that a sudden increase in output does not occur.
Do not connect the player through your video cassette recorder The picture may not be played back correctly due to the copy guard.
Selecting TV screen type
Choose the setting to suit your television and preference.
Preparations
- Turn on your television and the unit (→ page 14).
- Switch the video input mode on the television to suit the connection for the player.
1 Press [ACTION] to show the menus.
- [MENU] is also effective when stopped.
![PANASONIC DVDLV57 - Press [ACTION] to show the menus. - 1](/content/2026/02/377830/images/bcddee2562bd537caee23eb711d78633fa5a9e37bf696cb2c6a06f7d97ba6a0f.jpg)
2 Press [<, >] to select the Video tab.
![PANASONIC DVDLV57 - Press [<, >] to select the Video tab. - 1](/content/2026/02/377830/images/ea8ef23158cc89ec72a9280983760978d658d3b8a6f96939ea6c2f9e156e06d5.jpg)
3 Press [▲,▼] to select "TV Aspect" and press [ENTER].
4 Press [▲,▼] to select the item and press [ENTER].
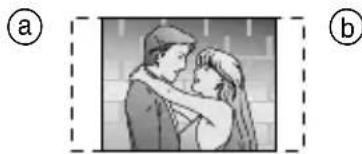
4:3 Pan&Scan
Select if you have a regular television and to view 16:9 software in the pan and scan style (a).
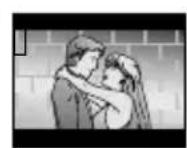
4:3 Letterbox
Select if you have a regular television and to view 16:9 software in the letterbox style (b).
-16:9 (factory preset)
Select when a wide-screen television is connected.
The Video menu screen is shown.
5 Press [ACTION] to end the settings.
To return to the previous menu
Press [RETURN].
Note
- 16:9 software prohibited from being shown in the pan and scan style will appear in the letterbox style despite the setting here.
- DVDs are recorded in a variety of aspect ratio. You can change the way software is shown on a regular television (4:3) with the above operation. If you have a widescreen television (16:9), use the television's picture modes.
Preparations
- Prepare the power supply (→ pages 10 and 11).
- When connected to a television ( pages 12 and 13), turn on the television and select the appropriate video input on the television to suit the connections for the player.
Open the outer cover.
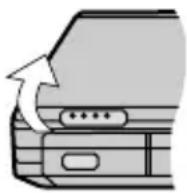
1 Press [PUSH OPEN] to open the disc
![PANASONIC DVDLV57 - Press [PUSH OPEN] to open the disc - 1](/content/2026/02/377830/images/eb453c601ccae90ffd2ba96860f6e7149dd3e44e65e53722691791288f716fe4.jpg)
lid and insert a disc with the side you want to play label up.
Close the disc lid by hand.

2 Press and hold [▶, ON] to start play.
The unit comes on automatically.
See below if a menu appears.
Chapter/track number
(2-digit display)
![PANASONIC DVDLV57 - Press and hold [▶, ON] to start play. - 1](/content/2026/02/377830/images/7e97a45f1608cc2359ba8f7b9f7fc7212fb8186fc1d2840a1c94f73f6415ac53.jpg)
Display
Elapsed
playing time
3 Adjust the volume.

To stop play
Press [■] (→ page 15, Resume function).
■To pause play
Press [I] during play.
Press [▶] (play) to restart play.
To turn the unit off

Press and hold [■, - OFF] until
"bye"
appears on the displ
Using menus: Basic operations

VCDDVD
Press the remote control's numbered buttons to select an item.
Or
DVD
Use [, , , ] to highlight an item
and press [ENTER].
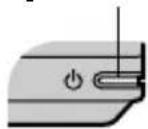
■Turning the unit on and off with the remote control
POWER

Press [POWER].
Auto power-off function
The unit automatically turns off after being stopped for 15 minutes (5 minutes when the battery pack is being used).
Selecting a 2-digit number
e.g. 25: [≥ 10] [2] [5]
■Other menu operations
Operation of menus differs from disc to disc, so read the disc's instructions for details.
[▶▶]: To move to the next menu
[]: To return to the previous menu
[TOP MENU]: To return to the first menu
[MENU]: To show menus
[RETURN]: To show menus


Note
- If “ ” appears on the screen
The operation is prohibited by the unit or disc.
- When the disc ends
If you have finished using the unit, turn it off to conserve power ( page 14, "To turn the unit off").
-
The surface of the unit may become warm if it is used for a long time, but this is normal and not an indication of malfunction.
-
The disc is still spinning while a menu is on screen. Press [■] if you have finished viewing.
-
The [O] indicator on the unit flashes to indicate the unit is on when the monitor's mode is set to "4 (Off)" ( page 21) or the outer cover is closed.
- You cannot use the remote control to turn the unit on when it is being powered by the battery pack.
- To prevent accidental operation

Slide [HOLD] to the left.
In the hold mode, the unit does not respond when you press the buttons. If you press a button in the hold mode, "Ho Id" appears on the unit's display and the [O] indicator flashes.
To release:
Slide [HOLD] to the right.
Resume function
The position you stopped play at is recorded by the unit when the "RESUME" indicator lights on the unit's display.

While "RESUME" indicator lights on the unit's display, press [▶] (play) to start play from where you stopped it (Resume function).
DVD
The following display also appears.

Pressing [▶] (play) while the message is displayed, the beginning portions of each chapter up to the current one are played and full play resumes from the point where you stopped play. (Chapter Preview) (Chapter Preview feature works only within a title.)
If you do not press [▶] (play), the message disappears and play starts from where you stopped it.
■To cancel
Press [■].
Note
The resume function does not work if the disc's play time is not displayed.
It is cleared if you open the disc lid.
Playing CD-R and CD-RW
This unit can play CD-DA (digital audio) and video CD format audio CD-R and CD-RW that have been finalized* upon completion of recording.
It may not be able to play some CD-R or CD-RW due to the condition of the recording.
*Finalizing is a process that enables CD-R/CD-RW players to play audio CD-R and CD-RW.


Skipping chapters and tracks
While playing or paused
Press [or [].
Each press increases the number of skips.
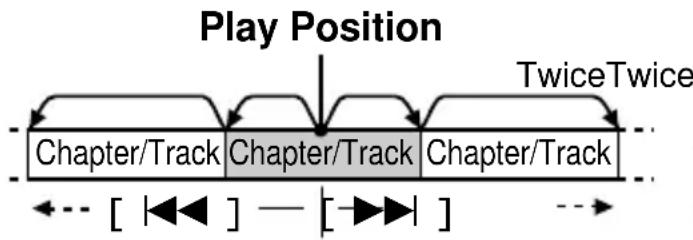
Fast forward and rewind—SEARCH
On the main unit
During play
Press and hold [or [].
During play
Press [<or [▶].
- For DVDs and Video CDs, audio will be heard at the initial scan speed (forward direction only). You can turn this sound off if required ( page 29, Audio—Audio during Search).

VCDDVD
Slow-motion
While paused
Press and hold [ ] or [ ] .
While paused
Press [or [].
Once Once
Frame-by-frame viewing
While paused
Use [<] or [>.
-
Press and hold to move the frames in succession.
-
Pressing [III] also activates forward frame-by-frame.
Note
- If you press [▶,▶] or [▲,▲] during menu play of Video CDs with playback control (→ page 38), the unit may not perform properly.
- The speed of search and slow-motion increases up to 5 steps.
- Press [▶] (play) to restart play.
- You cannot move backwards with Video CD during frame-by-frame and slow-motion.
- [↓], [↓], [↓]: Backward
[ ] , [], []: Forward


CDV
DVD
Starting play from a selected title or track
Remote control only
While stopped
Press the numbered buttons.
Play starts from the selected title/track.
- This also works during play if the disc is a karaoke DVD, Video CD, or CD.
This may not work with some discs.
*When playing Video CDs with playback control
Before performing the above operation, press [■] to cancel menu play.
The P_BC indicator on the unit's display goes out.
To restore menu play
To return to menu play, press [■] twice to stop play and cancel the resume function (→ page 15), then press [▶] (play).
The "P b c" indicator on the unit's display comes on.

VCDDVD
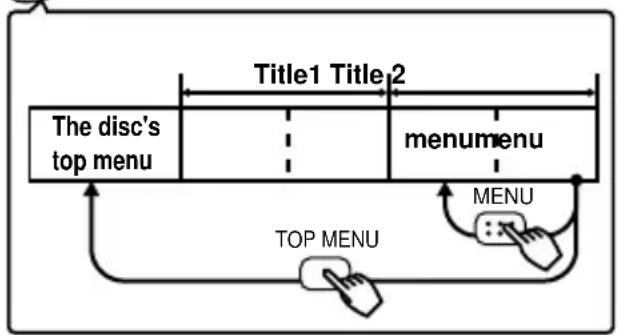
Returning to a menu
The actual contents of menus differ from disc to disc, so here we explain only the basic operations.
During play

Press [MENU].

Press [RETURN].
■With DVDs that contain multiple menus
Pressing [TOP MENU] also takes you to a menu.
- The menus displayed when you press [MENU] and [TOP MENU] may differ.

Example
Program play
You can select up to 32 tracks to play in the order you choose.
While stopped Press [PLAY MODE] until the program play screen appears.
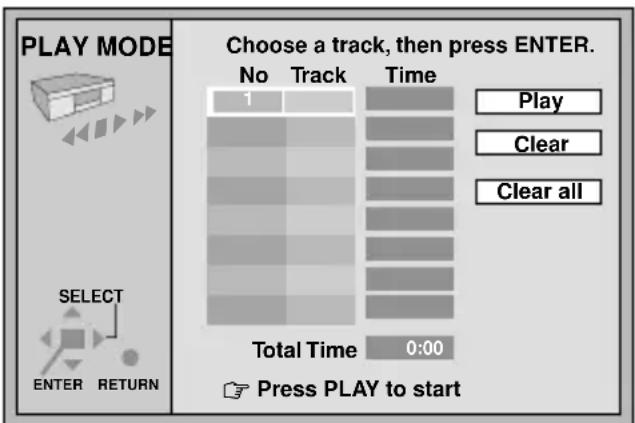
2 Press the numbered buttons to select the track.
- To select a 2-digit number
Example: To select track 23, press [≥10], then [2] and [3].
- To select a track using the cursor jockey buttons
Press [ENTER] and [, ] to select a track, then press [ENTER] again to register the track number.
- Repeat step 2 to select another track.
- "Total Time" tells you the total time of the programmed tracks.
3 Press [▶] (play).
Play now begins in the programmed sequence.
To add or change tracks
Press [, ] to select an available item, then repeat step 2.
To move to the page before or after the one shown
Press [▲, ▷].
To clear the programmed tracks one by one
Press [, ] to select the track and press [CANCEL]. (Alternatively you can select "Clear" and press [ENTER].)
To clear the whole program
Move to "Clear all" with [, , , ] and press [ENTER]. The whole program is also cleared when the unit is turned off, or the disc lid is opened.
To exit the program mode
Press [PLAY MODE] until the program play screen disappears.
The program is retained in memory.
Random play
The unit plays the tracks on a disc in random order.
While stopped Press [PLAY MODE] until the random play screen appears.
Random Playback
Press PLAY to start
2 Press [▶] (play).
Play now begins in random order.
To exit the random mode
Press [PLAY MODE] while stopped until the random play screen disappears.
Changing soundtracks, subtitle languages and angles Remote control
Soundtracks
During play
Press [AUDIO].
The number changes each time you press the button.
- You can also use this button to turn the vocals on and off on karaoke discs. Read the disc's instructions for details.
Angles
During play
Press [ANGLE].
The number changes each time you press the button.

Subtitles
During play
Press [SUBTITLE].
The number changes each time you press the button.

■To clear/display the subtitles
- Press [SUBTITLE].
- Press [▶].
- Press [▲,▼] to select "ON" and "OFF".
Note
- You can also press [, ] or the numbered buttons to change the soundtracks, subtitle languages and angles.
- Some discs allow changes to soundtracks, subtitle languages and angles only by using the disc's menus.
- Soundtrack and subtitle languages can be set before play with the initial settings ( page 28, Disc—Audio and Subtitle).
- “—” or “—” is displayed instead of the language number in circumstances such as when no language is recorded on the disc.
- Some discs allow you to set angles before multi-angle scenes are played. Read the instructions that come with the DVD.
- In some cases, the subtitle language is not changed to the selected one immediately.
- If the subtitles overlap closed captions recorded on discs, turn the subtitles off.
Enjoying Virtual Surround Sound
(V.S.S.)
Remote control only
DVD
(Dolby Digital, 2-channel or over only)
Use V.S.S. to enjoy a surround-like effect if you are using 2 front speakers. If you are playing a disc with surround effects recorded on it, the effect is broadened and sound seems to come from virtual speakers on either side.
Press [V.S.S.] to select the V.S.S. level.
The level is shown on the unit's display. Each time you press the button:
1 (Natural effect) 2 (Emphasized

To get the most from V.S.S.
Note
- You can also use the On-Screen Menu icons to perform this operation ( pages 22 and 25).
V.S.S. will not work, or will have less effect, with some discs.
V.S.S. may cause distortion with some discs. Turn V.S.S. off if this occurs.
Changing the monitor settings
While stopped or playing
Press [MONITOR] to change the monitor settings.
Each time you press the button:
A Changing the size of the picture
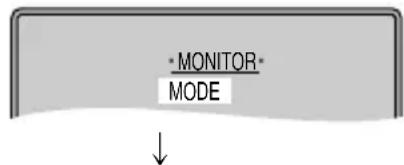
Adjusting the brightness
Adjusting color intensity

The setting mode is cleared.
Select the indicator for the setting you want to change then follow the procedures on page 21.
Turn the indicator off after you complete the setting.
- Picture size returns to "1 (Normal)" if the unit is turned off or [IN/OUT] ( page 37) is pressed.
- Brightness and color intensity settings are saved even if the unit is turned off unless the settings were made while the "LINE-IN" mode is on.
Note
These changes are effective only for this unit's LCD.
Make changes to the television's settings if you have connected one.
A Changing the size of the picture
Use [, ] to change the picture mode.
The mode is shown on the unit's display as follows.
1 (Normal) 2 (Full) 3 (Zoom)
4 (Off)
The picture mode and size
The picture shown on the LCD depends on the display mode and the size recorded on the disc.
| Mode Software | 1 (Normal) | 2 (Full) | 3 (Zoom) |
| Wide- screen | Full screen | Full screen | Top and bottom edges are cut off. |
| Te quirero | Te quirero | Te quirero | |
| Regular (4:3) | Screen with black bands on the right and left | The “Mode 1” screen is horizontally enlarged. | Top and bottom edges of the “Mode 2” screen are cut off. |
| Te quirero | Te quirero | Te quirero | |
| Regular (4:3), Letterbox | The picture is surrounded by a black frame. | The “Mode 1” screen is horizontally enlarged. | Full screen |
| Te quirero | Te quirero | Te quirero |
- If you are not using the LCD on this unit, select "4 (Off)" to conserve power.
The LCD is turned off if you close the unit. - Horizontal lines may appear in the picture when the mode is switched to "3 (Zoom)", but this is not an indication of malfunction.
B Adjusting the brightness
Use the [, ] to adjust the brightness.
-5: dark 5: light
Power consumption increases with the level of brightness.
C Adjusting color intensity
Use [, ] to adjust the color shade.
-5: dark 5: light
On-Screen menu icons are menus that contain information about the disc or unit. These menus allow you to perform operations by changing this information.
Common procedures
1 Press [DISPLAY].
Each time you press the button:
Example: DVD
![PANASONIC DVDLV57 - Press [DISPLAY]. - 1](/content/2026/02/377830/images/480268807cbb2b4c5f76b4738a99d1eba007c4be9d491a412fb0d05a5a175d1f.jpg)
- The screens depend on the disc contents.
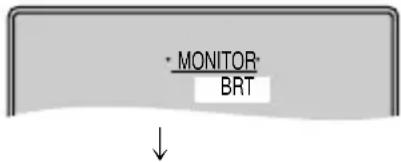
2 Icons for unit information only
While the leftmost icon is highlighted
Use [, ] to select the menu.
Each time you use the cursor jockey:
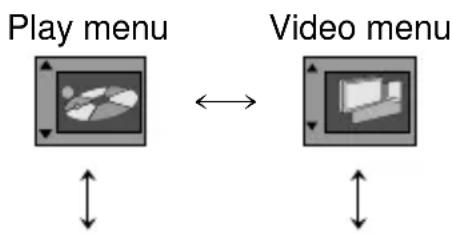
Display menu Audio menu
3 Use [, ] to select the item.
4 Use [, ] to select the setting.
Items with "▲" or "▼" above and below can be changed by [▲,▼]. Other items use different buttons. See pages 23-26 for details.
■To clear the icons
Press [RETURN].
When [RETURN] is pressed while one of the icons for unit information is highlighted, the leftmost icon is highlighted. The icons are cleared when you press [RETURN] while the leftmost icon is highlighted.
To change the position of the icons
You can lower the position of the icons on the screen if they are cut off for some reason. There are 5 positions to choose from.
1.Use [ , ] to select the
rightmosticon.
- Use [, ] to move the icons.

Note
- Some functions cannot be accessed from the stop mode (e.g. changing the soundtrack language).
- Press [ENTER] if the setting does not change after using [, ] .
- When numbers are displayed (e.g.title No.), the numbered buttons are also effective for setting. When numbers are entered with the numbered buttons, press [ENTER] to register the setting.
Icons for disc information
| Icon | Content |
| 2 | DVD Title number VCD CD Track number |
| C 2 | DVD Chapter number |
| 1:46:50 | DVD Time (select a position to start play by specifying a time) VCD CD Changing the time display →Track elapsed time ↑ ↓ Track remaining time ↑ ↓ →Disc remaining time |
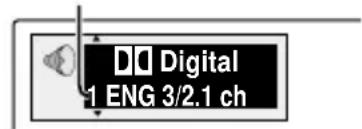
| DIDigital 1ENG 3/2.1 ch | DVD Soundtrack language (See a at right for lan-guage abbreviations.) |
| DIDigital 1 ENG 3/2.1 ch | Audio signal type (See b at right for details.) |
| Vocal 1 OFF | Karaoke vocal on/off (Karaoke DVD only) Solo: OFF or ON Duet: OFF, 1+2, V1 or V2 |
| ON 1 ENG | DVD Subtitle language (See a at right for lan- guage abbreviations.) |
| ON 1 ENG | Subtitle on/off ON←OFF |
| Icon | Content |
| 1 | DVD Angle number |
| LR | VCD Audio mode LR←L←R |
| PBCPBQC ON | VCD (with playback control only) Menu play Indicates whether menu play (playback control) is on or off. |
Audio/Subtitle language
ENG: English POR: Portuguese
FRA: French RUS: Russian
DEU: German JPN: Japanese
ITA:Italian CHI:Chinese
ESP: Spanish KOR: Korean
NLD: Dutch MAL: Malay
SVE: Swedish VIE: Vietnamese
NOR: Norwegian THA: Thai
DAN: Danish *: Others
Signal type/data
LPCM/Digital/DTS: Signal type
k (kHz): Sampling frequency
b (bit): Number of bits
ch (channel): Number of channels
Example
3/2 .1ch
| .1: Subwoofer signal (not displayed if there is no subwoofer signal) |
| 0: No surround 1: Mono surround 2: Stereo surround (left/right) |
| 1: Center 2: Front left+Front right 3: Front left+Front right+Center |
Icons for unit information
Play menu
| Icon Content | |
| AB | A-B repeat [ENTER] (start point)→[ENTER] (finish point) To cancel: [ENTER] |
| OFF | Repeat play DVD C (Chapter)←→T (Title)←→OFF CDU T (Track)←→A (All)←→OFF ●“1” lights on the unit's display during Chapter/Track repeat play. ●“→” lights on the unit's display during Title/All repeat play. To repeat programmed tracks CDV 1. Program the tracks and start play (→page 18). 2. Select the repeat mode “→T” or “→A”. When playing Video CDs with playback control Cancel menu play first. 1. Press [■] to clear “P bL” from the display. 2. Press the numbered buttons to select a track and start play. 3. Select the repeat mode. To return to menu play, press [■] twice to stop play and cancel the resume function (→page 15), then press [▶] (play). |
| --- | Play mode display CDV ---: Off PGM: Program play RND: Random play |
| 123** | Marker You can mark up to 5 positions to play again. [ENTER] (The unit is now ready to accept markers.) To mark a position: [ENTER] (at the desired point) To mark another position: [▲, ▲]→[ENTER] To recall a marker: [▲, ▲]→[ENTER] To erase a marker: [▲, ▲]→[CANCEL] ●All the markers are cleared when the unit is turned off, or the disc lid is opened. |
Note
- A-B repeat play (DVD), repeat play and marker functions do not work if the disc's elapsed play time is not shown on the unit's display.
Video menu
| Icon Content | |
| N | DVD VCD Digital picture mode N: Normal mode C: Cinema mode (Mellow movies, enhances detail in dark scenes.) |
Audio menu
| Icon Content | |
| OFF | DVD (Dolby Digital, 2-channel or over only) V.S.S. (→ page 20) 1←→2←→OFF ↑→ |
| OFF | DVD (Dolby Digital, 3-channel or over only) Dialogue Enhancer ON←→OFF |

Display menu
| Icon Content | |
| IPBIPB OFF | DVD IPB display Displays the picture type (I/P/B) in the still picture mode. ON←→OFF |
Shuttle screen
| Icon Content | |
| Pause | |
| Slow-motion play ←: Backward DVD →: Forward DVD VCD | |
| Play | |
| Search ←: Backward →: Forward |
- There are 5 speeds for both backward and forward slow-motion and search.
- The numbers on either side of the shuttle screen indicate the maximum speeds of the search.
Change the initial settings to suit your preference and to suit the unit to the environment in which it is being used.
These settings are retained in memory until they are changed, even the unit is turned off.
Common procedures
1 Press [ACTION] to show the menus.
- [MENU] is also effective when stopped.
The screen shows the disc settings menu first.
![PANASONIC DVDLV57 - Press [ACTION] to show the menus. - 1](/content/2026/02/377830/images/fbf92029e623acb135ab2f2dee7a24e1181b04e76f0bf20d56343ca817083d3d.jpg)
2 Press [A, ] to select the tab for settings you want to change.
The screen changes to display the menu.
![PANASONIC DVDLV57 - Press [A, ] to select the tab for settings you want to change. - 1](/content/2026/02/377830/images/59dd7012dbf2d143d42d74f51174eddb3e1e66f0e327f07238547e9c44116b4b.jpg)
3 Press [, ] to select the item you want to change and press [ENTER].
4 Press [▲,▼] to select the option and press [ENTER]. The screen now shows the menu again.
To return to the previous screen Press [RETURN].
■When you are finished Press [ACTION].
Summary of initial settings
This chart shows the initial settings for this unit. See page 27 for details on menu operation.
- The menu and on-screen message language has been factory preset to English. You can change the language by going to "Menu Language" in the Display menu.
- Underlined items are the factory presets.
| Menu | Items | Options |
| Disc DVD | Audio Choose the preferred audio language.*1 | English French Spanish Original*2 Other * * * * *3 |
| Subtitle Choose the preferred subtitle language.*1 | Automatic*4 English French Spanish Other * * * * *3 | |
| Menu Choose the preferred language for disc menus. *1 | English French Spanish Other * * * * *3 | |
| Ratings (→ page 31) Set a ratings level to limit DVD play. ·The password screen is shown if you choose levels 0 to 7. ·Select "Level 0" to prevent play of discs that do not have ratings levels recorded on them. ·The password screen is shown when you select "Ratings" if levels 0 to 7 have been selected. | Setting ratings (When level 8 is selected) 8 No Limit: All DVDs can be played. 1 to 7: Prohibits play of DVDs with corresponding ratings recorded on them. 0 Lock All: Prohibits play of all DVDs. | |
| Changing ratings (When level 0-7 is selected) Unlock Player Change Level Change Password Temporary Unlock | ||
| Video DVD VCD | TV Aspect (→ page 13) Choose the setting to suit your television and preference. | 4:3 Pan&Scan 4:3 Letterbox 16:9 |
| Still Mode Specify the type of picture shown when paused. | Automatic Field*5 Frame*6 | |
| Audio | PCM Down Conversion DVD Digital output of 96-kHz linear PCM signals (→ page 32) | No Yes |
| Dolby Digital DVD Digital output of Dolby Digital signals (→ page 32) | Bitstream PCM | |
| DTS Digital Surround DVD Digital output of DTS Digital Surround signals (→ page 32) | Off Bitstream | |
| D. Range Compression DVD (Dolby Digital Only) Change the dynamic range for late night viewing. | Off On | |
| Audio during Search □ VCDV □ On Off Choose whether to have sound during search. | ||
| Display | Menu Language Choose the preferred language for these menus and the on-screen messages. | English Français Española |
| On-Screen Messages Choose whether to show on-screen messages or not. | On Off | |
| Others | Demo A demonstration of the unit's on-screen displays starts when you select "On". The demonstration stops when you press the button. | Off On |
^※1 Some discs are designed to start in a certain language despite any changes you make here.
^2 The original language of each disc will be selected.
^3 Input a code number with the numbered buttons ( page 30)
^4 If the language selected for "Audio" is not available, subtitles of that language will automatically appear if available on that disc.
*5 Less blurred field stills are shown. Select if jittering occurs when "Automatic" is selected.
^※6 Sharper frame stills are shown. Select if small text or fine patterns cannot be seen clearly when "Automatic" is selected.
Language code list
| 6566: Abkhazian | 7074: Fiji | 7678: Lingala | 8373: Singhalese |
| 6565: Afar | 7073: Finnish | 7684: Lithuanian | 8375: Slovak |
| 6570: Afrikaans | 7082: French | 7775: Macedonian | 8376: Slovenian |
| 8381: Albanian | 7089: Frisian | 7771: Malagasy | 8379: Somali |
| 6577: Ameharic | 7176: Galician | 7783: Malay | 6983: Spanish |
| 6582: Arabic | 7565: Georgian | 7776: Malayalam | 8385: Sundanese |
| 7289: Armenian | 6869: German | 7784: Maltese | 8387: Swahili |
| 6583: Assamese | 6976: Greek | 7773: Maori | 8386: Swedish |
| 6588: Aymara | 7576: Greenlandic | 7782: Marathi | 8476: Tagalog |
| 6590: Azerbaijani | 7178: Guarani | 7779: Moldavian | 8471: Tajik |
| 6665: Bashkir | 7185: Gujarati | 7778: Mongolian | 8465: Tamil |
| 6985: Basque | 7265: Hausa | 7865: Nauru | 8484: Tatar |
| 6678: Bengali; Bangla | 7387: Hebrew | 7869: Nepali | 8469: Telugu |
| 7273: Hindi | 7879: Norwegian | 8472: Thai | |
| 6890: Bhutani | 7285: Hungarian | 7982: Oriya | 6679: Tibetan |
| 6672: Bihari | 7383: Icelandic | 8083: Pashto, Pushto | 8473: Tigrinya |
| 6682: Breton | 7378: Indonesian | 7065: Persian | 8479: Tonga |
| 6671: Bulgarian | 7365: Interlingua | 8076: Polish | 8482: Turkish |
| 7789: Burmese | 7165: Irish | 8084: Portuguese | 8475: Turkmen |
| 6669: Byelorussian | 7384: Italian | 8065: Punjabi | 8487: Twi |
| 7577: Cambodian | 7465: Japanese | 8185: Quechua | 8575: Ukrainian |
| 6765: Catalan | 7487: Javanese | 8277: Rhaeto-Romance | 8582: Urdu |
| 9072: Chinese | 7578: Kannada | 8590: Uzbek | |
| 6779: Corsican | 7583: Kashmiri | 8279: Romanian | 8673: Vietnamese |
| 7282: Croatian | 7575: Kazakh | 8285: Russian | 8679: Volapük |
| 6783: Czech | 7589: Kirghiz | 8377: Samoan | 6789: Welsh |
| 6865: Danish | 7579: Korean | 8365: Sanskrit | 8779: Wolof |
| 7876: Dutch | 7585: Kurdish | 7168: Scots Gaelic | 8872: Xhosa |
| 6978: English | 7679: Laotian | 8382: Serbian | 7473: Yiddish |
| 6979: Esperanto | 7665: Latin | 8372: Serbo-Croatian | 8979: Yoruba |
| 6984: Estonian | 7686: Latvian, Lettish | 8378: Shona | 9085: Zulu |
| 7079: Faroeese | 8368: Sindhi |
Entering a password

Remote control only DVD
Refer also to "Common procedures" ( page 27) and the Disc menu in "Summary of initial settings" ( page 28).
When setting ratings
(when level is 8)
The password screen is shown when you select levels 0 to 7.
- Input a 4-digit password with the numbered buttons and press [ENTER].
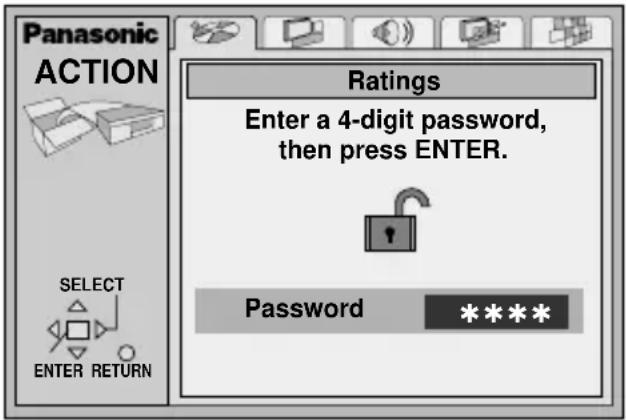
- If you enter a wrong number, press [CANCEL] to erase it before you press [ENTER].
The lock symbol appears closed to show the rating is locked.
Do not forget your password.
- Press [ENTER] to confirm the 4 digits.
Now, when you insert a DVD that exceeds the ratings limit you set, a message appears on the television.
Follow the on-screen instructions.
When changing ratings
(when level is set to 0 to 7)
The password screen is shown when you select "Ratings".
- Input your 4-digit password with the numbered buttons and press [ENTER].
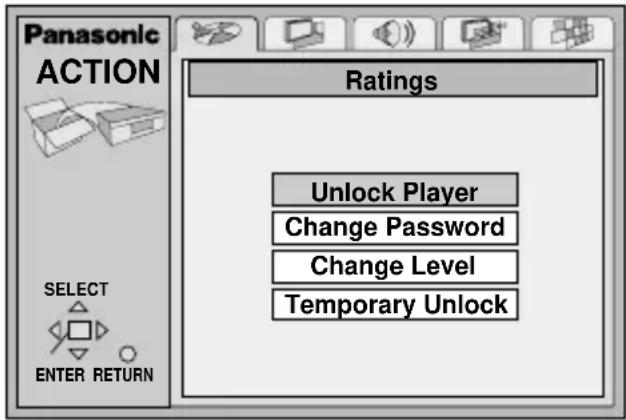
- Select the item with [, ] and press [ENTER], and follow the on-screen instructions.
Digital output DVD
Refer also to "Common procedures" ( page 27) and the Audio menu in "Summary of initial settings" ( pages 28 and 29).
■PCM Down Conversion
No (Factory preset): When you have connected an amplifier with audio cables.
Yes: When you have connected an amplifier with an optical
digital audio cable.
Copyright protection limits digital output to 48kHz / 16 bit.
When playing DVDs recorded in 96 kHz
Sound is output as follows in accordance with the connections and settings you have made.
| Setting\Connection | Analogue | Digital |
| No | Output as 96 kHz | No output (Audio will be output at 96 kHz if the DVD has not had copyright protection recorded on it.※1) |
| Yes | Converted and output as 48 kHz | Converted and output as 48 kHz/16 bit |
*1 The connected equipment must be able to handle 96 kHz LPCM in order to take advantage of high quality audio found on these discs.
■Dolby Digital
Bitstream (Factory preset): When you have connected a unit with a built-in Dolby Digital decoder.
PCM: When you have connected a unit that doesn't have a built-in Dolby Digital decoder.※2
DTS Digital Surround
Off (Factory preset): When you have connected a unit that doesn't have a built-in DTS decoder. ^2 (No digital signal is output.)
Bitstream: When you have connected a unit with a built-in DTS decoder.
^*2 These changes to digital audio output must be made, otherwise bitstream signals the decoder cannot handle will be output. If these signals are output, "noise" will be output which can cause harm to your ears and speakers.
Connecting other equipment
This model can play Dolby Digital, but only in two channels. This model does not have a DTS decoder. You must connect a unit with a Dolby Digital or DTS decoder to enjoy surround sound.
| What you want to do | How to do it | Settings (→page 32) |
| To enjoy 5.1-channel surround sound | Digital connection Connect digitally and use the decoder in another piece of equipment. (⇒page 34) | PCM Down Conversion Select “Yes”. Dolby Digital DTS Digital Surround Settings depend on your decoding equipment. |
| To enjoy stereo or Dolby Pro Logic | Analog connection Connect to an analog amplifier or system component. (⇒page 35) | PCM Down Conversion Select “No”. |
| Digital connection Connect to a digital amplifier or system component. (⇒page 35) | PCM Down Conversion Select “Yes”. Dolby Digital Select “PCM”. DTS Digital Surround Select “Off”. |
Other uses
Recording to MDs or cassette tapes ( page 36).
Note
- Close the LCD to conserve power when you have connected this unit to another monitor and speakers. The LCD and speakers are off while the LCD is closed.
- The equipment connections described are examples.
- Peripheral equipment and optional cables sold separately unless otherwise indicated.
- Before connection, turn off all equipment and read the appropriate operating instructions.
Manufactured under license from Dolby Laboratories.
"Dolby", "Pro Logic" and the double-D symbol are trademarks of Dolby Laboratories.
"DTS", "DTS Digital Surround" and "DTS Digital Out" are registered trademarks of Digital Theater Systems, Inc.
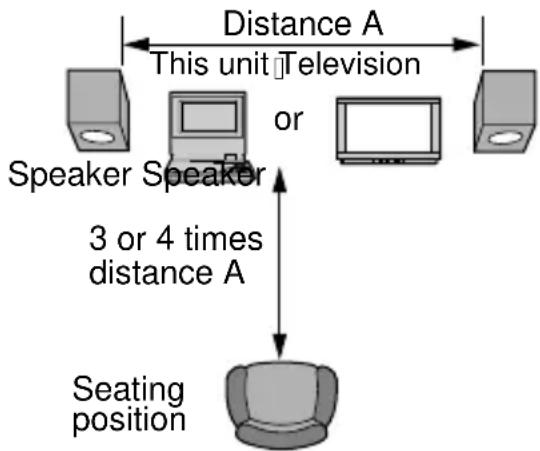
Enjoying surround sound with 3 or more speakers
Digital connection
1 Connect an amplifier that has the necessary decoders built-in (or an amplifier-decoder combination).
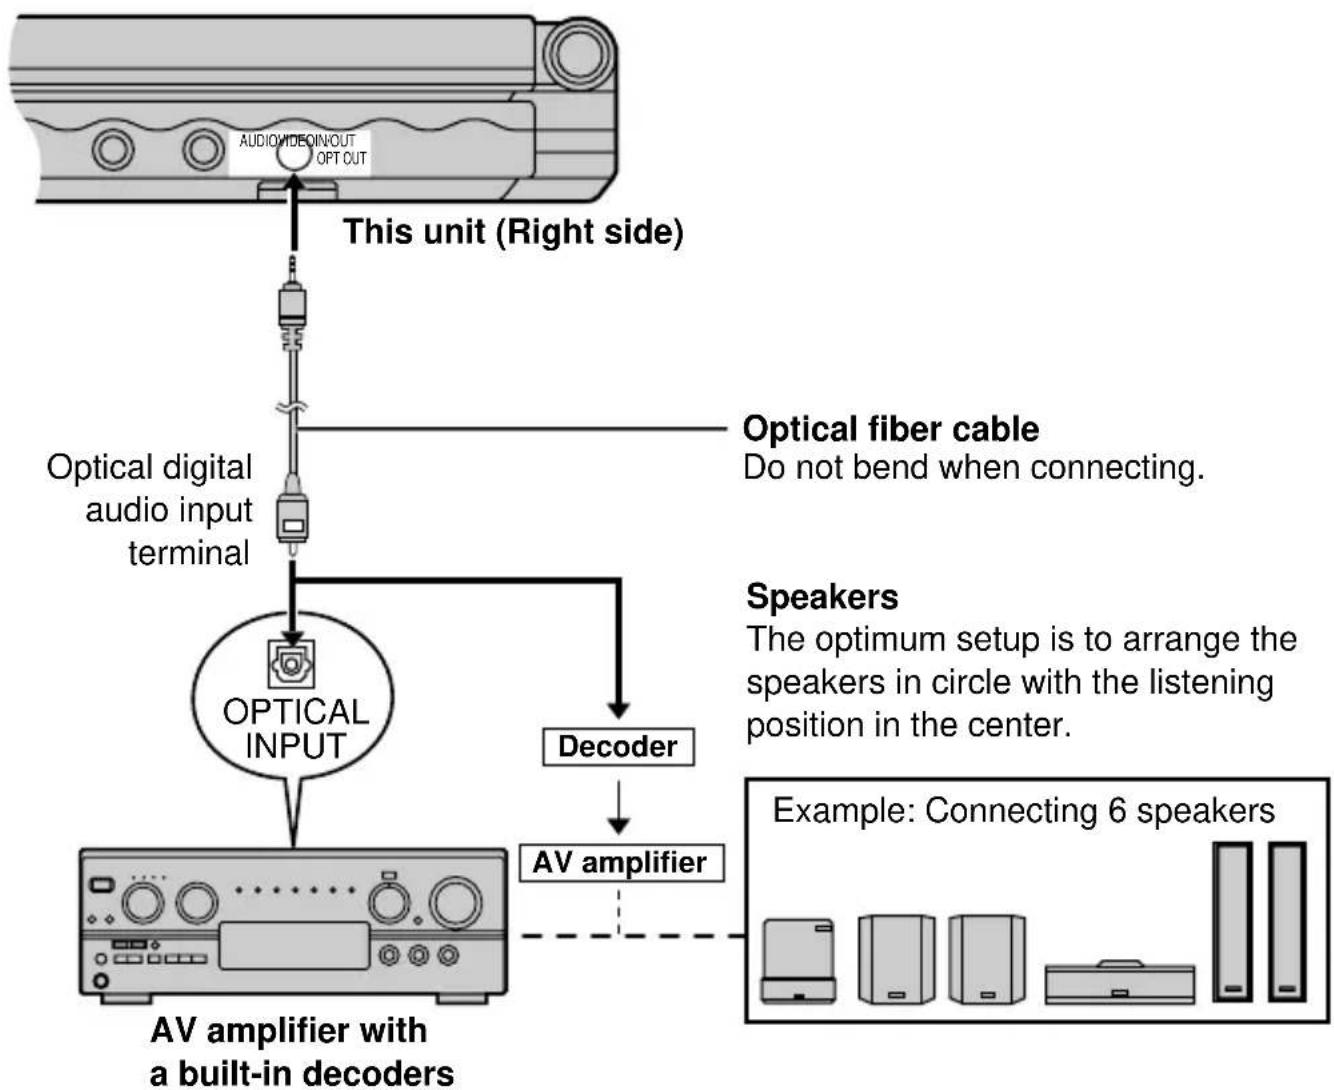
2 Adjust the settings to suit the equipment you have connected ( page 32, "Digital output").
Note
You cannot use a DTS decoder that cannot handle signals from DVD.
Listening through 2 speakers
Analog connection
Connect a 2-channel analog amplifier or mini-system.
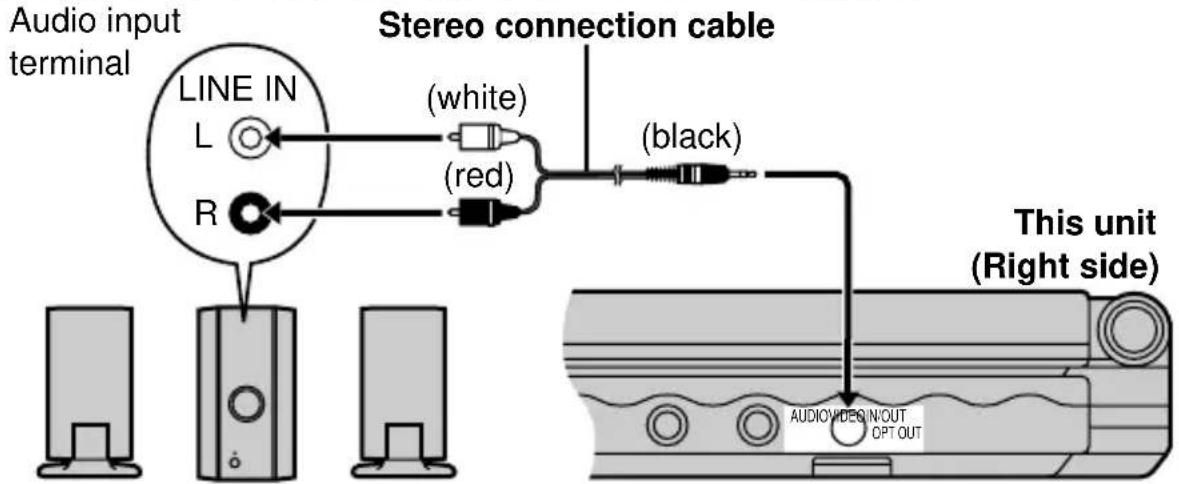
2-channel analog amplifier or mini-system (including amplifier with Dolby Pro Logic)
To enjoy Dolby Pro Logic (→ page 38)
As well as the connections shown above, you will need to connect center and surround speakers. See the operating instructions for the other equipment for connection procedures.
- Turn V.S.S. off. Surround effects will not work correctly if V.S.S. is on ( page 20).
Digital connection
1 Connect a 2-channel digital amplifier or mini-system.

2-channel digital amplifier or mini-system
2 Adjust the settings to suit the equipment you have connected ( page 32, "Digital output").
Recording to MDs and cassettes
You can connect recording equipment either through an amplifier or directly to this unit. When connecting directly, use the same method used for connecting a 2-channel amplifier or mini-system ( page 35).
Analog recording
You can record to a cassette or MD deck without sound being affected by copy guard if you use analog connection.
- Use a stereo connection cable for analog connection.
Digital recording
You can record the digital signal directly onto an MD.
-
Use an optical fiber cable for digital connection. Ensure the following conditions are met.
-
There is no copy guard recorded on the disc.
- The recording equipment can handle a sampling frequency of 48kHz
- Settings in "Audio" ( page 32, "Digital output") have been set as follows:
PCM Down Conversion: Yes
Dolby Digital: PCM
DTS Digital Surround: Off
Using an optional car adaptor: Part number DY-DC95
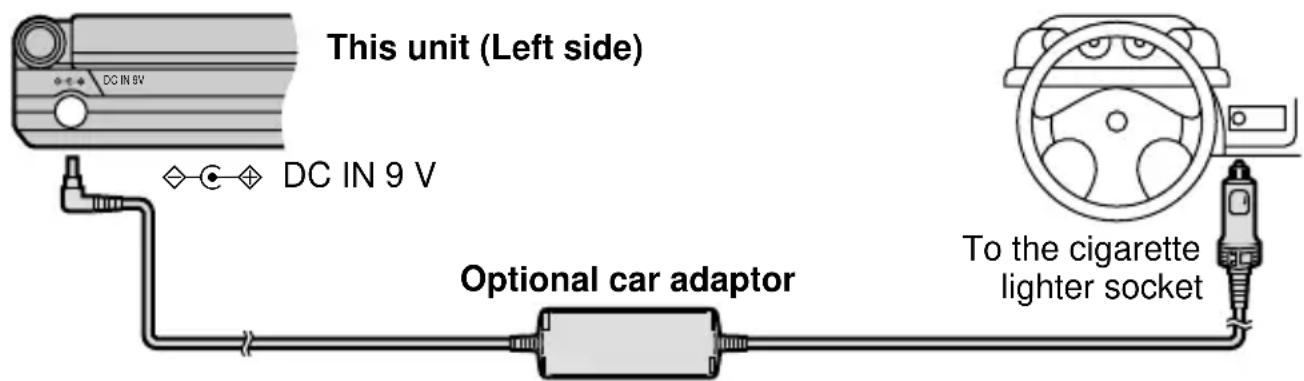
Note
- In the interests of the traffic safety, do not perform operations on the unit or view video software while driving a vehicle.
- Do not rest the unit directly on your lap for a long time. It can become hot and cause burns. Place the unit in a secure position for viewing.
- You can enjoy sound through your car's audio system by connecting a car stereo cassette adaptor (part number—RP-CC20) to this unit's headphone jack.
Using headphones
Preparations
- Turn down the volume before connection, and then adjust the level.
- Headphones with 3.5mm (1/8^ ) stereo plug can be connected.
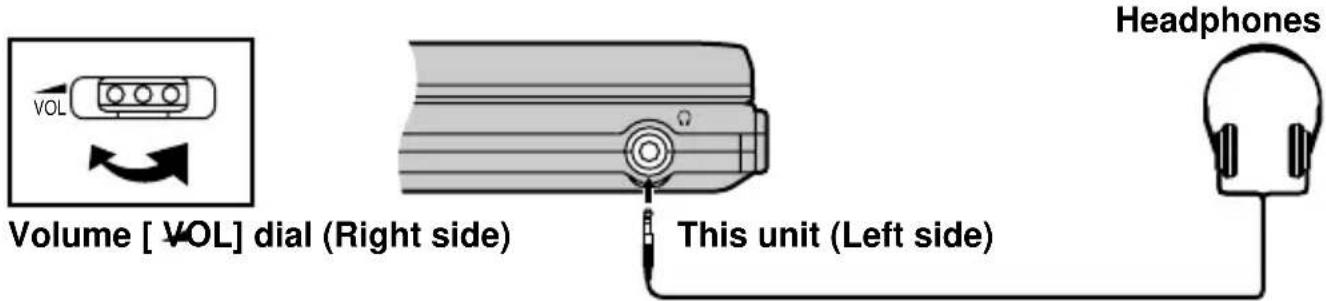
Note
When headphones are connected, no sound will be output from the unit's stereo speakers.
Watching video from a video camera
1 Connect the camera to this unit.
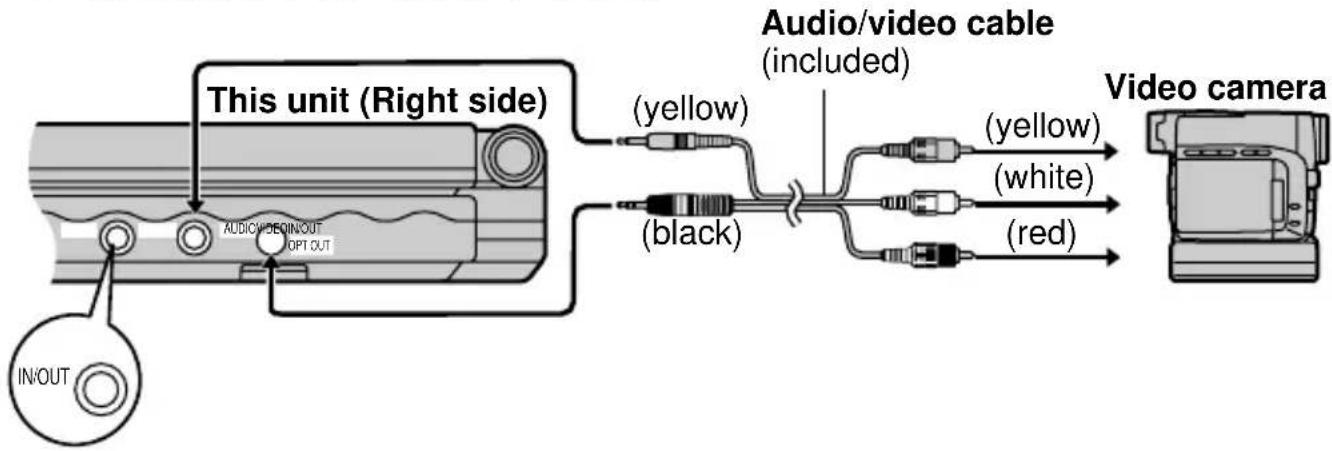
2 Press [IN/OUT] to switch to input mode.
The "LINE-IN" indicator lights on the unit's display.
Note
- "LINE-IN" mode is cancelled when this unit is turned off. Press [IN/OUT] again so "LINE-IN" indicator lights on the unit's display.
- Auto power-off function ( page 14) does not work while the "LINE-IN" mode is on. Turn the unit off when you have finished using it.
Bitstream
This is the digital form of multiple channel audio data (e.g., 5.1 channel) before it is decoded into its various channels.
Chapter
This is the smallest division on DVDs and is roughly equivalent to a track.
Dolby Digital
This is a method of coding digital signals developed by Dolby Laboratories. Apart from stereo (2-channel) audio, these signals can also be 5.1-channel audio. A large amount of audio information can be recorded on the disc using this method.
Dolby Pro Logic
A surround system where a 4-channel audio track is recorded as 2 channels and then is restored to 4 channels for play. The surround channel is monaural and can reproduce up to 7kHz
DTS (Digital Theater Systems)
This is a method of coding digital signals developed by Digital Theater Systems. The signals are compressed at a low ratio to maintain sound quality.
Dynamic range
Dynamic range is the difference between the lowest level of sound that can be heard above the noise of the equipment and the highest level of sound before distortion occurs.
Field
One frame is made up of 2 fields.
A regular television shows these fields one after the other to create frames.
Frame
Frames are the still pictures that go together to make a moving picture.
There are about 30 frames shown each second.
Frame still and field still
A still is shown when you pause a moving picture.
A frame still is made up of 2 alternating fields, so the picture may appear blurred, but overall quality is high.
A field still is not blurred, but it has only half the information of a frame still so picture quality is lower.
I/P/B
MPEG 2, the video compression standard adopted for use with DVDs, codes frames using these 3 picture types.
I: Intra coded picture (I-picture)
This is the standard picture and is a complete picture in itself. This means it has the best picture quality and is the best to use when adjusting the picture.
P: Predictive coded picture (P-picture)
This picture is calculated based on past I or P-pictures.
B: Bidirectionally-predictive coded picture (B-picture)
This picture is calculated by comparing past and future I and P-pictures so it has the lowest volume of information.
Linear PCM (pulse code modulation)
PCM is the usual digital method used for music CDs. DVDs have a greater volume so they use linear PCM, which has a higher sampling rate.
Playback control (PBC)
This method of controlling disc play is included on version 2.0 Video CDs. You are able to interact with the disc through menus.
Title
This is the largest division on DVDs.
Track
This is the smallest division on Video CDs and CDs and usually equates to a single song.
Before requesting service, make the below checks. If you are in doubt about some of the check points, or if the remedies indicated in the chart do not solve the problem:
In the U.S.A., contact the Panasonic Customer Call Center at 1-800-211-7262, or e-mail consumerproducts@panasonic.com, or web site
(http://www.panasonic.com).
In Canada, contact the Panasonic Canada Inc. Customer Care Centre at 1-800-561-5505, web site (www.panasonic.ca), or an authorized Servicentre closest to you.
Reference pages are shown as black circled numbers 10.
| Problem | Solution |
| No power. | Check connections to the AC adaptor or battery pack. 10 11 |
| Release the hold mode. 15 | |
| Confirm the battery charge on the unit's display. 11 | |
| You cannot turn on the unit with the remote control if the unit is powered by the battery pack. | |
| Unit turns off automatically. | The unit turns off after it has been stopped for about 15 minutes (5 minutes when using the battery pack) to conserve power. Turn the unit on again. 14 |
| Cannot charge battery pack or the [CHG] indicator fails to light. | The battery pack can only be recharged when the unit is off. 11 14 |
| The charging time increases if the battery pack is warm and charging may not be possible under some circumstances. Wait for the battery pack to cool off. | |
| Check connection to the AC adaptor. 10 | |
| Unit doesn't work when powered by the battery pack. | The battery pack has protection circuitry that activates if the pack becomes too hot or too cold. The battery pack will not work if this occurs. Use the unit at about 20 °C (68 °F). 7 |
| No response when buttons are pressed. | Some discs prohibit certain operations. 3 |
| Release the hold mode. 15 | |
| If there is no response at all, the unit may have been affected by lightning or static electricity. Try turning the unit off and on again. Alternatively, turn the unit off, disconnect the power source (AC or battery pack) reconnect the power and turn the unit on again. | |
| Play fails to start or stops soon after starting. | Condensation may have formed in the unit. Wait an hour for it to clear. |
| This unit cannot play discs other than those specified. 3 | |
| Wipe the disc clean. 9 | |
| Ensure the disc is inserted correctly. 14 | |
| Check the ratings setting. 31 | |
| No operation with remote control. | Check the battery is inserted correctly. 10 |
| Replace the battery if it is drained. 10 | |
| Aim the remote control at the remote control signal sensor. 10 | |
| The audio soundtrack or subtitle language cannot be changed. | Languages can only be selected if they are recorded on the DVD. |
| Some DVDs require you to change the languages through menus. | |
| Subtitles not shown. | Subtitles appear only if they are recorded on the DVD. |
| Turn the subtitles on. 10 | |
| Subtitles may fail to appear around the A and B points in A-B repeat, and around the points you marked to play again. | |
| Angles cannot be changed. | Angles can only be selected if they are recorded on the DVD. There may be parts of multi-angle DVDs where different angles are not recorded. |
| You have forgotten your ratings password. | Do the following to reset the unit to its original factory settings. While the unit is stopped, press and hold [II], [I-] (backward), and [→, ON] on the main unit for about 3 seconds until the message “initialized” disappears from the screen, then turn the unit off. |
| You want to reset the unit to the factory settings. | |
| There is a lot of noise. | Separate the unit from mobile phones if they are being used close to each other. |
| Distorted sound. | V.S.S. may cause distortion with some discs. Turn V.S.S. off if this occurs. 20 |
| No sound from the unit's speakers. | The speakers are off if the LCD is closed or headphones are connected. |
| Turn up the volume. | |
| No sound from other speakers. | Check all connections and settings. 38-47 |
| Check input mode of the other equipment. | |
| The monitor is dark. | Adjust the brightness. 21 |
| The picture is disrupted during fast forward and rewind. | Some disruption is normal. |
| No picture on the screen (including video from another unit). | Check connections. ③7 |
| Ensure the video input setting is correct. • While you are playing a disc “LINE-IN” should be off. • While you are viewing video from other equipment “LINE-IN” should be on. ③7 | |
| Select a picture mode other than “4 (Off)”. ① | |
| Ensure the power of the connected equipment is on. | |
| Picture doesn’t appear on the television (or the size of the picture seems wrong). | Check connections. ⑫ |
| Check that the television is on. | |
| Check that the input mode on the television is correct. | |
| Check the settings in “Video—TV Aspect”. ⑬ | |
| LCD pixels turn black or radiate different colors. | The LCD is constructed with precision technology so 99.99 % of the pixels are active, but of the remaining of 0.01 %, there are pixels that may be black or emit light constantly. This phenomenon is not a malfunction. |

and [CHG] indicators
| The [◎] indicator flashes when you press the button. | The unit is in hold mode or “LINE-IN” on the unit's display is on. Release the hold mode or press [IN/OUT] to turn off “LINE-IN”. ⑮, ⑱ |
| The [◎] indicator flashes slowly. | The unit is on and the LCD is closed or the display mode is set to “4 (Off)”. Turn the unit off when you have finished. ⑲ |
| The [CHG] indicator flashes. | A problem occurred with the battery pack. Confirm the unit's display. ⑳ |
| The [CHG] indicator flashes slowly. | Battery pack charge is low. The unit will turn off automatically after a few minutes. |
Displays
| NO PLAY | The unit cannot play this disc. ⑧ |
| “bt Err” and a number appear on the display. | “bt Err1”: A problem has occurred with the battery pack. Consult your dealer. “bt Err2”: The pack has been recharging for 12 hours but has failed to recharge for some reason. Recharge again. “bt Err3”: You are recharging in a location that is too hot or too cold. Recharge at normal temperature. |
| No On-Screen display. | Go to the Display menu in the ACTION screen, and select “On” for “On-Screen Messages”. ⑨ |
| On-Screen Menu Icons are cut off or are not displayed at all. | Press [▲, ▼] while the rightmost icon is highlighted to move them down. ⑩ |
| U11 | Wipe the disc clean. ⑨ |
| H □□ □□ stands for a number. | Trouble has occurred. The number appearing after H depends on the problem. Turn the unit off and on again. Alternatively, turn the unit off, disconnect the power source (AC or battery pack) reconnect the power and turn the unit on again. If the service numbers fail to clear, note the service number and contact a qualified service person. |
Note
The following do not indicate malfunction.
- A sound is heard from the AC adaptor during recharging.
- The battery pack warms up after recharging or during use.
Maintenance
To clean this unit, wipe with a soft, dry cloth.
- Use eyeglass cleaner to remove stubborn dirt from the LCD.
- Never use alcohol, paint thinner or benzine to clean this unit.
- Before using chemically treated cloth, read the instructions that came with the cloth carefully.
■Maintenance of the lens
- If dust is attached to the lens, remove dust carefully with an air blower for camera lenses (optional).
Recommended product: Lens cleaner kit (SZZP1038C)
- Be careful not to touch the lens with your fingers.
Operating temperature range:
$$ + 5 \text {t o} + 3 5 ^ {\circ} \mathrm {C} (+ 4 1 \text {t o} + 9 5 ^ {\circ} \mathrm {F}) $$
Operating humidity range:
$$ 5 - 90 \% \text{RH} (\text{no condensation}) $$
Discs played:
(1) DVD-Video
(2) Compact disc (CD-DA, Video CD)
(3) CD-R/CD-RW
(CD-DA, Video CD formatted discs)
Signal system: NTSC
LCD screen:
$$ 5 ^ {\prime \prime} \alpha - S i, T F T \text {w i d e - s c r e e n L C D} $$
Video output/output:
Output/Input level: 1 Vp-p (75 Ω)
Output/Input terminal: Mini-jack
(1 system, Output/Input selectable)
S video output:
Y output level: 1 Vp-p (75 Ω)
C output level: 0.286 Vp-p (75 Ω)
Output terminal: Mini-jack
(1 system, Also used
for video output/input)
Audio output/input:
Output/Input level:
$$ 1. 5 \mathrm {V r m s} (1 \mathrm {k H z}, 0 \mathrm {d B}, 1 0 \mathrm {k} \Omega) $$
Output/Input terminal:
$$ S t e r e o m i n i - j a c k $$
(1 system, Output/Input selectable)
2 ch (MIX) Output (L/R)
Audio performance:
(1) Frequency response:
DVD (linear audio):
4 Hz-22 kHz (48 kHz sampling)
4 Hz-44 kHz (96 kHz sampling)
CD audio: 4 Hz-20 kHz
(2) S/N ratio:
CD audio: 115 dB
(3) Dynamic range:
-CD audio: 97 dB
Digital audio output:
Optical digital output:
Mini optical terminal
(1 system, Also used
for audio output/output)
Pickup:
Wave length: 668 nm/790 nm
Laser power:CLASS II/CLASS I
Power supply:
DC 9 V (DC IN terminal)
DC 7.2 V (Exclusive battery terminal)
Power consumption:
12 W (7.5 W: Unit only)
Recharge mode 23 W
(when using the included AC adaptor)
AC adaptor:
Power supply: AC 120 V, 60 Hz
Power consumption: 23 W
DC output: 9 V, 1.5 A
Ext. battery (lithium ion):
Voltage: 7.2 V
Capacity: 3600 mAh
Dimensions:
159 (W)×140 (D)×27 (H) mm
[6^{1 / 4^{\prime \prime}}(\mathsf{W})\times 5^{1 / 2^{\prime \prime}}(\mathsf{D})\times 1^{1 / 16^{\prime \prime}}(\mathsf{H})]
(when the LCD screen is closed,
excluding protrusions)
Mass: 499 g (17.6 oz.)
Note
Specifications are subject to change without notice.
Mass and dimensions are approximate.
Power consumption in standby mode: 2 W (when using the included AC adaptor)
- Damage requiring service—The unit should be serviced by qualified service personnel if:
(a) The AC power supply cord or AC adaptor has been damaged; or
(b) Objects or liquids have gotten into the unit; or
(c) The unit has been exposed to rain; or
(d) The unit does not operate normally or exhibits a marked change in performance; or
(e) The unit has been dropped or the cabinet damaged.
- Servicing—Do not attempt to service the unit beyond that described in these operating instructions. Refer all other servicing to authorized servicing personnel.
- Replacement parts—When parts need replacing ensure the servicer uses parts specified by the manufacturer or parts that have the same characteristics as the original parts. Unauthorized substitutes may result in fire, electric shock, or other hazards.
- Safety check—After repairs or service, ask the servicer to perform safety checks to confirm that the unit is in proper working condition.
Product information
For product information or assistance with product operation:
In the U.S.A., contact the Panasonic Customer Call Center at 1-800-211-7262, or e-mail consumerproducts@panasonic.com, or web site (http://www.panasonic.com).
In Canada, contact Panasonic Canada Inc. Customer Care Centre at 1-800-561-5505, web site (www.panasonic.ca), or an authorized Servicentre closest to you.
Apparatus Claims of U.S. Patent Nos. 4,631,603, 4,577,216, and 4,819,098, licensed for limited viewing uses only.
This product incorporates copyright protection technology that is protected by method claims of certain U.S. patents and other intellectual property rights owned by Macrovision Corporation and other rights owners. Use of this copyright protection technology must be authorized by Macrovision Corporation, and is intended for home and other limited viewing uses only unless otherwise authorized by Macrovision Corporation. Reverse engineering or disassembly is prohibited.
Panasonic Technics Quasar
For Product Information, Operating Assistance, Literature Request, Dealer Locations, and all Customer Service inquiries please contact: 1-800-211-PANA (7262), Monday-Friday 9 am-9 pm; Saturday-Sunday 9 am-7 pm, EST.
Web Site: http://www.panasonic.com
You can purchase parts, accessories or locate your nearest servicenter by visiting our Web Site.
Accessory Purchases:
1-800-332-5368 (Customer Orders Only)
Panasonic Services Company 20421 84th Avenue South, Kent, WA 98032 (6 am to 5 pm Monday-Friday; 6 am to 10:30 am Saturday; PST)
(Visa, MasterCard, Discover Card, American Express, Check)
Factory Servicenters Locations
CALIFORNIA
6550 Katella
Avenue Cypress, CA 90630
800 Dubuque
Avenue
S. San Francisco
CA 94080
3878 Ruffin Road
Suite A
San Diego, CA
92123
FLORIDA
3700 North 29th
Avenue Suite 102
Hollywood, FL 33020
GEORGIA
8655 Roswell
Road
Suite 100
Atlanta, GA 30350
ILLINOIS
9060 Golf Road Niles, IL 60714
1703 North
Randall Road
Elgin,IL 60123
(Pick-up/Drop-off only)
MASSACHUSETTS
60 Glacier Drive
Suite G
Westwood, MA
02090
MINNESOTA
7850-12th Avenue
South
Airport Business Center
Bloomington, MN
55425
OHIO
2236 Waycross
Road
Civic Center Plaza
Forest Park, OH
45240
PENNSYLVANIA
2221 Cabot Blvd.
West
Suite B
Langhorne, PA
19047
TEXAS
13615 Welch Road Suite 101 Farmers Branch TX 75244
WASHINGTON
20425-84th
Avenue South
Kent, WA 98032
HAWAII
99-859 Iwaiwa
Street
Aiea, Hawaii
96701
Phone
(808) 488-1996
Fax
(808) 486-4369
Service in Puerto Rico
Matsushita Electric of Puerto Rico, Inc. Panasonic Sales Company/Factory Servicenter: Ave. 65 de Infanteria, Km. 9.5, San Gabriel Industrial Park, Carolina, Puerto Rico 00985 Phone (787) 750-4300 Fax (787) 768-2910
Panasonic Consumer Electronics
Company, Division of Matsushita Electric Corporation of America
One Panasonic Way Secaucus, New Jersey 07094
Panasonic Sales Company, Division of Matsushita Electric of Puerto Rico, Inc.
Ave. 65 de Inferteria, Km. 9.5
San Gabriel Industrial Park, Carolina, Puerto
Rico 00985
Panasonic/Technics DVD Player Limited Warranty
Panasonic Consumer Electronics Company or Panasonic Sales Company (collectively referred to as "the Warrantor") will repair or replace this product with new or refurbished parts or equivalent product, free of charge in the USA or Puerto Rico, in the event of a defect in materials or workmanship as follows (all time periods commence from the date of original purchase):
Parts—New or rebuilt parts in exchange for defective parts for one (1) year from the date of original purchase. Labor—Carry-in or mail-in service for ninety (90) days from the date of original purchase. After the ninety (90) day labor period, purchaser pays for all labor charges.
Batteries—(if included) New rechargeable batteries in exchange for defective rechargeable batteries for ten (10) days from the date of the original purchase. Non-rechargeable batteries are not warranted.
Carry-in or mail-in service in the USA can be obtained during the warranty period by contacting a Panasonic Services Company (PASC) Factory Servicenter listed in the Servicenter Directory. Or call, toll free, 1-800-211-7262 to locate an authorized PASC Servicenter. Carry-in or mail-in service in Puerto Rico can be obtained during the warranty period by calling the local telephone number in the Servicenter Directory.
This warranty is extended only to the original purchaser.
A purchase receipt or other proof of date of original purchase will be required before warranty service is rendered.
This warranty only covers failures due to defects in materials and workmanship which occur during normal use and does not cover normal maintenance. The warranty does not cover damages which occurred in shipment, or failures which are caused by products not supplied by the warrantor, or failures which result from
accident, misuse, abuse, neglect, mishandling, faulty installation, misapplication, improper set-up adjustments, operation or maintenance, alteration, modification, power line surge, lightning damage, interference, commercial use such as hotel, office, restaurant, or other business or rental use of the product, or serviced by anyone other than an PASC Factory Servicenter or an authorized PASC Servicenter, or damage that is attributable to acts of God.
LIMITS AND EXCLUSIONS
There are no express warranties except as listed above.
THE WARRANTYOR SHALL NOT BE LIABLE FOR INCIDENTAL OR CONSEQUENTIAL DAMAGES RESULTING FROM THE USE OF THIS PRODUCT, OR ARISING OUT OF ANY BREACH OF THIS WARRANTY, INCLUDING WITHOUT LIMITATIONS, DAMAGE TO DISCS. ALL EXPRESS AND IMPLIED WARRANTYES, INCLUDING THE WARRANTYES OF MERCHANTABILITY, AND FITNESS FOR A PARTICULAR PURPOSE, ARE LIMITED TO THE APPLICABLE WARRANTY PERIOD SET FORTH ABOVE.
Some states do not allow the exclusion or limitation of incidental or consequential damages, or limitations on how long an implied warranty lasts, so the above exclusions or limitations may not apply to you.
This warranty gives you specific legal rights and you may also have other rights which vary from state to state.
If a problem with this product develops during or after the warranty period, you may contact your dealer or Servicenter. If the problem is not handled to your satisfaction, then write to the Consumer Affairs Department at the company address indicated above.
If you ship the product
Carefully pack and send it prepaid, adequately insured and preferably in the original carton. Attach a postage-affixed letter, detailing the complaint, to the outside of the carton.
Do NOT send the product to the Executive or Regional Sales offices. They are NOT equipped to make repairs.
The model number and serial number of this product can be found on either the back or the bottom of the unit. Please note them in the space provided below and keep for future reference.
MODEL NUMBER DVD-LV57
SERIAL NUMBER
User memo:
DATE OF PURCHASE
DEALER NAME
DEALER ADDRESS
TELEPHONE NUMBER
Panasonic Consumer Electronics Company, En Division of Matsushita Electric Corporation of America
One Panasonic Way Secaucus, New Jersey 07094
http://www.panasonic.com
Panasonic Sales Company,
Division of Matsushita Electric of Puerto Rico, Inc. ("PSC")
Example: 25: [≥ 10] [2] [5]
DTS Digital Surround
1,5 V eff. (1 kHz, 0 dB, 10 kΩ)
Sortie 2 canaux (MIX) [L (G)/R (D)]
CD audio: 4 Hz-20 kHz
Puissance de laser:CLASS II/CLASS I
Alimentation: 9 V c.c.
(prise d'alimentation c.c.)
7,2V c.c.
Alimentation: 120 V c.a., 60 Hz
Consummation: 23 W
Sortie c.c.: 9 V, 1,5 A
Batterie externe (lithium-ion):
Tension: 7,2 V
Puissance: 3600 mAh
Dimensions L×P×H:
159 mm×140 mm×27 mm
[ [6^{1/4} \text{po} \times 5^{1/2} \text{po} \times 1^{1/16} \text{po}] ]