Dublin - TV SEG - Free user manual and instructions
Find the device manual for free Dublin SEG in PDF.
Download the instructions for your TV in PDF format for free! Find your manual Dublin - SEG and take your electronic device back in hand. On this page are published all the documents necessary for the use of your device. Dublin by SEG.
USER MANUAL Dublin SEG
Operating Instructions
Mode d'emploi
Istruzioed'uso
Inhalt
Important Safety Instructions 3
FIRST STEPS 5
Connecting External Equipment 5
Identification of Controls. 6
Front. 6
DESCRIPTION OF THE CONTROLS 7
Remote Control 7
Antenna connection 10
Powering on your device and the initial use. 10
Initial power on and performing settings. 10
Batteries. 10
Menu Operations 11
Picture Menu 11
SOUND MENU 12
CHANNEL MENU 13
Favorite Manager 14
Auto Search 14
Analog Manual Search. 15
Feature Menu 16
System Lock 16
Language 17
Setup Menu 17
DTV 19
CHANNEL MENU 19
Feature Menu 20
Channel List 21
EPG (ELECTRONIC PROGRAM GUIDE) 22
PC 22
Setup Menu 22
YPBPR 23
Setup Menu 23
YPBPR Setup 23
HDMI 24
Setup Menu 24
HDMI Setup 24
MEDIA 25
Movie Menu 25
Disk Manager 25
Music Menu 26
Photo Manager 26
Basic operating instructions 27
1.DVD on 27
2.Insert Disc 27
3. Play 27
Functions operating instructions 29
- Play 29
- Previous/Next 29
3.Forward/Backward 29 - Slow motion 29
5.Pause 29
6.Repeat 29
7.D.DISP 30 - Goto 30
- Intro 30
- Audio 30
- Language 30
12.Subtitle 31
13.Angle 31
14.Mute. 31 - Zoom 31
- Repeat A-B 31
- Volume 31
MP3/JPEGPlayback 32
Function Settings 33
1.DVD Function General Setup 33
- Others Functions Setup System Setup 33
Language Setup 35
Audio Setup 36
Dolby Digital Setup 36
Troubleshooting 37
Technical Specification 37
Wall Mount 38
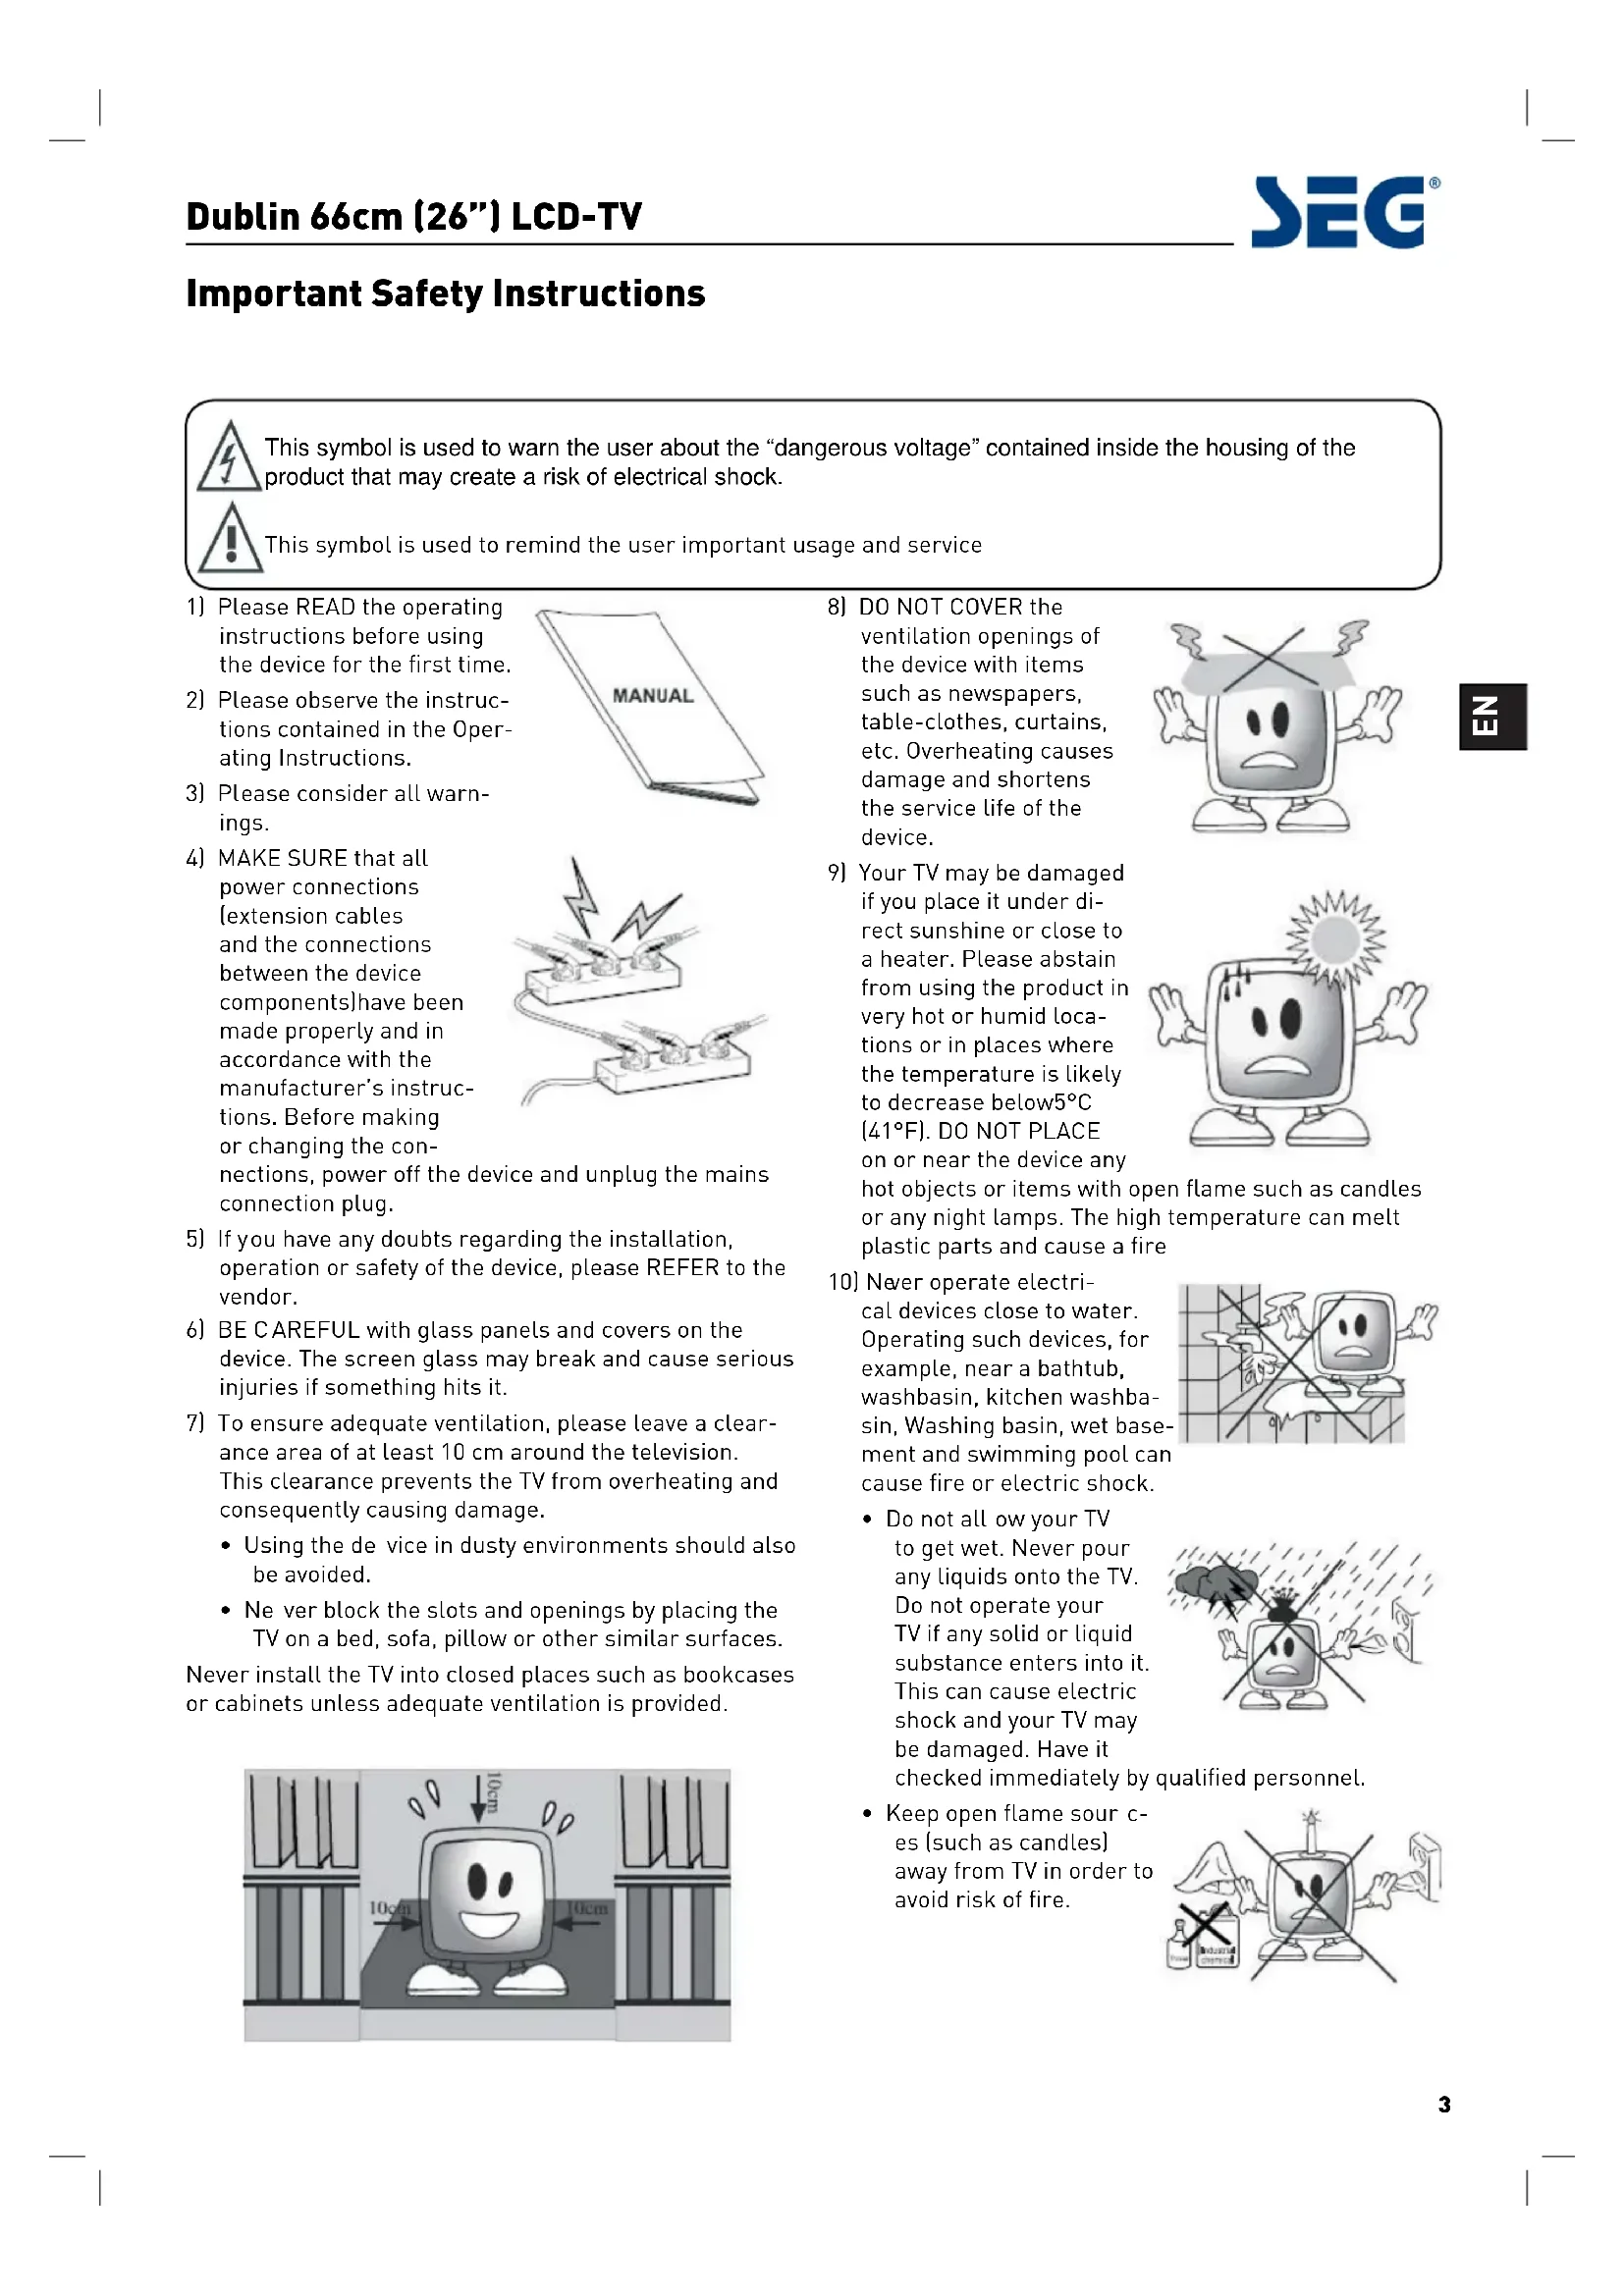
Important Safety Instructions

This symbol is used to warn the user about the "dangerous voltage" contained inside the housing of the product that may create a risk of electrical shock.

This symbol is used to remind the user important usage and service
1) Please READ the operating instructions before using the device for the first time.
2) Please observe the instructions contained in the Operating Instructions.
3) Please consider all warnings.
4) MAKE SURE that all power connections (extension cables and the connections between the device components) have been made properly and in accordance with the manufacturer's instructions. Before making or changing the connections, power off the d connection plug.
5) If you have any doubts regarding the installation, operation or safety of the device, please REFER to the vendor.
6) BE CAREFUL with glass panels and covers on the device. The screen glass may break and cause serious injuries if something hits it.
7) To ensure adequate ventilation, please leave a clearance area of at least 10cm around the television. This clearance prevents the TV from overheating and consequently causing damage.
- Using the de vice in dusty environments should also be avoided.
- Ne ver block the slots and openings by placing the TV on a bed, sofa, pillow or other similar surfaces.
Never install the TV into closed places such as bookcases or cabinets unless adequate ventilation is provided.

8) DO NOT COVER the ventilation openings of the device with items such as newspapers, table-clothes, curtains, etc. Overheating causes damage and shortens the service life of the device.
9) Your TV may be damaged if you place it under direct sunshine or close to a heater. Please abstain from using the product in very hot or humid locations or in places where the temperature is likely to decrease below 5^ (41^) . DO NOT PLACE on or near the device any hot objects or items with or any night lamps. The plastic parts and cause a
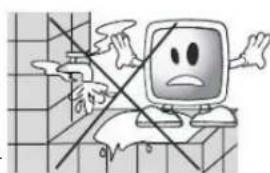
10) Never operate electrical devices close to water. Operating such devices, for example, near a bathtub, washbasin, kitchen washbasin, Washing basin, wet basement and swimming pool can cause fire or electric shock.
- Do not all ow your TV to get wet. Never pour any liquids onto the TV. Do not operate your TV if any solid or liquid substance enters into it. This can cause electric shock and your TV may be damaged. Have it
checked immediately by qualified personnel.
- Keep open flame sour c- es [such as candles] away from TV in order to avoid risk of fire.


11] DO NOT USE headphones at extremely high volume levels since this may cause permanent loss of hearing.

12] Operate your TV only in the 230V50Hz voltage range. Use the AC power cable supplied with the product. If your TV is a grounded [Class I] product, then it must certainly be connected to a grounded socket.
- The sock et into which you plug in the AC power cable or the adaptor must be within easy reach.

- Turn off your device with the ON/OFF button and then unplug it in order to disconnect it from mains.
Note: If your device has an adaptor, then use the adaptor and AC power cable supplied with your product. Do not use defective sockets. Make sure that the plug is firmly inserted into the socket. If the plug remains loose, then it can cause fire due to arching. Refer to an electrician to have your socket replaced.
13) Make sure that the power cable is not stepped on and that there is no ending at the plug sections, plug heads and device output point.

14] Use only the add-ons/accessories specified by the manufacturer.
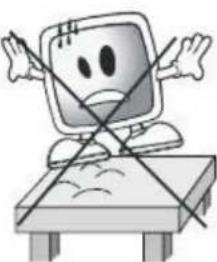
15] Use only together with the carts, bases, tripods, brackets or stands specified by the manufacturer or sold along with the product. When using a cart, pay attention that it won't overturn while carrying the cart/device combination and cause injuries. The device must be fixed to the floor or wall as indicated in the installation instructions in order to avoid any possible damages. Place your device on a level surface.

16] Unplug the power cable during thunderstorms or when you will not use your device for a long period of time.

17 Consult authorised service personnel for service requirements. Never attempt to repair the device yourself.
Opening the cabinet can expose you to dangerous voltages or other hazardous situations. Service is

required in situations such as damage to the power cable of the device or its plug, water spills or substances falling into the device, the device is subjected to rain or moisture, it does not operate normally or it is dropped.
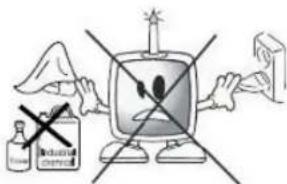
18) Wipe the TV cabinet clean with a soft and dry cloth. Wipe dust from the screen gently with a soft cloth. Stubborn stains can be cleaned with a cloth slightly moistened with soap and luke

warm water. Never use solvents such as thinner or gasoline for cleaning. Unplug the AC power cable from the socket when cleaning the TV. Otherwise, there shock.
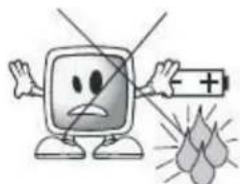
19) Do not dispose of the batteries in fire.
- Do not short circuit, dismantle or overheat the batteries. There is the risk of explosion if the batteries are not replaced correctly. Replace only with the same or equivalent type batteries.
Note 1: This is a Class A product. During operation, the device can cause radio interference. In this case the user may have to remedy this. Please contact your specialist dealer.
Note 2: Electromagnetic fields can cause temporary performance degradation. This can be distinguished as noise in the image.
Note 3: Tighten the screws that are used to connect the wall mount kit by 1 Nm (10kgfcm) maximum.
Note4: Packaging materials are no toys. Please keep away from children. Plastic bags can cause suffocation when pulled over the head.
20 Disposing of the exhausted batteries: Dispose of the exhausted batteries in accordance with the local laws and regulations in order to protect our environment
21) Do not dispose of your TV with regular household waste. Observe local laws and regulations for disposal.


FIRST STEPS
Follow the instructions below to correctly perform the initial configuration of the television set and remote control. In subsequent pages you will find details of how to use the remote control and how to tune in channels.
- Place the television set on a solid and completely horizontal surface.
- Connect the antenna cable to the" RF" socket at the back side of the television set
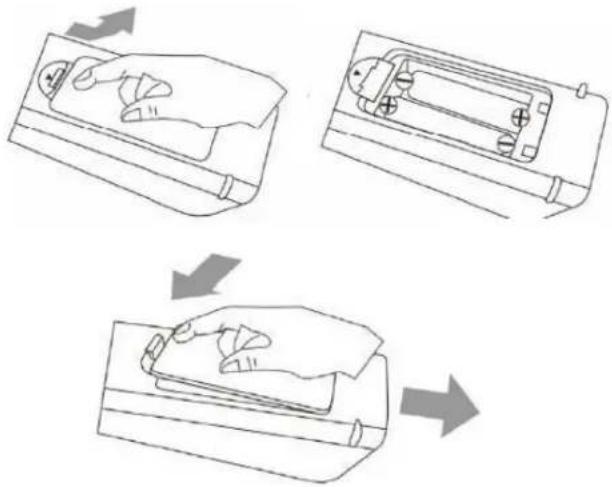
- Remote control:
Open the battery compartment. Insert the two batteries (type AAA 1.5V) supplied with the unit.
- Power:
Plug the input socket of the power cable into the "AC IN" port at the backside of the television set. Then, plug the other end of the cable into the power socket.
5. Turn on the television set:
Press the On/Stand-by (按钮) button on the remote control or at the front of the television set to turn it on. The power light at the front of the set will turn green. When the television set is on Stand-by mode the power light will be red.
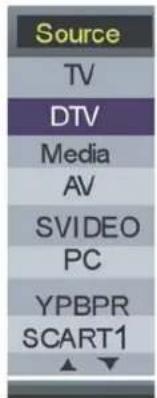
- Select Inputs:
TV/DTV/Media/AV/S-VIDEO/PC/YPBPR/SCART1/SCART2/HDMI1/HDMI2/DVD
Press the Input button to display the inputs mode menu, then press / key to select a input source and press Enter key to confirm.
Connecting External Equipment
You can connect a wide range of audio and video equipment to your TV.
NOTE: Refer to the manufacturer's guide for further-instructions on how to connect the equipment.


The following table lists a range of the available connectors on the TV.
| Connector Purpose | |
| USB1 | Plays multimedia file |
| USB2 | USB2 (DVD mode) |
| HDMI IN Receives High Quality HDMI input. | |
| VGA IN Receives the video signal from a PC. | |
| PC ADUIO IN Receives audio signal for PC mode. | |
| S-VIDEO Brightness and chroma signal input. | |
| YPbPr COMPONENT IN Receives component video signal for YPBPR (Component) mode. | |
| AV IN Receives composite video signal and audio signal for AV mode. | |
| SCART Receives a complete AV (Audio Visual) signal. | |
| RF IN Receives TV signals from an external aerial. | |
| SD SD CARD READER | |
Identification of Controls
Front
I. Control Panel Functions:
1-INPUT- Select the input signals: TV/DTV/Media/AV/SVIDEO/PC/YPBPR/SCART1/SCART2/HDMI1/HDMI2/DVD
2-MENU - Enter into MENU
3-VOL+ -Volume up/Right orientation
4-VOL- -Volume down / Left orientation
5-CH+ - Cahnnel up
6-VOL--Channel down
7-PLAY/PAUSE - Press to pause/play the DVD playback.
8-EJECT - DVD eject button
9-POWER - Switches the TV to power and on again
10-Remote Control Sensor Standby indicator
11-Stand
DESCRIPTION OF THE CONTROLS
Remote Control
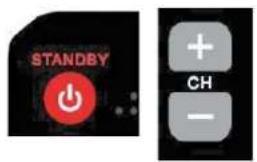
- STANDBY
Switch the TV set in and out of standby mode
2.AUTO
Press this key to AUTO config the picture setting while in VGA mode
- MUTE
Press this button to mute or restore sound.
- <0> - <9> Numeric keys.

Press this key to return to the previous channel in no-menu mode.
6.-1--
One / two digit TV channel selection
- VOL+/VOL-
Volume increase or decrease choice.
- ASPECT
The zoom mode settings can be select in the screen setting.
- AUDIO
Select audio channel.
10.DISPLAY
Show the current mode of information.
- CH + / CH-
Press these buttons to select channels in descending, or ascending order
12.CURSORSA / /
The four directions allow you to navigate the menu
Advanced Function in TV mode:
/ : Function Channel increase/decrease
/FunctionVolumedecrease/increase
- ENTER
Press this key enters chose item or into channel list. Both ENTER and OK function.
14.LCD MENU
Press this button to enter the menu screens for various optional adjustable Settings.
15.DVD SETUP/EXIT
To show the DVD SETUP menu while in DVD mode, or EXIT current setting in any mode.
- INPUT
Switching current signal source selection.
- PMODE
Press this button to select the desired picture mode.
- SMODE
Press this button to select the desired sound mode.
- SLEEP
Automatic domancy time setting.
20.FAV
Favorite television programs.
21.FAV-
View last pages of the favorite program.
22. FAV+
View the next page of the favorite program.
23. EPG
Electronic Program Guide.
24. TEXT/ANGLE
Starts and exits Teletext.
Use to access various camera angles in a DVD.
25. HOLD/ZOOM
Press this button to hold the Teletext page on display to prevent the page from changing. Zoom in or out while in DVD mode.
26. TV/RADIO
Press to switch between DTV and Radio.
27. SUBTITLE
Subtitle key in digital TV.
28. INDEX/D.MENU
Back to teletext home page.
DVD-Disc menu.
29. SIZE/TITLE
Switch the teletext size.
When DVD is playing, brings up the Title Menu.
30. REVEAL/D.DISP
Reveal the hidden Information for some Teletext pages, and presses again to hide the information.
Displays the disc info.
31.SUBPAGES/GOTO
Function subpage in teletext mode.
DVD GOTO.
32.
Stops in MEDIA mode or DVD mode.
33.
Press to start to record and twice to stop in DTV mode.
34.MEDIA/
Direct access to the MEDIA PAUSE and STEP play in DVD mode.
35.
Start the playback or resume play back from pause in MEDIA mode or DVD mode.
Fast forward in MEDIA mode or DVD mode.
Fast reverse in MEDIA mode or DVD mode.
Skip to the previous track/title/chapter in MEDIA mode or DVD mode.
Skip to the next track/title/chapter in MEDIA mode or DVD mode.
36.PROGRAM/RED
Use the PROGRAM button to edit the sequence of the program when in DVD mode. RED is a user defined shortcut button in Teletext mode or in DTV mode.
37. A-B/BLUE
A-B selects the start and finish points in repeat cycle in DVD mode. Blue is a user defined shortcut button in Teletext mode or in DTV mode.
38. INTRO / GREEN
Use the INTRO button to show nine sub pictures of the program if the disk inserted support this function when in DVD mode.
GREEN is a user defined shortcut button in Teletext mode or in DTV mode.
39. REPEAT/YELLOW
Repeat: repeats selected sections in DVD mode. Yellow is a user defined shortcut button in Teletext mode or in DTV mode.
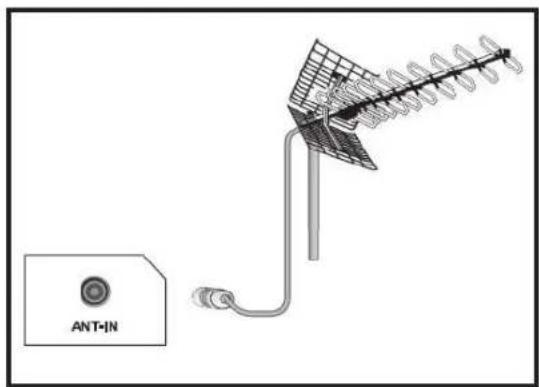
Antenna connection
If you use a 75 Ohm coaxial cable (round cable) as an antenna cable, connect the antenna plug directly to the antenna input located on the TV. Motorized vehicles, energy lines and telecommunication lines affect your antenna. Therefore, be careful to install your antenna away from these and metal surface in such a way that it shall not swing. Do not make your antenna cable longer than required and do not coil it. Make sure that it is not crimped passing through a window or door. Your antenna and cable might be affected by natural phenomena such as rain, wind, smoke and humidity over time. Periodically check your antenna and equipment.
Powering on your device and the initial use
-
Insert the power cable into the appropriate power supply input located on the back panel of the LCD TV.
-
Insert the plug of the power cable supplied with the device into the mains socket. Note 1: Your TV will switch to the stand-by mode in five minutes if there is no broadcast signal from antenna.
-
To power on your television, press SB any numerical key or CH+ or CH- keys on the remote control.
Note: If you are not going to use your television for a long time, unplug its power cable from the socket.
Initial power on and performing settings
To set up your television, read the sections on the TV controls and making the channel settings.
Batteries
Open the lid of the battery compartment and make sure that you have placed the batteries in the correct direction. For this remote control, UM-4, IEC R03 or AAA 1.5 V batteries are suitable.
Do not throw your old batteries into the fire, discard them in a dedicated waste area for this purpose.
Do not mix used batteries with new ones or different types of batteries together. The performance of the remote control will be reduced at a distance of 8 meters from or at an angle of 30 degrees beyond the center of the TV.
Menu Operations
Press INPUT button to display the input source list;
Press / button to select the input source you want to watch;
Press ENTER button or button to enter the input source; Press MENU button to display the MAIN OSD MENU; Press / button to select the MENU you want; Press ENTER button or button to enter the sub menu; Press / button to select the option and then press ENTER button or button to enter the submenu. Press / button to adjust the value or press / button to select in the sub menu;
You can press MENU button to save and return back to the previous menu, and press EXIT button to exit the entire menu.
Press display button on the remote control to display program information.
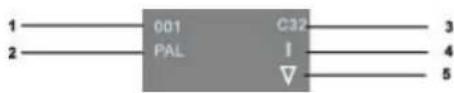
- Current Channel Number.
- The colour system of current channel, could be changed on Manual Search menu.
- Current Channel Name.
- The sound system of current channel, could be changed on Manual Search menu.
- The NICAM mode of current program.

If the icon of NICAM mode is red, it means the current program supplies multiple NICAM signals, and you can change it by pressing AUDIO button.
Four kinds of NICAM modes and relative icons:

Mono

Stereo

Dual1

Dual II
Picture Menu
Press MENU button to display the main menu.
Press / button to select Picture in the main menu then press ENTER button or button to enter.
- Press / button to select the option that you want to adjust in the Picture menu, then press ENTER button or button to enter.
- Press / button to adjust or press / button to select.
- After finishing your adjustment. Press MENU button to save and return back to the previous menu, and press EXIT button to exit the entire menu.
Picture Mode
Press / button to select Picture Mode, then press ENTER button or button to enter and press / button to select. [Available Picture Mode: Personal, Standard, Sport, Movie, Mild, Game].
You can change the value of brightness, contrast, sharpness, colour, when the picture is in Personal mode, If you change the value of these selections, the Picture Mode will be "Personal" automatically.
TIPS: You can press PMODE button on the remote control again and again to change the Picture Mode directly.
Brightness
Press / button to select Brightness, then press ENTER button or button to enter and press / button to adjust.
Contrast
Press / button to select Contrast, then press ENTER button or button to enter and press / button to adjust.

Sharpness
Press / button to select Sharpness, then press EN-TER button or button to enter and press / button to adjust.
Colour
Press / button to select Colour, then press ENTER button or button to enter and press / button to adjust.
Colour Temperature
Press / button to select Colour Temperature, then press / button to select standard, warm, cool. (Only available in PC, VGA mode.)
Noise Reduction
Press / button to select Noise Reduction, then press / button to select off, Low, Middle, High.
SOUND MENU
Press MENU button to display the main menu. Press / button to select Sound in the main menu, then press ENTER button or button to enter.
- Press / button to select the option that you want to adjust in the Sound menu, then press ENTER button or button to enter.
- Press / button to adjust or press / button to select.
- After finishing your adjustment. Press MENU button to save and return back to the previous menu, and press EXIT button to exit the entire menu.
Sound Mode
Press / button to select Sound Mode, then press / button to select.
Available Sound mode: Personal, Voice, Music, Theatre, Standard).
You can change the value of bass and treble, Balance, when the sound is in Personal mode.
TIPS: You can press SMODE button on the remote control to change the Sound Mode directly.
Bass
Press / button to select Bass, then press ENTER button or button to enter and press / button to adjust.
Treble
Press / button to select Treble, then press ENTER button or button to enter and press / button to adjust.
Balance
Press / button to select Balance, then press ENTER button or button to enter and press / button to adjust.
AVL
Press / button to select AVL, then press / button to select On or Off.
CHANNEL MENU
Press MENU button to display the main menu. Press / button to select Channel in the main menu, then press ENTER button or button to enter.
- Press / button to select the option that you want to adjust in the Channel menu, then press ENTER button or button to enter.
- Press / button to adjust or press / button to select.
- After finishing your adjustment. Press MENU button to save and return back to the previous menu, and press EXIT button to exit the entire menu.
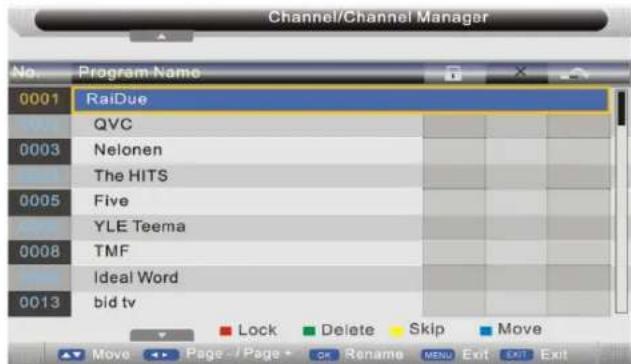
Channel Management
Press / button to select Channel Management, then press ENTER button or button to enter
- Press red button to set the current channel to lock, if the current channel already lock, press red button again will unlock.
- Press green button to set the current channel to delete, if the current channel already delete, Press green button again will cancel delete.
- Press yellow button to skip the current channel. Use the cursor buttons to select the channel you wish to skip. Press yellow button and will be shown at the channel selected. To remove the skip function, press the yellow button again.
- If one of the s tations has been incorrectly placed in the station listing, you may move it to the correct position. Using the cursor select the channel to be moved, press blue button, move the station to the new location and press ENTER button, this will move the station to the new location.
If there is delete channel logo, press MENU button or ENTER button, the menu will appear as follows:
Delete the selected items if select "Yes" and press ENTER button, otherwise cancel to delete the selected items. After a few second, the menu will appear as follows:


- Press button to turn to the previous page, press button to turn to the next page.
- Press / button to select channel, then press EN-TER button to enter the rename channel menu.
Note: Channel name is 8 characters. Press green button to switch the size of the letters. Press / or / button to select the character. Press EXIT button, the menu will appear as follows:

Exit the entire menu if select "No" and press ENTER button
Save successful if select "Yes" and press ENTER button the menu will appear as follows

Favorite Manager
Press / to select Favorite Manager, then press ENTER button or button to enter.
Press / button to select Channel, press red button to set to Fav1.
Press / button to select Channel, press green button to set to Fav2.
Press / button to select Channel, press yellow button to set to Fav3.
Press / button to select Channel, press blue button to set Fav4.
If the current channel already be one of your favorite channel, press red/green/yellow/blue button again will set it to a normal channel. Press MENU button or EXIT button, the successfully updated menu will appear.
Auto Search
Press / button to select Auto Search, then press ENTER button or button to enter (When the System Lock is on, please input the default password"0000").
Country
Press ENTER button or button to enter, then press / button to select appropriate country. Move the cursor to the start, press ENTER button, the menu will appear as follow:
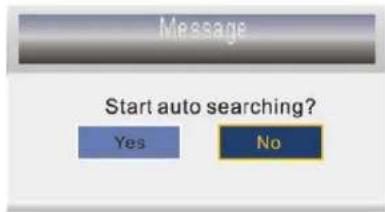
Exit the entire menu if select "No" and press ENTER button. If select "Yes" and press ENTER button. Auto search menu will appear as follows:
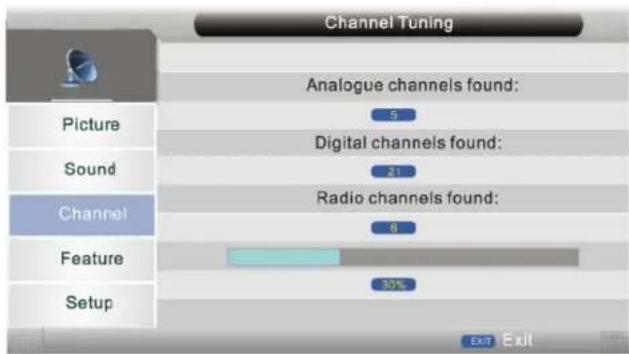
When auto search finish, the save successful menu will appear a few second.
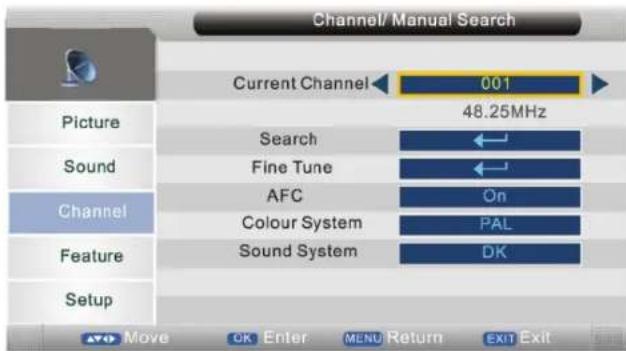
Analog Manual Search
Press / button to select Analog Manual Search, then press ENTER button or button to enter. (When the System Lock is on, please input the default password"0000")
Note: Save the result of the adjustment.
AFC
Press / button to select AFC, then press / button to select On or Off.
Colour System
Press / button to select Colour System, then press
/ button to select Auto, PAL, SECAM.
Sound System
Press / button to select Sound System, then press
/ button to select BG, DK, I, L/L'.

Current Channel
Press / button to select Current Channel, then press
/ button to select Search
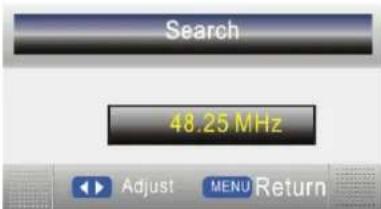
Search
Press / button to select Search, then press ENTER button or button to enter, the menu will appear as fol
lows:
Press / button shortly to adjust channel frequency, and press for a long time to begin search until the units found.
Press MENU button to return back to the previous menu.
Fine Tune
Press / button to select Fine Tune, then press ENTER button or button to enter, the menu will appear as fol
lows:
Press / button to adjust channel frequency, press MENU button to return back to the previous menu.
Feature Menu
Press MENU button to display the main menu.
Press / button to select Feature In the main menu, then press ENTER button or button to enter.
- Press / button to select the option that you want to adjust in the Feature menu, then press ENTER button or button to enter.
- Press / button to adjust or press / button to select.
- After finishing your adjustment, Press MENU button to save and return back to the previous menu, and press EXIT button to exit the entire menu.
System Lock
Press / button to select System Lock, then press ENTER button or button to enter.
System Lock
Press / button to select System Lock, then press / button to select on or off (when the System Lock is on, please input the default password "0000").
Parental Lock
Press / button to select Parental Lock, then press / button to select.
Key Lock
Press / button to select Key lock, then press / button to select On or Off to lock the KEY board.
Change Pin Code
Press / button to select Change Pin Code, then press ENTER button or button, change pin code menu will appear as follows:
Input old password at "Old Password", if the old password is incorrect, the password will not be allowed to modify. Default Password "0000" Input new password at "New Password".
Input new password again at "Confirm New Password", if new password and confirm new password consistent, the successfully updated menu will appear a few seconds, otherwise, the menu will display the password mismatch.
Language
Press / button to select Language, then press ENTER button or button to enter submenu.
OSD Language
Press / button to select OSD Language, then press / button to select.
Preferred Subtitle
Press / button to select Preferred Subtitle, then press / button to select.
Preferred Audio
Press / button to select Preferred Audio, then press / button to select.
TT Language
Press / button to select TT Language, then press / button to select.
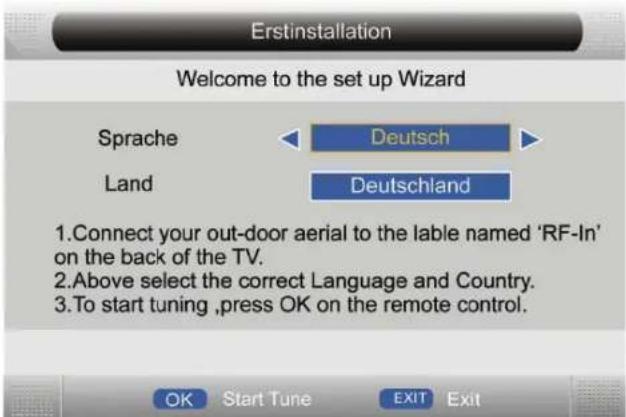
First Time Installation
Press / button to select First Time Installation, then press ENTER button or button to enter submenu.
Press ENTER button to start auto search. The picture appear as follow:
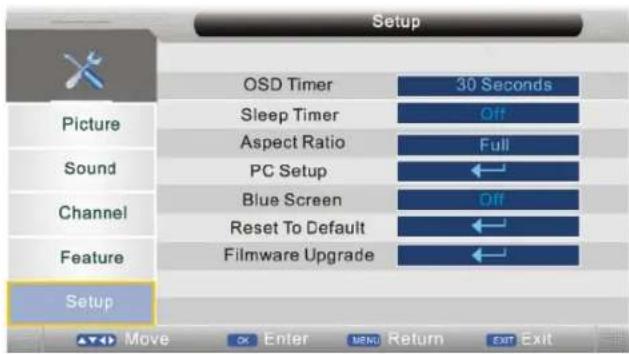
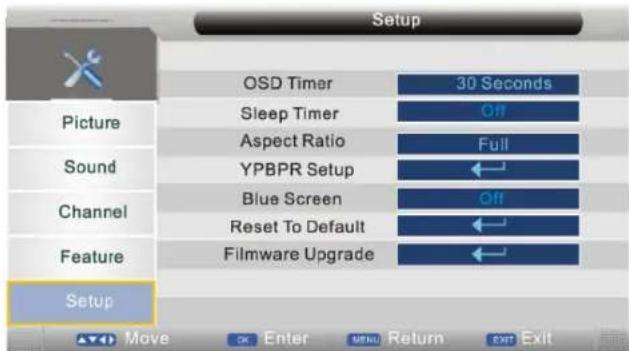
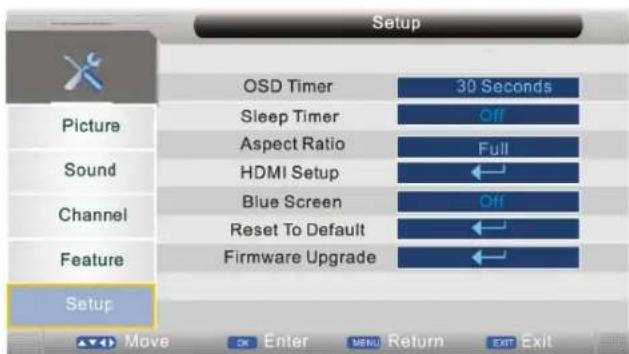
Setup Menu
Press MENU button to display the main menu. Press / button to select Setup in the main menu, then press ENTER button or button to enter.

- Press / button to select the option that you want to adjust in the Setup menu, then press ENTER button or button to enter.
- Press / button to adjust or press / button to select.
- After finishing your adjustment. Press MENU button to save and return back to the previous menu, and press EXIT button to exit the entire menu.
OSD Timer
Press / button to select OSD Timer, then press / button to select.
Available OSD Timer: 5 Seconds, 10 Sec., 15 Sec., 20 Sec., 25 Sec., 30 Sec.].
Sleep Timer
Press / button to select Sleep Timer, then press / button to select. (Available Timer: Off, 15 Min., 30 Min., 45 Min., 60 Min., 75 Min., 90 Min., 105 Min., 120 Min.).
Aspect Ratio
Press / button to select Aspect Ratio, then press / button to select.
Available aspect ratio: Auto, Full, 4:3,16:9,14:9, Zoom1, Zoom2).
TIPS: You can press Aspect button on the remote control to change the aspect ratio directly.
Blue Screen
Press / button to select Blue Screen, then press / button to select On or Off.
Reset To Default
Press / button to select Reset To Default, then press ENTER button or button, the password menu will appear [when the System Lock is on].
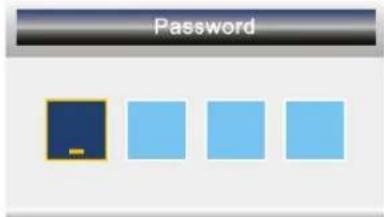
At the cursor, input password to enter, default password is "0000".
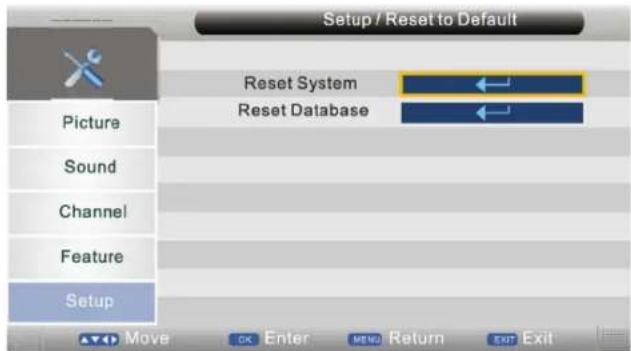
Reset System
Press / button to select Reset System, then press ENTER button or button, the menu will appear as follows:
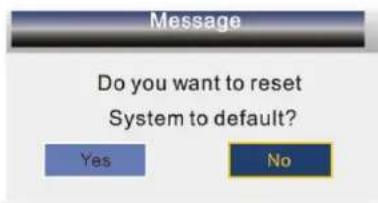
Return back to the previous menu if select "No" and press ENTER button.
If select "Yes" and press ENTER button, the resetting menu will appear a few seconds.
Reset Database
Press / button to select Reset Database, then press ENTER button or button, the menu will appear as follows:
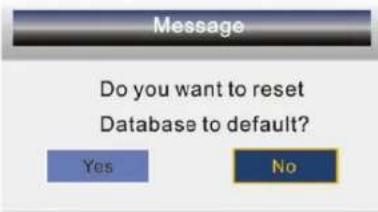
Return back to the previous menu if select "No" and press ENTER button.
If select "Yes" and press ENTER button, the resetting menu will appear a few seconds, then the first time installation menu will appear.
Firmware Upgrade
Press / button to select Firm Software Upgrade, then press ENTER button or button to enter the software upgrade menu. Through DVD mode.
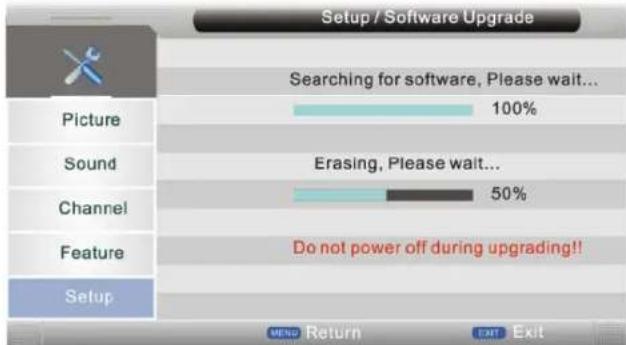
Erase the original program, then the menu will appear as follows
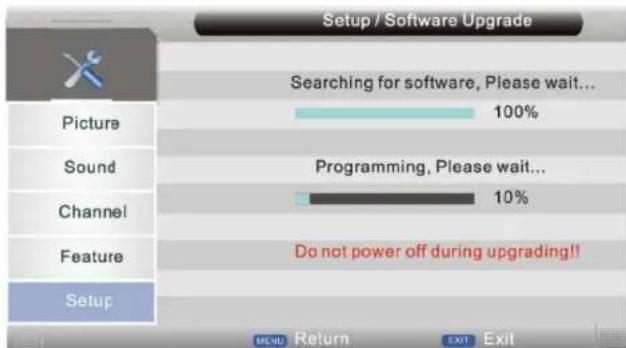
Note: Do not cut off the power during the upgrade. Otherwise the upgrade won't occur.
Notes:
- Media/AV/S-Video/PC/YPRPB/SCART 1/SCART2/HDMI 1/HDMI 2/DVD source's channel menu is not available and they will be shown in gray.
- Picture menu and description are the same as that for TV source, for detailed information please refer to page 12.
- Sound menu and description are the same as that for TV source, for detailed information please refer to page 13.
- Feature menu and description are the same as that for TV source, for detailed information please refer to page 17.
- Setup menu and description are the same as that for TV source, for detailed information please refer to page 18.
DTV
Press DISPLAY button on the remote control to display program information.

- The current channel No. and channel name.
- The current program name.
- The current time.
- The current program's start-stop time.
Notes:
- Picture menu and description are the same as that for source. For detailed information please refer to page 12.
- Sound menu and description are the same as that for TV source. For detailed information please refer to page 13.
- Setup menu and description are the same as that for TV source. For detailed information please refer to page 18.
CHANNEL MENU
Press MENU button to display the main menu. Press / button to select Channel in the main menu, then press ENTER button or button to enter.

- Press / button to select the option that you want to adjust in the Channel menu, then press ENTER button or button to enter.
- Press / button to adjust or press / button to select.
- After finishing your adjustment, press MENU button to save and return back to the previous menu, and press EXIT button to exit the entire menu.
Channel Manager
Press / button to select Channel Manager, then press ENTER button or button to enter.
Digital Manual Search
Press / button to select Digital Manual Search, then press ENTER button or button to enter (when the System Lock is On, please input the default password "0000").
Channel
Press button to select Channel.
Move the cursor to the start, press ENTER button or will appear a few seconds.
NOTE:other menu and description are the same as that TV source, for detailed information please refer to page 12-18.
Feature Menu
Press MENU button to display the main menu. Press / button to select Feature in the main menu, then press ENTER button or button to enter.
- Press / button to select the option that you want to adjust In the Feature menu, then press ENTER button or button to enter.
- Press / button to adjust or press / button to select.
- After finishing your adjustment, Press MENU button to save and return back to the previous menu, and press EXIT button to exit the entire menu.
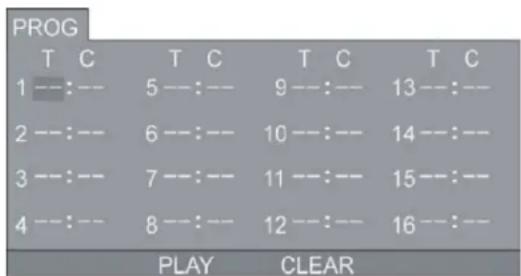
Timer
Press / button to select Timer, then press ENTER button or button to enter.
Press / button to select Ch No, then press Red button to delete selected channel, the menu will appear as follows:

Return back to the previous menu if select "No" and press ENTER button.
If select "Yes" and press ENTER button to delete the selected channel from the timer list.
Press Green button to delete all timers, the menu will appear as follows:
Return back to the previous menu if select "No" and press ENTER button. If select "Yes" and press ENTER button to delete all timers.
- Press Yellow button to add channel to the timer list, the menu will appear as follows:
Type
Press / button to select Type, then press ENTER button or button to enter and press / to select DTV or Radio.
Channel
Press / button to select Channel, then press ENTER button or button to enter and press / to select channel you want to add to the timer list.
Start Time
Press / button to select Start Time, then press ENTER button to enter and press 0~9 button to input time.
Date
Press / button to select Date, then press ENTER button to enter and press 0-9 button to input date.
Mode
Press / button to select Mode, then press ENTER button or button to enter and press / to select Once, Daily, Weekly, Monthly.
Recorder (When the PVR format support)
Press / button to select Recorder, then press button to enter and press / button to select ON or OFF
Press / button to select channel that you want to edit, press Blue button to edit selected channel, the timer edit menu will appear.
Clock
Press / button to select Clock, then press OK button or button to enter submenu.
Time Zone
Press / button to select Time Zone, then press / button to select.
DST
Press / button to select, press / button to select On or Off.
Hearing Impaired
Press / button to select Hearing Impaired, then press / button to select On or Off.
Channel List
Press ENTER button on the remote control to display the channel list menu.
Press / button to select channel that you want to view, then press ENTER button to view.
FAV List
Press FAV button on the remote control to display the FAV list menu.
Press / button to select channel that you want to view, then press ENTER button to view. Press / button to switch favorite 1, favorite 2, favorite 3 and favorite 4.
Subtitle
Press Subtitle button on the remote control, the subtitle menu will appear as follows:
Press / button to OFF, then press ENTER button, will not display subtitle. Press / button to ENG, then press ENTER button, show the subtitle in English. Press EXIT to exit.
Multi-Audio
Press AUDIO button on the remote control to display the multi-audio menu.
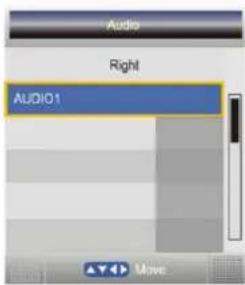
Press / button to select the audio format of the language, [available audio format: right, stereo, left].
Press / button to select the different language.
EPG (ELECTRONIC PROGRAM GUIDE)
Press EPG button on the remote control to display the EPG daily mode menu.
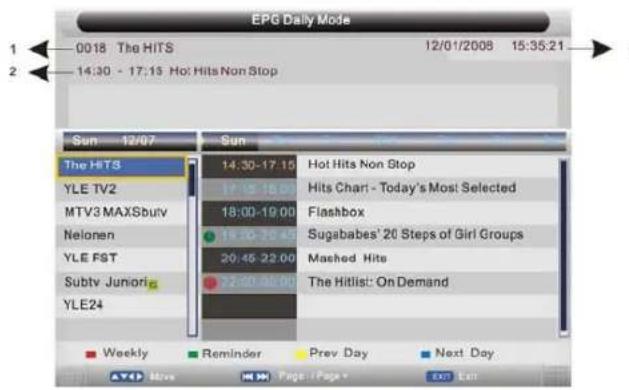
1: The current channel No. and channel name.
2: The current program's start-stop time and program name.
3: The current date and time.
Press / button to select the channel or program.
Press / button to choose between the channel and program.
Press RED button to switch between EPG weekly mode and EPG daily mode.
To see programmes for the yesterday or further. Press the YELLOW button to decrease the date.
To see programmes for the next day or further, press the BLUE button to increment the date.
For more information about a programme .press INFO. Press GREEN button to add channel to the reminder list.
PC
Setup Menu
Press MENU button to display the main menu. Press / button to select Setup in the main menu, then press ENTER button or button to enter.
- Press / button to select the option that you want to adjust in the Setup menu, then press ENTER button or button to enter.
- Press / button to adjust or press / button to select.
- After finishing your adjustment, Press MENU button to save and return back to the previous menu, and press EXIT button to exit the entire menu.
PC Setup
Press / button to select PC Setup, then press ENTER button or button to enter.
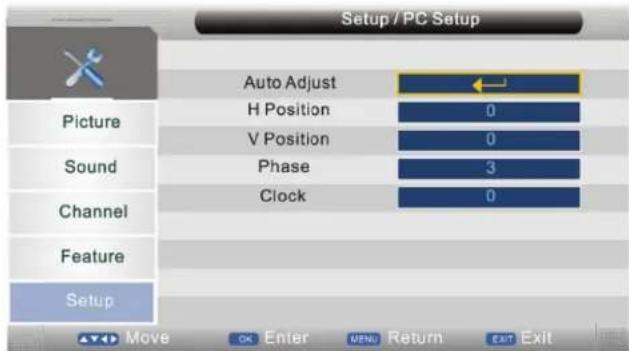
Auto Adjust
Press / button to select Auto Adjust, then press button, the menu will appear a few second.

H Position
Press / button to select H Position, then press button to enter, press / button to adjust. Adjusts the picture horizontally.
V Position
Press / button to select V Position, then press button to enter and press / button to adjust. Adjusts the picture vertically.
Phase
Press / button to select Phase, then press button to enter and press / button to adjust. Adjusts the clock phase to minimise picture jitter.
Notes:
- Aspect ratio and blue screen at the PC source is not available, and they will be shown in gray. Other menu and description are the same as that for TV source, for detailed information please refer to page 18.
- PC source's channel menu is not available, and it will be shown in gray.
- Picture menu and description are the same as that for TV source, for detailed information please refer to page 12.
- Sound menu and description are the same as that for TV source, for detailed information please refer to page 13.
- Feature menu and description are the same as that for TV source, for detailed information please refer to page 17.
YPBPR
Setup Menu
Press MENU button to display the main menu. Press / button to select Setup in the main menu, then press ENTER button or button to enter.
- Press / button to select the option that you want to adjust in the Setup menu, then press ENTER button or button to enter.
- Press / button to adjust or press / button to select.
- After finishing your adjustment, Press MENU button to save and return back to the previous menu, and press EXIT button to exit the entire menu.
YPBPR Setup
Press / button to select YPBPR Setup, then press ENTER button or button to enter.
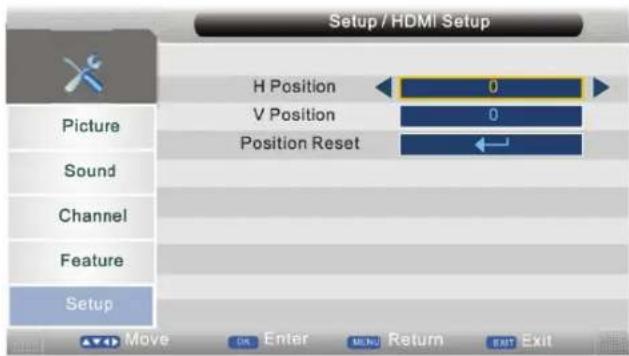
H Position
Press / button to select H Position, then press ENTER button or button to enter and press / button to adjust. Adjusts the picture horizontally.
V Position
Press / button to select V Position, then press ENTER button or button to enter and press / button to adjust. Adjusts the picture vertically.
Position Reset
Press / button to select Position Reset, then press ENTER button or button to reset H position and V position.
Notes:
- YPBPR source's channel menu Is not available, and It will be shown In gray.
- Picture menu and description are the same as that for TV source, for detailed information please refer to page 12.
- Sound menu and description are the same as that for TV source, for detailed information please refer to page 13.
- Feature menu and description are the same as that for TV source, for detailed information please refer to page 17.
SCART
Notes:
- SCART source's channel menu is not available, and it will be shown in gray.
- Picture menu and description are the same as that for TV source, for detailed information please refer to page 12.
- Sound menu and description are the same as that for TV source, for detailed information please refer to page 13.
- Feature menu and description are the same as that for TV source, for detailed information please refer to page 17.
HDMI
Setup Menu
Press MENU button to display the main menu. Press / button to select Setup in the main menu, then press ENTER button or button to enter.
- Press / button to select the option that you want to adjust in the Setup menu, then press ENTER button or button to enter.
- Press / button to adjust or press / button to select.
- After finishing your adjustment, Press MENU button to save and return back to the previous menu, and press EXIT button to exit the entire menu.
HDMI Setup
Press / button to select HDMI Setup, then press ENTER button or button to enter.
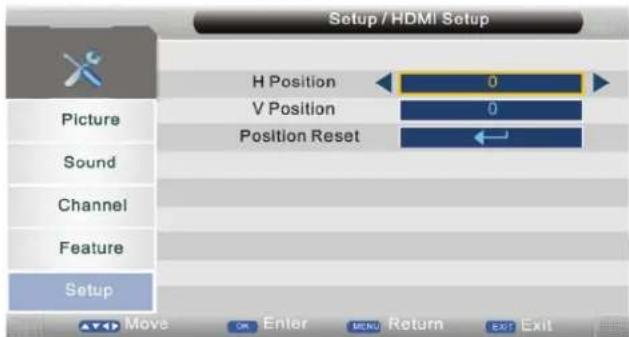
H Position
Press / button to select H Position, then press ENTER button or button to enter and press / button to adjust. Adjusts the picture horizontally.
V Position
Press / button to select V Position, then press ENTER button or button to enter and press / button to adjust. Adjusts the picture vertically.
Position Reset
Press / button to select Position Reset, then press ENTER button or button to reset H position and V position.
HDMI Setup
Press / button to select HDMI Setup, then press ENTER button or button to enter and Press / button to select Overscan or Underscan.
Notes:
- Other menu and description are the same as that for TV source, for detailed information please refer to page 18.
- HDMI source's channel menu is not available, and it will be shown in gray.
- Picture menu and description are the same as that for TV source, for detailed information please refer to page 12.
- Sound menu and description are the same as that for TV source, for detailed information please refer to page 13.
- Feature menu and description are the same as that for TV source, for detailed information please refer to page 17.
MEDIA
Note: Before operating MEDIA menu, Plug in USB device or memory card, then press INPUT button to set the Input Source to Media. Press / button to select MEDIA in the Source Menu, then press ENTER button or button to enter.
You can also enter the Media by pressing MEDIA button on the remote control.
- Press / button to select the option that you want to adjust in the Media menu, then press ENTER button or button to enter.
- Press / button to adjust or press / button to select.
- After finishing your adjustment, Press MENU button to save and return backtothe previous menu, and press EXIT button to exit the entire menu.
Movie Menu
Press / button to select Movie in the main menu, then press ENTER button or button to enter.
Press MENU button to return back to the previous menu. Press / button to select the folder that you want to view, press ENTER button or button to select the sub folder, press ENTER button to play, press the EXIT button to return back. Press blue button, then press / button to select Slide Time, Repeat, BG music, Disk Manager.
Slide Time
Press button to select 3 seconds, 5seconds, 10secondsand15seconds.
Repeat
Press / button to select Repeat one, Repeat folder, Random, Single, Folder.
BG Music
Press / button to select Off, on.
NOTE: After the selection through / one can select via ENTER the chosen option.
Disk Manager
Press ENTER button or button to enter and select the folder.
- Press green button to delete the selected folder.
- Press yellow button to rename the selected folder.
- Press blue button to return menu.
Return
Press ENTER button to return.
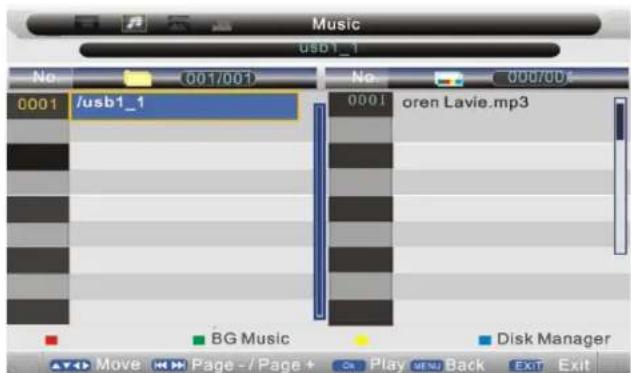
Music Menu
Press / button to select Music in the main menu, then press ENTER button or button to enter. Press MENU button to return back to the previous menu.
Press green button, it appears as follow: BG Music Folder is set.

Notes:
- The menu and description are the same as that for Movie menu, for detailed information please refer to page 26.
Photo Manager
Press / button to select Photo Manager in the main menu, then press ENTER button or button to enter. Press MENU button to return back to the previous menu.
Press green button, then press / or / to skin the photos, press ENTER button to view.
Notes: Other menu and description are the same as that for Movie menu, for detailed information please refer to page 26.
This Product can play the following format of DVD Disc.
| Disc type Disc Size Recorded Ti | Time Recorded Content Re | marks | ||
| DVD 12cm | Single side:120mins.Approx. | DVD format: Compressed digitalAudio and Video | ||
| Double side:240mins.Approx | ||||
| Super VCD 12cm 45mins. Approx. | MPEG 2 Compressed DigitalAudio and Video | Included: SVCD, VCD | ||
| VCD 12cm 74mins. Approx. | MPEG 1 Compressed DigitalAudio and Video | Included:VCD2.0,VCD1.1 | ||
| CD 12cm 74mins. Approx. CD-D | A: Digital Audio | |||
| HD-CD 12cm 74mins. Approx. H | D-CD: Digital Audio | |||
| MP3/JPEG 12cm 600mins. Approx. | ox. Compressed digital Audio | |||
Notice: Also support DVD-R, CD-R, and CD-RW playback.
Basic operating instructions
1. DVD on
Turn on the LCD TV, switch to the DVD mode for the DVD operation.
2.Insert Disc
Insert the Disc to the Disc slot (Printed side facing towards the rear of the TV); the player will load the disc automatically. There will have an on screen indication "NO DISC" then "READ". After loading the disc content, it will switch to play mode automatically. If the disc is already placed inside, the disc will be read automatically.
Note 1: For some discs, after loading the content of the disc, need to press PLAY or select from the disc menu to start.
Note 2: Please make sure when inserting the Disc, the printed side of the disc should be facing the rear of the TV. When inserting the Disc incorrectly, you may damage the DVD mechanism
3. Play
According to the disc content, the disc menu will display for your selection.
When playing the disc, you may use PAUSE button to toggle between Play and Pause mode. This product also supports Menu, Title, and Sequential and Program playback.
3.1 Menu Playback
(For DVD, Super VCD and VCD2.0 discs)
<1> Press MENU button
- F or DVD discs, the screen will display the DVD Disc Menu [Root Menu]
- For Super VCD & VCD2.0 discs, the screen will display the Super VCD, VCD2.0 Disc Menu (PBC: [OFF]) (Press the MENU button to display the PBC status.)
- Playback the Super VCD & V CD2.0 discs, the default PBC status is ON.
<2> For DVD discs, use the navigation buttons to select and Play the highlighted contents; For Super VCD & VCD2.0 discs, use the numeric buttons to play your favorite content directly. (Note: PBC should be OFF.)
<3> Press ENTER or PLAY button to start from the highlighted content.
<4> Returns to the Root Menu when playing the disc - F or DVD discs, press MENU to display the Disc Menu.
- For Super VCD & VCD2.0 discs, when PBC is ON, press MENU to display the Disc Menu.
<5> STOP
- Press STOP button once to stop. Press PLAY button to resume from where you stopped.
- Press STOP button Twice to stop. Press PLAY button to start from beginning. In order to protect the disc, press STOP butt on then press EJECT button to take the disc out. When the disc is ejected, hold the disc edges lightly and take it from the eject direction to prevent scratches.
When not using the DVD function (in stand-by mode or using others modes for a long time), please take out the disc to protect the DVD loader and the disc.
3.2 TitlePlayback
[For DVD Disc only]
- Press TITLE button, there will have an on screen indication "TITLE".
- Press the direction or numeric buttons to select your favorite title.
- Then will play from the first chapter of the selected title.
3.3 Sequential Playback
[For DVD, Super VCD, VCD, CD, CD-G, HD-CD, MP3/JPEG discs].
For Super VCD & VCD discs, if PBC is "ON" status, press PLAY button will enter the disc menu. Press MENU button to turn PBC OFF. Press PLAY button to start in sequent.
For others, while it stopped, press PLAY button to start in sequent.
3.4 Program Playback
(For DVD, Super VCD, VCD, CD, CD-G, HD-CD, MP3/JPEG discs).
Using Program playback, you can select max. 16 tracks from the disc to play back in programmed order.
OSD for Program playback
DVD, MP3/JPEG discs
SuperVCD, VCD, CD, CD-G, D-CD discs
If it is in PBC ON status, using program playback will turn to PBC OFF automatically. According to the highlight area input the title and chapter number by numeric buttons, press PLAY button to start; or move to the
While playing the program, you may press PROGRAM button to display the program menu for edit. To clear the program by moving to <CLEAR> and press ENTER button Or press STOP button to end the program. When press PLAY button again, the disc will play by sequent. While playing the program, there will have an on screen indication "PRG PLAY" and the current title and chapter number.
Functions operating instructions
1. Play
[For DVD, SuperVCD, VCD, CD, CD-G, HD-CD, MP3/JPEG discs].
- For DVD disc, press PLAY button from root or title menu; while playing the DVD, you may play your favorite title directly with title selection by pressing the TITLE button.
- For Super VCD & VCD discs, while playing the disc, you may play your favorite tracks by numeric buttons. [Note: When using the Program playback or when it is PCB ON status, you can only use PREV or NEXT buttons to change the track]
- For CD, CD-G & HD-CD discs, while playing the disc, you may play your favorite tracks by numeric buttons.
- ForMP3/JPEG disc, you may play your favorite tracks by numeric buttons from the content menu.
Note: From track 1-10, use numeric buttons directly; For tracks over 10, press - / - button first. (e.g. Track 15 press - / - then 5). If input track number is not valid, it will not function.
2. Previous/Next
(For DVD, SuperVCD, VCD, CD, CD-G, HD-CD, MP3/JPEG discs). While playing the disc;
- Press PREVIOUS button to play to the last Title / Chapter / track.
- Press NEXT button to play to the next Title / Chapter / track. For superVCD &VCD discs, in PBC OFF status;
- If the current tr ack is the first one, press PREVIOUS button will stop the playback.
- If the current track is the last one, press NEXT button will stop the playback. For DVD discs, the above functions may vary due to different DVD disc's structure.
3.Forward/Backward
[For DVD, Super VCD, VCD, CD, CD-G, HD-CD, MP3/JPEG discs]
While playing the disc, you may use forward or backward function.
- There are 4 speeds for forward. Press forward button to toggle between different speeds in sequent. (FORWARDx2 - FORWARDx4 - FORWARDx8 - FORWARDx20 - Play)
- While in forward, you may press PLAY to resume normal speed.
- CD, HD-CD, MP3, forwar d also have audio output. For DVD discs, if forward to last title / chapter, it will start from the beginning. For Super VCD & VCD discs, in PBC ON status, if forward to the last track, it will start from the beginning.
-
There are 4 speeds for backward. Press backward button to toggle between different speeds in sequent. (BACKWARDx2 - BACKWARDx4 - BACKWARDx8 - BACKWARDx20 - Play)
-
While in backward, you may press PLAY to resume normal speed,
- For CD, HD-CD, MP3, backward also have audio output. For DVD discs, if backward to first title / chapter, it will start from the beginning. For SuperVCD & VCD discs, in PBC ON status, if backward to the first track, it will start from the beginning.
Note: During Forward or Backward, the sound will be off.
4. Slow motion
(For DVD, SuperVCD & VCD discs) While playing the disc, you may use slow motion function.
- There are 6 speeds for slow motion. Press SLOW button to toggle between different speeds in sequent. (SF1/2 - SF1/3 - SF1/4 - SF1/5 - SF1/6 - SF1/7 - Play)
- While in slow motion, you may press PLAY to resume normal speed. Note: During Slow motion, the sound will be off.
5. Pause
[For DVD, SuperVCD, VCD, CD, CD-G, HD-CD, MP3/JPEG discs]
FOR CD, CD-G, HD-CD & MP3/JPEG discs, press PAUSE button to pause; press PLAY button to resume.
FOR DVD, SuperVCD, VCD discs, press PAUSE button to pause; press STEP button to playback frame by frame; press PLAY button to resume.
6.Repeat
(For DVD, SuperVCD, VCD, CD, CD-G, HD-CD, MP3/JPEG discs)
Press REPEAT button once to display the current repeat mode.
- F or Super VCD, VCD, CD, CD-G, HD-CD, discs, while playing in sequent, you may use the repeat playback.
There are 2 repeat modes, press REPEAT to toggle between different modes in sequent. (REP : [OFF] - REP : [REP 1] - REP : [REP ALL]).
- F or DVD discs, you may setup the repeat playback mode.
There are 2 repeat modes, press REPEAT to toggle between different modes in sequent. (REP : [OFF] - REP : [REP CHAPTER] - REP : [TITLE] - REP : [REP ALL]).
- F orMP3/JPEG discs, while playing the disc, you may use the repeat playback. There are 3 repeat modes, press REPEAT to toggle between different modes in sequent. [REP: [OFF]-REP: [REP 1] - REP: [REP DIR] - REP: [REP ALL]].
7. D.DIS
(For DVD, SuperVCD, VCD, CD, CD-G, HD-CD, MP3/JPEG discs)
Press D.DISP button to activate the on screen roll-down menu for the current Title, Chapter, time and other information.
- F or DVD discs, (2 pages) Press D.DISP button once to display first page:
Disc type, Title -/-(Current / Full), Chapter -/-(Current/ Full), Full disc time. Press D.DISP button again to display second page:
Audio-/--[Current/Full] or OFF, Language, Audio type, Subtitle-/[Current/Full] or OFF. Press D. DISP button again to turn off the on screen display.
Audio-/--[Current/Full] or OFF, Audio type, Language, Subtitle-/[Current/Full] or OFF. Press D.DISP button again to turn off the on screen display.
- F or Super VCD discs, (2 pages) Press D. DISP button once to display first page: Disc type, Track -/ - (Current / Full), Mute status, PBC status, Repeat mode status, Current track time.
Press D.DISP button again to display second page:
Audio-/--[Current/Full] or OFF, Audio type, Language, Subtitle-/[Current/Full] or OFF. Press D.DISP button again to turn off the on screen display.
- F or CD, CD-G, HD-CD, MP3 / JPEG discs, Press D. DISP button once to display first page:
Disc type, Track -/-(Current / Full), Mute status, Repeat mode status, Current track time. Press D.DISP button again to turn off the on screen display.
8. Goto
(For DVD, Super VCD, VCD, CD, CD-G, HD-CD, MP3/JPEG discs)
This function allows you to play your favorite Title / Chapter/ Track. Press GOTO button to activate the on screen scroll-down menu for edit. According to the highlighted area, input your favorite Title / Chapter/Track number by numeric buttons or input the playback time.
After editing, press ENTER to start. If the input is invalid, it will not function.
Note: While editing, the GOTO button is not function.
If it is in PBC ON status, this function will switch the it to OFF.
9. Intro
(For Super VCD, VCD, CD, CD-G, HD-CD, MP3/JPEG discs)
- For Super VCD & VCD discs, while the disc had stopped, press INTRO button.
- The screen will split to 9 small display to play each track by 3sec. according to the tracks order.
- If it is in PCB ON s tatus, this function will switch it to OFF. (Note: If started the disc menu, preview will not function]
- Press PREV/ NEXT button to navigate the 9 small screens,
- Press PLAY buttons to playback the current selection,
- Press 1 - 9 button to activate corresponding small screen directly.
- For CD, CD-G, DTC-CD, HD-CD discs, while the disc had stopped, press INTRO button. It will start to play each track by 15sec.acordingtothetracks order.
- Press numeric buttons directly to select the tracks for preview
- Press PLAY button to playback the current track
- While playing the discs, you may also press INTRO button to activate this function. (Note: if the current track started over 15 sec. this function will start from next track.)
10. Audio
(For Super VCD, VCD, CD, CD-G, HD-CD, MP3/JPEG discs)
- Press AUDIO button once to display current audio mode.
- Press again to toggle between different audio modes in sequent,
- For Super VCD & VCD discs: [Stereo - L - R - Auto L - Auto R]
- For CD, CD-G, HD-CD, MP3 discs: (Stereo - L - R)
Note: Switching to Auto L/R audio channel may be vary due to different discs contents. Bilingual VCD discs can use AUDIO button to switch between different languages.
11. Language
[For DVD, SuperVCD discs]
- Press AUDIO button once to display current language.
- Press again to toggle between different languages mode in sequent.
Note: For Multi-languages DVD & Super VCD discs, press AUDIO button to select your favorite language.
12. Subtitle
[For DVD, SuperVCD discs]
- Press SUBTITLE button once to display current subtitle.
- Press again to toggle between different subtitle modes in sequent.
Note: For Multi-languages subtitle DVD & Super VCD discs, press SUBTITLE button to select your favorite subtitle language.
13 Angle
[For DVD discs]
- Press ANGLE button once to display current playback angle.
- Press again to toggle between different playback angle code in sequent, [e.g. Angle -/[Current/Full] or OFF]
Note: Only for DVD with multi-angle, press ANGLE button to select your favorite playback angle. Selectable playback angle depends on the availability of the DVD contents. Only for DVD with multi-angle, press ANGLE button to select your favorite playback angle. Selectable playback angle depends on the availability of the DVD contents.
14. Mute
(For DVD, Super VCD, VCD, CD, CD-G, HD-CD, MP3/JPEG discs)
- Press MUTE button to mute the audio output. There will have an on screen symbol indicate, "MUTE".
- Press again to cancel, or Press VOL + /VOL- to cancel and adjust the volume.
- In case there is no audio output, try to press MUTE button to cancel mute.
15. Zoom
[For DVD, SuperVCD, VCD, MP3/JPEG discs]
- Press ZOOM button to zoom in the picture.
- There are 6 zoom modes, press ZOOM button to toggle between different zoom modes in sequent. [Zoom2 - Zoom3 - Zoom4 - Zoom1/2 - Zoom1/3 - Zoom1/4 - Zoom OFF]
- In Zoom2-4, You may use the navigation butt ons to pan the picture for your favorite portion.
16. Repeat A-B
[For DVD, SuperVCD, VCD, CD, CD-G, HD-CD, MP3/JPEG discs]
- In normal Playback, fast forward or fast reverse, press A-B button at where you want to start the repeat portion. There will have an on screen indication "REPEAT A"
- In normal Playback, fast forward or fast reverse, press A-B button again at where you want to stop the repeat portion. There will have an on screen indication "REPEAT A - B".
- The repeat function started to playback the portion from A to B automatically.
- Press A-B button again to cancel. There will have an on screen indication "A-B CANCEL".
- For Super VCD, VCD&CD discs, repeat A-B is only function within the same track. When playing the others, repeat A-B will cancel automatically.
- For Super DVD discs, repeat A-B is only function within the same Title/Chapter. When playing the others, repeat A-B will cancel automatically.
17. Volume
[For DVD, SuperVCD, VCD, CD, CD-G, HD-CD, MP3/JPEG discs]
Press VOL-/VOL + buttons to adjust the output volume.
Note: Playback DVD discs in original code, is not adjustable.
MP3/JPEG Playback
After loading the MP3/JPEG disc, it will start to scan for the stored MP3/JPEG folders. Then will firstly display the MP3 contents automatically and start to play the first file (highlighted file). Screen as follow.
This display shows the current MP3 playback function

This displays the currently played track
Buttons to toggle between MP3 and JPEG playback
This display shows the current JPEG playback function
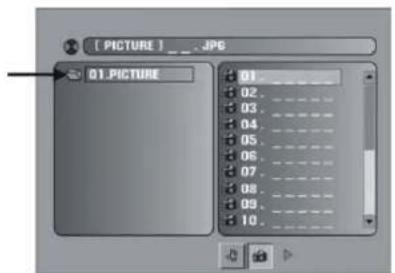
Using the navigation buttons to check your favorite folder and playback the first file or move to your favorite file.
Note:
- Pr ess / buttons to move the highlight to folders, documents or mode selection.
- Press numeric buttons to select the contents directly. For number over 10, press -- button first, [e.g. File number 15, press -- then 5.]
- When playback MP3 files, there is no picture display, only audio output.
- Playing the JPEG discs, pres s PROGRAM button to select slide effects. There are 17 slide modes, press PROGRAM button to toggle between different modes in sequent. [Start from top - Start from bottom - Start from left - Start from right - Start from upper left corner - Start from upper right corner - Merge from left / right - Horizontal blades - Vertical blades - Mergefrom4corners-Random Playback-Slide effect OFF]
- When play or pause with picture playback, you may use navigation buttons to flip / rotate the picture.
- button to flip horizontally
- button to flip vertically
Note: The maximum JPEG image size that can be displayed is 1280 x 1024
Function Settings
1. DVD Function General Setup
- Press DVD - SETUP button to activate the DVD player OSD menu;
- Press / button to move and highlight between different sub-menu. Press / ENTER button to enter the highlighted sub-menu.
- Press DVD-SETUP button to exit the OSD menu, or move the highlight to EXIT SETUP then press ENTER button to exit.
Note: In Setup mode, the following functions will be cancel or pause : TITLE, SUB-TITLE, DISPLAY, PLAY, SETUP, STOP, SLOW/STEP, NICAM / AUDIO, FF, FR, PREV, NEXT, GOTO, ZOOM, ANGLE, PROGRAM, PREVIEW, REPEAT, REPEAT A-B.
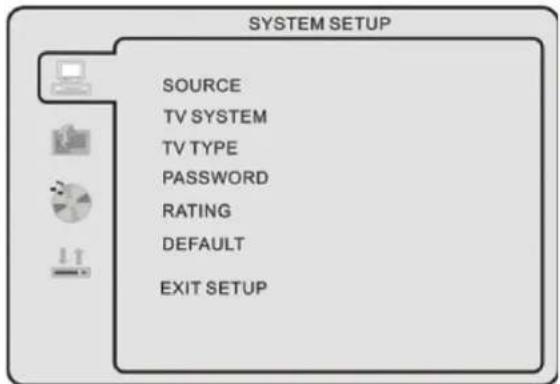
2. Others Functions Setup System Setup Source
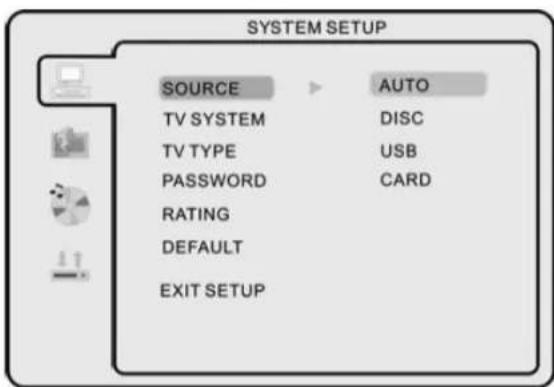
Select according to what type of media you want to playback [Disc USB memory card]. Default setting is DISC.
TV color system
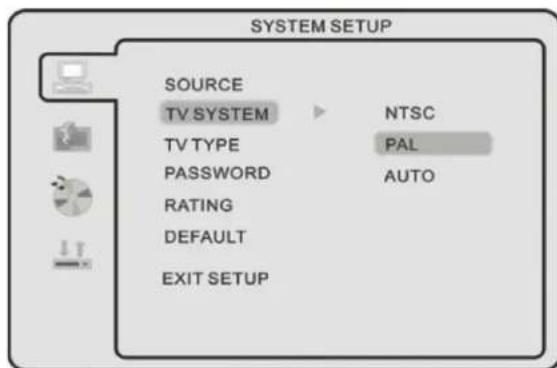
Select according to your TV color system: (NTSC, PAL, Auto for Multi-system) Default setting is PAL.
TV Type
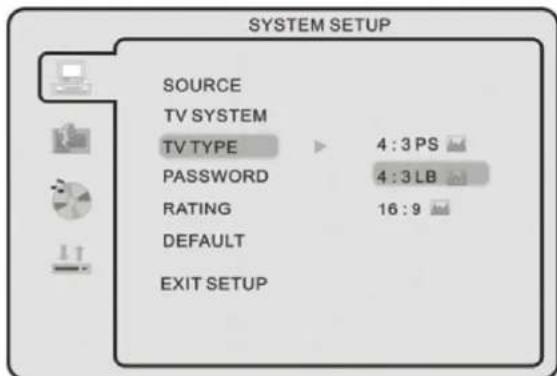
4:3PS: suitable for normal TV, when playback wide screen movie, the left and right of the screen will be cropped.
4:3LB: suitable for normal TV, when playback wide screen movie, the top and bottom will have a black border.
16:9: suitable for connecting a wide screen TV / Display.
Note:
- Playback screen size may vary according to the discs contents,
- Fordiscswith4:3contents,usinganymodewouldonlydispl aya4:3screen,
- Screen ratio selection should be according to the connected TV/Display aspect ratio.
Password
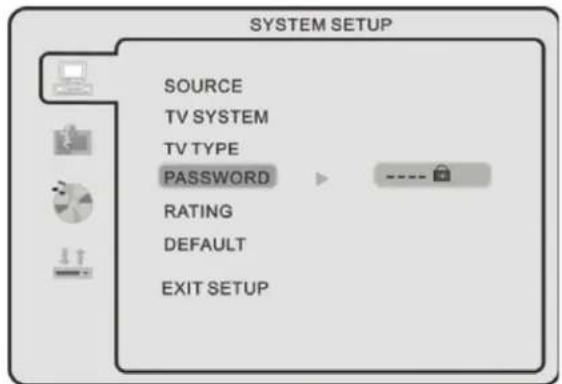
- The default setting is locked.
No Rating selection or change password could be done. To edit the Rating setting, please enter default password "0000" by numeric buttons, then press ENTER button to confirm. - To change password, input any 4-digit number when the lock is unlocked. Once the 4-digit number in entered, that will be your new password.
Default setting
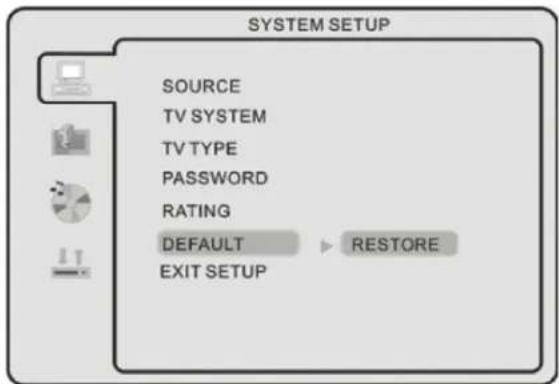
Press ENTER button to restore factory default.
Rating
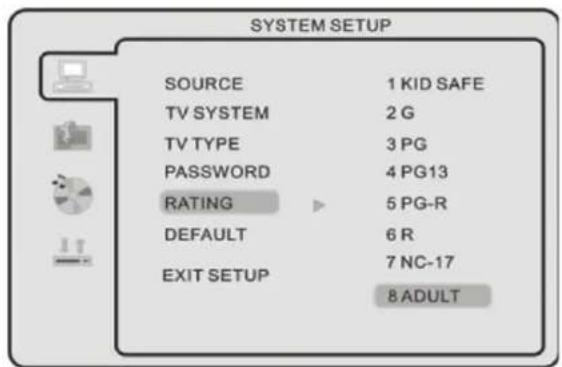
Playback for some discs with rating, you can select the rating setting according to your preference.
Rating restriction divided in eight different categories from KID SAFE to ADULT.
Note: Only editable when password is unlocked. And only can function when password is locked.
Language Setup
Press DVD-setup button to enter the DVD OSD menu.
OSD Language
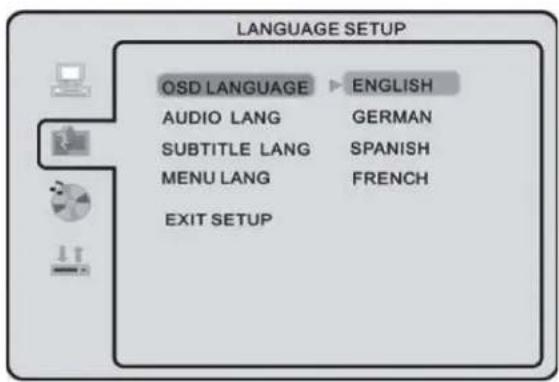
Use navigation buttons to select the OSD LANGUAGE setup icon, press ENTER button to confirm.
There are 6 languages for your selection, press / but-tons to toggle between different languages.
Press ENTER button to confirm.
Note: If the selected language is not included in you DVD disc content, it will select the default Language of the disc automatically.
Audio Language
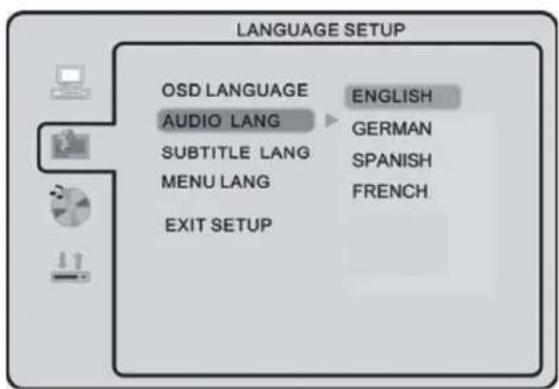
Use navigation buttons to select the AUDIO LANG setup icon, press ENTER button to confirm. Thereare6language esforyouselection,press / buttons to toggle between different languages.
Press ENTER button to confirm.
Note: If the selected language is not included in you DVD disc content, it will select the default language of the disc automatically.
Subtitle Language
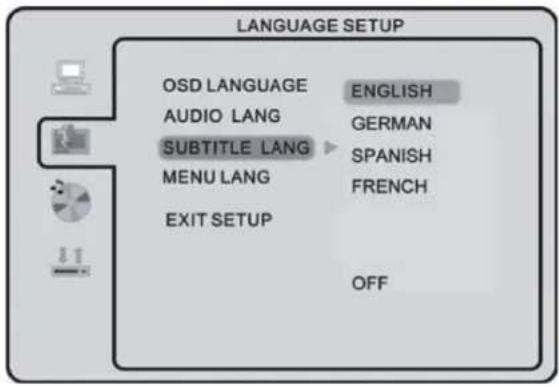
Use navigation buttons to select the SUBTITLE LANGUAGE setup icon, press ENTER button to confirm. There are 6 languages for you selection, press / buttons to toggle between different languages. Press ENTER button to confirm.
Note: If the selected language is not included in you DVD disc content, it will select the default language of the disc automatically.
Menu Language
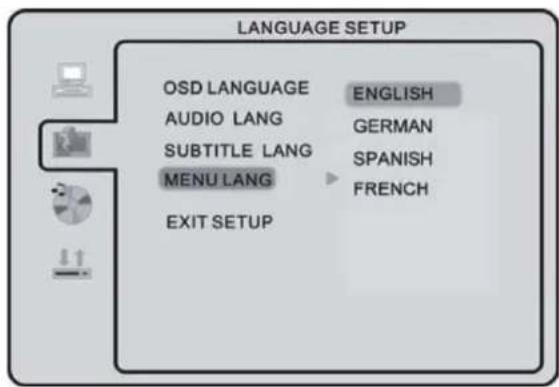
Use navigation buttons to select the MENU LANG setup icon, press ENTER button to confirm. There are 6 languages for you selection, press / buttons to toggle between different languages. Press ENTER button to confirm.
Note: If the selected language is not included in you DVD disc content, it will select the default language of the disc automatically.
Audio Setup
Tone
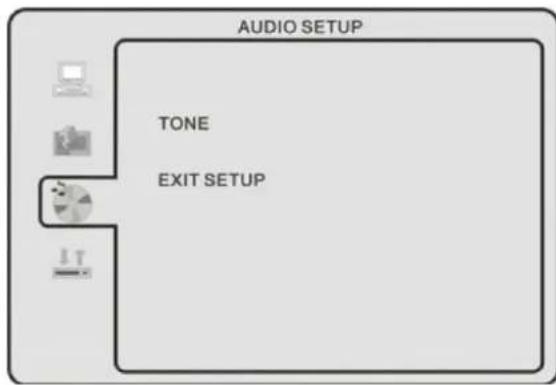
Use / buttons to adjust the Tone setting.
Dolby Digital Setup
Dynamic Range
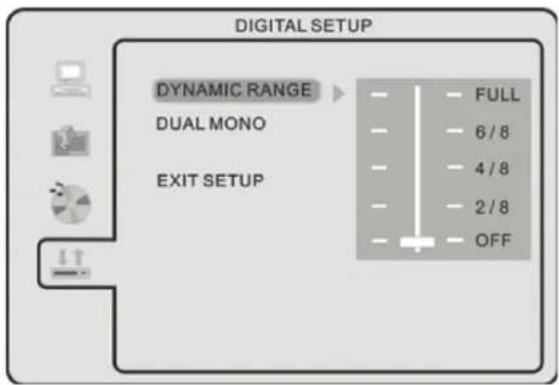
When switch the compress mode to "Audio output", adjust the compress ratio for different effect. When selected FULL, the peak signal value is smallest. When selected OFF, the peak signal value is biggest.
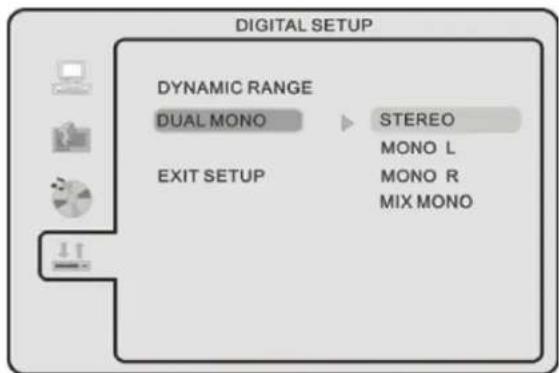
You can select four different audio output, STEREO, MONOL, MONOR, MIXMONO.
Troubleshooting
| Problem Possible Cause | |
| The TV does not work Ma | ke sure that the power supply is connected and that the mains supply is switched on. |
| Poor picture | Is the aerial plugged in? Try changing the direction of the outdoor aerial. High buildings and hills can cause ghost pictures or double images. Check the channel is tuned properly. Try adjusting the picture settings; brightness, colour, sharpness. Make sure the TV is not located close to electrical appliances |
| No TV picture | Is the aerial plugged in properly? Is the aerial lead damaged? Are all the plugs in the aerial lead fitted correctly? Is the TV in the correct input signal mode? |
| No sound Is the sound muted? Press the Mute button. Is the volume | |
| No colour | Adjust the colour setting. Check the programme is broadcast in colour. Check the channel is tuned properly. |
| No response from the remote control. | Is there an obstruction between the remote control and the sensor on the TV? Try changing the batteries. Avoid direct sunlight on the remote control sensor. |

WARNING: IF THIS DOES NOT WORK, CONTACT EITHER YOUR SUPPLIER OR A QUALIFIED TV REPAIR TECHNICIAN. NEVER ATTEMPT TO REPAIR THE TV YOURSELF.
Technical Specification
| Items Relevant illustrations | |
| Screen size 26" Wide Screen LCD | |
| Number of Pixels 1366x768 pixel | |
| Viewing Angle 160°[H]/150°[V] | |
| TV System | PAL. SECAM |
| DVB-T | |
| OSD Language English, Italiano, Espanol, Português, Francais, Deutsch | |
| Audio output NICAM/A2 | |
| Wall Mount VESA Standard (200 x 200 mm) | |
| Power Supply AC In 100-240V50/60HZ | |
| Power Consumption Working 150 W [Max] | |
| Dimension 895x662x250mm (Carton) | |
| Weight | 9.0 Kg (Net)/11.6Kg (Gross) |
| Accessories | User Manual incl. Warranty Card x1Remote Control x 2 AAA Batteries(Pair) Power Cord X1 |
Wall Mount
Screw taps x 4 for wall mounting
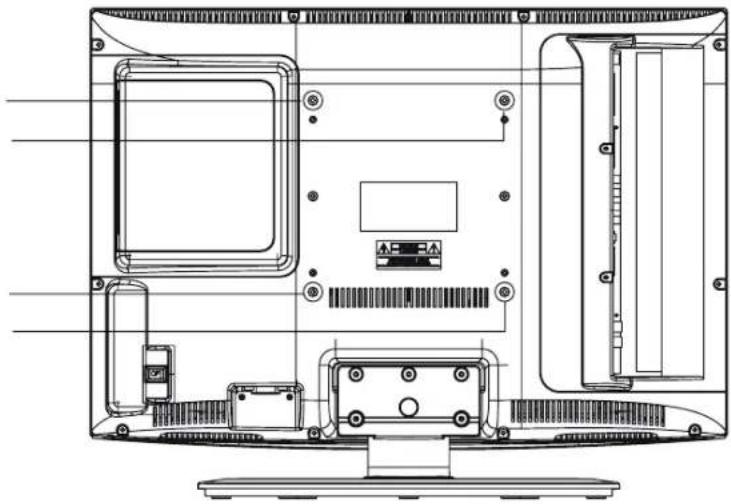
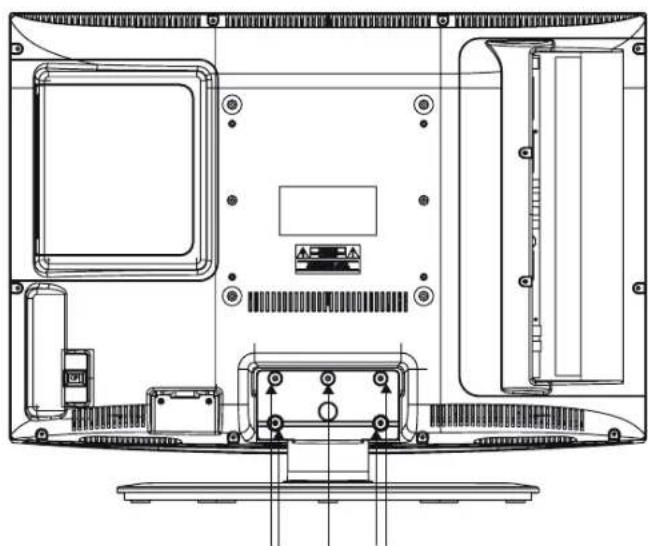
Remove the stand by taking out the 5 screws

Do not dispose of this product in the usual household garbage at the end of its life cycle; hand it over at a collection point for the recycling of electrical and electronic appliances. The symbol on the product, the instructions for use or the packing will inform about methods
for disposal.
The materials are recyclable as mentioned in its marking. By recycling, material recycling or other forms of re-utilization of old appliances, you are making an important contribution to protect our environment.
Please inquire at the community administration for the authorized disposal location.
Notice:
Disposing of the exhausted batteries:
Dispose of the exhausted batteries in accordance with the local laws and regulations in order to protect our environment.
Notice:
Packaging materials are no toys. Please keep away from children. Plastic bags can cause suffocation when pulled over the head.
This product fulfils the following EU regulations:
EN55013:2001+A1:2003+A2:2006
EN55020: 2007
EN61000-3-2:2006
EN61000-3-3:1995+A1:2001+A2:2005
EN55022:2006{CLASS-A}
EN55024:1998+A1:2001+A2:2003
EN60065:2002+A1:2006

Contents
Current Channel (Chaine active)
Specifications techniques
EPG (GUIDA ELETTRONICA AI PROGRAMMI) 22
PC 22
Menu Setup 22
YPBPR 23
Menu Setup 23
YPBPR Setup 23
HDMI 24
Menu Setup 24
HDMI Setup 24
MEDIA 25
EPG (GUIDA ELETTRONICA AI PROGRAMMI)
service@schmid-electronics.de