
AV14BM8EPS - Television JVC - Free user manual and instructions
Find the device manual for free AV14BM8EPS JVC in PDF.

| Product type | Color television |
| Brand | JVC |
| Model | AV14BM8EPS |
| Dimensions (W x H x D) | 374 x 332 x 378 mm |
| Weight | 9.4 kg |
| Power supply | 220-240 V AC, 50 Hz |
| Power consumption | 59 W max |
| Screen size | 14 inches (cathode ray tube) |
| Color systems | PAL, SECAM, B/G, L |
| Reception | VHF (Band I/III), UHF, Hyperband, Cable TV |
| Number of presets | 100 |
| Connectors | 2 Scart (AV-1 and AV-1 S), F-AV input (RCA), headphone jack, RF antenna 75 ohms |
| Remote control | Yes, with full functions |
| Teletext | Yes |
| APS system | Automatic programming of channels |
| Program timer | Programmable timer up to 2 hours |
| Child lock | Yes, disables front panel buttons |
| Audio output | 2 W RMS (10% THD) |
| Care and cleaning | Soft dry cloth, do not use abrasive or liquid cleaners |
| Safety | Do not expose to moisture, do not block ventilation openings, unplug during storms |
| Spare parts and repairability | Use manufacturer-specified parts; repair by qualified technician only |
Frequently Asked Questions - AV14BM8EPS JVC
User questions about AV14BM8EPS JVC
0 question about this device. Answer the ones you know or ask your own.
Ask a new question about this device
Download the instructions for your Television in PDF format for free! Find your manual AV14BM8EPS - JVC and take your electronic device back in hand. On this page are published all the documents necessary for the use of your device. AV14BM8EPS by JVC.
USER MANUAL AV14BM8EPS JVC
MANUEL D'INSTRUCTIONS
Safety Precautions 1
Remote Control Buttons 2
Control Panel Buttons 3
Antenna Connections 3
Preparation 4
Features 4
Before Switching on your TV
Power connection 4
Aerial Connections 4
How to connect the external equipments 4
Inserting batteries in the remote control handset 4
Switching the TV ON/OFF 4
To switch the TV on 4
To switch the TV off 4
Initial Settings 4
Operating with the onset buttons 5
Operating with Remote Control 5
Menu System 5
Picture Menu 5
Feature Menu 6
Install. Menu 7
Program. (Programming) Menu 7
Other Features 8
Sound Mute 8
Information on Screen 8
To Display the Time 8
Standard 8
VCR Control Buttons 8
Teletext 9
To operate Teletext 9
To select a page of Teletext 9
To Select Index Page 9
Searching for a teletext page while watching TV 9
To Select Double Height Text 9
To Reveal "concealed" Information 9
To Stop Automatic Page Change 9
To Select a Subcode Page 9
To exit Teletext 9
Connect the External Equipments 10
Via the Euroconnector 11
AV-1 S Mode 11
Via the RCA jacks 11
Via the ANT (aerial) socket 17
TV and Video Recoder (VCR) 11
NTSCPlayback 11
Connecting Headphones 11
Tips 11
Specifications 12
Safety Precautions
1. Power Source
The receiver should be operated only from a 220-240V AC, 50Hz . outlet. Ensure you select the correct voltage setting for your convenience.
2. Power Cord
The power supply cord should be placed so that they are not likely to be walked on or pinched by items placed upon them or against them. Pay particular attention to cord where they enter the plug, power outlet, and the point where they exit from the receiver.
3. Moisture and Water
Do not use this equipment in a humid and damp place (avoid the bathroom, the sink in the kitchen, and near the washing machine). Do not expose this equipment to rain or water and do not place objects filled with liquids on it as this may be dangerous.
4. Cleaning
Before cleaning, unplug the receiver from the main supply outlet. Do not use liquid or aerosol cleaners. Use with soft and dry cloth.
5. Ventilation
The slots and openings on the receiver are intended for ventilation and to ensure reliable operation. To prevent overheating, these openings must not be blocked or covered in anyway.
6. Lightning
In case of storm and lightning or when going on holiday, disconnect the power cord from the wall outlet.
7. Replacement Part
When replacement parts are required, be sure the service technician has used replacement parts which are specified by the manufacturer or have the same specifications as the original one. Unauthorized substitutions may result in fire, electrical shock, or other hazards.
8. Servicing
Please refer all servicing to qualified personnel. Do not remove cover as this may result in electric shock.
9. Flame sources
Do not place naked flame sources on the apparatus.
10. Stand-By
Do not leave your TV stand-by or operating condition when you leave your house.
Warning!
Any intervention contrary to regulations, in particular, any modification of high voltage or a replacement of the picture tube may lead to an increased concentration of x-rays. Any television modified in this way no longer complies with license and must not be operated.
Instructions for waste disposal:
Packaging and packaging aids are recyclable and should principally be recycled. Packaging materials, such as foil bag, must be kept away from children.
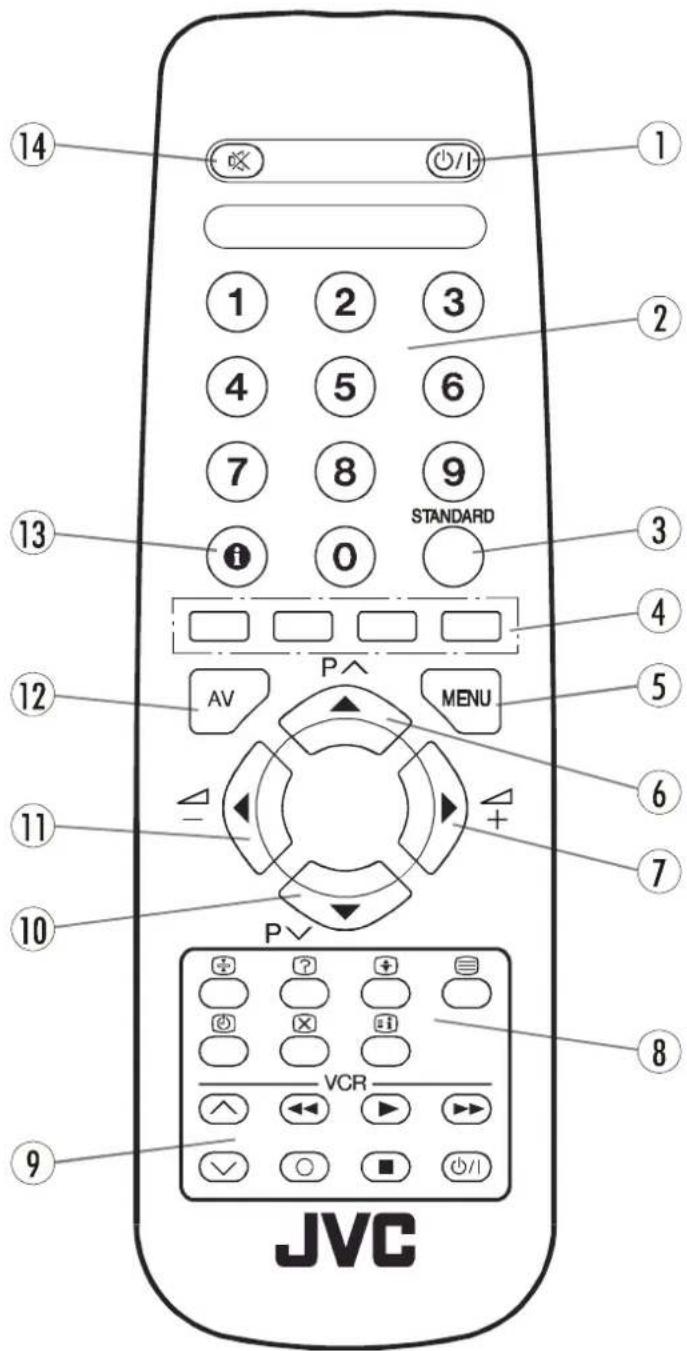
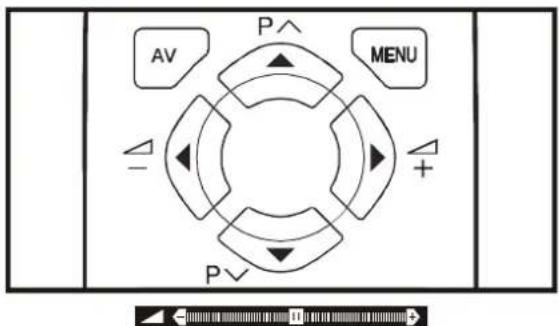
Remote Control Buttons
① 与Atand By / Power
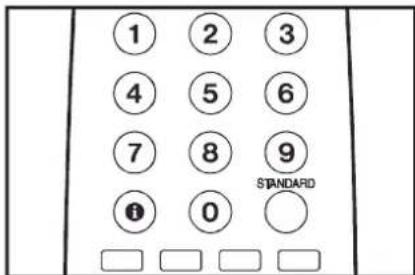
② 0 - 9 = Direct Program
3 Standard Button (PICTURE default settings)
4 Colour Buttons
5 MENU = Menu Button
6 Cursor Up / Programme Up
7 Cursor Right / Volume +
Teletext Control Buttons
9 VCR Control Buttons
10 Cursor Down / Programme Down
(1) Cursor Left / Volume -
12 AV = AV Button
13 Information Button
14 Mute

CAUTION
RISK OF ELECTRIC SHOCK

The lightning flash with arrowhead symbol, within an equilateral triangle, is intended to alert the user to the presence of uninsulated "dangerous voltage" within the product's enclosure that may be of sufficient magnitude to constitute a risk of electric shock of persons.
The exclamation point within an equilateral triangle is intended to alert the user to the presence of important operating and maintenance (servicing) instructions in the literature accompanying the appliance.
Control Panel Buttons
Antenna Connections
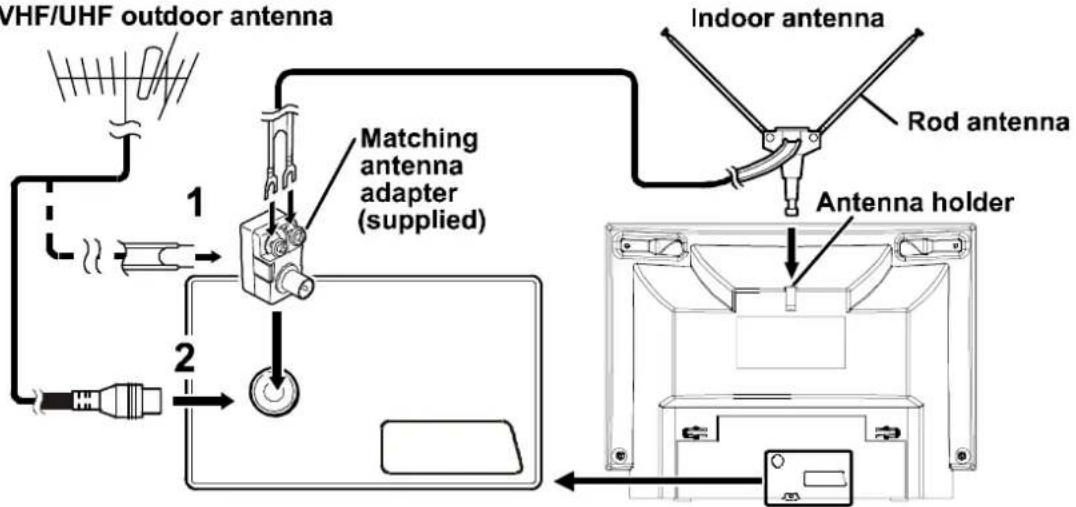
VHF/UHF outdoor antenna
AV14BJ8EPS
VHF/UHF outdoor antenna
Preparation
Place TV on a solid surface.
For ventilation, leave a space of at least 10cm free all around the set. To prevent any fault and unsafe situations, please do not place any objects on top of the set.
Features
It is a remote controlled colour television.
- 100 programmes from VHF, UHF bands or cable channels can be preset.
It can tune cable channels.
- Controlling the TV is very easy by its menu driven system.
- It has an Euroconnector socket for external devices (such as video recorder, video games, audio set, etc.)
- Front AV Input available.
- Teletext.
It is possible to connect headphone.
- Direct channel access.
- APS (Automatic Programming System).
- All programmes can be named.
- Forward or backward automatic tuning.
- Sleep timer.
Automatic sound mute when no transmission.
- 5 minutes after the broadcasting (closedown), the switches itself automatically to stand-by mode.
Before Switching on your TV
Power connection
Important: The TV set is designed to operate on 220-240 V AC, 50 Hz.
- After unpacking, allow the TV set to reach the ambient room temperature before you connect the set to the mains.
Aerial Connections
- Connect the aerial plug to the aerial input socket located at the back of the TV.
How to connect the external equipments
See "Connect the External Equipments" on page 10.
- See the instruction manuals provided with the external devices too.
Inserting batteries in the remote control handset
- Remove the battery cover located on the back of the handset by gently pulling upwards from the indicated part.
- Insert two AA (R6) or equivalent type batteries inside.
- Replace the battery cover.

NOTE: Remove batteries from remote control handset when it is not to be used for a long period. Otherwise it can be damaged due to any leakage of batteries.
Switching the TV ON/OFF
You can operate your TV either using the remote control handset or directly using the TV onset buttons.
To switch the TV on
Your TV will switch on in two steps:
1- Press the power button located on the front of the TV. Then the TV switches itself to standby mode and the RED LED located below the TV turns on.
2- To switch on the TV from stand-by mode either:
Press a digit button on the remote control so that a programme number is selected, or,
Press Standby / Power Button or Programme Up and Down buttons on the front of the TV or on the remote control respectively, so the TV will switch on and the RED Led will turn GREEN.
To switch the TV off
- Press the stand-by button on the remote control, so the TV will switch to stand-by mode and the GREEN LED will become RED, or,
Press the power button located on the front of the TV.
Initial Settings
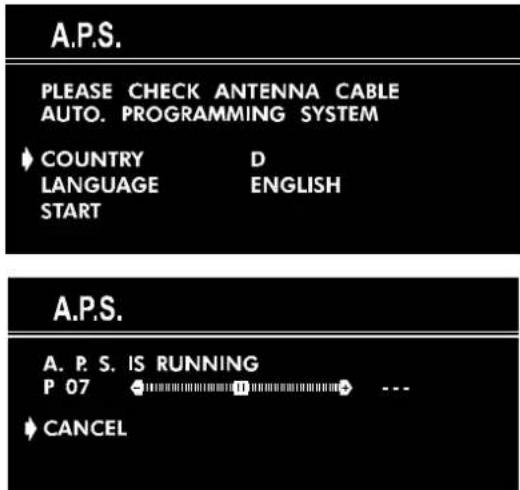
The message "PLEASE CHECK ANTENNA CABLE AUTO. PROGRAMMING SYSTEM" will be displayed when you turn on your TV for the first time.
1- Select LANGUAGE with the "P" or "P" button, then press the "or" button to select a menu language.
2- Select COUNTRY with the "P" or "P" button, then press the "or" button to select the country you are now located.
3- Select START with the "P" or "P√" button, then press the "P" button to start APS.
APS (Automatic Programming System) automatically programmes the received channels in your TV's programme numbers. During APS, "A. P. S. IS RUNNING" will be displayed. After APS is finalized, the "PROGRAM." menu appears.
To cancel APS, press the " " button.
You can delete a channel, insert a channel into a programm number, or re-start APS with the "PROGRAM." menu.
For details, see "Program. (Programming) Menu" on page 7.
4- Press the "STANDARD" button to complete the initial settings.
After the initial settings are complete, you can change a programme number or to name a programme number or to programme new channel manually. For details, see "Install. Menu" on page 7.
If the message "PLEASE CHECK ANTENNA CABLE AUTO. PROGRAMMING SYSTEM" does not appear, follow the description "Program. (Programming) Menu" on page 7 to select a menu language and the country where you are now located, and to use A.P.S.

Operating with the onset buttons
Volume setting and programme selection can be made using the buttons on the front panel.
Volume Setting
- Press " - VOL." button to decrease volume or "VOL. +" button to increase volume, so a volume level scale will be displayed on the screen.
Programme Selecting
- Press "PROG. +" button to select next programme "PROG." button to select the previous programme.
Entering Main Menu (AV14BJ8EPS)
- Press "MENU" button to enter main menu. In the main menu select submenu using "PROG." or "-PROG." button and enter the submenu using "VOL." or "-VOL." button. To learn the usage of the menus, refer to "Menu System" on page 5.
Operating with Remote Control
The remote control handset of your TV is designed to control all the functions of the model you selected. The functions will be described in accordance with the menu system of your TV.
Functions which you can use out of menu system are described below.
Volume Setting
Press " ^+ button to increase volume.
Press " button to decrease volume.
Programme Selecting (Previous or next programme)
- Press "P button to select the previous programme.
- Press "P button to select the next programme.
Programme Selecting (direct access):
Press digit buttons on the remote control handset to select programmes between 0 and 9. TV will switch to the selected program after a short delay.
When you press first digit, second digit will be displayed with '-' symbol for 3 seconds. To select programmes between 10 and 99 press corresponding digit buttons consecutively before '-' symbol on the second digit disappears. (e.g. for programme 27, first press 2 and then 7 while program number displayed as '2-')
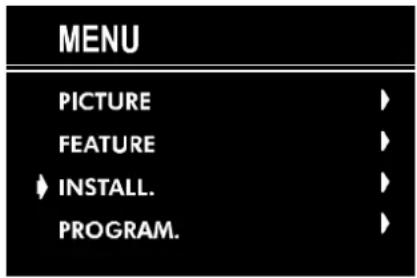
Menu System
Your TV has been designed with a menu system. Display "MENU" (main menu) and enter one of four menus (PICTURE, FEATURE, INSTALL. and PROGRAM.).
1- Press "MENU" button to display "MENU" (main menu). The menu titles will be displayed in the main menu.
2- Press "P" or "P" button to select a menu title, then press "or" button to enter the menu.
- To exit a menu, press "STANDARD" button.
- To go to the previous menu, press "MENU" button.
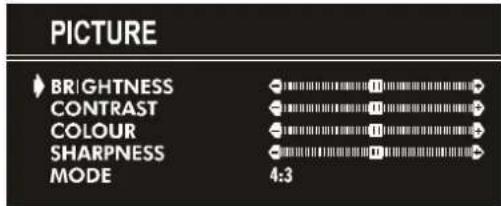
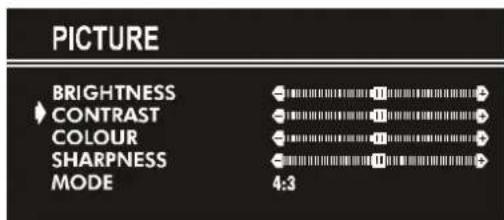
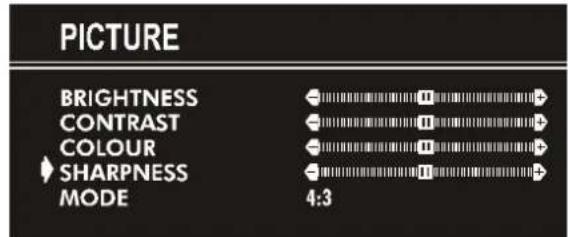
Picture Menu
To change picture settings:
- Press "MENU" button, now you are in main menu. In the main menu, select PICTURE using "P " or "P " button, then enter the picture menu pressing "or " button.
- Enter the Picture Menu directly, pressing the GREEN button.
Setting Brightness:
- As you enter the picture menu, BRIGHTNESS will be the first selected option.
- Press "▶" button to increase BRIGHTNESS.
- Press " button to decrease BRIGHTNESS.
Setting Contrast:
- Using "P on" button select CONTRAST.
- Press "▶" button to increase CONTRAST level.
- Press " button to decrease CONTRAST level.
Setting Colour:
- Using "POK" but not select COLOUR.
-
Press "▶" button to increase COLOUR level.
-
Press " button to decrease COLOUR level.

Setting Sharpness:
- Using "POK" button select SHARPNESS.
- Press "▶" button to increase SHARPNESS level.
- Press button to decrease SHARPNESS level.
Setting Hue (In AV mode only) :
Using "Pex" button select HUE.
- Press "▶" button to increase HUE level.
- Press " button to decrease HUE level.
HUE adjust is functional only when NTSC 3.58/4.43 is plied in AV mode. It does not appear when other colour systems used.
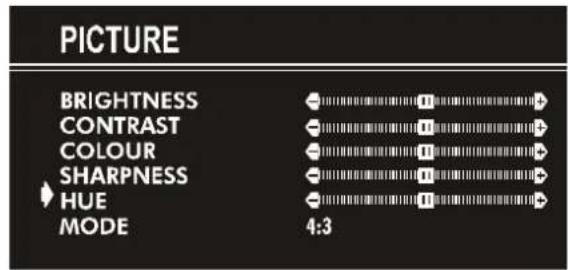
Mode:
This option is used to change the picture size according to the coming transmission.
- If AUTO function is selected, then the picture size will be automatically changed according to the transmission.
- Selecting 4:3 mode forces picture ratio size to 4:3.
- Selecting 16:9 mode forces picture ratio size to 16:9.
Every program has its own picture mode setting. When you store the picture mode for a program other programs keep their picture mode setting unaffected.
Feature Menu
- Press "MENU" button, now you are in main menu. In the main menu, select FEATURE, using "P " or "P " button. Then enter the feature menu pressing "or " button.
or,
- Enter the Feature Menu directly, pressing the YELLOW button.
Sleep Timer:
- As you enter the feature menu, SLEEP TIMER will be the first selected option.
- Use "←" or "→" button to change the value of the sleep timer between OFF, 0:15:00, 0:30:00, 0:45:00, 1:00:00, 1:15:00, 1:30:00, 1:45:00 and 2:00:00 hours. Your TV will get into standby mode when the period you selected passes after you make the selection.
It is displayed on the upper right of the screen. If sleep timer is activated it is displayed with the TV status and erased with it after 3 seconds.
0:15:00

During the last minute of the count down, the timer is displayed on the upper right of the screen. When the timer reaches zero, TV goes to stand-by.
Child Lock:
In Feature Menu, press P or " button to select CHILD LOCK. Using "or" button turn CHILD LOCK On or Off.
When Off is selected, there will be no difference in the operation of your TV. When On is selected, the TV can only be controlled by the remote control handset. In this case, the front panel buttons (except the Switch On/Off button) will not work.

Language:
Menu Language can be selected by pressing “ or “ button on LANGUAGE item.

- Press "MENU" button, now you are in main menu. In the main menu, select INSTALL. using "P " or "P " button, then enter the Installation menu pressing "or " button.
or - Enter the Installation Menu directly, pressing the BLUE button.
To programme a channel in a TV's programme number manually:
- PROGRAMME will be the first selected item as you enter the INSTALL. menu. Pressing " " or " " button select the programme number where you want to the tuned channel to be stored. (You may also type the programme number using the digit buttons.)
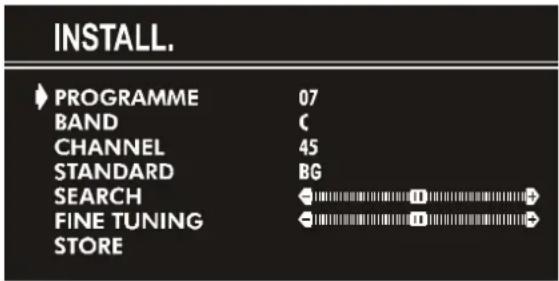
- Press "P" or "P" button to select BAND. Using "<" or "> button to select the band in which you want to search a channel.
- Press "P" or "P" button to select SEARCH. Press "←" or "→" button to start searching. (Press "▶" button to search forward. Press "←" button to search backwards.)
If the found channel is not the desired one, press " " button to start searching again.
To stop searching before a channel is found, press the reverse direction button. For example, when the TV is searching forward with " button, press " button to stop searching. If you know the channel number which you want to find, you can find the channel directly.
Press "P " or "P " button to select CHANNEL, then press " or " " button to select the channel number, or enter the number with the digit buttons.
(Follow the step 5 to select the correct standard before you select a channel number.)
- If you want to name the new programme, follow the instructions under "To change the name of a programme" on page 7.
- If the sound or picture is abnormal, change the standard (broadcasting system) of new channel.
Press "P" or "P" button to select STANDARD, then press "or" button to change the correct one.
The indicated channel number will be changed when you change the standard.
B/G: C02-C73 / S01-S41 / S75-S79
L: C01-C73 / S01-S41 / S75-S77
- If the channel reception is poor, fine-tune the channel. Press "P " or "P " button to select FINETUNING, then press "or" to fine-tune the channel.
- After the all settings are completed, store the new channel's setting to the programme number which you selected. Press "P" or "P√" button to select STORE, then press "or" to store it.
If you want to modify the current programme number's setting (for example, changing fine tuning, etc.):
- Select the programme number you want to modify the settings while no menu appears.
- Display the INSTALL. menu.
- Follow "To programme a channel in a TV's programme number manually:" on page 7 and change the settings of the current programme number.
If you want to name the new programme, follow the instructions under "To change the name of a programme" on page 7.
Note:
Do not use Programme item in the INSTALL. menu to select the programme number. If you select the programme number with Programme item and store the settings, the selected programme number's current settings are cancelled.
Program. (Programming) Menu
PROGRAM. (Programming) menu is used to display the programme names and numbers. You can use this menu to delete a channel, to insert a channel and to autostore the programmes.
Select the PROGRAM. menu pressing "P 一 ^ 一 or "P 一 ^ 一 button and open it pressing "or" button. When you enter the programme menu, all the programme numbers and names will be displayed on the screen. The programme number and name of the tuned channel will be shown by the cyan color. All the other channel numbers will be white. You can move the number in cyan using "P or " or P or " button. Also, it's possible to use digit buttons to select programme numbers. As you pass through the programme numbers this way, to reach the programme number you want, the channels corresponding to the programme numbers you pass through will be tuned and the selected programme number will be shown in cyan.
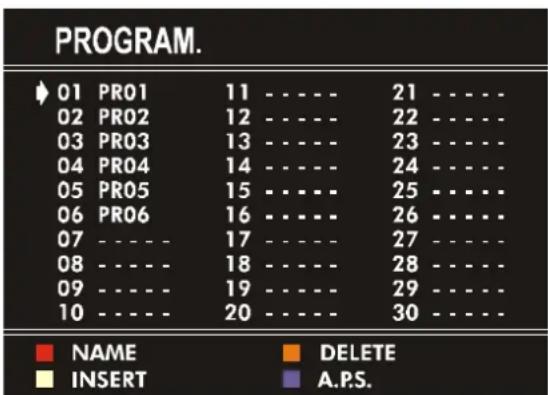
To change the name of a programme:
-
Move to the channel you want to rename or use the digits so that the selected programme number is in cyan color.
-
Press the RED button. Use “ ” or “ ” button to select the position and press “P ” or “P button to select a letter.
Now, press the RED button again to store or BLUE button to cancel NAME.
To delete a channel from a programme number:
- Move to the channel you want to delete or use the digits so that the selected programme number is in cyan color.
- Press the YELLOW button. Now the corresponding channels will be deleted and all the other channels below this programme number will be moved one programme number up.
Now, press the YELLOW button again to delete or BLUE button to cancel DELETE.
To insert a channel into a programme number:
- Move to the channel to be inserted or use the digits so that the selected programme number is in cyan color.
- Press the GREEN button. Now using "P" or "P or P" or "P" buttons, move to the programme number.
Now, press the GREEN button again to insert or BLUE button to cancel INSERT.
A.P.S.
If you enter the A.P.S. menu, you can automatically programme the received channels in your TV's programmes with A.P.S. (Automatic programme system).
- After displaying the PROGRAM. menu, press the BLUE button to enter the A.P.S. menu.
- Select LANGUAGE with the "P " or "P " button, then press the "or" button to select a menu language.
- Select COUNTRY with the “P ∧ ” or “P ∨ ” button, then press the “ ” button to select the country you are now located.
- If you want to start programming, select START with the "P" or "P" button, then press the "P" button. The message "A.P.S. IS RUNNING" appears and A.P.S. automatically programmes the received channels in your TV's programme numbers. After A.P.S. is finalized, the PROGRAM menu appears again.
To cancel A.P.S., press the “▶” button.
Other Features
Sound Mute
To cut off the sound of the TV, press " button. The sound will be cut off. To cancel mute, press " or " button. The volume level will be the same as the level before mute when you cancel mute.
Information on Screen
First pressing the "1" button displays the current status "Programme number" and "Station name".
Pressing this button again displays the current time.
Pressing this button once more remove the on-screen display.
To Display the Time
While watching a TV programme with Teletext transmission press "1" button twice. The current time information, captured from Teletext will be displayed on the screen.
- If the programme being watched does not have Teletext transmission, only a box will be displayed at the same location.
- The time information will disappear after pressing "1" button again.
When time information is displayed on screen, entering another menu will remove it.
Standard
You can re-set the current PICTURE menu settings (except Picture Mode setting) to the default settings.
- Press "STANDARD" button when no menu appears.
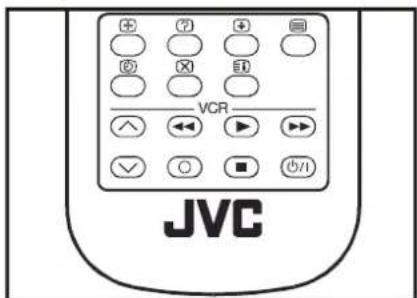
VCR Control Buttons
The buttons can be used to operate a JVC brand VCR. Pressing the button having the same appearance as the original remote control button of a device makes the function work in the same way as the original remote control.
Press the VCR Control Button to control your VCR.
Note:
If your device is not made by JVC, these buttons cannot be used.
- Even if your device is made by JVC, some of these buttons or any one of the buttons may not work, depending on the device.
- You can use the / buttons to choose a TV channel which the VCR will receive.
Teletext
Teletext is an information system that displays text on your TV screen. Using the Teletext information system you can view a page of information on a subject that is available in the list of contents (index).
No on screen display will be available in text mode.
No contrast, brightness or colour control, but volume control is available in text mode.
To operate Teletext
- Select a TV station on which Teletext is being transmitted.
- Press (TELETEXT) "按钮. Usually the list of contents (index) is displayed on the screen.
To select a page of Teletext
- Press the appropriate digit buttons for the required Teletext page number.
The selected page number is displayed at the top left corner of the screen. The Teletext page counter searches until the selected page number is located, so that the desired page is displayed on the screen.
- Press "P button to move the Teletext screen forward one page at a time.
- Press "P button to move the Teletext screen backward one page at a time.
To Select Index Page
To select the page number of the index (generally page 100), press "按钮.
Searching for a teletext page while watching TV
- In the Teletext mode pressing button will switch the screen to the TV mode. In the TV mode enter a page number using digit keys. As you enter last digit of page number, "sign will replace the page number and flash until the entered page number is found. Then the page number will replace "sign again. Now you can display this teletext page pressing button.
To Select Double Height Text
- Press "按钮 for the top half of the information page to be displayed in double height text.
- Press " + " button again for the bottom half of the information page to be displayed in double height text.
- Press " 12 button once more for the full page of normal height text.
To Reveal "concealed" Information
- Pressing "Button once will reveal answers on a quiz or games page.
- Pressing button again will conceal the revealed answers.
To Stop Automatic Page Change
The teletext page you have selected may contain more information than what is on the screen; the rest of the information will be displayed after a period of time.
- Press "按钮 to stop the automatic page change."
- Press "按钮 again to allow the next page to be displayed.
To Select a Subcode Page
Subcode pages are subsections of long Teletext pages that can only be displayed on the screen one section at a time.
- Select the required Teletext page.
- Press "按钮。
- Select the required subcode page number by pressing four digit buttons (e.g. 0001).
- If the selected subroutine page is not displayed in a short time, press "按钮. TV programme will be displayed on the screen.
- Teletext page number will be displayed on the upper left corner of the screen when the selected page is found.
- Press " × button to display the selected Teletext page.
To exit Teletext
- Press "按钮. The screen will switch to TV mode.
Connect the External Equipments
Before connecting anything
- Switch off all equipments including the TV.
- Read the manuals provided with the equipments.
To select an AV mode
Pressing "AV" button on the remote control selects one of the three AV modes (AV-1, AV-1 S and F-AV).
- To return to the TV mode, repeatedly press "AV" button or press "P ∧" or "P ∨" button.
AV-1 (SCART) terminal: Euroconnector (21-pin, SCART)
- Video input, Audio input and RGB inputs are available.
- TV broadcast outputs (Video and Audio) are available.
AV-1 S (SCART) terminal: Euroconnector (21-pin, SCART)
- Video input, S-VIDEO (Y/C) input and Audio input are available.
Video and Audio outputs are available.
F-AV (Front AV) terminal: RCA connectors x 2
- Video input and Audio input are available.
Via the Euroconnector
Your TV set has an Euroconnector socket. If you want connect equipments (e.g. video recorder, decoder, etc.) which have Euroconnectors, to your TV, use the AV-1 (SCART) or AV-1 S (SCART) terminals.
AV-1 S Mode
If the equipment connected to your TV set supports S-Video (Y/C) output from Euroconnector, you can have a better picture quality by selecting AV-1 S mode and connecting your equipment to the AV-1 S (SCART) terminal of TV. See your equipment's booklet to check if your equipment has such feature.
Via the RCA jacks
If you have an equipment (such as a Camcorder) which has the RCA jacks, connect it to the F-AV (Front AV) terminal with the video and audio cables.
Via the ANT (aerial) socket
If your equipment does not have an Euroconnector or RCA jacks, connect it to the TV with an aerial cable. For details, see the manual provided with the equipment.
- To store the test signal that comes from the equipment, see "Install. Menu" on page 7 and store it to the programme number 0. You can watch images from that equipment to select the programme number which you stored the test signal.
TV and Video Recoder (VCR)
- Connect the Video Recorder to the ANT (antenna input socket of the TV with the aerial cable.
- Connect the Video Recorder to the AV-1 or AV-1 S terminal with the SCART cable, or connect it to the F-AV (Front AV) terminal with the audio and video cables.
NTSCPlayback
Connect a NTSC video recorder to a terminal. Then press "AV" button to select the corresponding AV mode.
NTSC 3.58/4.43 system is detected automatically in AV mode.
Connecting Headphones
Use the headphone socket of your TV, to connect headphones.
Tips
Care of the Screen:
Clean the screen with a slightly damp, soft cloth. Do not use abrasive solvents as they may damage the TV screen coating layer.
Poor Picture:
Have you selected the correct TV system? Is your TV set or house aerial located too close to the loudspeakers, nonearthed audio equipment or neon lights, etc. ?
Mountains or high buildings can cause double pictures or ghost images. Sometimes you can improve the picture quality by changing the direction of the aerial.
The picture quality may degrade when two peripherals are connected to the TV at the same time. In such a case, disconnect one of the peripherals.
No Picture:
Is the aerial connected properly? Are the plugs connected tightly to the aerial socket? Is the aerial cable damaged? Are suitable plugs used to connect the aerial? If you are in doubt, consult your dealer.
No Picture means that your TV is not receiving any transmission. Have you pressed the correct keys on the remote control? Try once more.
stRemote Control:
Your TV no longer responds to the remote control. Press the "STANDARD" button on the remote control once more. Perhaps the batteries are exhausted. If so you can still use the local buttons at the front of your TV.
Have you selected the wrong menu? Press "STANDARD" button to return to TV mode or press "MENU" button to return to the previous menu.
No solution:
Switch your TV set off and on. If this does not work, call the service personnel; never attempt to repair it yourself.
Specifications
TV BROADCAST PAL SECAM B/G L
RECEIVING CHANNELS VHF (BAND I/III)
UHF (BAND U)
HYPERBAND
CABLE TV (BIG: S01-S41 / S75-S79; L: S01-S41 / S75-S77)
NUMBER OF PRESET CHANNELS 100
CHANNEL INDICATOR . On Screen Display
RF AERIAL INPUT 75 Ohm (unbalanced)
SOUND-MULTIPLEX SYSTEMS Mono
PICTURE TUBE For 14" For 14
AUDIO OUTPUT POWER
(W_RMS) (% 10THD) 22
POWER CONSUMPTION (W) (max.) 59 59
DIMENSIONS (mm) AV14BJ8EPS AV14BM8EPS
D 377 378
L 446 374
H 334 332
Weight (Kg.) 9,75 9,4
Sommaire
Antennenanschlüsse 27
Vorbereitungen 28
Produktmerkmale 28
Vor dem Einsatz 28
Netzanschluss 28
Antennenanschlüsse 28
m = 311 ;
11
图1
1
1
111
m = 311 ;
|
D
ore
en
ne
no
ii
ta
st
。
C
1
0,
A
C
C6
ed
e)
e
d
re
am
e
nt
。
NE
图1
1
C
Spegnim. a tempo:
1c
1
m
an
1
C
a
79
H
ar.
1
C
D
E6
N
IN
1
A
n
。
on
zi
or
e
SC
ele
27
io
na
ta
.
.1
1+1
liz
7
an
。
11
as
sta
“
0
1
e
T
nc
dd
ifi
2
re
ii
s
D
ed
an
in
ne
en
to
m
D.
cs
sta
an
d
2
S
P
E
N
TC
D.
0
4
45
0
0
1
0
0
1
1
14
5·6
10
。
:
30
0
1
4
5
0
in
1
:
.
di
10
。
in
.
31
m
1
C
OK
1
1
无
1
1
中
1
ip
C.
1
A
1a
V
is
11
77
3
io
de
11
in
r
yi
or
06
n
el
12
D
str
a
d
el
0
SC
ch
en
m
0
9
Se
il
ti
m
en
d
is
SD
ec
in
im
m
yes
11
77
+
5
D.
1
ct
at
de
to
V
rc
A
C
ad
e
S
SC
C
01
DC
3
Si
ec
Q
i.
0:15:00
CARATTER.
SI
PE1
GI
117
A.
A
TE
M
0
(2)
SPI
EN
TC
1
12/14
12/12
- 实验原理及实验方法
12/12
12/12
12/12
m = 311
12/12
C
AI
A
E
B7
M
图1
1
m = 311
13/14
TQ
EN
HC
1
13/14
12/12
D.
1
or
1
1
ti
26
n
ji
图1
1
1e
1
Q
nt
。
al
-1
:
一
+
。
1
-11
+
一
…
m = 311 ;
Q
19
D.
i
ti
m
AR
a
图1
D
76
1.5
17
E1
1
+
di
ri
DC
isc
D.
St
dl
DV
。
m = 311
m = 311
(1)
- 1.1.1.1
CH
ji
av
VE
.1
D.
b
in
C
:
Ne
m
e
图1
C
a
at
the
r
1
or
er
ne
re
i
t
as
sta
1
D.
1
“
1
V
E
A
E
1
HC
1
1
1+
1
all
C
m = 311
m = 311
31
11
A
L
1
E
1
E
1
C
att
IV
an
e
0
。
all
tT
1a
re
:
a
fu
10
ne
C
HI
Se
·
al
e
fui
fu
n
ne
。
当
hi
S2
iv.
ata
D
or
A
i
图2
2
(一)
4
1
1
1
.
1
1
。
(二)
1
-
一
1
1
1
1
ne
:
att
iv
V3
at
3
图1
ye
e
vi
so
are
1
1
16
-
1
图1
A
(1)
1
1
(1)
.
1
10 × 20
D
地
fun
D7
io
ne
era
an
no
m = 311
m = 311
1,2,3 1,3,4 2,3,4 1,4,5 2,3,4 3,4 4,5
1 + u7 = 70%
1 + u7 = 7419
1 + u7 = 70%
1 + u7 = 70%
1 + u7 = 70%
1 + u7 = 70%
1 + u7 = 70%
1 + u1 - 1 = ( 1 + u) u1 < 1 = u
1 + u7 = 70%
1 + u7 = 70%
12 =
C
A
R
AI
图
图
3
4
12/12
12/14
12/14
12/14
12/12
12/14
12/12
12/14
12/12
12/12
m = 311
C
C
1
A
A
0
Terminal AV-1 (SCART): Euroconector (21 pines, SCART)
Terminal AV-1 S (SCART): Euroconector (21 pines, SCART)
Menu "INSTALLATIE" 67
Menu“PROGRAMEREN” 67
Overige functies 68
Geluiduit 68
AUDIO-UITGANGSVERMOGEN
(W_RMS) (%10 THD) 22
STROOMVERBRUIK (W) (max.) 59 59
AFMETINGEN (mm) AV14BJ8EPS AV14BM8EPS
D. 377 378
B 446374
H. 334 332
Para operar com Teletexto
AV-1 (SCART) terminal: Euroconnector (21-pin, SCART)
AV-1 S (SCART) terminal: Euroconnector (21-pin, SCART)