Competition CA 470 - Car stereo CALIBER - Free user manual and instructions
Find the device manual for free Competition CA 470 CALIBER in PDF.

User questions about Competition CA 470 CALIBER
0 question about this device. Answer the ones you know or ask your own.
Ask a new question about this device
Download the instructions for your Car stereo in PDF format for free! Find your manual Competition CA 470 - CALIBER and take your electronic device back in hand. On this page are published all the documents necessary for the use of your device. Competition CA 470 by CALIBER.
USER MANUAL Competition CA 470 CALIBER
CALIBER AUDIO TECHNOLOGY
Thank you for choosing a Caliber product. In doing so you've demonstrated a desire to own the finest in Car Audio Technology. Caliber strives to provide you with the finest products possible, and is always looking for ways to please our customers even more.
Properly installed, your Caliber amplifier will provide years of high quality sonic reproduction.Before installing the amplifier in your vehicle,please read this entire manual carefully, in order to protect your vehicle, and get the maximum performance of your mobile sound system.
Caliber Warranty
Due to the complexity of our products, we strongly recommend that this amplifier is installed by your authorized Caliber dealer. If properly installed by your dealer we provide a warranty for 12 month from the date of purchase.
If you install this amplifier yourself, we wish you lots of fun and success in doing so. If you follow our guidelines, you'll get the best result. Our warranty, however, will be limited to and not exceed 30 days from the date of purchase.
Caliber Accessories
To realize the exceptional performance of which this amplifier is capable, it is necessary that power sources, signal sources, speakers and interconnects are of the highest quality. Remember that Caliber is not just an amplifier manufacturer. We also manufacture everything needed for the 'optimal' Car Audio System (except the car). So be sure to 'Get Connected' with Caliber and ask your local Caliber dealer for our accessories.
Contents
Before you start your installation .This page
Features and Specifications 2
Mounting and Locations 5
Electrical installation 6
Signal input/ -output 7
Speaker output 8
Equalizer adjustments 10
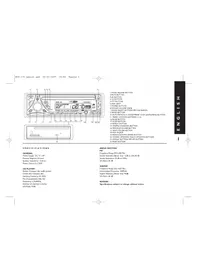
Due to our effort to innovate and improve our amplifiers, this modern generation of Caliber Competition Pro Series amplifiers offers you the following features:
- Bridgeable outputs.
- Tri-mode' output capability, simultaneous stereo & bridged mono set up is possible.
- Pulse Width Modulated (PWM) MOSFET Power Supply.
- 2 Ohm stable (4 Ohm mono-bridged)
Double sided epoxy board.
Variable input sensitivity: 15V to 0.5V.
Thermal-, Overload- and Shortcircuit protection.
Excellent muting circuitry assures no turn on/off 'pops'.
Built-in 7 band equalizer for each channel.
Built-in phase control for each channel
Built-in adjustable HighPass/LowPass/FullRange Filter(s).
Built-in subsonic filter adjustable 10-50Hz - Differential inputs to shunt any input noise
- Signal output RCA's for additional amplifier(s) (exept CA 670).
Large power supply connectors for optimal power distribution. - Chrome-plated speaker connectors for optimal signal output.
European design and engineering.
Superb Sonic Performance for your 'Dream Machine' on wheels.
Years and years of acoustic pleasure.
CALIBER
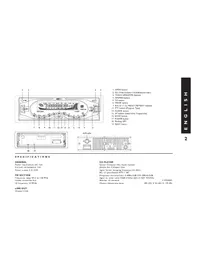
All Caliber Competition Pro Series Amplifiers have the following specifications. Variable specifications are listed per model.
Frequency response (+0, -1dB) 20Hz - 30kHz
Total Harmonic Distortion < 0.05% with 80kHz LPF
Signal to noise ratio (A-W weighted) >95dB
Input Sensitivity RCA Input 15V - 500mV
Input Impedance 20 kOhm
Damping Factor > 180
Output Impedance 2-8 Ohm
2-channel Amplifiers
Competition CA 130 Pro Series
Maximum Power Output at 14,4V
4 Ohm 20Hz - 30kHz THD 0.5% 2x 130W
4 Ohm 1kHz Mono Bridged 1x 260W
Continuous Power Output at 14,4V
4 Ohm 20Hz - 30kHz THD 0.5% 2x 65W
4 Ohm 1kHz Mono Bridged 1x 130W
Fuse Rating 20A
Dimensions (WxHxD mm) 200 x 60 x 235
Competition CA 190 Pro Series
Maximum Power Output at 14,4V
4 Ohm 20Hz - 30kHz THD 0.5% 2x 190W
4 Ohm 1kHz Mono Bridged 1x 380W
Continuous Power Output at 14.4V
4 Ohm 20Hz - 30kHz THD 0.5% 2x 95W
4 Ohm 1kHz Mono Bridged 1x 190W
Fuse Rating 25A
Dimensions (WxHxD mm) 250 x 60 x 235
Competition CA 250 Pro Series
Maximum Power Output at 14,4V
4 Ohm 20Hz - 30kHz THD 0.5% 2x 250W
4 Ohm 1kHz Mono Bridged 1x 730W
Continuous Power Output at 14.4V
4 Ohm 20Hz - 30kHz THD 0.5% 2x 125W
4 Ohm 1kHz Mono Bridged 1x 250W
Fuse Rating 2x 20A
Dimensions (WxHxD mm) 320 x 60 x 235


Competition CA 510 Pro Series
Maximum Power Output at 14.4V
4 Ohm 20Hz - 30kHz THD 0.5% 2x 510W
4 Ohm 1kHz Mono Bridged 1x1100W
Continuous Power Output at 14,4V
4 Ohm 20Hz - 30kHz THD 0.5% 2x 255W
4 Ohm 1kHz Mono Bridged 1x 510W
Fuse Rating 4x 20A
Dimensions (WxHxD mm) 440 x 60 x 235
4-Channel Amplifiers
Competition CA 470 Pro Series
Maximum Power Output at 14,4V
4 Ohm 20Hz - 30kHz THD 0.5% 4x 130W
4 Ohm 1kHz Mono Bridged 2x 260W
Continuous Power Output at 14,4V
4 Ohm 20Hz - 30kHz THD 0.5% 4x 65W
4 Ohm 1kHz Mono Bridged 2x 130W
Fuse Rating 40A
Dimensions (WxHxD mm) 330 x 60 x 235
6-Channel Amplifier
Competition CA 670 Pro Series
Maximum Power Output at 14.4V
4 Ohm 20Hz - 30kHz THD 0.5% 4x 90W + 2x 130W
4 Ohm 1kHz Mono Bridged 2x 180W + 1x 260W
Continuous Power Output at 14,4V
4 Ohm 20Hz - 30kHz THD 0.5% 4x 45W + 2x 65W
4 Ohm 1kHz Mono Bridged 2x 90W + 1x 130W
Fuse Rating 25A + 20A
Dimensions (WxHxD mm) 400 x 60 x 235
Mounting your Caliber Amplifier
Before mounting your Caliber Amplifier you must carefully choose the place where it can be installed. The amplifier has to have at least 5cm (2^) ventilation space at all sides, to allow the heat to rise away from the amplifier. Be sure that the power and signal cables can enter and leave the amplifier in a straight line, to avoid the risk of malfunction.
The amplifier should be protected from exposure to moisture and direct sunlight. The best places for it to be mounted are:
The floor of the trunk.
Under the driver's seat
- On your sub-woofer case.
If you've decided where to place your Caliber Amplifier, and you've convinced yourself there is enough air circulation and protection from unusual hazards, Mark the mounting surface using the amplifier as a template (Placing masking tape on these surfaces first will make your markings more visible).
Drill 2.5 mm (1/8") diameter holes at the marked locations and mount the amplifier using the supplied self-tapping screws.
Note: Do not drill any holes while using the amplifier as a template. You can easily damage the amplifier's anodized coating in this manner.
CALIBER
REMEMBER TO ALWAYS DISCONNECT BATTERY GROUND BEFORE WORKING ON A VEHICLE'S ELECTRICAL SYSTEM
- We highly recommend that you carefully design your Car Audio System before you start the installation. Make sure that the cables for power and signal are not on the same side of the vehicle, and do not cross each other. This will help reduce any noises caused by the power cable radiating into the signal cables. If a signal cable is too close to a power cable, it will pick up the magnetic field of the power cable, which will lead to a loss of quality in the signal.
Always use the largest gauge power/ground cable available, at least 10mm^2 (8 AWG). Ask your local Caliber dealer for the Caliber Powerflow power-, ground- and remote cables. A guarantee for a safe power management. - F or the protection of your vehicle, always place a fuse or circuit breaker no more than 30 cm (12") from the battery. This fuse or circuit breaker should be greater than the fuse(s) of your amplifier for optimal protection. For instance: a Caliber Competition Pro Series amplifier has 2x 25A fuses. Your "vehicle protection" fuse should be about 60A (2x25A=50A). Get good professional advice about the value of this specific fuse.
REMEMBER TO ALWAYS DISCONNECT BATTERY GROUND BEFORE WORKING ON A VEHICLE'S ELECTRICAL SYSTEM
Getting your power started
- First, the +12V terminal is connected directly to the battery of your car. Use a cable of at least 10mm^2 (8 AWG), and make sure that the connectors are of the same value. Don't forget the extra "Vehicle protection" fuse. The 12V + terminal should NOT be connected to the car fuse box.
- Second, the ground terminal (GND) must be fastened securely to the chassis of the vehicle with the same gauge cable as the positive cable (the same amount of power has to run through it). Ensure that all paint, undercoating or any other insulation is removed from the area where you want to make your ground connection to.
- Third, the last cable to connect is your remote turn-on (REM). Many radio-cassette and CD-players have an output terminal for connection of the REM of a amplifier. If you don't have such an output, a separate switch must be installed to control your amplifiers on/off function.
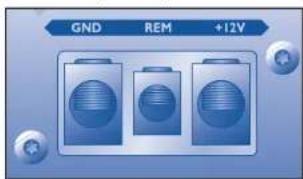
Large Powerterminal for optimal power distribution.

CCS entrance for optional Caliber Control System
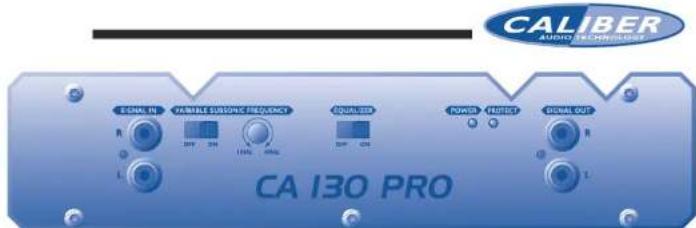
Signal Input
- The RCA's to your left are the 'Line-in' terminals and are to be connected with your radio/cassett or CD player. Make sure you put the left channel to the RCA-jack marked "Left", and the right channel to the RCA-jack marked "Right". When you're the proud owner of a 4 channel amplifier, you have to pay extra attention. These amplifiers have a 4 channel input. Don't mix up all the different channels: Left, Right Front and Rear and connect them with care. The CA 670 is a 6-channel amplifier which gives you an option to connect an external signal input, or have the signal input linked internally. You can select this by the switch right to the subwoofer RCA-input terminals.
- As you can see, each Caliber amplifier offers you the possibility to connect a second (or more) amplifier(s) to your system via the "Signal-out" terminals (except CA 670). The advantage of two amplifiers is that one amplifier can be used for normal stereo, while the other is used as a subwoofer amplifier.
- All Caliber amplifiers have a variable input level adjustment. It allows you to match any signal source (CD player.AM/FM cassettedeck, etc) correctly from its pre-amp output into your Caliber amplifier. The adjustment ranges from 15V - 500mV(0.5V).
- F or the professionals outthere, Caliber has intergraded a subsonic filter in this amplifier. This 12dB/Oct. subsonic filter is variable from 10Hz to 40Hz . Of course you can switch it off, in case you don't have a need for it.
The last knob you can switch is the on/off switch for the build in equalizer which you find on top of your amplifier. - The Competition Pro amplifiers are all fitted with a CCS entrance. The CCS is the Caliber Control System, which can be purchased as an option. The CCS gives you information of how the status of your amplifier is. How many voltage it consumes, what the temperature is and whether it is in a terminal or short-circuit protection. It can give this information simultaneously for up to 4 amplifiers, and always gives you a warning when an amplifier disfunctions.

Speakeroutput 2-channel amplifiers
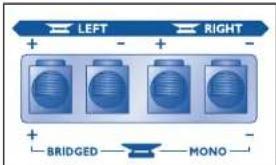
Speaker output
- All the Caliber Competition Pro Series amplifiers have a Stereo/Bridgeable TriMode speaker output terminal. The amplifier has its own stereo/bridge switch built-in, so there is no need to select a stereo or bridged mode. You can connect the speakers to each channel in stereo mode, and simultaneously connect a sub-woofer to the speaker terminal in the bridged mode.
- Pay attention in connecting your speakers and sub-woofer. Be sure to observe correct speaker output connections and polarity.
In the stereo mode, connect the right speaker output to the right speaker and the left to the left.
Connect the positive (+) output to the positive (+) speaker terminal and the negative (-) output to the negative (-) speakerterminal. - In the bridged mode connect the Left (+) positive to the positive speaker terminal and the Right (-) negative to the negative speaker terminal.
- Do not use the negative speaker output commonly for left and right speakers (common ground). Improper polarity causes a loss of bass response.
- Use a quality speaker cable for your Car Audio System. Once you've heard the difference, you'll know why we advise you to consult your local Caliber dealer for our range of stereo loudspeaker cables with gold-plated connectors.
- Never connect the negative speaker output to the chassis of your vehicle. This can cause severe damage to your Car Audio System.
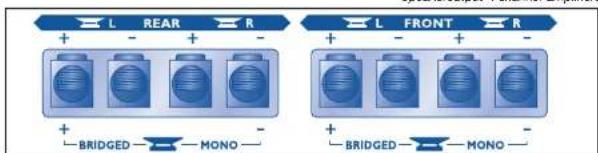
Speakeroutput 4-channel amplifiers

Speakeroutput 6-channel amplifiers
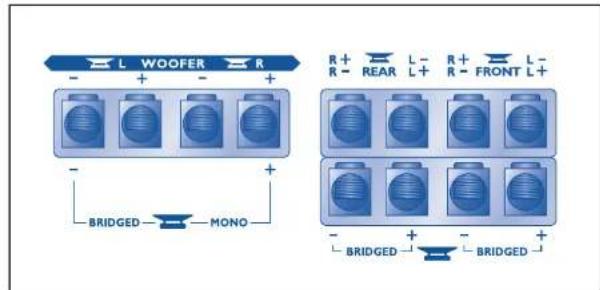
- In case you have a Caliber Competition Pro series 4-channel or 6 channel amplifier you have to pay extra attention to your speaker connections. Be sure that the front speaker output terminal (left and right) is connected to the front speakers, the rear speaker output terminal (left and right) is connected to your rear speakers and your subwoofer(s) to the subwoofer output terminal. (Note: if you only use one subwoofer on amplifier, you are advised to connect it in a bridged mode. Be sure that in the bridged mode you connect the Left (+) positive to the positive speaker terminal and the Right (-) negative to the negative speaker terminal.)
- Enjoy your installation and have lots of fun and good music in your moving sound machine.
CALIBER
On top of your Competition Pro Series amplifier you will find the build-in topcontrols. The 2-channel amplifiers have one set of controls for right/left. The 4-channel amplifiers have two sets of controls, one for front left/right and one for rear left/right. The 6-channel amplifiers have 3 sets of controls, one for front left/right, one for rear left/right and one for the subwoofer channel.
Equalizer
These topcontrols have a 7-band equalizer for each channel (except the subwoofer channels on the 6-channel amplifier). Normal equalizers adjust the sound for both the right and the left channel. By separating the equalizers for the left and right channel you are able to adjust the sound in your car very precisely. Since, in a car, you are sitting at the driversseat you don't hear the same sound from your right speakers as you do from your left speakers (One side is further away from you, while the other side is positioned differently to your ears, so every side gives you a different sound). By adjusting the right- and the left channel separately you can make them sound the same.

All the 7 frequencies we selected for you on this equalizer are the ones that have the most influence on the total audio spectrum.
Level Control
Before adjusting the equalizer, make sure that your input level is set to a minimum (Note: the minimum is 15V, not 0.5V).

Every input level control controls a pair of channels (left and right) per control unit. So for 4- channel amplifiers turn down two level controls (front and rear). For 6-channel amplifiers you even have to turn
down 3 level controls (front, rear and subwoofer). In this way you will have enough headroom to adjust your equalizer correctly, without your output signal starting to clip before the adjustment is finished.
Variable phase control.
Each pair of channels (left/right, front/rear and subwoofer) has a variable phase
control, for eliminating every eventual phase problem that will occur. Phase problems can occur for various reasons; the use of passive filters, the difference in path length, unwanted reflections or others. The phase control switch has three positions.The
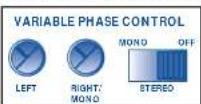
off position for if you do not need to use the phase control. The stereo position, if you have connected both right and left speakers, you can shift the fase separately for the left or right channel by turning the potmeters.
CALIBER
The mono position, if you have connected a subwoofer in a bridged mode. The phase can now be shifted by turning on the potmeter of the right channel.. Adjusting the phase is not an easy job.You have to listen very carefully to hear the difference. The best way to do it is to play some music you know very well and has a lot of vocals in it.When you start adjusting you can hear the vocals shifting over your front stage. Ask someone to help you with this fine tuning. In that way you can remain seated in your car and listen to the changes in the music, while the otherone adjusts the phase by turning slowly on the potmeters.
The phase-shift is variable from 0 to 180 degrees. Although your amplifier is equipped with these phase-shift controls, it is not always necessary to use them. So if you don't know if you have a phase problem, or can't hear the difference if you are adjusting the phase, leave the phase control untouched and consult your local Caliber dealer. He is trained for this job, and will be willing to help you.
Variable Crossover
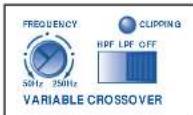
A Caliber Competition Pro amplifier has a variable crossover for each pair of channels. It can be switched into FullRange (Off-position), LowPass (put it on the LPF-position in the middle) or to HighPass (in which case you have to slide it all the way to the left in the HPF-position).
Once you have selected the position in which you want that pair of channels to play, you can start adjusting the filterfrequency by turning on the frequency potmeter. The filterfrequency is variable between 50Hz and 250Hz . You get the best result if you play several parts of music you know very well, when you are adjusting your filter. Always adjust every pair of speakers separately. You can turn off your other pair(s) of speakers and/or your sub's, by simply disconnecting the input RCA's for these channels. In this way you will be able to hear every reacting this speaker/pair gives you when you are adjusting them. Do the same thing if you want to adjust your subwooers. Let the sub's play alone, and listen carefully to the reactions to the music.
Golden Rule
It is lots of fun to adjust your amplifier, but you can easily overdo it. There is one golden rule you have to remember: Before you start tuning your amplifier, always turn the input level all the way down to a minimum (15V). Then you can safely adjust all the options your amplifier offers you. Once you have fine tuned the sound to your likings, you can slowly turn your input level up a bit, until you hear your amplifier starting to clip (or look at the clipping LED's). Once your amplifiers clips, you have given it to much input level, so you will have to turn it down a little. In this way you will get the maximum power from your amplifier, without the danger of damaging your speakers or subwoofer.
CALIBER
CALIBER AUDIO TECHNOLOGY
Competition CA 130 Pro Series
Competition CA 190 Pro Series
Competition CA 250 Pro Series
Puissance de sortie maximale à 14,4 V
4 Ohm 20Hz - 30kHz THD 1% 2x 250W
4 Ohm 1kHz Mono Pontee 1x 730W
Puisance de sortie continue a 14,4 V
4 Ohm 20Hz - 30kHz THD1% 2x 125W
4 Ohm 1kHz Mono Pontee 1x 250W
Intensité nominale du fusible 2x 20A
Dimensions (L× H× Pmm) 320× 60× 235

Competition CA 470 Pro Series