
MCD 560 M - Car stereo CALIBER - Free user manual and instructions
Find the device manual for free MCD 560 M CALIBER in PDF.
User questions about MCD 560 M CALIBER
0 question about this device. Answer the ones you know or ask your own.
Ask a new question about this device
Download the instructions for your Car stereo in PDF format for free! Find your manual MCD 560 M - CALIBER and take your electronic device back in hand. On this page are published all the documents necessary for the use of your device. MCD 560 M by CALIBER.
USER MANUAL MCD 560 M CALIBER
XCD 560K skincalCouplext 10 C3 2006 12:55 Paqina 1

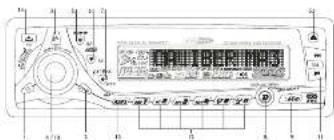
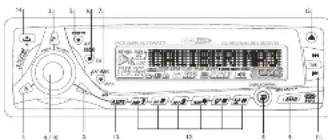
POWER LUTTER
2 MODE BUTTON
1 POTB BUTTON
1.610112015 64777
A TAKU TION: ECS RUT TON (RESET EQUALIZER RUT TON)
? PTY BUTTON X-HASS BUTTON
3 DISPLAY BUTTON MENU BUTTON
-
BAND BUTTON MP3 SEARCH BUTTON
-
JUNNE LIQUIDAN TRACK UP, DOWNING LIONS
12 PRESET STATIONS BUTTONS (M1-MS)
- AUTOMATICALLY STORE, PRESET SCAN (APPSI) BUTTON
THE INFORMATION
1 PANEL RELEASE BUTTON
- SHUTATION
(1) 本次股东大会的决议
SPECIFICATIONS
GENERAL
Power Supply DE 11-14V
Marty Negative Ground
Sealbar impresa < china
Power Output 4 x 70%
CD PLAYER
Sjegsen-Compart de ando system
Smiling frequency 44.1KJ
No of question on the
frequency 5-20/00MHz
Number of church 2 stores
SN Rate 70dB
RADIO SECTION
FM
Frequency Range 87.5-100 MHz
Intermediate frequency 10.7 MHz
Double Security Home then 15d/s or SiN 10 ch
S### Sapanoum 23 de al IKHz
5K Rate 50 dB
AMIMW
Frequency Range 522.1620 KHz
Intermediate frequency 450K
Double Sensory Figure then 45d1
SN Rate 10 dB
REMARK
Specifications subject to change without notice.
DISC PLAY
PRECAUTIONS
• The in-person 15 out of the negative ground effect system
• Unassured the vehicle's negative luxury seasonal while mounting and connecting the
out
• When reporting the Lec, the sure is up, and set in detail encoding of
• 2. Sign a line with all other knowledge may be used to manage by the site.
- 1. (2) 4. (3)
- 2014年1月1日,公司与北京中联
The following table provides the original text: "1.20" and "2.00".
• You have made the job in hot, cold work
regulations in the backbones' normal salaries (e.g. 2017) are
• Keep the whole at a level = 60 you can bear outs be waiting (couns) down
s. zra. cle.
CD NOTES
- Binding a detection or carry CD on the surface in bone.
• Holo L'au un
• DO NOT must the up select
• L25 F01 attach any vca label or data protection should be other side of x dax.
• DO NOT expect a CD to cut out weight range set
* tape and fly: 12 from the outer adjacent with a cleaning cloth.
• 1.000
• T-3 and 100% play lunch (15m) C11c
• EBITDA - net of CD
2.3.10.11.12.13.14.
- The all may not be able to call 1. making it a
(1)
BEFORE OPERATION
• O NEW rate the volume
yll, ysh, salas, smls, mcln, dln, a.
• Plan the car before performing on any normal rate.
CANADL
(二)
CAUTION
D: NOT open covers and do not repair by yourself
Central, the doctor or an experience technician for help.
(1) 本次股东大会的决议
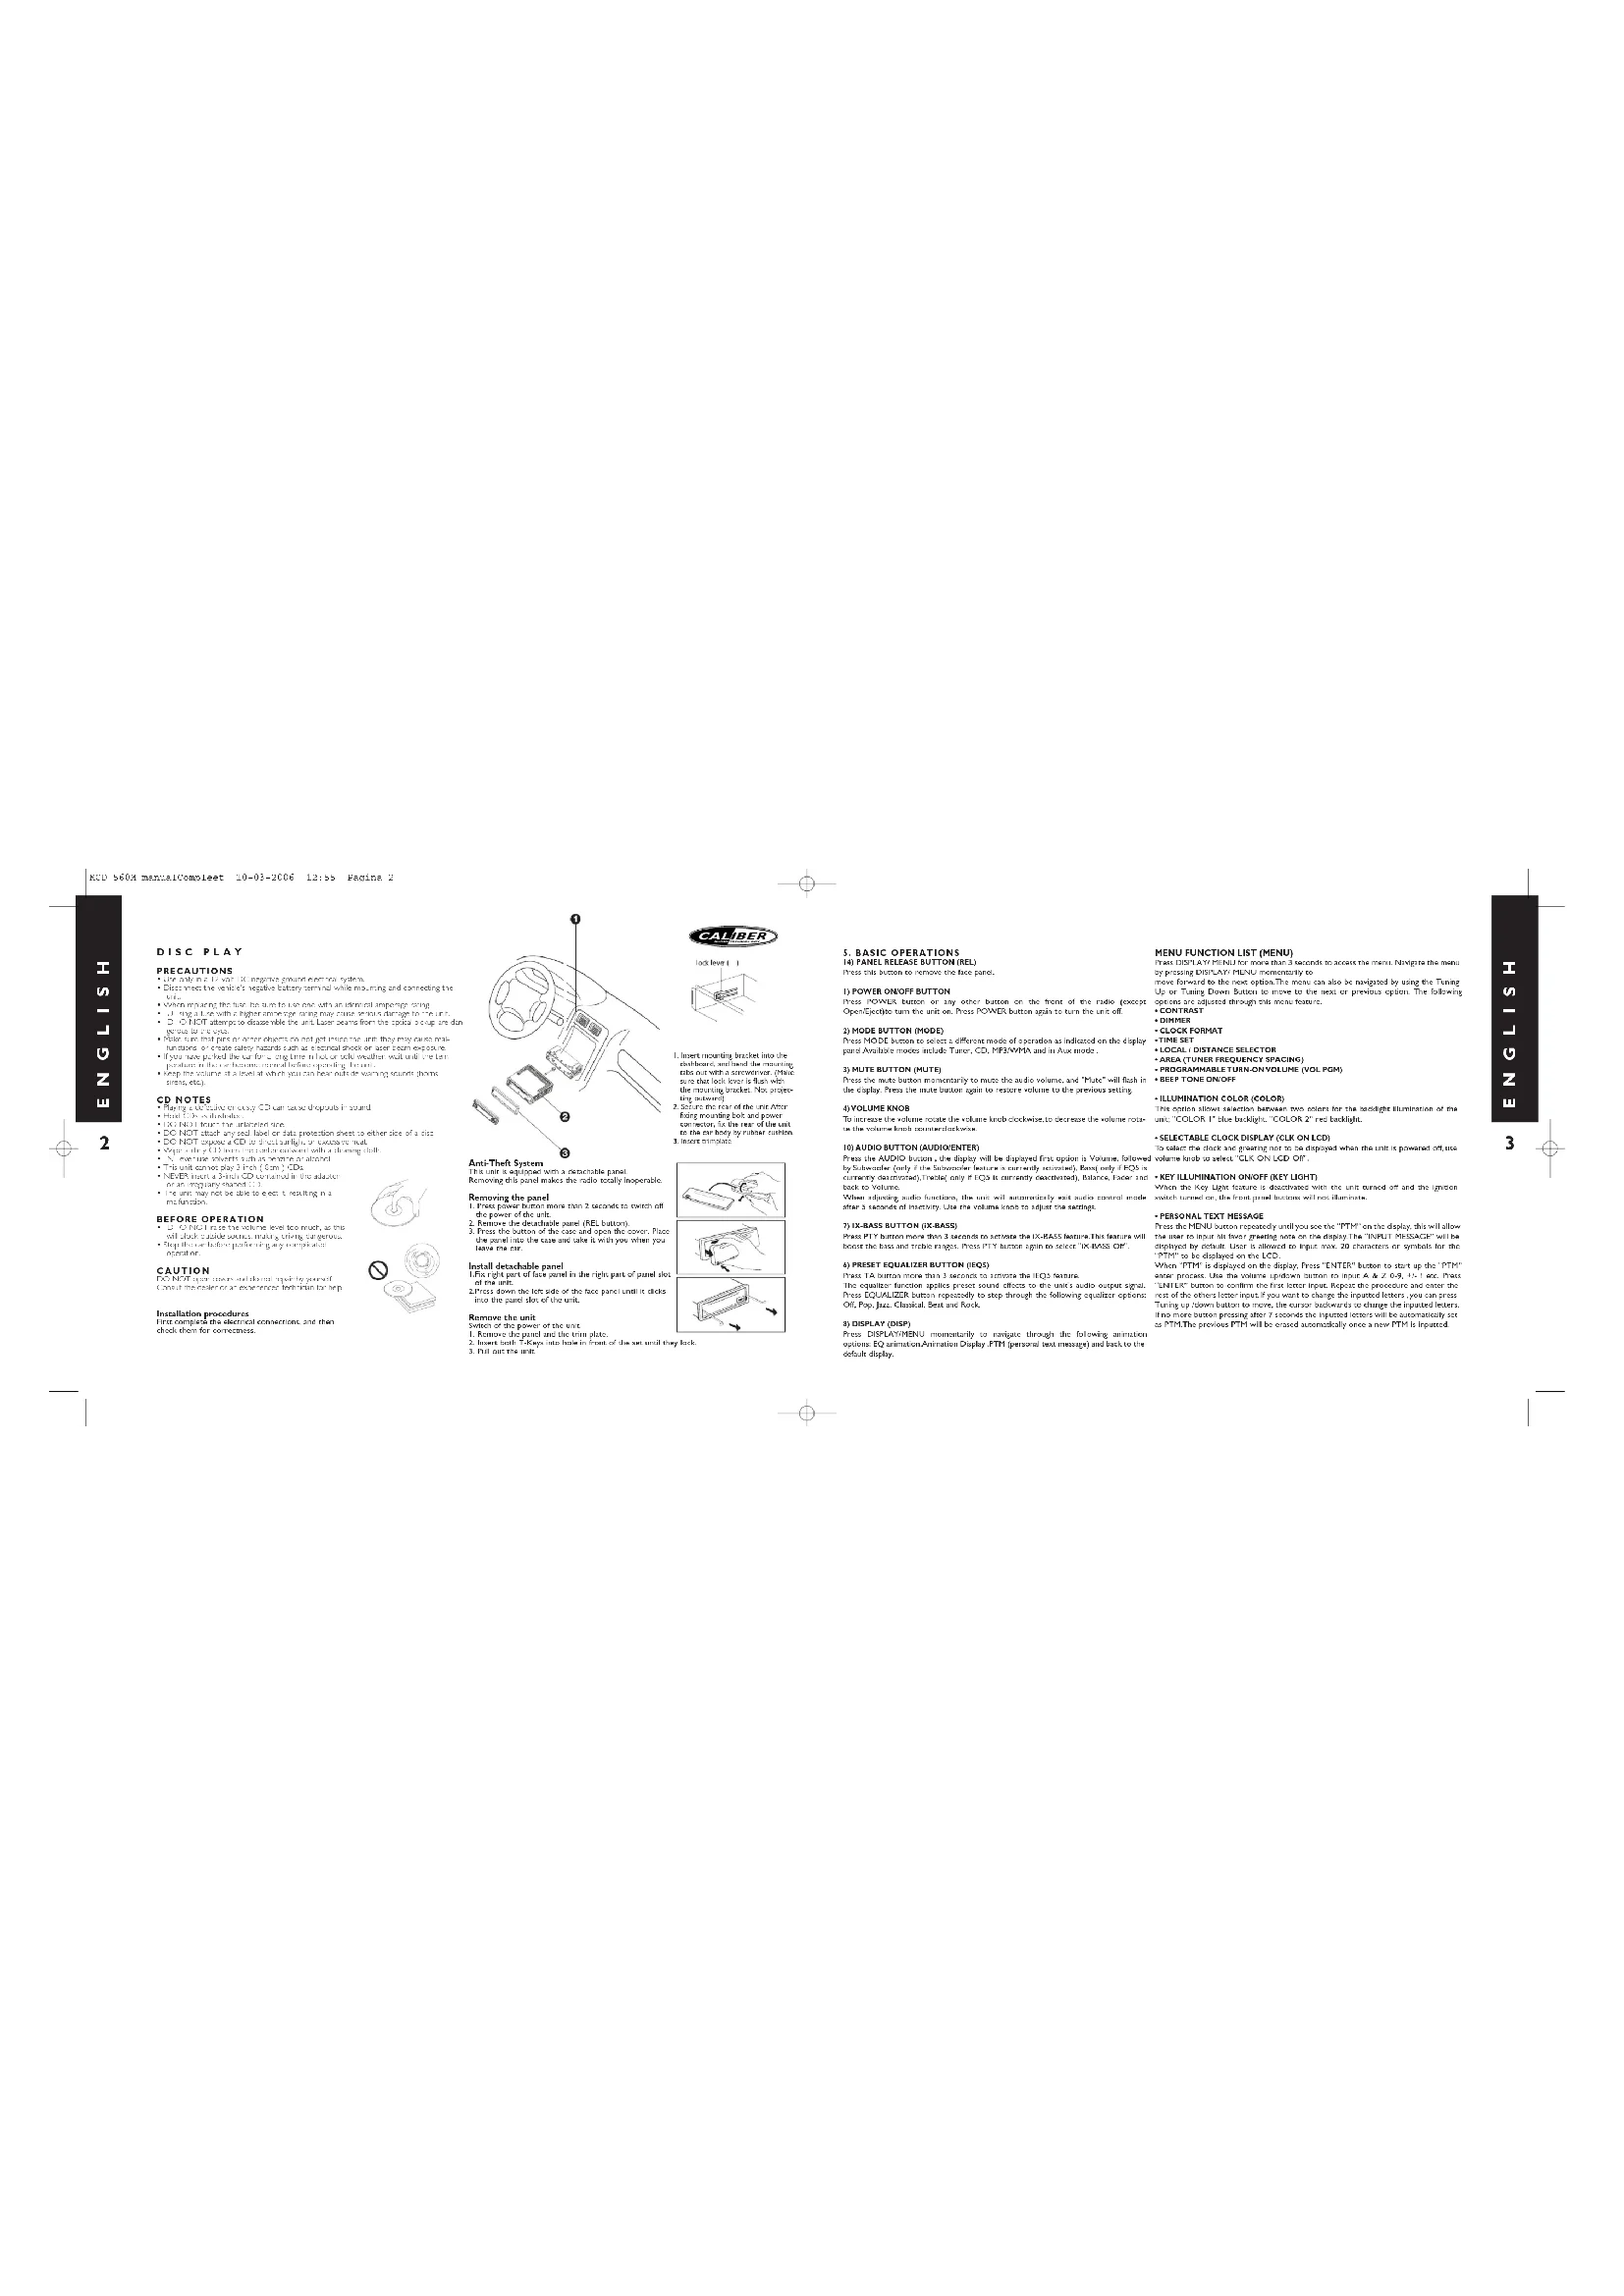
Installation procedures
First complete the electrical connections, and then
stack them for correspondence.

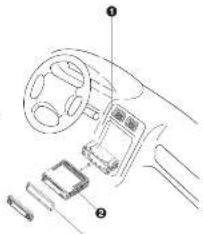

- lesermoging bracket into the
durband, and bend the mounting
in a cut m in a kred-bay. (Mai
sure that lack lower is that with
The following
(1) current
- Secure the rear of the unit After
forg mounting bolt and power
Sufforder, for the pair of the life
is the best by rubber starch
2.17 CAP
Anti-Teift System
This unit is designed with a broadband power
Here are this case, makes the radio apply inoperable.
√
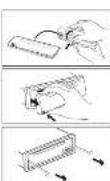
Removing the panel
- Press power button more than 2 seconds to switch off
the power of the arc.
-
Remove the desirazie panel (RL system).
-
From the button of the case and open the cover. Place
the pencil into the case and take it with you when you
have the 24
install shareholders' own
I fix calls per of her way is the calls one of next day
of the right
2.10.10.11.12.13.14.15.16.17.18.19.20.21.22.23.24.25.26.27.28.29.30.31.32.33.34.35.36.37.38.39.40.41.42.43.44.45.46.47.48.49.50.51.52.53.54.55.56.57.58.59.60.61.62.63.64.65.66.67.68.69.70.71.72.73.74.75.76.77.78.79.80.81.82.83.84.85.86.87.88.89.90.91.92.93.94.95.96.97.98.99.100
into the panel star of the unit.
2. 本次股东大会的决议
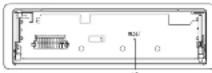
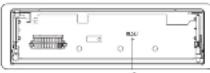
Remove the unit
Switch of the power of the unit
-
Remove the pure and the thin plate
-
Heart both T-Knee firm has in front of the chest until stay lock.
-
Pull out on mL

5. BASIC OPERATIONS
(4) PANEL RELEASE BUTTON (BELL
Press the human to remove the face panel.
1.2.3.4.5.6.7.8.9.10.11.12.13.14.15.16.17.18.19.20.21.22.23.24.25.26.27.28.29.30.31.32.33.34.35.36.37.38.39.40.41.42.43.44.45.46.47.48.49.50.51.52.53.54.55.56.57.58.59.60.61.62.63.64.65.66.67.68.69.70.71.72.73.74.75.76.77.78.79.80.81.82.83.84.85.86.87.88.89.90.91.92.93.94.95.96.97.98.99.100
1) POWER ON/OFF BUTTON
Buy POWER built as an upper level in the front of the down frame
Cross-Harium was the wait on. Pass 87195K being only to save the wait all.
Press MODE human to select a different mode of operation as indicated on the daily
the real possible number return (year: 12) MKS7078 was to due made.
PUMBERG
3) NUTE BUTTON (NUTE)
Dress the pure human reciprocal to sum the audio volume and "24 me" will look
The order: The real-time buying point in which there is a positive one.
the capa. This is the main button apart to date a point to the previous setting,
4)VOLUME 1000
To increase the volume over the volume in each schedule to subtract the volume on
in the culture built over the world.
6.015 - 2017
10 AUDIO BUTTON/AUDIOENTERT
(1) ABIO DE TION (ABIDENTAL)
Practive Aclulis Mina+, the display with the quality of the quality, Stusha
by subwoofer [any] The Subwoofer feature is currently eliminated. Bas[only TEQ9]
currently deceased. Treble, only if BPS is currently deceased), Balance, Fader and
back to Volume
When adjusting audio homote, the int = 1 simultaneously wet audio control mode
after 5 seconds of industry. Use the volume knob to adjust the settings.
D: IX-BASS BUTTON (IX-BASS)
Press PTY, cumin more than 3 seconds to activate the X-BASS feature. This feature will
beout the base and profile spaces. Cross "TY" based again to select TX PASS OFT.
(1) 本说明仅供参考。
6) PRESET EQUALIZER BUTTON (EDS)
Press 1A lumen more than 2 seconds to restore the IBO3 feature.
The equiter for the 2015 present sound effects to the right audio output signal
Prax SCHULIZER button currently in any there, the following material
Off Box has Capital
(2)
8) DISPLAY (DISP)
Pass DISPLAYMENU remains to signal through the following animation
odora: BO animation, Arimation Display, F1P (temporal box, manual) and back to the
the next plan
MENU FUNCTION LIST (MENU)
Sana DISPLAY, 1990. You must follow 3 seconds in operation the menu. Choose the menu.
by the first DAS-AY: MHA, management co
was forward to the past option. The men can also be extended by six the Tries
The following table provides the information in the United States: The National Association of the United States, 1980.
Up to Turning Down Edition to MOVE TO THE PART OF CRE-LOSS CASH. THE FOLLOWING
«cpots are CONTRA
CONTRA
• DIMMER
- CLOCK FORMAT
• TIME SET
This action includes choosing between two colors for the broadcast illumination of the
with "COLOR" how backbone, "COLOR 7" can backstart.
(1) 2017
- SELECTABLE CLOCK DISPLAY (CLK ON LCD)
To select the clock and quarter set to be discarded when the unit is removed off one.
- Select the 100% group has to be 48,450 times the 100% power to action
WHMS RUSH FOR CHINA
附件1:以打法程序分发版,送到人收尾。
When the Key Light frame is structured with the unit named of and the ignition
switch numbers, the front panel bellows will not illuminate.
公司简介
- PERSONAL TEXT MESSAGE
Does the HTML file run on reportedly and you see the 'PTM' as the display, this will also
the user to have its your greening page on the display. The INPUT MESSAGE will be
disordered by default. Litter is almost to hear any 20 characters or cents for the
"PIM" to be download on 20s LCD.
Video "THE" is driven on the diary. Peru "THYTH" humos to jump up me. "EEM"
- 2017: a request in the equity, that is not stated to be up the 1% of the share. The rights reserved by the above written house or in lieu of \$4,500.00 per share.
other protein. Use the variance up to 100% of HPL: A & 2.5% - 4.7%. The, Frital
1973.8.12: 5th Floor, 400-600 m. 2014. April 2014. October 2014.
Yes, of the benefits better input. If you want to charge the needed costs, you can press.
Hiring up, down button to move, the curve is wellened to charge the inputted limit.
If no more buttons press any 7 seconds the inputted letters will be automatically set.
as PTH. The previous PTH will be created statistically once a new PTH is reported

CALIBER
• SHEETING NOTE
There are three different greeting note displayed on LCD base on different conditions. I.Good Morning, Good Afternoon or Good Evening.
-
Enjoy Driving Have a Safe Trip!
-
"See you! How a nice day!"
• IGNITION OFF CLOCK RECALL
The user can recall to display the clock time by press DISPLAY home, even when ignition
a cl
6. TUNER OPERATION
Press BAND to change between FH and AM(HW) bands.
(1) TURING UP DOWN BUTTON (2)
11) TOMING BROWN COTTON ( )
Manual Tuning Does the Up Two
At the line of turning of Down Turning because more than 3 seconds to move the
Auto Seek Tuning
Press the Up Tuning or Down Tuning button for less than 3 seconds to move to next
station automatically
(1) PRESET STATIONS BUTTONS
Six numbered present buttons store and retail stations for each band (3 PM1 PM4).
Store a Station
Select a band (if needed), then select a station. Hold a power button for 3 seconds. The
preset number will appear in the display
Recall a Station
1) AUTOMATICALLY STORE / PRESET SCAN (ASPS)
Autoperically Store
Automatically insert 5 a
(if needed). Try ASTS human for more than three seconds. The new stations reduce
stations already stored in that band.
Preset Scan
Scan stations stored in the current band. Select a band (if needed). Press AS-PS button
for less than 3 seconds. The unit will pass for ten seconds at each preset option. Press
ASPS button again to stop scanning when the closed station is reached.
Stereo
The unit will automatically put up a stereo signal. If stereo signals available, when it means made the ST lock will arrive on the derby.
- 20:35, 17. 21:10, 18. 20:45, 19. 21:10, 19. 20:45, 19. 21:10, 19. 20:45, 19. 21:10, 19. 20:45, 19. 21:10, 19. 20:45, 19. 21:10, 19. 20:45, 19, 20:45, 19, 20:45, 19, 20:45, 19, 20:45, 19, 20:45, 19, 20:45, 19, 20:45, 19, 20:45, 19, 20:45, 19,
Insert a CD that-side up with the unit turned on, and the disc will begin to play. Press
the Eext button to stop CD play and eject the CD. This unit does not have to be turned
at to
PAUSE BUTTON (PAU)
Press the pulse button to stand and disc play. Press the pulse button again to resume disc
Play.
TRACK SELECT
Press the Up Tuning or Down Tuning button for less than one second to advance
to the next track on the CD, The selected track number will appear on the display. Press
and hold the Up Tuning or Down Tuning button for more than one second to fast
forward or fast reverse through the disc.
REPEAT BUTTON (RPT)
Press REPEAT BUTTON (RPT) during last plan to continuously signal the task. Press
REPEAT BUTTON (RPT) again to stop Repeating
RANDOM BUTTON (RDM)
Press RANDOM BUTTON (ADM) during disc play to play all tracks at a CD in ran-
dom order. Press RANDOM BUTTON (ROM) again to stop random play.
INTRO SCAN BUTTON (INT)
During this play, press INTRO SCAN BUTTON (INT) to play the first 10 seconds to each play on the floor? When the desired track is moved, press INTRO SCAN BUTTON
TOP 1000 series on our own and gives the relevant text.
FOR (14) Option to offer the RAI and play the Internet user.
GO TEXT
The unit can display the first 11 letters of Aibam Title Artist Title. If he recorded information
tion a longer than 11 characters. The rest of text will scroll from right to left on the table.
BDS FUNCTIONS
The work is assigned with the following RDS functions:
- AF Alternative Frequencies
- CT Clack Time
- EON Enhanced other Network
- 10 Program Identifications
By pressing AF human < 3 seconds to select AF ON/OFF. "AF ON" or "AF ON" will
show 8 remain on the LCD segment for 5 seconds. Under AF "On" mode, if the tuned
in station signal to getting weak, the unit will automatically switches to a different trajectory on the new artwork with stewart stand.
Q2/19 on the 32
LTA FUNCTION
By preserving TA button < 2 second datum switch on TA standby mode, "TA ON" will show
& remain on the LCD segment for 5 seconds & the TA icon will light up on the LCD. In
the stand by mode. When a transit announcement broadcast stands, the transit announcement broadcast will be received to the project participants of the function mode Yobe.
a significant story "TRAFFIC INFO" will view on the LCD onto the TA bus.
tion can cancelled the broadcast reception while a traffic announcement broadcast is
berg, received.
The unit will go back to the previous mode and TA goes into stand by made again. When
the TP icon is not light up for 60 seconds A beep Alarm tone is heard and the LCD =1
chase 120-17
3. PTY FUNCTION
Pressing PTY button < 3 seconds to goes into PTY select mode 'PTT' icon will light
up on the LCD. The LCD around encoder volume will start hiring. The user now has
5 seconds to select the desired PTY item by using volume lunch. Once selected the PTY
Item, user have 5 seconds to press "SELECT" or "TUNE UP OF TUNE DOWN" buttons
• I recommend to give for the choice P1 + EPI. The LED will display -PT SHK. For gaming with the selected IPTX tournament can be reached, the LED will disky "bin
Match PTC ^4 and blinks for 5 seconds then returns to the previous mode.
User can store his favor PTY into the next memory MI to M6. After selected a PTY
ham, long press any one of the present memory human can store the selected PTY.To
recall the stored PTY item by switching on PTY mode than press press memory < 2
seconds, the unit will automatically search the shared PTV station in the preset memory.
EASY, LIGHT SPORT, EDUCATE
JAZZ, COUNTRY WEATHER, FINANCE, CHILDREN
CLASSIC DEPARTMENT
NATION, OLDIES SOCIAL, RELIGION.
NO. 104
Note: History detail stored for P11 private memory. ELLtirea, 2023 information. M.Poc Duie, 667bps
- RDS (RADIO DATA SYSTEM) MENU
To access the LOG-MINU press the SELECT button > 3 seconds
The following list of features can be selected
-Aira Seek All? RE
- TA Suck On / Off
- TA Volume 0-40 (default 18)
- Rejofo Oil Of
Steps to access Menu Item(s)
1) To excess the ROS MENU press the SELECT button > 3 seconds.
3) KOSKIRKO will be equipped on deploy the 1 meter, and then also
3) To audience there
through the menu items. Or Press SELECT BUTTON repeatedly to view the menu
Item saquardiv
4) Use the Volume knob to adjust the selected menu item.
3) After the selected menu item(s) has been charged and no other operation have been
made, a 5-second time-out will resume the head unit to the previous mode.
Feature description of PDF Many Items
- Auto seek RDS/All
Auto Seek "RDS" will be deployed by default. The user now has 5 seconds to adjust its
using volume knob from "KDS" to "ALL". If "ALL" is selected, during the Auto Seat.
naring mode, the unit will stop at all radio stations including Non-LED station regardless
AF and TA is switched on. IF "RDS" was selected and the AF is on, during the Auto Seek
- TA seek On/Off
Theook "On" will be displayed by default. The user now has 5 seconds to adjust by using
volume mode from "On" to "Off". If selected "On" mode, when a received station cover
not have TP information for 60 seconds, the unit automatic search to next station which
does not have the same station (P), but has the IP information. When a TP information
ge that at the car,ve aion over the drive rente hit (all rentals), but that ever to mostly to next miss 5 station. When she gave 5 station does not carry in. I could
to use in the next station. To find the same TP information search, the unit wishes to enter station with TP information.
If "OF" is selected, when a received station does not have TP information for 60
seconds, a Double Blap Sound (Alarm) is output and the LCD will be displayed 'Lost
TP TA" but the return mode is not activated. Note: This function reactivation order ITAL
1.3.4.1.2008 The function only exists when TX switches off mode
-TA Volume
TAVolume "15" will be displayed by default. The user now has 3 seconds to adjust by
DOOLIBING Volume is Arab from '0-40'. What TA function is activated, if a TA program is nured
in at the volume level set regardless of the volume of the other source at the time.
Note: When the unit turned into a TA program, The volume level can only be increased but target be decreased.

CALIBER
- Regional On! Off
REGIONAL "OFF" will be displayed by default. The time now has 5 seconds to adjust by using volume hash from "off" to "On". P'll not be enacted when the AP search or PI seek, it will implement a station which have all the PI codes which are the same as current station. If "off" is selected, when AP search or PI seek the regional code in the format PI code will be protected. A regional station is possible to be received.
The unit supports package of MPJAMMA and CDDA (CD8), Mixed Mode CDs and CD-extra (including multination disk) but does on which the semi-cash had not been closed will not play.
60.9561
193 569, LVD - [H. 2014]
6.1 year-end 2 (a)
Johis (3) transducers
Named (All characters)
Up to 200 characters can be deployed in the long file name form. The media copy
double on the unit has the following limitations
Maximum number of nested folders: 8
Maximum number of 410 per inch: 950
Maximum number of folders per disc
ENTERING ID: TAG
The unit supports 03 on version 1.0 and 1.1. The unit also supports CD-TEXT
apprised data for Album Track and Art. 15a informing.
Note: A file came entered with characters set on the code, but may not play co-pacty.
HIVAMIA SECTION
Dr. Rouse Through upsets list on Jan 27, 2014
FILE FOLDER PLAY
There are three different play methods as following:
FLO FOLDER INTRO PLAY
Press H2 button more than 3 seconds during playing FPT/VATIA due for "intro play" will be of the current holder. Intro play should restart from the first song of the current holder, after all files in the course 1 or have been in-sloved.
In display current (after "as-m-she", long gamma M2 but, on given than 3 seconds.
than M2 hemen less than 3 percents in "pre-mic" sifles on the mic. I'm also should
The fact that the world has been a great deal for the people, but it is not to be able to see.
To break at the very strict of the zinc and as that in the ductal bed mine played. To double all five large windows, one M7 home into six 3 seconds.
- In fact that the balance, the balance of the balance
PEEPOLDER REPEAT PLAY:
Press MS buttons more than 3 seconds during buying MP37/MPA data for "repeat play" all files of the current folder. And keep an repeat playing the current folder until "repeat play" is desired.
In addition, the "raced pin" line represents 12 units more than 1 second.
Row 53 (belting any one seconds in 'years old') the current (by Antenna Southwest)
Where the number is up to the "repeat ring" is diluted
To divide a number of repeat plots, news, MI begin to run 1 second. FileFridas
in order of 10% and total pay, price in cash and value is calculated as
RANDOM PLAY:
Press PM button more than 3 seconds during playing MP2WHA due to "random play"
all files of the corner folder.
To disable current buffer "random sky", long press MH button more than 3 seconds
Press MH human less than 3 seconds is "random play" all files on the list.
In addition, the "magnes" class [21] is given that 3 seconds.
MP1WMA SECTION
NPI/WHIA FILE OR FOLDER SEARCHING (polar inch)
The work also was over three different methods for us the /under armands.
The results of the last year have been obtained from the first 12 months.
DIRECT FILE NUMBER SEARCHING "014 MP3 FILE"
Press 163 search user liked home once LCD will dimly "number search". Press
"Angi, John" has an open book to cover "Brendy series".
Use the whole book with "B14" loss from 1993 over human (Auto Japan)
to confirm & play file '014'
1) FOLDER FILES NAVIGATE SEARCHING, FOLDER "05" & FILE "016 MP2"
During PPS or NYM, the playback, once PPS was hit into (Band Eutters) within LCU
and Amas "Nyayea specia". Power "Audio Select" key or power volume key to appa:
the "Nasgras search"
Use the source book and LCD of revised "X" (short format MP) camera key (audio format
The following table provides the information in a specific format:
Bulien to go into order '06' (Note 1 MPJ under key a press more than 3 seconds
The first 1st-2nd company, the 1st-2nd. He is not acquired on the
LED,
The warm heat and 125 displayed on MPT
(Note: Press the "ASPS" better = I follows a quick return back to folier "US" or press
volume knob backward to "06"
Long press MPS after key (Audio select button) to confirm play "U.S. MPS" in
3) DIRECT ALPHABETICAL INPUT SEARCHING. POLDER "B" & FILE "016 HPS" NOTE OF IDI ICONS ON DISPLAY
Doraz MP3 or WME fires markets new MP3 search barion band lasting three turns.
ICD will display "alpha search". Draw "Audio Sales" can or press "volume inch" to
ocas the Alphabet cal search
The following words in the
Free volume ratio to input - 36
Use the online job to 6 and then, the job select to apply next 6 by press.
Volume K150.
(Painted) 145 up / small human line is the clever in state to be next to the present
epriest inpo.
Long press "Double street" key to confirm the input of "06" and "06" will be deploy on
the LCLX
Short press HPS enter key (Autee waver humer) to go into fokter "06"
Use the volume knob will arrive to navigate through "015 MP3" > "016 MP3"
Long Press. "Audio Select" key to confirm to play "016 M23"
IDS INFORMATION DISPLAY
If any MP3WMA is recording with ID3 Tag information on The ID3 information subject in
Albem rds Track rds Amlr Trls will be deployed and automatic scrolling through the
LCD with the file closing. Use also defines prepare the ASPS button received to
view the 123 new information manually.
NOTE OF ID1 ICONS ON DISPLAY
NOTE: REDEPTION
CON DESCRIPTION
C
PODER
Jin
A TRACK
3
品 28(15)
on
LIS ALSUM
CALIBER
TROUBLESHOOTING
Before going through the check list, check wiring connection. If any of the problems perdir after check for has been made, consult your newest service dealer.
| Problem | Cause | Solution |
| No power | The car lights switch is not an | If the power supply is properly connected to the car accessory terminal, which the ignition step is MGC |
| The house is blown | Replace the tree | |
| One cannot be loaded or adjusted | Presence of disc inside the player | Remove the disc in the player, then insert a new one |
| Inserting the disc in reverse direction | Insert the compact disc with the label being upward | |
| The disc is extremely dirty or collection | Clean the disc or try to play a new one | |
| Temperature inside the car is too high | Cost of or und the ambient temperature returns to normal | |
| Consideration | Leave the player off for an hour, then my sight | |
| No sounds | Volume is in minimum | Adjust volume to a decimal level |
| Wiring is not properly contrasted | Check writing correction | |
| Sound slips | The incivitation stage is move past 30 degrees | Adjust the vibration stage last than 30 degrees |
| The disc is extremely dirty or collection | Clean the compact disc, then try to play a new one | |
| The operation steps do not work | The button is microcomputer. It is not operating properly due to noise | Front panel is not properly fixed into its place. Press the MSCI button |
| The risks does not work | The antenna circle is not connected | Insert the occurrence cable timely |
| The signals are too weak | Slower a circle moderately | |
| Error 1 | Mechanism error | Press the next button to convert the problem. If the error case does not disappear, Orwalk your nearest service dealer |
| Error 2 | Same-to-Potus error | Press the next button to convert the problem. If the error case does not disappear, Orwalk your nearest service dealer |
| Error 3 | Same-to-tracing error | Press the next button to convert the problem. If the error case does not disappear, Orwalk your nearest service dealer |
| Error 4 | Pulsortra-pulsal error | Press the next button to convert the problem. If the error case does not disappear, Orwalk your nearest service dealer |
CARACTÉRISTIQUES
GENERALITES
Alimentation Electrique DC II -19V
Pobetá Mio A la marca nigrup
Purposes 15th 4-2 ANN
LECTEUR CD
Balance inverter/sica 15.7 MHz
Savashika uifingale Necruhens 1 Udk 6 NK 30 dK
Support Signal / Bus. 50 dB
AHIMW
Frequency Intermediates 450°C/ft
Sensitelnä utilisable Superiuren a 15dB
Opposed sign of EBITE 40 SE
REMARQUE
• Extermination is home - light or the home to use a map on it.
[Unreadable]
- Tax on replacement policy, will be a benefit of the policy design.
The following table is provided in the image:
- _0 = _1 = _2 = _3 = _4
16.4(2) + 16.5(3)
• Volta que da bachea su miro de yom a perejana pao cie fure; a peutali
-
En los de la demanda en el que de los úques para la sujana del que de
-
First, the company is now leading to his own home, but is much
• NE w: 25% in line with CO gas, gas, etc.
• No non-###
When you can find the case,
• Napi##### P#S in CN 3115
d. in chicken panoyar.
Nulfez jans de sol
de Divos
The following table is a simple diagram of the relationship between two variables: a and b .
form regulation
• Financials, Inc. may be a financial institution
exp(-t) = 100%
[Unreadable]

In this case, the following
m = 311
(1)
-
2017年1月1日
-
2017年
V
m = 311
5. OPERATIONS DE BASE
14) TOUCHE DERLOCAGE PANNEAU (REL)
[TOUCHE MARCHE'ARRE]
Darwin's substances: EQ animation, Animation Display, FTH message text person
- No. 2004, a remo d'afrika en de la
[10] 公司股票交易系统
LISTE DE FONCTIONS DE MENU (MENU)
-TIME SET (U/R) ALL 100%
-LOCAL DISTANCE SEL
• AREA ITUNER FREQUENCY SPACING, AREA ISCHLE DE PASD
• PROGRAMMABLE TURN ON VOLUME /WOL PPGM VOLUME INT'L. PREHANT
• FREE TONE ONION OF SCIENCE HANDICHEAT
- ILLUMINATION COLOR (COLOR) COLOUR DE RETROCLARAGE (COLOR)
1.Good Morning, Good Afternoon on Good Evening
- a Enjoy Drinking Have a Safe Trip?
2.5 see you have a few days?
• RAPPEL D'HORLOGE CONTACT COUPS
The user can recall to display the clock time by print DISPLAY button, even when ignition is of.
- FONCTIONNEMENT DE LA RADIO
Michonster One Station Silver gauge one gauge (in brackets) can be run at station. A##p#e su ### #### ##
- A frequency alternation
- CT Tempe chorlges
- A B C D E F G H I J K L M - T P Q R S T H N H I N E I
- 11. Regulink p34: 2007/05/25
- FONCTIONNEMENT RDS
I. FONCTION AP
11 Post October to MEND PCS, approved sur its touch SELECT Pencare > 3 seconds.
2) La maraga e KUG-AI-KU s'opera s l'acti panare 2 baseta, d'au de la man- tive a Auto Soma.
3) La 2018. A moment that the most effective X and Y measures be quite less than a period of effect on the effects present. S. assumption, l'opportunistic reaction, as risks persistent.

CALIBER
Press PM button more than 1 second during playing PM1-WHA disc to "random play all two of the current holder.
To divide current fader "random play" long press M4 human more than 3 seconds. Press M4 human less than 3 seconds a "random play" of file on the list. To divide all the "random play" press M4 human less than 3 seconds.
SECTION MPJWMA
RECHERCHE DE FICHIERS OU BOSSIERS NP3/WHA (postes volume)
SPEZIFIKATIONEN
ALLGEMEINES
Soraphylocaine DE 11-14 Y
Pelarg Negative Pro
Lauaparchar-Insgedag 4 Ohm
System □□-Digital system
Verwandhers CBU CBU
Abitadfrequency 14,1 kHz
Artem Qunhara, 1983
H. H.
Kunazul 2, 50-60
KUISUNSHIN
-
STRCHTASTE
-
HOSUBISTA
-
报告归母关系
-
LALTSANKERNOFF
-
16-TESTUSTRATE TESTE FUR QUALIZHI-WORNSCHILIGINA
2 PTY-TASTE X-BAIS-TASTE
-
DISPLAY-TASTE MENU-TASTE
-
WELLENBERECHSTASTE MPJ-SUCHTASTE
IN ADULTAISWARE, ASTO, HYPENTER-TRISTERS, HENG IN INITIATING CONSUMPTIONS, IN AOCIATION OF
1.2007/17/2016 MUDG (UN 4): 28
georgine, one of the other two. The name of the name is: "he" and "the"
• Victoria de France, USA, 2018
• Select: Be a CD NIGHT can be seen in September, recall any year's decline.
1.278.1.5
- 陈建平、张文和、王小华、周小伟、张
Bolgi, gshach.
Vorwaren be chama, our plan that we can add
A. 2017年1月1日

Ridicated confidence
- His Geral and Anschaff

[Unreadable]
(1) 本说明仅供参考。
[Unreadable]
1
m - 1 0 ;
m = 311
76
[Unreadable]
[Unreadable]
(1)
2017
m = 311
the Avonar, Dushan Su, the Mau-Tate canal, and etc. are unprudible
Laumores punlesquakes.
(1) 2017年1月1日
1) LAUTSTARKEKNOFF
- Good Morning, "Good Afternoon" order, "Good Evening"
L'Enjoy Driveq! Have a Sale Trip!
- See your I have a nice day!
(No text)
Harmonic Security scheme
-
- 17:30-18:30, 18:31-19:30, 19:32-20:30, 20:33-21:30, 21:34-22:30, 22:35-23:30, 23:36-24:30, 24:37-25:30, 25:38-26:30, 26:39-27:30, 27:40-28:30, 28:41-29:30, 29:42-30:30, 30:43-31:30, 31:44-32:30, 32:45-33:30, 33:46-34:30, 34:47-35:30, 35:48-36:30, 36:49-37:30, 37:50-38:30, 38:51-39:30, 39:52-40:30, 40:53-41:30, 41:54-42:30, 42:55-43:30, 43:56-44:30, 44:57-45:30, 45:58-46:30, 46:59-47:30, 47:60-48:30, 48:61-49:30, 49:62-50:30, 50:63-51:30, 51:64-52:30, 52:65-53:30, 53:66-54:30, 54:67-55:30, 55:68-56:30, 56:69-57:30, 57:70-58:30, 58:71-59:30, 59:72-60:30, 60:73-61:30, 61:74-62:30, 62:75-63:30, 63:76-64:30, 64:77-65:30, 65:78-66:30, 66:79-67:30, 67:80-68:30, 68:81-69:30, 69:82-70:30, 70:83-71:30, 71:84-72:30, 72:85-73:30, 73:86-74:30, 74:87-75:30, 75:88-76:30, 76:89-77:30, 77:90-78:30, 78:91-79:30, 79:92-80:30, 80:93-81:30, 81:94-82:30, 82:95-83:30, 83:96-84:30, 84:97-85:30, 85:98-86:30, 86:99-87:30
Ferdier plumpelchem
Seider entspeichem
- At - Alteal/tequency
CT Uhoei
- DON - Deyanwalu Nez andwic Sweden
P. Pucumulatistikalien
- Transposed symptoms
PTY: 2017
• BFC • Renterphoechful
The following section
- Vasselszumazam
2.1.1 2017年1月1日
IL PDS-RETRIB
- RDS-BETRIED LOF Evolution
• CULT RE (Kurtis Kindel and Gaspelod) SCIENCE (Warranties) VARIED
- 2017年1月1日
• SOCIAL Service Religion PHONE IN (Standard)
-
11621 (Babatlanogonal, H5188 (Iwara)) F2C1Mth (Iwara)
-
2022 [国泰君安证券](主承销商):华泰联合证券有限公司
Phil. 4105, M2/Architect St., P.O.Fop A326
-
RDS (Basic Data System) MENÜ
-
RDS (Radio Data System) MENU
Off in our RDS-4-MoD 25 foreign stockman at the SELECT-Take for 30%ger as 5
(2)
The following is the first
1) For 2 Seconds were "KDS-MENU" and danate "Auto book" pregnancy.
The following table is presented in the image.
-TΔ-Lautstärke
| HOLDER | |
| FLF | |
| TRACK | |
| ARTIST | |
| ALSUH |